Presentation prepared By Andrea Thomas, Texas and Arkansas Master Gardener, Plant Propagation Specialist
|
|
|
- Edmund Dawson
- 5 years ago
- Views:
Transcription

1 Presentation prepared By Andrea Thomas, Texas and Arkansas Master Gardener, Plant Propagation Specialist
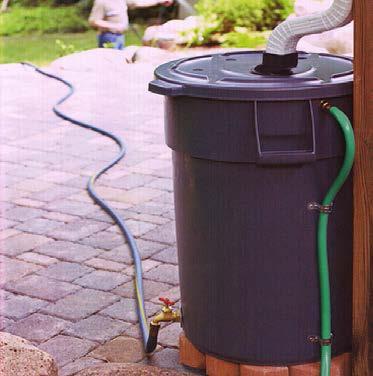
2 The water from a rain barrel is nonpotable (not drinkable), but it has several practical uses such as: Hand watering plants Watering plants with drip irrigation Watering pets Filling bird baths or providing water to other wildlife Water features
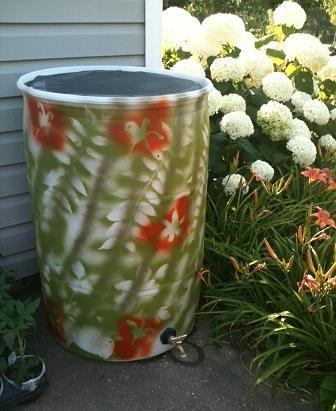
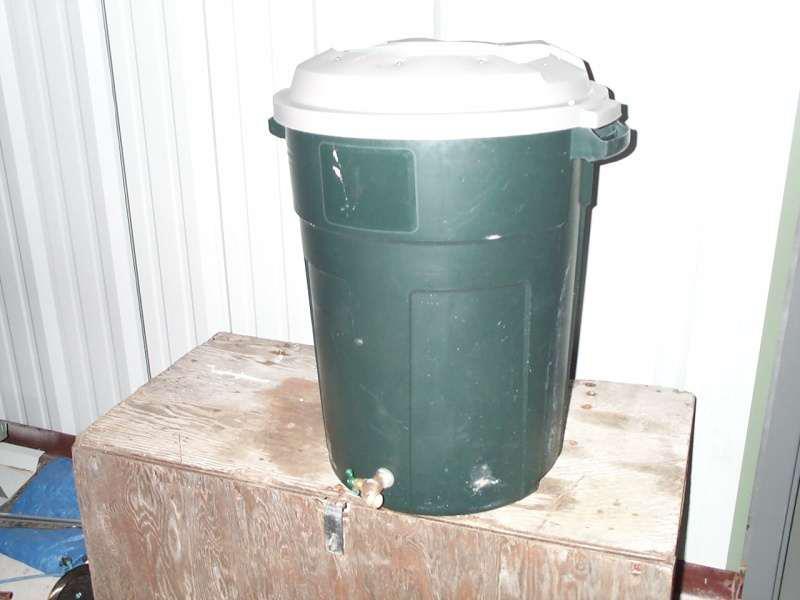
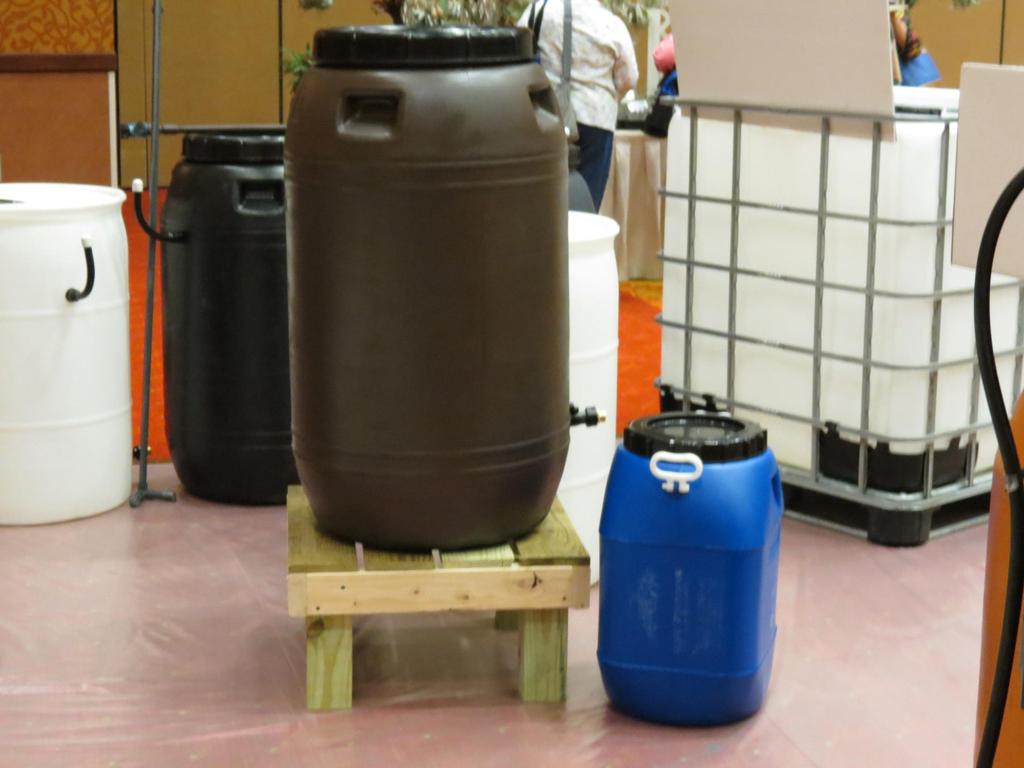
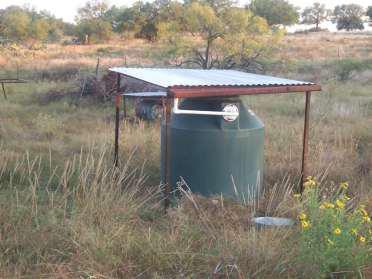
3 Constructing a Rain Barrel The first step: find the right container. There are several kinds to choose from. The best container is a 20- to 50-gallon barrel made of recycled, food-grade plastic. If it is food-grade you can be sure that it is strong enough to hold water and it has never contained harmful chemicals. The barrel must be opaque to keep out light (usually blue or black plastic, though it can also be painted). Barrels have various shapes and types of lids. They can have sealed lids with only small openings or completely removable lids.
4 1. Barrel - This one has a sealed lid. 2. ¾-inch outdoor hose bib faucet 3. 8-inch round piece of window screen 4. Tube of clear silicone sealer or similar adhesive 5. Overflow pipe 6. 2-inch PVC male adapter 7. 2-inch electric conduit nut 2-inch PVC street elbow


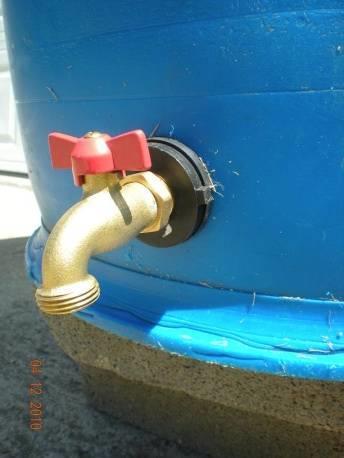
5 ¾-inch hose bib 2-inch PVC male adapter and electrical nut 55 gal Barrel with a sealed lid. Caulking gun and sealant 2-inch PVC street elbow

6

7
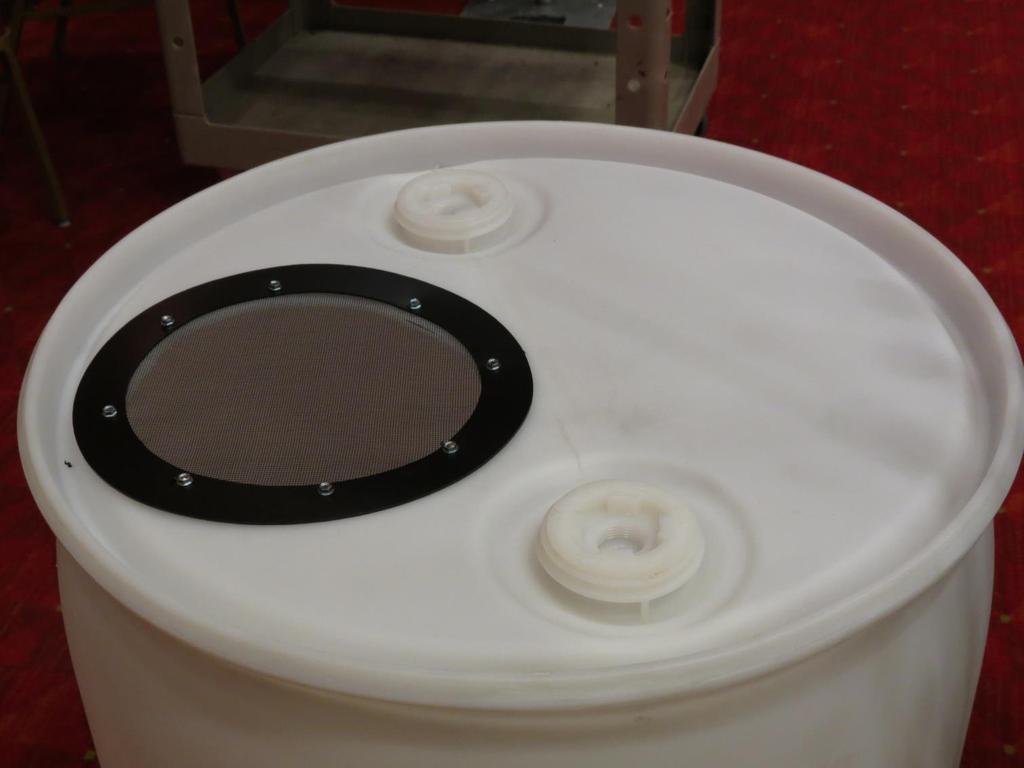
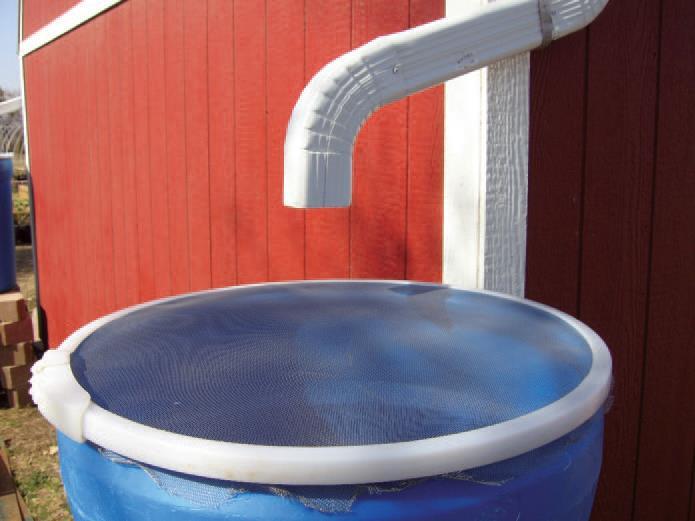
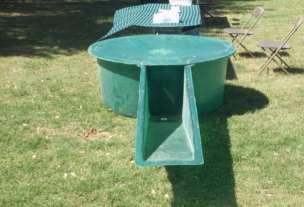
8 Diagram of Rain Barrel components Inlet with Screening Overflow Hose bib faucet (outlet)

9 1. Electric or cordless drill 2. 1-inch and 2 3/8-inch hole saw or paddle drill bits 3. Caulking gun


10 4. 6-inch hole saw, sheetrock saw or jig saw 5. Pliers (optional)
11 Wash the barrel inside and outside to remove any residue.
 the hole should be 3 to 4")


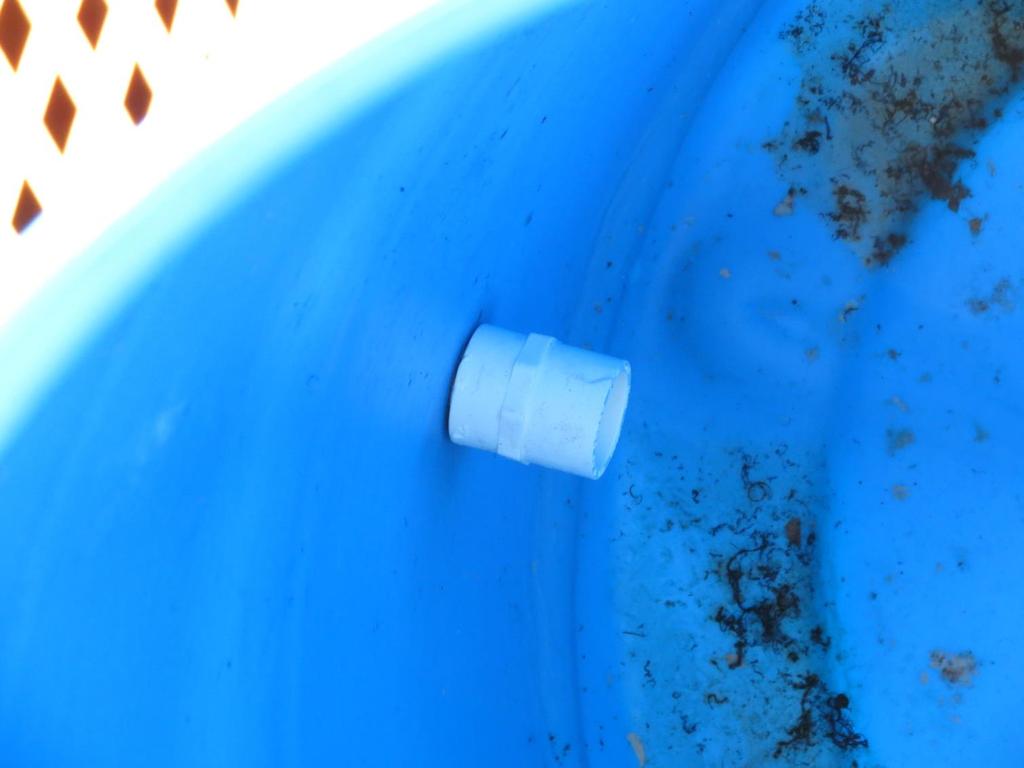
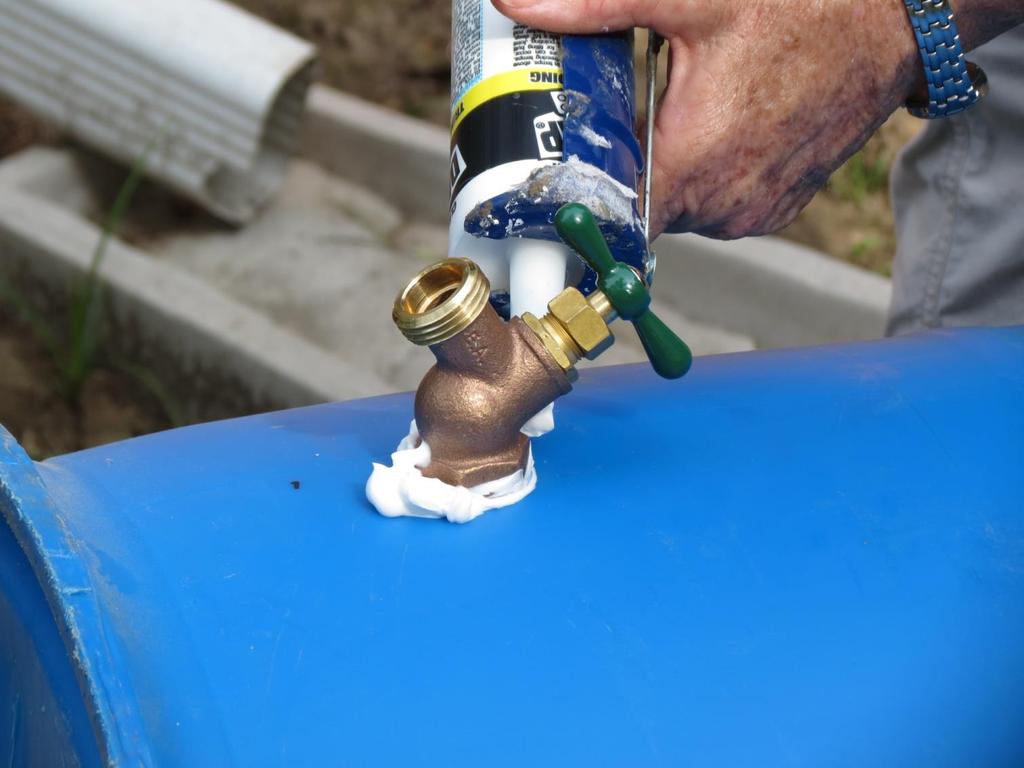
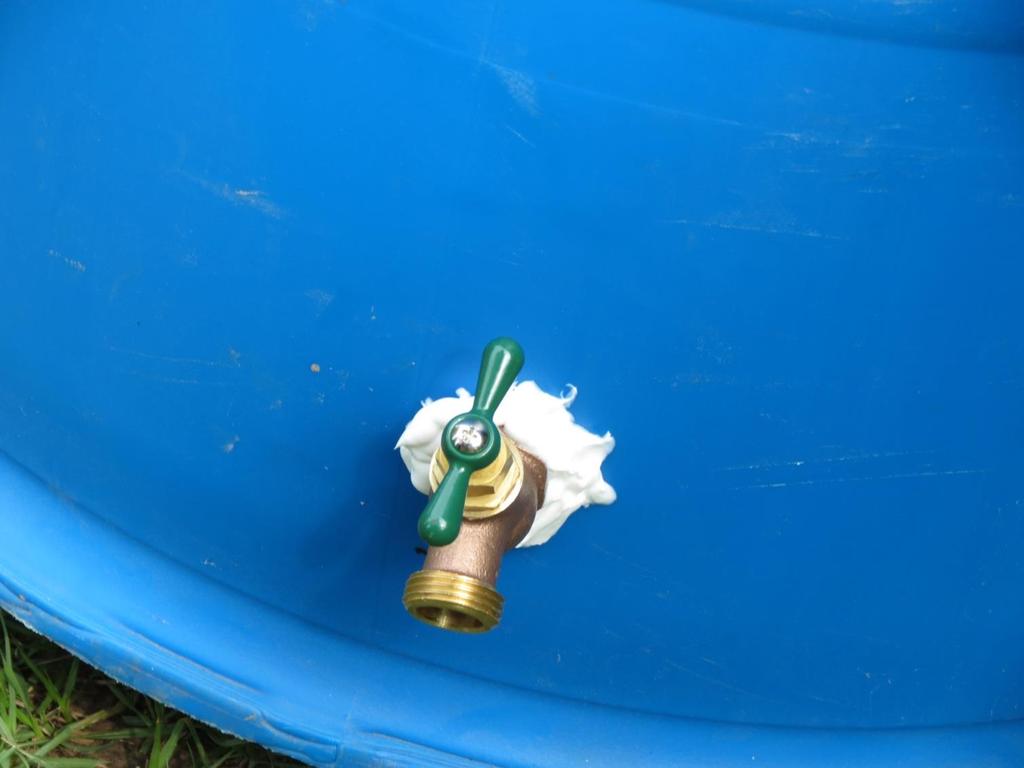
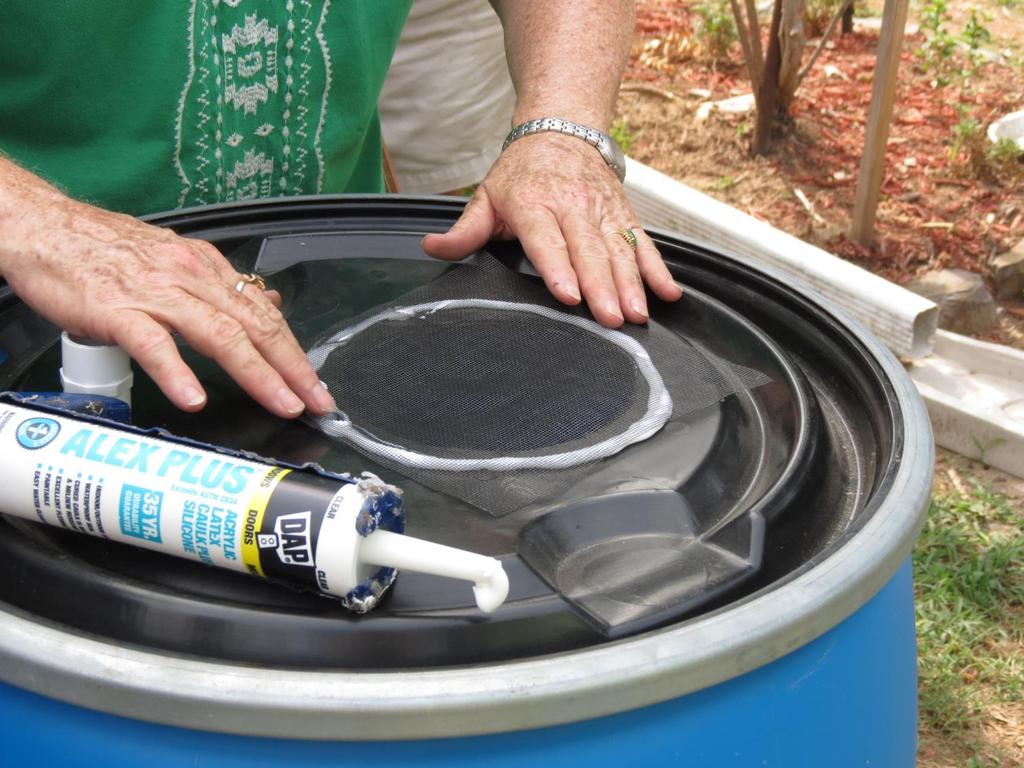
12 1. Drill a hole for the hose bib with the 1-inch drill bit (or 15/16 inch drill bit) the hole should be 3 to 4 inches from the bottom of the barrel 2. Place sealant around the hole 3. Thread the hose bib into the hole halfway and apply adhesive to the threads and continue screwing in until tight (this may require significant force to thread)

13 Hose bib facing down Hose bib facing to the side
14

15
16
17
18


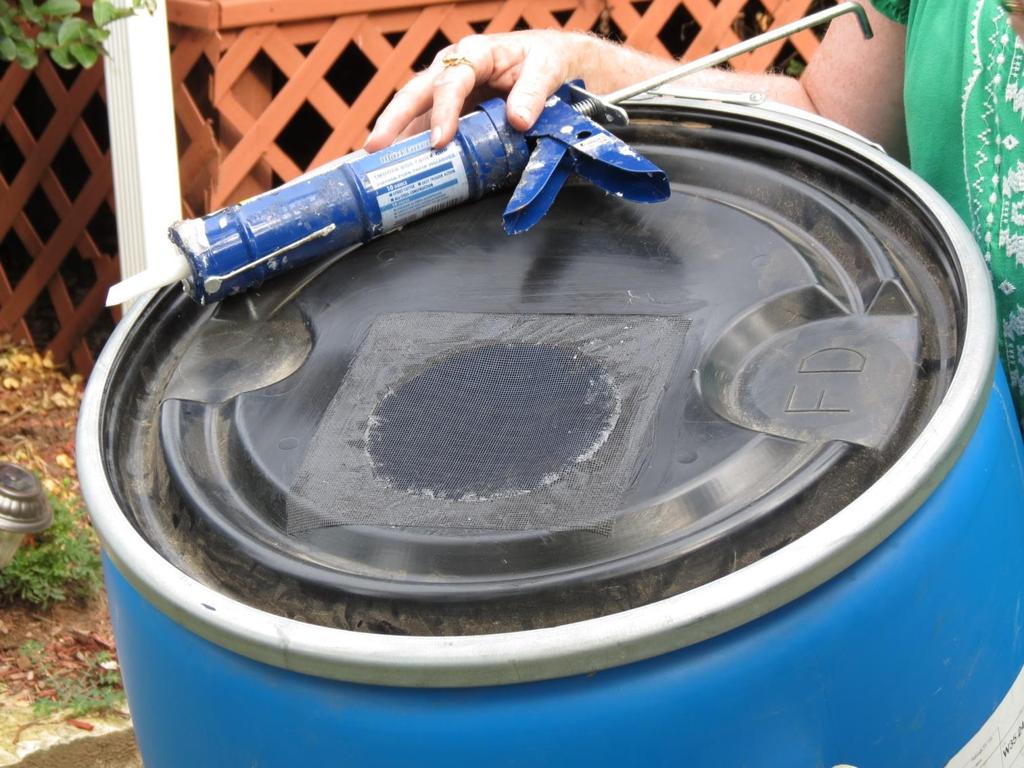
19 1. Drill an overflow hole with the 2 3/8-inch drill bit (for a 2-inch pipe) 2. Thread the 2-inch male adapter through the 2 3/8-inch hole 3. Attach a 2-inch electrical nut inside the barrel to the 2-inch PVC male adapter. Use pliers to hold the fitting while tightening 4. Glue the 2-inch PVC street elbow to the male adapter. 5. The overflow should also be screened to prevent mosquito entry.


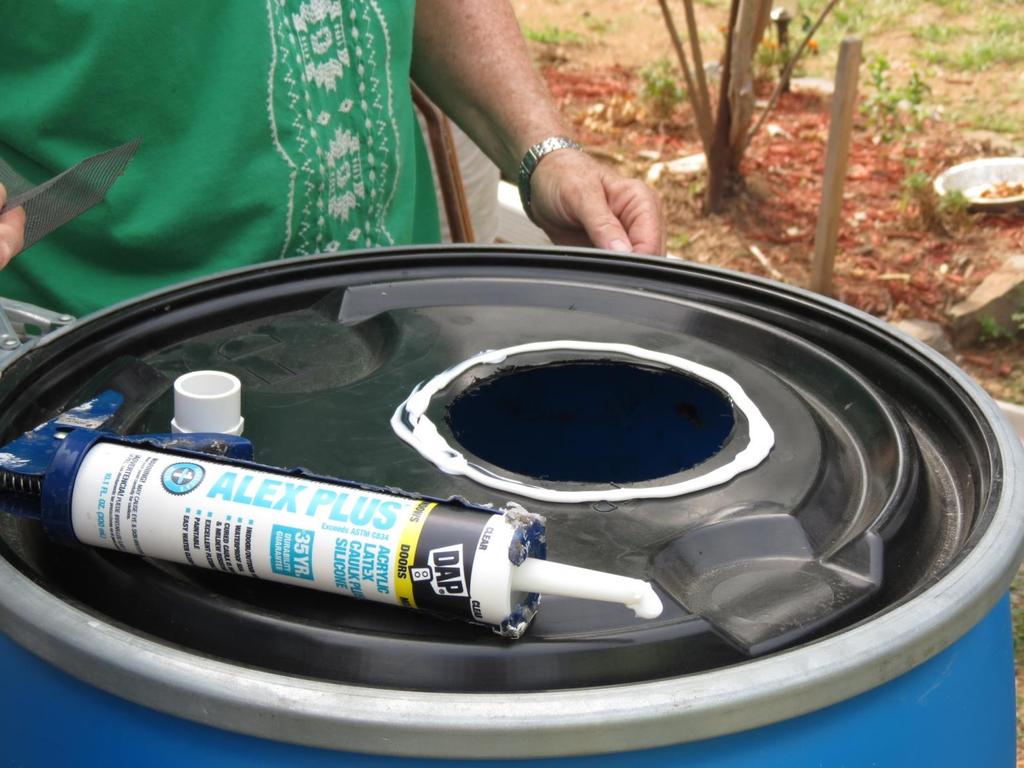
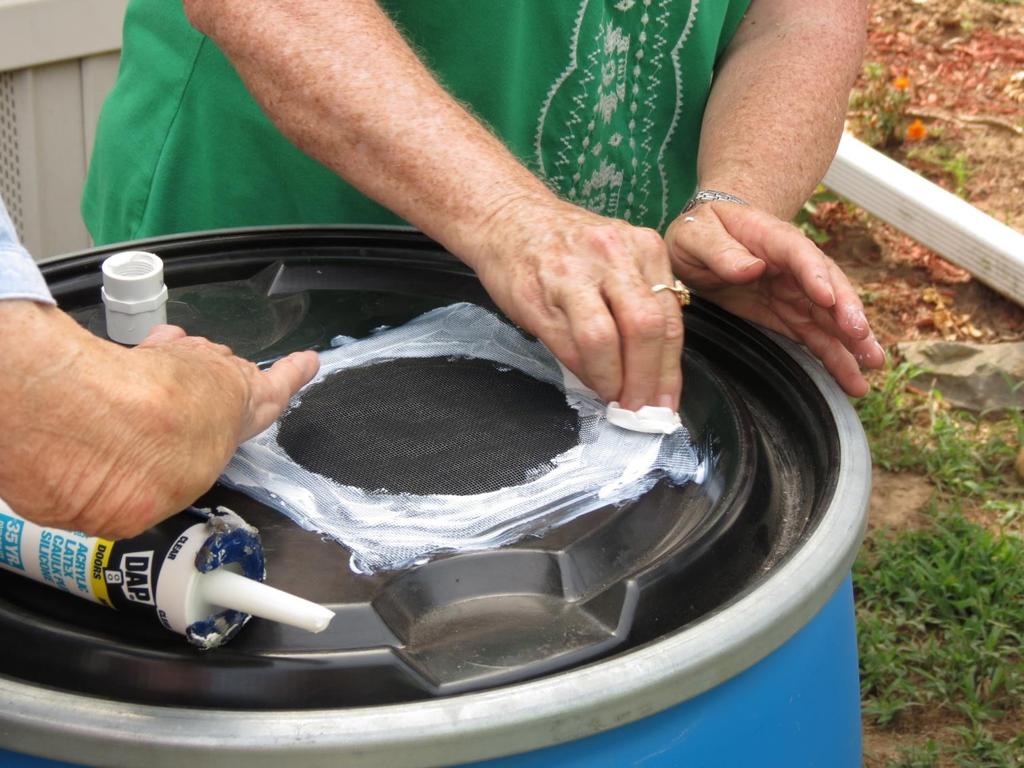
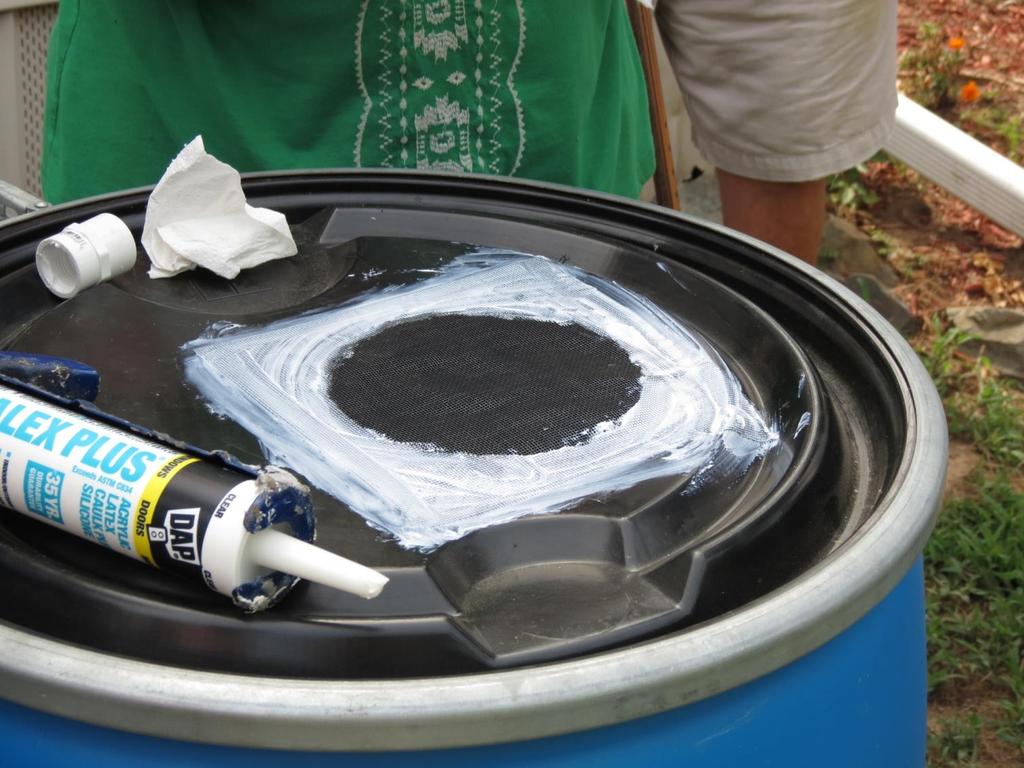
20 1. Cut the inlet hole on the top of the barrel with the 6-inch hole saw or jig saw 2. Place adhesive around the 6-inch inlet hole with the caulk gun and place the 8-inch screen over the hole
21
22

23
24
25
26

27


28

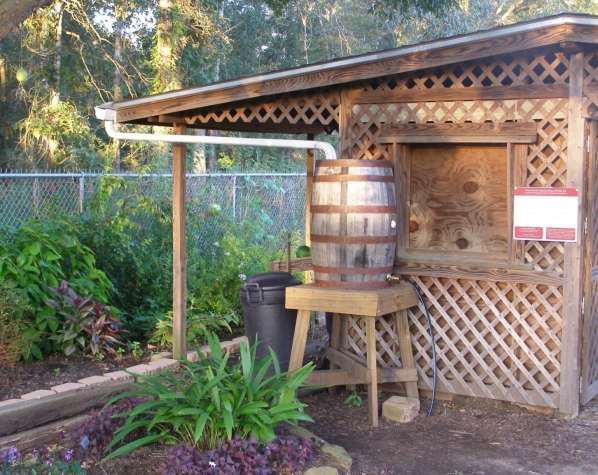
29


30 1) Drill holes: 1 Pilot hole to cut top off 1 for Overflow 1½ for Spigot


31 2) Cut top off (leave lip): Reciprocating saw Jigsaw

32 3) Prep barrel Remove/smooth plastic burrs Wash barrel


33 4) Install overflow hardware ¾ Hose adapter (narrow threads into barrel)


34 4) Install hardware: ¾ Bulkhead tank fitting


35 4) Install hardware: Hose spigot

36 5) Safety/mosquito control Cover with fiberglass window screen Staple gun, trim excess

 Bricks Cinder blocks Wooden")
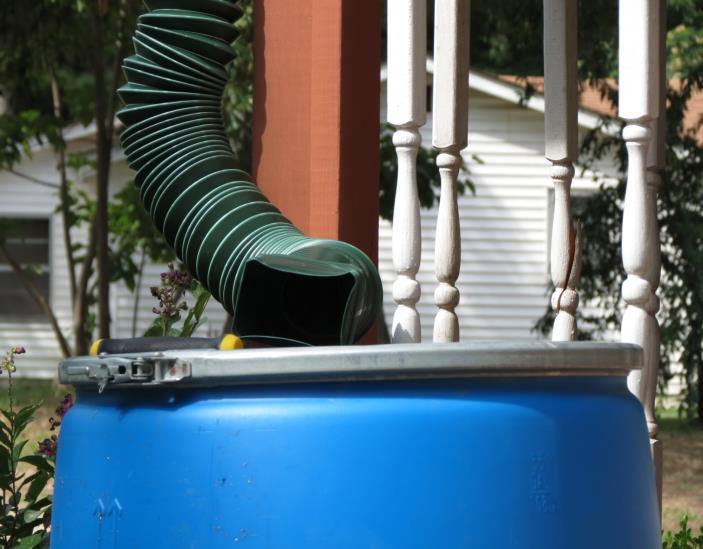
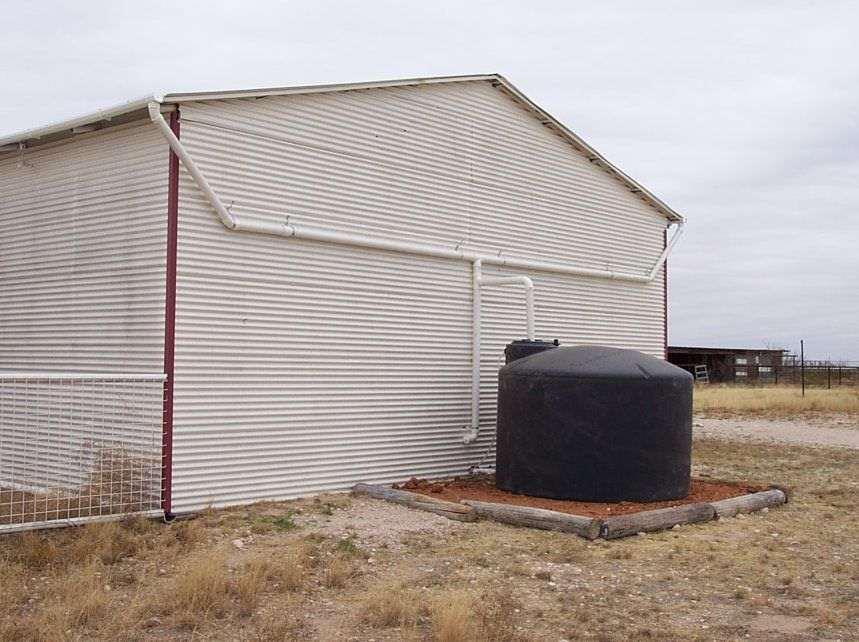
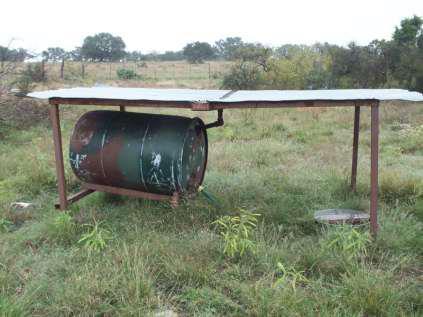
37 Hacksaw cut downspout 2 above barrel inlet Flex-a-spout ~$10 Elevate - head pressure (~460 lbs) Bricks Cinder blocks Wooden stand


38 What does water weigh? One US Gallon of water weighs pounds lbs X 55 = lbs
39 Consider safety when determining where to place the barrel. Though raising the barrel provides better water pressure, it also creates a tipping hazard. The barrel should be secured to keep children safe and prevent the barrel from being blown or knocked over by wind or heavy rain. Be sure that lids are secured to keep children and animals out. Any opening larger than window screening can allow mosquitoes to enter the barrel and breed. Be sure all openings, including the overflow, are covered in screen. Be sure everyone knows that the water in the barrel is not safe to drink. Put a non-potable label on the barrel or remove the faucet handle when not in use.
40 Regular maintenance will keep your rain barrel functioning properly and extend its life. Be sure that the gutters, downspout and screen on the barrel are clear of sticks, leaves and other debris. This organic matter can encourage the growth of algae in the barrel, so it must be removed. At least once a year, empty and wash out the barrel. Also be sure to check the seal around the hose bib and apply more caulking if any leaks are spotted.

41 Decorative covering made from wooden pickets and metal flashing

42

43 Paint must adheres to plastic Finely sand the barrel to apply latex paint. If using spray paint be sure it is for use on plastics. Painting improves aesthetics and can extend the life of the plastic.


44


45
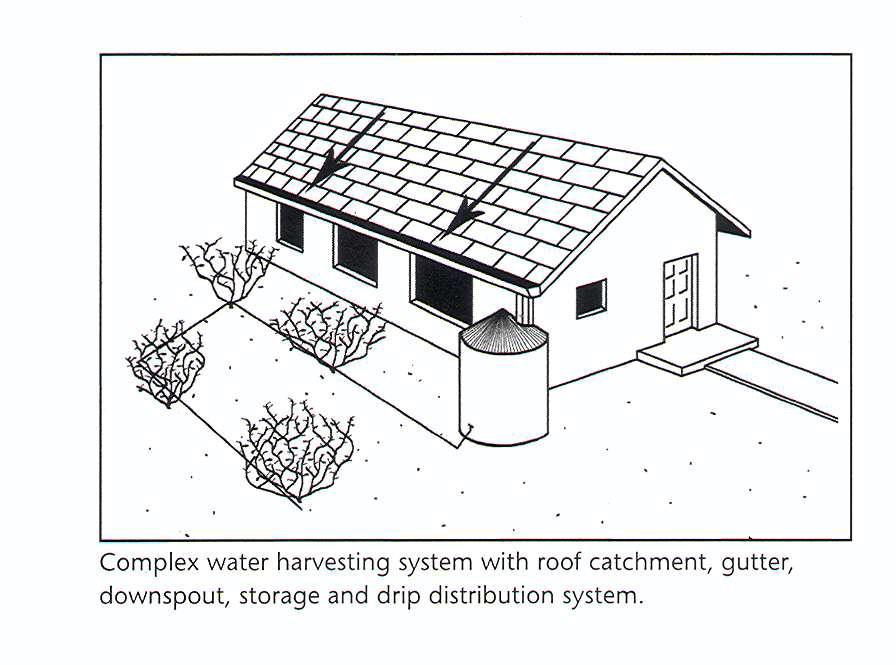
46 How much runoff is generated by your home?
47 How Much Rain Water Runs Off Your Roof? You may be as astonished! Take a guess--what is the volume of water that runs off a 1,000 square foot roof during a 1" rain storm? 20 gallons? 50 gallons? 100 gallons? 1000 gallons?
48 The answer is about 623 gallons. To calculate the runoff from any given rainfall: Take the dimensions of the footprint of your roof and convert them to inches. (So, a 50' x 20' roof is 600" x 240".) Multiply the roof dimensions by the number of inches of rainfall. (In this example, 600" x 240" x 1" = 144,000 cubic inches of water.) Divide by 231 to get the number of gallons (because 1 gallon = 231 cubic inches). (144,000/231 = ).
49 How to Calculate Rainwater.623 gallons/square foot of roof/1 rainfall.623 gal. X 1,000 sq. X 1" rain = 623 gal. water.623 gal. X 50" rainfall per year= 31,150 gal/yr


50 Determine roof area: Length x Height Example: Length = 25 feet Height = 20 feet 25 ft x 20 ft = 500 sq.ft 500 sq. ft sq.ft. = 1,000 sq.ft.

51 How much runoff is generated by your home? 1 4
 by.")

52 Estimate the amount of water generated from a 1 rain: Multiply roof area (in sq.ft.) by sq.ft. x.623 = 607 gallons! 1,250 sq.ft. x.623 = 780 gallons! 3,000 sq.ft. x.623 = 1869 gallons!
 2) But, with only 0.2 inches of rain 748 gallons x 0.")
53 A 0.2-inch rain on a home with a 1,200-sq.ft. roof 1) 1,200 sq.ft. x.623 = 748 gallons (with 1 of rain) 2) But, with only 0.2 inches of rain 748 gallons x 0.2 = 150 gallons That is still a LOT of water!!


54 Assuming 45 inches of annual rainfall, a 1,200-sq. ft. home will generate 28,000+ gallons of runoff every year!

55 Don t let that runoff escape - - Collect it and use it to irrigate your landscape!
56
57
58

59
60


61
62 Option 1 Connect at Overflows Option 2 Connect at Faucets

63
64

65
66

67
68 2013 Price Information 55 gal Drum/Barrel - $15 - $ gal Totes - $20 - $90 Fiberglass Screen (36 X 84 ) - $5.68 Waterproof Silicone - $3.78 Red Rubber Packet (Gasket Material) - $ X3 PVC Coupling - $6.28 #72 Clamp - $1.84 ¾ Bib (Tank Bung) - $8.53 ¾ Bulkhead Union - $11.92 ¾ X ¾ Adapter - $0.79 ¾ PVC Female Adapter - $0.52 ¾ Nipple - $0.40
69 How to Build a Rain Barrel Information You Tube: How to Build a rain Barrel by forthaysstate Texas AgriLife Extension Service University of Arkansas
Before you begin. Rain Barrel Building Instructions
 Before you begin 1. Start with Step 1 (big surprise right?). Note that the remaining steps 2 through 4 can be done in any order as long as you pay careful attention to adhere to the barrel layout. 2. SAFETY
Cosmic Ray Telescope Construction Instructions for 2017 Eclipse Tracking design
 Cosmic Ray Telescope Construction Instructions for 2017 Eclipse Tracking design Parts 1 ¼ aluminum conduit 10 Two aluminum (or plastic) LB Conduit boxes, 1 ¼ thread. You want the longer box. Two -- 1 ¼
 www.wildmanconstruction.com Changing your toilet is an easy project that should take half a day or less. The most common toilet has a separate tank that mounts on top of the bowl. These instructions apply
HydroCycle 4" Pro NFT Lettuce Systems
 HydroCycle 4" Pro NFT Lettuce Systems 110830 Hydroponic Table Kit* Designed to grow healthy plants without soil using mineral-nutrient solutions. 2016 Growers Supply All Rights Reserved. Reproduction is
Previous ( ) Rain Barrel System Assembly
 Rain Barrel System Assembly") Previous (2010-2014) Rain Barrel System Assembly Montgomery Soil & Water Conservation District 10025 Amity Road Brookville, Ohio 45309 Phone: (937) 854-7645 www.montgomeryswcd.org Website Facebook Building
Previous (2010-2014) Rain Barrel System Assembly Montgomery Soil & Water Conservation District 10025 Amity Road Brookville, Ohio 45309 Phone: (937) 854-7645 www.montgomeryswcd.org Website Facebook Building
PREMIUM CONCRETE COUNTERTOP MIX INSTALLATION INSTRUCTIONS
 PREMIUM CONCRETE COUNTERTOP MIX INSTALLATION INSTRUCTIONS High Strength Fast Setting Pourable Helpful Items: TCC Materials February 09 Version 2.0 Tools Required: Concrete mixer or ½ drill (600 RPM or
Austin Standing Seam Awning Assembly and Installation Instructions. Assembly Instructions
 Austin Standing Seam Awning Assembly and Installation Instructions Be sure to use safety glasses when assembling and installing the awning. Some metal parts may have sharp edges. Use work gloves to handle
Austin Standing Seam Awning with Overhead Braces Assembly and Installation Instructions. Assembly Instructions
 Austin Standing Seam Awning with Overhead Braces Assembly and Installation Instructions Be sure to use safety glasses when assembling and installing the awning. Some metal parts may have sharp edges. Use
Installation Guide Simplicity Alfresco. V1.9 Lu070318
 0333 305 5272 www.canoports.co.uk Installation Guide Simplicity Alfresco V1.9 Lu070318 Tools Required Below is a list of tools that you will require to install your the Simplicity Alfresco System. Cordless
Assmann Corporation of America TANK INSTALLATION AND USE GUIDELINES FOR BULK STORAGE TANKS
 Assmann Corporation of America TANK INSTALLATION AND USE GUIDELINES FOR BULK STORAGE TANKS General Information Assmann polyethylene storage tanks are manufactured to give you the toughest, most reliable
FERAL CAT WINTER SHELTER HOW-TO GUIDE
 FERAL CAT WINTER SHELTER HOW-TO GUIDE WHAT YOU NEED MATERIALS Hard Styrofoam sheet 2 feet wide, 8 feet long, 2 inches thick One tube (that fits a caulk gun) of clear silicone sealant; OR two smaller hand-squeezable
YUKON PATIO COVER INSTALLATION INSTRUCTIONS
 YUKON PATIO COVER INSTALLATION INSTRUCTIONS Before You Begin: Consult your local building department for any required permits You may be required to obtain a building permit for this structure. Contact
Pressure Balance Shower Only Dual Control (Volume & Temperature) Ceramic Disc Cartridge Platinum Shower Trim Kit
 Ceramic Disc Cartridge Platinum Shower Trim Kit") Shower Only PL8900-00 & TR-SH Pressure Balance Shower Only Dual Control (Volume & Temperature) Ceramic Disc Cartridge Platinum Shower Trim Kit - Installation Instructions Before Your Installation Read
Shower Only PL8900-00 & TR-SH Pressure Balance Shower Only Dual Control (Volume & Temperature) Ceramic Disc Cartridge Platinum Shower Trim Kit - Installation Instructions Before Your Installation Read
CT Evaporative Cooling System With End Tank
 CT Evaporative Cooling System With End Tank EC1606 EC1642 R R Ventilation Systems CT Series Cooling with EC1642 Tank Kit CT Series Cooling with EC1606 Tank Kit Page 1 of 38 USER'S MANUAL and INSTALLATION
Installation Guide Contemporary Alfresco V1.3 LU
 Installation Guide Contemporary Alfresco V1.3 LU 010818 Tools Required Below is a list of tools that you will require to install you're the Contemporary Alfresco System. Cordless Drill Mastic Gun Spirit
Heat Exchanger Coil: Build Instructions
 Heat Exchanger Coil: Build Instructions Tank Assemblies Feed Tank (Drawing: WS-101) o Use a jig-saw to cut a large circle into the top of the barrel, 2-3 inches in from the edge o Leave the lip intact.
Building Instructions
 Building Instructions Tools Required Tape measure Straight edge Pencil/pen Jigsaw Table Saw Circular Saw Electric drill 1 Hole saw bit Saw horses/table Protractor Staple gun Caulk gun Paint brush Wrenches
A simple demand feeder can be made with a 5 gallon bucket, a funnel, brass rods and PVC pipe. It can hold 12 pounds of extruded (floating) fish feed.
 fish feed.") How to build a demand feeder. A simple demand feeder can be made with a 5 gallon bucket, a funnel, brass rods and PVC pipe. It can hold 12 pounds of extruded (floating) fish feed. Use a typical 5 gallon
How to build a demand feeder. A simple demand feeder can be made with a 5 gallon bucket, a funnel, brass rods and PVC pipe. It can hold 12 pounds of extruded (floating) fish feed. Use a typical 5 gallon
Dura-Lock Roof System
 DLR-14 Dura-Lock Roof System Assembly and Installation Instructions Read the instructions before starting the job. They explain the steps required to produce a finished product that will meet factory specifications.
Constructing a Cycle Shop
 Constructing a Cycle Shop Materials needed 4 sq ft 3/8 outdoor plywood 2 sq ft. 1/2 outdoor plywood 2 sheets of Precision Sheet plastic ( cement block pattern) Clear window glass: 2 sq ft. to allow for
ELECTRICAL PANEL SYSTEM
 ELECTRICAL PANEL SYSTEM Version 2.3 23-Jul-2016 Copyright 2016 Rancho La Paloma Ministry Center / ClubRust ClubRust and Rancho La Paloma Ministry Center is providing this information and services on its
hargreaves cast iron installation guide
 Jointing Methods for Rainwater Pipes Vertical rainwater pipes would not normally be sealed. Only seal joints between gutter outlet and rainwater pipe or offset plus any joints in a horizontal position
TYPHOON ASSEMBLY AND INSTALLATION INSTRUCTIONS
 TYPHOON ASSEMBLY AND INSTALLATION INSTRUCTIONS CORPORATE HEADQUARTERS WESTERN SALES AND MANUFACTURING PLANT P.O. Box 400 1017 SW Berg Parkway Canby, Oregon 97013 Phone: (503) 266-2231 Fax: (503) 266-4334
Installation Guide Simplicity 6. v3.5 lu171117
 0845 869 6006 www.canoports.co.uk Installation Guide Simplicity 6 v3.5 lu171117 Tools Required Below is a list of tools that you will require to install the Simplicity 6 Canopy or Carport. Cordless Drill
USER'S MANUAL and INSTALLATION GUIDE
 Aerotech CP Evaporative Cooling System with Center Tank 123456789012345678901234567890121234567890123 123456789012345678901234567890121234567890123 123456789012345678901234567890121234567890123 EC1609
Construction Manual for High Altitude Test Chamber
 Construction Manual for High Altitude Test Chamber Howard L. Brooks, Principal Investigator Department of Physics and Astronomy DePauw University Greencastle, IN 46135 hlbrooks@depauw.edu 6 January 2014
General Array Layout Sketch
 General Array Layout Sketch Cold TO Panels Hot FROM Panels OR Cold TO Panels Hot FROM Panels 1 Introduction This document describes how to install EZ series panels. The EZ series panels are designed to
Overflow Kit Installation!
 Overflow Kit Installation! Thank you for choosing a Glass-Holes overflow kit. Please note that this is a do-it-yourself project that we supply the do-it yourself stuff for you to do-it-yourself. Working
Water Rocket Launcher
 Rocket Activity Water Rocket Launcher Objective Construct a launch platform for launching water rockets. National Science Content Standards Physical Science Position and motion of objects Motions and forces
Bird Feeder BUILD TIME
 This bird feeder should attract many different birds to your yard. With a platform for those birds that like to move around on a flat surface while they pick at feed as well as a dowel for those who prefer
Prepare Base Assembly. (If pump is pre-assembled on base, go to step#8.)
") F L Instructions Maxim 3000 Turbo Flush Installation INTRODUCTION Satellite portable restrooms and accessories must be assembled according to approved assembly procedures. Avoid variations in assembly
F L Instructions Maxim 3000 Turbo Flush Installation INTRODUCTION Satellite portable restrooms and accessories must be assembled according to approved assembly procedures. Avoid variations in assembly
AWNING / PATIO COVER INSTALLATION INSTRUCTIONS
 AWNING / PATIO COVER INSTALLATION INSTRUCTIONS Before You Begin Read the installation instructions thoroughly before beginning the installation procedure. Perspective In the Awning Instructions, Back means
Acrylic Claw Foot Tub
 Acrylic Claw Foot Tub Wrench or socket Drill & Bits Parts Recommended 2-2 x12 boards 4 Lag Bolts 4 Flat Washers Be sure to re-inforce the floor before securing tub. We recommend 2-2 x12 s securely fastened
Plans & Materials List for Handwashing Station
 Plans & Materials List for Handwashing Station Required Tools Arc Welder (mig or stick) Chop or metal band saw Grinder (bench and/or handheld) 3/8" Drill 1/8", 1/4", 5/16" Drill Bits Copper Pipe Cutter
Plumbing Removal and Replacement Procedure
 Plumbing Removal and Replacement Procedure Tools required: #2 Phillips screwdriver 1/8 slotted screwdriver 5/16 slotted Screwdriver 7/16 wrench Pliers 6 diagonal cut pliers Garden hose Hack saw Tape Measure
Step 1: Planning the project
 Step 1: Planning the project 1 of 1 Completed gutter Evaluate and plan the project Professionally installed continuous gutters using strip miters or the box style corners, remember to add 5 for each outside
RLZ-02 - Rear Cross Bar, Ford Transit Connect.
 Important: Please read these instructions carefully prior to installation. Please refer to your fitting instruction to ensure that the roof racks are installed in the correct locations. Check the contents
Building + Mounting Learn about Rooftop Mounts
 Building + Mounting Learn about Rooftop Mounts A Build-It-Ourselves Guide to Wireless Mesh Networks 1 Introduction For the best network connections to your neighbors, the best place to put a wireless router
FLARE COMPRESSION CPVC IRON PIPE HOSE BARB GARDEN HOSE DRAIN/SHUT-OFF COCKS NEEDLE & HUMIDIFIER VALVES
 Brass Fittings Innovative solutions delivered Better engineering, better selection, better results FLARE COMPRESSION CPVC IRON PIPE HOSE BARB GARDEN HOSE DRAIN/SHUT-OFF COCKS NEEDLE & HUMIDIFIER VALVES
Float Tank Plans Copyright 2006 All Rights Reserved
 Float Tank Plans Copyright 2006 All Rights Reserved Tank Material list: 5 4x8 sheets ½ Plywood 5 4x8 sheets ¼ Plywood 5 4x8 sheets 1 ½ Rigid Styrofoam 24 8 2 x 2 s (1 ½ x 1 ½ actual dimensions) 1 Door
Version 2016_1.1 VICTORIAN ASSEMBLY INSTRUCTIONS. Victorian Vi-23, 34, 36
 Version 2016_1.1 VICTORIAN ASSEMBLY INSTRUCTIONS Victorian Vi-23, 34, 36 PRODUCT INFORMATION Dear customer, Thank you for buying a high-quality aluminium greenhouse. REMARKS The drawings in these instructions
Corrugated Installation and Technical Guide
 Corrugated Installation and Technical Guide AmeriLux International, in partnership with Menards, offers high quality polycarbonate, pvc and fiberglass panels which feature the latest in product technology.
ONASSIS SHOWER SET INSTALLATION
 SKU(s): 925939 BEFORE YOU BEGIN We recommend consulting a professional if you are unfamiliar with installing plumbing fixtures. Signature Hardware accepts no liability for any damage to the plumbing, floor,
FLARE COMPRESSION CPVC IRON PIPE HOSE BARB GARDEN HOSE DRAIN/SHUT-OFF COCKS NEEDLE & HUMIDIFIER VALVES
 Brass Fittings Innovative solutions delivered Better engineering, better selection, better results FLARE COMPRESSION CPVC IRON PIPE HOSE BARB GARDEN HOSE DRAIN/SHUT-OFF COCKS NEEDLE & HUMIDIFIER VALVES
Installation Guidelines
 Page 1 Tools You ll Need 4 ft. Carpenter s level Chalk line (to mark U channel locations) Cordless drill/nut driver Caulking gun Chop saw with a metal cutting blade on it (required to make accurate and
12, 14 & 16 Wide Enclosure Assembly Guide
 www.rmfiberglass.com 12, 14 & 16 Wide Enclosure Assembly Guide RM Products Ltd 1-800-363-0867 www.rmfiberglass.com Table of Contents 1. Handling and Storage page 3 to 5 2. Parts and Tools List page 7 3.
CONSTRUCT YOUR DREAMS WITH HIGH QUALITY MATERIALS
 www.tenbek.com CONSTRUCT YOUR DREAMS WITH HIGH QUALITY MATERIALS CONSTRUCTION MATERIALS FASTERNERS ELECTRICAL HAND TOOLS PPE WE DEAL WITH Building Materials Facilities Management Waste Management Real
Connect Transit Shelter
 Tools Required *denotes special tools required Connect Shelter, 8ft Connect Shelter, 12ft *Soft, non abrasive protective surface such as a furniture blanket *Source of compressed air (for thorough dust
Included in Hardware Kit. Jeep Cut-Out Fender Flare Set of 4 Set Part # Rev STEP 1 PRIOR TO INSTALLATION
 Jeep Cut-Out Fender Flare Set of 4 Set Part #10926-07 Rev-01 09-11-12 STEP 1 PRIOR TO INSTALLATION A) Bushwacker only approves installing the flares according to these written instructions with the hardware
Synseal assembly guide 2009:Synseal assembly guide /2/09 12:38 Page 1. Conservatory Roof Assembly Guide
 Synseal assembly guide 2009:Synseal assembly guide 2007 9/2/09 12:38 Page 1 Conservatory Roof Effective from February 2009 Synseal assembly guide 2009:Synseal assembly guide 2007 9/2/09 12:39 Page 6 3.1
Installation Guidelines
 Page 1 Tools You ll Need 4 ft. Carpenter s level Chalk line (to mark U channel locations) Cordless drill/nut driver Caulking gun Chop saw with a metal cutting blade on it (required to make accurate and
The Chena Grow Tower Project
 The Chena Grow Tower Project is the brainchild of Alaskan entrepreneur Bernie Karl. It is much more than just an experiment with vertical hydroponics, it is a concept meant to spark the curiosity of the
8 Ft Wide Enclosure Assembly Guide
 www.rmfiberglass.com 8 Ft Wide Enclosure Assembly Guide RM Products Ltd 1-800-363-0867 www.rmfiberglass.com Table of Contents 1. Parts and Tools List page 3 2. Hardware page 4 3. Maintenance page 5 4.
Traditional Wall Mounted Potfiller
 TOOLS NEEDED FOR INSTALLATION 1/4 hex wrench (provided in installation kit) 3/32 hex wrench (provided in installation kit) Pencil or marker PTFE tape Small level, or carpenters square Power Drill with
-1- Coach Instructions.
 -1- Coach Instructions. Insert the bogie pivot pins through the bottom of the coach body ensuring the dimples fit into the recesses. Glue the.06 x.25 short strips each side of the pivot head, bridge the
12-16 Ft Wide Enclosure Assembly Guide
 www.rmfiberglass.com 12-16 Ft Wide Enclosure Assembly Guide RM Products Ltd 1-800-363-0867 www.rmfiberglass.com Handling and Storage 2 P a g e Handling and Storage: 3 P a g e Before You Begin Contact RM
Installation Instructions for Mincey Marble Manufacturing s Standard 3-Piece Panels [Not Extending to the Ceiling]
![Installation Instructions for Mincey Marble Manufacturing s Standard 3-Piece Panels [Not Extending to the Ceiling]](/thumbs/90/104106060.jpg "Installation Instructions for Mincey Marble Manufacturing s Standard 3-Piece Panels [Not Extending to the Ceiling]") , inc. Mincey Marble Mfg., Inc. 4321 Browns Bridge Road Gainesville, GA 30504 Ph: 800.533.1806 Fx: 770.531.0935 www.minceymarble.com Installation Instructions for Mincey Marble Manufacturing s Standard
, inc. Mincey Marble Mfg., Inc. 4321 Browns Bridge Road Gainesville, GA 30504 Ph: 800.533.1806 Fx: 770.531.0935 www.minceymarble.com Installation Instructions for Mincey Marble Manufacturing s Standard
'Mutiny' Ozone Reactor Kit
 'Mutiny' Ozone Reactor Kit Skill Level: Beginner Tools Required: Scissors or razor blade Other Materials: Teflon tape Time to Build: Approximately 1 hour not including drying time Version: 2012 spray nozzle
Pump Replacement Manual. Bill Wallace by Wallace Marine Services, Inc.
 by Wallace Marine Services, Inc. Maintain Your Equipment The Easy Way Bill Wallace 843-693-4336 info@willyvac.com www.willyvac.com Pump Replacement Manual 1 How to change the water pump on the Willy Vac
D.I.Y. Dog and Cat Manual
 D.I.Y. Dog and Cat Manual For Cats: Cat Wand Sunshine Toy Sock Fish Pom Poms Puzzle Feeder Scratch Circle For Dogs: Tennis Ball Sock Water Bottle Sock Sock Donut Braided Tug Toy Rope Toy PVC Treat Dispenser
Affiliate: Richmond Tool Inventory As Of: 4/16/2018
 Affiliate: Richmond Tool Inventory As Of: 4/16/2018 NOTE: The Total Inventory quantity does not reflect current tool type availability; please call the Richmond ToolBank at 804-301-0750 for more information.
INSTALLATION INSTRUCTIONS
 CERBER FIBER CEMENT SIDING - SIERRA PREMIUM SHAKE Construction Requirements Sierra Premium Shake boards must be installed over vertical wood framing spaced no greater than 16 oc. with an APA rated 7/16
WILLIS WIDESPREAD FAUCET
 SKU(s): 924621 WILLIS WIDESPREAD FAUCET BEFORE YOU BEGIN We recommend consulting a professional if you are unfamiliar with installing plumbing fixtures. Signature Hardware accepts no liability for any
Santa Fe Cover INSTALLATION GUIDE. Alumawood TM Newport with MAXX Panel TM Installation Guide
 Alumawood TM Newport with MAXX Panel TM Installation Guide Santa Fe Cover INSTALLATION GUIDE Whatever the weather, you can enjoy the sophisticated charm of a lattice cover. The Santa Whatever the weather,
Build your own Drawer unit. D3 / D4
 Page1 Build your own Drawer unit. D3 / D4 1: Introduction. This guide will give you the plans, materials and how to information to build your own drawer unit. The dimensions given will fit a D3 or D4,
PREHUNG DOOR SYSTEM INSTALLATION INSTRUCTIONS: FIBRECOMP COMBINATION UNITS
 PREHUNG DOOR SYSTEM INSTALLATION INSTRUCTIONS: FIBRECOMP COMBINATION UNITS Read all instructions before starting. Calgary Toll Free: 1-866-664-7664 Saskatoon Toll Free: 1-800-667-6977 Winnipeg Toll Free:
Waterlox It. Our guide will show you how to attach the vessel sink to the cabinet surface
 The cabinet is 90% assembled, the most important part of installation will be Vessel sink attachment Drain installation Faucet installation Our guide will show you how to attach the vessel sink to the
CALLAS THERMOSTATIC SHOWER SET
 SKU(s): 925945 CALLAS THERMOSTATIC SHOWER SET BEFORE YOU BEGIN We recommend consulting a professional if you are unfamiliar with installing plumbing fixtures. Signature Hardware accepts no liability for
K9 KIT INSTALLATION INSTRUCTIONS CROWN VIC KK-K9-F7-K
 K9 KIT INSTALLATION INSTRUCTIONS 1998-2011 CROWN VIC KK-K9-F7-K TOOLS REQUIRED: Power Drill (Cordless preferable) Drill Bit Set Standard Wrench and Socket Set Metric Socket Set Screwdriver Set Torx Bit
Aluminum Clad Wood Window 1/2 Reinforced Field Mulling and Stacking Supplement
 Aluminum Clad Wood Window 1/2 Reinforced Field Mulling and Stacking Supplement 1 Aluminum Clad Wood Window 1/2 Reinforced Field Mulling and Stacking Supplement The following instructions are a supplement
HYDRO-TOWER INSTALLATION INSTRUCTIONS
 HYDRO-TOWER 300 300 INSTALLATION INSTRUCTIONS IN-WALL TANK K-4179T/K-4178T/K-10611T K-4177T/K-8857T/K-20341T/K-75890T/K-75891T BEFORE YOU BEGIN Read installation guide in illustration and word file carefully,
A SRF/SERF A SRF/SERF
 A1100-055SRF/SERF A1100-056SRF/SERF Remote Fill Assembly INSTALLATION INSTRUCTIONS **CRITICAL - MUST READ** This unit can only be used for new installations or tank level retrofits that allow access to
Cut-Out Fender Flares Rear Pair. Jeep. Included in Hardware Kit:
 Jeep Cut-Out Fender Flares Rear Pair STEP 1 PRIOR TO INSTALLATION A) Bushwacker only approves installing the fl ares according to these written instructions with the hardware provided. WARNING: Failure
Installation Instructions
 Installation Instructions READ BEFORE INSTALLING UNIT For Slider Casement Air Conditioners INSTALLATION WARNINGS AND CAUTION Carefully read the installation manual before beginning. Follow each step as
Quick Hook SB & LB Standard and Low Height Hooks for Bottom Mount Rails
 Quick Hook SB & LB Standard and Low Height Hooks for Bottom Mount Rails Installation Instructions Quick Hook SB & LB Instructions for Installing Standard and Low Height Hooks for Bottom Mount Rails Installation
RELINER INSIDE DROP SYSTEM SPECIFICATIONS
 1. PRODUCT NAME RELINER INSIDE DROP SYSTEM U.S. Patent 6074130 Canadian Patent # 2269565 All RELINER Products are proudly made in the U.S.A. 2. MANUFACTURER RELINER /Duran Inc. 53 Mount Archer Rd. Lyme
Durabrac Gable Bracket Installation Guide
 Durabrac Gable Bracket Installation Guide Durabrac vinyl gable brackets are manufactured from high quality natural white vinyl with UV inhibitors. There are currently six styles and three sizes to choose
RPI ROYAL EDGE EPDM MATERIAL GLOSSARY & GUIDE
 RPI ROYAL EDGE EPDM MATERIAL GLOSSARY & GUIDE WHITE EPDM MEMBRANE TPO MEMBRANE WHITE EPDM MEMBRANE TPO MEMBRANE Multi-System Products: W TPO Cured field membrane used for waterproofing sidewalls, flat
ASAP Sr. A Strap and Pole. Magic Christmas. Single Stage. Walter Monkhouse. Alexandria, La. Version 1.2.
 ASAP Sr Single Stage A Strap and Pole Version 1.2 Walter Monkhouse Walter@MagicChristmas.org Magic Christmas Alexandria, La. Description The ASAP Sr, single stage, has the same concept as the ASAP Jr.
AK30 Melter Operation Manual
 AK30 Melter Operation Manual This article will help you show the importance of knowing how to operate the AK30 melter. Let s start by making your safety a priority. It is recommended that you wear eye
Product Guide Specification
 Zurn Industries, LLC November 2014 1801 Pittsburgh Avenue Erie, PA 16502 Toll Free (855) 663-9876 Phone (814) 455-0921 Fax (814) 871-6141 Website www.zurn.com Product Guide Specification Specifier Notes:
Outdoor Cooler Cart. Outdoor Cooler Cart Construction Instructions
 Outdoor Cooler Cart Outdoor Cooler Cart Construction Instructions Make the Legs and Side Panels. Cut the eight long and short leg pieces to length. See Material List on next page.. Apply a bead of glue
MALEKO WALL-MOUNT FAUCET INSTALLATION
 SKU(s): 934146 BEFORE YOU BEGIN We recommend consulting a professional if you are unfamiliar with installing bathroom fixtures and plumbing. Signature Hardware accepts no liability for any damage to the
FITTINGS AND HOSES TOOL
 FITTINGS AND HOSES INGERSOLL-RAND FITTINGS AND HOSES The Ingersoll-Rand line of ruggedly convenient hose reels and recoil hoses are pressurerated for optimized pneumatic performance, even in the toughest
Cabinet is 90% assembled, all you need to do is to attach the legs, lay the glass top on the cabinet, connect the faucet, drains & ptrap.
 Things you might need for the installation: vessel sink, plumber's putty(home depot), liquid nails(home depot), Bucket silicone caulk(home depot), Putty knife Plumber's putty Pipe wrench Channel-lock pliers
SHINGLE ROOF SUMMARY INSTALLATION MANUAL METHOD 1 CONVENTIONAL ORIENTATION, ALTERNATING HEADERS
 Distributed and serviced in the USA by Hot Sun Industries Inc 13460 Cayuga Dr., Poway CA 92064 858-627-9007 e-mail: ken@h2otsun.com web site: http://www.h2otsun.com Safety First! Note: Most occupational
FITTINGS & GAUGES 20,000 PSI
 PRESSURE GAUGE Features 4" high visibility face with laminated safety glass dial cover Accurate within +/- 0.5% of full scale range Stainless steel case and internals Heavy-duty movement Glycerine-filled
Installation Instructions
 READ BEFORE INSTALLING UNIT For Slider Casement Air Conditioners To avoid risk of personal injury, property damage, or product damage due to the weight of this device and sharp edges that may be exposed:
Installation Instructions Student 101 Fume Cupboard
 Installation Instructions Student 101 Fume Cupboard Refer drawing on next page 0. If your fume cupboard is supplied with a flatpack bench frame, see step1. If your fume cupboard will be mounted on an existing
ROTUNDA WALL-MOUNT FAUCET INSTALLATION
 SKU(s): 919045 BEFORE YOU BEGIN We recommend consulting a professional if you are unfamiliar with installing bathroom fixtures and plumbing. Signature Hardware accepts no liability for any damage to the
PANEL INSTALLATION GUIDE
 GUIDE The Manufacturer has provided these instructions as installation guidelines in accordance with ASTM E-330. The manufacturer, however neither installs the panels nor has any control over the installation.
Traditional Undermount: S Method (Undermount):
:") TOOLS REQUIRED 15.1 TOOLS REQUIRED The installation of Corian shape product must be a precise and exacting process to ensure that a good fit is always created. Using the correct tools is essential. In
TOOLS REQUIRED 15.1 TOOLS REQUIRED The installation of Corian shape product must be a precise and exacting process to ensure that a good fit is always created. Using the correct tools is essential. In
How to Build a Raised Bed Cold Frame
 How to Build a Raised Bed Cold Frame Protect your plants from frost with a cold frame that sits right on top of your existing 4' x 4' raised bed. The lid is held open with screen door closers, and the
Never fill any required clearance space with insulation or any other building materials surrounding the chimney.
 INSTALLATION AND MAINTENANCE INSTRUCTIONS 1700ºF Air-Cooled Temp/Guard Chimney Sizes 8-16 Listing No. MH8251 Tested to UL103/ULC-S604 A MAJOR CAUSE OF RELATED FIRES IS FAILURE TO MAINTAIN REQUIRED CLEARANCE
The Ultimate Guide To Creating A Wind Turbine
 The Ultimate Guide To Creating A Wind Turbine DISCLAIMER These guides and videos have been designed to help others to help create alternative energy by showing how to create a wind turbine. Every effort
Balustrade Systems / Installation Instructions
 A. PARTS AND SUPPLIES NEEDED FOR INSTALLATION Hardware included for each 10 section of rail: 2 3 x 1-1/2 L-brackets 4 1-3/4 x 3/16 Blue hex-head screws for anchoring the L-brackets to the newel cap, column
17MAY18 U.S. RACK, Inc Falcon Drive, Madera, CA
 17MAY18 U.S. RACK, Inc. - 2850 Falcon Drive, Madera, CA 93637-559-661-3050 INSTRUCTIONS for FIFTH WHEEL RACK Model 2010-4AD WARNING: Do NOT attempt to install or use this rack without following all instructions.
DYI shelter enrichment items
 DYI shelter enrichment items Toys out of paper towel or toilet paper rolls: TP ball: Cut four pieces of paper towel roll about ½ to ¾ inch thick. Then make into a ball by slipping them together making
HBS-AP ASSEMBLING INSTRUCTIONS
 ALUMINIUM PIPEWORK - ALUMINIUM PIPEWORK - ALUMINIUM PIPEWORK 97 HBS-AP ASSEMBLING INSTRUCTIONS 1. INTRODUCTION 1.1. This manual is very easy to consult and we recommend reading it before starting work,
This installation guide has been created to assist in constructing a Liniar conservatory roof from a kit format.
 1.00 - Introduction This installation guide has been created to assist in constructing a Liniar conservatory roof from a kit format. Please note, each roof has been individually designed to meet specific