Expedient Homemade Handgun Ammo
|
|
|
- Abner Wheeler
- 5 years ago
- Views:
Transcription

1 EXPEDIENT Handgun AMMO HOMEMADE If old grandpa left you his old 12 gauge, or you want to shoot that old pistol you came across while cleaning the attic (and don t have any ammo!) what do you do? If you can t buy ammo, or even primers and re-loading presses from a store, what do you do?? You will need to start from scratch! Expedient Homemade Ammo provides all the info you need to make simple effective ammo. At the end of the day, you don t need Presses or Primers to construct you own improvised ammo with just a few simple tools! -1-
2 MATERIALS REQUIRED 1) Brass tube. 2) Curtain rings. 3) Solder paint. 4) Tube cutter. 5) Vernier gauge. 6) Gas torch. 7) 30 x 30mm Square tube. 8) Hardwood section. 9) Attention to detail. -2-

3 We will start by manufacturing.38 Special cartridge cases. The.38 Special is one of the most popular revolver cartridges in the world, supplying ammunition to a countless array of handguns, so it seems the appropriate cartridge to start with. To manufacture our homemade.38 cartridges we require some lengths of thin walled brass tube. This material is readily available from most good hobby and craft shops. The tubing I am using is manufactured in the U.S.A. For the various calibre of ammunition we will construct in this book we require tube in the following sizes; 15/32-13/32-3/8-7/16 - and 11/32. For the.38 cartridge case a length of 3/8 tube is required. The vernier gauge is set to 30mm, and as shown in the photos below, used to scribe a line around the tube. This is achieved by simply rotating the tube against the sharp point of the gauge. This section of tube, measuring 30mm, is now removed. The scribe mark is the point at which the tube is cut. Brass tube is harder to cut than ordinary copper plumbing tube so a good quality plumbers tube cutter is required. I emphasize good quality. It is perfectly possible to buy a good quality cutter for around 10. It is well worth spending an extra few pounds as it will make tube cutting an easier prospect. -3-


4 Mark the tube. Cut the tube. The tube cutter should be carefully rotated clockwise and anti-clockwise so as to allow the section of tube we require to be removed. It is important not to rush the tube cutting procedure as this may cause the cutting wheel to wander leading to an inaccurately cut case. -4-


5 Square the case end. It is of great importance to ensure that one end of the tube section (from here on referred to as the case) is perfectly square. To achieve this the case is placed in a drill press and the spinning case lowered onto a flat file, as illustrated in the above photo. It should be noted that the drill chuck should be tightened by hand only so as not to distort the roundness of the case. This method of case trimming is just as accurate as using a small lathe and no different in principle to the case trimmers used in conventional re-loading practices. Measure the case. -5-


6 Following the trimming operation the case is measure to ensure it has an overall length of 29mm. The correct case length is very important. ATTACHING THE CASE RIM Soldering materials. Case rims Now that we have the main body of our.38 case it is necessary to attach the case rim. To achieve this we require a small micro pencil gas torch, a 3/8 curtain ring, and some solder paint. Solder paint is a mixture of flux and powdered lead solder. -6-


7 The.38 case rim consists of a 3/8 curtain ring. These can be found in most good hobby and craft shops and usually have Rings and Clips printed on the pack. The clips should be discarded as they are not required. It is very important to make sure the rings have an inside diameter of 3/8. Apply the solder. A matchstick or small artists paintbrush is used to apply a small amount of solder paint to the squared end of the case. Ensure that the solder is fully covering the circumference of the case. Solder the rim. -7-


8 The ring is now placed in the centre of a section of steel rod, around 1 in diameter, as shown above. The painted end of the case is then inserted into the ring. It must be ensured that the case is inserted fully and the end of the case resting against the top of the rod. The pencil torch is now used to solder the ring to the case. Only a small amount of heat is required to melt the solder so it is important not to over do it. Allow the case to cool for thirty seconds or so and then carefully remove the case and place it to one side while the next case is soldered. CASE CLEAN UP File the base. De- burr the case. -8-

9 As illustrated above, the case must be passed back and forth across the surface of a file several times to remove any solder residue. The inside of the case mouth must also be completely de-burred using a knife. A collection of finished cases. For the simple manufacture of moderate quantities of.38 cases, the tube and ring method is perhaps ideal for the hobby gunsmith. Once the necessary quantity of tube sections are cut and trimmed to their correct length, cases can be manufactured quiet quickly. -9-

10 PRIMING THE CASES In the event of having to manufacture our own cartridge cases it is highly likely we will also have to utilise an unconventional method of priming the cases. Without the primer the cartridge cannot be made. This book illustrates the improvised method of case manufacture, so we will take similar liberties in respect of the primer. If primers are unavailable, we can make good use of the blank cartridge as a priming method. I am using the well-known and widely available 8mm Fiocchi blanks for this reason. The blank must be disassembled before it may be used to prime our.38 cases. This is a simple procedure involving the removal of the blanks tip and green plastic plug liner, leaving us with a primed empty 8mm case. The fioochi 8mm blank case is actually manufactured from steel as apposed to conventional brass. The blanks are used in a wide array of blank firing pistols for re- enactments and training purposes where a real firearm would be unwise, or just general fun usage by replica gun collectors. They are a strong and reliable method of priming the improvised cartridge case. -10-

11 Remove the blank tip. The first step is to use a tube cutter to remove the tip of the blank. It will be necessary to hold the blank in a pair of pliers to do this as the blank is a small component. Once the tube cutter has cut through the case wall, both ends of the blank are gripped in pliers and both halves pulled apart. In doing so the green plastic insert will be removed. The section containing the green plastic plug is discarded. Pull the blank apart. A bit of twisting and pulling will be required to separate the two halves but this is not difficult. The above photo shows the tip removed. -11-


12 Measure the blank. The blank can now be measured. It should be somewhere between 13mm and 15mm in length. The exact length not being too important. Before we can use the blank cases to prime our.38 cases we must make a small brass sleeve insert, so as to permit the blank to fit the.38 case. For this sleeve we require a simple 15mm length of 11/32 brass tube. Measure the sleeve. A 15mm, or thereabouts, length of 11/32 brass tube is cut and measured, as shown above. The tube just acts as a filler between the outer diameter of the blank and the inside diameter of our.38 case. -12-

13 Press the blank into the sleeve. After de- burring one end of the sleeve we can bond the blank and sleeve together. The outside of the sleeve is coated with a high strength retainer such as bearing adhesive and the blank inserted into the sleeve. Do not use Super Glue. Insert the priming assembly into the case. The blank and sleeve priming assembly can now be inserted into our.38 case. Retainer is now applied to the outer circumference of the sleeve and the assembly inserted into the.38 case, as shown in the above photo. -13-

14 The primed case. The above photo shows our newly primed case with the priming assembly in place. At each point of inserting the blank into the sleeve and the sleeve and blank into the case, the base of each assembly should be placed against a flat surface to ensure all inserts are completely flush with each other. The primed case must now be put to one side while the retainer has time to harden. We may use this drying time to prime more cases. -14-


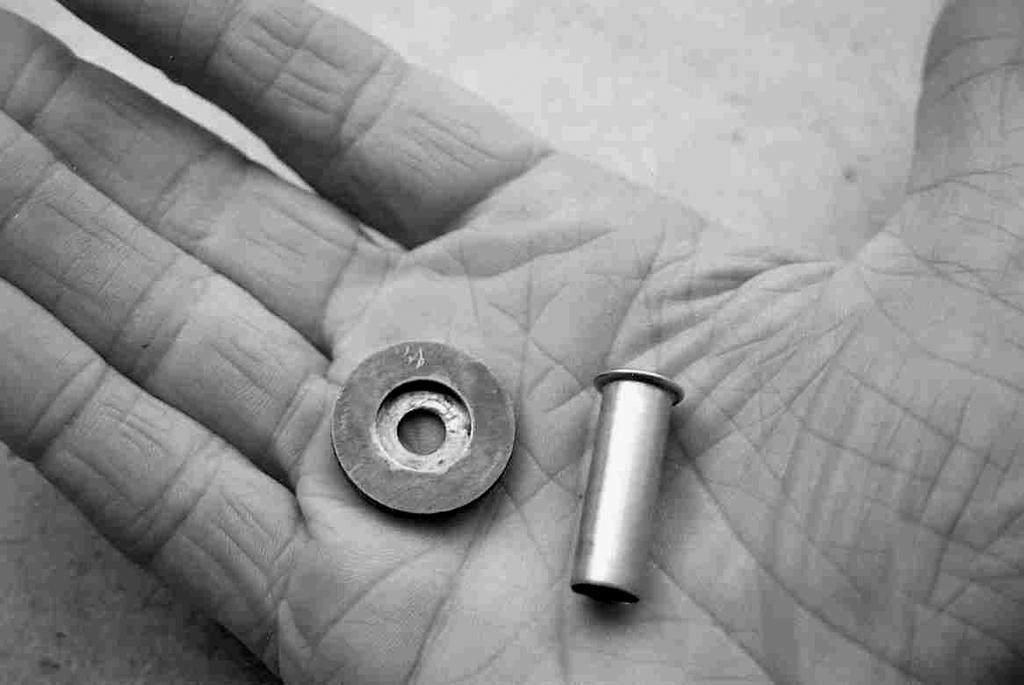
15 THE SHELL HOLDER Before our newly primed cases can be charged with powder it is necessary to make a simple shell holder. To make the shell holder we require two washers. Both washers are 1 in diameter. One washer must have a ¼ hole and the second a ½ hole. The two washers must be soldered together and for this we require some solder paint and our gas torch. Again, I am using a pencil torch due to its small size and more accurate flame. The photo below shows the complete shell holder and a handmade.38 case ready for loading. Shell holder materials. Washers ready to solder. -15-
 on top of the first.")
16 Before the washers can be soldered together the zinc surface should be removed by simply sliding the washers over a file several times. To solder the two washers together place the washer with the ¼ hole on a flat surface and apply solder paint to it s circumference. Place the second washer (½ hole) on top of the first. Apply heat to the washers until the solder runs. Now leave the assembly to cool. If, as sometimes occurs, the washers slide out of alignment with each other during soldering, the washers may be soldered on a wooden board and four tacks may be used to hold the washers in alignment. Simply place a tack at the 12, 3, 6, and 9 o clock points around the washers. The wooden surface allows the tacks to be pressed in by finger pressure only and permits their easy removal after soldering. The small amount of heat required will not burn the wood unduly but it s best not to use the best dining room table! Soldering the shell holder. In the above photo I am soldering the washers together on top of a section of steel tube, but as pointed out earlier, it is sometimes easier to use the board and tack method. The purpose of the shell holder is to protect the primer in the base of the case from coming into contact with any object that may cause the primer to detonate unintentionally. It is of great importance when reloading ammunition and although it is a very simple component it s importance should not be overlooked. The photo below shows the finished shell holder and case ready for loading with powder and bullet. The next step is to resize our bullets ready for loading. -16-
17 -17-

18 BULLET SIZING DIE The bullet sizing die. I am using commercially available.38 bullets for my improvised cartridges simply because they are readily available, but even if they were not a bullet mould can easily be acquired and bullets cast. Due to the wall thickness of our brass tube (thicker than that of a factory manufactured case) we cannot seat off the shelf bullets without first resizing them to fit our handmade cases. For this purpose we must make a very simple sizing die to re- size our bullets to the correct diameter. Drilling the die holes. -18-

 again making sure the drill passes through both walls.")
19 The homemade re-sizing die is nothing more than a modified section of box section tubing. I am using 30 x 30mm tube with a wall thickness of 2.5mm. The length of the tube is also 30mm, just to keep things simple. For accuracy of drilling a drill press must be used to make the die. The first step is to drill a 2mm or 3mm pilot hole through the centre of the tube section. The hole must pass through both walls. Next, the hole is enlarged to 5mm or 6mm, and then the final 8.9mm hole is drilled (carefully and slowly) again making sure the drill passes through both walls. The holes can be made by simply holding the tube section on the drill table with your hand and drilling the holes. It is not necessary to clamp the tube or hold it in a vice. Drill the tube. Solder the nut. -19-
 nut to the inside wall of the die in alignment with one of the holes,")

20 We now have the main body of a simple sizing die through which to pass our bullets. The next step is to simply solder an 8mm (M8) nut to the inside wall of the die in alignment with one of the holes, as shown in the above photo. Screw in the die bolt. An 8mm bolt, 2 in length, is now screwed into the die. It should screw freely in and out. The bolt allows us to press the bullet through the opposite hole. The finished die is shown below. The finished die tool. -20-

21 We must re-size our bullets to a diameter of 8.9mm in order for them to fit into our.38 cases. This diameter of bullet is obviously less than any factory made or home cast bullet, but still of sufficient diameter to engage the riffling of any.38 calibre handgun. Just as with our cases, we must compromise to get the job done. In the photo below I am sizing 9mm jacketed bullets because they are as near to the diameter we require as bought (9mm ) and less sizing will be required as a result. You can of course re-size any.38 lead bullet ( mm) and from a re-sizing standpoint any lead bullet is easier to size than the jacketed variety. I am using jacketed bullets simply because that is what was available at the time of writing but it does illustrate that even the hard case of the jacketed bullet can be sized using this simple device. To size the bullet, place the bullet in the die as shown in the photo below and, using a spanner, slowly tighten the bolt. Press the bullet through the die. Screwing the bolt in will drive the bullet through the opposite hole sizing the bullet to a diameter of 8.9mm. I would suggest sizing perhaps fifty or so bullets in one session so as to have a ready supply. -21-


22 BULLET SEATING DIE The bullet seating die. Now that we have our supply of resized bullets we can begin the reloading process and start seating bullets into our cases. But before this can be done a simple bullet seating die must be made. Drilling the bores. The purpose of the die is to ensure bullets are driven into the cartridge case accurately. The die is made from a simple section of hardwood. I am using a section of banister rail, and a 50mm diameter washer with a -22-

23 10mm diameter hole. We also require an 8mm diameter bolt, 50mm (2 ) long and two nuts to fit the bolt. Any section of hardwood will do and ideally it should be around 1 in diameter. The rail section I use was actually 45mm in diameter but it was easy to obtain so I used it. Whatever wood section is used, it should measure about 45mm in length. As shown in the above photo, a hole is drilled through the centre of the die. A drill press must be used for this purpose. We must drill two separate diameter bores through the die, one to accept the case and the other the bullet. It is of vital importance that both ends of the die are perfectly square before attempting to drill any of the bore holes. The first hole to be made is the Case Bore to accept the cartridge case. This is drilled to a diameter of 9.9 or 10mm (25/64 ). The second hole to be made is the Bullet Bore to a diameter of 9mm (23/64 ). The bullet bore must be drilled first. Two bore diameters are drilled. The two bores must be drilled slowly. At regular intervals during drilling the drill handle should be raised and any wood shavings released from the bit. This will ensure the bores are drilled as cleanly as possible. To drill the bullet bore hole, hold the die on the drill table and slowly drill all the way through the centre of the die, regularly releasing drill pressure to allow shavings to be removed. Do not move or rotate the die once the first hole had been made. Lower the drill table and remove the drill. Now place the 9.9mm Case Bore drill in the chuck and carefully raise the drill table back into alignment with the new drill bit. -23-

24 Now carefully drill the second bore to a depth of 30mm. This is the bore that will accept the cartridge case in due course. The bores of the die should now be inspected to ensure they are clean and true. It is a good idea to insert each of the two drill bits just used back into each bore and rotate them several times by hand to remove any slight imperfections or wood shavings. The top washer can now be screwed to the bullet bore end of the die. A washer of similar diameter to the die should be used, in my case 50mm. Drill a couple of holes either side of the washers 10mm hole and countersink each hole. Now use a couple of short screws to attach the washer to the die. Now attach the two nuts to the bolt and insert the bolt into the die. The die is now ready for use. The finished seating die. The two nuts act as an adjustment method to alter as necessary the depth to which a bullet is seated. -24-


25 LOADING THE CARTRIDGE. Insert the die over the case. The.38 cases are now ready to load. The primed case is first placed in the shell holder and the die inserted over the case. The powder charge is then poured into the dies bullet bore. See page 35 for improvised propellant. Insert the bullet. The resized bullet is now inserted into the die, as shown above. -25-


26 Insert the bolt. The seating bolt is now inserted over the bullet. Note that the two nuts are initially screwed onto the bolt a distance of about 3/8 to begin with. Tap the bolt home. The seating bolt is now tapped with a hammer, or preferably a hard rubber mallet. The bullet will be driven into the mouth of the case. Adjust the two seating bolt nuts as necessary so as to allow the bullet to be seated until the overall length of the loaded cartridge is 37. 5mm. The length of the cartridge should be measured using the vernier gauge. -26-


27 Checking the cartridge length. Adjust the bolt nuts gradually during the seating of the first bullet until the cartridge measures 37.5mm, as shown above. Once the nuts are set at this position all future cartridges can be loaded without touching the two lock nuts again. The loaded improvised cartridge compares favourably with its factory made counterpart. Once the necessary materials are acquired and the simple loading tools made, reloading these.38 Special cartridges is nearly as easy as loading using conventional reloading methods. -27-
28 Bullet seating die dimensions for the.38 special. -28-


29 As an alternative to using the brass curtain ring for the case rim we can use a simple 10mm diameter circlip, as shown below. Attach the clip. The circlip is attached to the case using a pair of circlip pliers. It can be fitted by hand but it is easier with the correct tool. The clip is attached to the very end of the case. Apply the solder. Apply solder paint to the clip circumference and solder the clip in place. It is possible to shoot these cartridges in a revolver without actually -29-

30 soldering the clip providing the clip is tight enough but tension of the clips do tend to vary so it will be down to trial and error as to whether you use solder or not. I would strongly advise doing so to make the clip as secure as possible. Clip attached. The two clip plier holes will need to be filed or ground away once the rim is fitted to allow the round to be loaded into a revolver cylinder. If the plier holes are not removed the cartridge will still chamber but only with the clips open side facing outwards away from the cylinders axis. It will be obvious to those readers with a knowledge of revolver and cartridge design history that the circlip is reminiscent of the half moon clips used for loading the.45acp auto pistol cartridges in the revolvers. Our improvised version works just as well! -30-


31 THE.380 ACP A B Commercial and improvised.380 cases. The.380 automatic pistol cartridge is a very simple cartridge to manufacture. Just like our homemade.38 cases it is assembled using 3/8 brass tube and a blank case as the primer. The photo above shows a commercial.380 case at B and a homemade version at A. To make the.380 we require two sections of brass tube, one 14mm length of 3/8 and a 9mm length of 11/32. Both tubes must be carefully de- burred. The.380 case components ready for assembly. -31-

32 The above photo shows the three component parts of the improvised.380 case in order of assembly, consisting of two tube sections and an 8mm modified empty blank case. To assemble the.380 case apply retainer to the outer surface of the 11/32 tube and insert it into the 3/8 tube. Ensure one end of both the tubes are completely flush before the retainer sets. Allow several minutes for the retainer to set and then apply retainer to the outer surface of the blank and insert this into the flush end of the two tube assembly. Adjust the blank so the case as an overall length of 17mm and then allow the retainer to set. This is a simple case to make once the necessary tubes are cut to the correct length. The bullet for the.380 should be sized to 8.9mm just like the.38 special. The seating die bore depths are as follows: The Case Bore is drilled to a depth of 16mm. All other measurements are as for the.38 Special. The shell holder washers are 1 diameter with 8mm and 6mm (1/4 ) holes. Measure the case. It cannot be over emphasized how important the de-burring of all tubes used to manufacture these cases is. Each tube must be the specified length and they must slide freely inside each other. The tubes and blank should be assembled without retainer first to ensure they fit together correctly before any retainer is used in final assembly. Once retainer had set hard it will not be possible to make any alterations to the case. -32-

33 .32 ACP The.32 auto pistol round was very popular in its day and there are an enormous number of pistols out there chambered in this calibre. Making improvised cartridges in this calibre could not be easier as we only require a single 14mm length of 11/32 tube and a modified blank case. There is also no need to re-size any bullets because off the shelf bullets will fit the 11/32 tube without any re-sizing! After de- burring the tube, retainer is simply applied to the outer surface of the blank, and the blank inserted into the tube. The case should be measured using the vernier gauge to ensure it is 17mm in length. The.32 case ready for assembly. The improvised.32acp case is shown on right ready for assembly. A commercial case is shown on the left for comparison. The seating die Case Bore diameter should be 9mm. The Case Bore depth should be 15mm. The Bullet Bore diameter should be 8mm. The same shell holder used for the.380 case may be used. When making any of the above cases, it cannot be over emphasized how important the careful de-burring of all the tubes is. Also, all tubes and blank primer should be test fitted first before any retainer is used. Once retainer sets hard it will not be possible to carry out any adjustments to the cartridge case. -33-


34 If it is found that any small adjustment to the assembled case are necessary once the retainer has set the drill press can once again be used to trim the case length. Obviously, it is the mouth of the case that will be trimmed and not the end containing the primer! Trimming the case mouth. The assembled case may be trimmed using the drill press for very small adjustments as shown above. Measure the case. The length of the finished case must always be checked. -34-

35 Improvised match head Propellant The best type of propellant for any cartridge is obviously the kind manufactured for the purpose, but if this is not available we must improvise if we wish to shoot our improvised cartridges. The simplest of all improvised propellant is the common match head. I have used both safety and standard match heads to quiet good effect. A reliable method is to shave the match head material from the tips of matches and powder (crush) the material on a flat hard surface. For safety reasons only a small number of heads should be crushed at any one time. I usually crush enough match head propellant sufficient for one round at a time, and in the unlikely event of the powder detonating, the result will only be that of a small flame. The following list shows the correct number of heads for each calibre covered in this book..38 Special: acp: 10.32acp: 9-35-

36 An alternative to the match head propellant is black powder. If black powder cannot be purchased it can be sourced from black powder blank cartridges. Because of their large size, the 12 gauge BP blank referred to as yachting blanks or alarm blanks are useful. I have used the black powder obtained through such methods for years in a variety of handguns and rifles shooting both commercial brass cases and handmade versions. The 12 gauge black powder blank cartridge. -36-
37 ..Experimentation is the Key To Success Expedient Homemade Ammo Copyright P.A.Luty (D.F.C - D.A.C) No part of this document may be reproduced with out the written permission of the author. All transgressors will be eliminated, or at least made to feel very ill. The constriction of improvised ammunition can be dangerous. This document is a visual commentary of my own ammunition experiments only and does not condone or encourage the manufacture of ammunition by any individual. The information contained in this publication is, therefore, presented for amusement, educational and academic study purposes only. -37-
The Virgo/Libra Steam Engine
 The Virgo/Libra Steam Engine Congratulations on becoming the owner of a Virgo or Libra Steam Engine. With careful use and maintenance it will give many years of satisfying performance. Contents 1) Notes
Installation Instructions
 Supafold Slide Aside System Three Fold Room Divider Installation Instructions Distinctive Doors Ltd Supafold Slide Aside Internal Folding System IMPORTANT: Before proceeding with the installation, and
Rorty No.2 Tube Bender.
 Copyright. This entire Manual is copyrighted to Rorty Design, with all rights reserved. No part may be transferred or copied by any means whatsoever, without the express written permission of Rorty Design.
Clock 35 - Toyland. Construction instructions for Clock 35
 This clock has been designed for children, it is a stand-alone unit and can be positioned on a shelf or cabinet out of the reach of very young hands who may be tempted to touch. The clock is shown in two
QB78 CO 2 Pellet Rifle
 QB78 CO 2 Pellet Rifle Maintenance Instructions Text and photos by George Fox Lang The Chinese QB78 pellet rifle is one of the nicest and most popular CO 2 rifles ever produced. Here are the long-wanted
SE5a Instrument Board part 2 - rev 1.1
 SE5a Instrument Board part 2 - rev 1.1 Fuel (Petrol) Valve This valve uses two circular name plates, eight brass screws, one black plastic base, copper wire and two black plastic risers. You can pick any
METAL FABRICATION MECHANICAL
 METAL FABRICATION MECHANICAL Machine Screws Machine screws have a parallel thread and need a threaded hole to screw into. They come in a wide variety of materials and sizes and are used for semi-permanent
joining materials - wood
 UNIT D E S I G N A N D M A N U F A C T U R E : C O U R S E M A T E R I A L Wood joints joining materials - wood The majority of joints used in woodcraft have been designed specifically to attain the maximum
I m going to try my best to explain how most bullets are made and can be made by an individual. There are essentially three ways to make a bullet.
 We have all seen them, cursed them and sang their praises, but how are they made? Have you ever wondered where they come from? I mean a good bullet is worth its weight in gold, a bad bullet is rubbish.
Bushwacker Jeep Flat Style Fender Flares Front Pair
 Bushwacker Jeep Flat Style Fender Flares Front Pair Note: These instructions involve cutting parts of your vehicle. Please read all instructions prior to starting. Installation Time: 3-4 Hours Tools Required:
Continue gluing the remaining top parts ensuring the angled piece is glued well. Set aside and let dry. See photo below
 Radiator rev 1.1 The SE5a s radiator is one of the most recognized radiators in WW1. It is one of the components that defines the SE5a. The original SE5a has seen multiple radiator designs used during
AR-15 Armorer s Essentials Kit. Product # Instructions # Revision: B
 AR-15 Armorer s Essentials Kit Product #156111 Instructions #1025769 Revision: B 1 INDEX 3 AR-15 Adjustable Receiver Link 3 Pivot Pin and Roll Pin Installation Tool 4 Mag well Vise Block 7 Upper Vise Block
LYMAN S ORANGE CRUSHER/ CRUSHER II PRESS
 LYMAN S ORANGE CRUSHER/ CRUSHER II PRESS Your new Crusher Press combines the most desirable features of O-Frame press design with innovations that make it truly distinct as a reloading tool. Its magnum
Design and Technology Resistant materials Key words and definitions
 Design and Technology Resistant materials Key words and definitions Word Acrylic Definition a type of thermoplastic, which is hard and can be transparent. Used to make shop signs. Perspex is a trade/brand
Bullet Pen Casing. Contributed by: David Bell. This tutorial was downloaded from.
 Bullet Pen Casing Contributed by: David Bell This tutorial was downloaded from http://www.penturners.org The International Association of Penturners - 2014 This tutorial is designed around the bullet casing
BE1151 Precision Priming Press Instructions
 BE1151 Precision Priming Press Instructions Tech Support: (360) 676-3299 Email: service@bullets.com Web: www.bullets.com Shell Holder Not Included. Introduction The Model BE1151 is designed to be the ultimate
Legacy Bullet Click Pen Kit
 Description: The Bullet Click pen is a step-up kit, with similar features to a Power Click Pen. It has a click mechanism instead of a twist. It uses an 8mm tube and a Parker style gel refill. It is popular
Motorized M3 AX7200 Rotary-Style Gasket Cutter Operating Instructions
 Motorized M3 AX7200 Rotary-Style Gasket Cutter Operating Instructions INTRODUCTION Congratulations! You are the owner of the finest rotary-style gasket cutter in the world. Originally developed and patented
Hey, check out this tutorial on Window Casing Pens!
 Hey, check out this tutorial on Window Casing Pens! My good buddy Mr. Natural assumes that you already know the basics for making a casing pen so things like drilling and seating bullets won't be covered.
Spiderbeam Balun Construction Guide
 BALUN CONSTRUCTION GUIDE Ver. 1.0 1 The components of the Balun Kit are in a plastic bag. Most of the components are inside the plastic case of the balun. The aluminum U-profile and the RG-142 Teflon Coax
Freedom Pens: Penturning hints, tips and tricks See figure 1. Figure 1
 PenTurner s Corner Freedom Pens: The Freedom Pens project is an endeavor to make and furnish pens to US servicemen and women. On July 26 I attended a Freedom Pens turn-a-thon at Wood World Texas in North
Case Trimmer Accessories
 Case Trimmer Accessories An Accessory for Every Stage of the Case Conditioning Process Cleaner (supports case mouth) (supports case mouth) Outside Turner 3-in-1 Case Mouth Cutter Reamer Accessory Name
MOTOR & BULK HEAD. A Manual for Repair and Maintenance Technicians
 MOTOR & BULK HEAD A Manual for Repair and Maintenance Technicians CAUTION This manual is designed to help technicians who are already experienced in workshop procedures and know how to handle tools. Only
THE T-MAG II PRESS. Figure 6
 THE T-MAG II PRESS The Lyman T-Mag Press features a powerful compound leverage with a unique position indexable turret and quick disconnect release system. This allows you to mount several die sets, precisely
Razr Adapter Retrofit Project by Craig Hoy, Edmonton, AB, Canada
 Razr Adapter Retrofit Project by Craig Hoy, Edmonton, AB, Canada The following is a description of the process that I have used to modify the console eject box for e38, e39, e46 and x5 s, part number 84-21-6-933-415.
#4500 BULLET SIZER & LUBRICATOR
 #4500 BULLET SIZER & LUBRICATOR Assembly Your new #4500 Bullet Sizer and Lubricator has been fully assembled at the factory, However, to facilitate packaging and shipping, the handle has been dismounted.
Interchangeable Insert Worldwide. Mika Koivuniemi PBA & World Tour Champion. Installation Guide
 #1 Interchangeable Insert Worldwide Mika Koivuniemi PBA & World Tour Champion Installation Guide Switch Grip TM Finger Assemblies are designed to compliment our Switch Grip Thumb Assemblies and aid pro
Striking with the cheek of the hammer instead of the face. Using the claws of the hammer for work that is best done with a wrecking bar.
 The most important consideration is the squareness of the hammer head to the nail at the moment of impact. Sometimes in order to get a nail started, it is convenient to grip the handle closer to the head.
SLIDING MECHANISM TROLLEY CATCH TROLLEY ASSEMBLY FLOOR GUIDE
 Set A Set B PFD30 Fire Door Kit FITTING INSTRUCTIONS For use with 44mm thick doors only For Single and Double doors IF INSTALLING A TOUCH LATCH, PLEASE READ THE CORRESPONDING FITTING INSTRUCTIONS FIRST
All Terrain Flares 2014 Chevy Silverado
 Page 1/8 Components: 1. Front Flares (2) 2. Rear Flares (2) Tools required: - Utility knife - #2 Phillips driver - Socket wrench - 13 mm Socket - 6 mm Allen Wrench - T-15 Torx bit - Trim Removal Tool -
Giraud Tool Company, Inc.
 Motor Upgrade for Gracey Trimmer This package is intended to allow the user to upgrade their Gracey trimmer with a higher rpm motor and convenience features not found in the production offering. This upgrade
By C.W. Woodson From the pages of Model Craftsman magazine June, 1937
 By C.W. Woodson From the pages of Model Craftsman magazine June, 1937 As shown in Fig. 1, the tool post grinder for which plans are given here can be used to finish up delicate work to more accurate dimensions
1984 to ZX (Z31) Rear Camber Modification Gary Molitor, March 1, 2009
 Rear Camber Modification Gary Molitor, March 1, 2009") 1984 to 1989 300ZX (Z31) Rear Camber Modification Gary Molitor, March 1, 2009 Step 1: Bushing Removal After removal of the rear suspension and disassembly of all the parts, the first thing I did was remove
1984 to 1989 300ZX (Z31) Rear Camber Modification Gary Molitor, March 1, 2009 Step 1: Bushing Removal After removal of the rear suspension and disassembly of all the parts, the first thing I did was remove
Salter Industries Spiral Stair
 Salter Industries Spiral Stair The Leader in Spiral Staircases Continuous Sleeve Stair Installation Instructions TOOLS NEEDED: 1. Electric drill with hex chuck and Phillips bit 2. Drill bits 1/8", 1/4",
Presents the. Partizan MK IV and MkV. Berdan primer conversion systems and tools.
 Presents the Partizan MK IV and MkV Berdan primer conversion systems and tools. ***Warning- Russian Reloads takes no responsibility in the reloading of ammunition. Please use safety and caution in your
Model SS-99. Reloading Press. Instructions
 Model SS-99 Reloading Press Instructions 2 Parts List Key Part Number Description Quantity 1. 122-921 Link Arm...2 2. 180-319 Ram...1 3. 194-389 Shellholder Retainer Spring...1 4. 303-962 Toggle Block...1
REPAIR INSTRUCTIONS. Cat. No Cat. No MILWAUKEE ELECTRIC TOOL CORPORATION. SDS Max Demolition Hammer. SDS Max Rotary Hammer
 Cat. No. 9-0 SDS Max Demolition Hammer Cat. No. -0 SDS Max Rotary Hammer MILWAUKEE ELECTRIC TOOL CORPORATION W. LISBON ROAD BROOKFIELD, WISCONSIN 00-0 8-9-0 d 000 8-9-0 d Special Tools Require Forcing
SLIDING MECHANISM TROLLEY CATCH TROLLEY ASSEMBLY FLOOR GUIDE
 Set A Set B PFD30 SG Fire Door Kit FITTING INSTRUCTIONS For use with 44mm thick doors only For Single and Double doors SUGGESTED TOOLS DRILL G-CLAMP TAPE MEASURE (Image for reference only) HACKSAW POCKET
6043 DESIGN AND TECHNOLOGY
 UNIVERSITY OF CAMBRIDGE INTERNATIONAL EXAMINATIONS GCE Ordinary Level www.xtremepapers.com MARK SCHEME for the October/November 2008 question paper 6043 DESIGN AND TECHNOLOGY 6043/01 Paper 1 (Technology),
K-Jetronic (CIS) Barb Insertion Tool Instructions
 Barb Insertion Tool Instructions") K-Jetronic (CIS) Barb Insertion Tool Instructions Rev. J Effective: 04-AUG-2018 Unobt ainium Supply Co. 523 Longley Rd Groton, MA 01450 978.448.2110 www.unobtainiumsupply.com Contents K-Jetronic (CIS)
K-Jetronic (CIS) Barb Insertion Tool Instructions Rev. J Effective: 04-AUG-2018 Unobt ainium Supply Co. 523 Longley Rd Groton, MA 01450 978.448.2110 www.unobtainiumsupply.com Contents K-Jetronic (CIS)
Plastic Welding Experiences
 Plastic Welding Experiences In the past I have advocated plastic solvent welding with ABS solvent to rejoin ABS plastic parts without repainting. Solvent is inexpensive but it does takes considerable time
STOL CH 801 SECTION 2: Nose Rib 8R1-7
 SECTION 2: Nose Rib 8R1-7 Position the lower nose rib on the front of the spar at the predrilled holes just above rear rib #3 (615mm from the bottom of the spar) Check lateral alignment (rib is centered
INSPECTION AND CORRECTION OF BELLHOUSING TO CRANKSHAFT ALIGNMENT
 INSPECTION AND CORRECTION OF BELLHOUSING TO CRANKSHAFT ALIGNMENT BACKGROUND Proper alignment of the transmission input shaft to the crankshaft centerline is required in order to achieve the best results
PARTS INCLUDED IN FIXED STAIR CABLE RAIL KIT:
 175 SERIES FIXED STAIR CABLE RAIL - INSTALLATION INSTRUCTIONS PARTS INCLUDED IN FIXED STAIR CABLE RAIL KIT: FIXED STAIR TOP RAIL (1) A FIXED STAIR BOTTOM RAIL (1) B D UPPER SADDLE BRACKET (1) C BRACKET
Fig. 2 DORMA-Glas Stand/Issue 02/03 Seite/Page 1/7
 FSW Installation instructions Track rail 75 x 72 mm 1. Ceiling substructure and installation of the track rail (Fig. 1): The track rail must be bolted over its entire length (including the stacking track
WESTERN PISTOL.22 CALIBER SINGLE SHOT. Entire pamphlet Copyrighted by JACO Designs 1972
 WESTERN PISTOL.22 CALIBER SINGLE SHOT Entire pamphlet Copyrighted by JACO Designs 1972 This pamphlet contains the plans and instructions necessary to construct the Western pistol. This pistol breaks open
MINI-LATHE QUICK CHANGE TOOL POST
 MINI-LATHE QUICK CHANGE TOOL POST Cutting and assembly details Machinists should familiarize themselves with the contents of this section before jumping in to the drawings. Many details are described here
Practical Scrap Metal Small Arms Vol.10 By Professor Parabellum
 Practical Scrap Metal Small Arms Vol.10 By Professor Parabellum Introduction The 9mm submachine gun design described here is extremely basic and can be put together using very limited tools and materials.
A Cartridge Pen Presented to the SWAT Symposium 2006 in Temple, Texas
 A Cartridge Pen Presented to the SWAT Symposium 2006 in Temple, Texas By Don Ward Thanks to Jay Pickens for teaching me how A picture of special tools used is at the end of the article. Improvised tools
Fortress Fe Posts must always be secured to the deck framing. Fortress Fe Posts should never be attached to only the deck boards.
 Installation Instructions for Fortress Horizontal Cable Panel System with UB-05 Brackets and Fe Posts It is the responsibility of the installer to meet all code and safety requirements, and to obtain all
CHAPTER 8. Through Dovetail Procedures
 CHAPTER Through Dovetail Procedures 52 Chapter D4 User Guide THROUGH DOVETAIL PROCEDURES Chapter Foreword In these instructions for using the Leigh Dovetail Jig, we have recommended using certain cutters
Astro-Physics Inc. 400QMD Lubrication/Maintenance Guide
 Astro-Physics Inc. 400QMD Lubrication/Maintenance Guide The following guidelines should be followed to lubricate the three main parts of the 400QMD mount. The QMD stands for Quartz Micro-Drive controller.
Jet-ski with motor boat engine
 117.178 Tools required: Vice with bending support Wood glue (water resistant) Scissors Ruler Pencil Round file ø2 ø3 ø4 Drills Jigsaw Sandpaper Super glue Please Note The OPITEC range of projects is not
Additional Parts List:
 THE TIME MACHINE Additional Parts List: In addition to the cast resin parts enclosed in this kit, there should also be a plastic bag containing the following items needed to complete your time machine
HAND CASE NECK TURNER & CASE HOLDER
 HAND CASE NECK TURNER & CASE HOLDER PRODUCT INSTRUCTIONS SAFETY Reloading is an enjoyable and rewarding hobby that is easily conducted with safety. But carelessness or negligence can make reloading hazardous.
Quick-Release Front Vise 05G34.01
 Quick-Release Front Vise 05G34.01 Patent Pending Introduction A front vise is the most generally useful vise on a typical workbench. It can be used for clamping parts on edge within the jaws, for clamping
Vash/Knives Future Revolver Kit. V2.0
 Vash/Knives Future Revolver Kit. V2.0 Thank you for purchasing the Vash/Knives Future Revolver Pistol Kit. This kit contains almost everything you ll need to build up your own replica. This kit is an advanced
Tool & Cutter Grinder
 Tool & Cutter Grinder The Bonelle Tool and Cutter grinder (based on prof. Chaddock s Quorn) can be used to grind most kind of tools from lathe tools to end-mills and reamers. I have been grinding my end-mills
Cabinet is 90% assembled, all you need to do is to attach the legs, lay the glass top on the cabinet, connect the faucet, drains & ptrap.
 Things you might need for the installation: vessel sink, plumber's putty(home depot), liquid nails(home depot), Bucket silicone caulk(home depot), Putty knife Plumber's putty Pipe wrench Channel-lock pliers
 ARIZ NA www.arizonamodels.com Lewis.30 cal MACHINE GUN KIT Assembly Directions- All Scales Reprinted with the permission of Air Age Publications Inc. Lewis Gun Arrangements use for option variations and
Potter s Wheel Plans. Flywheel is poured in form made by tacking tar paper to plywood disk. Partly set concrete is broom-finished.
 Potter s Wheel Plans Flywheel is poured in form made by tacking tar paper to plywood disk. Partly set concrete is broom-finished. Throwing Pottery on a wheel is the most challenging form of pottery making
Paper Patched Bullet Cartridges 101
 .45-70 Paper Patched Bullet Cartridges 101 The following is an introduction to building.45-70 paper patched bullet (PPB) cartridges, using real black powder and a bore riding PPB. This article is intended
Side Winder R o u t e r L i f t.
 Woodpeckers PRECISION WOODWORKING TOOLS Side Winder R o u t e r L i f t. INSTALLATION INSTRUCTIONS The wrench handle must be pointing left in order to fully insert or remove it. Lift Wrench Once fully
INSTALLATION GUIDE PREMIUM FRONT BUMPER. AEV30103AE Last Updated: 09/08/14 US PATENTS: D683281, D CHINESE PATENT: ZL
 PREMIUM FRONT BUMPER US PATENTS: D683281, D697842 CHINESE PATENT: ZL 2012 3 0026081.4 AEV30103AE Last Updated: 09/08/14 INSTALLATION GUIDE PLEASE READ BEFORE YOU START TO GUARANTEE A QUALITY INSTALLATION,
Assembly Instructions: Kit #5
 Assembly Instructions: Kit #5 1. Insert the T-pin into one of the caps. 2. Insert the rotor core into the same cap as shown below. Apply some pressure to push the rotor core approximately 1/2" (10-12 mm)
Tools: Sharpie, Square, Vise, Hack saw, Ruler, Punch, Hammer, File. 2. Cut the stock Place stock in vise and cut with hack saw
 Purpose: MAKE CATAPULT ARM Step 1 Tools: Sharpie, Square, Vise, Hack saw, Ruler, Punch, Hammer, File Materials: Flat aluminum ½ inch stock (see picture below) Gloves required 1. Pick up the aluminum ½
Rosalina Accessories Tutorial Version March 2011 Martyn
 Rosalina Accessories Tutorial Version 1.0 - March 2011 Martyn Star Brooch Feel free to experiment with these dimensions, you should make a template you are happy with, the method still works. 1) Creating
INSTALLATION INSTRUCTIONS
 Tools required for the installation. A. Core Drill 87mm Drill bit B. Tape measure C. Spirit Level D. Marking pen E. Caulking gun F. Cutting Pliers G. Cordless Drill and Philips head bit, 5mm Drill bit.
OTECO INC. MODEL ,000 PSI 4-1/16 PORT DM GATE VALVE MAINTENANCE MANUAL
 Page 1 of 7 OTECO INC. MODEL 45 4 5,000 PSI 4-1/16 PORT DM GATE VALVE MAINTENANCE MANUAL Page 2 of 7 TABLE OF CONTENTS 1. Assembly Blowout 2. Repair Kit Contents & Technical Specifications 3. Disassembly
TOYOTA MOTOR EUROPE CA Products Division Tel : Fax :
 TOYOTA MOTOR EUROPE CA Products Division Tel : + 32 2 745 26 77 Fax : + 33 2 745 26 99 Ordering part numbers Comments Part Numbers Wooden floor one hatch PZ449-D3C42-11 one hatch with carpet PZ449-D3C42-01
M14 MODULAR CHASSIS SYSTEM (MOD 1) INSTRUCTION MANUAL. West Springfield, MA Phone: (866) FAX: (413)
 INSTRUCTION MANUAL. West Springfield, MA Phone: (866) FAX: (413)") M14 MODULAR CHASSIS SYSTEM (MOD 1) INSTRUCTION MANUAL Troy Industries, Inc. WWW.TROYIND.COM West Springfield, MA 01089 Phone: (866) 788-6412 FAX: (413) 383-0339 Thank You M14/M1A MODULAR CHASSIS SYSTEM
M14 MODULAR CHASSIS SYSTEM (MOD 1) INSTRUCTION MANUAL Troy Industries, Inc. WWW.TROYIND.COM West Springfield, MA 01089 Phone: (866) 788-6412 FAX: (413) 383-0339 Thank You M14/M1A MODULAR CHASSIS SYSTEM
Tools for Plumbing. Introduction
 2 Tools for Plumbing Introduction So far, we have studied the importance of plumbing system, its stages and the role and responsibilities of a plumber. We will now look at the various tools that help a
JK Front Crusher Flares
 INSTALLATION INSTRUCTIONS INST-17-03-030_A JK Front Crusher Flares IMPORTANT: Thank you for purchasing this Poison Spyder product. Please read through this entire document before proceeding with installation.
PAT installation of a Sun Dome over a in-ground
 PAT. 3766573 Installation of Sun Domes for in-ground pool GENERAL INSTRUCTIONS: STEP 1. Read thru the entire instructional materials before beginning any installation. You will find that the installation
Pocket Door Kit PD1 / PD2 Installation Instructions. Kit Contents.
 Pocket Door Kit PD1 / PD2 Installation Instructions Kit Contents. 1, Create Rough Opening In Stud Wall Construct rough opening ensuring all sides are square and level. Rough opening should be; Height =
TOOL LIST FOR TAILGATE HIDDEN LATCH & LINK ASSY FOR FORD FLARESIDE TRUCKS
 TOOL LIST FOR TAILGATE HIDDEN LATCH & LINK ASSY FOR 53-87 FORD FLARESIDE TRUCKS Vise Grip Clamps C-clamps Sharpie Marker Ball Peen Hammer Center Punch 3/8 or 1/2 Drill 5/32, 7/32, 9/32, and 3/8 Drill Bits
M14 MODULAR CHASSIS SYSTEM (MOD 1) INSTRUCTION MANUAL. West Springfield, MA Phone: (866) FAX: (413)
 INSTRUCTION MANUAL. West Springfield, MA Phone: (866) FAX: (413)") M14 MODULAR CHASSIS SYSTEM (MOD 1) INSTRUCTION MANUAL Troy Industries, Inc. WWW.TROYIND.COM West Springfield, MA 01089 Phone: (866) 788-6412 FAX: (413) 383-0339 Thank You M14/M1A MODULAR CHASSIS SYSTEM
M14 MODULAR CHASSIS SYSTEM (MOD 1) INSTRUCTION MANUAL Troy Industries, Inc. WWW.TROYIND.COM West Springfield, MA 01089 Phone: (866) 788-6412 FAX: (413) 383-0339 Thank You M14/M1A MODULAR CHASSIS SYSTEM
Obtained from Omarshauntedtrail.com
 http://www.scary-terry.com/dancskele/dancskele.htm This is a how-to for making a set of dancing skeletons for your Halloween window display. It uses a pair of cheap, glow-in-the-dark plastic skeletons
Machining. Module 5: Lathe Setup and Operations. (Part 1) Curriculum Development Unit PREPARED BY. August 2013
 Curriculum Development Unit PREPARED BY. August 2013") Machining Module 5: Lathe Setup and Operations (Part 1) PREPARED BY Curriculum Development Unit August 2013 Applied Technology High Schools, 2013 Module 5: Lathe Setup and Operations (Part 1) Module Objectives
Machining Module 5: Lathe Setup and Operations (Part 1) PREPARED BY Curriculum Development Unit August 2013 Applied Technology High Schools, 2013 Module 5: Lathe Setup and Operations (Part 1) Module Objectives
Frameless Inline Door With Return QCI5263
 INSTALLATION INSTRUCTIONS Frameless Inline Door With Return QCI5263 WALL MOUNT HINGES FRAMELESS DOOR / PANEL / RETURN PANEL QCI5263 REV. 0 Page 1 Certified 06/17/2016 Parts List with wall mount hinges
METAL BENDER OPERATING & MAINTENANCE INSTRUCTIONS Model Nos: CCB1 & CCB2 Part Nos: & CCB2 CCB1
 METAL BENDER Model Nos: CCB1 & CCB2 Part Nos: 7630073 & 7630074 CCB2 CCB1 OPERATING & MAINTENANCE INSTRUCTIONS 1206 1 The Compact Bender allows you to economically make a variety of bends in flat, square,
Machine Your Fishing Reel
 Machine Your Fishing Reel You will be well prepared for the coming season if you start on this smooth-running job now. IF you're an enthusiastic fisherman and have a lathe in your workshop, we'll say no
tion and certain lever-action guns are generally sized in a small base sizing die to assure proper chambering. Be certain that dies are adjusted
 Load Development Brian Pearce Case Inspection, Preparation and Priming B efore proceeding with load development for any cartridge, it is imperative to properly prepare cases. Previously fired cases should
Installation Guide. Bi-fold Doors
 Installation Guide Bi-fold Doors Installation Guide Components box 1. 6. 2. 3. 7. 5. 4. 8. Contents 1. Fixing plugs 2. Wedge gasket 3. Bottom trolley 4. Top trolley 5. Magnetic keep (x 2 if door height
ASSIGNMENT 4. Textbook Assignment: The point, edge, face, heel, and tang are the five parts of which of the following tools?
 ASSIGNMENT 4 Textbook Assignment: "Files," "Grinders and Sharpening Stones," "Scrapers," "Awls," "Bolt and Cable Cutters," "Glass Cutters," "Knives,' 'Pipe Cutting and Threading Tools," "Tube Cutting and
MODEL T27697 & T " & 8" HELICAL CUTTERHEADS INSTALLATION INSTRUCTIONS
 MODEL T27697 & T27699 6" & 8" HELICAL CUTTERHEADS INSTALLATION INSTRUCTIONS For questions or help with this product contact Tech Support at (570) 546-9663 or techsupport@grizzly.com These indexable insert
RACER TECH COMMANDER HD TIE ROD INSTALLATION
 RACER TECH COMMANDER HD TIE ROD INSTALLATION NOTE: These instructions are a universal explanation of how to install our HD Tie Rods. All kits are identical for all inner joints and nearly identical for
MODEL T " SPIRAL CUTTERHEAD INSTALLATION INSTRUCTIONS
 MODEL T27449 8" SPIRAL CUTTERHEAD INSTALLATION INSTRUCTIONS The Model T27449 indexable insert spiral cutterhead is designed to replace the straightknife cutterhead on the Grizzly jointer Model G0490W/G0490XW
ELECTRIC TOOL CORPORATION
 Cat. No. -0 / Hex Demolition Hammer Cat. No. 0-0 Spline Rotary Hammer MILWAUKEE ELECTRIC TOOL CORPORATION W. LISBON ROAD BROOKFIELD, WISCONSIN 00-0 -9-00 d 000 -9-00 d SpecialTools Require Forcing discs
SUPERSEDED REVISION. Reasons for reissue of this instruction sheet are provided in Section 7, REVISION SUMMARY.
 PRO BEAM Jr. EB cable plug connectors are designed to be installed onto jacketed fiber optic cable with KEVLAR strength members. The connector must be assembled using a cable plug connector shell kit,
Build a Drill Press Vise
 Youth Explore Trades Skills Introduction This activity plan will develop the student s machining and metalworking skills as they fabricate a multi-piece steel vise. The project will encompass basic lathe
3M Impact Protection Profile Installation System Instructions
 3M Impact Protection Profile Installation System Instructions IMPORTANT: READ INSTRUCTIONS FOR USE BEFORE OPERATING Intended Use: The 3M Impact Protection Profile Installation System is for installing
Greenfaulds High School
 Greenfaulds High School Technical Department Standard Grade Craft & Design Knowledge & Understanding In Metal Page 1 Metals All metals in use today are either PURE METALS or ALLOYS. Copper, iron, tin,
Screws. Introduction. 1. Nuts, bolts and screws used to clamp things together. Screws are used for two purposes:
 Screws Introduction Screws are used for two purposes: 1. To clamp things together. 2. To control motion. 1. Nuts, bolts and screws used to clamp things together. Nuts, bolts and screws that are used for
How to install backchecks
 How to install backchecks Note: All pictures can be enlarged for better clarification. Revision 7 8/2009 Backchecks wear out in a piano much like brake pads in an automobile. While wear is a valid reason
Technicians of Terror. This is the air valve we make to use with our air
 These are pictures of our scissor prop. Technicians of Terror http://www.halloweenfear.com/scissorprop.html props. This is the air valve we make to use with our air This pictures the duel door closer cylinders
Lumber Smith. Assembly Manual. If you are having problems assembling the saw and need assistance, please contact us at:
 Lumber Smith Assembly Manual If you are having problems assembling the saw and need assistance, please contact us at: 804-577-7398 info@lumbersmith.com 1 Step 1 Safety Carefully read the Owners Manual.
Removing Right-Side. Components. Right-Side. Components. Click Here to Go Back AT THIS POINT
 Click Here to Go Back NOTE: There is an oil passage beneath the driven gear/drive gear assembly. This passage should be plugged prior to removing the driven gear and drive gear. Failure to do so could
Metal Shapers Forums and Tech Rodding Roundtable Home Forums Events Members Webring Tech Merchandise Contact Chat Services Links Want Ads Advertising
 Metal Shapers Forums and Tech Home Forums Members Webring Tech Contact Chat Services On the following pages your will find detailed instructions on the parts needed and assembly instructions for a 12"