Fix-R EPDM Installation Guide. Field Installation Guide
|
|
|
- Austen Pitts
- 5 years ago
- Views:
Transcription
1 Field Installation Guide 1
2 CONTENTS General Information & Precautions 3 Tools, Equipment & Roof Surface Preparation 4 Membrane Installation Installation of Fix-R EPDM roofing 5/6 Base Tie-in Detail 7/8 Bonding Adhesive 9 Pipes/Penetrations in membrane 10 Skylights, Chimneys 10 Perimeter Wall & Vertical Terminations 11 76mm Seam Tape mm PS Cover Strip mm PS Uncured Flashing 14 Pressure Sensitive Details T-Joint Cover Patch 15 Internal Corner Details 16 External Corner Details 17 Prefabricated Pipe Boot 18 Pipe & Penetration Flashing 19 Roof Outlets/Drains Anti-Back-up 68mm Outlet 20 Fix-R EPDM Top Drain Outlet 21 Angled Roof Drain Outlet 22 On-site Fabricated Outlet 23 EPDM to BUR Join 24 Perimeter Terminations Sure Edge PVC Gutter Trims 25/26 Sure Edge PVC Kerb Trims 27/28 2
3 GENERAL INFORMATION This Rooftop Guide has been designed to give the user a GENERAL overview of the application of a Fix-R EPDM roof. This Guide is intended as broad reference aid and is not intended or meant to be all-inclusive. It should be used in conjunction with Fix-R EPDM CAD details. PRECAUTIONS If the bonding adhesive is not allowed to properly dry, gas bubbles or blisters may form under the membrane sheet. These bubbles or blisters may subside over time. Due to solvent flash off, condensation may form on freshly applied adhesive when the ambient temperature is near the dew point. If condensation develops, possible surface contamination may occur and the application of adhesive must be discontinued. Allow the surface to dry and when conditions allow apply a thin refresher coat at a coverage rate that is approximately half of the normal coverage rate when re-adhering a previously coated surface. Extreme care must be exercised when working on ladders, roofs, or at elevations above ground. If used as an emergency repair to a roofing system, contact the roofing system manufacturer for compatibility and to ensure compliance with terms and limitations of the warranty. Surface can be slippery when wet, damp, or frost covered. Do not stretch the product during installation. Do not expose product to temperatures in excess of 82 C (180 F). This product is not intended for use where roof top traffic or activity is anticipated without a protective layer installed on its surface. THIS INFORMATION AS WELL AS INFORMATION CONTAINED IN THE MATERIAL SAFETY DATA SHEET AND ON PRODUCT PACKAGING MUST BE REVIEWED PRIOR TO STORAGE, HANDLING OR USE OF THESE PRODUCTS. 3
4 TOOLS & EQUIPMENT 50mm hand roller Hammer Hook blade knife/scissors Pencils/Chalk Line 228mm medium nap roller on pole Chalk line Safety glasses Tape Measure 50-76mm brushes Stirrers for adhesive and primer Solvent resistant gloves Soft bristle broom Caulk gun Scrubbing pads for EPDM primer ROOF SURFACE PREPARATION The Fix-R EPDM fully-adhered system will adhere to wood, wood fibreboard and lightweight concrete. This product may NOT be applied to polystyrene insulation. Fix-R EPDM WBA Adhesive is intended for bonding to timber surfaces only. Other surfaces must be bonded with Fix-R EPDM Bonding Adhesive. Roofs over 100m² must also be installed with Bonding Adhesive. Ensure the roof surface is clean, free of dust, dirt, rust, oil, grease, and loose material. The roof surface must be dry. This product will not adhere to wet or damp surfaces. Trapped moisture may vaporise and negatively affect the performance of this product. Good roofing practice dictates that ponding water be avoided. The roof surface should have a positive slope of at least 1 in 80 to prevent ponding water conditions. Before starting please consult the Precautions section at the beginning of this manual. 4

5 INSTALLATION OF FIX-R EPDM ROOFING Unroll Fix-R EPDM membrane over the substrate so that the sheet is in the desired position and is wrinkle free. Fix-R EPDM WBA Adhesive is intended for bonding to timber surfaces only. Other suitable surfaces must be bonded with Fix-R EPDM Bonding Adhesive. Roofs over 100m² must be installed with Bonding Adhesive. It is essential for Fix-R EPDM membrane is allowed to relax prior to adhering. The time required for this will vary depending on weather conditions. Cut the membrane to length if required, and position the sheet to achieve an overhang off the roof of at least 76mm (3 ) for both the length and width. RUSS (Reinforced Universal Secure Strip) should be installed wherever the membrane turns up through an angle change. Fold the sheet back to expose one-half of the deck; take care to avoid wrinkles. 5

6 Open and thoroughly stir the Fix-R EPDM WBA Adhesive or Bonding Adhesive. Using a medium nap paint roller apply the adhesive to the substrate. If using Bonding adhesive, the rear of the membrane must also be coated. Adhesive must be applied to 100% of the surface in an even coat without globs or puddles. WBA adhesive can alternatively be applied in a thin coat to both the membrane and substrate. Roll the sheet onto the coated substrate avoiding wrinkles by rolling the middle of the sheet first. Immediately after rolling the sheet into the adhesive, broom or roll the membrane sheet to achieve maximum contact. DO NOT apply excessive pressure to cause the membrane to wrinkle. Repeat the application of Fix-R EPDM WBA adhesive for the other half of the Fix-R EPDM membrane. NOTE: DO NOT APPLY WBA or BONDING ADHESIVE TO ANY SEAM AREAS. 6

7 BASE TIE-INS In common with most single ply material EPDM will, overtime, try to shrink by up to 10%. Base tie-in s control membrane movement and stop membranes pulling away from perimeters and angle changes. Further movement is accommodated by membrane flexibility. Fix-R EPDM PS RUSS (Reinforced Universal Secure Strip) is used to mechanically secure EPDM membranes to the substrate. 152mm RUSS has cured EPDM splice tape adhesive laminated along one edge. It can be installed to horizontal or vertical surfaces in conjunction with Seam Fastening Plates. Seam Fastening Plates are used with RUSS to securely clamp it to the surface at 300mm centres; these must be used in conjunction with the appropriate fasteners for the substrate. Fix-R EPDM should be mechanically secured wherever an inside angle of greater than 15 occurs. RUSS can be used to achieve this. All unreinforced EPDM s and most other single ply membranes produced, regardless of manufacturer, require mechanical securement to eliminate shrinkage and to install in accordance with manufacturers specifications. This is standard practice. 7


 Once secured to the RUSS finish the upstand by using Bonding Adhesive")
8 1) Mechanically fasten RUSS to decking or vertical upstand at 300mm centres. The PS section must face main field area. 2) Apply Fix-R EPDM Primer to target area on the underside of the EPDM membrane that will come into contact with the 76mm PS tape on the RUSS. 3) Once the primer is dry remove the protective strip from the PS tape on the RUSS. Guide primed membrane onto the PS tape. Avoid wrinkles or air pockets. Smooth by hand then roll with hand roller. 4) Once secured to the RUSS finish the upstand by using Bonding Adhesive to the remainder of RUSS, upstand and membrane. 8

 Apply Bonding Adhesive to both substrate and reverse of the Fix-R EPDM membrane.")

9 BONDING ADHESIVE Fix-R EPDM Bonding adhesive is used on all surfaces on the roof area greater than 15, e.g. wall upstands, batten and sky light edges. This adhesive will work on porous and non-porous surfaces, providing they are clean and dry. The Bonding Adhesive will enable tight angles to be formed quickly and easily. 1) Apply Bonding Adhesive to both substrate and reverse of the Fix-R EPDM membrane. 2) Once the adhesive has become touch dry with no wet puddles, mate the two surfaces together. Leave no voids between the Fix-R EPDM membrane and the receiving surface. 3) Applying positive pressure to the membrane work the membrane up the upstand to the desired height. These areas should be rolled to achieve a strong bond between membrane and substrate. 9
10 PIPES/PENETRATIONS IN MEMBRANE When laying out the field sheets and a pipe or penetration is encountered, roll the folded membrane to the pipe. Be sure to maintain the proper alignment of the sheet with the roof edge, wall, and seams. Make a straight cut from the pipe to the nearest edge of the field sheet. Cut a hole to match the diameter of the pipe and roll the field sheet around the pipe. Check the final position off the sheet. Fold the membrane back and begin the bonding procedure. Once the field sheet has been glued and broomed into place, apply a Fix-R EPDM 152mm (6 ) wide Semi-cured Cover Strip over the entire cut in the field sheet from the pipe to the outside edge of the sheet. See the Prefabricated Pipe Boot section of this manual for further information on finishing this detail. SKYLIGHTS & CHIMNEY Prior to applying the adhesive, and while maintaining proper sheet alignment with walls, perimeter edges and other protrusions, unroll the membrane up to the base of the unit. Measure the width and depth of the unit and transfer the corresponding dimensions onto the folded membrane. Draw an X inside the box. Cut the X mark and from one corner cut a straight line to the nearest edge of the membrane. Roll the membrane around the unit, leaving a triangle of membrane turning up each one of the four (4) sides. After all cuts are made and the membrane has been correctly positioned, fold the membrane back and begin bonding procedures. After the field area is complete, bond the triangles up the sides of the unit (chimney, skylight, etc.). Take care to bond the membrane into the angle change so that the membrane is completely adhered. After the field sheet has been glued and broomed into place, apply a Fix-R EPDM 152mm (6 ) Cover strip over the entire cut in the field sheet from the curb to the end of the sheet. 10


11 PERIMETER WALLS It is possible to seal abutments using a continuous sheet of membrane from the field area, provided mechanical securement is used. The membrane must extend up the wall a minimum of 150mm and an appropriate termination used. VERTICAL TERMINATION Wall Trim After the desired flashing height is attained and the membrane has been adhered. Insert the trim into the previously cut chase and mechanically fix into place using RB fasteners at a max spacing of 500mm. Apply a bead of Lap Sealant along the top of the trim and wall. Coping Stone Lay Fix-R EPDM across the wall. Use Bonding adhesive and apply a bead of water cut off mastic under the outside edge of membrane and compress. Apply an even bed of mortar over the membrane. Lay suitable coping stones ensuring they have sufficient over hang and drip channels. 11
 Fold the top sheet back to expose the seam area. Using a scrubbing pad apply the Fix-R EPDM Primer to the seam area. Apply the primer past the seam edge to the line.")
 Using moderate pressure set the Seam Tape into place to keep air from being trapped under the tape.")
 Lay the top membrane onto the Seam Tape.")
12 SEAMS 76mm PS TAPE The membrane should be positioned so that the width of the seam is 76mm (3 ). Mark a line 5mm (1/4 ) from the leading seam edge. 1) Fold the top sheet back to expose the seam area. Using a scrubbing pad apply the Fix-R EPDM Primer to the seam area. Apply the primer past the seam edge to the line. Fix-R EPDM Primer must be dry before application of PS tapes. NOTE: If the EPDM membrane is contaminated with dirt, etc., clean the seam area. 2) Using moderate pressure set the Seam Tape into place to keep air from being trapped under the tape. Unroll the 76mm PS Tape along the length of the seam, aligning the tape (not the clear backing) along the chalk line. Care must be taken not to get any bubbles or wrinkles in the tape. 3) Lay the top membrane onto the Seam Tape. Pull away the clear backing from the tape at 45 degrees to the seam. While removing the poly backing, apply pressure across the seam, from the back to the leading edge. Roll the seam at right angles to the seam direction, & along it. 12
 Ensure there is no gap between the membrane when butt jointing.")
 Apply Fix-R EPDM Primer to the area to be seamed.")
 Once the Fix-R EPDM Primer has dried, peel back 150mm of the poly backing and press the PS tape into")

13 152mm PS COVER STRIP When butt jointing of Fix-R EPDM membrane or seaming to a metal drip or similar a 152mm cover strip is used. 1) Ensure there is no gap between the membrane when butt jointing. The 152mm tape should be centrally located over the joint. 2) Apply Fix-R EPDM Primer to the area to be seamed. Apply primer mm either side of the join of the EPDM sheets. 3) Once the Fix-R EPDM Primer has dried, peel back 150mm of the poly backing and press the PS tape into the primed area. Once the tape is held in position, peel back the poly backing and smooth the tape into the primed area. Progress along the seam. 4) Once the entire length of tape is applied to the seam, roll across the 152mm tape with hand roller. Where 152mm tapes intersect other tapes, 228mm PS Uncured Flashing cover patches must be applied. 13
14 228mm PS UNCURED FLASHING This tape is used for any detail work necessary on the roof. It has the ability to mould to almost any shape and will adhere to most surfaces, provided the surface is clean, dry, and correctly primed with the HP250 primer. To seal pipes, penetrations, corners and other details. Adaptable to irregular shapes and surfaces. Self-curing membrane. IF 228mm PS UNCURED FLASHING MAY BE SUBJECTED TO SUBMERSION OR HIGH FLOW OF WATER, ALL EDGES SHOULD BE PROTECTED WITH CARLISLE LAP SEALANT. LAP SEALANT HELPS TO KEEP WATER FROM INFILTRATING BETWEEN THE FLASHING PLY AND THE TAPE PLY BEFORE THE FLASHING HAS FULLY CURED ON THE ROOF. Typical details are shown on the following pages. 14
15 T-JOINTS A T-Joint is formed when two sheets of membrane form a seam that travels under, or over, a third section. The centre of the T is where the three sheets intersect. Use Fix-R EPDM Uncured Flashing to form T-Joint patches. T-Joint patches should be at least 152mm (6 ) x 152mm (6 ). Apply primer to membrane surface before applying T-Joint patches. NOTE: All T-Joint Patches should be thoroughly rolled with a steel or silicone hand roller. 15


, press the flap back to the upstand and")
16 INTERNAL CORNER 1) Form excess membrane into neat flap. Cut back to leave a 76mm wide flap. Apply Fix-R EPDM Primer to the front & back of the flap and to the membrane on the wall. Fix-R EPDM Primer must be allowed to dry before application of PS tape. 2) Cut an appropriate size piece of 228mm PS Uncured Flashing (min. 50mm wider than the flap of membrane), press the flap back to the upstand and install the uncured flashing tape. 3) Roll the taped area with hand roller once installed. 16


17 EXTERNAL CORNERS 1) Cut the Fix-R EPDM membrane at 45 to allow the membrane to run around the corner and create both upstands. Bond in place with Fix-R EPDM Bonding Adhesive. Cut a section of 228mm PS Uncured Flashing to a min. 76mm onto deck and 50mm past angled cut in membrane. 2) Apply Fix-R EPDM Primer to the marked area to be taped and allow to dry. The area must be clean and dry before application of primer, apply primer to membrane and to upstand substrate. Fix-R EPDM Primer must be allowed to dry before application of tapes. 3) Start installing the tape from the top point. Work the tape down upstands first and into the bottom angle change. 4) Work the tape onto the deck around the corner and smooth out and roll the entire flashing with hand roller. 17


18 PRE FABRICATED PIPE BOOT 1) Cut the Fix-R EPDM PS Pipe Seal above the raised rib one size smaller than the pipe diameter. DO NOT CUT THROUGH THE RIB. Pull pipe seal over pipe until base flange is in contact with the Fix-R EPDM membrane. 2) Once in position clamp the seal to the pipe with the supplied metal clamp and mark around the base of the seal to give a line to prime up to. Pull pipe seal upwards on pipe to expose the membrane and apply Fix-R EPDM Primer to the EPDM deck membrane. 3) Pull pipe seal back down over pipe and into position. Remove poly backing from the tape and with hand pressure press tape onto primed area. Roll splice area with a hand roller Apply Fix-R EPDM uncured T-Joint Patches where pipe seal intersects a field splice. NOTE: Temperature of the pipe must not exceed 82 C (180 F) 18

19 PIPE AND PENETRATION FLASHINGS To fabricate a pipe boot or flashing for other penetrations follow the procedures below using Fix-R 228mm PS Uncured Flashing. 19


 Apply the 228mm PS Uncured Flashing to the primed area.")
20 INTERNAL DRAIN There are two basic methods for sealing to an internal drain. Fix-R EPDM Premade outlets of various types can be used for standard outlets or an on-site method may be used for non-standard outlets. ANTI-BACKUP DRAIN FOR 68MM OUTLET These are 68mm roof outlets designed to be inserted into a standard rainwater down pipe. The outlet is fitted with a seal to achieve a watertight join. The outlet is sealed to the membrane using 228mm PS Uncured Flashing. A Leaf grate for this outlet is also available. 1) Cut the outlet flange back to leave a min. 50mm to deck. Cut the membrane back to meet the perimeter of the outlet head. Secure the outlet to the decking and apply Fix-R EPDM Primer to the head of the outlet and to the EPDM membrane. 2) Apply the 228mm PS Uncured Flashing to the primed area. Once fitted cut a small section from the centre of the tape out to expose the outlet opening and press the remaining tape down into the outlet. Roll the entire flashing with a 50mm hand roller. 3) Finally install the leaf grate to complete the outlet. 20
 Fit the outlet into the roof before installing the membrane; ensure the outlet has the")

 Remove the circular section of membrane and the yellow protective cap from the outlet.")

21 Fix-R EPDM TOP DRAIN 110mm flat roof outlets allow high water flow where required. 1) Fit the outlet into the roof before installing the membrane; ensure the outlet has the yellow protective cap installed. Install the Fix-R EPDM membrane to the roof and over the outlet. Place cutting guide over the pin and cut round the circular plate. 2) Remove the circular section of membrane and the yellow protective cap from the outlet. 3) Insert a bead of Fix-R EPDM Water Cut Off mastic between the underside of the membrane and the top flange on the outlet. Screw in the clamping ring till it s completely tightened. Use the two tightening lugs to apply leverage to the ring. 4) Install the leaf grate into the three locating tabs. 21


22 ANGLED ROOF DRAIN For roofs designed with horizontal drains to go through walls and pitched roofs. The Fix-R EPDM Angled Roof Drain is fitted to the deck and sealed to the membrane using 228mm PS Uncured Flashing. 1) Install outlet into parapet wall before installing EPDM membrane. Install Fix-R EPDM membrane over the outlet with Fix-R EPDM Bonding Adhesive. Cut the membrane away from outlet opening by 25mm. Apply Fix-R EPDM Primer to the membrane, outlet face and into the outlet pipe. 2) Install 228mm PS Uncured Flashing to the outlet. This should be large enough to join onto the membrane by a minimum of 50mm. Cut a 30mm diameter circle from the middle of the tape. Mould the tape into the outlet pipe. Cut a second section of Uncured Flashing 100mm wide. Prime pipe and apply this to outlet. 3) Once the second section of tape is installed, complete by inserting the leaf grate into the outlet. 22
23 FOR NON-STANDARD OUTLET DESIGN This method uses just the 228mm PS Uncured Flashing to seal the membrane to the outlet pipe. 23
24 EPDM to BUR JOIN There are two alternate methods to be used when the new Fix-R EPDM roof joins directly onto a neighbouring flat roof. The diagram below shows a cold termination and simple guidelines to follow in the planning stage of the roof. 24

25 EDGE TERMINATIONS Sure Edge PVC Perimeter Trims Offering a fast simple, good looking finish to the flat roof system. See more at Gutter System This is available in two options, standard and built in batten back plate. The standard requires a timber batten to be installed first then the back plate fixed to it. The Built in Batten doesn t require the extra timber batten. Fix the 25mm x 40mm back plate to the fascia at the edge of the roof. Allow minimum 50mm Fix-R EPDM membrane over the back plate. Position the front plate with foam seal to clamp the membrane between the 2 sections and fully fix into place with supplied fixings. Between lengths allow 2.5mm expansion joint for each trim. Note: In areas of high wind, exposed areas and high buildings additional fixings between predrilled holes is recommended. 25


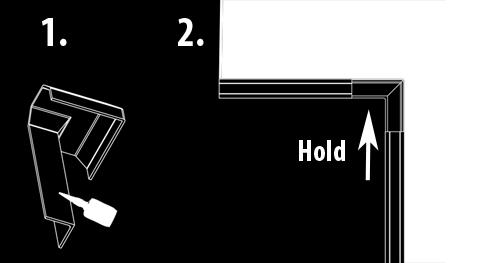
26 Gutter Trim Joiner Install joint covers by hooking the joiner under the bottom the front plate and clipping the top over. Gutter Corners External Apply the adhesive to one side of the corner Push down into position and hold till adhesive is set. Internal Apply the adhesive to one side of the corner Push down into position and hold till adhesive is set. 26

27 Sure Edge Check Kerb System Used to create upstand and edge trim in one component. Lay membrane and allow minimum 50mm overhang. Ensure membrane is clean, position edge trim and firmly push down to compress foam seal by min. 30% & max. 50%. Fix trim into place using supplied fixings. Between lengths allow 2.5mm expansion joint for each trim. Note: If a secure fixing cannot be achieved a timber fixer should be fitted to the vertical edge of the roof. In areas of high wind, exposed areas and high buildings additional fixings between predrilled holes is recommended. Kerb Joiner Install joint covers by hooking the joiner under the front plate and clipping the top over. 27


28 Internal Corner Mitre the trims so they fit together with foam seal compressing between the two trim ends. Apply adhesive to one side of the corner. Fit over trims and hold in place till set. External Corner / Stop End This universal corners is designed for both external check corners and stop end for gutter. External Corner Mitre the trims so they fit together with foam seal compressing between the two trim ends. Remove the two blanking plates. Apply adhesive to one side of the corner. Fit over trims and hold in place till set. Stop End Remove one blanking plate for the relevant side. Apply adhesive to one side of the corner. Fit over trims and hold in place till set. 28
29 Disclaimer All the information in this product sheet is based on practical experience and is published in good faith. However, because we have no control over the manner or conditions in which our products are used, or over work undertaken or end product manufactured by the purchaser, we cannot accept liability for results. Responsibility for ascertaining the suitability of products for their purposes rests with the purchaser. All conditions, representations, statements, warranties or guarantees whatsoever, whether express, implied or statutory, in respect of any goods manufactured, sold or supplied by us are hereby expressly excluded and we accept no liability in respect of any claim for damage or consequential loss caused to any property arising directly or indirectly out of the use of our products or goods. FIX-R, Harding Way, St Ives, Cambridgeshire, PE27 3YJ Tel: Fax:
ClassicBond Installation Guide. Field Installation Guide
 Field Installation Guide 1 CONTENTS General Information & Precautions 3 Tools, Equipment & Roof Surface Preparation 4 Membrane Installation Installation of ClassicBond roofing 5 & 6 Base Tie-in Detail
ClassicBond Installation Guide. Field Installation Guide
 Field Installation Guide 1 CONTENTS General Information & Precautions 3 Tools, Equipment & Roof Surface Preparation 4 Membrane Installation Installation of ClassicBond roofing 5 & 6 Base Tie-in Detail
A. Provide a comprehensive guide to the products that are used when flashing, what they are used for, and the proper way to use them.
 EPDM FLASHINGS & ADHESIVES GUIDE PART 1 - GENERAL Revised March 2017 1.01. Introduction 1.02. Scope: A. While many roofing projects are likely to have their special problems, the contractor is certain
RPI ROYAL EDGE EPDM MATERIAL GLOSSARY & GUIDE
 RPI ROYAL EDGE EPDM MATERIAL GLOSSARY & GUIDE WHITE EPDM MEMBRANE TPO MEMBRANE WHITE EPDM MEMBRANE TPO MEMBRANE Multi-System Products: W TPO Cured field membrane used for waterproofing sidewalls, flat
3.4 Wall Flashing Wall Flashing General
 3.4 Wall Flashing 3.4.1 Wall Flashing General The wall flashing details are in line with the two methods of base tie-in, previously described. Either the field membrane has to be spliced onto the QuickSeam
ARDEX Butynol. Installation Instructions. For installation of ARDEX Butynol and Butyseal
 Instructions For installation of ARDEX Butynol and Butyseal ARDEX Australia Pty Ltd 20 Powers Road Seven Hills NSW 2147 Phone: 1300 788 780 Fax: 1300 780 102 Email: technicalservices@ardexaustralia.com
AQUAGARD EPDM FLAT ROOFING SYSTEMS INSTALLATION GUIDE THE MECHANICALLY FIXED SYSTEM
 AQUAGARD EPDM FLAT ROOFING SYSTEMS INSTALLATION GUIDE THE MECHANICALLY FIXED SYSTEM The following guide covers the technique for the Mechanically Fixed System. This system is best employed when an overlay
The Firestone QuickSeam Reinforced Perimeter Fastening Strip needs to be installed with appropriate fasteners at maximum centres of 300 mm.
 3.3 Base Tie-in 3.3.1 Base Tie-in General In order to account for structural movement of the substrate, stresses inherent in the handling and production of elastomeric sheets and thermal variations, the
Three layer Felt Roofing using cold applied adhesive
 Three layer Felt Roofing using cold applied adhesive Useful tips - Skill level - Safety - Felt Roofing Materials - Tools and Equipment Laying a felt roof is within the capabilities of most diy people providing
Dura-Lock Roof System
 DLR-14 Dura-Lock Roof System Assembly and Installation Instructions Read the instructions before starting the job. They explain the steps required to produce a finished product that will meet factory specifications.
EPDM RESIDENTIAL INSTALLATION HANDBOOK. EPDM Membrane Low-Slope Roofing System For projects under 1000 sq. ft.
 EPDM RESIDENTIAL INSTALLATION HANDBOOK EPDM Membrane Low-Slope Roofing System For projects under 1000 sq. ft. Now that you ve selected one of the best Low-Slope Roofing Systems available today, please
Installation Guidelines. Next Dimension. Single Hung / Single Hung Fixed / Double Hung / Sliding Window / Fixed Window
 Installation Guidelines Next Dimension Single Hung / Single Hung Fixed / Double Hung / Sliding Window / Fixed Window Windsor Windows & Doors Windsor Windows & Doors 900 S. 19 th St. 2210 Stafford St. Extn
TYPAR WEATHER PROTECTION SYSTEM TABLE OF CONTENTS. SPECIAL INSTALLATION CONSIDERATIONS Stucco** Brick** Stone Veneer** Wood Siding**
 TYPAR WEATHER PROTECTION SYSTEM INSTALLATION GUIDE TABLE OF CONTENTS Table of Contents...01 Special Installation Considerations...01 Code Requirements...02 Approvals and Reports...02 Recommended Materials...02
CONSERVATORY ROOF INSTALLATION GUIDE Issue
 CONSERVATORY ROOF INSTALLATION GUIDE Issue 3 CONTENTS 1. Statements 2. General assemblies 3. Victorian / Edwardian roof installation 4. Jack rafter installation 5. P-shaped roof installation 6. Lean-to
window installation Guide wood FRaMinG New Construction
 window installation Guide wood FRaMinG New Construction IMPORTANT NOTICES AND INFORMATION Read these instructions in their entirety prior to installing windows. Any local building code requirements supersede
TABLE OF CONTENTS A-1
 TABLE OF CONTENTS PAGE NUMBER: DETAIL DESCRIPTION A-1...TABLE OF CONTENTS A-2...GENERAL NOTES B-1...GENERAL INFORMATION C-1...EAVE DRIP DETAIL C-2...EAVE DRIP with GUTTER DETAIL C-3 & C-4...FIXED RIDGE
Tuff-Rib Install Guide
 Install Guide bestbuymetalroof.com Page 2 of 27 Page 3 of 27 1. Page 4 2. a. Installation Guide b. Panel Squaring Pages 5, 6 Pages 7, 8 3. Pages 9, 10 4. a. Fascia (optional) b. Eave / 1.5x3.5 Angle c.
Eurocell conservatory roof system. Installation manual Issue 3
 Eurocell conservatory roof system Installation manual Contents Statement General Assemblies Cross Sections Victorian/ Edwardian Roof Installation Jack Rafter Installation P Shape Roof Installation 15-45
Read guide from beginning to end before starting installation. Read all warnings and cautions during unit installation.
 Installation Guide for E-Series/Eagle High-Performance Mullion Windows with LVL Reinforcement and Installed Using Type B Clips Thank you for choosing Andersen. Instructions are for typical, new wood-framed
COMPOSITE SIDING INSTALLATION GUIDE
 CENTURY HOME LIVING COMPOSITE SIDING INSTALLATION GUIDE Read all instructions prior to installing any siding product. Failure to install and finish this product in accordance with all local building codes,
DESIGNER SERIES GUTTER SYSTEM INSTALLATION INSTRUCTIONS
 DESIGNER SERIES GUTTER SYSTEM INSTALLATION INSTRUCTIONS GENERAL DESCRIPTION: The Designer Series Gutter System is a specially designed roof edge drainage product for industrial, commercial, and high end
Aluminum Clad Wood Window 1/2 Reinforced Field Mulling and Stacking Supplement
 Aluminum Clad Wood Window 1/2 Reinforced Field Mulling and Stacking Supplement 1 Aluminum Clad Wood Window 1/2 Reinforced Field Mulling and Stacking Supplement The following instructions are a supplement
Installation Guidelines For Quaker Window Products Aluminum flange fin sub sill & receptor system using a T mulled twin window unit.
 Installation Guidelines For Quaker Window Products Aluminum flange fin sub sill & receptor system using a T mulled twin window unit. Installer: Read these instructions completely before starting any installation.
Handrail H Series. Product Installation. Instructions. Installation Instructions For. Wall Mounted and Freestanding Round Handrails
 Product Installation Installation Instructions For Instructions Handrail H Series Installation Instructions for Wall Mounted and Freestanding Round Handrails Step Nosing F Series Concrete and Timber Step
Eagle clad double-hung window installation instructions
 Eagle clad double-hung window installation instructions These instructions are for typical installation in new typical wood frame wall construction. These instructions and methods are not intended for
Installation Guidelines For ALUMINUM M-SERIES 3 PANEL SLIDING DOOR
 www.quakerwindows.comv www.quakercommercialwindows.com PO Box 128 504 Highway 63 South Freeburg, MO 65035 800-347-0438 573-469-4151 (fax) Installation Guidelines For ALUMINUM M-SERIES 3 PANEL SLIDING DOOR
Installation Guide. for E-Series/Eagle Clad Hinged Inswing French Door
 Installation Guide for E-Series/Eagle Clad Hinged Inswing French Door Thank you for choosing Andersen. Instructions are for typical, new wood-framed wall construction with weather protection in place.
Tools required by installer: Materials required by installer:
 Installation Guidelines For Quaker Window Products Vinyl product line (Single Hung, Double Hung, Sliding Window, Fixed Window, Casement, Awning, and Hopper) Installer: Read these instructions completely
VERTICAL STILE ABOVE HORIZONTAL TRIM VERTICAL STILE BELOW COVE BASE ADHESIVE. 1" [25.4mm] BASE DETAIL
![VERTICAL STILE ABOVE HORIZONTAL TRIM VERTICAL STILE BELOW COVE BASE ADHESIVE. 1 [25.4mm] BASE DETAIL](/thumbs/87/96020661.jpg "VERTICAL STILE ABOVE HORIZONTAL TRIM VERTICAL STILE BELOW COVE BASE ADHESIVE. 1 [25.4mm] BASE DETAIL") Please Read All sheet will be provided in stock sizes for field cutting. All trims will be provided in 8-0 stock lengths for field cutting. CEILING TRIM 1" [25.4mm] Acrovyn Interiors vinyl acrylic wall
Please Read All sheet will be provided in stock sizes for field cutting. All trims will be provided in 8-0 stock lengths for field cutting. CEILING TRIM 1" [25.4mm] Acrovyn Interiors vinyl acrylic wall
Ekoroof LiteTile Dimensions
 Ekoroof LiteTile Dimensions 7 3 3.5 Height 40 Width 20 Length Weight per Panel: 3 kg / 6.61 lbs 2 2 Area per panel 800 in / 5.55 ft 2 Panels per Square: 20 (including overlap, for a 100 ft covered area)
Skypod. Pitched PVC-U skylights. Installation guide PITCHED PVC-U SKYLIGHTS ISSUE 1
 Skypod Pitched PVC-U skylights PITCHED PVC-U SKYLIGHTS Installation guide ISSUE 1 Skypod pitched PVC-U skylights Installation guide Contents 1. Surveying 3 2. Installation 4 3. Additional information 10
eco-shake INSTALLATION INSTRUCTION
 1 eco-shake INSTALLATION INSTRUCTION NOTE: Shuffling the eco-shakes during installation may be necessary to obtain a uniform color throughout the roof. Due to the natural wood content in the ecoshakes,
SANERI 3 º. Self-adhesive SBS-elastomer bitumen cap sheet
 SANERI 3 º Self-adhesive SBS-elastomer bitumen cap sheet 0809 www.katepal.fi 06 EN 13707 Producer: KATEPAL OY P. O. Box 33 FI-37501 LEMPÄÄLÄ FINLAND Tel. +358 (0)3 375 9111 Fax +358 (0)3 375 0974 E-mail:
ForceField Air & Water Barrier System. installation instructions
 ForceField Air & Water Barrier System installation instructions Protection and Performance inside and out The ForceField air and water barrier system consists of engineered wood sheathing panels laminated
Flashing Materials. Rough Opening Preparation
 Installation Instructions for CertainTeed New Construction Windows Handling vinyl windows CAUTION: Always store vinyl windows and doors in an upright position on a slight angle. Never lay them flat or
Roll Out Vinyl Installation Guide
 Sub-floor Requirements The contractor performing the installation of the performance vinyl flooring must ensure the proper quality of the sub-floor. The sub-floor must be clean, smooth, permanently dry,
REDLAND DRY VALLEY. Installation Instructions for Redland Dry Valley. Version: 6. Date: May Redland Technical Solutions
 REDLAND DRY VALLEY Installation Instructions for Redland Dry Valley Version: 6 Date: May 2013 Author: Department: Redland Technical Solutions Redland Technical Solutions 1 Introduction 1.1 TECHNICAL DATA
COMPONENTS OF THE CLICKFAST FASCIA AND GUTTER SYSTEM 5: INTERNAL MITRE
 INTRODUCING THE CLICKFAST FASCIA AND GUTTER SYSTEM The Clickfast Fascia and Gutter System was originally designed by Stratco and has proven to be the most successful fascia and gutter system in Australia
Steel Roofing & Siding INSTALLATION GUIDE
 Steel Roofing & Siding INSTALLATION GUIDE Your Authorized Dealer is: WASHINGTON Auburn (800) 700-7228 WASHINGTON Spokane (866) 321-5954 www.nuraymetals.com CALIFORNIA Redlands (800) 806-8729 CONTENTS BEFORE
ROOFING APPLICATION STANDARD (RAS) No. 115 STANDARD PROCEDURES FOR ASPHALTIC SHINGLE INSTALLATION
 No. 115 STANDARD PROCEDURES FOR ASPHALTIC SHINGLE INSTALLATION") ROOFING APPLICATION STANDARD (RAS) No. 115 STANDARD PROCEDURES FOR ASPHALTIC SHINGLE INSTALLATION 1. Scope 4. Underlayment 2. 1.1 This roofing application standard has been developed to provide a responsive
ROOFING APPLICATION STANDARD (RAS) No. 115 STANDARD PROCEDURES FOR ASPHALTIC SHINGLE INSTALLATION 1. Scope 4. Underlayment 2. 1.1 This roofing application standard has been developed to provide a responsive
Series Sloped glazed Curtain wall. Installation Instructions
 Series 5600 Sloped glazed Curtain wall Installation Instructions Part NO. Y308 February 2013 SECTION TABLE OF CONTENTS PAGE I. General Notes & Guidelines. 3-4 II. Gutter and Mullion Assembly.. 5 III. End
 TremLock T-138 INSTALLATION MANUAL T-138 www.tremcoroofing.com 3735 Green Road Beachwood, Ohio 44122 1.800.852.6013 50 Beth Nealson Drive Toronto, Ontario M4H 1M6 1.800.668.9879 7241 6/8/18 TABLE OF CONTENTS
3M Air and Vapour Barrier 3015 Technical guide
 3M Air and Vapour Barrier 3015 Technical guide Product overview Typical physical properties For installation ease and flexibility, 3M Air and Vapour Barrier 3015 High performance 3M acrylic adhesive grabs
Installation Guide. Pionite Decorative Surfaces One Pionite Road, Auburn, Maine PIONITE ( )
") Installation Guide A Subsidiary of Panolam Surface Systems SMPBRO00-012 6/14 Pionite decorative laminates are designed for finished interior surfaces which require high impact, wear and stain resistance
Installation Guide A Subsidiary of Panolam Surface Systems SMPBRO00-012 6/14 Pionite decorative laminates are designed for finished interior surfaces which require high impact, wear and stain resistance
Fibre Cement G C. Batten Fixing Setout ST-01. Jan 2014 A4 PROFILE DATE SCALE DETAIL DETAIL NO. Plank joint. 600mm stud crs.
 Plank joint 600mm stud crs 600mm 600mm 600mm Horizontal Structural Timber Cavity atten 50x20mm H3.1 atten fixing points 800mm 800mm 300mm 800mm Max. Nog spacing 50mm All intermediate battens to be 50x20mm
THE B6 HEEL BEAD SEAL SECURITY GLAZING SYSTEM
 THE B6 GLAZING SYSTEM GLAZING SYSTEMS FOR JUNE 2009 THE B6 HEEL BEAD SEAL SECURITY GLAZING SYSTEM Page 1 DESCRIPTION The B6 Heel Bead Seal Security Glazing System is suitable for installing all types of
for Rigid Sun Lite Planning the layout
 for Rigid Sun Lite These instructions refer to installations on a flat and pitched roof. Various roof flashing units are available according to the particular roof covering. The roof flashing will be boxed
installation guide Villa
 installation guide Villa Table of Contents Introduction............................. 2 Safety................................... 2 Tools.................................... 2 Codes & Requirements....................
Wallgard 1,3 product
 INSTALLATION INSTRUCTIONS Wallgard 1,3 product October 2015 GENERAL Application can be done to smooth, dry, clean, sound walls of concrete, plaster, hardboard, plywood and fibreboard. Board material must
NEW skypod INSTALLATION GUIDE
 NEW skypod INSTALLATION GUIDE NOW INCLUDES ACUTE CONTENTS 1. Preparing to install 2 2. Installation 4 3. Installing jack rafters 10 4. Installation examples 11 If in doubt at any stage Please contact the
for Flexi Sun Lite Planning the layout
 for Flexi Sun Lite These instructions refer to installations on a flat and pitched roof. Various roof flashing units are available according to the particular roof covering. The roof flashing will be boxed
This installation guide has been created to assist in constructing a Liniar conservatory roof from a kit format.
 1.00 - Introduction This installation guide has been created to assist in constructing a Liniar conservatory roof from a kit format. Please note, each roof has been individually designed to meet specific
Show them you're an InstallationMaster, and watch your business grow. InstallationMasters Training Manual Addendum Level RLC-1
 Show them you're an InstallationMaster, and watch your business grow. InstallationMasters Training Manual Addendum Level RLC-1 August 2007 This addendum was developed by the InstallationMasters Institute
DuPont Flashing Systems Commercial Installation Guidelines
 DuPont DuPont Flashing Systems Commercial Installation Guidelines FOR STOREFRONT WINDOW ON A KNEE WALL AFTER WRB IS INSTALLED Table of Contents Applicable Products... 2 Recommended Materials... 2 Optional
Tapecoat. Application Guideline
 Tapecoat Application Guideline 1.0 SCOPE This document contains general instructions and recommended practices for the application of Tapecoat wax/petrolatum coating systems. The various coating grades
Installation - Sub Cills
 Installation - Sub Cills Fitting of Subcill Drainage paths through the sub-cill can be seen on the illustration alongside so care must be taken to ensure they are not obstructed and that screw fixings
INSTALLATION MANUAL STORAGE
 IMVersion 1.1 INSTALLATION MANUAL GENERAL GUIDE: The information in this IM is intended to serve as a general guide to proper installation with no warranties intended or implied. Prime Panels assumes no
NewTech - CleverDeck Composite Decking Installation Guidelines
 NewTech - CleverDeck Composite Decking Installation Guidelines Composite decking has unique characteristics and requires specific fixing requirements that differ from timber. We strongly recommend that
Installation Guide. Step 3. Valley Flashing. Step 7. Transition Flashings and Accessories. Step 6. Hip and Ridge Installation
 Step 7. Transition s and Accessories Step 3. Valley Step 6. Hip and Ridge Installation Step 2. Rake Trim Step 5. Installing the Shingles Step 1. Eave Starter Installation Step 4. Endwall s Installation
LuxCore Installation Instructions
 LuxCore Installation Instructions ATTENTION: LuxCore PANELS MUST BE ACCLIMATIZED FOR 24 HOURS BEFORE INSTALLATION PLEASE READ ALL INSTRUCTIONS PRIOR TO INSTALLATION The guidelines provided herein have
DW HORIZONTAL INSTALLATION
 AR-PJ-01-DW2H 2" HORIZONTAL PANEL JOINT AR-PJ-02-DW2H 2" VERTICAL PANEL JOINT AR-PJ-03-DW2H 3" HORIZONTAL PANEL JOINT AR-PJ-04-DW2H 3" VERTICAL PANEL JOINT AR-PJ-05-DW2H CUSTOM REVEAL AR-PJ-06-DW2H DW-2000S
Installation Instructions
 www.marlite.com Effective Date 03/01/2018 ARTIZAN FRP, SYMMETRIX FRP, ENVUE FRP, STANDARD FRP Installation Instructions Statements expressed in this technical bulletin are recommendations for the application
Stratco Sanctuary INSTALLATION BEFORE YOU START TOOLS REQUIRED GUIDE
 INSTALLATION GUIDE Stratco Sanctuary Verandahs, Patios and Carports BEFORE YOU START It is important to check with your Local Government Authority prior to the installation of your new Stratco Sanctuary
SECTION SHEET METAL FLASHING AND TRIM
 SECTION 07620 PART 1 - GENERAL 1.1 SUMMARY A. Section Includes: 1. Formed roof drainage sheet metal fabrications. 2. Formed low-slope roof sheet metal fabrications. 1.2 SUBMITTALS A. Shop Drawings: Show
Adorn Mortarless Stone Veneer Installation Natural Concrete Products
 Adorn Mortarless Stone Veneer Installation Adorn Mortarless Stone Veneer can be used on new or existing construction. Adorn is nailed or screwed onto the wall; therefore no brick ledge is required. Adorn
ARMA-CHEK SILVER APPLICATION MANUAL. T. +49 (0)
") ARMA-CHEK SILVER APPLICATION MANUAL T. +49 (0) 251 7603-0 info@armacell.com www.armacell.eu 02 Arma-Chek Silver Application Manual General application instructions Working with Arma-Chek Silver The installer
ARMA-CHEK SILVER APPLICATION MANUAL T. +49 (0) 251 7603-0 info@armacell.com www.armacell.eu 02 Arma-Chek Silver Application Manual General application instructions Working with Arma-Chek Silver The installer
WindowSeal. Installation Instructions. Prep & General Conditions
 Prep & General Conditions All surfaces must be clean, dust free, smooth and dry. Do not apply over sealants or uncured caulks containing solvents or plasticizers. This includes most silicones and polyurethane
Nanton Grain Mill Assembly
 ( 1 ) Nanton Grain Mill Assembly Locate package for assembling storage building. These are cut from 1/8 masonite. Inspect and lightly sand edges where it will be bonded. Use white glue or CA glue to bond.
Installation Instructions Stainless Steel Wall Panels
 Please read all instructions before installing wall panels. Always plan before you place! 1. Before installation: a. Acclimate Stain Steel Panels, Trim, adhesives and wall substrates to room temperature
IMPORTANT: This product cannot perform its intended function if not properly installed.
 www.emseal.com HORIZONTAL COLORSEAL INSTALL DATA - HORIZONTAL COLORSEAL FEBRUARY 2015, PAGE 1 OF 3 INSTALLD AT DO NOT OPEN ANY PACKAGES or install this material until all members of your crew have read
RIDGEMASTER PLUS CAUTION INSTALLATION INSTRUCTIONS ALWAYS WEAR SAFETY GLASSES TOOLS NEEDED GENERAL GUIDELINES FOR RIDGEMASTER PLUS AND HIPMASTER
 INSTALLATION INSTRUCTIONS RIDGEMASTER PLUS CAUTION Before beginning installation read all general guidelines, special notes and installation steps thoroughly and be sure to check and follow all your local
Installation Guide Simplicity Alfresco. V1.9 Lu070318
 0333 305 5272 www.canoports.co.uk Installation Guide Simplicity Alfresco V1.9 Lu070318 Tools Required Below is a list of tools that you will require to install your the Simplicity Alfresco System. Cordless
NURABOND LOW FOAMING PU ADHESIVE TECHNICAL DATA SHEET
 53 A Victoria Street Onehunga Auckland Phone 09 579 2046 www.nuralite.co.nz NURABOND LOW FOAMING PU ADHESIVE TECHNICAL DATA SHEET DESCRIPTION AND USE Nurabond PU Adhesive is a ready to use, high performance,
Installation Guidelines
 TM TM Installation Guidelines * Guidelines also apply to installation of astroeco products More For Pre-Engineered Metal and Post-Frame Buildings icient, Safer To Use and Easier To Install Than Regular
Silicoflex Joint Sealing System
 Silicoflex Joint Sealing System SILICOFLEX GLAND ON WOODEN REEL P-200 Primer (A and B Components) Single Component Silicone Locking Adhesive Page 1 Preformed Silicone Gland Sizing Chart (5 Different Sizes)
skypod INSTALLATION GUIDE Issue 2 CONTENTS 1. Preparing to install 3 2. Installation 4 3. Installing jack rafters Installation examples 11
 skypod INSTALLATION GUIDE Issue 2 CONTENTS 1. Preparing to install 3 2. Installation 4 3. Installing jack rafters 10 4. Installation examples 11 INSTALLATION GUIDE SURVEYING WARNING 1.2 Good surveying
Building Wrap and Flashing
 Insulati o n Fifth Revision January 2019 Building Wrap and Flashing INSTALLATION GUIDE FOR RESIDENTIAL & LIGHT COMMERCIAL APPLICATIONS 1. General Information 2. Usage & Limitations MAX, HPW, VW, RainDrop
Steel Reinforced Joining Thank you for choosing Andersen. Please leave this guide with building owner.
 Steel Reinforced Joining (Horizontal/Vertical) for Andersen 400 Series Woodwright & Tilt-Wash Double-Hung, Picture, and Transom Windows and 400 Series Double-Hung Half Circle and Flexiframe Specialty Windows
HUB REV 9/18 ROOF INSTALLATION MANUAL ZIPSYSTEM.COM
 ROOF INSTALLATION MANUAL ZIPSYSTEM.COM 2 ATTENTION: This installation guide is intended to provide general information for the designer and end user. The following guidelines will help you safely and properly
STACKING MULTI-SLIDE DOOR SYSTEM INSTALLATION INSTRUCTIONS
 STACKING MULTI-SLIDE DOOR SYSTEM INSTALLATION INSTRUCTIONS 1290363 Revision 1 12/16 Page 1 Weather Shield Mfg., Inc. NOTICE CAUTION! Failure to install and maintain our product according to these instructions
C.00. Ullrich Aluminium Co. Ltd. Ulltraclad Aluminium Cladding September Wall Batten Elevation. Horizontal battens between verticals at soffit
 Horizontal battens between verticals at soffit 2 C.04 600 600 600 600 Cavity batten at 600 mm centres 1 C.03 Batten fixing points 1 C.04 1 C.07 1 C.12 1 C.13 1 C.14 Meter Box Window 1 C.08 1 C.09 800 800
Installation Guidelines
 Page 1 Tools You ll Need 4 ft. Carpenter s level Chalk line (to mark U channel locations) Cordless drill/nut driver Caulking gun Chop saw with a metal cutting blade on it (required to make accurate and
CFDTT-01. Control Joint Study (General)
") Trim Method Classic Method Notes: Control joints are required and should be located by the designer at the following locations on the construction documents: 144 sf (13.4 sm) is the maximum overall area
Trim Method Classic Method Notes: Control joints are required and should be located by the designer at the following locations on the construction documents: 144 sf (13.4 sm) is the maximum overall area
Balustrade Systems / Installation Instructions
 A. PARTS AND SUPPLIES NEEDED FOR INSTALLATION Hardware included for each 10 section of rail: 2 3 x 1-1/2 L-brackets 4 1-3/4 x 3/16 Blue hex-head screws for anchoring the L-brackets to the newel cap, column
BARRELL VAULT BATTENLESS
 i BARRELL VAULT BATTENLESS INSTALLATION GUIDE INSTALLATION NOTIFICATION The installation procedures demonstrated in this manual are recommended methods for the installation of the Gerard Barrel Vault battenless
Installation Instructions Palladium 3D Hi Impact Wall System, Partial Height with Color Matched Caulk Joints
 Please read all instructions before installing Palladium 3D Hi Impact Wall System.. Before installation: a. Acclimate rigid sheet, Palladium 3D boards, adhesives and wall substrates to room temperature
The better way to build TM. Installation Manual ROOF SIPs
 The better way to build TM Installation Manual ROOF SIPs August 2017 ROOF SIPs Installation Manual Table of Contents Topics General Requirements.................................... 3 Materials..............................................
Installation Guide for E-Series/Eagle Clad Mechanically Fastened Windows
 Guide for E-Series/Eagle Clad Mechanically Fastened Windows Thank you for choosing Andersen. Instructions are for typical, new wood-framed wall construction with weather protection in place. Instructions
DOOR INSTALLATION GUIDE WOOD FRAMING New Construction
 DOOR INSTALLATION GUIDE WOOD FRAMING New Construction IMPORTANT NOTICES AND INFORMATION Read these instructions in their entirety prior to installing doors. Any local building code requirements supersede
Skypod. Pitched PVC-U skylights. Installation guide PITCHED PVC-U SKYLIGHTS ISSUE 1
 Skypod Pitched PVC-U skylights PITCHED PVC-U SKYLIGHTS Installation guide ISSUE 1 Skypod pitched PVC-U skylights Installation guide Contents 1. Surveying 3 2. Installation 4 3. Additional information 10
Skypod. Pitched PVC-U skylights. Installation guide PITCHED PVC-U SKYLIGHTS ISSUE 1
 Skypod Pitched PVC-U skylights PITCHED PVC-U SKYLIGHTS Installation guide ISSUE 1 Skypod pitched PVC-U skylights Installation guide 1. Surveying Before unpacking the Skypod roof, review the supplied layout
skypod INSTALLATION GUIDE CONTENTS Issue 2 If in doubt at any stage NOW INCLUDES ACUTE BE SAFE WHEN WORKING AT HEIGHT
 skypod INSTALLATION GUIDE Issue 2 NOW INCLUDES ACUTE CONTENTS 1. Preparing to install 2 2. Installation 4 3. Installing jack rafters 10 4. Installation examples 11 BE SAFE WHEN WORKING AT HEIGHT Ensure
INSTALLATION GUIDE WOOD PIVOTING CIRCLE/ OVAL
 WOOD PIVOTING CIRCLE/ OVAL READ SPECIFIC INSTALLATION INSTRUCTIONS COMPLETELY BEFORE STARTING ANY INSTALLATION Failure to install and maintain our product according to these instructions will VOID any
INSTALLATION PROCEDURE
 Vinyl Siding INSTALLATION PROCEDURE Tools Needed and Preparation MOST ESSENTIAL TOOLS The proper tools, materials and equipment can make the installation of Durabuilt Vinyl Siding much easier. Here are
Installation Manual. Last Updated 4 February, Postal PO Box 932 Bayswater VIC
 Installation Manual Last Updated 4 February, 2013 Part 1: Provided Material The Panel Expandable Foam Sealing Strip Barge Capping Z-Fascia Structural Screws Timber: 3/8 head size Metal: 5/16 head size
RECOMMENDED INSTALLATION PROCEDURE LEVEL 3
 Step 1. Install Sill Flashing Product: 9" or 12" RainBuster #440 SubZero Flashing Tape 1.A Flashing Length = (Rough Opening Width) + 12" 1.B Install sill flashing flush with the sill of the rough opening.
Installation Guide. Evolve bi-fold. 8. Door restrictor- optional p9. 1. Before you start p2. 9. Adjustment. 2. Measuring and surveying p2
 Evolve bi-fold Installation Guide 1. Before you start p2 8. Door restrictor- optional p9 2. Measuring and surveying p2 3. Configuration details p4 4. Installation p5 5. Glazing p5 6. Glazing packer details
Flex Fence Instruction Manual
 The Safer Stronger Smarter Choice Flex Fence Instruction Manual Table of contents 2 3 4 4 5 5 6 7 8 10 10 11 11 12 13 13 15 18 18 19 20 22 Table of contents Supplies, tools and equipment Introduction Laying
REGAL. Installation Manual
 REGAL Installation Manual General Information The details shown on the following pages are suggestions or guidelines for installing the Regal system. The installation details shown here are proven methods