eco-shake INSTALLATION INSTRUCTION
|
|
|
- Opal McCormick
- 6 years ago
- Views:
Transcription
1 1 eco-shake INSTALLATION INSTRUCTION NOTE: Shuffling the eco-shakes during installation may be necessary to obtain a uniform color throughout the roof. Due to the natural wood content in the ecoshakes, a natural range of shades can be seen in all color selections. PREPARATION OF EXISTING SURFACES FOR REROOFING A. Remove old roofing and underlayment down to deck. B. Install 15/32" thick A-B Exterior Grade plywood over open sheathing with common hot dipped galvanized or Type 304 stainless steel nails machine or hand driven with sufficient length to provide minimum 3/4" penetration in supporting structural members (or as is required by your local/state building code officials). C. Plumbing stacks and roof penetrations shall be in place and flashed to deck surface. Extend piping as necessary to a minimum of 8" above deck. D. Correctly frame roof openings. E. Deck surfaces shall be dry, free of ridges, warps and voids. ROOF DECK FOR NEW CONSTRUCTION A. Install 15/32" thick A-B Exterior Grade plywood or minimum 3/4" thick solid wood decking over supporting wood roof structure with common hot dipped galvanized or Type 304 stainless steel nails machine or hand driven with sufficient length to provide minimum 3/4" penetration in supporting structural members (or as required by your local/state building code officials). B. Structural deck shall provide minimum 2" rise in 12" slope. C. Plumbing stacks and roof penetrations shall be in place and flashed to deck surface. Extend piping as necessary to a minimum of 8" above deck. D. Correctly frame roof openings. E. Deck surfaces shall be dry, free of ridges, warps and voids. PREPARATION OF SUBSTRATE A. Broom deck surfaces clean. B. Fill knot holes and surface cracks with latex filler at areas of bonded eave protection. Cover knot holes with sheet metal. INSTALLATION - EAVE, RAKE, RIDGE (ICE DAM) PROTECTION A. Place eave edge and gable rake edge metal flashings tight with fascia boards. Weather lap joints 2 inches (50 mm) and seal with plastic cement. Secure flange with nails spaced 8 inches (200 mm) oc. B. Apply rubberized asphalt/polyethylene sheet eave protection equal to GAF "Weather Watch" or Tamko "Weather Guard" in accordance with manufacturer's instructions. C. Extend eave Ice Dam Protection membrane minimum 3 feet (600 to 1200 mm)
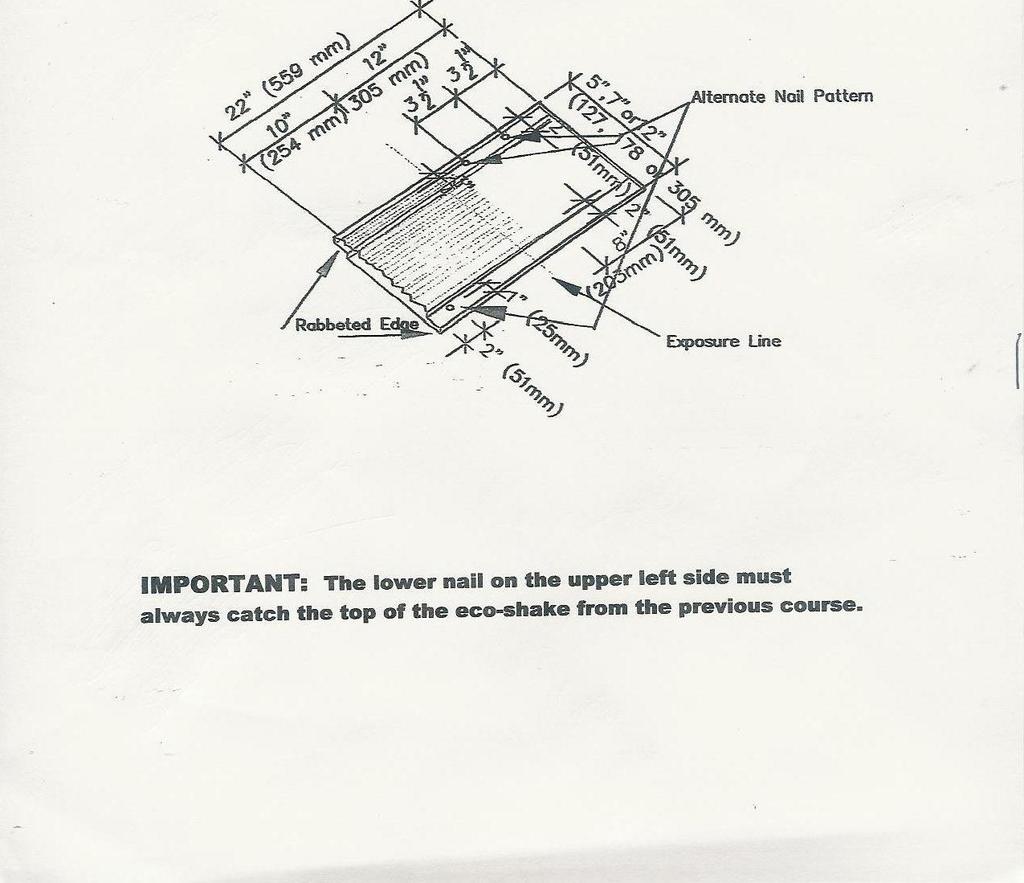
2 2 up-slope beyond interior face of exterior wall. D. Install 18 inch (450 mm) wide underlayment at gable rake. E. Install 36 inch (900 mm) wide ice dam underlayment centered over ridges and hips providing 18 inches (450 mm) of coverage on each slope. INSTALLATION - PROTECTIVE UNDERLAYMENT A. Place one ply of 30# Organic UL tested ASTM D-226 Type II (Non-perforated) felt underlayment over area not protected by Ice Dam protection, with ends and edges weather lapped minimum 6 inches (150 mm). Stagger end laps of each consecutive layer. Nail in place. B. Install protective underlayment perpendicular to slope of roof and weather lap minimum 4 inches (100 mm) over eave protection. C. Weather lap and seal watertight with plastic cement items projecting through or mounted on roof. D. No underlayment shall be exposed to the weather in completed installation. INSTALLATION-VALLEY PROTECTION AND METAL FLASHING A. Place one ply of Ice Dam Protection Underlayment roofing, minimum 36 inches (900 mm) wide, centered over valleys. Weather lap joints minimum 3 inches (75 mm). B. Place one layer of galvanized sheet metal flashing, minimum 26 gage thickness, 16 oz. copper or minimum.030 inch (7.5 mm) thick aluminum minimum 24 inches (600 mm) wide, centered over open valleys and "V" crimp to guide water. Weather lap joints minimum 4 inches (100 mm) and seal. Nail metal clips of similar metal in place minimum 18 inches (450 mm) on center. C. Trim shake back 4 inches (100 mm) from valley "vee crimp". INSTALLATION - METAL FLASHING AND ACCESSORIES A. Weather lap joints minimum 3 inches (75 mm) and seal weather tight with plastic cement. B. Secure in place with nails at 18 inches (450 mm) on center. Conceal fastenings. C. Flash and seal work weather tight, projecting through or mounted on roofing with plastic cement. INSTALLATION - SHAKES STARTER COURSE A. "Cut Starter" course from full size "eco shake" 11 inches (275 mm) from butt end. Save 11 inch (275 mm) butt end for "ridge filler" at ridge & hip installation locations. B. Nail smooth surfaced 11 inch (275 mm) "tail piece" as "starter course" with the cut edge exposed leaving 1 inch (25.4 mm) overhang at eave metal trim with (2) nails at "tail end" 4 inches (100 mm) above eave and 2 inches (50 mm) from each side. C. Set "starter course" in 8 inch (200 mm) wide bed of flashing cement. D. Overlap rabbeted sides a minimum of 1 inch (25 mm). E. Seal rabbeted edge with 1/4" - 3/8" continuous bead of Geocel 2300 or other like adhesive.
3 3 F. Seal "starter course" to next course with 1/4" - 3/8" continuous bead of Geocel 2300 or other like adhesive, with 1 inch (25 mm) of the outside edge. INSTALLATION-SHAKES A. Lay shakes over approved protective underlayment to produce straight coursing pattern with 10 inches (250 mm) weather exposure to produce a double thickness over the entire roof area. Staggered coursing - Stagger shingles up to and not greater than notched area on overlap. Maintain maximum of 10" weather exposure. B. Nail "eco shake" in place with (3) 1 1/4 inch "non-corosive" 6d roofing nails with "hot dipped galvanized" coating or of Type 304 stainless steel either hand or pneumatically driven ( If nails are pneumatically driven, do not exceed 100 psi). Nails should be set flush with the surface of the shingle and should penetrate completely through the deck. Nails should be located as follows: (2) nails 8 inches (200 mm) down from top (tail edge) and 2 inches (50 mm) in from each side. (1) nail 2 inches (50 mm) up from bottom (butt edge) and 1 inch (25 mm) in from rabbeted edge. C. Provide double course of shakes by using starter course mentioned above at eaves. D. Project first course of shakes 1 inch (38 mm) beyond face of fascia boards and stagger joints over "starter course". Keyway shall not be positioned within 1-1/2 inches (38 mm) of previous course. E. Overlap sides a minimum of 1 inch (25 mm). F. Coordinate installation of roof mounted components or work projecting through roof with weather tight placement of counter flashings. G. Extra care during installation may be needed when temperatures are near and/or fall below freezing or when eco-shakes are exposed to freezing and/or near freezing temperatures for extended periods of time (this may include hand nailing). INSTALLATION - RIDGE & HIP LOCATIONS A. Position 11 inch (275 mm) "ridge filler" cut from eave "starter course" at ridge lapping over ice dam protection underlayment mentioned above and providing maximum 10 inches (250 mm) weather exposure on last full course of "eco shake". B. Nail textured surface 11 inch (275 mm) long "butt piece" cut from "eave starter course" with (3) nails as follows: (2) nails 4 inches (100 mm) down from top (tail end) and 2 inches (50 mm) in from each side. (1) nail 2 inches (50 mm) up from bottom (butt edge) and 1 inch (25 mm) in from rabbeted edge. C. Install 12 inch (300 mm) wide preformed "eco shake ridge" pieces in shingle fashion over "ridge filler" providing 6 inches (150 mm) coverage on each slope. Overlap 18 inch (450 mm) strip of 30# organic felt underlayment between each ridge shake overlapping "tail end of shake 3 inches (75 mm). D. Nail in place with (4) 2 inch (50 mm) nails placed as follows: (2) nails 2 inches (50 mm) from "tail end" and 2 inches (50 mm) from each side. (2) nails 8 inches (200 mm) from "tail end" and 2 inches (50 mm) from each side. E. All nails should be flush set with the surface of the shingle and should penetrate
4 4 completely through the deck. PROTECTION OF FINISHED WORK A. Protect installed work. B. Do not permit traffic over finished roof area. SPECIAL INSTRUCTIONS FOR COASTAL REGIONS INSTALLATION - EAVE & RAKE EDGE METAL (Coastal Regions) A. Install 3 inch (75 mm) x 3 inch (75 mm) galvanized metal drip edge at perimeter eaves and rakes set tight to decking. If gap is created due to irregularities, the gap shall be sealed in a bed of flashing cement after priming. B. Fasten drip edge at 4 inches (100 mm) on center approximately 1 inch (25 mm) from the top edge. "Strip in" nails with flashing cement and 6 inch (150 mm) wide fabric. C. Overlap edge metal at corners 5 inches (125 mm). Notch and bend around corner. Coat overlap with flashing cement after priming. INSTALLATION - PROTECTIVE UNDERLAYMENT (Coastal Regions) A. In building locations where ice & snow are not common and buildings are exposed to winds from bodies of water such as Coastal Regions, delete modified bitumen ice dam protection at eaves, valleys, hips & ridges and install a double layer of 30# Organic UL tested ASTM D-226 Type II (Non-perforated) felt underlayment with 19 inch (475 mm) overlap. B. Fasten underlayment with 12 ga. x 1-1/4inches (31 mm) annular ring shank galvanized roofing nails with 32 ga. x 1-3/4 inches (44 mm) diameter tin caps, 6 inches (150 mm) on center 1 inch (25 mm) from horizontal side lap and 2 rows 12 inches (300 mm) on center staggered in the field. C. Vertical side laps shall be woven at valleys. Extend top ply minimum 12 inches (300 mm) past valley center line. D. Install protective underlayment perpendicular to slope of roof. E. Weather lap and seal watertight with plastic cement items projecting through or mounted on roof. F. No underlayment shall be exposed to the weather in completed installation. INSTALLATION - VALLEY PROTECTION (Coastal Regions) A. In building locations where ice & snow are not common and buildings are exposed to winds from bodies of water such as Coastal Regions, in lieu of modified bitumen ice dam protection install one additional 36 inch (900 mm) wide ply of 30# Organic UL tested ASTM D-226 Type II (Non-perforated) felt underlayment centered on valley and fastened with sufficient fasteners to secure in place until metal flashing installation. B. Place one layer of galvanized sheet metal flashing, minimum 26 gage thickness, 16 oz. copper or minimum.030 inch (7.5 mm) thick aluminum minimum 24 inches (600 mm) wide, centered over open valleys and "V" crimp to guide water. Weather lap joints minimum 4 inches (100 mm) and seal.
5 5 C. Install valley metal flashing in 1//8 inch (3 mm) continuous bead of ASTM D 4586 flashing cement and fasten 4 inches (100 mm) on center within 1 inch (25 mm) from the outside edge of valley metal. D Lap valley metal 4 inches, prime and set in bed of flashing cement. E "Three course" outside edges of valley metal with flashing cement and 6 inch (150 mm) wide fabric after priming. F. Trim shake back 4 inches (100 mm) from valley "vee crimp". FIRE-RETARDANT RATINGS The normal underlayment of 30 lb. asphalt-saturated organic felt confers a UL Class C fire rating for both new and reroofing applications. The following are types of underlayment needed to meet Class A ratings: Two layers of Elk Corporation Versashield, 1/2" sheet of gypsum board or 1/4" Georgia Pacific Dens-Deck must be applied over solid decking.
6
ROOFING APPLICATION STANDARD (RAS) No. 130 INSTALLATION CRITERIA FOR WOOD SHINGLES AND SHAKES APPLICATION
 No. 130 INSTALLATION CRITERIA FOR WOOD SHINGLES AND SHAKES APPLICATION") ROOFING APPLICATION STANDARD (RAS) No. 130 INSTALLATION CRITERIA FOR WOOD SHINGLES AND SHAKES APPLICATION 1. 2. 3. Scope 1.1 This application standard provides the minimum installation criteria for wood
ROOFING APPLICATION STANDARD (RAS) No. 130 INSTALLATION CRITERIA FOR WOOD SHINGLES AND SHAKES APPLICATION 1. 2. 3. Scope 1.1 This application standard provides the minimum installation criteria for wood
ROOFING APPLICATION STANDARD (RAS) No. 130
 No. 130") ROOFING APPLICATION STANDARD (RAS) No. 130 1. Scope 1.1 This application Standard provides the minimum installation criteria for wood shingles and shakes. 2. Definitions 2.1 For definitions of terms used
ROOFING APPLICATION STANDARD (RAS) No. 130 1. Scope 1.1 This application Standard provides the minimum installation criteria for wood shingles and shakes. 2. Definitions 2.1 For definitions of terms used
Turada Hardwood Shingles and Shakes Installation instructions
 1. General 1.1 Maximum Exposure: Maximum exposure for wood shingles and shakes shall comply with Table 1 herein, unless specifically specified in the roof assemblies Product Approval. 1.2 Solid and Spaced
ROOFING APPLICATION STANDARD (RAS) No. 115 STANDARD PROCEDURES FOR ASPHALTIC SHINGLE INSTALLATION
 No. 115 STANDARD PROCEDURES FOR ASPHALTIC SHINGLE INSTALLATION") ROOFING APPLICATION STANDARD (RAS) No. 115 STANDARD PROCEDURES FOR ASPHALTIC SHINGLE INSTALLATION 1. Scope 4. Underlayment 2. 1.1 This roofing application standard has been developed to provide a responsive
ROOFING APPLICATION STANDARD (RAS) No. 115 STANDARD PROCEDURES FOR ASPHALTIC SHINGLE INSTALLATION 1. Scope 4. Underlayment 2. 1.1 This roofing application standard has been developed to provide a responsive
RED DIAMOND SHINGLES Roof Installation Introduction:
 RED DIAMOND SHINGLES Roof Installation Introduction: The guidelines set forth in this manual are intended for use with the application of Red Diamond shingles. Wallaba specie (Eperua Falcata) shingles
Brava Old World Slate Installation Guide
 Brava Old World Slate Installation Guide Brava Roof Tile Phone: 844-290-4196 www.bravarooftile.com This document includes the recommended and suggested installation procedures for Brava Old World Slate
B. Related Sections: The following Sections contain requirements that relate to this Section:
 SECTION 07311 - ASPHALT SHINGLES PART 1 - GENERAL 1.1 RELATED DOCUMENTS A. Drawings and general provisions of the Contract, including General and Supplementary Conditions and Division 1 Specification Sections,
Slate Shingle Specifications
 Slate Shingle Specifications California Slate is a proud member of the Slate Roofing Contractors Association of North America, Inc. (SRCA) which publishes Section 07310 Slate Shingles setting forth architectural
ESR-1129 Reissued June 1, 2011 This report is subject to renewal in two years.
 ICC-ES Evaluation Report ESR-1129 Reissued June 1, 2011 This report is subject to renewal in two years. www.icc-es.org (800) 423-6587 (562) 699-0543 A Subsidiary of the International Code Council DIVISION:
Installation Guide. Titan Old World Slate REV Titan Manufacturing Phone: (407) Fax: (866)
 Fax: (866)") Installation Guide Titan Old World Slate REV70908 Titan Manufacturing Phone: (407) 587-5492 Fax: (866) 741-2147 www.titanroofsystems.com This document includes the recommended and suggested installation
Installation Guide Titan Old World Slate REV70908 Titan Manufacturing Phone: (407) 587-5492 Fax: (866) 741-2147 www.titanroofsystems.com This document includes the recommended and suggested installation
SECTION SLATE SHINGLES. 1.1 SUMMARY A. Section Includes: 1. Slate shingles over underlayment nailed to roof sheathing.
 SECTION 07 31 26 SLATE SHINGLES SPEC WRITER NOTES: Delete text between // // not applicable to project. Edit remaining text to suit project. PART 1 - GENERAL 1.1 SUMMARY A. Section Includes: 1. Slate shingles
SG-30 A P P L I C A T I O N I N S T R U C T I O N S. Directions For Application
 1 2 3 General Instructions NOTICE: THESE SHINGLES MUST BE APPLIED TO CONFORM WITH ALL APPLICABLE BUILDING CODES. THESE DIRECTIONS REPRESENT COMMON AND ACCEPTED ROOFING PRACTICES. DEVIATIONS FROM THESE
Asphalt Shingle Installation at Roof Edges, Intersections and Valleys
 & Asphalt Shingle Installation at Roof Edges, Intersections and Valleys Abstract This updated document is intended to provide additional guidance and options for asphalt shingle installations at roof edges,
Inspire Aledora Slate Application Guidelines
 July 2014 Inspire Aledora Slate Application Guidelines Only Basic Roofing Tools Required Hand fastened or fastened with a pneumatic nail gun Utility knife or a standard circular saw Tape measure, pry bar,
Inspire Slate Starter Piece Hip and Ridge. 13 1/2" Height: 13 ½" Width: 12" Squares/ Pallet. Bundles/ Square
 December 2017 Classic Slate Application Guidelines Only Basic Roofing Tools Required Hand fastened or fastened with a pneumatic nail gun Utility knife or a standard circular saw Tape measure, pry bar,
ICC-ES Evaluation Report Reissued September 1, 2012 This report is subject to renewal September 1, 2013.
 ICC-ES Evaluation Report www.icc-es.org (800) 423-6587 (562) 699-0543 ESR-1790 Reissued September 1, 2012 This report is subject to renewal September 1, 2013. A Subsidiary of the International Code Council
Installation Guide. Cedar Shake. Distributed by: BEST MATERIALS LLC, Phoenx AZ
 RPM ROOFING Installation Guide Cedar Shake Distributed by: BEST MATERIALS LLC, Phoenx AZ 602-272-8128 800-474-7570 www.bestmaterials.com Table of Contents OVERVIEW... 1 CAUTION... 1 DISCLAIMER... 1 PRODUCT
SECTION ASPHALT SHINGLES
 SECTION 07311 ASPHALT SHINGLES PART 1 GENERAL 1.01 SUMMARY A. Section Includes: 1. Asphalt shingle roofing. 2. Flexible sheet membranes for eave protection, underlayment, and valley protection. 3. Associated
AIA Specification. Section Slate Shingles PART 1 GENERAL
 AIA Specification Section 07315 Slate Shingles PART 1 GENERAL 1.1 RELATED DOCUMENTS A. Drawings and general provisions of the Contract, including General and Supplementary Conditions and Division 1 Specification
MIAMI-DADE COUNTY PRODUCT CONTROL SECTION DEPARTMENT OF REGULATORY AND ECONOMIC RESOURCES (RER)
") MIAMI-DADE COUNTY PRODUCT CONTROL SECTION DEPARTMENT OF REGULATORY AND ECONOMIC RESOURCES (RER) 11805 SW 26 Street, Room 208 BOARD AND CODE ADMINISTRATION DIVISION Miami, Florida 33175-2474 T (786) 315-2590
MIAMI-DADE COUNTY PRODUCT CONTROL SECTION DEPARTMENT OF REGULATORY AND ECONOMIC RESOURCES (RER) 11805 SW 26 Street, Room 208 BOARD AND CODE ADMINISTRATION DIVISION Miami, Florida 33175-2474 T (786) 315-2590
PROJECT INSTRUCTIONS Roofing
 PROJECT INSTRUCTIONS Roofing This handout outlines some basic regulations contained within the 2015 Minnesota State Building Code, as well as other good building practices. However, this handout is not
DIRECTIONS FOR APPLICATION
 Instructions 1 General NOTICE: THESE SHINGLES MUST BE APPLIED TO CONFORM WITH ALL APPLICABLE BUILDING CODES. THESE DIRECTIONS REPRESENT COMMON AND ACCEPTED ROOFING PRACTICES. DEVIATIONS FROM THESE DIRECTIONS
SECTION ASPHALT SHINGLES
 SECTION 073110 - ASPHALT SHINGLES PART 1 - GENERAL 1.1 SUMMARY A. This Section includes the following: 1. Asphalt shingles. 2. Felt underlayment. 3. Self-adhering sheet underlayment. 4. Ice Shield Underlayment
HERITAGE LAMINATED ASPHALT SHINGLES Frederick, MD
 Application Instructions for FORMERLY 30 THESE ARE THE MANUFACTURER S APPLICATION INSTRUCTIONS FOR THE ROOFING CONDITIONS DESCRIBED. TAMKO BUILDING PRODUCTS, INC. ASSUMES NO RESPONSIBILITY FOR LEAKS OR
PREMIUM LAMINATED ASPHALT SHINGLES Frederick, MD
 Application Instructions for FORMERLY 50 THESE ARE THE MANUFACTURER S APPLICATION INSTRUCTIONS FOR THE ROOFING CONDITIONS DESCRIBED. TAMKO BUILDING PRODUCTS, INC. ASSUMES NO RESPONSIBILITY FOR LEAKS OR
PREMIUM LAMINATED ASPHALT SHINGLES Dallas, TX Tuscaloosa, AL Phillipsburg, KS
 Application Instructions for FORMERLY 50 THESE ARE THE MANUFACTURER S APPLICATION INSTRUCTIONS FOR THE ROOFING CONDITIONS DESCRIBED. TAMKO BUILDING PRODUCTS, INC. ASSUMES NO RESPONSIBILITY FOR LEAKS OR
SECTION WOOD SHINGLES
 SECTION 07 31 29.13 WOOD SHINGLES SPEC WRITER NOTES: 1. Delete text between // // not applicable to project. Edit remaining text to suit project. 2. This guide specification does not include requirements
IRONWOOD SHAKE & FLASHING SPECIFICATIONS
 3 1-51 3-3/4 1 IRONWOOD SHAKE & FLASHING SPECIFICATIONS 6 1-13- 1-1-1/4 2-1.5 Drip Edge 2.5 Drip Edge 2-7/8 1-1-1/4 3/4 1 2-1 IRONWOOD SHAKE Overall Length 51 Length of Coverage 48 Width of Coverage 1
4. Metal roof jacks at penetrations and attachments
 - - - - - - - - - - - - - - - - - - - - - - - - - - - - - - - - - - - - - - - - - - - - - - - - - - - - - - - - - - - - - - - - - - - - - - SECTION 07 61 00 METAL SHINGLE ROOFING - - - - - - - - - - -
1 Roof Substrate (Deck) OWENS CORNING BERKSHIRE SHINGLES INSTALLATION INSTRUCTIONS
 OWENS CORNING BERKSHIRE SHINGLES INSTALLATION INSTRUCTIONS") General This Installation Instruction document for Owens Corning Berkshire roofing shingles is to be read in conjunction with the Installation information printed on each packet of shingles along with
General This Installation Instruction document for Owens Corning Berkshire roofing shingles is to be read in conjunction with the Installation information printed on each packet of shingles along with
Ekoroof LiteTile Dimensions
 Ekoroof LiteTile Dimensions 7 3 3.5 Height 40 Width 20 Length Weight per Panel: 3 kg / 6.61 lbs 2 2 Area per panel 800 in / 5.55 ft 2 Panels per Square: 20 (including overlap, for a 100 ft covered area)
1.04 QUALITY ASSURANCE
 SECTION 07312 ARCHITECTURAL ASPHALT SHINGLES PART 1 GENERAL 1.01 RELATED DOCUMENTS A. Drawings and general provisions of the Contract, including General and Supplementary Conditions and Division 1 Specification
OWENS CORNING LAMINATE SHINGLES INSTALLATION INSTRUCTIONS
 General This Installation Instruction document for Owens Corning asphalt roofing shingles is to be read in conjunction with the Installation information printed on each packet of shingles along with the
A P P L I C A T I O N I N S T R U C T I O N S
 1 2 3 General Instructions NOTICE: THESE SHINGLES MUST BE APPLIED TO CONFORM WITH ALL APPLICABLE BUILDING CODES. THESE DIRECTIONS REPRESENT COMMON AND ACCEPTED ROOFING PRACTICES. DEVIATIONS FROM THESE
Cambridge English Application Instructions
 Cambridge English Application Instructions ROOF SLOPE: Never apply asphalt shingles to roof slopes less than 2:12. For slopes 2:12 to 4:12 (LOW SLOPE), see special underlayment requirements outlined below.
b) Symphony comes pre-packaged in color and width blends. There is no need to mix Symphony at the job site. Currently Symphony is available in the
 Symphony comes pre-packaged in color and width blends. There is no need to mix Symphony at the job site. Currently Symphony is available in the") PART 1 GENERAL 1) DESCRIPTION a) CertainTeed Symphony TM composite slate is an innovative roofing product that simulates the appearance, texture, and contours of traditional natural slate. It is a carefully
PART 1 GENERAL 1) DESCRIPTION a) CertainTeed Symphony TM composite slate is an innovative roofing product that simulates the appearance, texture, and contours of traditional natural slate. It is a carefully
Steel Shingle Installation Guide
 Page THESE ARE THE MANUFACTURER S APPLICATION INSTRUCTIONS FOR THE ROOFING CONDITIONS DESCRIBED. TAMKO BUILDING PRODUCTS, INC. ASSUMES NO RESPONSIBILITY FOR LEAKS OR OTHER ROOFING DEFECTS RESULTING FROM
DECRA Shingle Installation Guidelines
 Installation Guide DECRA Shingle Installation Guidelines General Instructions Failure to use these guidelines may void the product warranty. Local building codes may require additional application techniques
DIRECTIONS FOR APPLICATION
 Instructions 1 General NOTICE: THESE SHINGLES MUST BE APPLIED TO CONFORM WITH ALL APPLICABLE BUILDING CODES. THESE DIRECTIONS REPRESENT COMMON AND ACCEPTED ROOFING PRACTICES. DEVIATIONS FROM THESE DIRECTIONS
DIRECTIONS FOR APPLICATION
 Instructions 1 General NOTICE: THESE SHINGLES MUST BE APPLIED TO CONFORM WITH ALL APPLICABLE BUILDING CODES. THESE DIRECTIONS REPRESENT COMMON AND ACCEPTED ROOFING PRACTICES. DEVIATIONS FROM THESE DIRECTIONS
ROOFING City of Grand Rapids Building Safety Division
 ROOFING City of Grand Rapids Building Safety Division 218-326-7601 www.cityofgrandrapidsmn.com This handout is intended only as a guide and is based in part on the 2015 Minnesota State Building Code, Grand
3-Tab Shingle Instructions DURA-SEAL 20 DURA-SEAL 25
 3-Tab Shingle Instructions DURA-SEAL 20 DURA-SEAL 25 1 Directions For Applying Malarkey 3-Tab Shingles GENERAL INSTRUCTIONS Install Malarkey 3-tab shingles according to building code and local amendments.
Timberline and Sovereign Expanded Fastener Placement Area
 Timberline and Sovereign Expanded Fastener Placement Area Information Sheet Updated: 2004 Quality You Can Trust Since 1886... From North America s Largest Roofing Manufacturer Less Fastening Hassles! Announcing
IRONSTONE SLATE & FLASHING SPECIFICATIONS IRONSTONE SLATE
 8 5/8" A) 1 5/8" 5/8" 1 10" 10 1 5 50" 9 7/8" IRONSTONE SLATE & FLASHING SPECIFICATIONS IRONSTONE SLATE 1/8" 1 B) 3/8" 2 7/8" 1 3/8" 3/8" 3/8" 3/8" 1" 1 5/8" 1 5/8" 1 2 1 8.3" 3/4" Overall Length 52 Length
Shapes Siding. Perfection Shingles. Chalk Line
 Snap a Chalk Line Shapes Siding Perfection Shingles Chalk Line To establish a straight reference line to guide the positioning of the starter strip and the first course of siding, snap a chalk line. starter
StormMaster Slate General Instructions 1.) GENERAL INSTRUCTIONS 2.) ROOF DECK VENTILATION 3.) ROOF DECK
 GENERAL INSTRUCTIONS 2.) ROOF DECK VENTILATION 3.) ROOF DECK") StormMaster Slate General Instructions IMPORTANT: THE STATEMENTS EXPRESSED ON THIS PAGE ARE THE RECOMMENDATIONS FOR THE APPLICATION OF THE ROOFING PRODUCTS AS OUTLINED AND ILLUSTRATED. ANY DEVIATION FROM
StormMaster Slate General Instructions IMPORTANT: THE STATEMENTS EXPRESSED ON THIS PAGE ARE THE RECOMMENDATIONS FOR THE APPLICATION OF THE ROOFING PRODUCTS AS OUTLINED AND ILLUSTRATED. ANY DEVIATION FROM
SECTION PVC THATCH SHINGLE ROOFING SYSTEM PART 1 GENERAL 1.01 SUMMARY
 SECTION 07312 PVC THATCH SHINGLE ROOFING SYSTEM PART 1 GENERAL 1.01 SUMMARY A. This Section Includes the following: 1. Endureed Dominica PVC thatch shingles. 2. Self- adhering sheet underlayment. B. Related
HERITAGE LAMINATED ASPHALT SHINGLES Tuscaloosa, AL
 Application Instructions for THESE ARE THE APPLICATION INSTRUCTIONS FOR THE ROOFING CONDITIONS DESCRIBED. TAMKO BUILDING PRODUCTS, INC. SHALL NOT BE RESPONSIBLE FOR LEAKS OR OTHER ROOFING PROBLEMS RESULTING
RESIDENTIAL ROOFS ADDENDUM NUMBER ONE. August 28, 2017
 RESIDENTIAL ADDENDUM NUMBER ONE August 28, 2017 The following additions to, deletions from, and clarifications of the Contract Documents govern insofar as they apply and shall take precedence over those
The City of Winnipeg SHINGLE ROOF REPLACEMENT Section Replacement of Shingle Roof - Louis Riel Library Page 1 of 5 Bid Opp. No.
 Replacement of Shingle Roof - Louis Riel Library Page 1 of 5 PART 1 GENERAL 1.1 SCOPE OF WORK.1 Total roof area approximately 1,312 m 2. The Work includes, but is not limited to:.1 Removal and disposal
Laminated Shingles. Landmark Series and Landmark TL. CertainTeed Shingle Applicator s Manual
 CertainTeed Shingle Applicator s Manual Laminated Shingles 12 Landmark Series and Landmark TL YOUR OBJECTIVE: To learn the correct procedure for installing Laminated shingles. LANDMARK SERIES AND LANDMARK
Hatteras Shingles. CertainTeed Shingle Applicator s Manual. YOUR OBJECTIVE: To learn the correct procedures for installing Hatteras shingles
 CertainTeed Applicator s Manual Hatteras s 14 YOUR OBJECTIVE: To learn the correct procedures for installing Hatteras shingles HATTERAS SHINGLES Hatteras shingles are a premium oversize (18" x 36") roofing
Capstone Application Instructions
 Capstone Application Instructions Information Sheet Updated: 2007 Quality You Can Trust Since 1886... From North America s Largest Roofing Manufacturer L IFETIME D ESIGNER S HINGLES APPLICATION INSTRUCTIONS
Barrel Vault Counter Batten and Batten
 Barrel Vault Counter Batten and Batten INSTALLATION GUIDE www.gerardusa.com INSTALLATION NOTIFICATION The installation procedures demonstrated in this manual are recommended methods for the installation
DIVISION: THERMAL AND MOISTURE PROTECTION SECTION: ASPHALT SHINGLES REPORT HOLDER: IKO INDUSTRIES LIMITED
 0 Most Widely Accepted and Trusted ICC-ES Report ICC-ES 000 (800) 423-6587 (562) 699-0543 www.icc-es.org ESR-3532 Reissued 01/2017 This report is subject to renewal 01/2019. DIVISION: 07 00 00 THERMAL
C e r t a i n T e e d S h i n g l e A p p l i c a t o r s M a n u a l. and Carriage House STEEP. Slope Application. (over 21/12)
") C e r t a i n T e e d S h i n g l e A p p l i c a t o r s M a n u a l Grand Manor 16 and Carriage House YOUR OBJECTIVE: To learn the correct method of installing each of these roofing products. These shingles
C e r t a i n T e e d S h i n g l e A p p l i c a t o r s M a n u a l Grand Manor 16 and Carriage House YOUR OBJECTIVE: To learn the correct method of installing each of these roofing products. These shingles
REPORT HOLDER: ISAIAH INDUSTRIES, INC. EVALUATION SUBJECT:
 0 Most Widely Accepted and Trusted ICC ES Evaluation Report ICC ES 000 (800) 423 6587 (562) 699 0543 www.icc es.org ESR 1360 Reissued 08/2018 This report is subject to renewal 08/2019. DIVISION: 07 00
ASPHALT T E C H N O L O G I E S
 ASPHALT T E C H N O L O G I E S Evaluation of Active Ventilation Products Inc. Aura-D (AV-24) Ventilator in Accordance With FLORIDA BUILDING CODE PROTOCOL TAS 100(A)-95 TEST PROCEDURE FOR WIND AND WIND
F-WAVE REVIA SYNTHETIC ROOFING SHINGLES
 F-WAVE REVIA SYNTHETIC ROOFING SHINGLES Installation Manual for Steep-Slope Residential Installations For support with all other Steep-Slope Installations, please call F-Wave Technical Support at 888-GO-FWAVE.
Multi-Width Shake. Widths: 9", 8", 7", 6", 4" Length: 22" Thickness at butt: 5/8" Single-Width Shake. Widths: 9" Length: 22" Thickness at butt: 5/8"
 N DaVinci Shake Multi-Width Shake Single-Width Shake INSTALLATION GUIDE DaVinci polymer shakes are carefully engineered to provide the authentic look of hand-split shakes with dramatically increased durability
Application Guidelines - Shake General Information
 Application Guidelines - Shake General Information No Special Tools Required hand fastened or fastened with a pneumatic nail gun utility knife or a standard circular saw tape measure, pry bar, tin snips
1 Exam Prep NRCA Roofing Manual: Steep-Slope Roof Systems 2013 Tabs and Highlights
 1 Exam Prep NRCA Roofing Manual: Steep-Slope Roof Systems 2013 Tabs and s These 1 Exam Prep Tabs are based on the National Roofing Contractors Association (NRCA) manual listed below: Steep-Slope Roof Systems
COMPOSITE SIDING INSTALLATION GUIDE
 CENTURY HOME LIVING COMPOSITE SIDING INSTALLATION GUIDE Read all instructions prior to installing any siding product. Failure to install and finish this product in accordance with all local building codes,
SmartVent Eave Edge Installation Instructions
 SmartVent Eave Edge Installation Instructions STEP 1: Cut a slit 1 wide (or a series of 1 ¾ holes at 3 on center) into the roof decking 6 to 7 up from the drip edge. SmartVent is rated 9NFA. Ensure drip
ONDUVILLA. The Attractive Alternative to Shingles I N S T A L L A T I O N I N S T R U C T I O N S
 ONDUVILLA The Attractive Alternative to Shingles I N S T A L L A T I O N I N S T R U C T I O N S 1 INSTALLATION INSTRUCTIONS Even though ONDUVILLA is easy to install, it is important to read through these
LAMINATED SHINGLES CERTAINTEED SHINGLE APPLICATOR S MANUAL SUPPLEMENT
 15 CERTAINTEED SHINGLE APPLICATOR S MANUAL SUPPLEMENT LAMINATED SHINGLES 90 YOUR OBJECTIVE: To learn the correct procedure for installing Laminated shingles. ENGLISH DIMENSIONS LANDMARK SERIES WOODSCAPE
BARDOLINE INSTALLATION INSTRUCTIONS
 BARDOLINE INSTALLATION INSTRUCTIONS www.onduline.com CONTENTS General conditions Material requirements Terms Estimating shingle requirements Roof preparation Shingle application 9 GENERAL CONDITIONS ONDULINE
INSTALLATION GUIDE LEARN MORE AT DECRA.COM
 Villa Tile INSTALLATION GUIDE LEARN MORE AT DECRA.COM Table of Contents DECRA Villa Tile Roof Overview... 2 Introduction... 3 Safety... 3 Tools.... 3 Estimating Sheet... 3 Codes & Requirements... 3 Roof
Best Materials LLC distributes backer rod, caulking and sealants for all types of EIFS joints and penetration sealing applications.
 Best Materials LLC distributes backer rod, caulking and sealants for all types of EIFS joints and penetration sealing applications. EXTERIOR INSULATION & FINISH SYSTEM CONSTRUCTION Data Published Courtesy
BARRELL VAULT BATTENLESS
 i BARRELL VAULT BATTENLESS INSTALLATION GUIDE INSTALLATION NOTIFICATION The installation procedures demonstrated in this manual are recommended methods for the installation of the Gerard Barrel Vault battenless
Grand Manor Carriage House and Centennial Slate 16 YOUR OBJECTIVE: To learn the correct method of installing each of these roofing products.
 CertainTeed Shingle Applicator s Manual Grand Manor Carriage House and Centennial Slate 16 YOUR OBJECTIVE: To learn the correct method of installing each of these roofing products. 90 STEEP Slope Application
REGAL. Installation Manual
 REGAL Installation Manual General Information The details shown on the following pages are suggestions or guidelines for installing the Regal system. The installation details shown here are proven methods
Table of Contents. Fasteners... 4 Venting Preparation Installation with Battens - DECRA Tile & DECRA Shake 1
 Table of Contents DECRA Tile & Shake Roof Overview... 2 Introduction... 3 Safety... 3 Tools.... 3 Estimating Sheets... 4 Codes & Requirements... 4 Roof Slope... 4 Underlayment... 4 Deck Preparation....
Table of Contents. Roof to Head Wall w/ Side Flashing DECRA Shake XD Roof Overview Roof Penetration - Pipes & Vents...
 Table of Contents DECRA Shake XD Roof Overview.... 2 DECRA Shingle XD Roof Overview.... 3 Introduction... 4 Safety... 4 Tools.... 4 Estimating Sheet... 4 Codes & Requirements... 4 Roof Slope... 4 Underlayment...
3-Tab Shingle Installation Instructions
 3-Tab Shingle Installation Instructions WWW.MALARKEYROOFING.COM Directions for Applying Malarkey 3-Tab Shingles GENERAL INSTRUCTIONS Install Malarkey 3-tab shingles according to adopted building code and
Hip & Ridge Shingles Installation Instructions
 Hip & Ridge Shingles Installation Instructions WWW.MALARKEYROOFING.COM Directions for Applying Malarkey Hip & Ridge Shingles MALARKEY HIP AND RIDGE SHINGLE SPECIFICATIONS Malarkey Roofing Products manufacture
Tapersawn Shake Installation Instructions
 Smart-Shingle TM System Tapersawn Shake Installation Instructions INSTALLATION GUIDE MARKS Shake-Strip 0 1 2 3 4 5 6 7 8 9 10 11 12 13 14 15 16 17 18 19 20 21 22 23 24 25 26 27 28 29 30 31 32 33 34 35
Application Guidelines - Slate General Information
 No Special Tools Required Application Guidelines - Slate General Information hand fastened or fastened with a pneumatic nail gun utility knife or a standard circular saw tape measure, pry bar, tin snips
9Upgrades to Windproof Your Roof
 9Upgrades to Windproof Your Roof Nail down the details to keep asphalt shingles where they belong By Mike Guertin Asphalt shingles are getting better all the time, but the elements can still get the best
Laminate Shingle Installation Instructions
 Laminate Shingle Installation Instructions WWW.MALARKEYROOFING.COM Directions for Applying Malarkey Laminate Shingles GENERAL INSTRUCTIONS Install Malarkey laminate shingles according to adopted building
ENGINEERED SLATE 2018 INSTALLATION GUIDE
 ENGINEERED SLATE 2018 INSTALLATION GUIDE Table of Contents Contact Information Page 2 General Product Details Page 3 Code Compliance Page 3 Adhesives and Sealants Page 3 General Design Details Page 3
Installation Manual. For Gerard Shingle Products
 Installation Manual For Gerard Shingle Products Gerard Shingle Installation Manual is a component of Gerard roofing products and as such is intended to be used with Gerard products only. All information
ENDUREED VIVA SERIES Specifications
 ENDUREED VIVA SERIES Specifications SECTION 07312 HDPE THATCH SHINGLE ROOFING SYSTEM PART 1 GENERAL 1.01 SUMMARY A. This Section Includes the following: 1. Endureed Viva Series synthetic thatch shingles.
STORMMASTER SHAKE GENERAL INSTRUCTIONS
 STORMMASTER SHAKE GENERAL INSTRUCTIONS IMPORTANT: THE STATEMENTS EXPRESSED ON THIS PAGE ARE THE RECOMMENDATIONS FOR THE APPLICATION OF THE ROOFING PRODUCTS AS OUTLINED AND ILLUSTRATED. ANY DEVIATION FROM
Fastener Schedule. a, b, c. FASTENER Roof 3-8d (2 1 / ) / ) 3-10d. 3-10d ( ) 3-16d box nails. (3 1 2 toe nails on one side
 / ) 3-10d. 3-10d ( ) 3-16d box nails. (3 1 2 toe nails on one side") ITEM 1 DESCRIPTION OF BUILDING ELEMENTS Blocking between joists or rafters to top plate, toe 2 Ceiling joists to plate, toe 3 4 5 6 Ceiling joists not attached to parallel rafter, laps over partitions,
ITEM 1 DESCRIPTION OF BUILDING ELEMENTS Blocking between joists or rafters to top plate, toe 2 Ceiling joists to plate, toe 3 4 5 6 Ceiling joists not attached to parallel rafter, laps over partitions,
Wood shakes and wood shingles
 Wood shakes and wood shingles Material description Wood shakes and wood shingles are manufactured from western red cedar, cypress, pine and redwood trees. Shakes are split from logs and reshaped by manufacturers
GlassMaster General Instructions - Ardmore, OK & Hampton, GA <br /> Atlas Roofing
 GlassMaster General Instructions - Ardmore, OK & Hampton, GA (For Metric Size Franklin, OH Instructions Click Here) IMPORTANT: THE STATEMENTS EXPRESSED ON THIS WRAPPER ARE THE RECOMMENDATIONS FOR THE APPLICATION
installation guide Villa
 installation guide Villa Table of Contents Introduction............................. 2 Safety................................... 2 Tools.................................... 2 Codes & Requirements....................
SECTION SHEET METAL FLASHING AND TRIM
 SECTION 07620 PART 1 - GENERAL 1.1 SUMMARY A. Section Includes: 1. Formed roof drainage sheet metal fabrications. 2. Formed low-slope roof sheet metal fabrications. 1.2 SUBMITTALS A. Shop Drawings: Show
UL Construction No. 254
 UL Construction No. Wind-Uplift - Class 90 (See Item No. ) / Fire Not Investigated Metal Roof Deck Panels* Snap-Clad No. MSG or No. MSG min. thickness coated steel panels. Panels in. wide max., 0 in. wide
Installation Guide. Step 3. Valley Flashing. Step 7. Transition Flashings and Accessories. Step 6. Hip and Ridge Installation
 Step 7. Transition s and Accessories Step 3. Valley Step 6. Hip and Ridge Installation Step 2. Rake Trim Step 5. Installing the Shingles Step 1. Eave Starter Installation Step 4. Endwall s Installation
ES Report GAF-Elk Shingle Roof Covering Systems ESR-1475
 ES Report GAF-Elk Shingle Roof Covering Systems ESR-1475 Product Evaluation Updated: 4/08 Quality You Can Trust Since 1886... From North America s Largest Roofing Manufacturer ESR-1475 Reissued April 1,
DIVISION: THERMAL AND MOISTURE PROTECTION SECTION: ASPHALT SHINGLES REPORT HOLDER: GAF 1 CAMPUS DRIVE PARSIPPANY, NEW JERSEY 07054
 0 Most Widely Accepted and Trusted ICC ES Evaluation Report ICC ES 000 (800) 423 6587 (562) 699 0543 www.icc es.org ESR 1475 Reissued 10/2017 This report is subject to renewal 10/2019. DIVISION: 07 00
METRO PANELS (EXPOSED
 METRO PANELS 001EX-METRO-PANELS.VSD STARTER EAVE Detail Metro V-Bat RISER METAL (1) PANELS (2) FASTENERS (5) BOTTOM ROW fastening 0.75in. (4) METRO RISER Metal, With Integral Batten Riser & Locator-Lip.
MIAMI-DADE COUNTY PRODUCT CONTROL SECTION DEPARTMENT OF REGULATORY AND ECONOMIC RESOURCES (RER)
") MIAMI-DADE COUNTY PRODUCT CONTROL SECTION DEPARTMENT OF REGULATORY AND ECONOMIC RESOURCES (RER) 11805 SW 26 Street, Room 208 BOARD AND CODE ADMINISTRATION DIVISION Miami, Florida 33175-2474 T (786) 315-2590
MIAMI-DADE COUNTY PRODUCT CONTROL SECTION DEPARTMENT OF REGULATORY AND ECONOMIC RESOURCES (RER) 11805 SW 26 Street, Room 208 BOARD AND CODE ADMINISTRATION DIVISION Miami, Florida 33175-2474 T (786) 315-2590
Shingle Installation Guidelines
 Shingle Installation Guidelines General Guidelines Materials to be used Key definitions Cost of roofing Preparation of the roofing deck Materials used for roofing should conform to approved norms and regulations
StormMaster Shake GENERAL INSTRUCTIONS For Spanish Instructions Click Here (Para las Instrucciones Españolas Haga Clic Aquí)
") StormMaster Shake GENERAL INSTRUCTIONS For Spanish Instructions Click Here (Para las Instrucciones Españolas Haga Clic Aquí) IMPORTANT: THE STATEMENTS EXPRESSED ON THIS PAGE ARE THE RECOMMENDATIONS FOR
StormMaster Shake GENERAL INSTRUCTIONS For Spanish Instructions Click Here (Para las Instrucciones Españolas Haga Clic Aquí) IMPORTANT: THE STATEMENTS EXPRESSED ON THIS PAGE ARE THE RECOMMENDATIONS FOR
SECTION ASPHALT SHINGLES
 (Specifier Note: The purpose of this guide specification is to assist the specifier in correctly specifying glass-fiber-reinforced asphalt shingle products for sloped roofing applications. The specifier
Application instructions
 Application instructions ASPHALT SHINGLES SECTION 3 GENERAL INSTRUCTIONS 3.1 General Directions A Nail Requirements B Asphalt Plastic Cement C Protective Tape D Application on slopes 15/12 E High Wind