MATRIX PRO KNEE BRACE
|
|
|
- Bernadette Pope
- 5 years ago
- Views:
Transcription

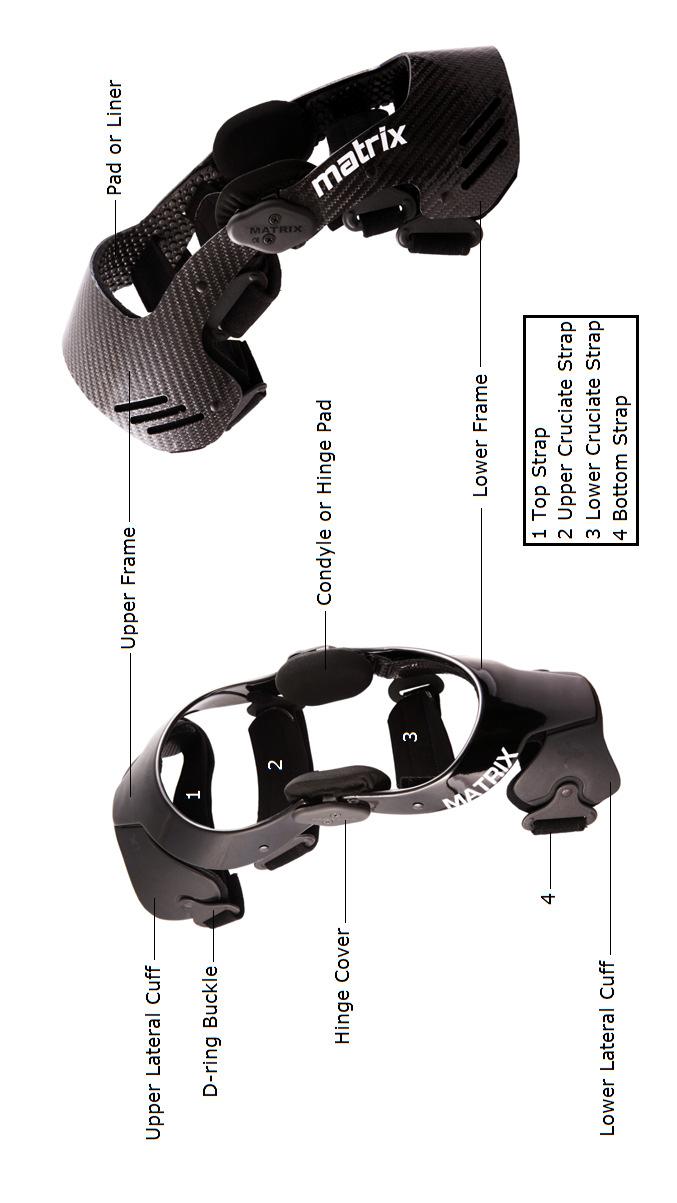
1 INSTRUCTIONS FOR USE MATRIX PRO KNEE BRACE

2 MATRIX LITE KNEE BRACE


3 SIZING CHART: Measure your knee joint width when the leg is in an even, weight bearing (straight leg) position. Use the following table as a guide to arrive at the brace size for your leg. This sizing chart is provided only as a guide. Use the brace size that is most comfortable for you.


4 STRAPPING THE BRACE: Strapping: How to strap the brace on the leg is important for both comfort and function. With the knee in bent position, as shown in the picture, place the brace over the knee so that the knee cap is centered between the hinges. Fasten the straps in the following sequence. Straps are numbered in the picture. 1. Fasten the lower cruciate strap. This is the strap just below the knee joint. Adjust the strap until it is snug and above the calf muscle. 2. Fasten the bottom most strap. Adjust it until it is snug. 3. Fasten the upper cruciate strap. This is the strap just above the knee joint. 4. Finally, fasten the top most strap. 5. Fasten snugly and ensure the straps are comfortable. Do not over tighten. Un-Strapping: Unfasten straps in any order, from the outside of the leg (lateral side). After removing the brace, fold back the hook tab onto the strap. This avoids strap entanglement and additional wear. WARNING: If the brace causes discomfort or irritation, at any point, stop using the brace immediately and contact your health care provider.
. Stops 1 and 2 limit extension by approx.")
 EX0 Zero-Full Extension EX1 0-5 Degrees EX2 5-10 Degrees Ex3 10-20 Degrees Ex4 20-30 Degrees Ex5 30-40 Degrees suggested angles are approximations only")
5 CHANGING EXTENSION STOPS: The Matrix knee braces come installed with number 0 (zero) stops in both hinges, allowing full range of motion. The included kit comes with a full set of extension stops (Ex0-Ex5). Stops 1 and 2 limit extension by approx. 5 deg each from the previous stop, while stops 3 through 5 limit extension by 10 deg each from the previous stop. Extension Stop Table to the left shows the limits of each stop, in degrees. EXTENSION STOP TABLE EXT STOP ANGLE (APPROX) EX0 Zero-Full Extension EX1 0-5 Degrees EX Degrees Ex Degrees Ex Degrees Ex Degrees suggested angles are approximations only Please use the steps below for changing the extension stops. 1. Remove the hinge cover by removing the two screws holding the hinge cover. Screw driver is provided in the kit that comes with the brace. 2. Remove the fabric hinge cover and then the foam pad on the inner side to see the screw holding the extension stop. 3. Remove the screw holding the extension stop. Once the screw is off the stop, remove the plastic extension stop. 4. Placing the new extension stop in between the frames, line up the holes of the inner plate and the extension stop, attach the screw to the stop. 5. Install the screw into the extension stop. Do not over tighten the screw. 6. Change the extension stop on the other hinge using the steps described above. Install the foam pad and the fabric condyle cover. Please note that the same numbered extension stop must be installed inside both hinges. 7. Make sure that the extension stops are installed in the identical direction as the one you removed. 8. Install both hinge covers using the two screws. Brace is now ready to use. Warning: Do not use the brace without extension stops installed properly inside both hinges.
6 BRACE MAINTENANCE: While the Matrix knee braces are designed for minimal maintenance and care, following the steps below will help maintain the braces, giving you extended use of the brace. Maintenance Do not disassemble the hinges or buckles Check regularly for foreign objects in the hinges Clean dirt from hinges using water or compressed air Lubricate the hinges, with oil or silicone spray, if necessary Washing Straps and Pads may be removed for occasional cleaning Rinse thoroughly. Hand wash using mild non-detergent soap. Air dry in the shade. Do not machine wash or place in the dryer If the product is used in salt water or chlorinated water, rinse well and air dry in the shade.

7
8 LIMITED WARRANTY: The brace comes with limited 1 year warranty for the frames and the hinges. All other parts including straps and pads come with six month limited warranty. Warranty period starts from the date of original purchase. Local distributor will repair or replace, at its discretion, any defective part covered under warranty at no charge. Warranty does not cover damages that are a result of normal wear, accident, negligence, misuse or abuse by the purchaser. In addition, collateral and incidental damages are not covered under this warranty. Only the original purchaser is entitled to claim service under this limited warranty. WARNING: The Matrix knee brace you have received is a supportive brace only. It is in no way guaranteed or intended to prevent knee injuries. The purchaser agrees to the following conditions: 1. The manufacturer accepts no responsibility for any injury incurred while using any Matrix knee brace products. The user assumes all risk associated with any activity that may cause injury or death or damage to property and waives all claims against the manufacturer. 2. The manufacturer does not make any guarantees, express or implied, regarding the fitness of any Matrix knee brace product for any particular purpose. 3. In addition, the manufacturer makes no guarantees, express or implied as to the extent to which the Matrix knee brace products protect the user or property from injury or death or damage. 4. With usage of this type of a product, it is possible for the wearer to receive various types of skin irritation, including but not limited to, rashes and pressure points. If you experience any adverse or unusual reaction while using this product, please consult your healthcare provider immediately. 5. If you have questions related to how this knee brace product is applicable to your specific needs or knee condition, please consult your health care provider.
Stop! Read This Important Information.
 Stop! Read This Important Information. Stop, Do Not Proceed, Read This This door replacement kit is designed for the replacement of doors on a Supertop ONLY! This door will not work on any other style
Installing A Carver Bimini Top
 Installing A Carver Bimini Top How To Prolong The Life Of Your Bimini Top Carver Bimini Tops are a classy way to protect yourself and your boat from the elements. They also add style and color to your
Half Door Installation Instructions
 Half Door Installation Instructions For: CJ5 (1955-1975), CJ6 (All), M38-A1 (1955-1971) Part Number: 53025 Congratulations on your purchasing decision. Bestop designed these Doors to give you years of
INSTALLATION INSTRUCTIONS CJ-5 M38A PART # With Doors
 INSTALLATION INSTRUCTIONS CJ-5 M38A1 1955-1975 PART #109-011 With Doors Thank you for purchasing Specialty s Convertible Top for your Jeep vehicle. It has been designed for great fit and long wear. Please
RAMPAGE P R O D U C T S. BRONCO ZIPPER FASTRACK TOP PART #984xx BRONCO TOOLS REQUIRED
 RAMPAGE P R O D U C T S 84 (+/- 1/4 ) BRONCO ZIPPER FASTRACK TOP PART #984xx BRONCO 1966-1977 TOOLS REQUIRED 3/8 WRENCH 7/16 WRENCH ½ WRENCH #2 PHILLIPS SCREWDRIVER 1/8 DRILL BIT 9/64 DRILL BIT 5/32 DRILL
INSTALLATION INSTRUCTIONS JEEP SCRAMBLER FAST TRAC TOP PART #108-21X
 INSTALLATION INSTRUCTIONS JEEP SCRAMBLER FAST TRAC TOP PART #108-21X Thank you for purchasing Specialty s Convertible Top for your Jeep vehicle. It has been designed for great fit and long wear. Please
HOME GYM Owner s Manual
 HOME GYM Owner s Manual Content Content-------------------------------------------------------------1 Safety precautions----------------------------------------------------2 Assembly instruction-------------------------------------------------3-12
Sailcloth Fabric Replacement Top and Doors with Tinted Side and Rear Curtains Installation Instructions
 Sailcloth Fabric Replacement Top and Doors with Tinted Side and Rear Curtains Installation Instructions TM For: Wrangler / TJ 2003 - Current Part Number: 79129 Inc. This product is only designed for the
Installing A Carver Bimini Top
 Installing A Carver Bimini Top How To Prolong The Life Of Your Bimini Top Avoid letting water or snow stand on the top. Always travel with top in the stored position. Allow Bimini Top to dry thoroughly
INSTALLATION INSTRUCTIONS Scout II - Fast Trac PART #
 INSTALLATION INSTRUCTIONS Scout II - Fast Trac PART #442-210 Thank you for purchasing Specialty s Convertible Top for your Scout vehicle. It has been designed for great fit and long wear. Please read and
Fabric Replacement Top and Doors
 Fabric Replacement Top and Doors Installation Instructions For: Wrangler/TJ 1997 and Newer Part Number: 51131 WARNING This product is designed to enhance the appearance of the vehicle and to shield the
INSTALLATION INSTRUCTIONS
 INSTALLATION INSTRUCTIONS BRONCO FAST TRAC TOP PART #331-210 BRONCO 1966-1977 Thank you for purchasing Specialty s Convertible Top for your Bronco. It has been designed for great fit and long wear. Please
Installation Instructions TrekStep Side Mount
 Installation Instructions TrekStep Side Mount Vehicle Application Ford F150 Regular Cab and Super Cab 2009 Current Part Number: 75402-15 Fits both Driver s and Passenger Side www.bestop.com - We re here
Installation Instructions Yamaha Rhino Soft Cab Enclosure
 Installation Instructions Yamaha Rhino Soft Cab Enclosure Vehicle Application Yamaha Rhino 2008 Current Part Number: 20301 www.bestoputv.com - We re here to help! Visit our web site and click on Ask a
Sailcloth Fabric Replacement Top and Doors Installation Instructions
 Sailcloth Fabric Replacement Top and Doors Installation Instructions For: Wrangler/TJ 1997-2002 Part Number: 79121 This product is only designed for the vehicles listed above. DO NOT INSTALL THIS PRODUCT
Models 2130 and 2140
 Models 2130 and 2140 Overview... 2 Tools Needed... 2 Hardware... 2 Assembly... 3-10 Installation...11 Operation... 11 Maintenance... 12 Accessories...12 Limited Warranty... 12 Perform the following sequence
Prime Engineering Up-Rite Stander
 OWNER S MANUAL PRODUCT PHOTO PARTS LIST ASSEMBLY INSTRUCTIONS MAINTENANCE WARRANTY Prime Engineering Up-Rite Stander Manufactured By Prime Engineering A Division of Axiom Industries Industries, Inc. 4202
Installation Instructions Trektop NX
 Installation Instructions Trektop NX Vehicle Application: Jeep Wrangler Unlimited TJD 2004 2006 Part Number: 56821 www.bestop.com - We re here to help! Visit our web site and click on Ask a Question. Click
Models 2230 and 2240
 Models 2230 and 2240 Overview... 2 Tools Needed... 2 Hardware...3 Assembly... 4-13 Installation... 14 Drawer Removal... 15 Operation... 15 Maintenance... 15 Accessories... 16 Limited Warranty... 16 Perform
Models 2030 and 2040
 Models 2030 and 2040 Overview... 2 Tools Needed... 2 Hardware... 2 Assembly... 3-8 Installation... 9 Operation... 9 Maintenance... 10 Accessories... 10 Limited Warranty... 10 Document # 101290 0607 Printed
Installation Instructions and Owner's Manual. Model: CJ3A, and M38, Part Number 51403
 by Installation Instructions and Owner's Manual Model: CJ3A, 1949-1953 and M38, 1950-1951 Part Number 51403 Congratulations on your purchasing decision. Bestop designed this Convertible Top to give you
INSTALLATION INSTRUCTIONS Super Scout PART #
 INSTALLATION INSTRUCTIONS Super Scout 71-80 PART #443-010 Thank you for purchasing Specialty s Convertible Top for your Scout vehicle. It has been designed for great fit and long wear. Please read and
Sunset Swings By Health in Motion, LLC
 Sunset Swings By Health in Motion, LLC Model 421 Lounge Swing Assembly and Operation Manual Record Serial Number Here www.sunsetswings.com by Health In Motion, LLC. 11/6/2009 421 Owners Assembly and Operation
Models 2130 and 2140
 Models 2130 and 2140 Overview... 2 Tools Needed... 2 Hardware... 2 Assembly... 3-10 Installation...11 Operation... 11 Maintenance... 12 Accessories...12 Limited Warranty... 12 Printed in USA 2007 Perform
Installation Instructions Sailcloth Replace-a-top
 Installation Instructions Sailcloth Replace-a-top Upper Door Skins Not Included Vehicle Application Jeep Wrangler TJ 2003-2006 Tinted Glass Windows Part Number: 79141 www.bestop.com - We re here to help!
INSTALLATION & OPERATING INSTRUCTIONS. REDCO LETTUCE KING I and LETTUCE KING IV
 INSTALLATION & OPERATING INSTRUCTIONS for REDCO LETTUCE KING I and LETTUCE KING IV Lettuce King I Shown with optional Drum Ring Lettuce King IV TO BE SERVICED ONLY BY AUTHORIZED PERSONS P/N: 2802381 REV:
Installation Manual. Tamarack Solar Products. Top of Pole Mount Edition v1.01. For models:
 Mount Installation Manual 2016 Edition v1.01 For models: UNI-TP/06 UNI-TP/06LL UNI-TP/08 UNI-TP/08LL UNI-TP/10 UNI-TP/10LL UNI-TP/12 UNI-TP/12LL UNI-TP02-MAN Table of Contents 1 Introduction 1 2 Customer
Installation Instructions Fabric Replacement Top Upper Door Skins Not Included
 Installation Instructions Fabric Replacement Top Upper Door Skins Not Included Vehicle Application Jeep Wrangler TJ 1997 and 2002 Clear Glass Windows Part Number: 51127 Jeep Wrangler TJ 1997 and 2002 Tinted
Replay Top w/ Tinted Side and Rear Windows and Upper Door Skins Installation Instructions For: Jeep Wrangler (TJ) Part Number: 51197
 Part Number: 51197") Replay Top w/ Tinted Side and Rear Windows and Upper Door Skins Installation Instructions For: Jeep Wrangler (TJ) 1997 2002 Part Number: 51197 Table of Contents FABRIC REPLACEMENT TOP PARTS LIST... PAGE
Replay Top w/ Tinted Side and Rear Windows and Upper Door Skins Installation Instructions For: Jeep Wrangler (TJ) 1997 2002 Part Number: 51197 Table of Contents FABRIC REPLACEMENT TOP PARTS LIST... PAGE
OWNER S MANUAL. Distributed by ASLI, 1011 Centre Road, Wilmington, DE Tools Required: Allen Wrench
 Tools Required: Adjustable Wrench Allen Wrench OWNER S MANUAL Retain This Manual For Reference Distributed by ASLI, 1011 Centre Road, Wilmington, DE 19805 TABLE OF CONTENTS BEFORE YOU BEGIN..... 1 IMPORTANT
MODEL 402 PORTA-NAILER For Tongue and Groove Solid Wood & Hardwood Laminate Flooring
 ACCESSORIES cont d. Cat. No. 42626 Angled Shoe Base for Nailing 3/4 Flooring over 3/4 Plywood over Concrete OWNER S MANUAL MODEL 402 PORTA-NAILER For Tongue and Groove Solid Wood & Hardwood Laminate Flooring
Please read and understand the OnBoard Timpani Cart Owner s Manual before using the Timpani Cart.
 Assembly and Owner s Manual OnBoard Timpani Cart Performance Position Towing Position CONTENTS Important User Information...........................2 General......................................2 Manufacturer.................................2
POOL FENCE STARTER KIT
 POOL FENCE STARTER KIT Complies with Australian Standard, AS1926.1-2012: Safety barriers for swimming pools INSTALLATION MANUAL DESIGNED FOR ASSEMBLY ON GRASS Pool not included WARNING! ADULT ASSEMBLY
OWNER S MANUAL with Assembly Instructions
 OWNER S MANUAL with Assembly Instructions VISIT E LIFETIME WEB SITE: WWW.LIFETIME.COM ** Do Not Contact the Store ** For Assistance, including missing or broken parts, Call Customer Service at: 1 (800)
Convertible Crib and Changer (M661/662)
") Model No.: M661/662 PO #: Serial #: Convertible Crib and Changer (M661/662) THIS PRODUCT IS NOT INTENDED FOR INSTITUTIONAL OR COMMERCIAL USE. If you have any questions or missing parts, please contact
Model No.: M661/662 PO #: Serial #: Convertible Crib and Changer (M661/662) THIS PRODUCT IS NOT INTENDED FOR INSTITUTIONAL OR COMMERCIAL USE. If you have any questions or missing parts, please contact
Installation Instructions Tigertop
 Installation Instructions Tigertop Vehicle Application Jeep CJ5 1976 1983 Part Number: 51407 www.bestop.com - We re here to help! Visit our web site and click on Ask a Question. Click here for more Jeep
2-Door EXO-Top Roof Rack System
 Page 1/29 Part 13516.01 2-Door EXO-Top Roof Rack System! WARNING The EXO-Top Roof Rack System is rated to a dynamic 300 lb, evenly distributed load. Further loading could result in serious injury or death.
Installation Instructions Windjammer
 Installation Instructions Windjammer Vehicle Application Jeep Wrangler 2003 2006 Part Number: 80032 www.bestop.com - We re here to help! Visit our web site and click on Ask a Question. Click here for more
Installation Instructions HOSS Hardtop Organized Storage System
 Installation Instructions HOSS Hardtop Organized Storage System Application: Hard Top and Doors Storage System Part Number: 42801 www.bestop.com - We re here to help! Visit our web site and click on Ask
Installation Manual Roof Zone Ladder Rack
 Installation Manual Roof Zone Ladder Rack 102113,E1346 Installation Time: About 90 minutes. Depending on truck and Do-it-Yourself experience level Tools Required: Electric Drill with 1/2 Chuck 1/2 & 7/32
Mercer Crib (M6801)- Assembly and Operation Manual
- Assembly and Operation Manual") Mercer Crib (M6801)- Assembly and Operation Manual Congratulations on purchasing this product. This crib will provide many years of service if you adhere to the following guidelines for assembly, maintenance,
Mercer Crib (M6801)- Assembly and Operation Manual Congratulations on purchasing this product. This crib will provide many years of service if you adhere to the following guidelines for assembly, maintenance,
WARNING Indicates a hazardous situation which, if not avoided, could result in death or serious injury. WARNING. Ranger XP Door Kit
 REVISION 04 November, 20 2018 Ranger XP Door Kit Prior to installation, please verify if a revised version of this instruction sheet is available on Knowledge Center. The following symbols may be used
WARNING WARNING. CAUTION Indicates a hazard which, if not. NOTICE Indicates an instruc on which, if not
 Prior to installa on, please verify if a revised version of this instruc on sheet is available on Knowledge Center. The following symbols may be used in this document. WARNING Indicates a hazardous situa
Assembly Instructions
 Assembly Instructions Item# L-DN37SCO-B (Table) Congratulations on your purchase of our SUNJOY products. Our clear, easy to follow, step-by-step instructions will guide you through the assembly process
Installation Operation Care
 Installation Operation Care Applause Honeycomb Shades LiteRise Operating System with TrimKit Contents GETTING STARTED Product View... 1 Tools and Fasteners Needed... 2 INSTALLATION Installation Overview...
2 IN 1 18GA. NAILER/STAPLER KIT
 2 IN 1 18GA. NAILER/STAPLER KIT performance plus MODEL: 8210NS INSTRUCTION MANUAL COPYRIGHT 2005 ALL RIGHTS RESERVED BY KING CANADA TOOLS INC. IMPORTANT INFORMATION 2-YEAR LIMITED WARRANTY FOR THIS 18
Installation Operation Care
 Installation Operation Care Applause Honeycomb Shades LiteRise Operating System Contents GETTING STARTED Product View...1 Tools and Fasteners Needed...2 INSTALLATION Installation Overview...3 Mount the
Installation Instructions:
 NOTE: Carefully read entire instructions thoroughly before attempting to install this part. (SB76904) Parts Included Qty 94-241CA001 Front Upright: Drvr 1 94-241CA002 Front Upright: Pass 1 94-241CA003
Installation Operation Care. Duette Honeycomb Shades EasyRise Lifting System
 Installation Operation Care Duette Honeycomb Shades EasyRise Lifting System CONTENTS Getting Started: Product View... 1 Tools and Fasteners Needed... 2 Installation: Installation Overview... 3 Mount the
Half Door Installation Instructions
 Half Door Installation Instructions For: CJ7, CJ8/Scrambler and Wrangler/YJ Part Number: 53028 Note: Wrangler/YJ Use of this product may not allow use of factory side mirrors. Note: Wrangler/YJ Use of
BOUNCE TABLE TENNIS TABLE & ACCESSORIES ASSEMBLY INSTRUCTIONS
 BOUNCE TABLE TENNIS TABLE & ACCESSORIES ASSEMBLY INSTRUCTIONS NG2325 THANK YOU! Thank you for your purchase of our product. We work around the clock and around the globe to ensure that our products maintain
Top Mount. See Installation 2 on page 2
 INSTALLATION INSTRUCTIONS TOILET SEAT Thank you for selecting American Standard the benchmark of fine quality for over 00 years. To ensure this product is installed properly, please read these instructions
IMPORTANT, RETAIN FOR FUTURE REFERENCE: READ CAREFULLY For Outdoor Use Only
 ITEM#: FG-SNP4272TBL17 San Paulo 42 x72 Oval Dining Table IMPORTANT, RETAIN FOR FUTURE REFERENCE: READ CAREFULLY For Outdoor Use Only Customer Service E-Mail : customerservice@foremostgroups.com 8:30a.m.
Half Door Installation Instructions
 Half Door Installation Instructions For: CJ5 (1955-1975), CJ6 (All), M38-A1 (1955-1971) Part Number: 53025 WARNING This product is designed primarily to enhance the appearance of the vehicle and to shield
ASSEMBLY INSTRUCTIONS
 ASSEMBLY INSTRUCTIONS ATTENTION: THIS PRODUCT IS NOT FOR COMMERCIAL USE INTENDED FOR RESIDENTIAL USE ONLY. RTSV Use the correct bolts as indicated. Do not tighten any of the bolts until the swing is completely
Installation Operation Care
 Installation Operation Care Designer Banded Shades Cassette with Custom Clutch and UltraGlide CONTENTS Getting Started Product View Custom Clutch... 1 Product View UltraGlide... 2 Tools and Fasteners Needed...
Installation Instructions Cage Kit JK Unlimited (4-Dr) Part # 76902
 Part # 76902") Please read instructions entirely before installing this product. Drilling is required to install this part. Parts Included Qty Parts Included Qty Driver Front Upright 1 Pass Side Drill Template (7289)
Please read instructions entirely before installing this product. Drilling is required to install this part. Parts Included Qty Parts Included Qty Driver Front Upright 1 Pass Side Drill Template (7289)
ASSEMBLY INSTRUCTIONS
 ASSEMBLY INSTRUCTIONS ATTENTION: THIS PRODUCT IS NOT FOR COMMERCIAL USE INTENDED FOR RESIDENTIAL USE ONLY. RUSH!!! Do not discard of any of the packaging until you have checked that you have all of the
COMPETITOR CB-610 STANDARD BENCH
 NOTE: Please read all instructions carefully before using this product Table of Contents Safety Notice COMPETITOR CB-610 STANDARD BENCH Hardware Identifier Assembly Instruction Exploded Diagram Parts List
Item # L-DN1856SST-E-SFLS SKU# Loveseat:
 Stoneridge Loveseat & Sofa Assembly Instruction Item # L-DN1856SST-E-SFLS SKU# 810330969 Loveseat: Sofa: CAUTION: Chair is for setting purpose only. Standing on or misuse of sofa and loveseat may result
Model DB Disc Caliper Brake AIR CHAMP PRODUCTS. User Manual. (i) MTY (81)
 MTY (81)") DIST. AUTORIZADO MEX (55) 53 63 3 3 QRO (44) 95 7 60 MTY (8) 83 54 0 8 AIR CHAMP PRODUCTS User Manual Model DB Disc Caliper Brake (i) FORM NO. L-00-G-030 MEX (55) 53 63 3 3 MTY (8) 83 54 0 8 DIST. AUTORIZADO
DIST. AUTORIZADO MEX (55) 53 63 3 3 QRO (44) 95 7 60 MTY (8) 83 54 0 8 AIR CHAMP PRODUCTS User Manual Model DB Disc Caliper Brake (i) FORM NO. L-00-G-030 MEX (55) 53 63 3 3 MTY (8) 83 54 0 8 DIST. AUTORIZADO
HEAVY GLASS HINGE INSTALLATION INSTRUCTIONS HINGE PARTS LIST. Tel: G D K I
 HEAVY GLASS HINGE INSTALLATION INSTRUCTIONS Tel: 800-643-1514 www.alumaxshowerdoor.com A F J E C K I H G D F L B M N HINGE PARTS LIST A. 1 Stationary Leaf With Gasket B. 1 Hinge Leaf With Gasket C. 1 Back
Be sure any accessory used will fit with the soft upper doors before installing. Not all accessories will be compatible.
 Company Name: Spike Power Sports Vehicle Name: Polaris General 2P Product Description: Soft Upper Doors Part Number: 58-1600 Revision: R01 09/19/2018 Contents: 655 Elm Ridge Ave, Canal Fulton OH, 44614
Comfort 10S Wall Hardwire Installation and Operations Manual
 Comfort 10S Wall Hardwire Installation and Operations Manual 10/24/2012 REQUIRED TOOLS STARHEAD SCREWDRIVERS DRILL & BIT FLAT HEAD SCREWDRIVERS ALLEN KEY PENCIL MEASURING TAPE LEVEL ELECTRICAL REQUIREMENTS:
CT Box and Pan Brake User Manual
 CT153 12 Box and Pan Brake User Manual Important Safety Precautions Plead read all the instructions before using this tool. 1) Always keep your work area clean. Cluttered areas invite injuries. 2) Do not
year5 Luxaflex Guarantee Guarantee, Installation and Operating Instructions Luxaflex Duette & Plissé Blinds Freehanging Models
 year5 Luxaflex Guarantee Guarantee, Installation and Operating Instructions Luxaflex Duette & Plissé Blinds Freehanging Models Guarantee, Installation and Operating Instructions Luxaflex Duette & Plissé
Replay Top with Tinted Side and Rear Windows Installation Instructions For: Jeep Wrangler (TJ) Part Number: 51141
 Part Number: 51141") Replay Top with Tinted Side and Rear Windows Installation Instructions For: Jeep Wrangler (TJ) 2003 2006 Part Number: 51141 Table of Contents FABRIC REPLACEMENT TOP PARTS LIST... PAGE 2 FABRIC REPLACEMENT
Replay Top with Tinted Side and Rear Windows Installation Instructions For: Jeep Wrangler (TJ) 2003 2006 Part Number: 51141 Table of Contents FABRIC REPLACEMENT TOP PARTS LIST... PAGE 2 FABRIC REPLACEMENT
Convertable Binimi Top Assembly and Instruction Guide
 Convertable Binimi Top Assembly and Instruction Guide Taylor Made Convertible Bimini Top Assembly and Instruction Guide: This Kit contains the following components: If you are missing any of the listed
OWNER S MANUAL STORAGE SHED MODELS: STOR-96-G-W-1RH & STOR-912-G-W-1RH
 STORAGE SHED MODELS: STOR-96-G-W-1RH & STOR-912-G-W-1RH OWNER S MANUAL Introduction.. 1 Assembly Instructions STOR-96-G-W-1RH... 2 Assembly Instructions STOR-912-G-W-1RH... 8 STOR-96-G-W-1RH Exploded Parts
WESTPORT 8' SLATE POOL TABLE ASSEMBLY INSTRUCTIONS
 WESTPORT 8' SLATE POOL TABLE ASSEMBLY INSTRUCTIONS NG2690A THANK YOU! Thank you for purchasing this product. We work around the clock and around the globe to ensure that our products maintain the highest
Installation instructions for: Visi-Guard and EZ-Guard Pool Fence Kits
 Installation instructions for: Visi-Guard and EZ-Guard Pool Fence Kits Planning: Layout Your Pool Fence Planning is the first step of any successful project. Decide where you would like your fence to surround;
10' ROUND OFFSET WITH X BASE
 10' ROUND OFFSET WITH X BASE 08807249-1 8-48681-066-1 Thank you for your purchase Thank you for your purchase! We are pleased that you have chosen Sears for your outdoor furniture purchase. We hope that
Installation Instructions Tigertop
 Installation Instructions Tigertop Vehicle Application Jeep CJ2A 1946 1948 Part Number: 51402 Jeep MB 1941 1945 Part Number: 51402 www.bestop.com - We re here to help! Visit our web site and click on Ask
COMPETITOR WM-203 COMBO BENCH
 NOTE: Please read all instructions carefully before using this product Table of Contents Safety Notice Hardware Identifier COMPETITOR WM-203 COMBO BENCH Assembly Instruction Exploded Diagram Parts List
ASSEMBLY INSTRUCTIONS
 ASSEMBLY INSTRUCTIONS ATTENTION: THIS PRODUCT IS NOT FOR COMMERCIAL USE INTENDED FOR RESIDENTIAL USE ONLY. RUSW Use the correct bolts as indicated. Do not tighten any of the bolts until the swing is completely
4-Door EXO-Top Roof Rack System
 Page 1/31 4-Door EXO-Top Roof Rack System 13516.02! WARNING The EXO-Top Roof Rack System is rated to a dynamic 300 lb, evenly distributed load. Further loading could result in serious injury or death.
100LB WEIGHT BENCH SET SF-BH6510 USER MANUAL
 100LB WEIGHT BENCH SET SF-BH6510 USER MANUAL IMPORTANT: Please read this manual carefully before using the product. Retain owner s manual for future reference. For Customer Service, please contact: support@sunnyhealthfitness.com
Basic Spring Motor Roller Shades
 Basic Spring Motor Roller Shades ATTENTION!!! READ CAREFULLY! This shade has a reliable long-lasting Spring Motor. The Spring Motor must have proper tension in order to function as intended. Handling in
SS/SW3230RTA Assembly Instructions Ready to Assemble Multimedia Lectern
 650 Anthony Trail, Suite D, Northbrook, IL 60062 Phone: (800)267-5486 Fax: (800)267-5489 www.ampli.com - info@ampli.com SS/SW3230RTA Assembly Instructions Ready to Assemble Multimedia Lectern Thank you
the slim retracting clothesline product manual
 &6 the slim retracting clothesline product manual for 4 and 6-line models HLS0046_4-6 line_owners Manual_v6.indd 1 2 Introduction Congratulations Congratulations on the purchase of your new Hills slim
PRIMO 56" FOOSBALL TABLE ASSEMBLY INSTRUCTIONS
 PRIMO 56" FOOSBALL TABLE ASSEMBLY INSTRUCTIONS NG1035 THANK YOU! Thank you for purchasing this product. We work around the clock and around the globe to ensure that our products maintain the highest possible
Snap Tabs, Chin Strap, Swing Catch, Sealed Pull Pins Stainless Steel. Contents
 Snap Tabs, etc. Stainless Steel Helmets Snap Tabs, Chin Strap, and Earphone Retainers Snap Tabs, Chin Strap, Swing Catch, Sealed Pull Pins Stainless Steel Contents SSBTM-1 1.1 Snap Tabs, Chin Strap, and
ITEM#:DNSW5102J PK IMPORTANT, RETAIN FOR FUTURE REFERENCE: READ CAREFULLY. St. Thomas Swivel Rocking Dining Chair
 ITEM#:DNSW5102J-48019-2PK IMPORTANT, RETAIN FOR FUTURE REFERENCE: READ CAREFULLY St. Thomas Swivel Rocking Dining Chair Customer Service E-Mail : customerservice@foremostgroups.com 8:30a.m. 5:00p.m. EST,
MARCY CLASSIC MCB-252 COMBO BENCH W/120 lbs Weight Set
 NOTE: Please read all instructions carefully before using this product Table of Contents Safety Notice Hardware Identifier Assembly Instruction MARCY CLASSIC MCB-252 COMBO BENCH W/120 lbs Weight Set Exploded
Spa & Hot Tub Necessities. Cover Removal System Installation & Use Manual
 Spa & Hot Tub Necessities Cover Removal System Installation & Use Manual SET-UP AND ASSEMBLY BEFORE BEGINNING ASSEMBLY, CAREFULLY READ THE FOLLOWING INFORMATION AND INSTRUCTIONS: Place all parts in a cleared
Installation Instructions Supertop with Tinted Windows
 Installation Instructions Supertop with Tinted Windows Vehicle Application: Ford Bronco 1966 1977 Part Number: 51533 www.bestop.com - We re here to help! Visit our web site and click on Ask a Question.
WARNING! READ ALL INSTRUCTIONS BEFORE USE OF THE CHANGING TABLE, ADD-ON CHANGING UNIT, OR CONTOURED CHANGING PAD.
 Crib Changer Set (5731) - Assembly and Operation Manual Congratulations on purchasing an MB Family product. This product will provide many years of service if you adhere to the following guidelines for
Owner s Manual & Safety Instructions
 Owner s Manual & Safety Instructions Save This Manual Keep this manual for the safety warnings and precautions, assembly, operating, inspection, maintenance and cleaning procedures. Write the product s
Kendall Crib (W5921)- Assembly and Operation Manual
- Assembly and Operation Manual") Kendall Crib (W5921)- Assembly and Operation Manual Congratulations on purchasing this product. This crib will provide many years of service if you adhere to the following guidelines for assembly, maintenance,
Kendall Crib (W5921)- Assembly and Operation Manual Congratulations on purchasing this product. This crib will provide many years of service if you adhere to the following guidelines for assembly, maintenance,
INSTALLATION INSTRUCTIONS TOOLS YOU WILL NEED GETTING STARTED
 INSTALLATION INSTRUCTIONS HONEYCOMB SHADES TOP-DOWN, MOVABLE ARCH Thank you for your purchase. This shade has been custom built for you from the highest quality materials. To avoid errors and save valuable
Installation Instructions Replacement Top (Part # ) Unlimited (4 Door) Replacement Top (Part # ) JK (2 Door)
 Unlimited (4 Door) Replacement Top (Part # ) JK (2 Door)") NOTE: Read entire instructions thoroughly before installing this product. It is recommended to install this Top when temperatures are above 70 degrees. The top can contract and stretch an inch or more.
NOTE: Read entire instructions thoroughly before installing this product. It is recommended to install this Top when temperatures are above 70 degrees. The top can contract and stretch an inch or more.
LM600 Landmark Permanent Blind
 LM600 Landmark Permanent Blind Get parts online at www.huntriversedge.com P/N: 23033 REV1: 02/23/16 2016 RETI All Rights Reserved INTRODUCTION Landmark Permanent Blinds are engineered with you the hunter
OPERATORS MANUAL WEEKENDER STEEL LADDER RACK
 OPERATORS MANUAL WEEKENDER STEEL LADDER RACK WWW.WEATHERGUARD.COM MODELS 1450 & 1475 1475 Shown INSTALLATION TIME Approximate installation time: 60 minutes (depending on truck equipment installation experience
PortableTM Indoor Outdoor Clotheslines
 PortableTM Indoor Outdoor Clotheslines Product Manual TO SUIT MODELS: PortableTM 170 PortableTM 120 Introduction Congratulations Congratulations on the purchase of your Portable Clothesline, which will
Installation Instructions TrekStep Side Mount
 Installation Instructions TrekStep Side Mount Vehicle Application Chevrolet Silverado / GMC Sierra All Bed Sizes 1999 Current Part Number: 75400-15 www.bestop.com - We re here to help! Visit our web site
3-PC TONNEAU COVER WITH SPORTS BAR INSTALLATION INSTRUCTIONS. 407L Toyota Hilux 2005 Onwards
 3-PC TONNEAU COVER WITH SPORTS BAR INSTALLATION INSTRUCTIONS TC004c /7 407L Toyota Hilux 005 Onwards Care Instructions: Clean Tonneau Cover with a mild detergent and water solution. Do not use abrasive
TherAdapt Products Inc. (800) phone (866) fax
 phone (866) fax") TherAdapt Products Inc. (800) 261-4919 phone (866) 892-2478 fax www.theradapt.com Feeding Chair- 2-in-1 Booster Seat Please read all of the following information before using this product. TherAdapt Products
TherAdapt Products Inc. (800) 261-4919 phone (866) 892-2478 fax www.theradapt.com Feeding Chair- 2-in-1 Booster Seat Please read all of the following information before using this product. TherAdapt Products
UNIVERSAL STAND. Owner s Manual. Visit us on the web at QUESTION Model No. UT1002
 Owner s Manual Model No. UT1002 UNIVERSAL STAND QUESTION... 1 877 393 7121 Visit us on the web at www.southerntechllc.com You will need this manual for safety instructions, operating procedures, and warranty.
TFC UPRIGHT FABRICATION MANUAL. from Fillauer LLC
 TFC UPRIGHT from Fillauer LLC FABRICATION MANUAL TFC UPRIGHT CONTOURING PROCESS FOR AFO 1. Determine calf band position, ankle joint placement, and upright clearances using a standard tracing. Place tracing
Quick Setup Guide. GLIDECAM INDUSTRIES, INC Camelot Drive Plymouth, MA Customer Service Line:
 Quick Setup Guide GLIDECAM INDUSTRIES, INC. 130-4 Camelot Drive Plymouth, MA 02360 Customer Service Line: 1-508-830-1414 Manufactured in the U.S.A. COPYRIGHT 2005 GLIDECAM INDUSTRIES, INC., ALL RIGHTS