Column Wraps. Column Wraps are non-structural. Pressure-treated posts not included.
|
|
|
- Jeffrey Melton
- 6 years ago
- Views:
Transcription


1 Column Wraps Column Wraps are non-structural. Pressure-treated posts not included.


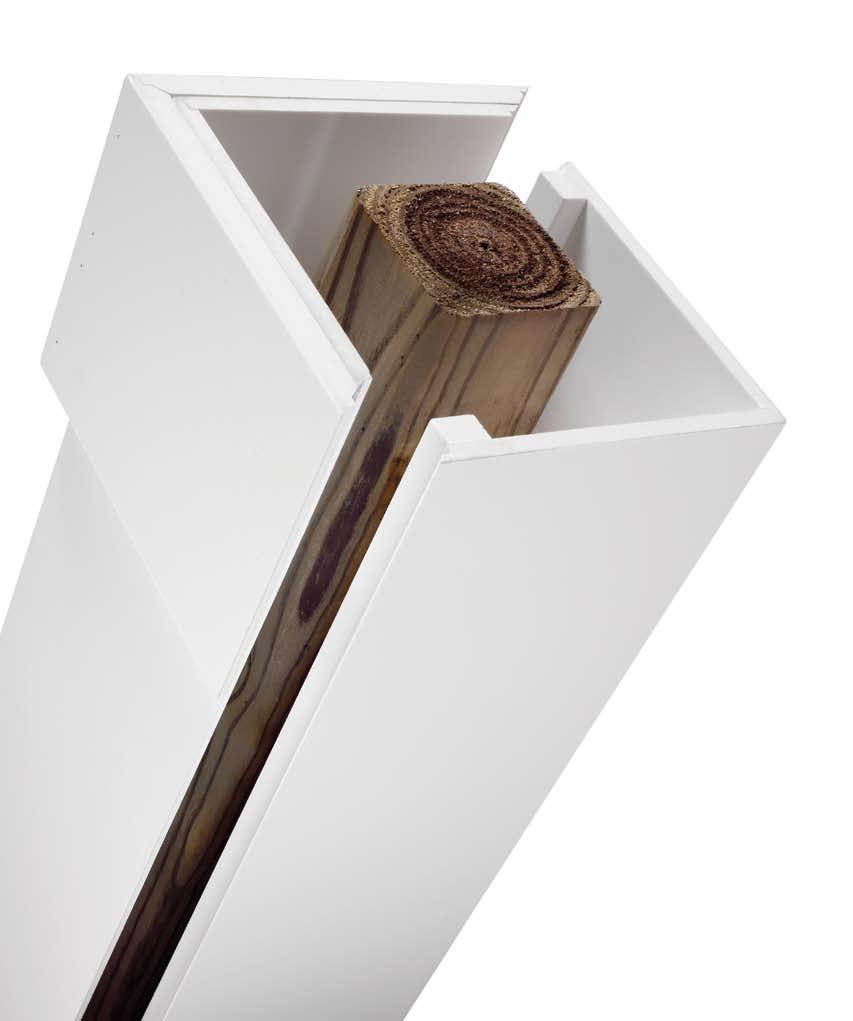
2 The transformation is amazing. For 35 years, Fypon has offered the finest millwork and moulding products in the industry beautiful, durable, easy to install and designed to meet the high standards of design and building professionals. Our new PVC Column Wraps meet those same exacting standards. Elegant and easy to install around an existing structural support, Fypon Column Wraps allow you to add the sophistication of traditional columns near the end of a building project protecting columns from incidental damage on the job site. Our unique design makes installation a breeze and Column Wraps are sold as a kit with everything you need to complete your project. In this catalog, you'll find a complete listing of all our Column Wraps. If you have any questions, we are available to assist you from 8 a.m. to 5 p.m. EST, Monday through Friday at the contact numbers listed on each page. Or visit us at for current, up-to-date information. So, if you need to add a special touch to a new job or cover an existing eyesore, trust Fypon to have the right product for your next project. Features and Benefits and Column Wraps come in a complete kit which includes the shaft, cap, base, squaring blocks, installation instructions and adhesive caulk. Our unique semi-assembled, two-piece design can be installed in about 15 minutes and allows for more installation flexibility. Fypon's squaring block supports make installation a breeze by aligning the column perfectly every time. They come ready to install around a 4" x 4" post and can be field trimmed to accommodate a larger support post. Available in multiple styles that can be used for both interior and exterior applications. Ensuring long-lasting beauty, our Column Wraps are constructed of durable PVC that won't rot, chip or flake and come with a Limited Lifetime Warranty. Standard orders deliver in five days along with the rest of your Fypon standard millwork order. 1 Phone U.S. and Canada Fax U.S. and Canada


3 How to Order Column Wraps 1 How to Measure The first step is to find an available Column Wrap size for your specific application by measuring the height required and the available clearance. a. Measure desired height. b. Measure the available clear distance space for the Column Wrap. Make sure you have enough clear distance for the wrap and the base between your support post and the porch edge. Remember the Column Wrap and base will need space on all sides of the pressure treated support post. Then select the column width that fits within the available space. Note: For tapered columns, the base will require more floor space than a non-tapered column. See installation instructions on page 19 for more information. Assured cleared distance Column Wrap Incorrect HOUSE 2 Select Style You can then find the Column Wrap you need to order by locating your desired style with corresponding measurements from step one on the following pages. Column Wraps are non-structural. Pressure-treated posts not included. Plain/Economy Plain Fluted/Double Fluted Raised Panel/Double Raised Panel Recessed Panel/Double Recessed Panel Plain Raised Panel Recessed Panel 3 Cap & Base Selection The Column Wrap kits come with a standard cap and base: kits include the Box cap and base, while tapered kits include the Craftsman cap and base. If you desire a special design, an optional cap and base can be ordered. s All Column Wraps are coded alphanumerically starting with letters as a product abbreviation, numbers showing the size and additional letters on the end describing shaft style and kit cap/base style. CW 6X120 EP 1BX Column Wrap Size = of Shaft Base & Height of Shaft Style = EP = Economy Plain Style of the Cap & Base = Box Phone U.S. and Canada Fax U.S. and Canada 2


4 Our standard Plain and Economy Plain Column Wraps add a timeless elegance to any project and are easily modified in the field. Column Wraps Fypon's PVC Column Wraps provide classic style with today's performance. They can transform an ordinary post or pole into a beautiful and elegant design element for any style home. Choose from a or Column Wrap that can be transformed into 11 different styles with an optional cap and base. Our Column Wraps come in a convenient, complete kit that includes the shaft, cap, base, squaring blocks and adhesive caulk. All Column Wraps come in the 5/8" shaft thickness, except our Economy Plain which is constructed of an economic 3/8" thick material. Standard Products We offer several sizes in our Plain and Economy Plain kits that ship within five days. The kit includes the Column Wrap, cap, base, squaring blocks, installation instructions and adhesive caulk. Optional Caps and Bases A host of optional caps and bases allow you to personalize the look of your Column Wrap for your wants and needs. Choose from 11 classic styles that can be used with both and Column Wraps and ship in four weeks. Box (Standard on ) BX Craftsman (Standard on ) CF Flat FL Greek GK Italian IT Mission MS Modern MD Prairie PR Roman RO Tuscan TS Victorian VC 3 Phone U.S. and Canada Fax U.S. and Canada


5 Special Orders Our Column Wraps feature many unique styles, with a 5/8" thick column shaft, that can be ordered and shipped within four weeks. All come as a complete kit, which includes the standard Box style cap and base. Column Wraps are available in 6", 8", 10" and 12" widths and 6', 8', 9', 10' and 12' heights. Fluted F Double Fluted DF Raised Panel RP Double Raised Panel DRP Recessed Panel RC Double Recessed Panel DRC Column Wraps are available in 8"/12", 11"/16", 13"/20" and 16"/24" top/ bottom widths and 4', 4.5', 5', 5.5', 6' and 8' heights. All come in a complete kit with a standard Craftsman cap and base and ship within four weeks. Plain TP Custom Orders Raised Panel TRP Recessed Panel TRC If you are unable to find exactly what you are looking for, custom columns are available. Call Fypon Technical Sales for a quote and visit to download a custom quote form to assist in the ordering process. Phone U.S. and Canada Fax U.S. and Canada 4
6 Plain Column Wrap Kits Height Material Thickness Shaft Inside CW6X72P1BX 6" 72" 5/8" 4 1/2" Special Order CW6X96P1BX 6" 96" 5/8" 4 1/2" Special Order CW6X108P1BX 6" 108" 5/8" 4 1/2" Special Order CW6X120P1BX 6" 120" 5/8" 4 1/2" Special Order CW8X72P1BX 8" 72" 5/8" 6 1/2" Special Order CW8X96P1BX 8" 96" 5/8" 6 1/2" STANDARD CW8X108P1BX 8" 108" 5/8" 6 1/2" STANDARD CW8X120P1BX 8" 120" 5/8" 6 1/2" STANDARD CW8X144P1BX 8" 144" 5/8" 6 1/2" Special Order CW10X72P1BX 10" 72" 5/8" 8 1/2" Special Order CW10X96P1BX 10" 96" 5/8" 8 1/2" STANDARD CW10X108P1BX 10" 108" 5/8" 8 1/2" STANDARD CW10X120P1BX 10" 120" 5/8" 8 1/2" STANDARD CW10X144P1BX 10" 144" 5/8" 8 1/2" Special Order CW12X72P1BX 12" 72" 5/8" 10 1/2" Special Order CW12X96P1BX 12" 96" 5/8" 10 1/2" STANDARD CW12X108P1BX 12" 108" 5/8" 10 1/2" STANDARD CW12X120P1BX 12" 120" 5/8" 10 1/2" STANDARD CW12X144P1BX 12" 144" 5/8" 10 1/2" Special Order Standard product ships within five (5) days, special orders ship in four (4) weeks. Comes in a kit with the Box cap/base and adhesive. Actual shaft width is 1/4" less than stated width. Economy Plain Column Wrap Kits Height Material Thickness Shaft Inside CW6X72EP1BX 6" 72" 3/8" 5" Special Order CW6X96EP1BX 6" 96" 3/8" 5" Special Order CW6X108EP1BX 6" 108" 3/8" 5" Special Order CW6X120EP1BX 6" 120" 3/8" 5" Special Order CW8X72EP1BX 8" 72" 3/8" 7" Special Order CW8X96EP1BX 8" 96" 3/8" 7" STANDARD CW8X108EP1BX 8" 108" 3/8" 7" STANDARD CW8X120EP1BX 8" 120" 3/8" 7" STANDARD CW8X144EP1BX 8" 144" 3/8" 7" Special Order CW10X72EP1BX 10" 72" 3/8" 9" Special Order CW10X96EP1BX 10" 96" 3/8" 9" STANDARD CW10X108EP1BX 10" 108" 3/8" 9" STANDARD CW10X120EP1BX 10" 120" 3/8" 9" STANDARD CW10X144EP1BX 10" 144" 3/8" 9" Special Order CW12X72EP1BX 12" 72" 3/8" 11" Special Order CW12X96EP1BX 12" 96" 3/8" 11" STANDARD CW12X108EP1BX 12" 108" 3/8" 11" STANDARD CW12X120EP1BX 12" 120" 3/8" 11" STANDARD CW12X144EP1BX 12" 144" 3/8" 11" Special Order Standard product ships within five (5) days, special orders ship in four (4) weeks. Comes in a kit with the Box cap/base and adhesive. Actual shaft width is 1/4" less than stated width. Note: Column thickness is 3/8" and the cap, base and squaring blocks are 5/8" USES SAME CAP AND BASES AS STANDARD NON-TAPERED 5/8." 5 Phone U.S. and Canada Fax U.S. and Canada


 weeks for delivery. Actual shaft width is 1/4\" less than stated width.")

7 Fluted and Double Fluted Column Wrap Kits Fluted Double Fluted Height Material Thickness Shaft Inside CW6X72F1BX CW6X72DF1BX 6" 72" 5/8" 4 1/2" CW6X96F1BX CW6X96DF1BX 6" 96" 5/8" 4 1/2" CW6X108F1BX CW6X108DF1BX 6" 108" 5/8" 4 1/2" CW6X120F1BX CW6X120DF1BX 6" 120" 5/8" 4 1/2" CW8X72F1BX CW8X72DF1BX 8" 72" 5/8" 6 1/2" CW8X96F1BX CW8X96DF1BX 8" 96" 5/8" 6 1/2" CW8X108F1BX CW8X108DF1BX 8" 108" 5/8" 6 1/2" CW8X120F1BX CW8X120DF1BX 8" 120" 5/8" 6 1/2" CW8X144F1BX CW8X144DF1BX 8" 144" 5/8" 6 1/2" CW10X72F1BX CW10X72DF1BX 10" 72" 5/8" 8 1/2" CW10X96F1BX CW10X96DF1BX 10" 96" 5/8" 8 1/2" CW10X108F1BX CW10X108DF1BX 10" 108" 5/8" 8 1/2" CW10X120F1BX CW10X120DF1BX 10" 120" 5/8" 8 1/2" CW10X144F1BX CW10X144DF1BX 10" 144" 5/8" 8 1/2" CW12X72F1BX CW12X72DF1BX 12" 72" 5/8" 10 1/2" CW12X96F1BX CW12X96DF1BX 12" 96" 5/8" 10 1/2" CW12X108F1BX CW12X108DF1BX 12" 108" 5/8" 10 1/2" CW12X120F1BX CW12X120DF1BX 12" 120" 5/8" 10 1/2" CW12X144F1BX CW12X144DF1BX 12" 144" 5/8" 10 1/2" Comes in a kit with the Box cap/base and adhesive. All Fluted Column Wraps are a special order, please allow four (4) weeks for delivery. Actual shaft width is 1/4" less than stated width. Raised Panel and Double Raised Panel Column Wrap Kits Raised Panel Double Raised Panel Height Material Thickness Shaft Inside CW8X72RP1BX CW8X72DRP1BX 8" 72" 5/8" 6 1/2" CW8X96RP1BX CW8X96DRP1BX 8" 96" 5/8" 6 1/2" CW8X108RP1BX CW8X108DRP1BX 8" 108" 5/8" 6 1/2" CW8X120RP1BX CW8X120DRP1BX 8" 120" 5/8" 6 1/2" CW8X144RP1BX CW8X144DRP1BX 8" 144" 5/8" 6 1/2" CW10X72RP1BX CW10X72DRP1BX 10" 72" 5/8" 8 1/2" CW10X96RP1BX CW10X96DRP1BX 10" 96" 5/8" 8 1/2" CW10X108RP1BX CW10X108DRP1BX 10" 108" 5/8" 8 1/2" CW10X120RP1BX CW10X120DRP1BX 10" 120" 5/8" 8 1/2" CW10X144RP1BX CW10X144DRP1BX 10" 144" 5/8" 8 1/2" CW12X72RP1BX CW12X72DRP1BX 12" 72" 5/8" 10 1/2" CW12X96RP1BX CW12X96DRP1BX 12" 96" 5/8" 10 1/2" CW12X108RP1BX CW12X108DRP1BX 12" 108" 5/8" 10 1/2" CW12X120RP1BX CW12X120DRP1BX 12" 120" 5/8" 10 1/2" CW12X144RP1BX CW12X144DRP1BX 12" 144" 5/8" 10 1/2" Comes in a kit with the Box cap/base and adhesive. All Raised Panel Column Wraps are a special order, please allow four (4) weeks for delivery. Actual shaft width is 1/4" less than stated width. Phone U.S. and Canada Fax U.S. and Canada 6


8 Recessed Panel and Double Recessed Panel Column Wrap Kits Recessed Panel Double Recessed Panel Height Material Thickness Shaft Inside CW8X72RC1BX CW8X72DRC1BX 8" 72" 5/8" 6 1/2" CW8X96RC1BX CW8X96DRC1BX 8" 96" 5/8" 6 1/2" CW8X108RC1BX CW8X108DRC1BX 8" 108" 5/8" 6 1/2" CW8X120RC1BX CW8X120DRC1BX 8" 120" 5/8" 6 1/2" CW8X144RC1BX CW8X144DRC1BX 8" 144" 5/8" 6 1/2" CW10X72RC1BX CW10X72DRC1BX 10" 72" 5/8" 8 1/2" CW10X96RC1BX CW10X96DRC1BX 10" 96" 5/8" 8 1/2" CW10X108RC1BX CW10X108DRC1BX 10" 108" 5/8" 8 1/2" CW10X120RC1BX CW10X120DRC1BX 10" 120" 5/8" 8 1/2" CW10X144RC1BX CW10X144DRC1BX 10" 144" 5/8" 8 1/2" CW12X72RC1BX CW12X72DRC1BX 12" 72" 5/8" 10 1/2" CW12X96RC1BX CW12X96DRC1BX 12" 96" 5/8" 10 1/2" CW12X108RC1BX CW12X108DRC1BX 12" 108" 5/8" 10 1/2" CW12X120RC1BX CW12X120DRC1BX 12" 120" 5/8" 10 1/2" CW12X144RC1BX CW12X144DRC1BX 12" 144" 5/8" 10 1/2" Comes in a kit with the Box cap/base and adhesive. All Recessed Panel Column Wraps are a special order, please allow four (4) weeks for delivery. Actual shaft width is 1/4" less than stated width. Plain Column Wrap Kits TOP BOTTOM Height Material Thickness Shaft Inside CW12X48TP1CF 8" 12" 48" 5/8" 6 1/2" CW12X54TP1CF 8" 12" 54" 5/8" 6 1/2" CW12X60TP1CF 8" 12" 60" 5/8" 6 1/2" CW12X66TP1CF 8" 12" 66" 5/8" 6 1/2" CW12X72TP1CF 8" 12" 72" 5/8" 6 1/2" CW12X96TP1CF 8" 12" 96" 5/8" 6 1/2" CW16X48TP1CF 11" 16" 48" 5/8" 9 1/2" CW16X54TP1CF 11" 16" 54" 5/8" 9 1/2" CW16X60TP1CF 11" 16" 60" 5/8" 9 1/2" CW16X66TP1CF 11" 16" 66" 5/8" 9 1/2" CW16X72TP1CF 11" 16" 72" 5/8" 9 1/2" CW16X96TP1CF 11" 16" 96" 5/8" 9 1/2" CW20X48TP1CF 13" 20" 48" 5/8" 11 1/2" CW20X54TP1CF 13" 20" 54" 5/8" 11 1/2" CW20X60TP1CF 13" 20" 60" 5/8" 11 1/2" CW20X66TP1CF 13" 20" 66" 5/8" 11 1/2" CW20X72TP1CF 13" 20" 72" 5/8" 11 1/2" CW20X96TP1CF 13" 20" 96" 5/8" 11 1/2" CW24X48TP1CF 16" 24" 48" 5/8" 14 1/2" CW24X54TP1CF 16" 24" 54" 5/8" 14 1/2" CW24X60TP1CF 16" 24" 60" 5/8" 14 1/2" CW24X66TP1CF 16" 24" 66" 5/8" 14 1/2" CW24X72TP1CF 16" 24" 72" 5/8" 14 1/2" CW24X96TP1CF 16" 24" 96" 5/8" 14 1/2" Comes in a kit with the Craftsman cap/base and adhesive. All Column Wraps are a special order, please allow four (4) weeks for delivery. Actual shaft width is 1/4" less than stated width. 7 Phone U.S. and Canada Fax U.S. and Canada


9 Raised Panel Column Wrap Kits TOP BOTTOM Height Material Thickness Shaft Inside CW12X48TRP1CF 8" 12" 48" 5/8" 6 1/2" CW12X54TRP1CF 8" 12" 54" 5/8" 6 1/2" CW12X60TRP1CF 8" 12" 60" 5/8" 6 1/2" CW12X66TRP1CF 8" 12" 66" 5/8" 6 1/2" CW12X72TRP1CF 8" 12" 72" 5/8" 6 1/2" CW12X96TRP1CF 8" 12" 96" 5/8" 6 1/2" CW16X48TRP1CF 11" 16" 48" 5/8" 9 1/2" CW16X54TRP1CF 11" 16" 54" 5/8" 9 1/2" CW16X60TRP1CF 11" 16" 60" 5/8" 9 1/2" CW16X66TRP1CF 11" 16" 66" 5/8" 9 1/2" CW16X72TRP1CF 11" 16" 72" 5/8" 9 1/2" CW16X96TRP1CF 11" 16" 96" 5/8" 9 1/2" CW20X48TRP1CF 13" 20" 48" 5/8" 11 1/2" CW20X54TRP1CF 13" 20" 54" 5/8" 11 1/2" CW20X60TRP1CF 13" 20" 60" 5/8" 11 1/2" CW20X66TRP1CF 13" 20" 66" 5/8" 11 1/2" CW20X72TRP1CF 13" 20" 72" 5/8" 11 1/2" CW20X96TRP1CF 13" 20" 96" 5/8" 11 1/2" CW24X48TRP1CF 16" 24" 48" 5/8" 14 1/2" CW24X54TRP1CF 16" 24" 54" 5/8" 14 1/2" CW24X60TRP1CF 16" 24" 60" 5/8" 14 1/2" CW24X66TRP1CF 16" 24" 66" 5/8" 14 1/2" CW24X72TRP1CF 16" 24" 72" 5/8" 14 1/2" CW24X96TRP1CF 16" 24" 96" 5/8" 14 1/2" Comes in a kit with the Craftsman cap/base and adhesive. All Column Wraps are a special order, please allow four (4) weeks for delivery. Actual shaft width is 1/4" less than stated width. Recessed Panel Column Wrap Kits TOP BOTTOM Height Material Thickness Shaft Inside CW12X48TRC1CF 8" 12" 48" 5/8" 6 1/2" CW12X54TRC1CF 8" 12" 54" 5/8" 6 1/2" CW12X60TRC1CF 8" 12" 60" 5/8" 6 1/2" CW12X66TRC1CF 8" 12" 66" 5/8" 6 1/2" CW12X72TRC1CF 8" 12" 72" 5/8" 6 1/2" CW12X96TRC1CF 8" 12" 96" 5/8" 6 1/2" CW16X48TRC1CF 11" 16" 48" 5/8" 9 1/2" CW16X54TRC1CF 11" 16" 54" 5/8" 9 1/2" CW16X60TRC1CF 11" 16" 60" 5/8" 9 1/2" CW16X66TRC1CF 11" 16" 66" 5/8" 9 1/2" CW16X72TRC1CF 11" 16" 72" 5/8" 9 1/2" CW16X96TRC1CF 11" 16" 96" 5/8" 9 1/2" CW20X48TRC1CF 13" 20" 48" 5/8" 11 1/2" CW20X54TRC1CF 13" 20" 54" 5/8" 11 1/2" CW20X60TRC1CF 13" 20" 60" 5/8" 11 1/2" CW20X66TRC1CF 13" 20" 66" 5/8" 11 1/2" CW20X72TRC1CF 13" 20" 72" 5/8" 11 1/2" CW20X96TRC1CF 13" 20" 96" 5/8" 11 1/2" CW24X48TRC1CF 16" 24" 48" 5/8" 14 1/2" CW24X54TRC1CF 16" 24" 54" 5/8" 14 1/2" CW24X60TRC1CF 16" 24" 60" 5/8" 14 1/2" CW24X66TRC1CF 16" 24" 66" 5/8" 14 1/2" CW24X72TRC1CF 16" 24" 72" 5/8" 14 1/2" CW24X96TRC1CF 16" 24" 96" 5/8" 14 1/2" Comes in a kit with the Craftsman cap/base and adhesive. All Column Wraps are a special order, please allow four (4) weeks for delivery. Actual shaft width is 1/4" less than stated width. Phone U.S. and Canada Fax U.S. and Canada 8

 weeks for delivery.")

10 Box Cap and Base Box Caps and Bases for Column Wraps CW6CC1BX 6" CAP 6" 7 1/4" CW6CB1BX 6" BASE 6" 7 1/4" CW8CC1BX 8" CAP 8" 9 1/4" CW8CB1BX 8" BASE 8" 9 1/4" CW10CC1BX 10" CAP 10" 11 1/4" CW10CB1BX 10" BASE 10" 11 1/4" CW12CC1BX 12" CAP 12" 13 1/4" CW12CB1BX 12" BASE 12" 13 1/4" Standard with Plain Column Wraps. Cap and base height varies with column height. Box Caps and Bases for Column Wraps TOP BOTTOM CW8CCT1BX 8" CAP 8" 9 1/4" CW12CBT1BX 12" BASE 12" 13 1/4" CW11CCT1BX 11" CAP 11" 12 1/4" CW16CBT1BX 16" BASE 16" 17 1/4" CW13CCT1BX 13" CAP 13" 14 1/4" CW20CBT1BX 20" BASE 20" 21 1/4" CW16CCT1BX 16" CAP 16" 17 1/4" CW24CBT1BX 24" BASE 24" 25 1/4" Box caps and bases are a special order, please allow four (4) weeks for delivery. Cap and base height varies with column height. Craftsman Cap and Base Craftsman Caps and Bases for Column Wraps CW6CC1CF 6" CAP 6" 9" CW6CB1CF 6" BASE 6" 9" CW8CC1CF 8" CAP 8" 11" CW8CB1CF 8" BASE 8" 11" CW10CC1CF 10" CAP 10" 13" CW10CB1CF 10" BASE 10" 13" CW12CC1CF 12" CAP 12" 15" CW12CB1CF 12" BASE 12" 15" Craftsman caps and bases are a special order, please allow four (4) weeks for delivery. Height of cap and base is 1 15/16." Craftsman Caps and Bases for Column Wraps TOP BOTTOM CW8CCT1CF 8" CAP 8" 11" CW12CBT1CF 12" BASE 12" 15" CW11CCT1CF 11" CAP 11" 14" CW16CBT1CF 16" BASE 16" 19" CW13CCT1CF 13" CAP 13" 16" CW20CBT1CF 20" BASE 20" 23" CW16CCT1CF 16" CAP 16" 19" CW24CBT1CF 24" BASE 24" 27" Standard with Plain Column Wraps. Height of cap and base is 1 15/16." 9 Phone U.S. and Canada Fax U.S. and Canada
 weeks for delivery. Height of cap and base is 5/8.")
 weeks for delivery. Height of cap and base is 5/8.")
11 Flat Cap and Base Flat Caps and Bases for Column Wraps CW6CC1FT 6" CAP 6" 8" CW6CB1FT 6" BASE 6" 8" CW8CC1FT 8" CAP 8" 10" CW8CB1FT 8" BASE 8" 10" CW10CC1FT 10" CAP 10" 12" CW10CB1FT 10" BASE 10" 12" CW12CC1FT 12" CAP 12" 14" CW12CB1FT 12" BASE 12" 14" Flat caps and bases are a special order, please allow four (4) weeks for delivery. Height of cap and base is 5/8." Flat Caps and Bases for Column Wraps TOP BOTTOM CW8CCT1FT 8" CAP 8" 10" CW12CBT1FT 12" BASE 12" 14" CW11CCT1FT 11" CAP 11" 13" CW16CBT1FT 16" BASE 16" 18" CW13CCT1FT 13" CAP 13" 15" CW20CBT1FT 20" BASE 20" 22" CW16CCT1FT 16" CAP 16" 18" CW24CBT1FT 24" BASE 24" 26" Flat caps and bases are a special order, please allow four (4) weeks for delivery. Height of cap and base is 5/8." Greek Cap and Base Greek Caps and Bases for Column Wraps CW6CC1GK 6" CAP 6" 8" CW6CB1GK 6" BASE 6" 8" CW8CC1GK 8" CAP 8" 10" CW8CB1GK 8" BASE 8" 10" CW10CC1GK 10" CAP 10" 12" CW10CB1GK 10" BASE 10" 12" CW12CC1GK 12" CAP 12" 14" CW12CB1GK 12" BASE 12" 14" Greek caps and bases are a special order, please allow four (4) weeks for delivery. Height of cap and base is 1 3/4." Greek Caps and Bases for Column Wraps TOP BOTTOM CW8CCT1GK 8" CAP 8" 10" CW12CBT1GK 12" BASE 12" 14" CW11CCT1GK 11" CAP 11" 13" CW16CBT1GK 16" BASE 16" 18" CW13CCT1GK 13" CAP 13" 15" CW20CBT1GK 20" BASE 20" 22" CW16CCT1GK 16" CAP 16" 18" CW24CBT1GK 24" BASE 24" 26" Greek caps and bases are a special order, please allow four (4) weeks for delivery. Height of cap and base is 1 3/4." Phone U.S. and Canada Fax U.S. and Canada 10
 weeks for delivery. Height of cap and base is 3 7/8.")
 weeks for delivery. Height of cap and base is 3 7/8.")
 weeks for delivery. Height of cap and base is 2 1/4.")
12 Italian Cap and Base Italian Caps and Bases for Column Wraps CW6CC1IT 6" CAP 6" 10" CW6CB1IT 6" BASE 6" 10" CW8CC1IT 8" CAP 8" 12" CW8CB1IT 8" BASE 8" 12" CW10CC1IT 10" CAP 10" 14" CW10CB1IT 10" BASE 10" 14" CW12CC1IT 12" CAP 12" 16" CW12CB1IT 12" BASE 12" 16" Italian caps and bases are a special order, please allow four (4) weeks for delivery. Height of cap and base is 3 7/8." Italian Caps and Bases for Column Wraps TOP BOTTOM CW8CCT1IT 8" CAP 8" 12" CW12CBT1IT 12" BASE 12" 16" CW11CCT1IT 11" CAP 11" 15" CW16CBT1IT 16" BASE 16" 20" CW13CCT1IT 13" CAP 13" 17" CW20CBT1IT 20" BASE 20" 24" CW16CCT1IT 16" CAP 16" 20" CW24CBT1IT 24" BASE 24" 28" Italian caps and bases are a special order, please allow four (4) weeks for delivery. Height of cap and base is 3 7/8." Mission Cap and Base Mission Caps and Bases for Column Wraps CW6CC1MS 6" CAP 6" 8" CW6CB1MS 6" BASE 6" 8" CW8CC1MS 8" CAP 8" 10" CW8CB1MS 8" BASE 8" 10" CW10CC1MS 10" CAP 10" 12" CW10CB1MS 10" BASE 10" 12" CW12CC1MS 12" CAP 12" 14" CW12CB1MS 12" BASE 12" 14" Mission caps and bases are a special order, please allow four (4) weeks for delivery. Height of cap and base is 2 1/4." Mission Caps and Bases for Column Wraps TOP BOTTOM CW8CCT1MS 8" CAP 8" 10" CW12CBT1MS 12" BASE 12" 14" CW11CCT1MS 11" CAP 11" 13" CW16CBT1MS 16" BASE 16" 18" CW13CCT1MS 13" CAP 13" 15" CW20CBT1MS 20" BASE 20" 22" CW16CCT1MS 16" CAP 16" 18" CW24CBT1MS 24" BASE 24" 26" Mission caps and bases are a special order, please allow four (4) weeks for delivery. Height of cap and base is 2 1/4." 11 Phone U.S. and Canada Fax U.S. and Canada
 weeks for delivery. Height of cap and base is 2 1/4.")
13 Modern Cap and Base Modern Caps and Bases for Column Wraps CW6CC1MD 6" CAP 6" 8" CW6CB1MD 6" BASE 6" 8" CW8CC1MD 8" CAP 8" 10" CW8CB1MD 8" BASE 8" 10" CW10CC1MD 10" CAP 10" 12" CW10CB1MD 10" BASE 10" 12" CW12CC1MD 12" CAP 12" 14" CW12CB1MD 12" BASE 12" 14" Modern caps and bases are a special order, please allow four (4) weeks for delivery. Height of cap and base is 2 1/4." Modern Caps and Bases for Column Wraps TOP BOTTOM CW8CCT1MD 8" CAP 8" 10" CW12CBT1MD 12" BASE 12" 14" CW11CCT1MD 11" CAP 11" 13" CW16CBT1MD 16" BASE 16" 18" CW13CCT1MD 13" CAP 13" 15" CW20CBT1MD 20" BASE 20" 22" CW16CCT1MD 16" CAP 16" 18" CW24CBT1MD 24" BASE 24" 26" Modern caps and bases are a special order, please allow four (4) weeks for delivery. Height of cap and base is 2 1/4." Prairie Cap and Base Prairie Caps and Bases for Column Wraps CW6CC1PR 6" CAP 6" 8" CW6CB1PR 6" BASE 6" 8" CW8CC1PR 8" CAP 8" 10" CW8CB1PR 8" BASE 8" 10" CW10CC1PR 10" CAP 10" 12' CW10CB1PR 10" BASE 10" 12" CW12CC1PR 12" CAP 12" 14" CW12CB1PR 12" BASE 12" 14" Prairie caps and bases are a special order, please allow four (4) weeks for delivery. Height of cap and base is 2 1/8." Prairie Caps and Bases for Column Wraps TOP BOTTOM CW8CCT1PR 8" CAP 8" 10" CW12CBT1PR 12" BASE 12" 14" CW11CCT1PR 11" CAP 11" 13" CW16CBT1PR 16" BASE 16" 18" CW13CCT1PR 13" CAP 13" 15" CW20CBT1PR 20" BASE 20" 22" CW16CCT1PR 16" CAP 16" 18" CW24CBT1PR 24" BASE 24" 26" Prairie caps and bases are a special order, please allow four (4) weeks for delivery. Height of cap and base is 2 1/8." Phone U.S. and Canada Fax U.S. and Canada 12
 weeks for delivery. Height of cap and base is 2 5/8.")
14 Roman Cap and Base Roman Caps and Bases for Column Wraps CW6CC1RO 6" CAP 6" 10" CW6CB1RO 6" BASE 6" 10" CW8CC1RO 8" CAP 8" 12" CW8CB1RO 8" BASE 8" 12" CW10CC1RO 10" CAP 10" 14" CW10CB1RO 10" BASE 10" 14" CW12CC1RO 12" CAP 12" 16" CW12CB1RO 12" BASE 12" 16" Roman caps and bases are a special order, please allow four (4) weeks for delivery. Height of cap and base is 2 5/8." Roman Caps and Bases for Column Wraps Tuscan Cap and Base TOP BOTTOM CW8CCT1RO 8" CAP 8" 12" CW12CBT1RO 12" BASE 12" 16" CW11CCT1RO 11" CAP 11" 15" CW16CBT1RO 16" BASE 16" 20" CW13CCT1RO 13" CAP 13" 17" CW20CBT1RO 20" BASE 20" 24" CW16CCT1RO 16" CAP 16" 20" CW24CBT1RO 24" BASE 24" 28" Roman caps and bases are a special order, please allow four (4) weeks for delivery. Height of cap and base is 2 5/8." Tuscan Caps and Bases for Column Wraps CW6CC1TS 6" CAP 6" 9 1/16" CW6CB1TS 6" BASE 6" 9 1/16" CW8CC1TS 8" CAP 8" 11 1/16" CW8CB1TS 8" BASE 8" 11 1/16" CW10CC1TS 10" CAP 10" 13 1/16" CW10CB1TS 10" BASE 10" 13 1/16" CW12CC1TS 12" CAP 12" 15 1/16" CW12CB1TS 12" BASE 12" 15 1/16" Tuscan caps and bases are a special order, please allow four (4) weeks for delivery. Height of cap is 3 1/4" and height of base is 5 1/4." Tuscan Caps and Bases for Column Wraps TOP BOTTOM CW8CCT1TS 8" CAP 8" 11 1/16" CW12CBT1TS 12" BASE 12" 15 1/16" CW11CCT1TS 11" CAP 11" 14 1/16" CW16CBT1TS 16" BASE 16" 19 1/16" CW13CCT1TS 13" CAP 13" 16 1/16" CW20CBT1TS 20" BASE 20" 23 1/16" CW16CCT1TS 16" CAP 16" 19 1/16" CW24CBT1TS 24" BASE 24" 27 1/16" Tuscan caps and bases are a special order, please allow four (4) weeks for delivery. Height of cap is 3 1/4" and height of base is 5 1/4." 13 Phone U.S. and Canada Fax U.S. and Canada


15 Victorian Cap and Base Victorian Caps and Bases for Column Wraps CW6CC1VC 6" CAP 6" 11 1/2" CW6CB1VC 6" BASE 6" 11 1/2" CW8CC1VC 8" CAP 8" 13 1/2" CW8CB1VC 8" BASE 8" 13 1/2" CW10CC1VC 10" CAP 10" 15 1/2" CW10CB1VC 10" BASE 10" 15 1/2" CW12CC1VC 12" CAP 12" 17 1/2" CW12CB1VC 12" BASE 12" 17 1/2" Victorian caps and bases are a special order, please allow four (4) weeks for delivery. Height of cap and base is 3 5/8." Victorian Caps and Bases for Column Wraps TOP BOTTOM CW8CCT1VC 8" CAP 8" 13 1/2" CW12CBT1VC 12" BASE 12" 17 1/2" CW11CCT1VC 11" CAP 11" 16 1/2" CW16CBT1VC 16" BASE 16" 21 1/2" CW13CCT1VC 13" CAP 13" 18 1/2" CW20CBT1VC 20" BASE 20" 25 1/2" CW16CCT1VC 16" CAP 16" 21 1/2" CW24CBT1VC 24" BASE 24" 29 1/2" Victorian caps and bases are a special order, please allow four (4) weeks for delivery. Height of cap and base is 3 5/8." Phone U.S. and Canada Fax U.S. and Canada 14


16 Warranty Guidelines Before Installation, please keep in mind that Fypon Cellular PVC Products: Should be used for decorative purposes only, not to provide structural support. Always check local building codes for regional installation requirements. If installing with a rail system, internal blocking must be used and the railing system must be secured into the support beam. Please refer to the installation guidelines and the local building codes. Should never be installed with mechanical fasteners only. For best results, always use coated or stainless steel fasteners along with PVC adhesive for joining boards. Are easy to repair. Use PVC adhesive to quickly fill dents or gashes. Broken moulding can easily be successfully rejoined with PVC adhesive. Should be stored on a flat level surface. Should never be placed in an area subject to solar temperature buildup, such as behind a storm door. May require altered installation procedures to meet local specifications. Check local building codes. The installation suggestions are to be used only as a guideline. Fypon assumes no liability for any damages, including but not limited to personal, property incidental, or consequential damages, resulting from the installation of its products. Using paint with a Light Reflectance Value (LRV) of 54% or lower will void the warranty. Fypon's sole responsibility in connection with the sale and installation of its products is the limited warranty set forth on the following page Phone U.S. and Canada Fax U.S. and Canada

 for evaluation. Fypon, Ltd. will then review the situation and determine if replacement, repair or refund of the product is appropriate.")
17 Fypon Cellular PVC Trim Lifetime Limited Warranty Fypon, Ltd. provides a LIFETIME LIMITED WARRANTY to the original purchaser of the Fypon Cellular PVC Trim material. This LIFETIME LIMITED WARRANTY provides that the Fypon Cellular PVC material will be free from defects in material and workmanship under normal use. If a defect is found in a Fypon Cellular PVC Trim product and the above conditions have been met, a customer should notify Fypon, Ltd. in writing within thirty (30) days of discovering the defect. The customer may be required to return the product to Fypon, Ltd. (at his or her expense) for evaluation. Fypon, Ltd. will then review the situation and determine if replacement, repair or refund of the product is appropriate. This warranty does not include labor, transportation costs or any other expenses of any kind incurred in connection with the purchase, use or installation of the product. Replacement, repair or refund is the sole and exclusive option under the limited warranty. This limited warranty does not cover damages resulting from mishandling in transit (if within the customer's control), acts of God, customer alteration, vandalism, misuse, abuse, improper maintenance, unreasonable care or other causes not arising from defects in workmanship and materials. THERE ARE NO WARRANTIES, EXPRESS OR IMPLIED, WRITTEN OR ORAL, INCLUDING ANY WARRANTIES OF MERCHANTABILITY OR FITNESS FOR PURPOSE, OTHER THAN AS EXPRESSED HEREIN. No person, agent, distributor, dealer, service facility, or company is authorized to change, modify or amend the terms of this limited warranty in any manner or fashion whatsoever, except to the extent provided in this limited warranty. Fypon, Ltd. shall not be liable to the customer or to any other person for any incidental or consequential damages or loss of profit resulting from any defect in the product. Fypon, Ltd. assumes no liability for any damages, including but not limited to personal, property, incidental, or consequential, damages, resulting from the installation of its products. This warranty does not cover painted finishes or coating applied to the product by the original purchaser or any third party. Failure to adhere to Manufacturer's recommended guidelines for application of painted surfaces shall void the warranty. Some states do not allow limitations on how long an implied warranty lasts, or the exclusion or limitation of incidental or consequential damages, so that the above limitation or exclusion may not apply. This warranty gives you specific legal rights. You may also have other rights, which vary from state to state. Phone U.S. and Canada Fax U.S. and Canada 16
18 Column Wrap Installation Before You Begin Fypon PVC Column Wraps are non-structural and will require an existing support post. The Column Wrap is designed to install around a previously installed structural post. The structural post (not included) provides the load-bearing component of the column, and the load-bearing capacity is determined by the physical properties of the structural post. Do not use untreated lumber for structural posts. Possible infiltration of water and condensation inside the PVC column shaft can cause degradation of untreated lumber. The bottom of the structural post should be mounted to a wooden deck or concrete/ masonry porch floor using a code-approved method and post anchor. The top of the structural post should be mounted to the beam using a code-approved method and post-to-beam mounting bracket. Note: Check applicable building codes for specific installation requirements. Kit Contents L-shaped PVC Column Half (2), L-shaped Cap Half (2), L-shaped Base Half (2), L-Shaped Internal Squaring Blocks (4), One tube of Siroflex Duo-Sil Adhesive Caulk. For more information see page 22 Materials Needed Safety glasses, tape measure, miter saw, jigsaw or skill saw, combination square, hammer or pneumatic nailer, nail countersink, rust-resistant finishing nails, caulk gun, exterior spackling, damp cloth, sandpaper, pencil, latex- or oil-based paint for finish color. 1 Measure, square off and cut to length with a skill saw or jigsaw. 2 Squaring Blocks Attach the four (4) squaring blocks (included) to the floor and to the header. The squaring blocks can be attached using staples, nails, screws or adhesive. The squaring blocks wrap around the structural post and act as an indexing block for the Column Wrap. Be sure that they are square and plumb at the top and bottom. Squaring blocks are designed to go around a 4" x 4" pressuretreated structural post. They can be field trimmed to accommodate a larger support post. Tip: Direct contact with the concrete floor surface is acceptable. 3 Treated Lumber (4x4) PVC Column Additional Blocking If installing a balustrade railing system, pressure treated blocking must be installed at the height where the railing will be attached. Blocking is not included in the kit. The final thickness of the blocking must span the entire space between the support post and the inside surface of the Column Wrap. Mounting screws must be long enough to go through the blocking into the support post for proper installation Phone U.S. and Canada Fax U.S. and Canada

19 Install one L-shaped column half around the structural post and attach to the top- and bottom-internal squaring blocks. Note: If you are using the 3/8" thick Column Wrap with the nailing cleats install this L-shaped section with the cleats attached first. This will allow you to drive the fasteners for the second section into the cleat. Note: There are not cleats in columns with a 5/8" thickness. Section 1 with Nailing Cleat 4 Apply provided adhesive caulk to the two mitered edges of the L-shaped column shaft. Slide the second L-shaped column half in place and push the mitered edges together, making sure to match the edges with the arrows on them. Screw top and bottom of the column shaft into the top and bottom squaring blocks. Fasten screws 3/4" away from the seam to ensure you are gripping enough material. Fasten the column along both edges, as well as attaching it to the squaring blocks. Fasten the column edges every 6 to 8 inches using 1-1/4" rust-resistant staples or finish nails. Wipe off any adhesive caulk squeeze out with a damp cloth. It is important to wipe off the excess adhesive caulk before it dries. 5 6 Attach the cap and base collars to the column shaft. The cap and base are labeled for your convenience. Apply adhesive to the mitered edges and wrap the collars around the shaft at the top and bottom. Fasten the collars to the shaft and fasten both halves together at the corners. Wipe off any adhesive squeeze out with a damp cloth. Use the provided adhesive to caulk the small gap between the back of the collars and the column shaft. Use lightweight spackle to fill in the nail and staple holes. 7 Phone U.S. and Canada Fax U.S. and Canada 18
20 Column Wrap Installation Before You Begin Fypon PVC Column Wraps are non-structural and will require existing support post. The Column Wrap is designed to install around a previously installed structural post. The structural post (not included) provides the load-bearing component of the column, and the load-bearing capacity is determined by the physical properties of the structural post. Do not use untreated lumber for structural posts. Possible infiltration of water and condensation inside the PVC column shaft can cause degradation of untreated lumber. The bottom of the structural post should be mounted to a wooden deck or concrete/ masonry porch floor using a code-approved method and post anchor. The top of the structural post should be mounted to the beam using a code-approved method and post-to-beam mounting bracket. Note: Check applicable building codes for specific installation requirements. Kit Contents L-shaped PVC Column Half (2), L-shaped Cap Half (2), L-shaped Base Plinth Half (2), L-Shaped Internal Squaring Blocks (2), Internal Nailing Cleats for Base (4), One tube of Siroflex Duo-Sil Adhesive Caulk. For more information see page 22 Materials Needed Safety glasses, tape measure, miter saw, jigsaw or skill saw, combination square, hammer or pneumatic nailer, nail countersink, rust resistant finishing nails, caulk gun, exterior spackling, damp cloth, sandpaper, pencil, latex- or oil-based paint for finish color. 1 Before you begin installation, dry fit the Column Wrap into position to ensure the column base taper is correct and that the base doesn't project beyond the deck or porch. Please check local Correct Incorrect safety codes before installation for any regional requirements. Follow local installation code requirements. 2 Measure and cut the column to the field-measured height, minus the thickness of the base plinth, which is 5/8" thick. For example, if the field measured height is 59 inches, cut the column shaft to Base Plinth 5/8" 58 3/8." This can be done using a jig saw or skill saw. NOTE: Field trimming can be done at the column shaft base only! 3 Treated Lumber (4x4) PVC Column Additional Blocking If installing a balustrade railing system, pressure treated blocking must be installed at the height where the railing will be attached. Blocking is not included in the kit. The final thickness of the blocking must span the entire space between the support post and the inside surface of the Column Wrap. Mounting screws must be long enough to go through the blocking into the support post for proper installation Phone U.S. and Canada Fax U.S. and Canada
21 Temporarily put the two halves of the base plinth together on a level surface. Draw a line from the top right corner diagonally 4 across the square to the bottom left corner. Repeat with the other two corners. Center the column on the square. Make sure each corner of the column is touching the pencil lines and you have an equal distance all of the way around the outside column. Remove one half of the column shaft and mark the inside edge of the remaining L-shaped half on the top of the base plinth. Mark 5 the outside edge as well. Repeat with the other half of the shaft. Align the outside edges of the internal-mounting cleat strips with the pencil mark you made in Step 4, locating the inside edge of the column shaft. Slide the two halves of the base plinth around the structural post. Align and push the two halves of the base plinth together. Align column on the base Column Wrap Cleats Column Wrap Squaring Block 6 Screw the loose end of the mounting cleats to the second half of the base plinth. For the moment, leave the base plinth unattached to the floor (or to the column pier, as shown in this photo.) 7 Install the internal-top squaring block cleats to the header. This may be done using staples, nails, screws or adhesive. Screw the top of one L-shaped column half to the edge of the top squaring block. Note: Install the L-shaped half with the nailing cleat first. Section 1 with Nailing Cleat 8 (continued on following page) Phone U.S. and Canada Fax U.S. and Canada 20


22 9 Screw the bottom of the L-shaped column half to the edge of the bottom internal cleats. At this point, the base plinth should still not be mounted to the floor (or to the column pier, as shown in this photo.) Apply provided adhesive caulk to the two mitered edges of the L-shaped column shaft. 10 Slide the second L-shaped column half in place, and push the mitered edges together, making sure to match the edges with the arrows on them. Screw the top and bottom of the column shaft into the top squaring block and bottom mounting cleats. Fasten the column on both edges. Fasten the column every 6 to 8 inches using 1 1/4" long rust-resistant staples or finish nails. Wipe off any adhesive caulk squeeze out with a damp cloth. The adhesive caulk cleans up with water. It is important to wipe off the excess adhesive caulk before it dries. 11 Base Plinth Center the column and attach the 5/8" base plinth to the floor or the pier base with appropriate masonry or galvanized/stainless steel wood screws. The base moulding trim in Step 12 will cover the screws. 12 Fit the pre-mitered cap and base mouldings to the column shaft. To trim these to length it will necessary to use a power miter box. Fasten in place with the same pneumatic fasteners used to attach the halves of the column shaft together. Caulk the gap between the cap and base and the shaft with the same adhesive caulk. Wipe off any excess caulk with a damp cloth. Use lightweight spackle to fill staple or nail holes. This completes your installation Phone U.S. and Canada Fax U.S. and Canada

23 Temperature Related Issues Cellular PVC becomes brittle in colder temperatures, causing it to be susceptible to damage. It is recommended that the material be warmed around 50 to 55 degrees before installing. This can be accomplished by moving the pieces into a heated space and allowing adequate time for the temperature of the material to increase. This warming procedure allows the columns to be installed when the outdoor ambient temperature is considerably cooler than 50 degrees. If you are unable to warm the columns before installation, you should pre-drill the nail or screw holes to avoid fractures. Be careful when nailing the columns, trying to avoid striking the column faces with a hammer. Cutting and Fastening Cellular PVC can easily be cut with conventional carpentry and woodworking tools. Small pneumatic finish nailers and staplers can be used to fasten the Column Wrap. Large pneumatic framing staplers and nailers are not suitable for fastening this material as the percussion of the drivers can fracture the PVC material. Coarse thread, galvanized or stainless-steel drywall screws are also suitable as fasteners. It is suggested that pilot holes be used for screws longer than 1 5/8." Painting and Finishing Caulk where required using Siroflex brand Sealant and Adhesive provided. Use lightweight spackle to fill any staple or nail holes. Lightly sand or scuff column surface. Clean the surface of column to remove any dirt or hand oil residue with light detergent and water, denatured alcohol, or window cleaner. Be sure to remove soap residue with clean water. Follow Sherwin Williams paint instructions, available at com. For best performance, paint Cellular PVC using light colors with a Light Reflective Value of 55% or higher. Dark colors will have an impact on the expansion and contraction of the material. Note: Using paint with a LRV value of 54% or lower will void the warranty. Phone U.S. and Canada Fax U.S. and Canada 22


24 The Right Stuff. The right stuff. It's everything we are. Everything we make. And how we go about making it. It's our commitment to you to be the best that we can possibly be. At Fypon, our goal is to have the right product for every possible application. Through a state-of-the-art, streamlined manufacturing process, Fypon creates intricate, richly detailed moulding and millwork pieces with unmatched quality control and unparalleled efficiency. This efficiency allows us to offer lead-times that set the industry standard, combined with dedicated service that allows us to respond to the ever-changing needs of our customers with innovative new products. All to prove, no matter what the project, you can trust Fypon to have the right stuff. 960 West Barre Road Archbold, OH Phone: U.S. and Canada Fax: U.S. and Canada info@fypon.com Fypon is a registered trademark and The Right Stuff. is a trademark of Fypon, Ltd. All rights reserved. Changes to the products may have been made since publication. Please consult your supplier prior to ordering Fypon, Ltd. Printed in U.S.A. For complete information on all Fypon product categories Louvers, E-Vents, Window and Door Trim, Mouldings, Decorative Millwork, Balustrade Systems, Columns and Cellular PVC Trim consult our comprehensive, full-line catalog or visit FY330 / 0606 Publication No
PVC Column Wraps - Semi-Assembled INSTALLATION INSTRUCTIONS
 - Semi-Assembled INSTALLATION INSTRUCTIONS Page 1 of 2 Materials Needed Safety Glasses Pencil Tape Measure Miter, Jig or Skill Saw Combination Square Hammer or Air Nailer Nail Countersink Flat Head Fasteners
Craftsman Style Columns. Ease of installation Interior or exterior use Quick Ship from inventory Made-to-Order services CAD drawings / shop drawings
 Craftsman Style Columns Craftsman Style Columns S O L U T I O N S Complete kits Low maintenance PVC Square tapered columns Square non-tapered columns Architect library on web Ease of installation Interior
Endura-Classic Craftsman Information
 Endura-Classic Craftsman Information Endura Classic Craftsman Series Columns have a Limited Lifetime Warranty against rot, corrosion and moisture damage. Endura Classic Craftsman Series Columns are manufactured
Make every component count.
 Make every component count. Technical Bulletin Installation Instructions ABOUT THE MATERIAL The frame and material have been thoroughly tested for strength, durability and low maintenance, offering a never
A. Columns: Worthington Millwork; Cellular Polyvinyl Chloride (PVC) columns; decorative, weatherproof, insect-proof, and highly durable.
 columns; decorative, weatherproof, insect-proof, and highly durable.") WorthingtonWrap PVC Columns Architectural Specifications 1.1 SECTION INCLUDES A. Columns: Worthington Millwork; Cellular Polyvinyl Chloride (PVC) columns; decorative, weatherproof, insect-proof, and highly
WorthingtonWrap PVC Columns Architectural Specifications 1.1 SECTION INCLUDES A. Columns: Worthington Millwork; Cellular Polyvinyl Chloride (PVC) columns; decorative, weatherproof, insect-proof, and highly
Balustrades & Columns
 Balustrades & Columns Look and feel of wood without the maintenance Most non-corrosive fasteners are concealed Variety of styles and sizes define both indoor and outdoor spaces Make porches, patios, balconies
GENERAL INSTALLATION GUIDE: WARRANTY: PRODUCT INFORMATION T F
 GENERAL INSTALLATION GUIDE: Unless otherwise indicated, all Seven Oaks M.U. Architectural Products materials are to be used for decorative purposes only. All products must be installed using ample amount
INSTALLATION GUIDE. 5" Balustrade System
 5" Balustrade System PARTS LIST ITEM QTY A PORCH POST INSTALLATION KIT (PPK6) (SEE STEP 3C) 5 1/2" x 5 1/2" Trim Collar 2 2" Wide x 1 1/2" x 2" Angle Bracket 4 MATERIALS NEEDED INSTALLATION GUIDE #14 x
INSTALLATION SUGGESTIONS LEVEL APPLICATION LIMITED WARRANTY
 INSTALLATION SUGGESTIONS LEVEL APPLICATION LIMITED WARRANTY L.J. Smith, Inc. issues the following Limited Warranty: The product(s) furnished hereunder are warranted to be free from defects in material
KNEEWALL APPLICATION
 INSTALLATION SUGGESTIONS KNEEWALL APPLICATION LIMITED WARRANTY L.J. Smith, Inc. issues the following Limited Warranty: The product(s) furnished hereunder are warranted to be free from defects in material
HOW TO INSTALL ELITE PANELED WAINSCOTING Using X-Rails with Either Raised, Flat or Beaded Panels
 HOW TO INSTALL ELITE PANELED WAINSCOTING Using X-Rails with Either Raised, Flat or Beaded Panels 1. First, remove the cover plates from all electrical outlets. All baseboards should also be removed; the
MANCHESTER VANITY BASE
 MANCHESTER VANITY BASE INSTALLATION INSTRUCTIONS Questions? Call our customer service department at 1-855-995-5578, 8:30 a.m. - 5 p.m., EST, Monday - Friday or e-mail: contactus@magickwoods.com. Models:
Page 1 of 18. SunRail System Installation Instructions
 Page 1 of 18 SunRail System Installation Instructions Page 2 of 18 SunRail Stainless Steel Railing Installation Guide Table of Contents Before You Begin 3 Installing Surface Mount Bases for a Two Rail
340 & 350 SERIES BATH ENCLOSURES
 INSTALLATION INSTRUCTIONS 340 & 350 SERIES BATH ENCLOSURES 800-643-1514 www.alumaxbath.com Copyright Alumax Bath Enclosures 2010. All rights reserved. LIMITED WARRANTY AND REMEDY ALUMAX BATH ENCLOSURES
Installation Instructions
 www.marlite.com Effective Date 03/01/2018 ARTIZAN FRP, SYMMETRIX FRP, ENVUE FRP, STANDARD FRP Installation Instructions Statements expressed in this technical bulletin are recommendations for the application
Installation Guidelines. Next Dimension. Single Hung / Single Hung Fixed / Double Hung / Sliding Window / Fixed Window
 Installation Guidelines Next Dimension Single Hung / Single Hung Fixed / Double Hung / Sliding Window / Fixed Window Windsor Windows & Doors Windsor Windows & Doors 900 S. 19 th St. 2210 Stafford St. Extn
Beams INSTALLATION INSTRUCTIONS
 Beams INSTALLATION INSTRUCTIONS Page 1 of 1 You may wish to paint, stain or faux finish your decorative millwork piece prior to installation. This can speed up installation and reduce errors (spilling
340 & 350 SERIES DELUXE FRAMELESS BYPASS
 BATH ENCLOSURES An Alcoa Company Tel: 800-643-1514 Fax: 870-234-3181 www.alumaxbath.com INSTALLATION INSTRUCTIONS 340 & 350 SERIES DELUXE FRAMELESS BYPASS BATH ENCLOSURES Copyright Alumax Bath Enclosures
Balustrade Systems / Installation Instructions
 A. PARTS AND SUPPLIES NEEDED FOR INSTALLATION Hardware included for each 10 section of rail: 2 3 x 1-1/2 L-brackets 4 1-3/4 x 3/16 Blue hex-head screws for anchoring the L-brackets to the newel cap, column
QWALL 5.2 (2 Back Panels)
") QWALL 5. ( Back Panels) SHOWER ACRYLIC WALL INSTALLATION INSTRUCTIONS IMPORTANT DreamLine TM reserves the right to alter, modify or redesign products at any time without prior notice. For the latest up-to-date
QWALL 5. ( Back Panels) SHOWER ACRYLIC WALL INSTALLATION INSTRUCTIONS IMPORTANT DreamLine TM reserves the right to alter, modify or redesign products at any time without prior notice. For the latest up-to-date
Flex Trim Flexible Mouldings
 Flexible Mouldings Flex Trim Flexible Mouldings SOLUTIONS Advanced polymer composite Quick Ship from large inventory Made to order custom sizes and shapes Cost advantage over wood shapes Straight pieces
Installation Instructions Free-Standing Pergola
 Outdoor Distinctions 303 W. Carmel Drive Carmel, IN 46032 844.345.2424 www.outdoordistinctions.com Free-Standing Pergola Harmony Series (14 x 10, 14 x 12, 14 x 14, 14 x 16, 14 x 18, 14 x 20) 1 (14 x 10,
INSTALLATION MANUAL VERANDA ENCLAVE RAILING. Model # SEC17 EW R15 PRE W/H SEC17 EW R15 KD W/HW SEC17 EWS R13 KD W/H
 Model # SEC17 EW R15 PRE W/H SEC17 EW R15 KD W/HW SEC17 EWS R13 KD W/H INSTALLATION MANUAL VERANDA ENCLAVE RAILING Questions, problems, missing parts? Before returning to the store, call Veranda Customer
CXT PRO RAILING INSTALLATION INSTRUCTIONS For Installations Using Aluminum and Glass Balusters Sold Separately
 CXT PRO RAILING INSTALLATION INSTRUCTIONS For Installations Using Aluminum and Glass Balusters Sold Separately CCRR-0171 PFS AA-652 Drill/power screwdriver Assorted drill bits Hammer Miter or circular
Endura-Stone Installation Instructions
 Endura-Stone Installation Instructions 1. Measure the total distance from the bottom of the beam to the platform. 2. Using a jack and post, jack up the beam only enough to remove the sting post, no more
Vanity top, faucet and drain not included. 1-3/8 screws (x 2) (for middle and bottom drawers) Knobs (x 5)
 (for middle and bottom drawers) Knobs (x 5)") ASHWELL VANITY BASE INSTALLATION INSTRUCTIONS Nutmeg models: 30176, 30177, 30178, 30179 Dark chocolate models: 30183, 30184, 30185, 30186 Gray models: 30190, 30191, 30192, 30193 Matte white models: 30197,
ASHWELL VANITY BASE INSTALLATION INSTRUCTIONS Nutmeg models: 30176, 30177, 30178, 30179 Dark chocolate models: 30183, 30184, 30185, 30186 Gray models: 30190, 30191, 30192, 30193 Matte white models: 30197,
ALUMINUM FENCE. Additional freight charges may apply depending on order size. Please call for quote at
 ALUMINUM FENCE Additional freight charges may apply depending on order size. Please call for quote at 1-888-662-1788 Powder Coat Finish FORGERIGHT Fences are offered in the choice of three colors: Black,
limited lifetime warranty
 PRODUCT CARE PACKET bellmont 1900 series limited lifetime warranty At Bellmont Cabinet Company, we are proud of the quality, design and construction of our Bellmont 1900 series. We make every effort to
QWALL 4 ACRYLIC SHOWER WALL INSTALLATION INSTRUCTIONS
 QWALL 4 ACRYLIC SHOWER WALL INSTALLATION INSTRUCTIONS IMPORTANT DreamLine TM reserves the right to alter, modify or redesign products at any time without prior notice. For the latest up-to-date technical
Linear Shower Bases 6030 Linear RH Drain (LBUxx603025R) 6030 Linear LH Drain (LBUxx603025L)
 6030 Linear LH Drain (LBUxx603025L)") DO NOT RETURN PRODUCT OR CONTACT STORE! FOR QUESTIONS OR CONCERNS please call or e-mail our customer support team 8:00am-4:30pm EST. Monday - Friday 1-800-458-9036 lyonssupport@lyonsindustries.com 6032
DO NOT RETURN PRODUCT OR CONTACT STORE! FOR QUESTIONS OR CONCERNS please call or e-mail our customer support team 8:00am-4:30pm EST. Monday - Friday 1-800-458-9036 lyonssupport@lyonsindustries.com 6032
Veranda Decorative Lattice & Deck Skirting Special Order Catalog
 Veranda Products. Built by Barrette. Veranda Decorative Lattice & Deck Skirting Special Order Catalog NEW! Designer Series Deck Skirting in 4 styles V1 2/17 1 Your Decorative Lattice Options Choose the
INSTALLATION GUIDE CABINETRY
 INSTALLATION GUIDE CABINETRY The instructions given here serve as general guidelines on how to install full-access cabinets in a reasonably simple installation. Many cabinet designs and installations may
QWALL TUB TUB ACRYLIC BACK WALL INSTALLATION INSTRUCTIONS
 QWALL TUB TUB ACRYLIC BACK WALL INSTALLATION INSTRUCTIONS IMPORTANT DreamLine TM reserves the right to alter, modify or redesign products at any time without prior notice. For the latest up-to-date technical
Sonoma Outdoor Kitchen Pergola. Assembly Instructions
 Sonoma Outdoor Kitchen Pergola Assembly Instructions Introduction Thank you for your purchase from The Outdoor GreatRoom Company. This pergola has been engineered and manufactured in the USA. This user
Retrofit Apron Front Farm Sink With Dual Mount Capability Installation Instructions
 For Under-Mount Installation please refer to page 14 FOR EXPERIENCED AND PROFESSIONAL INSTALLATION ONLY This installation project is designed for an advanced skill level. Disclaimer: Undermount Application
INSTALLATION MANUAL VERANDA REGENCY RAILING WITH METAL BALUSTERS. Model # SEC17 RW U8 W/MTL KD SEC17 RWS U8 W/MT KD
 Model # SEC17 RW U8 W/MTL KD SEC17 RWS U8 W/MT KD INSTALLATION MANUAL VERANDA REGENCY RAILING WITH METAL BALUSTERS Questions, problems, missing parts? Before returning to the store, call Veranda Customer
300C6 CONTINUOUS HINGE SEMI-FRAMELESS DOOR KIT
 300C6 CONTINUOUS HINGE SEMI-FRAMELESS DOOR KIT LIMITED WARRANTY AND REMEDY Alumax Bath Enclosures warrants to its dealers, customers, and all subsequent purchasers and users, that the products supplied
Installation Guidelines For Quaker Window Products Aluminum flange fin sub sill & receptor system using a T mulled twin window unit.
 Installation Guidelines For Quaker Window Products Aluminum flange fin sub sill & receptor system using a T mulled twin window unit. Installer: Read these instructions completely before starting any installation.
INSTALLATION INSTRUCTIONS
 CREATING POSITIVE CUSTOMER EXPERIENCES INSTALLATION INSTRUCTIONS Universal Low Profile Tilt Mount for 42 to 63 Flat Panels NORTH AMERICA 3130 East Miraloma Avenue Anaheim, CA 92806 USA USA and Canada Phone:
Full Height Ladder Safety Gate
 Full Height Ladder Safety Gate Installation Instructions/Operation and Maintenance Manual Models Powder Coat Yellow (PCY) 304 Stainless Steel (SS) Hot Dipped Galvanized (GAL) Table of Contents Product
INSTALLATION INSTRUCTIONS TABLE OF CONTENTS
 TABLE OF CONTENTS Balustrade Parts Lists... 32-34, 38 5", 6", 7" Balustrade System... 35-37 12" Balustrade System... 38-42 Brick and Masonry Applications...16 Crossheads for Doors and Windows...20 Decorative
WoodTrac Direct Mount Ceiling System
 WoodTrac Direct Mount Ceiling System Assembly Instructions All product is Class C rated and some product is available Class A rated. Check the ordering information to obtain the class rating for your product.
The Heritage Pergola
 Eye Level Corporation One Trefoil Drive Trumbull, CT 06611 USA Phone: 888.782.1760 Fax: 888.782.1761 www.@eyelevelliving.com The Heritage Pergola Installation Instructions ARBORS COLUMNS HOSE REELS MAILBOX
60 DIRECT-TO-STUD SHOWER WALL SET
 60 DIRECT-TO-STUD SHOWER WALL SET 60 X 30 MODEL # DKW6008-XX 60 X 32 MODEL # DKW6028-XX 60 X 36 MODEL # DKW6068-XX Unit consists of Model DB608-XX Backwall, and requires one of the following Side Panel
Tools required by installer: Materials required by installer:
 Installation Guidelines For Quaker Window Products Vinyl product line (Single Hung, Double Hung, Sliding Window, Fixed Window, Casement, Awning, and Hopper) Installer: Read these instructions completely
Wood Fencing Special Order Catalog
 Built by Barrette Outdoor Living Wood Fencing Special Order Catalog 1 V1 2/17 Your Fencing Options Buying wood fencing is as easy as 1-2-3. 1 Choose the panel style you prefer. 2 Choose your available
Fiberglass, Wood & PVC Columns and Accessoriess
 Fiberglass, Wood & PVC Columns and Accessoriess Fiberglass, Wood & PVC Columns and Accessories S O L U T I O N S 164 Quick Ship sizes/styles in stock Square non-tapered and tapered Fluted and raised panel
Sun Windows General Information New Construction Hinged Door Installation Instructions
 A G H F H H A. Apply Weather Resistive Barrier B. Apply Bottom Flashing Tape C. Install Sill Pan End Caps & Pan D. Caulk Sides & Top Nailing Surface, Set Door, Fasten E. Apply Side Flashing Tape F. Apply
Ready-To-Assemble VersaRail INSTALLATION INSTRUCTIONS
 Ready-To-Assemble VersaRail INSTALLATION INSTRUCTIONS Read all instructions prior to installing product. Refer to manufacturers safety instructions when operating any tools. To register your product, please
Canadian Product Spec Guide
 2017 Canadian Product Spec Guide Table of Contents Facts are facts and details are details. Royal Building Products offers a seriously complete line of 100% cellular PVC trim, moulding and siding accessories.
738 SERIES PIVOT SHOWER DOOR
 INSTALLATION INSTRUCTIONS 738 SERIES PIVOT SHOWER DOOR Copyright Alumax Bath Enclosures 1997. All rights reserved. Page 1 of 8 LIMITED WARRANTY AND REMEDY Alumax Bath Enclosures warrants to its dealers,
INSTALL INSTRUCTIONS WELCOME TO THE NEWAGE PERFORMANCE CABINETRY SERIES NEWAGE STEEL WELDED CABINETRY
 NEWAGE STEEL WELDED CABINETRY WELCOME TO THE NEWAGE PERFORMANCE CABINETRY SERIES ALL CABINETS MUST BE MOUNTED TO STUDS ON A SECURE WALL, AS PER THESE INSTRUCTIONS. FAILURE TO DO SO MAY RESULT IN SERIOUS
Instruction Sheet REB SERIES. Rotating Sliding Base REB18
 Instruction Sheet REB SERIES Rotating Sliding Base REB14 REB18 THANK YOU Thank you for purchasing the REB Series Rotating Sliding Base. Please read these instructions thoroughly before installing this
NOVA-EXT Versatile Projector Mount Model: NOVA-EXT
 INSTALLATION MANUAL NOVA-EXT Versatile Projector Mount Model: NOVA-EXT NORTH AMERICA 3130 East Miraloma Avenue Anaheim, CA 92806 USA USA and Canada Phone: 800-368-9700 Fax: 800-832-4888 Other Locations
Need a little help installing your railing?
 Need a little help installing your railing? www.rdirail.com/support/installation-videos.html Post Installation LAG BOLT APPLICATION Determine the desired rail placement and snap a line on to the deck to
INSTALLATION INSTRUCTIONS
 INSTALLATION INSTRUCTIONS P4263F Universal Low Profi le Flat Mount for 42 to 63 Flat Panels NORTH AMERICA 3130 East Miraloma Avenue Anaheim, CA 92806 USA USA and Canada Phone: 1.800.368.9700 Fax: 1.800.832.4888
Balustrades & Columns Systems
 Balustrades & Columns Systems Balustrade Systems... 163 7" Balustrade Systems... 167 12" Balustrade Systems... 172 Stone Balustrade Systems... 176 Define Your Boundaries This design accent is excellent
Vista SCREEN. and Double Door Link Kit. Installation Manual for. For Double Doors (French Doors) Quick and Easy to Size and Install
 Quick and Easy to Size and Install") and Double Door Link Kit Installation Manual for Vista SCREEN TM Quick and Easy to Size and Install For Double Doors (French Doors) Durable. Reliable. Attractive. For door openings up to 72 13 /16 (1,849
and Double Door Link Kit Installation Manual for Vista SCREEN TM Quick and Easy to Size and Install For Double Doors (French Doors) Durable. Reliable. Attractive. For door openings up to 72 13 /16 (1,849
CABINET INSTALLATION Please read prior to installation.
 CABINET INSTALLATION Please read prior to installation. U180652 Rev. 2-19 Preparation UNEVEN FLOORS AND WALLS Because floors and walls have uneven spots which will affect the installation, it will be necessary
Lodge II Pergola. Manual and Installation Instructions. Please read these instructions before removing parts from crate
 Lodge II Pergola Manual and Installation Instructions Please read these instructions before removing parts from crate Introduction Thank you for your purchase from The Outdoor GreatRoom Company. This pergola
P4263TP. Installation Guide. Low-Profile Tilting Portrait Mount for Flat-Panels
 Low-Profile Tilting Portrait Mount for Flat-Panels 1321 S. State College Blvd., Fullerton, CA 92831 USA Weight Limit Maximum Flat Panel Weight: 175 lbs. Warning Statements THE WALL STRUCTURE MUST BE CAPABLE
PURE. Exterior PVC Millwork Catalog. Preparation UV Protection Realistic Look Extruded by Gossen EXTERIOR PVC MILLWORK
 PURE EXTERIOR PVC MILLWORK Preparation UV Protection Realistic Look Extruded by Gossen Exterior PVC Millwork Catalog 2015 High performance millwork for a simply beautiful exterior GOSSEN : A LEGACY OF
INSTALLATION INSTRUCTIONS FOR FORGENT SLIDING PATIO DOORS RECOMMENDATIONS FOR COMMON INSTALLATION OF SLIDING PATIO DOORS.
 INSTALLATION INSTRUCTIONS FOR FORGENT SLIDING PATIO DOORS RECOMMENDATIONS FOR COMMON INSTALLATION OF SLIDING PATIO DOORS. Installer: DO NOT DISCARD Please leave the Installation Guide with the home owner
INSTALLATION. A Crane Plastics Company
 INSTALLATION A Crane Plastics Company Maximum Vinyl Products offers a complete line of durable, attractive vinyl fencing and railings a wise investment adding both beauty and value to your home. Contents
Dura-Lock Roof System
 DLR-14 Dura-Lock Roof System Assembly and Installation Instructions Read the instructions before starting the job. They explain the steps required to produce a finished product that will meet factory specifications.
Duet Tub Door & QWALL-TUB Kit
 Duet Tub Door & QWALL-TUB Kit Tub Door AND SHOWER BACKWALLS KIT INSTALLATION INSTRUCTIONS IMPORTANT DreamLine TM reserves the right to alter, modify or redesign products at any time without prior notice.
Frameless Inline Door With Return QCI5263
 INSTALLATION INSTRUCTIONS Frameless Inline Door With Return QCI5263 WALL MOUNT HINGES FRAMELESS DOOR / PANEL / RETURN PANEL QCI5263 REV. 0 Page 1 Certified 06/17/2016 Parts List with wall mount hinges
One Shelf, Wall Mounted A/V Component Stand Installation Guide Model: EX101SS
 One Shelf, Wall Mounted A/V Component Stand Installation Guide Model: EX0SS For technical assistance or troubleshooting please call -855-994-3832. This product is intended for use only with Audio/Video
tile redi redi DOOR Redi Redi Swing Slide g TM TM...Opening Doors to Stunning Showers! TM TM SERIES: CONFIGURATION: MOUNTING PACKAGE:
 redi DOOR INSTALLATION INSTRUCTIONS tile redi Redi Redi Swing Slide g TM TM...Opening Doors to Stunning Showers! TM TM SERIES: CONFIGURATION: MOUNTING PACKAGE: 1100 Door-Door Framed sliding doors RDQCI5023
Vista SCREEN. Installation Manual for. For left hinged doors. Quick and Easy to Size and Install
 Installation Manual for Vista SCREEN For left hinged doors Quick and Easy to Size and Install Durable. Reliable. Attractive. For door openings up to 36 (914mm) wide and 81 3 /16 (2,062mm) high QC03-0512L
Balustrade System Installation - Cambridge & Huntington
 A. PARTS AND SUPPLIES NEEDED FOR INSTALLATION Hardware included for each 10 section of rail: 2 3 x 1-1/2 L-brackets 4 1-3/4 x 3/16 Blue hex-head screws for anchoring the L-brackets to the newel cap, column
Sawn Baluster Sizing and Installation Guide
 Sawn Baluster Sizing and Installation Guide Welcome to the Durabrac sizing and installation guide for Sawn Balusters. This guide has been prepared to answer any questions you may have about our Sawn Balusters
STACKING MULTI-SLIDE DOOR SYSTEM
 SMSD STACKING MULTI-SLIDE DOOR SYSTEM INSTALLATION INSTRUCTIONS READ THESE INSTRUCTIONS COMPLETELY BEFORE STARTING ANY INSTALLATION! CAUTION Lead-based paint may be present in older homes, and the removal
Installation Instructions for. Before You Begin TOOLS REQUIRED
 Composite Railing System STEP-BY-STEP Installation Instructions for Spectrum Composite Railing Virtually maintenance free 20-year warranty EverNew Spectrum Railing system is designed to work with a number
CUTTING THE PIPE: BLUE DUCT Pipe can be easily cut using a Circular Saw or Reciprocal Saw. Trim all edges as necessary.
 Installation Instructions In the past it has been IMPOSSIBLE to install an air and water tight underground system. BLUE DUCT (AKDUCT ) has produced a user friendly system that will reduce the amount of
Installation Guide for Andersen 400 Series Tilt-Wash Transom and 200 Series Narroline Transom Windows
 for Andersen 400 Series Tilt-Wash Transom and 200 Series Narroline Transom Windows Congratulations! You have just purchased one of the many fine Andersen products. Proper assembly, installation and maintenance
Installation Operation Care
 Installation Operation Care Designer Banded Shades Cassette with Custom Clutch and UltraGlide CONTENTS Getting Started Product View Custom Clutch... 1 Product View UltraGlide... 2 Tools and Fasteners Needed...
Basic Spring Motor Roller Shades
 Basic Spring Motor Roller Shades ATTENTION!!! READ CAREFULLY! This shade has a reliable long-lasting Spring Motor. The Spring Motor must have proper tension in order to function as intended. Handling in
Tilting Flat Panel Wall Mount Installation Guide
 Tilting Flat Panel Wall Mount Installation Guide Model: A580TM Easy installation Built-in level for easy positioning Safety bolts lock the TV on the mount Easy to adjust tilt angles: +5 to -15 degrees
Installation Instructions/Operation and Maintenance Manual. PS DOORS Contact Information. Website psdoors.com
 Ladder Safety Gate Installation Instructions/Operation and Maintenance Manual Models All Models: LSG-5 to LSG-48 Table of Contents Product Information...2 Inspection & Mainteance...2 Warranty Information...2
TREX PERGOLA INSTALLATION INSTRUCTIONS
 RECOMMENDED TOOLS/SUPPLIES: Pencil 4' Level Measuring Tape Framing Square/Speed Square 8' High Step Ladder (Two recommended) Hacksaw or Bolt Cutters Socket Wrench with 9/16" Socket and 3/4" Deep Socket
Vinyl Windows Manufactured by VPI Quality Windows
 Vinyl Windows Manufactured by VPI Quality Windows Part Number: 531&591 Installation 531 & 591 SERIES SLIDING AND HUNG WINDOW INSTALLATION INSTRUCTIONS Installation Instructions for Typical Construction.
Installation Guidelines For ALUMINUM M-SERIES 3 PANEL SLIDING DOOR
 www.quakerwindows.comv www.quakercommercialwindows.com PO Box 128 504 Highway 63 South Freeburg, MO 65035 800-347-0438 573-469-4151 (fax) Installation Guidelines For ALUMINUM M-SERIES 3 PANEL SLIDING DOOR
Tilting, Swiveling & Rotating Flat Panel Wall Mount
 Tilting, Swiveling & Rotating Flat Panel Wall Mount Model: VXA980TC +5 to -5 +5 to -5 Supports most 0-80 Flat Panel TVs Maximum Weight Capacity: 32 lbs. Supports VESA Sizes up to 600x500 For technical
ProLine PL60 - PL70 - PL80 RETURN PANEL SUPPLEMENT
 INSTALLATION INSTRUCTIONS ProLine PL60 - PL70 - PL80 RETURN PANEL SUPPLEMENT Copyright Alumax Bath Enclosures 2013. All rights reserved. G03000000 7-1-13 Three-Year Limited Residential Warranty Alumax
PORCH-LOC INSTALLATION INSTRUCTIONS
 PORCH-LOC INSTALLATION INSTRUCTIONS 2017 HB&G Building Products, Inc. Porch-Loc Installation Instructions NOTE: DISCARD THE INSTALLATION INSTRUCTIONS AND HARDWARE THAT CAME IN YOUR PERMAPOST PACKAGING
OWENS FLOORING LLC MAINTENANCE AND WARRANTY
 OWENS FLOORING LLC MAINTENANCE AND WARRANTY Wood Floor Care and Maintenance Your new wood floor is an important investment, and must be properly cared for and maintained in order for you to enjoy its full
The package you received should contain:
 Congratulations on your purchase of a MaxSeal Door by Security Boss. The following is a step by step guide for installing your Security Boss product. A SAFETY REMINDER! Always wear eye protection and gloves
2.0. Select Rail & Stair Kit Assembly and Installation Instructions BOM V2 5/13. Owner's Manual. Version
 Select Rail & Stair Kit Assembly and Installation Instructions PLEASE READ OWNER'S MANUAL COMPLETELY BEFORE ASSEMBLING YOUR RAIL OR STAIR KIT. 34106886BOM V2 5/13 Models 73012418 / 73012436 / 73012424
Worktop. Weight Capacity. 100 lbs. 21 Corner Worktop. 48 Worktop. Fits over 2 Cabinets. 72 Worktop. Fits over 3 Cabinets. 200 lbs. 150 lbs.
 Bold.0 Warning: Excessive weight hazard! Use two or more people to move, assemble or install cabinets and locker to avoid back injury. Do not leave children unattended near cabinets. High risk of tipping
Installation Operation Care
 Installation Operation Care Provenance Woven Wood Shades Standard Cordlock CONTENTS Getting Started: Product View...1 Tools and Fasteners Needed...2 Installation: Installation Overview...3 Mount the Standard
STACKING MULTI-SLIDE DOOR SYSTEM INSTALLATION INSTRUCTIONS
 STACKING MULTI-SLIDE DOOR SYSTEM INSTALLATION INSTRUCTIONS 1290363 Revision 1 12/16 Page 1 Weather Shield Mfg., Inc. NOTICE CAUTION! Failure to install and maintain our product according to these instructions
MIRAGE SHOWER DOOR & TUB DOOR INSTALLATION INSTRUCTIONS
 MIRAGE SHOWER DOOR & TUB DOOR INSTALLATION INSTRUCTIONS IMPORTANT DreamLine TM reserves the rights to alter, modify or redesign products at any time without prior notice. For the latest up-to-date technical
Installation Guide. for E-Series/Eagle Clad Hinged Inswing French Door
 Installation Guide for E-Series/Eagle Clad Hinged Inswing French Door Thank you for choosing Andersen. Instructions are for typical, new wood-framed wall construction with weather protection in place.
Assembly Instructions and Parts Manual JPSF-1 Fence and JPSR Rail Set #
 Assembly Instructions and Parts Manual JPSF-1 Fence and JPSR Rail Set #1002493 JET 427 New Sanford Road LaVergne, Tennessee 37086 Part No. M-708482 Ph.: 800-274-6848 Revision C3 02/2014 www.jettools.com
The following instructions will guide you through the installation of your new vinyl railing stair kit.
 Installation Guide Vinyl Standard Stair Railing Tools Required Protective eye glasses Tape measure Variable speed drill/screwdriver Rotary hammer or hammer drill and masonry percussion bit recommended
Fold-A-Way Patio Door ASSEMBLY & INSTALLATION GUIDE
 Fold-A-Way Patio Door ASSEMBLY & INSTALLATION GUIDE This instruction guide provides the minimum recommended procedures to correctly prepare the rough opening, install a fold-a-way patio door unit and apply
Loading Dock Safety Gate
 Installation Instructions/Operation and Maintenance Manual Models LDSG-120-PCY LDSG-144-PCY Table of Contents Product Information...2 Parts List...3 Installation Instructions...5 Operation...13 Inspection
Eagle clad double-hung window installation instructions
 Eagle clad double-hung window installation instructions These instructions are for typical installation in new typical wood frame wall construction. These instructions and methods are not intended for
Fortress Fe Posts must always be secured to the deck framing. Fortress Fe Posts should never be attached to only the deck boards.
 Installation Instructions for Fortress Vertical Cable Panel System with Brackets and Fe Posts It is the responsibility of the installer to meet all code and safety requirements, and to obtain all required