Aluminum Sprinter Rack Installation
|
|
|
- Austin Gallagher
- 6 years ago
- Views:
Transcription

1 INSTALLATION INSTRUCTIONS MyGlassTruck.com Division of Demountable Concepts, Inc Aluminum MyGlassTruck.Com Demountable Concepts, Inc. 200 Acorn Rd. Glassboro, NJ toll free local fax web 1
2 Demountable Concepts Installation Instructions ATTENTION: The success or failure of this equipment could very well depend on a thorough and proper installation. Any missed steps or improper procedures could result in serious injury or death to the installer or end user. Read and understand the contents of these instructions before proceeding. IMPORTANT: When installed, this Glass Rack must not alter or prevent vehicle compliance to any existing state or federal standards. Each vehicle manufacturer's recommendations should be consulted for compliance. NOTE TO INSTALLER Prior to installation read the entire Instruction guide and all of the Installation Instructions to familiarize yourself with this system. 2
3 INSTALLATION INSTRUCTIONS INTRODUCTION EVEN THOUGH THE FOLLOWING GOES WITHOUT SAYING, WE FEEL COMPELLED TO STATE... This Glass Rack system should only be installed by those with sufficient basic skills to understand the installation and operation of glass carrying equipment, along with the equipment on which these systems are installed. These installation instructions are not intended to give rationale for all of the instructions that are given; however, it is the intent of these instructions to give the installer both the operations and what we believe to be the most desirable sequence of implementing these operations. These instructions can in no way expand into an area where they will replace a qualified person, or clear thinking, common sense and a basic knowledge that must be possessed by the installer. We urge the installer (or anyone else) to call us if they have any questions. We have qualified personnel at our Glassboro, New Jersey plant to answer any questions that you may have. A detailed discussion on the telephone is far more satisfactory and productive than a detailed written explanation. It has been our experience that a knowledgeable journeyman following these installation instructions and observing the operation of the Glass Carrying System will have sufficient comprehension to enable this person to troubleshoot and correct all normal problems that may be encountered. However, again we urge you to call us at our Glassboro, New Jersey plant if you find any problems during installation or have any doubts or questions. MyGlassTruck.com Demountable Concepts, Inc. 200 Acorn Rd. Glassboro, NJ toll free phone fax sales@myglasstruck.com web Required tools: Electric Drill or Cordless, 5/16 & 3/8 drill bits, 9/16 and ½ sockets and wrenches, impact gun not needed but highly suggested. 3

4 Bolt Through Side Wall Mount Use Bag V-2 Hardware for this next part. FOR ROOF RACK MOUNT SKIP AHEAD to next section Find the front of the rack, identified by the holes where the front body stop will go Place the rack up against the side of the vehicle with the upper mount ½ below the rain gutter / roof line. Use jack stands or wooden blocking to support the rack. Make sure the carrier does not interfere with any doors. Be sure your supports are strong enough to support the weight of the rack. Bolt Mounting Angle Through Skin Of Sprinter Below Rain Gutter / Roof Line Set the angle of the carrier by moving the bottom in or out. Be sure to keep the rack as close to the Sprinter as possible without touching the wall. Try to keep about ½ between the rack and the Sprinter. Set pitch of the rack to 5 degrees. Do not exceed the legal width limit of 102 4
. Drill from the inside out through the slots.")

5 Close-up Of Bolts Through Skin Of Vehicle Drill through the Sprinter where the roof and the wall meet. (See photo below). Drill from the inside out through the slots. Drill 5 holes through the Sprinter and through the racks main mounting angle. If the Sprinter is double walled remove the inside panel wall for the bolts then reinstall the panel when finished. Drill Through This Part Of The Inside Of Sprinter 5

6 ROOF RACK MOUNTING OF GLASS RACK The Sprinter will need to have a roof track installed to properly mount the roof rack. If your Sprinter does not already have a roof track there are two options. Your local Sprinter dealer should be able to install the track or MGT has a solution utilizing Aluminum Unistrut. Aluminum Track That Can Be Purchased From Local Sprinter Dealer The Parts are: 3 Aluminum Crossbars 6 Roof Rack Mounts For factory Roof Track (Hardware Kit S-3) 6 Slider Plate with Studs 12 Washers and Locknuts OR for MGT supplied Unistrut Track (Hardware Kit S-4) 2-10 lengths of Aluminum Unistrut 22- ¼ x 1 Bolts with Washers and Locknuts 22 Rubber Washers 12 Unistrut Nuts with Springs 12-5/16 x 1 Bolts with Washers and Lock washers 12- Rubber Washers 6

7 Roof Rack Setup After installing the roof track. Slide the studded slider plate into the track. OR press and twist the Unistrut nuts into the Unistrut track. Use the following measurements as a guide for where the roof mounts should go. Start first mount as far forward on roof rack track as possible. Install the center bar 60 from the front of the roof rack track Install the rear bar 103 from the front of the roof rack track You can vary these dimensions slightly as they are simply a guide. The object is to keep the cross bars as close to a vertical post on the glass rack as possible for added strength. Install roof rack mounts Place the Roof Rack mounts over the brackets/unistrut nuts and LOOSLEY put the 5/16 hardware on. Slide in the aluminum cross bars so that they protrude evenly from side to side. Make sure that Crossbars are perpendicular to the track from side to side. Drill holes through the crossbars using the holes in the roof rack mounts as a guide. Bolt in using 5/16 x 2-1/4 bolts, nuts, & washers (V-8 Hardware Kit). Tighten ALL of the bolts on the mounts and crossbars Front Roof Rack Mount Started As Far Forward As Possible 7
.")

8 Hang the rack Hang the rack from cross bars as shown. Confirm that the rack is at the correct elevation for your vehicle (CHECK CLEARANCE FOR THE FRONT DOOR). Glass Rack Hung On Roof Rack Crossbar Bolt the rack to the cross bars using 3/8 x 2 ½ bolts. Be sure to drill through the center of the angle on the back of the glass rack. (Use V-10 Hardware Kit) Double Check the Tightness of all the Bolts on the Roof Rack and Glass Rack! 3/8 x 2 ½ Bolts Going Through Mounting Angle & Horizontal Roof Rack Bar 8

9 Under Body Mounts Use Bag S-1 Hardware for this next part. Note: IF installing a Double-Sided rack, make sure your vehicle does NOT exceed the 102 W Legal DOT Limit. The rack WILL NOT be able to be set at a 5 degree angle on a Double-Sided Sprinter. This Part Gets Bolted To Chassis Frame This Part Mounts To Ledge Note: If This Is a 2006 Or OLDER Sprinter, Skip to Page 15 for Specific Mounting Instructions Find the cross-member that is the farthest forward in relation to the glass rack and the one closed to but forward of the rear wheel. This where you will install your under body mounts. Clamp the undermounts to the cross-members. Make sure that the flange that bolts to the ledge is as close as you can get it. Occasionally, the ends of the undermount will needed to be trimmed off to fit under the ledge. 9


10 Use your 3/8 x 3 bolts for the front and middle under body mounts. Under Mount That Is Mounted To A Cross-Member Before The Rear Wheel Find the cross-member that is behind the rear wheel and install your under body mount there. Use 3/8 x 1-1/2 bolts for this one. Secure all the bracket bolts. Under Mounted That Is Mounted Directly Behind Rear Wheel Once complete, skip ahead to Attaching the glass rack to the undermounts 10
 stainless steel angles and (x2) square plates and extra bolts.")
 Sometimes the 2 nd mount can be")
11 Under Mount Setup (FOR 2006 MODEL SPRINTERS & OLDER) The older model Sprinters have a different under carriage design then the current models. Due to this, our under mounts need to be slightly modified to work on these vehicles. Provided in the crate are (x2) stainless steel angles and (x2) square plates and extra bolts. The first under mount will be bolted through the floor of the Sprinter. Use the stainless steel angle, extra bolts, and square plate to modify the under mount and bolt through the floor. Stainless Steel Angle Used To Modify Under Mount & Mount Through Sprinter Floor Square Plate Used To Hold Under Mount To Sprinter (Interior of Sprinter is Shown) Sometimes the 2 nd mount can be mounted normally if this is the case, please reference the previous section for mounting. IF NOT, please repeat the above for the second mount. 11

12 Just like the 2 nd under mount, there are (2) different ways that the 3 rd under mount can be mounted behind the rear wheels on these older model vehicles. Provided in the crate are a 3 rd Sprinter Under Mount, and our Standard Under Mount for Cargo Vans. If the Sprinter Under Mount CAN NOT fit properly, please assemble the standard mount for Cargo Vans and follow the below. Using 3/8 x 1 bolts w/ locknuts (x 12), pre-assemble the under body mounting brackets This Part Gets Bolted To Chassis Frame This Part Mounts To Ledge Be sure to use minimum of 2 bolts per bracket through the chassis frame. Get one bolt high and one bolt low on the truck frame. Using self tapping 3/8 x 1 ½ bolts w/ lock washers, nuts (x 6) bolt the mounting brackets to the truck frame with the long arm of the bracket under the ledge. 12
 If there is a gap between the under mount and the ledge, add provided shims to bridge the gap.")

13 Attaching the Glass Rack to the undermounts Use 4 x 4 aluminum wear plate between top of bracket and bottom of ledge. (Shrink Wrapped Loose) If there is a gap between the under mount and the ledge, add provided shims to bridge the gap. (Shrink Wrapped Loose) Aluminum Wear Plate Rubber Shim Using 3/8 x 1 ½ w/ washers, nuts (x 6) drill through the ledge into the top of the mounting bracket. (Bag S-1 Hardware) Make Sure To Watch Out For Ledge Blocks When Bolting UnderMounts To Ledge 13

 Use V-11 Hardware Kit 3 L-Shaped end hooks 6 Hex cap screw stainless 3/8 x 1 6 Flat washer stainless 3/8 6")

14 Loose Front Stop MyGlassTruck.com ships the glass rack front stop loose. Use the 2 ½ x 3/8 bolts provided (x 2). Bolt the stop directly to the front of the glass rack. Use Bag V-6 Hardware Kit (2) Bolts need to be drilled into glass rack for Removable Front Stop Roof Rack Ends (Used only for single-sided glass racks) Use V-11 Hardware Kit 3 L-Shaped end hooks 6 Hex cap screw stainless 3/8 x 1 6 Flat washer stainless 3/8 6 Nylock nut 3/8 On the non-rack side of the van, slide the heads of two 3/8" x 1" hex cap screws into the channel on the underside of the roof rack cross bar. With the longer ladder keeper portion of the end hook facing upward, thread the screws though the end-hook s two pre-drilled holes. Slide a 3/8" washer onto each bolt and secure the end hook with two 3/8" lock nuts 14
15 15
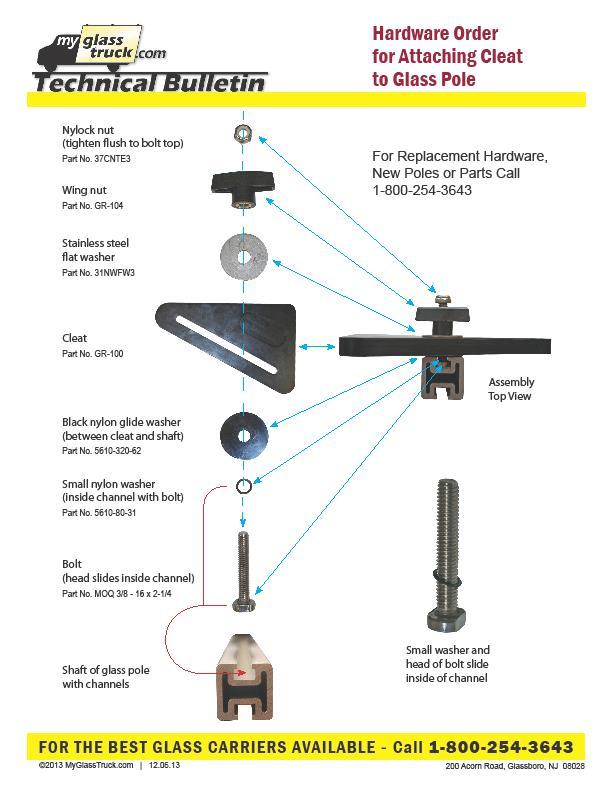
16 A. ( ) All bolts tight where rack bolts to the van body FINAL INSPECTION CHECK LIST B. ( ) All bolts are tight where the under body mounts secure the rack to the chassis C. ( ) All under body mount bolts are tight D. ( ) All bolts securing the rack ledge to the under body mounts are tight E. ( ) Wheel skirt properly bolted down F. ( ) All poles have cleats secured with wing nuts G. ( ) Front body stop bolted on securely WARRANTY VALID ONLY IF THE FORM BELOW IS COMPLETED AND MAILED BACK WITHIN 15 DAYS OF INSTALLATION. System complete by: (company)- (installer s name)- (completion date)- MyGlassTruck.com & Demountable Concepts, Inc. is always looking for ways to improve. Please make some comments to help us improve the Van Rack Installation Instructions. Fax or Mail Back: MyGlassTruck.com Demountable Concepts, Inc. 200 Acorn Rd. Glassboro, NJ toll free phone FAX COMMENTS: 16
Ram Promaster Rack. Installation instructions for
 Installation instructions for Ram Promaster Rack MyGlassTruck.com 200 Acorn Road LOCAL 856-595-9069 WEB www.myglasstruck.com Glassboro, NJ 08028 FAX 856-863-1480 1-844-364-4022 Version 1.0 November 2015
TIRE RACK INSTALLATION INSTRUCTIONS Dodge Sprinter
 Aluminess Products Inc 9402 Wheatlands Ct. #A Santee, CA 92071 619-449-9930 TIRE RACK INSTALLATION INSTRUCTIONS 07-11 Dodge Sprinter Please read before beginning Stainless steel hardware may bind together
MPA-9000 Universal Ceiling Projector Mount Kit
 I N S T R U C T I O N M A N U A L Universal Ceiling Projector Mount Kit The Universal Ceiling Projector Mount provides a unique, simplified method of ceiling mounting your inverted projector. This low
Instruction Guide 4A90L
 Instruction Guide 4A90L Kargo Master Rancho Cordova, CA 95742 800-343-7486 CustomerService@KargoMaster.com DATE: *PLEASE READ ALL INSTRUCTIONS AND WARNINGS PRIOR TO ASSEMBLING, INSTALLING, AND USING THIS
ASSEMBLY INSTRUCTIONS FOR SERVICE BODY A MOUNT RACKS
 ASSEMBLY INSTRUCTIONS FOR SERVICE BODY A MOUNT RACKS T12 Service Body A shown with optional middle crossbar Package Contents: HARDWARE KIT PARTS (8) 3/8-16 x 3 CARRAIGE BOLTS (1) RAIL DRIVER S SIDE ASSEMBLIES
E4-WM5-Y525A00 MOUNTING INSTRUCTION
 RAM 2500/3500 4WD B8 5100 (Dual Steering Damper Kit) The installation of these steering dampers must be performed only by experienced and qualified personnel. Read and follow the installation instructions
Contractors Rack Assembly and Installation Instructions
 Part # 18601 & 16601 Contractors Rack Assembly and Installation Instructions 4751 Littlejohn St. Unit A, Baldwin Park, CA 91706 Page 1 of 12 11/13/08 Thank you for purchasing the Paramount Restyling Contractors
DRAWER Mitsubishi pajero lwb
 DRAWER Mitsubishi pajero lwb SSDS601 / SSMP001 INSTALL TIME: 45 mins Thank you for purchasing a Front Runner Storage System. This Storage System is made up of the following components: 1. A Drawer System
PRORAC CONTRACTOR SERIES UNIVERSIAL STEEL TRUCK / CAP RACK INSTALLATION INSTRUCTIONS
 PRORAC CONTRACTOR SERIES UNIVERSIAL STEEL TRUCK / CAP RACK INSTALLATION INSTRUCTIONS 1000 Lb. Capacity Bed Mount 750 Lb. Capacity Cap Mount Package Contents: Parts Hardware (4) Legs (12) 3/8-16 x 1-1/4
INSTALLATION INSTRUCTIONS KK-K9-F14-K K9 KIT FOR FORD EXPEDITION
 INSTALLATION INSTRUCTIONS KK-K9-F14-K-32 32 K9 KIT FOR 2003-2016 FORD EXPEDITION TOOLS REQUIRED: Power Drill Drill Bit Set Standard & Metric Socket Sets Phillips Screw Driver Open End Wrench Set Wire Cutters
LAnd Rover defender TDI & TD5 Gullwing WINDOW Box. You will need to have installed a Gullwing Door before installing the Window Box.
 LAnd Rover defender TDI & TD5 Gullwing WINDOW Box GWLD008 INSTALL TIME: 2 Hours You will need to have installed a Gullwing Door before installing the Window Box. IMPORTANT WARNING! IT IS CRITICAL THAT
WPS crew Doors Installation instructions
 WPS-132-133 crew Doors Installation instructions ORDER OF INSTALLATION FOR A COMPLETE ENCLOSURE OF A CREW WPS (Weather Protection System) IS AS FOLLOWS: 1. Heater 2. Rear Thresholds - Right Hand & Left
INSTALLATION GUIDE N5-DS48-4
 INSTALLATION GUIDE N5-DS48-4 Shelving ( steel ) Transit High Roof & Medium Roof Promaster Standard Roof & High Roof Nissan NV High Roof Sprinter Low Roof & High Roof Box Truck / Trailer QUICK START GUIDE
TABLE MKI small with Basin and under rack brackets kit
 TABLE MKI small with Basin and under rack brackets kit TBRA024 INSTALL TIME: 15 mins IMPORTANT WARNING! IT IS CRITICAL THAT ALL FRONT RUNNER PRODUCTS BE PROPERLY AND SECURELY ASSEMBLED AND ATTACHED TO
Assembly Instructions 10 X 10 Aluminum Roof Support
 Assembly Instructions 10 X 10 Aluminum Roof Support Aluminum Roof Support Bolt Package 16-5/16 X 2 ¼ SS Bolt 24-5/16 X 1 SS Bolt 40-5/16 SS Nylon Lock Nuts 16-5/16 SS Flat Washers 28-4 ½ Wood Screws 36-1
Foot Rail. Nissan Navara_Frontier D23 DC START HERE! READ ME FIRST
 Foot Rail Nissan Navara_Frontier D3 DC ENG FANN00 START HERE! READ ME FIRST Don t be a hero and muscle through this without first reading these fitting instructions! Improper installation of this gear
Assembly Instructions 10 X 10 Aluminum Frame Building
 Assembly Instructions 10 X 10 Aluminum Frame Building 27 97 9 8 47 36 74 52 10 10 X 10 Square Building W/ Dome Includes: The Steel Entry Door with a Dead Bolt Lock assembly and Aluminum Door Frame. Metal
ASSEMBLY INSTRUCTIONS FOR HAULER II UNIVERSAL CAMPER SERIES RACKS
 ASSEMBLY INSTRUCTIONS FOR HAULER II UNIVERSAL CAMPER SERIES RACKS C11U2873-1 shown above Package Contents: HARDWARE KIT PARTS (4) 3/8-16 x 3 CARRAIGE BOLTS (1) RAIL DRIVER S SIDE ASSEMBLY (20) 3/8-16 x
ASSEMBLY INSTRUCTIONS for :
 ASSEMBLY INSTRUCTIONS for : 800 0 TMCS_3:1 (916) 638-8703 (800) 343-7486 11261 Trade Center Drive Rancho Cordova, CA 95742 www.kargomaster.com Tools Needed Hardware Pack Cont' 8' Tape Measure 1/2" End
INSTALLATION INSTRUCTIONS Lateral Shift Accessory Model: PAC-800
 INSTALLATION INSTRUCTIONS Lateral Shift Accessory Model: PAC-800 The PAC-800 Lateral Shift Accessory is for use with Chief Model PSM, PST, PRO, PLP, Large Flat Panel Display wall mounts. It can be installed
JEEP JK ( 5 DOOR ) SLIMLINE II - FULL TRAY EXTREME RACK KIT
 SLIMLINE II - FULL TRAY EXTREME RACK KIT") JEEP JK ( 5 DOOR ) SLIMLINE II - FULL TRAY EXTREME RACK KIT FAJK001 / KRJW014T INSTALL TIME: 2.5 Hours NOTE: Your Jeep JK (5 Door) Extreme Roof Rack Kit consists of four boxes. (1) the Tray, (2) the Roll
JEEP JK ( 5 DOOR ) SLIMLINE II - FULL TRAY EXTREME RACK KIT FAJK001 / KRJW014T INSTALL TIME: 2.5 Hours NOTE: Your Jeep JK (5 Door) Extreme Roof Rack Kit consists of four boxes. (1) the Tray, (2) the Roll
40670 Transit Connect/NV200/City Express/ProMaster City Partition
 40670 Transit Connect/NV200/City Express/ProMaster City Partition Top Panel (1) Bottom Panel (1) Transit Connect (2014) Top Angle (1) TC Top MNT BRKT (2) TC Bottom MNT PLT (2) NV200/City Express Top Mount
Pro Ski / Snowboard & Fishing Rod Carrier
 Pro Ski / Snowboard & Fishing Rod Carrier ENG RRAC123 10 min READ ME! Thank you for purchasing a Front Runner Pro Ski / Snowboard & Fishing Rod Carrier. Before you start, take a moment to familiarize yourself
table brackets for mki table incl latch TBRA020
 table brackets for mki table incl latch TBRA020 INSTALL TIME: 15 mins IMPORTANT WARNING! IT IS CRITICAL THAT ALL FRONT RUNNER PRODUCTS BE PROPERLY AND SECURELY ASSEMBLED AND ATTACHED TO YOUR VEHICLE. IMPROPER
MTS-SP100. RENOGY Pole Mount System E Philadelphia St, Ontario, CA Version: 1.2
 MTS-SP100 RENOGY Pole Mount System 2775 E Philadelphia St, Ontario, CA 91761 1-800-330-8678 1 Version: 1.2 Important Safety Instructions Please save these instructions. This manual contains important safety,
400A 40113V, 401A 40120V, & 401AL 40120VL ALUMINUM VERTICAL 4000 LB LIFT INCLUDES SCREW LEG ASSEMBLY INSTRUCTIONS
 12/11/07 PAGE 1 OF 12 400A 40113V, 401A 40120V, & 401AL 40120VL ALUMINUM VERTICAL 4000 LB LIFT INCLUDES SCREW LEG ASSEMBLY INSTRUCTIONS Thank you for purchasing our product! *Please read these instructions
INSTALLATION INSTRUCTIONS
 INSTALLATION INSTRUCTIONS SPORTSMAN WINCH MOUNT GRILLE GUARD APPLICATION: 2016-2018 Toyota Tacoma PART NUMBER: 40-93885, 45-93880, 46-23885 ITEM QUANTITY DESCRIPTION TOOLS NEEDED 1 1 WINCH TRAY 15MM SOCKET
RangerWare Fiberglass Door System Installation Instructions P/N
 Page 1 of 9 RangerWare Fiberglass Door System Installation Instructions P/N 2878016 ORDER OF INSTALLATION Note: To assure proper order, read all Accessory Installation Instructions before beginning. 1.
INSTALLATION INSTRUCTIONS, AND PARTS LIST
 INSTALLATION INSTRUCTIONS, AND PARTS LIST LB20 SERIES RAMPS Link Mfg. Ltd. 223 15th St. N.E. Sioux Center, IA USA 51250-2120 (712) 722-4868 Fax (712) 722-4779 QUESTIONS? CALL CUSTOMER SERVICE 1-800-248-3057
LPR System Installation instructions
 Toll LPR System Installation instructions 1 General Information The following installation instructions should be used as a guide for installing Folding Guard LPR System. Good common sense and appropriate
RH-412 STEEL DOORS INSTALLATION INSTRUCTIONS
 RH-412 STEEL DOORS INSTALLATION INSTRUCTIONS By following the steps outlined below, the assembly, installation and adjustment of the steel doors, will be a simple process. Let s start with the Driver Side.
FreshSesh, PowderHound & Big PowderHound
 FreshSesh, PowderHound & Big PowderHound Carrier (2x) universal mounting bracket (4x) SkiLift (2x) (mounting bracket parts:) Hex Key with Bolt (2x) SkiLift (2x) Button Head Screw (2x) Hex Wrench (1x) Base
INSTALLATION INSTRUCTIONS. PLASMA TV WALL MOUNT TILT Universal (RGTU-210) WARNINGS WARNING
 WARNINGS WARNING") PLASMA TV WALL MOUNT TILT Universal (RGTU-210) S CAUTION CAUTION CAUTION A alerts you to the possibility of serious injury or death if you do not follow the instructions. A CAUTION alerts you to the possibility
PLASMA TV WALL MOUNT TILT Universal (RGTU-210) S CAUTION CAUTION CAUTION A alerts you to the possibility of serious injury or death if you do not follow the instructions. A CAUTION alerts you to the possibility
K9 KIT INSTALLATION INSTRUCTIONS CROWN VIC KK-K9-F7-K
 K9 KIT INSTALLATION INSTRUCTIONS 1998-2011 CROWN VIC KK-K9-F7-K TOOLS REQUIRED: Power Drill (Cordless preferable) Drill Bit Set Standard Wrench and Socket Set Metric Socket Set Screwdriver Set Torx Bit
4832A Installation Sheet Part List
 4832A Installation Sheet Part List (1) 4016A-43-003 Qty 1- (2) 4016A-43-002 Qty 1- (3) 4016A-43-001 Qty 2- (4) 4016A-10-005 Qty 1- (5) 4016A-43-004L Qty 1- Mounting Bolt Kit (A) (K) Qty 2 - Qty 6 - M10
INSTALLATION INSTRUCTIONS RH 412 STEEL DOORS
 By following the steps outlined below, the assembly, installation and adjustment of the steel doors, will be a simple process. Let s start with the Driver Side. Note: Having the hood open makes the job
ASSEMBLY INSTRUCTIONS FOR HAULER II SERVICE BODY A RACK
 ASSEMBLY INSTRUCTIONS FOR HAULER II SERVICE BODY A RACK T12USBA-1 shown above Package Contents: HARDWARE KIT PARTS (4) 3/8-16 x 3 CARRAIGE BOLTS (1) RAIL DRIVER S SIDE ASSEMBLY (20) 3/8-16 x 2 CARRAIGE
STEP 1 STEP 2 LEVELER KIT OPTION MOBILE CASTER KIT OPTION
 B SERIES INDUSTRIAL BENCHES TOOLS REQUIRED FOR ASSEMBLY Socket set, Open end wrench set, Cordless drill with 3/8" socket bit (Magnetic recommended). BEFORE ASSEMBLY Read through the assembly instructions
JEEP JK ( 5 DOOR ) SLIMLINE II - FULL TRAY EXTREME RACK KIT
 SLIMLINE II - FULL TRAY EXTREME RACK KIT") JEEP JK ( 5 DOOR ) SLIMLINE II - FULL TRAY EXTREME RACK KIT FAJK002 / KRJW014T INSTALL TIME: 5 Hours NOTE: Your Jeep JK (5 Door) Extreme Roof Rack Kit consists of four boxes. (1) the Tray, (2) the Roll
JEEP JK ( 5 DOOR ) SLIMLINE II - FULL TRAY EXTREME RACK KIT FAJK002 / KRJW014T INSTALL TIME: 5 Hours NOTE: Your Jeep JK (5 Door) Extreme Roof Rack Kit consists of four boxes. (1) the Tray, (2) the Roll
SAFETY. Injury hazard
 SAFETY Installation Guidelines Your safety and the safety of others is very important. In order to help you make informed decisions about safety, we have provided installation instructions and other information.
DuraRac Shelving System
 GM Full Size Van Assembly Installation Instructions Sheet 1 of 13 BEFORE YOU START! IMPORTANT INSTALLATION STEPS ARE DENOTED USING A STOP SIGN. THESE STEPS MUST BE PERFORMED IN THE SPECIFIED ORDER TO ENSURE
MITSUBISHI PAJERO CK LONG WHEEL BASE 2100 MM TRACKS TRMP001
 MITSUBISHI PAJERO CK LONG WHEEL BASE 2100 MM TRACKS TRMP001 INSTALL TIME: 1.2 Hours IMPORTANT WARNING! IT IS CRITICAL THAT ALL FRONT RUNNER PRODUCTS BE PROPERLY AND SECURELY ASSEMBLED AND ATTACHED TO YOUR
Medium HoneyBadger Chase Rack Installation Instructions
 PREPARATION Medium HoneyBadger Chase Rack Installation Instructions 1. Disconnect the negative terminal on the battery. Park the vehicle on level ground and set the emergency brake. 2. We recommend reading
K9 KIT INSTALLATION INSTRUCTIONS CROWN VIC with Fire Suppression System Model KK-K9-F7-K-FS
 K9 KIT INSTALLATION INSTRUCTIONS 2005-2011 CROWN VIC with Fire Suppression System Model KK-K9-F7-K-FS TOOLS REQUIRED: Power Drill (Cordless preferable) Drill Bit Set Standard Wrench and Socket Set Metric
INSTALLATION INSTRUCTIONS GRILLE GUARD 09-ON DODGE RAM PART #
 INSTALLATION INSTRUCTIONS GRILLE GUARD 09-ON DODGE RAM PART # PARTS LIST: Qty Description Qty Description 1 Grille Guard 8 12-1.75mm x 35mm Hex Bolts 2 Brackets (for trucks without 22 12mm x 30.1mm OD
RLP Flat Track Hardware sliding door hardware/ barn door track
 Page 1 of 9 Installation Suggestions for: RLP Flat Track Hardware sliding door hardware/ barn door track Read these instructions to end before starting installation or ordering hardware. Reclaimed Lumber
Uni-Cross Universal Transmission Crossmember
 Uni-Cross Universal Transmission Crossmember Installation Guide Applications: Fits 1965-1970 Mustang READ THIS MANUAL IN ITS ENTIRETY PRIOR TO BEGINNING INSTALLATION Ford Performance Specialist 1001 Reno
IN-30000_F. Installation Instructions
 IN-30000_F Installation Instructions Parts Overview Detail A Detail B Detail C Detail A Detail C Detail B Parts List & Tools PARTS ITEM NO. PART NUMBER DESCRIPTION Qty 1 01-30008-01 P/C,DOUBLE T-SLOT CROSSBAR,
INSTALLATION INSTRUCTIONS 3 BULL BAR 99-04, 04 "HERITAGE" F-150/250LD 2WD, 97-04, 04 "HERITAGE" 4WD WD EXPEDITION/ WD EXPEDITION PART
 INSTALLATION INSTRUCTIONS 3 BULL BAR PART #B-F1971;B-F2971 PARTS LIST: 1 Bull Bar 2 12-1.75mm x 130mm x 40mm Hex Bolts 1 Driver/Left Mounting Bracket 4 12-1.75mm x 35mm Hex Bolts 1 Passenger/Right Mounting
INSTRUCTION BOOKLET #C21. For Wallbed models: KING SIZE
 For Wallbed models: KING SIZE INSTRUCTION BOOKLET #C1 WARNING! ALL MURPHY/WALLBED SYSTEMS CONTAIN STORED ENERGY. FAILURE TO USE AND FOLLOW THESE INSTRUCTIONS DURING THE INSTALLATION PROCESS COULD RESULT
START HERE BEFORE YOU BEGIN FIG 1 STEP 2
 PROFESSIONAL INSTALL RECOMMENDED REAR MODULAR / MULTI LED ROOF MOUNTS PART#: Z350040 / Z350050 REAR ROOF LED LIGHT MOUNTS Parts included (1) - Driver Side Roof Mount Upright (1) - Passenger Side Roof Mount
INSTALLATION INSTRUCTIONS GRILLE GUARD RAM 1500 PART # 5058/5058-2
 INSTALLATION INSTRUCTIONS GRILLE GUARD PART # 5058/5058-2 PARTS LIST: Qty Description Qty Description 1 Grille Guard 8 12-1.75mm x 35mm Hex Bolts 2 Upper Frame Mounting s (for trucks without tow hooks
INSTALLATION INSTRUCTIONS
 NOTE: Bolts should remain hand tight until all bolts are installed. STEP 1 Installing the door base (both sides). 1. Locate the outer, roll cage, mounting bolt (passenger side is shown in the illustration).
MSP-DCCPGTU Large Screen Tilt Display Mount
 INSTALLATION INSTRUCTIONS Large Screen Tilt Display Mount The Large Screen Tilt Display Mount is a quick disconnect mounting solution for large flat panel displays. The mount features infinite adjust ability
6X3 Patio Garden Shed Assembly Manual
 Thank you for purchasing a 6x3 Patio Garden Shed. Please take the time to identify all the parts prior to assembly. Revision #4 July 6th, 2016 6X3 Patio Garden Shed Assembly Manual Please use Safety Eyewear
D. Drill Bolt Holes Through Topper Shell and Bed Rails
 A. Check Mounting Kit Check to make sure that all of the following items are included in the mounting kit. Call 515-272-4372 if you need to obtain a part from BrandFX. Double-stick tape (1 roll) White
INSTALLATION INSTRUCTIONS FOR FRONT CASTING DECK RAIL Ranger
 INSTALLATION INSTRUCTIONS FOR FRONT CASTING DECK RAIL Ranger TOOLS REQUIRED FOR INSTALLATION: Drill motor, (1) 5/16 inch drill bit, (1) 13/64 drill bit, (1) 3/16 inch hex wrench (1) 3/32 inch hex wrench.
ETX Powered Loudspeaker Accessories
 ETX Powered Loudspeaker Accessories ETX-BRKT10, ETX-BRKT12, ETX-BRKT15, ETX-TCA-S, ETX-TCA-L, and ETX-BRKT35 en Installation Guide en 3 Table of contents 1 Safety 4 2 Installation 6 2.1 Wall mount bracket
MM540 Installation Instructions IMPORTANT SAFETY INSTRUCTIONS - SAVE THESE INSTRUCTIONS
 MM50 Installation Instructions IMPORTANT SAFETY INSTRUCTIONS - SAVE THESE INSTRUCTIONS Please read this entire manual before you begin. Do not unpack any contents until you verify all requirements on PAGE.
3,500/4,500lb. Vertical Cable Feighner Lift
 3,500/4,500lb. Vertical Cable Feighner Lift CAUTION - PUT SAFETY FIRST 1. Before attempting to install or operate this lift, study and fully understand the proper operating procedures and safety precautions
 For Wallbed models: KING SIZE INSTRUCTION BOOKLET #C1 Watch step by step installation instructions at: https://www.wallbedsbywilding.com/wallbed-installation-studio-series/ WARNING! ALL MURPHY/WALLBED
Installation Manual. SKU# TracVan Double SKU# TracVan Double SKU# TracVan Triple
 Installation Manual SKU# 29054 TracVan Double SKU# 29055 TracVan Double SKU# 29056 TracVan Triple TRACVAN INSTALLATION INSTRUCTIONS SKU# 29054, 29055 & 29056 TracVan installation is straightforward, and
Hip Roof Canopy Instructions
 Hip Roof Canopy Instructions - PUT SAFETY FIRST. NOT COMPLYING WITH THE PROCEDURES AND PRECAUTIONS OUTLINED IN THIS MANUAL MAY RESULT IN PERSONAL INJURY AND WILL INVALIDATE THE WARRANTY.. Before attempting
Installation Instructions - Model V4JSD 1
 Installation Instructions - Model V4JSD 1 Support Assemblies: Parts list: (Note see enclosed cut sheet for quantities and dimensional information) A vertical structural member (1 ½ x 1 ½ modular frame)
Gared Pro-S Portable Backstop
 Models: 9616 & 9618 Installation, Operation and Maintenance Instructions Please read all instructions before attempting installation or operation of these units SAVE THESE INSTRUCTIONS FOR FUTURE USE PUBLICATION
Hollywood Swing Away 2 and 4 Bike Racks Assembly and Installation Guide
 Hollywood Swing Away 2 and 4 Bike Racks Assembly and Installation Guide Tools Required: two adjustable wrenches, pliers, ¾ socket wrench recommended Note: please do assembly near your vehicle as you Can
Volkswagen T5 Transporter FAVT001 / KRVK004T / KRVK005T
 Volkswagen T5 Transporter 2003-2015 FAVT001 / KRVK004T / KRVK005T INSTALL TIME: 1 Hour READ ME FIRST: Thank you for purchasing a Front Runner Slimline II Rack. This Roof Rack consists of a kit that contains:
Before Assembling the Storage Wall
 Chapter 1 Assembling the Lista Storage Wall Lista provides two types of standard Storage Walls: B251 and B255. The design, construction, assembly, and quality are identical for both types, however, B251
INSTALLATION MANUAL WEEKENDER STEEL LADDER RACK
 TRUCK STORAGE SOLUTIONS SECURING YOUR REPUTATION INSTALLATION MANUAL WEEKENDER STEEL LADDER RACK STEEL & ALUMINUM SIDE BOX WITH PACK RAT DRAWER UNITS MODELS ATTENTION: PLEASE READ AND UNDERSTAND ALL INSTRUCTIONS
Rear Mount Installation Instructions
 Rear Mount Installation Instructions Ford Transit Low Roof 130 WB Frame Kit Part #: DTC 0809-011 V1.0.10.12.18 IMPORTANT INSTALLATION STEPS ARE DENOTED USING A STOP SIGN. THESE STEPS MUST BE PERFORMED
GlideRite Retractable Cover System For Hot Spot Spas (SE & SLX only)
") List of Contents Quantity Description 12 #10 x 1 ½ Flat Head Phillips Screw (see pg. 2) 2 #10 x ½ Pan Head Phillips Screw (see pg. 2) 8 ¼ x 2 ½ Lag Bolt (see pg. 2) 7 ¼ 20 x 5 / 8 Hex Head Bolt (see pg.
List of Contents Quantity Description 12 #10 x 1 ½ Flat Head Phillips Screw (see pg. 2) 2 #10 x ½ Pan Head Phillips Screw (see pg. 2) 8 ¼ x 2 ½ Lag Bolt (see pg. 2) 7 ¼ 20 x 5 / 8 Hex Head Bolt (see pg.
PLOW MOUNT KIT FOR POLARIS RANGER P/N ASSEMBLY / OWNERS MANUAL
 PLOW MOUNT KIT FOR POLARIS RANGER P/N 34-3010 ASSEMBLY / OWNERS MANUAL Application PLOW PUSH FRAME NO. 34-0000 or 34-0070 Before you begin, please read these instructions and check to be sure all parts
INSTALLATION INSTRUCTIONS PART#:17GT23MSS\17GT23MA MODULAR GRILL GUARD FOR CHEVY SILVERADO 1/2 TON 99-02
 INSTALLATION INSTRUCTIONS PART#:17GT23MSS\17GT23MA MODULAR GRILL GUARD FOR CHEVY SILVERADO 1/2 TON 99-02 1 guard, center section 1 brush guard, left side 1 brush guard, right side 1 wire guard insert,
INSTALLATION INSTRUCTIONS
 TEL:1-866-XANATOS INSTALLATION INSTRUCTIONS PART#: 17A110200MSS\17A110200MA MODULAR GRILL GUARD FOR NISSAN FRONTIER 05-10//PATHFINDER 05-07 1 guard, center section 1 brush guard, left side 1 brush guard,
INSTALLATION INSTRUCTIONS
 INSTALLATION INSTRUCTIONS R5 STEP BOARD APPLICATION: 2009-2017 Dodge Ram 1500 Quad / Crew Cab 2010-2017 Dodge Ram 2500/3500 Crew Cab PART NUMBER: 28-51040, 28-51045, 28-51050, 28-51055 ITEM QUANTITY DESCRIPTION
SAM. Model: STV-C65 LCD Mobile Visualized Stand Instruction Manual. Weight Capacity: 1251bs / 56.7kg Suits LCD Flat Panel Display: 42"-55" Page 20
 SAM Model: STV-C65 LCD Mobile Visualized Stand Instruction Manual Weight Capacity: 1251bs / 56.7kg Suits LCD Flat Panel Display: 42"-55" 20 Step 6 LCD Mobile Lift Stand Model: STV-C65 Cable management
TMA812 Tilt Mount Adapter for NEAR A8 and A12 Loudspeakers Installation Instruction Manual
 TMA812 Tilt Mount Adapter for NEAR A8 and A12 Loudspeakers Installation Instruction Manual 50 Spring Street, Ramsey, NJ 07446 USA Tel. 201-934-8500 Fax: 201-934-9832 www.bogen.com Specifications subject
INSTALLATION MANUAL PBL-UMP
 INSTALLATION MANUAL PBL-UMP Table of Contents Warning Statements... 4 Parts List... 5 Installation Tools... 5 Features... 7 Projector Preparation... 8 Bracket Installation... 10 Leveling the Mounting Bracket...
https://www.wallbedsbywilding.com/wallbed-installation-studio-series/
 For Wallbed models: KING SIZE INSTRUCTION BOOKLET #C1 Watch step by step installation instructions at: https://www.wallbedsbywilding.com/wallbed-installation-studio-series/ WARNING! ALL MURPHY/WALLBED
INSTRUCTIONS INSTRUCCIONES CONSIGNES
 AUTOMOTIVE PRODUCTS, INC. INSTRUCTIONS INSTRUCCIONES CONSIGNES APPLICATION: 2007-2010 CHEVY/GMC SILVERADO/SIERRA 2500/3500 (EXCLUDES CLASSIC) APP PART #46-23715, 40-92315/45-92310 MAX WINCH TRAY, SPORTSMAN
FOLDING TONNEAU RACK. 1. Rack Rail Assembly
 FOLDING TONNEAU RACK Package Contents (2) Load Bars (4) Load Bar End Caps (4) ¼-20 x 9/16 Narrow Shoulder Hex Head Screw (28) ¼ Flat Washers (24) ¼ Split Lock Washers (20) ¼-20 x ¾ long Button Head Screws
Installation Instructions
 IN-30000_F Installation Instructions TracRac Inc. 994 Jefferson St. FallRiver MA 02721 www.tracrac.com 800-501-1587 Thank you for your purchase of a T-Rac G2 cargo rack from TracRac. TracRac takes great
Truss Pitch-Adjustable (TPP) Mount
 Mount") I N S T R U C T I O N M A N U A L Truss Pitch-Adjustable (TPP) Mount The Truss Pitch-Adjustable (TPP) mount is a perfect solution exhibit, retail and digital signage applications. The mount is quick, easy
I N S T R U C T I O N M A N U A L Truss Pitch-Adjustable (TPP) Mount The Truss Pitch-Adjustable (TPP) mount is a perfect solution exhibit, retail and digital signage applications. The mount is quick, easy
INSTRUCTION BOOKLET #C20
 INSTRUCTION BOOKLET #C0 WARNING! ALL MURPHY/WALLBED SYSTEMS CONTAIN STORED ENERGY. FAILURE TO USE AND FOLLOW THESE INSTRUCTIONS DURING THE INSTALLATION PROCESS COULD RESULT IN SEVERE PERSONAL INJURY TO
INSTALLATION & OWNER S MANUAL
 Rev. O p. 1 of 16 INSTALLATION & OWNER S MANUAL V4213 BALL CAGE KIT INSTALLATION & OWNER S MANUAL The contents of this envelope are the property of the owner. Be sure to leave with the owner when installation
Table of Contents Heavy Duty Extra Long Poly Blade
 Table of Contents Heavy Duty Extra Long Poly Blade Arctic Heavy Duty Poly Blade 90" & 96" (Blade, Quadrant & A-frame)... 2 Power angling installation.....7 Shock absorber installation....12 Pro-Wings installation..
INSTALLATION INSTRUCTIONS KK-K9-C12-K CHEVY IMPALA
 INSTALLATION INSTRUCTIONS KK-K9-C12-K 2000-2005 CHEVY IMPALA READ ALL INSTRUCTIONS PRIOR TO INSTALLATION TOOLS REQUIRED: Power Drill Drill bits1/4 and 5/32 7/l6 wrench and socket 15,18 and\or 19mm socket
Toyota Prado 150 / LEXUS GX460 SLIMLINE II RACK ( 1255MM X 1964mm)
") Toyota Prado 150 / LEXUS GX460 SLIMLINE II RACK ( 1255MM X 1964mm) FATP001 / KRTP011T / KRLE007T INSTALL TIME: 1 Hour READ ME FIRST: Thank you for purchasing a Front Runner Slimline II Rack. This Roof
Toyota Prado 150 / LEXUS GX460 SLIMLINE II RACK ( 1255MM X 1964mm) FATP001 / KRTP011T / KRLE007T INSTALL TIME: 1 Hour READ ME FIRST: Thank you for purchasing a Front Runner Slimline II Rack. This Roof
HOUSE PARTS PACKED IN HOUSE BOX PARTS IN PLASTIC BAG (HARDWARE) PARTS IN SMALL PLASTIC BAG (FLOOR CLIPS) PARTS PACKED IN BUNDLE
 PARTS IN SMALL PLASTIC BAG (FLOOR CLIPS) PARTS PACKED IN BUNDLE") Check parts against this list before starting assembly. Refer to illustrations on pages 6 and 7 to view house parts. If any shortages are found, refer to Packing Slip for claim instructions. Item 3 5 6
Check parts against this list before starting assembly. Refer to illustrations on pages 6 and 7 to view house parts. If any shortages are found, refer to Packing Slip for claim instructions. Item 3 5 6
INSTALL INSTRUCTIONS
 Jeep JK Rear Stealth Bumper Product : 508R0B, 508R0B TC Applica on : 2007+ Jeep Wrangler JK ( 2 Door and 4 Door ) Page ( 1 of 5 ) I WARNING Read the instruc ons completely before beginning installa on.
MSP-DCCPGSU Large Screen Static Display Mount
 INSTALLATION INSTRUCTIONS Large Screen Static Display Mount The Large Screen Static Display Mount () is a quick disconnect mounting solution for large flat panel displays. The mount self-adjusts for the
Qwik-Fence Installation Instructions
 Qwik-Fence Installation Instructions 1 Tools Required The following installation instructions should be used as a guide for installing Folding Guard Qwik-Fence Partitions. Good common sense and appropriate
INSTALLATION INSTRUCTIONS 3"/4 BENT END SIDEBARS FORD F-150 SUPERCREW PART # DZ /DZ
 INSTALLATION INSTRUCTIONS 09-12 FORD F-150 SUPERCREW PART # DZ 372697/DZ 372699 PARTS LIST: 1 Driver/Left Sidebar 4 1/2 Lock Washers 1 Sidebar 4 12mm x 32mm OD x 3mm Flat Washers 1 Driver/Left Mounting
JEEP CARGO SLIDE IMPORTANT WARNING! SSST001. INSTALL TIME: 45 mins
 JEEP CARGO SLIDE SSST001 INSTALL TIME: 45 mins IMPORTANT WARNING! IT IS CRITICAL THAT ALL FRONT RUNNER PRODUCTS BE PROPERLY AND SECURELY ASSEMBLED AND ATTACHED TO YOUR VEHICLE. IMPROPER ATTACHMENT COULD
GroundControl. Follow instructions contained in this manual. Incorrect installation could result in serious injury or damage to property.
 GroundControl TM use supplied hardware Use only hardware supplied in your GroundControl kit or supplied by an authorized YAKIMA dealer. Use of unauthorized parts in the GroundControl system could result
Installation Guide 40670
 Installation Guide 40670 Kargo Master Rancho Cordova, CA 95742 800-343-7486 CustomerService@KargoMaster.com DATE: Installation Instructions 40670 *PLEASE READ ALL INSTRUCTIONS AND WARNINGS PRIOR TO ASSEMBLING,
FORD RANGER Onwards SLIMLINE II RACK (1255MM x 1358MM)
") FORD RANGER - 2012 Onwards SLIMLINE II RACK (1255MM x 1358MM) FAFR001 / KRFM010T INSTALL TIME: 60 mins READ ME FIRST: Thank you for purchasing a Front Runner Slimline II Rack. This Roof Rack consists of
FORD RANGER - 2012 Onwards SLIMLINE II RACK (1255MM x 1358MM) FAFR001 / KRFM010T INSTALL TIME: 60 mins READ ME FIRST: Thank you for purchasing a Front Runner Slimline II Rack. This Roof Rack consists of
TM12 ASSEMBLY INSTRUCTIONS
 TM12 ASSEMBLY INSTRUCTIONS Congratulations on purchasing the finest purple martin house available. Nature House Brand houses are the proven leader in aluminum martin housing for over half a century. After
RAMPAGE P R O D U C T S. INSTALLATION INSTRUCTIONS BRONCO ZIPPER FASTRACK TOP PART #984xx BRONCO TOOLS REQUIRED
 RAMPAGE P R O D U C T S 84 (+/- 1/4 ) INSTALLATION INSTRUCTIONS BRONCO ZIPPER FASTRACK TOP PART #984xx BRONCO 1966-1977 TOOLS REQUIRED 3/8 WRENCH 7/16 WRENCH ½ WRENCH #2 PHILLIPS SCREWDRIVER 1/8 DRILL
Attachment Kit Ford 250 4x4 Super Duty Early 350 4x4 Super Duty Early 450 Super Duty Early 550 Super Duty Early
 Fisher Engineering P.O. Box 529 Rockland, Maine 04841 September 2, 2005 Lit. No. 22303, Rev. 05 S Y S T E M Attachment Kit Ford 250 4x4 Super Duty 1999-04 Early 350 4x4 Super Duty 1999-04 Early 450 Super