Installation Instructions and Ordering Information
|
|
|
- Francine Fox
- 6 years ago
- Views:
Transcription


1 The Flush Finish Door Jamb System Installation Instructions and Ordering Information
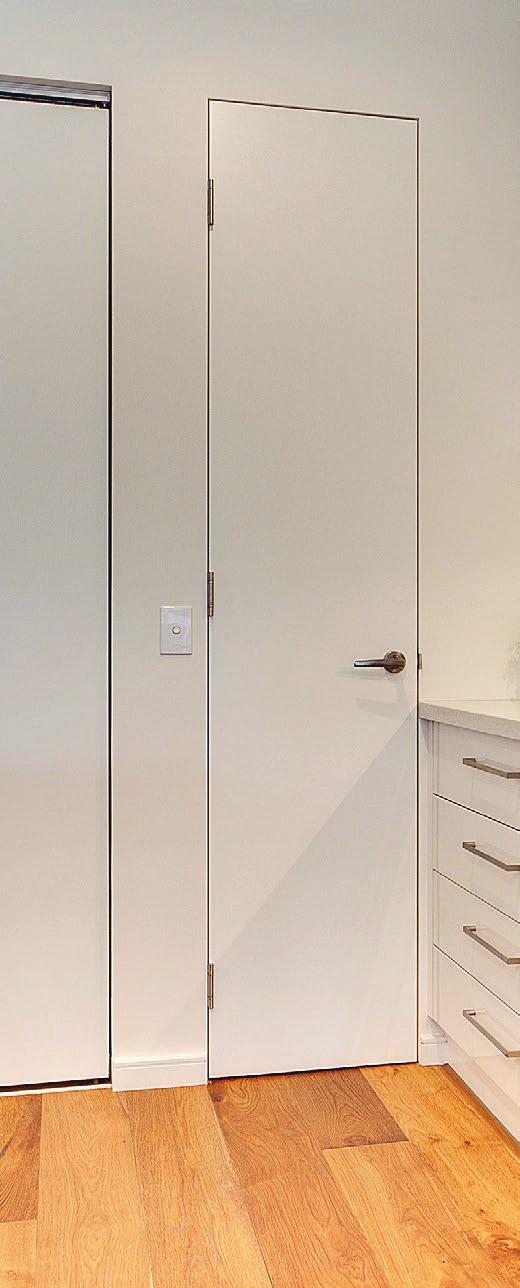
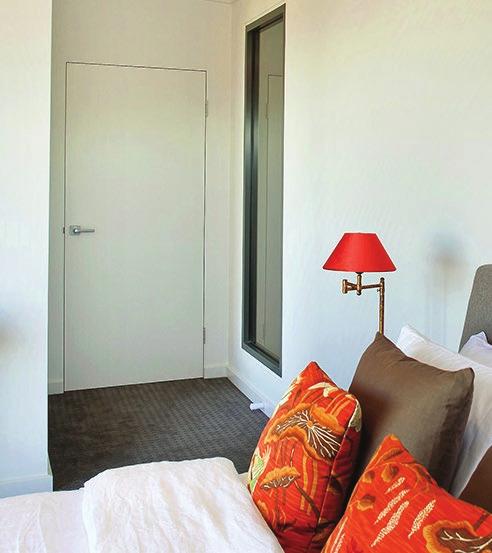
2 Installation Instructions Step 1 Step 2 Ensure that the stud opening is square and level and measures: Single Door width +15mm maximum Double Door width +18mm maximum Door height +8mm at header +25mm at floor level (depending on floor clearance. Check with the Project Manager on site to confirm floor coverings.) Important: The manufacturer strongly recommends a timber stud or a 0.75 BMT metal stud on both sides of the opening. Fasten hinge side first, making sure jamb is level and as tight against stud opening as possible. Then screw at 200mm centers up stile, screwing back through plasterboard into stud work see Detail 'B' and 'C'. Double screw all ends as Detail D. and beside hinge position - both above and below hinge as Detail E. SEE STEP 2A PLASTERBOARD SCREW WOOD OR STEEL STUD EZYJAMB JAMB DETAIL DETAIL "D" WIDTH + 15mm PLASTERBOARD SURFACE "D" "E" HEIGHT + 33MM (+ 8mm at header, +25mm at floor level) OPENING DETAIL "C" 200mm (8") DETAIL "E" FLOOR FLOOR "B" Elevation Elevation


3 Step 2A Head Installation Instructions Step 3 Fasten the final vertical section (strike jamb) below the head section. Ensure that the spacing between the two vertical sections are spaced evenly at the required distance. ie: 820 door, spacing is 825mm 720 door, spacing is 725mm Head joiner as inserted in jamb. EXAMPLE OF 820mm - 825mm EQUAL DISTANCE Locate head into joiner and make flush with jamb so the head joiner is not seen. EQUAL DISTANCE FLOOR Remove the remaining head joiner out of the strike jamb into the end of the head (as shown) to receive the strike jamb. EQUAL DISTANCE Elevation sales@ezyjamb.com.au


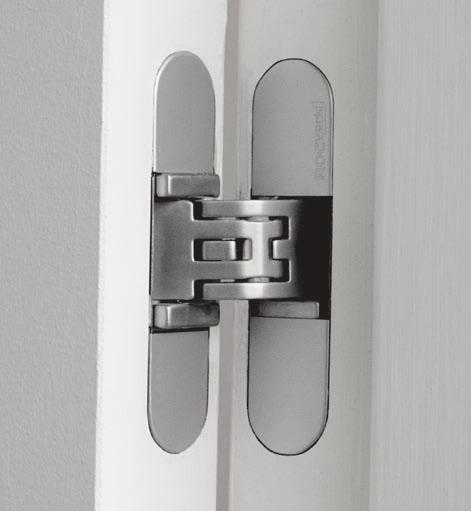
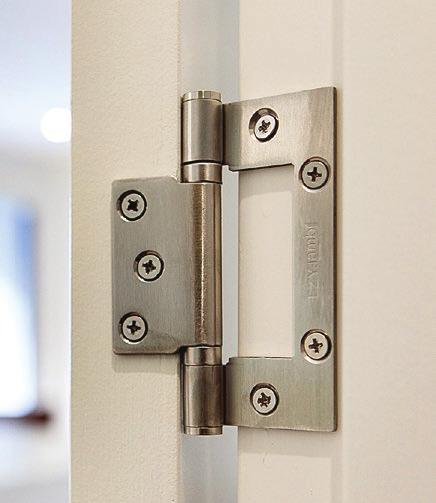
4 Installation Detail PLASTERBOARD VARYING SIZES PLASTER/ JOINTING COMPOUND HINGE 200mm WOOD OR STEEL WALL STUD SCREW FASTEN ONLY Step 4 Ensure the perforated side strips sit flat against the plasterboard to enable the jamb sections to be easily set into the wall surface. All the corners must be taped and plastered/ jointed in as Detail F. Finish the jamb with approved plaster/jointing compound. Hang the door in position leaving about 3mm clearance from the top and the hinged side using the EZYJamb Standard or Invisible Hinges. Surface mount the striker plate into position to align with the latch plate punching. REINFORCED ROLLED EDGE PERFORATED SIDE STRIPS SCREWS STEEL JAMB ADJUSTABLE SIDE SECTION FRICTION FITTED TO STOP SCREWS LATCH PLATE LATCH PLATE INSERT PLASTERBOARD DETAIL "F" EZYJAMB 3mm PLASTERBOARD 3mm STUD For all semi solid and solid core doors, outerleaf of hinge must be fixed to stile so that at least two screws are fixed back to the walls primary structure. TIMBER OR STEEL WALL STUD SCREW FIXING ONLY STEEL JAMB SCREW BACK TO SUBSTRATE PLASTER HINGE SET INTO WALL SURFACE Hinges Available FLOOR Elevation Standard Herline EZYJamb Lift-Off hinges Rocyork concealed hinges


5 CAVKIT - The Flush Finish Cavity Slider Trim Kit Cavkit Standard Head Detail FINISHING DETAIL FOR CAVITY SLIDER * Plasterboard Wall Plate Cavkit can be used to transform standard cavity sliders into architrave free, flush finish cavity sliders. This also complements and tones in with the EZYJamb flush finish door jamb system. The Cavkit is made up of Ezyreveal and Closer cap to trim and cap the plaster edges around the door penetration. Custom made closer cap can be produced to suit any specification. For more information visit the EZYJamb website at RA35 Studco 35mm Ezy Reveal Flush finish to Plasterboard *Trims only Cavkit Plan View Cavkit with Closer Cap Plasterboard Wall Stud Custom made closer cap Studco Closer Cap: Can be Custom Made to your requirements RA35 Studco 35mm Ezy Reveal Flush finish to Plasterboard RA35 Studco 35mm Ezy Reveal Flush finish to Plasterboard Plasterboard sales@ezyjamb.com.au


6 Ezy Finishing Sections EZYCap flush finish stop ends from Studco are designed for quick and economical finishing of wall ends. Designed for Quick & Economical Finishing of Reveals from 20mm to 180mm. Manufactured from Cold Rolled Steel providing a strong and secure Reveal, eliminating warping, twisting, cracking and damage from UV rays. EZY CAP EZY REVEAL Flush Finish Accessories ALUMINIUM SKIRTING SK mm x 1.6 Flat Natural Anodised Aluminium Skirting SK mm x 1.6 Flat Natural Anodised Aluminium Skirting SK100BL mm Natural Anodised Direct Screw Fix Skirting Information printed in this document or communicated by the designers, manufacturers, distributors or any agent is subject to change without notice to allow further development in design, manufacture and technology.


7 Section Details SECTION A SECTION C 37mm - Suit door 41mm 45mm * Suit door Suit door SECTION RA25 SECTION RA35 SECTION RA45 SECTION RA50 SECTION RA60 25mm 35mm 45mm 50mm 60mm SECTION RA65 SECTION RA80 SECTION RA90 SECTION RA100 65mm 80mm 90mm 100mm SECTION RA110 SECTION RA120 SECTION RA mm 120mm Custom Sizes Available* 150mm SECTION A FINISHED WALL TOLERANCES COMBINATIONS MINIMUM MAXIMUM SECTION A & RA25 82MM 91MM SECTION A & RA35 91MM 101MM SECTION A & RA45 101MM 111MM SECTION A & RA50 106MM 116MM SECTION A & RA60 116MM 126MM SECTION A & RA65 121MM 131MM SECTION A & RA75 131MM 141MM SECTION A & RA80 136MM 146MM SECTION A & RA90 146MM 156MM SECTION A & RA MM 166MM SECTION A & RA MM 176MM SECTION A & RA MM 186MM SECTION A & RA MM 201MM SECTION A & RA MM 216MM SECTION C FINISHED WALL TOLERANCES COMBINATIONS MINIMUM MAXIMUM SECTION C & RA25 85MM 95MM SECTION C & RA35 95MM 105MM SECTION C & RA45 105MM 115MM SECTION C & RA50 110MM 120MM SECTION C & RA60 120MM 130MM SECTION C & RA65 125MM 135MM SECTION C & RA75 135MM 145MM SECTION C & RA80 140MM 150MM SECTION C & RA90 150MM 160MM SECTION C & RA MM 170MM SECTION C & RA MM 180MM SECTION C & RA MM 190MM SECTION C & RA MM 205MM SECTION C & RA MM 220MM *LEAD TIMES APPLY sales@ezyjamb.com.au
 and e-mail it to sales@ezyjamb.com.")
8 Instructions for filling out EZYJamb Order Form - Both getting a quote for the EZYJamb product, and ordering it are very simple. Just follow the Ordering Instructions and fill out the Order Form available from the EzyJamb website (designed to be filled out on screen) and it to sales@ezyjamb.com.au Company Name and Address: This should be filled in with the Purchasing Company s actual address, contact name, phone & fax number. Jobsite Name & Address: This should be filled out with the delivery address if different than the one above. If it is the same, please write "same". Finished Wall Thickness: Total thickness of the studs and the plasterboard on the finished wall. Door Thickness: Door thicknesses of 35mm, 40mm & 44mm are available. Door Width x Height: The actual dimensions of the door are needed- we will oversize the frame to meet each application. Strike Plate Type/Height: The measurement from the bottom of the jamb to the center of the strike plate punch. Hinge Hand: Either LH or RH. Example below. Type of Hinges: Stainless Steel (SS), Liftoff or concealed hinges. Quantity of hinges per door if required. Quantity: Quantity of door frames of this size that is required. Comments: All the other information that is needed i.e. special delivery instructions etc Handing Example: Left hand door right hand door Any other questions can be answered by our well trained sales professionals. Feel free to give us a call. Customer Service Hotline 1300 EZY JAMB E: sales@ezyjamb.com.au W: DISTRIBUTED BY: ANOTHER PRODUCT FROM: MANUFACTURED BY:
A Studco Innovation. Openings and Finishings
 Openings and Finishings A Studco Innovation Openings Finishings 04 24 Create inconspicuous clean lines for a smooth flush finish door jamb. Quick and economical finishing of reveals from 13/16 to 6. 14
14 Intex Price Guide. Suitable for use in Fire Rated Wall Systems
 14 Intex Price Guide Suitable for use in Fire Rated Wall Systems O.50-0.55mm BMT W A L L T R A C K 0. 5 5 M M B M T A standard wall or floor track section which provides a friction fit for studs to fit
Innova. Concealed frame doorsets. Installation instructions
 Innova Concealed frame doorsets 1 2 Installation instructions 3 Thank you for choosing Innova To ensure the installation process is simple and efficient we recommended you read this guide in full before
Pocket Door Kit PD1 / PD2 Installation Instructions. Kit Contents.
 Pocket Door Kit PD1 / PD2 Installation Instructions Kit Contents. 1, Create Rough Opening In Stud Wall Construct rough opening ensuring all sides are square and level. Rough opening should be; Height =
SINGLE TRACK BYPASS (patent pending) barn door hardware
 barn door hardware") SINGLE TRACK BYPASS (patent pending) barn door hardware Installation Manual What is included in your kit: Part number Part name Quantity 1 Inner door hanger 2 2 Outer door hanger 2 3 5/16 x 1.5 lag bolts
SINGLE TRACK BYPASS (patent pending) barn door hardware Installation Manual What is included in your kit: Part number Part name Quantity 1 Inner door hanger 2 2 Outer door hanger 2 3 5/16 x 1.5 lag bolts
Arriva. Concealed frame doorsets. Installation instructions
 Arriva Concealed frame doorsets 1 2 Installation instructions 3 Thank you for choosing Arriva To ensure the installation process is simple and efficient we recommended you read this guide in full before
Fire rating: NFR/FD30. Una. Riser door systems. Installation instructions
 Fire rating: NFR/FD30 Una Riser door systems 1 2 Installation instructions 3 Thank you for choosing Una To ensure the installation process is simple and efficient we recommended you read this guide in
C-Series & S-Series Classic Frame with Transom (Single or Pair)
") 1. TOOLS REQUIRED Tape measure 6' magnetic level 3' magnetic level Safety Glasses Screw gun #2 Screwdriver tip #3 Screwdriver tip Philips Head screwdriver (Used to move frame on wall using oval slots on
1. TOOLS REQUIRED Tape measure 6' magnetic level 3' magnetic level Safety Glasses Screw gun #2 Screwdriver tip #3 Screwdriver tip Philips Head screwdriver (Used to move frame on wall using oval slots on
SLIDING MECHANISM TROLLEY CATCH TROLLEY ASSEMBLY FLOOR GUIDE
 Set A Set B PFD30 SG Fire Door Kit FITTING INSTRUCTIONS For use with 44mm thick doors only For Single and Double doors SUGGESTED TOOLS DRILL G-CLAMP TAPE MEASURE (Image for reference only) HACKSAW POCKET
Method of Build 1. Fire. Sound
 Method of Build 1 General Viso Fire & Acoustic in the solid form differs from most other systems as it can be erected using 12.5mm & 15.0mm boards within the same Aluminium framework. Also hidden fix board
IDP Entry-Fit Steel Door Frames. Installation Instructions K2A and NK2A Series Frames
 IDP Entry-Fit Steel Door Frames Installation Instructions K2A and NK2A Series Frames IDP Inc 21300 W. 8 Mile Rd. Southfield, MI 48075 1-877-645-2770 www.idpframes.com email: info@idpframes.com K2A and
Versatrim Side-Snap Frame
 Versatrim Side-Snap Frame net door width finished opening width rough opening width (finished opening width plus 1 1/2") Figure 1 Cross section of strike and hinge jambs The rough opening width is equal
SLIDING MECHANISM TROLLEY CATCH TROLLEY ASSEMBLY FLOOR GUIDE
 Set A Set B PFD30 Fire Door Kit FITTING INSTRUCTIONS For use with 44mm thick doors only For Single and Double doors IF INSTALLING A TOUCH LATCH, PLEASE READ THE CORRESPONDING FITTING INSTRUCTIONS FIRST
MINIMALIST DOOR FRAMES
 MINIMALIST DOOR FRAMES MINIMALIST DOOR FRAMES TIMELESSLY TRIMLESS. ENGINEERED PRODUCT SYSTEMS / DOOR FRAMES Fry Reglet's unique family of trimless door frame enhances modern design with all the functionality
Method of Build 1. General
 Method of Build 1 General GLAZED ELEVATIONS Viso Double Glazed in glazed form differs from many other systems as the vertical joints can have Viso dry joints or the unique HIDDEN mullion post between glazed
Trim type: Shadow gap. Fire rating: FD30. Enigma. Pocket sliding door systems. Installation instructions FD30 S
 Trim type: Shadow gap Fire rating: FD0 Enigma Pocket sliding door systems 1 2 FD0 S Installation instructions Thank you for choosing Enigma To ensure the installation process is simple and efficient we
MINIMALIST DOOR FRAMES
 MINIMALIST DOOR FRAMES MINIMALIST DOOR FRAMES TIMELESSLY TRIMLESS. ENGINEERED PRODUCT SYSTEMS / DOOR FRAMES Fry Reglet's unique family of trimless door frame enhances modern design with all the functionality
Chapter 18. Interior Doors
 Chapter 18. Interior Doors 18.1 SWINGING DOORS 18.2 SLIDING DOORS 18.3 BIFOLD DOORS Tools needed by volunteers: Hammer Nail apron Tape measure Square Pencil Tools and equipment needed: Extension cords
IF INSTALLING ANY OF THE PORTMAN SELF CLOSING SYSTEMS, PLEASE READ THE CORRESPONDING FITTING INSTRUCTIONS SUPPLIED WITH THE CLOSING SYSTEM FIRST
 Set A Set B PFD60 Fire Door Kit FITTING INSTRUCTIONS IF INSTALLING ANY OF THE PORTMAN SELF CLOSING SYSTEMS, PLEASE READ THE CORRESPONDING FITTING INSTRUCTIONS SUPPLIED WITH THE CLOSING SYSTEM FIRST SUGGESTED
rondo exangle drywall finishing sections
 rondo exangle drywall finishing sections SUMMARY The EXANGLE range of building board finishing profiles are designed to give plasterers a clean, defined edge on straight or curved details for internal
SLIDING MECHANISM TROLLEY CATCH TROLLEY ASSEMBLY FLOOR GUIDE
 Set A Set B P7001 Standard Kit FITTING INSTRUCTIONS For use with 44mm thick doors only For Single and Double doors IF INSTALLING A TOUCH LATCH, PLEASE READ THE CORRESPONDING FITTING INSTRUCTIONS FIRST
Grand Garden Chalet 6X3 Assembly Manual
 Revision #8 November 1, 2009 Grand Garden Chalet 6X3 Assembly Manual Thank you for purchasing a Grand Garden Chalet. Please take the time to identify all the parts prior to assembly. Please use Safety
Assembly Instructions
 Unite Panel System Hinge Door July 2016 #12 x / slotted hex washer head bolt Figure 1 threshold bracket frame Detail F threshold bracket threshold bracket (installed) #12 x / slotted hex washer head bolt
M O D E R N J A M B S Y S T E M S
 Casing-Less Jambs Cross-Section of Casing-Less Jamb Installation with Concealed Hinge Phillips U-200 trim or similar Requires jamb installation prior to Jamb width should be same as stud width Swing range
Fix Out Carpentry. Carpentry - Residential Construction. Product Code: 5594
 E PL SA M Fix Out Carpentry Carpentry - Residential Construction Product Code: 5594 Publishing details: Second Edition 2012 TAFE NSW Training and Education Support, Industry Skills Unit Orange and Granville
FIB-R-MAX STANDARD SINGLE DOOR
 FIB-R-MAX STANDARD SINGLE DOOR Style 1, 4, 4.4 and 11 Unitized Single Door Assembly By Fib-R-Max for Existing Openings 1. Set the crate, which will be marked with the specific opening location, at the
Heavy Wall Applied Stop Tube Frame and Door Installation
 INSTALLATION INSTRUCTIONS Heavy Wall Applied Stop Tube Frame and Door Installation Read all instructions before beginning installation. These instructions are provided to help prevent installation problems
1 PREPARE HEADER AND ROUGH OPENING
 CONTENTS. HEADER & TRACK ASSEMBLY. END BRACKET PLAIN 3. FLOOR PLATE.. 8. 4. SPLIT STUD 6 5. CARRIER (987) 6. QUICK RELEASE PLATE (960) 7. DOOR GUIDE SET (9883) 3. 4. 7. 8. BUMPER KIT (988) 9. #8 X 3/4
Installation Instructions. 45 and 60-Minute Fire-Rated Neutral Pressure Veneered Door Frame UBC & UL-10C
 Installation Instructions 45 and 60-Minute Fire-Rated Neutral Pressure Veneered Door Frame UBC 7-2-1997 & UL-10C Door Requirements: Consult the door manufacturer to make sure that the doors are qualified
RH-412 STEEL DOORS INSTALLATION INSTRUCTIONS
 RH-412 STEEL DOORS INSTALLATION INSTRUCTIONS By following the steps outlined below, the assembly, installation and adjustment of the steel doors, will be a simple process. Let s start with the Driver Side.
EXTRUTECH PLASTICS, INC. Custom Extruder of Close Tolerance Profiles
 PVC SINGLE DOOR INSTALLATION INSTRUCTIONS Single Pre-Hung Doors are shipped assembled in most cases ready for installation. Check the sill; in some cases you may want a sill in this door or if not requested
Grand Garden Chalet 6X3 Assembly Manual
 Revision #11 June 15, 2010 Grand Garden Chalet 6X3 Assembly Manual Thank you for purchasing a Grand Garden Chalet. Please take the time to identify all the parts prior to assembly. Please use Safety Eyewear
WPS crew Doors Installation instructions
 WPS-132-133 crew Doors Installation instructions ORDER OF INSTALLATION FOR A COMPLETE ENCLOSURE OF A CREW WPS (Weather Protection System) IS AS FOLLOWS: 1. Heater 2. Rear Thresholds - Right Hand & Left
INSTALLATION INSTRUCTIONS RH 412 STEEL DOORS
 By following the steps outlined below, the assembly, installation and adjustment of the steel doors, will be a simple process. Let s start with the Driver Side. Note: Having the hood open makes the job
8x12 SpaceMaker Garden Shed Assembly Manual
 8x12 SpaceMaker Garden Shed Assembly Manual Version #6 Revised June / 2007 Thank you for purchasing a 8x12 SpaceMaker Garden Shed. Please take the time to identify all the parts prior to assembly. Safety
Grand Garden Chalet 6X3 Assembly Manual - Costco
 Revision #16 March 22nd, 2013 Grand Garden Chalet 6X3 Assembly Manual - Costco Thank you for purchasing a Grand Garden Chalet. Please take the time to identify all the parts prior to assembly. Please use
Installation Instructions. Oakmont Folding Doors
 Before You Start For quick and easy installation of your Oakmont folding door, read these instructions thoroughly. A few minutes of prior planning will make the job easier and ensure years of trouble-free
Installation Instructions. 45 and 60-Minute Positive Pressure Fire-Rated Veneered Door Frame UBC & UL-10C
 Wood Doors Installation Instructions 45 and 60-Minute Positive Pressure Fire-Rated Veneered Door Frame UBC 7-2-1997 & UL-10C Positive Pressure Category Requirements: Category C The Maiman Company Fire
MINIMALIST DOOR FRAMES PRODUCT BROCHURE ARCHITECTURAL METALS
 MINIMALIST DOOR FRAMES ARCHITECTURAL METALS PRODUCT BROCHURE MINIMALIST DOOR MINIMALIST DOOR FRAME TIMELESSLY TRIMLESS. Fry Reglet's unique, trimless door frame enhances modern design with all the functionality
INSTALLATION INSTRUCTIONS. Thermal Entrances AA 250/AA 425 THERMAL DOOR WITH TRIFAB 601/601T FRAMING
 JANUARY, 2014 1 INSTALLATION Thermal Entrances AA 250/AA 425 THERMAL DOOR WITH TRIFAB 601/601T FRAMING INSTRUCTIONS 2 FRAME ASSEMBLY JANUARY, 2014 601442 SHEAR BLOCK BALL BEARING NRP BUTT (FACTORY APPLIED
SECTION BULLET- RESISTANT DOORS
 1 SECTION 08 3950 BULLET- RESISTANT DOORS PART 1- GENERAL 1.01 SUMMARY A. This Section Includes: 1. Bullet- resistant steel door and frame systems. 2. Door hardware for bullet- resistant steel door and
For doors up to and including standard door sizes
 The Pocket Door Kit FITTING INSTRUCTIONS - NOTICE DE POSE - MONTAGE HANDLEIDING - MONTAGEANLEITUNG ISTRUZIONI DI MONTAGGIO - INSTUCCIONES DE MONTAJE Warranty. This product is covered by a 10 year manufacturer
INSTALLATION INSTRUCTIONS
 INSTALLATION INSTRUCTIONS Thermally Broken Framing and Door Installation SL-450TB (2" x 4-1/2" with 1" Glazing) & SL-600TB (2" x 6" with 1" Glazing) IMPORTANT: Read all instructions before beginning installation.
Thermally Broken Framing and Door Installation
 INSTALLATION INSTRUCTIONS Thermally Broken Framing and Door Installation IMPORTANT: Read all instructions before beginning installation. These instructions are provided to help prevent installation problems
INSTALLATION GUIDE. 1. Overview. 2. Measuring. 3. Tools & fixings you will need B C. Opening Width. Opening Height
 INSTALLATION GUIDE Please take a few minutes to read through this guide before getting started. 1. Overview A Typical Sliding Wardrobe Door Layout A Frame - Top Liner (optional) B Top Track C Frame - Strike
INSTALLATION INSTRUCTIONS
 www.marwincompany.com Kit Number Door Height Rough Opening Height KD200BB68 80 84 ½ KD200BB70 84 88 ½ KD200BB80 96 100 ½ INSTALLATION INSTRUCTIONS 200BB SERIES KD POCKET DOOR FRAME FOR 2 X 4 STUD WALLS
Garden Chalet 4X2 Assembly Manual
 Revision #6 April 12th, 2010 Garden Chalet 4X2 Assembly Manual Thank you for purchasing a 4x2 Garden Chalet. Please take the time to identify all the parts prior to assembly. Please use Safety Eyewear
IMPORTANT NOTICE WARRANTY WILL BE HONORED ONLY IF THE JAMBS HAVE BEEN INSTALLED IN ACCORDANCE WITH THESE INSTALLATION INSTRUCTIONS
 LAMBTON JAMB SERIES INSTALLATION INSTRUCTIONS NON-RATED & 20 MINUTE WOOD JAMBS IMPORTANT NOTICE WARRANTY WILL BE HONORED ONLY IF THE JAMBS HAVE BEEN INSTALLED IN ACCORDANCE WITH THESE INSTALLATION INSTRUCTIONS
Installation Instructions
 TEL: 09 579-8895 FAX: 09 579-2933 EMAIL: sales@nzfiredoors.co.nz NZ Fire Doors Ltd, 89 Gavin Street, Ellerslie, PO Box 12709, Penrose 1642, Auckland, New Zealand. www.nzfiredoors.co.nz Installation Instructions
C. Samples for Initial Selection: Manufacturer's color charts showing the full range of colors available.
 SECTION 105113 - METAL LOCKERS PART 1 - GENERAL 1.1 RELATED DOCUMENTS A. Drawings and general provisions of the Contract, including General and Supplementary Conditions and Division 01 Specification Sections,
INTERIOR ALUMINUM DOORS AND FRAMES
 INTERIOR ALUMINUM DOORS AND FRAMES 8401 Rovana Circle, CA. 95828 PHONE: 1.866.566.2161 FAX: 1.888.454.2889 www.doormerica.com Updated - 9-1-2017 INTERIOR ALUMINUM FRAME SPECIFICATIONS Phone: 866-566-2161
XL JOINERY LTD LA PORTE VISTA MODULAR 3 ASSEMBLY INSTRUCTIONS
 XL JOINERY LTD LA PORTE VISTA MODULAR 3 2090mm High x 4687mm Wide ASSEMBLY INSTRUCTIONS READ AND UNDERSTAND THESE INSTRUCTIONS FULLY PRIOR TO STARTING INSTALLATION. IT IS STRONGLY RECOMMENDED THAT A COMPETENT
8x4 SpaceSaver Garden Shed Bevel Model Assembly Manual Revision #18 March 9th, 2017
 8x4 SpaceSaver Garden Shed Bevel Model Assembly Manual Revision #18 March 9th, 2017 Thank you for purchasing an 8x4 SpaceSaver Garden Shed. Please take the time to identify all the parts prior to assembly.
05/11. CI/SfB (22) fire & sound. tenon. A cost effective performer.
 fire & sound. tenon. A cost effective performer.") CI/SfB 05/11 (22) fire & sound tenon A cost effective performer fire & sound tenon fire & sound at a glance BOARD ROOMS EXECUTIVE OFFICE SUITES CONFERENCE SUITES GENERAL OFFICE CLEAN ROOMS LIGHT INDUSTRIAL
CI/SfB 05/11 (22) fire & sound tenon A cost effective performer fire & sound tenon fire & sound at a glance BOARD ROOMS EXECUTIVE OFFICE SUITES CONFERENCE SUITES GENERAL OFFICE CLEAN ROOMS LIGHT INDUSTRIAL
Installation Instructions
 Supafold Slide Aside System Three Fold Room Divider Installation Instructions Distinctive Doors Ltd Supafold Slide Aside Internal Folding System IMPORTANT: Before proceeding with the installation, and
SLIDING MECHANISM TROLLEY CATCH TROLLEY ASSEMBLY FLOOR GUIDE
 Set A Set B P7001 Standard Kit Glass Door FITTING INSTRUCTIONS SUGGESTED TOOLS DRILL MITRE/CHOP SAW TAPE MEASURE (Image for reference only) HACKSAW POCKER DOOR KIT SHORT / LONG Z SECTION LONG Z SECTION
8x4 SpaceSaver Garden Shed Assembly Manual
 8x4 SpaceSaver Garden Shed Assembly Manual Revision #8 July 5, 2010 Thank you for purchasing an 8x4 SpaceSaver Garden Shed. Please take the time to identify all the parts prior to assembly. Safety Points
FD30 & FD60 FRAME & DOOR INSTALLATION GUIDE
 FD30 & FD60 FRAME & DOOR INSTALLATION GUIDE SUPPORTING CONSTRUCTION The supporting construction may be timber or steel stud plasterboard partition, metal stud demountable partition or masonry wall, but
A-LOOK ver 1 A-LOOK TM. Installation Manual
 A-LOOK ver 1 A-LOOK TM Installation Manual Tools Required Pencil Measuring Tape Drill Hack Saw with 12D/32T Blade Jigsaw Self-Centering Punch Framing Square 7/16" Wrench Ladder 2" or 3" Paint Brush for
STC 46 3-Sided Paired Frame (Double Rabbet Only)
") (Toll Free) Phone 866-452-1845 Fax 910-452-1848 STC 46 3-Sided Paired Frame (Double Rabbet Only) FRAME PART DIMENSIONS E E THROAT THROAT MINIMUM 3 5/16" MAXIMUM 13" D A=Jamb Depth MINIMUM 4 5/16" MAXIMUM
(Toll Free) Phone 866-452-1845 Fax 910-452-1848 STC 46 3-Sided Paired Frame (Double Rabbet Only) FRAME PART DIMENSIONS E E THROAT THROAT MINIMUM 3 5/16" MAXIMUM 13" D A=Jamb Depth MINIMUM 4 5/16" MAXIMUM
Table of Contents F Series Frames
 Table of Contents F Series Frames How to Order Frames... F 1 F Series Spec Sheet... F 2 F Series Profiles 1 of 6... F 3 F Series Profiles 2 of 6... F 4 F Series Profiles 3 of 6... F 5 F Series Profiles
ED1300/1300F SERIES CONCEALED VERTICAL ROD DEVICE INSTALLATION INSTRUCTIONS
 ED1300/1300F SERIES CONCEALED VERTICAL ROD DEVICE INSTALLATION INSTRUCTIONS Ver.2 1300 SERIES CONCEALED VERTICAL ROD DEVICE Top Strike Latch Screws Strike Screws Release Plunger Top Latch Plunger Screws
InStallatIon InStruCtIonS for vinyl 2-lIte PatIo door assembled
 InStallatIon InStruCtIonS for vinyl -lite PatIo door assembled tools & materials you Will need: Measuring Tape Pencil Shims Square Hammer or Mallet Level Drill & Drill bits: 6", 8", 5 6", 7 6" Utility
CONCEALED VERTICAL ROD PANIC EXIT DEVICE
 INSTALLATION INSTRUCTIONS CRL JACKSON 1085-1085P CONCEALED VERTICAL ROD PANIC EXIT DEVICE crlaurence.com Phone: (800) 421-6144 Fax: (866) 921-0531 crlaurence.com usalum.com crl-arch.com 11M0236 ORDER OF
.1 Comply with the General Conditions of the Contract, Supplementary General Conditions and the requirements of Division 1.
 PAGE 1 PART 1 GENERAL 1.1 REFERENCE.1 Comply with the General Conditions of the Contract, Supplementary General Conditions and the requirements of Division 1. 1.2 RELATED WORK SPECIFIED ELSEWHERE.1 Installation
How To Measure Your Finished Opening
 3000 Series Bifold Doors How To Measure Your Finished Opening MEASURE FROM RIGHT TO LEFT 2 PLACES (WIDTH) MEASURE FROM TOP TO BOTTOM 2 PLACES (HEIGHT) Tools Required for Assembly: Tools Needed: Phillips
6x6 Maximizer Storage Shed Assembly Manual Version #9 Feb 26th, 2015
 6x6 Maximizer Storage Shed Assembly Manual Version #9 Feb 26th, 2015 Thank you for purchasing a 6x6 Maximizer Storage Shed. Please take the time to identify all the parts prior to assembly. Please Note-
ED5200(A) Series Rim Exit Devices
 Series Rim Exit Devices") ED5200(A) Series Rim Exit Devices Installation Instructions (Single Doors or Pairs with Mullion) FM156 4/10 (617350602) For Metal, Composite and Wood Doors of Either Hand End Clamp (3) 8-32 x 5/16" Flat
ED5200(A) Series Rim Exit Devices Installation Instructions (Single Doors or Pairs with Mullion) FM156 4/10 (617350602) For Metal, Composite and Wood Doors of Either Hand End Clamp (3) 8-32 x 5/16" Flat
Glass and Stainless Solutions
 Glass and Stainless Solutions Highgrove Glass and Stainless Solutions Glass Balustrading Stainless Steel Balustrading Glass Shower Screens Mirrors Glass Splashbacks Glass Fencing Stainless Steel Fencing
Assembly Instructions 10 X 10 Aluminum Frame Building
 Assembly Instructions 10 X 10 Aluminum Frame Building 27 97 9 8 47 36 74 52 10 10 X 10 Square Building W/ Dome Includes: The Steel Entry Door with a Dead Bolt Lock assembly and Aluminum Door Frame. Metal
Twin-Wall Double Swinging Door Kit
 115021 Twin-Wall Double Swinging Kit READ THIS DOCUMENT BEFORE YOU BEGIN Thank you for purchasing this GrowSpan door kit. When properly assembled and maintained, this product will provide years of reliable
B. Shop Drawings: Include elevations, door edge details, frame profiles, metal thicknesses, preparations for hardware, and other details.
 SECTION 081113 - HOLLOW METAL DOORS AND FRAMES PART 1 - GENERAL 1.1 SUMMARY A. Section Includes: 1. Standard hollow metal doors and frames. 1.2 SUBMITTALS A. Product Data: For each type of product indicated.
novista doorsets hidden door system
 novista doorsets hidden door system novista doorsets The name Novista is derived from the Italian for No Vista or No View and this perfectly describes this door system with a hidden frame which allows
DENVER PUBLIC SCHOOLS DESIGN AND CONSTRUCTION STANDARDS This Standard is for guidance only. SECTION METAL LOCKERS
 PART 0 A/E INSTRUCTIONS 0.01 GENERAL DESIGN REQUIREMENTS A. Architect shall coordinate with the DPS Project Manager the type, layout and size of lockers required on the project. B. Varsity athletic Lockers
HIDEAWAY SERIES POCKET DOOR SYSTEM ASSEMBLY INSTRUCTIONS
 HIDEAWAY SERIES POCKET DOOR SYSTEM ASSEMBLY INSTRUCTIONS Part No. PRODUCT RANGE (UK IMPERIAL SIZES) MADE FOR 50mm X 100mm STUD WALLS Item Code Available Sets Maximum Door Width Maximum Door Height Coburn
Installation Materials Required: Tools Required: 6" self-adhesive flashing. Shims. 3-foot level 6-foot level Tape measure 1/8" drill bit
 installation instructions for CUSTOM WOOD & FIBERGLASS EXTERIOR FOLDING DOOR SYSTEMs (JII101) Thank you for selecting JELD-WEN products. Attached are JELD-WEN s recommended installation instructions for
Hardware Fitting Accessories Bolts
 Lever action flush bolt With slide Width: 19 mm Stroke (a): 25 mm 1 Flush bolt 1 Set of fastening material With lever arm Width: 19 mm Stroke (a): 18 mm 1 Flush bolt 1 Set of fastening material Stainless
Shaft Wall SYSTEMS 210 INSTALLATION 211. Shaft Wall systems are fire rated non-load bearing walls used for shafts and service ducts.
 SYSTEMS 210 INSTALLATION 211 GENERAL REQUIREMENTS 211 FRAMING 212 PLASTERBOARD LAYOUT 213 PLASTERBOARD FIXING 214 CONSTRUCTION DETAILS 217 Shaft Wall Shaft Wall systems are fire rated non-load bearing
(773) INSTALLATION INSTRUCTIONS for Vinyl Windows with Integral Nailing Fin (JII001) IMPORTANT INFORMATION & GL OSSARY ROUGH OPENINGS
 INSTALLATION INSTRUCTIONS for Vinyl Windows with Integral Nailing Fin (JII001) IMPORTANT INFORMATION & GL OSSARY ROUGH OPENINGS") Thank you for selecting C l i m a t e G u a r d products. Attached are our recommended installation instructions for Vinyl windows with an integral (2400-02) will not affect application of the ClimateGuard
Thank you for selecting C l i m a t e G u a r d products. Attached are our recommended installation instructions for Vinyl windows with an integral (2400-02) will not affect application of the ClimateGuard
Smooth Operators. CS TrackSystems range offers a track system for every surface sliding doorway situation.
 Smooth Operators CS Systems is a range of high quality tracks. They are based on the one-piece heavy duty aluminium extrusions used in CS Cavity Sliders, and can be used for a multitude of applications.
Shim (2) Supplied. Strike Plate. (3) x 5/8" PFHMS or 10 x 1" PFHWS. Top Latch. (3) x 1/4" PRHMS. Latch Cover. (2) 8 x 3/8" PFH AB SMS
 Supplied. Strike Plate. (3) x 5/8 PFHMS or 10 x 1 PFHWS. Top Latch. (3) x 1/4 PRHMS. Latch Cover. (2) 8 x 3/8 PFH AB SMS") Installation Instructions ED5400 (A) Series ED5470 (B) Series Surface Vertical Rod Exit Devices Strike Angle Must Engage Strike Top Strike 10-24 PFHMS Top Bracket and Strike required for ED5470. Shim (2)
Installation Instructions ED5400 (A) Series ED5470 (B) Series Surface Vertical Rod Exit Devices Strike Angle Must Engage Strike Top Strike 10-24 PFHMS Top Bracket and Strike required for ED5470. Shim (2)
INSTALLATION INSTRUCTIONS FOR A&L PRODUCTS
 INSTALLATION INSTRUCTIONS FOR A&L PRODUCTS AUGUST 2017 1 RECOMMENDED BUILDING IN-DETAIL Should you require further information, please contact A&L Windows on 1800 441 414 2 IMPORTANT IMPORTANT Allow Vinyl
2. Skid should contain the following: A door & jamb B casing C seal cover kit & D extension jamb set (if ordered), E hardware box.
, E hardware box.") RECEIVING 1. Immediately inspect shipment for damage during transit, for example: damage caused by fork lifts, stacking, water stains etc. and disclose to delivery driver prior to signing for receipt.
RECEIVING 1. Immediately inspect shipment for damage during transit, for example: damage caused by fork lifts, stacking, water stains etc. and disclose to delivery driver prior to signing for receipt.
40mm Thermoclick. Type II Class 1 Clear Satin Anodize - 201R1 (Mid Grade Commercial)
") http://www.sundancesupply.com 40mm Thermoclick Type II Class 1 Clear Satin Anodize - 201R1 (Mid Grade Commercial) U-Profile 12' Lengths $39 Out System offers a complete set of extrusions and accessories
http://www.sundancesupply.com 40mm Thermoclick Type II Class 1 Clear Satin Anodize - 201R1 (Mid Grade Commercial) U-Profile 12' Lengths $39 Out System offers a complete set of extrusions and accessories
Precut Value Shed Manual Gambrel Barn
 Tools Needed: -Cordless Drill (12V or higher) -#2 Square Drive Bit -Hammer -6 Step Ladder -Tape Measure -Square utility knife w/ blade & hook blade -Speed Square Little Cottage Co. PO Box 455 Berlin, OH
4256HM JAMES HARDIE MONOLITHIC CLADDING
 4256HM JAMES HARDIE MONOLITHIC CLADDING 1. GENERAL This section relates to the supply and fixing of fibre cement flush finish cladding: - James Hardie Monotek Sheet for textured coating systems - James
8x12 SpaceMaker Garden Shed Assembly Manual Revision #20 June 27th, 2017
 8x12 SpaceMaker Garden Shed Assembly Manual Revision #20 June 27th, 2017 Thank you for purchasing our 8x12 SpaceMaker Garden Shed. Please take the time to identify all the parts prior to assembly. Safety
AYRLITE PROFILES & ASSEMBLY ACCESSORIES BOOKLET PROFILES & ASSEMBLY ACCESSORIES. Smart & Simple
 PROFILES & ASSEMBLY ACCESSORIES BOOKLET PROFILES & ASSEMBLY ACCESSORIES Smart & Simple PROFILES & ASSEMBLY ACCESSORIES The AYRLITE Profiles & Assembly Accessories are an integral component of the AYRES
Install Instructions. NewAge Steel Welded Tall Locker
 Kit Contains Full Width Adjustable Steel Shelves (4) Height-Adjustable Steel Leveling Legs (4) Aluminum Door Trim (2) 2.5 x ¼ Cabinet Mounting Lag Bolts (4) Large Zinc Plated Mounting Washers (4) 5/8 x
Sectional Door Installation Instructions
 Sectional Door Installation Instructions 1. Check opening height and door size. a. 25-30mm overlap on each side and >10mm at top. b. At least 150mm side room required 2. Check headroom clearance, standard
6X3 Patio Garden Shed Assembly Manual
 Thank you for purchasing a 6x3 Patio Garden Shed. Please take the time to identify all the parts prior to assembly. Revision #4 July 6th, 2016 6X3 Patio Garden Shed Assembly Manual Please use Safety Eyewear
Seamed Edge Doors 1000 Series
 Seamed Edge Doors 1000 Series 16 and 18 Gauge Doors Cold Rolled or Galvanized Steel Tight Corner Seam Full Body Polystyrene Core or Honeycomb Core Non-Handed Design 12-Gauge Closer Reinforcement Reversible
INSTALLATION MANUAL FORTRESS SERIES
 Guardian Security Structures TEL 1-406-212-2334 EMAIL rg@gssdoors.com WEB www.gssdoors.com FORTRESS SERIES GENERAL INSTALLATION GUIDELINES 1. The door frame is installed using 16 bolt screws 7,5 mm in
 CI/SfB 11/12 (22) fire & sound A cost effective performer fire & sound Areas of use L IA L IN IGH DU T ST R G OF EN FI ERA CE L fire & sound at a glance E OF XEC FI UT CE IV SU E IT ES CO SU N IT FER ES
Entry Mortise Handleset
 1. Pencil 2. No. 2 and No. 3 Phillips Head Screwdrivers 3. No. 1 and No. 2 Slotted Screw Drivers 4. 1/8" Allen Head Wrench 5. 3/4" Wood Chisel or Corner Chisel 6. Measuring Device 7. Lock Mortising Tool
STACKING MULTI-SLIDE DOOR SYSTEM INSTALLATION INSTRUCTIONS
 STACKING MULTI-SLIDE DOOR SYSTEM INSTALLATION INSTRUCTIONS 1290363 Revision 1 12/16 Page 1 Weather Shield Mfg., Inc. NOTICE CAUTION! Failure to install and maintain our product according to these instructions
Contents. Simplifying interior design and functionality. Concealed frame doorsets. Arriva introduction. Innova introduction.
 Em-B Solutions Simplifying interior design and functionality Contents Concealed frame doorsets What are Selo concealed frame doorsets? 04 Arriva & Innova system comparison 06 Arriva introduction Innova
Twin-Wall Double Swinging Door Kit
 105105 Twin-Wall Double Swinging Kit YOU MUST READ THIS DOCUMENT BEFORE YOU BEGIN TO ASSEMBLE THE DOOR KIT. Thank you for purchasing this GrowSpan door kit. When properly assembled and maintained, this
Coburn Interior Sliding Systems. Coburn COBURN SLIDING SYSTEMS
 Coburn Interior Sliding Systems Coburn COBURN SLIDING SYSTEMS Interior Sliding Door Gears FOR CUPBOARDS, WARDROBES, INTERIOR SLIDING AND FOLDING DOORS A comprehensive range of top hung and bottom rolling
Versatrac R-System Stock Extrusions, Clips and Accessories
 Versatrac R-System Extrusions are available in 300 series (for 3 3/4" walls) and 400 series (for 4 7/8" walls). Standard finishes are Satin Metallic Bronze, Satin Black, Satin White Baked Enamel, and Clear