Guardian warm roof conversion system. Installation Guide
|
|
|
- Helena Glenn
- 6 years ago
- Views:
Transcription


1 Guardian warm roof conversion system Installation Guide
2 2


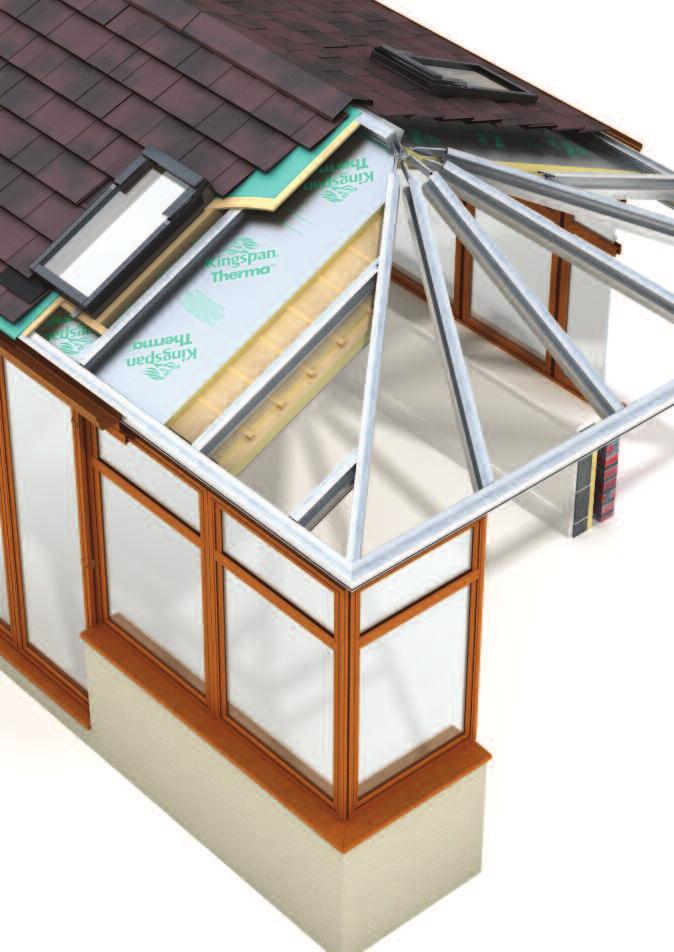
3 Conservatory walls consist largely of glazed elements including windows and doors that may include structural mullions or may be strengthened with internal structural reinforcement inside hollow sections. Modern conservatories are likely to be marked in accordance with BS EN : A1:2010. The Guardian Roof System is designed to be of similar weight to a glass roof of equal size, so it follows that the existing glazed walls, if correctly specified for a the original glazed roof, should be capable of supporting the replacement Guardian Roof System. It is the sole responsibility of the installer to establish the structural suitability of the existing conservatory wall system, to establish the location of any structural or reinforcing elements, and to ensure that the Guardian Roof System is fixed to the existing structural elements so that gravity and wind loads are transferred safely through the existing walls to the conservatory foundations. The following guide has been created to assist in the fabrication and installation of the Guardian Roof. Please note that each roof is individual and will be fabricated to suit various shapes and sizes. Each roof supplied will be accompanied by a roof layout plan and this guide. Your fabricator will be available to provide installation technical support. Roof Layout Plan Please refer to the roof layout plan prior to commencing installation. It is very important that the roof fits the windows layouts and that all the windows are fully reinforced. All components are numbered to match the roof layout plan for ease of installation. Tools required Cordless drill, angle grinder, silicone gun, tape measure, hand saw, 10mm spanner and 10mm nut spanner, 10mm ratchet, snips, staple gun, screwdriver, foam gun and expanding foam. Guardian warm roof construction Choice of tile finishes Rafter Exterior grade plywood Membrane 40 mm high performance insulation 25 mm high performance insulation (timber batten cut back for clarity) 72 mm high performance insulated plasterboard Timber battens 3


4 Step 1: Box gutter 1a Fix box gutter to wall and seal using suitable sealant. Place ringbeam on the side lip of the box gutter and fix in place by screwing up through the lip with a 25mm window screw. Ensure not to puncture the box gutter itself. For the best internal finish use insulated plasterboard under box gutter using timber battens. Step 2: Ringbeam 2a Cleats to be inserted internally into the ringbeam and fixed using 25mm stainless steel window screws. Ringbeam and packer should be installed flush with inside of window frame. Use 100mm stainless steel window screws at 600mm centres. 2b Remove existing glazing and fix through packer and eaves beam. Cleats to be fixed at 32mm from the outside angle of the ringbeam on die lines. 4


.")
5 Step 3: Assemble rafters Gable rafters to be bolted to house wall and secured at 300mm centres using suitable fixings determined by the wall construction. Ensure Stainless Steel Cleats provided are used when fixing to the house wall at the top and bottom of wall rafter. 3a Stainless steel cleats must also be used at gable front end. Edwardian stainless steel cleat Victorian stainless steel cleat Fix rafter to ringbeam using pre-installed cleats and bolts provided (loosely tighten at this stage). 3b Edwardian conservatory Victorian conservatory option 5

. 6 www.")
6 Step 3: Assemble rafters 3c Using location pin provided to temporarily fix arm to spider. 3d Temporary fix remaining rafters including any pre-engineered window framing (if required). 6


7 3e Ensure all roof sections are aligned to the preengineered positions and tighten into place. For edwardian/victorian hip cleats tighten bolts on rafters first before tightening to ringbeam. Edwardian aluminium cleat Victorian aluminium cleat 3f Tighten pre-installed grub screws using alan key. Please ensure grub screws are not overtightened. 7


8 Step 4: Timber battens 4a 4b Fit 25mm timber battens at maximum 400mm centres to underneath of rafters. Fixings are to be 50mm window screws. Batten out entire roof structure. Batten over window opening and cut back to suit. Step 5: Rafter Insulation 5a 5b From outside insert 40mm insulation board between rafters. Seal all gaps with expanding foam. 8


9 Step 6: Exterior plywood & window frame Fix timber sheets to rafters. 6a 6b 6c Timber out roof as per schedule. Timber sheets to be fixed at 200mm centres using 20/25mm self drilling screws. 6d Fix brackets to the V notch on roof window frame prior to installation. 6e Install roof window frame into pre-formed opening within rafters. Fix frame to timber ply through brackets using screws supplied within roof window pack. 9


. 10 www.guardianroof.co.uk All tiling is from right to left.")
10 Step 7: Membrane & roof tile 7a Cover with vapour permeable underlay with a vapour resistance of less than 0.25MNs/gram as required by BS5250: Overlap all joints of underlay by 150mm and staple down to timber sheets. Over run ringbeams by 100mm and up outer wall by 50mm. Torn underlay up window frame and staple to topside. 7b 7c Fix watercourse to outer wall. Starting bottom right corner of the roof with a full roof tile, fix to lip of ringbeam and into the corner of the watercourse (allow 4 x 16mm screw fixings per tile) All tiling is from right to left. Complete one row at a time. For the second course always start with half a tile.


11 7d Dependant on height of roof window 1-3 tiles should be fitted below window before bottom flashing is installed. 7e Roof window flashing to be installed to roof window pack instructions. 11


12 Step 8: Standard Ridge & end cap 8a Apply foam tape to underneath the 25mm treated timber batten. Using the profile ridge and hip for position fit timber battens and screw into place. 8b Position delta ridge over batten and fix side on. Use touch up kit provided to hide screw heads. Optional small ridge Dress over hip, cut and bend to shape at intersections 8c Follow instructions 8a and 8b for end capping. Fix rafter cap over delta ridge profile at verge. In cases of stretched Victorians and off angles on ridges, a smaller ridge is available to allow for angle adjustment. Paint cut edges with touch-up kit. Optional end capping 3-way capping 5-way capping Rafter cap 12


13 Step 9: Internal Insulation 9a Install 25mm insulation between battens and apply expanding foam to the spider assembly. Please ensure elecrical wiring is in place before 25mm PIR is positioned. 10a 9b Cut and mitre 72mm insulated plasterboard, fix into position, tape all joints and seal against window frame. Step 10: Gutter adaptor Fit box gutter adaptor into the box gutter and seal using suitable wet sealant. Seal between ringbeam/extension and window line with appropriate sealer. Also seal against house wall. 25mm PIR Insulation to be used under Box Gutter for insulating value and to avoid the risk of condensation. 11a Step 11: Gutter Twist fit gutter brackets to ringbeam prior to installing gutter and downpipe. 13


14 Step 12: Valley Gutter 12a Place valley tray on top of breather membrane within the valley itself. Fix flaps either side directly into membrane and ply. Tile into valley cutting at angle of roof. Seal where necessary. Optional mansard ceiling Use appropriate low voltage down lighters with cowl. 14
15 Notes: 15
16 call FREE: Important Guardian Roof have taken great care to ensure that the information in this installation guide is accurate and is supplied in good faith. However Guardian Roof issues this guide without warranty or guarantee of any kind and accepts no responsibility as to how the information is interpreted. Health and safety regulations are the sole responsibility of the installer and totally unconnected to Guardian Roof. The Guardian Roof is continually evolving and changes to product and specification can change at any time. Updates to this guide will be posted on our website immediately and all customers will be informed by electronic mail. The website is
The Leka System Installation Guide
 Installation Guide The Leka System Installation Guide The following guide has been created to assist in the fabrication and installation of the Leka System. Please note that each roof is individual and
CONSERVATORY ROOF INSTALLATION GUIDE Issue
 CONSERVATORY ROOF INSTALLATION GUIDE Issue 3 CONTENTS 1. Statements 2. General assemblies 3. Victorian / Edwardian roof installation 4. Jack rafter installation 5. P-shaped roof installation 6. Lean-to
Eurocell conservatory roof system. Installation manual Issue 3
 Eurocell conservatory roof system Installation manual Contents Statement General Assemblies Cross Sections Victorian/ Edwardian Roof Installation Jack Rafter Installation P Shape Roof Installation 15-45
Installation guide. Step-by-step instructions
 Installation guide Step-by-step instructions Contents Tools Required to Install p1 Screws & Fixings p2 Injection Moulded Solid Components p3 Components p4 Georgian Hips & Ancillaries p5 Fixing Eaves Beam
NEW equinox INSTALLATION GUIDE Issue
 NEW equinox INSTALLATION GUIDE Issue 1 CONTENTS If in doubt at any stage 1. Preparing the ring beam 2 2. Installing the framework 3 3. Insulation and waterproofing 7 4. Tile application: Steel tiles 9
INSTALL IN 2 DAYS. *Assumes 3-man fitting team. equinox. Tiled roof system. Installation guide ISSUE 1
 INSTALL IN 2 DAYS *Assumes 3-man fitting team equinox Tiled roof system Installation guide ISSUE 1 Equinox tiled roof system Installation guide Contents Pre-installation checks 1. Installing the framework
This installation guide has been created to assist in constructing a Liniar conservatory roof from a kit format.
 1.00 - Introduction This installation guide has been created to assist in constructing a Liniar conservatory roof from a kit format. Please note, each roof has been individually designed to meet specific
NEW equinox INSTALLATION GUIDE Issue
 NEW equinox INSTALLATION GUIDE Issue 2 CONTENTS 1. Preparing the ring beam 2 2. Installing the framework 3 3. How to install structural support posts 7 4. Insulation and waterproofing 8 5. Tile application:
This installation guide has been created to assist in constructing a Liniar conservatory roof from a kit format.
 1.00 - Introduction This installation guide has been created to assist in constructing a Liniar conservatory roof from a kit format. Please note, each roof has been individually designed to meet specific
Installation Guide. Guardian Slate Roof System. England, Scotland & Wales
 Installation Guide Guardian Slate Roof System England, Scotland & Wales March 2016 Product Information Construction: Manufactured from resin bonded crushed limestone Size (slate): 445 x 294mm (ridgecap):
Roll-Fix Kit The complete dry hip kit RFIG
 H I P Roll-Fix Kit The complete dry hip kit RFIG.045-0906-1 Roll-Fix is a quick and simple dry-fix roofing kit for hips. l Quick and easy to install no special tools required l Universal application fits
equinox INSTALLATION GUIDE Issue CONTENTS If in doubt at any stage BE SAFE WHEN WORKING AT HEIGHT
 equinox INSTALLATION GUIDE Issue 3 CONTENTS 1. Preparing the ring beam 2 2. Installing the eaves beam 3 3. How to install structural support posts 7 4. Insulating and waterproofing 8 5. Tile application:
Synseal assembly guide 2009:Synseal assembly guide /2/09 12:38 Page 1. Conservatory Roof Assembly Guide
 Synseal assembly guide 2009:Synseal assembly guide 2007 9/2/09 12:38 Page 1 Conservatory Roof Effective from February 2009 Synseal assembly guide 2009:Synseal assembly guide 2007 9/2/09 12:39 Page 6 3.1
ENGINEERING STRENGTH INSTAL L AT I O N M A NUAL OUR STRENGTH IS OUR STRENGTH
 ENGINEERING STRENGTH INSTAL L AT I O N M A NUAL OUR STRENGTH IS OUR STRENGTH RAFTER PREPERATION RAFTER PREPARATION A FRAME PREPERATION AND ASSEMBLY A FRAME PREPARATION AND ASSEMBLY... Open boxes, remove
INSTALLATION GUIDE SLIMLINE ROOF LANTERN 4 PANE CONFIGURATION
 INSTALLATION GUIDE SLIMLINE ROOF LANTERN 4 PANE CONFIGURATION SLIMLINE STEP-BY-STEP INSTALLATION GUIDE Thank you for choosing Roof Maker, we hope you are delighted with your new rooflight. Our roof lanterns
Contents. Stage 1. Preparation of the aperture 9. Interior finishing 25
 Installation Manual Pitchglaze Roof Window Contents Contents and introduction 2 Delivery 3 Pre Installation 4 Installation 8 Stage 1. Preparation of the aperture 9 Stage 2. Fitting the Pitchglaze 11 Stage
skypod INSTALLATION GUIDE CONTENTS Issue 2 If in doubt at any stage NOW INCLUDES ACUTE BE SAFE WHEN WORKING AT HEIGHT
 skypod INSTALLATION GUIDE Issue 2 NOW INCLUDES ACUTE CONTENTS 1. Preparing to install 2 2. Installation 4 3. Installing jack rafters 10 4. Installation examples 11 BE SAFE WHEN WORKING AT HEIGHT Ensure
Installation Guide Simplicity Alfresco. V1.9 Lu070318
 0333 305 5272 www.canoports.co.uk Installation Guide Simplicity Alfresco V1.9 Lu070318 Tools Required Below is a list of tools that you will require to install your the Simplicity Alfresco System. Cordless
 SUPREME WALL GARDEN ASSEMBLY INSTRUCTIONS 24/08/16 www.hallsgreenhouses.com Please refer to website for the most up to date instructions. SAFETY WARNING 1. Always wear protective glasses, shoes, gloves
GV Standard PitchVent
 GV Standard PitchVent Installation Manual Technical experts in the design, manufacture and supply of precision engineered, architectural rooflights for residential and commercial buildings. 202-INST v1.0
Installation. ng Kitt
 Installation Instructions Alpha SolarSmart 100 Roof Integrated Flashi ng Kitt for the Installation of Alpha Solar Collectors into Tiled Roofs 1 Integrated Flashing kit for Alpha SolarSmart 1000 CONTENTS
Stratco Sanctuary INSTALLATION BEFORE YOU START TOOLS REQUIRED GUIDE
 INSTALLATION GUIDE Stratco Sanctuary Verandahs, Patios and Carports BEFORE YOU START It is important to check with your Local Government Authority prior to the installation of your new Stratco Sanctuary
assembly guide effective from April 2005
 assembly guide effective from April 2005 assembly guide section 1 before you start 3 section 2 typical Georgian roof installation 4 section 3 fitting the traditional gutter 9 section 4 tie bars 10 section
Installation Guide Contemporary Alfresco V1.3 LU
 Installation Guide Contemporary Alfresco V1.3 LU 010818 Tools Required Below is a list of tools that you will require to install you're the Contemporary Alfresco System. Cordless Drill Mastic Gun Spirit
Installation guide for 20/20
 Introduction The following installation instructions are recommended minimum requirements for the 20/20. The designer and fixer should ensure that tiles are installed in accordance with BS 5534; The British
GV Standard Pitchglaze
 GV Standard Pitchglaze Installation Manual Technical experts in the design, manufacture and supply of precision engineered, architectural rooflights for residential and commercial buildings. 201-INST-101
Installation Manual. This installation is for the Odyssey H1800 Series Ventilation System.
 Installation Manual This installation is for the Odyssey H1800 Series Ventilation System. This installation is limited to roofs with pitches between 3 and 35. This instruction assumes that there is a power
REDLAND DRY VALLEY. Installation Instructions for Redland Dry Valley. Version: 6. Date: May Redland Technical Solutions
 REDLAND DRY VALLEY Installation Instructions for Redland Dry Valley Version: 6 Date: May 2013 Author: Department: Redland Technical Solutions Redland Technical Solutions 1 Introduction 1.1 TECHNICAL DATA
Section 1 Specifications..
 Section 1 Specifications.. Conservatory roofs, Atrium glazing, Rooflight & Entrance canopies E-mail: sales@amartsystems.com 07/06/2006 Section 1 Skycrest - 1 Information sheet product GENERAL. All styles
Skypod. Pitched PVC-U skylights. Installation guide PITCHED PVC-U SKYLIGHTS ISSUE 1
 Skypod Pitched PVC-U skylights PITCHED PVC-U SKYLIGHTS Installation guide ISSUE 1 Skypod pitched PVC-U skylights Installation guide Contents 1. Surveying 3 2. Installation 4 3. Additional information 10
Skypod. Pitched PVC-U skylights. Installation guide PITCHED PVC-U SKYLIGHTS ISSUE 1
 Skypod Pitched PVC-U skylights PITCHED PVC-U SKYLIGHTS Installation guide ISSUE 1 Skypod pitched PVC-U skylights Installation guide Contents 1. Surveying 3 2. Installation 4 3. Additional information 10
Skypod. Pitched PVC-U skylights. Installation guide PITCHED PVC-U SKYLIGHTS ISSUE 1
 Skypod Pitched PVC-U skylights PITCHED PVC-U SKYLIGHTS Installation guide ISSUE 1 Skypod pitched PVC-U skylights Installation guide 1. Surveying Before unpacking the Skypod roof, review the supplied layout
skypod INSTALLATION GUIDE Issue 2 CONTENTS 1. Preparing to install 3 2. Installation 4 3. Installing jack rafters Installation examples 11
 skypod INSTALLATION GUIDE Issue 2 CONTENTS 1. Preparing to install 3 2. Installation 4 3. Installing jack rafters 10 4. Installation examples 11 INSTALLATION GUIDE SURVEYING WARNING 1.2 Good surveying
NEW skypod INSTALLATION GUIDE
 NEW skypod INSTALLATION GUIDE NOW INCLUDES ACUTE CONTENTS 1. Preparing to install 2 2. Installation 4 3. Installing jack rafters 10 4. Installation examples 11 If in doubt at any stage Please contact the
DUTCH GABLE CARPORT RECOMMENDED INSTRUCTION MANUAL
 DUTCH GABLE CARPORT RECOMMENDED INSTRUCTION MANUAL Table of Contents Introduction 2 Components 3 Step 1a Marking out the Perimeter of the Carport with Footing only 4 Step 2a Footing Set-Out for Concrete
PRODUCT GUIDE K2. THE COMPLETE CONSERVATORY COMPANY
 K2. THE COMPLETE CONSERVATORY COMPANY CONTENTS PAGE NO. 02 System Specification 03 Product Identification 03 Quality Standards 04 Glazing Bars 06 Valley and Ridges 08 Wallplates 09 Eaves Beams 10 PVC Trims
SuperFOIL Insulation. Solutions Guide. Pitched Roof - Under Rafter
 SuperFOIL Insulation Solutions Guide Pitched Roof - Under Rafter SF19+ Pitched Roof Under Rafter Solutions CONSTRUCTION THICKNESS R -VALUE EXTERNAL SURFACE - 0.040 TILES / SLATES 10mm - BATTEN CAVITY 25mm
Safety Glasses Safety Gloves Ladders Measuring Tape Spirit Level String Line. Tin-Snips Rivet Gun Caulking Gun Silicone Socket Set
 BEFORE YOU START Carefully read these instructions and refer to them constantly during each stage of construction. If you do not have all the necessary tools or information, contact Stratco for advice.
SKY TUNNEL COMMERCIAL INSTALLATION GUIDE ALL WORK CARRIED OUT BY THE INSTALLER SHOULD BE IN ACCORDANCE WITH LOCAL LAWS & SAFETY REGULATIONS.
 XL 2 SKY TUNNEL COMMERCIAL INSTALLATION GUIDE ATTENTION: ALL WORK CARRIED OUT BY THE INSTALLER SHOULD BE IN ACCORDANCE WITH LOCAL LAWS & SAFETY REGULATIONS. Care must be taken when handling skylight components.
Metro Series Sauna. installation instructions
 Metro Series Sauna installation instructions Please immediately check for any hidden damage that may have occurred in shipping. If any damage is found you must notify the delivering carrier within seven
Installation Guide Simplicity 16. V2.9 Lu171117
 0845 869 6006 www.canoports.co.uk Installation Guide Simplicity 16 V2.9 Lu171117 Tools Required Below is a list of tools that you will require to install the Simplicity 16 Canopy or Carport. Cordless Drill
Installation Guide. Bi-fold Doors
 Installation Guide Bi-fold Doors Installation Guide Components box 1. 6. 2. 3. 7. 5. 4. 8. Contents 1. Fixing plugs 2. Wedge gasket 3. Bottom trolley 4. Top trolley 5. Magnetic keep (x 2 if door height
PATIO INSTALLATION MANUAL
 PATIO INSTALLATION MANUAL A few minutes spent reviewing the following instructions will help insure quick and proper assembly. The Patio Sauna Kit will arrive on a stretchwrapped pallet including pre-built
Cardo DOOR & RETURN SHOWER ENCLOSURE INSTALLATION PLEASE READ THESE INSTRUCTIONS CAREFULLY.
 Cardo DOOR & RETURN SHOWER ENCLOSURE INSTALLATION PLEASE READ THESE INSTRUCTIONS CAREFULLY. IT IS RECOMMENDED TO USE A TRAINED SHOWER INSTALLER FOR THIS SHOWER TO OBTAIN THE BEST INSTALLATION. D Square
Installation Guide Simplicity 6. v3.5 lu171117
 0845 869 6006 www.canoports.co.uk Installation Guide Simplicity 6 v3.5 lu171117 Tools Required Below is a list of tools that you will require to install the Simplicity 6 Canopy or Carport. Cordless Drill
Version 2016_1.1 VICTORIAN ASSEMBLY INSTRUCTIONS. Victorian Vi-23, 34, 36
 Version 2016_1.1 VICTORIAN ASSEMBLY INSTRUCTIONS Victorian Vi-23, 34, 36 PRODUCT INFORMATION Dear customer, Thank you for buying a high-quality aluminium greenhouse. REMARKS The drawings in these instructions
Gardman Lean-to Greenhouse Assembly Instructions
 Page 1 Gardman Lean-to Greenhouse Assembly Instructions Our Help Line provides support and advice to customers of Summer Garden Buildings after ordering. For advice before you buy you can phone us free
GROWING BETTER THROUGH DESIGN. 6ft Lean-To LEAN-TO. Assembly Instructions 04/02
 GROWING BETTER THROUGH DESIGN 6ft Lean-To LEAN-TO Assembly Instructions 04/02 6ft Lean-To Greenhouse Base Plan Introduction/Tools/Contents / / Contents This is a copy of our Lean-To greenhouse base plan.
Shingle Installation Guide
 Installation Guide Roof Framing Information Installation Installation Accessory Installation Estimating Data General Information Roof Framing Information It is the responsibility or roofers, building contractors
Allora ALCOVE ENCLOSURE INSTALLATION BEFORE INSTALLATION CHECK THAT YOUR ALLORA SHOWER ENCLOSURE SYSTEM IS UNDAMAGED
 Allora ALCOVE ENCLOSURE INSTALLATION BEFORE INSTALLATION CHECK THAT YOUR ALLORA SHOWER ENCLOSURE SYSTEM IS UNDAMAGED ALCOVE SHOWER Your shower can be installed to open Left hand or Right hand by rotating
INTRODUCTION. EqunioxRoof.com. Pro Tip
 INSTALLATION MANUAL INTRODUCTION The Equinox Louvered Roof System is designed to be installed in an aluminum frame. All these sections are 1/8" thick extruded aluminum. All engineering for this system
Installation Instructions
 Installation Instructions Alcove Enclosure Before Installation please check that your shower enclosure system is undamaged Please read these instructions carefully March 2015 TOOLS REQUIRED Electric or
Greenhouse Assembly Instructions
 Greenhouse Assembly Instructions Our Help Line provides support and advice to customers of Summer Garden Buildings after ordering. For advice before you buy you can phone us free 7 days a week on 0800
FIXING GUIDE. Designed for Garages & Sheds, Houses, DIY, Flat Roofs, Industrial & Agricultural Buildings etc. IS THE LONG TERM ROOFING SOLUTION
 FIXING GUIDE Designed for Garages & Sheds, Houses, DIY, Flat Roofs, Industrial & Agricultural Buildings etc. IS THE LONG TERM ROOFING SOLUTION Permaroof Permaroof Permaroof Profile Roofing Manufacturers
INSTRUCTIONS FOR ASSEMBLY 2355mm x 3125mm Workshop
 Manufacturer of Christie Glasshouses and Sheds INSTRUCTIONS FOR ASSEMBLY 2355mm x 3125mm Workshop 1 Thomas Burns Street, Dunedin Phone (03) 477 7909 www.allans.co.nz Congratulations on your purchase of
COMPONENTS OF THE CLICKFAST FASCIA AND GUTTER SYSTEM 5: INTERNAL MITRE
 INTRODUCING THE CLICKFAST FASCIA AND GUTTER SYSTEM The Clickfast Fascia and Gutter System was originally designed by Stratco and has proven to be the most successful fascia and gutter system in Australia
manthorpe Roll-Out Dry Fix Ridge System building products Fixing Instructions MBP 8265e
 manthorpe building products Roll-Out Dry Fix Ridge System Fixing Instructions MBP 8265e Ridge Details Fig A. Assembly View of Dry Ridge Detail s/s screw clamping plate rubber washer foam spacer ridge tile
TRADITIONAL GABLE ATTACHED PATIO AND CARPORT. Your complete guide to building an ATTACHED Outback TRADITIONAL GABLE PATIO or CARPORT
 TRADITIONAL GABLE ATTACHED PATIO AND CARPORT STRATCO OUTBACK ASSEMBLY INSTRUCTIONS. Your complete guide to building an ATTACHED Outback TRADITIONAL GABLE PATIO or CARPORT BEFORE YOU START Carefully read
STRATCO GABLE HOMESHED STRATCO GABLE HOMESHEDS STUBBIE INSTALLATION GUIDE
 STRATCO GABLE HOMESHED STRATCO GABLE HOMESHEDS STUBBIE INSTALLATION GUIDE INSTALL GUIDE BEFORE YOU START COUNCIL APPROVAL It is important that you have local council approval before building your Stratco
Fibre Cement G C. Batten Fixing Setout ST-01. Jan 2014 A4 PROFILE DATE SCALE DETAIL DETAIL NO. Plank joint. 600mm stud crs.
 Plank joint 600mm stud crs 600mm 600mm 600mm Horizontal Structural Timber Cavity atten 50x20mm H3.1 atten fixing points 800mm 800mm 300mm 800mm Max. Nog spacing 50mm All intermediate battens to be 50x20mm
SLIDING MECHANISM TROLLEY CATCH TROLLEY ASSEMBLY FLOOR GUIDE
 Set A Set B PFD30 Fire Door Kit FITTING INSTRUCTIONS For use with 44mm thick doors only For Single and Double doors IF INSTALLING A TOUCH LATCH, PLEASE READ THE CORRESPONDING FITTING INSTRUCTIONS FIRST
INSTALLATION GIUDE.
 INSTALLATION GIUDE INTRODUCTION The instructions and drawings included here are intended only as a guide for the installation of ECO Roofing Systems Spanish and Modern profiles. The materials and methods
INSTRUCTIONS FOR ASSEMBLY 2355mm x 4665mm Workshop
 Manufacturer of Christie Glasshouses and Sheds INSTRUCTIONS FOR ASSEMBLY 2355mm x 4665mm Workshop 1 Thomas Burns Street, Dunedin Phone (03) 477 7909 www.allans.co.nz Congratulations on your purchase of
Shed Assembly Instructions
 Shed Kit Contents The shed kit includes all the parts needed to assemble your shed except for tools and fasteners such as screws and nails. The various pieces are pre-cut and many are marked to indicate
ROOF FRAMING INFORMATION BATTEN INSTALLATION CORONA SHAKE INSTALLATION ACCESSORY INSTALLATION ESTIMATING DATA GENERAL INFORMATION
 ROOF FRAMING INFORMATION BATTEN INSTALLATION CORONA SHAKE INSTALLATION ACCESSORY INSTALLATION ESTIMATING DATA GENERAL INFORMATION ROOF FRAMING INFORMATION It is the responsibility or roofers, building
Installation Guide. Please read before installing SIPs Kit. 1 Method Statement for the erection of a SIPS Industries Kit Materials...
 30a Renewable Chase Bibra Lake WA 6163 Tel: (08) 9494 2211 Fax: (08) 9494 2202 Email: info@sipsindustries.com.au Web: www.sipsindustries.com.au Installation Guide Please read before installing SIPs Kit.
Roof Lantern. Installation Guide. Scan to view the installation guide on your mobile or tablet
 Roof Lantern Installation Guide Scan to view the installation guide on your mobile or tablet TOOLS REQUIRED Cordless Screwdriver 5mm Hex Bit (Supplied) Soft Mallet Wire Cutters Sealant PACKAGING CONTENTS
Austin Standing Seam Awning Assembly and Installation Instructions. Assembly Instructions
 Austin Standing Seam Awning Assembly and Installation Instructions Be sure to use safety glasses when assembling and installing the awning. Some metal parts may have sharp edges. Use work gloves to handle
ALLORA SWING PANEL INSTALLATION INSTRUCTIONS
 ALLORA SWING PANEL INSTALLATION INSTRUCTIONS Before Installation Please check that your Allora Swing Panel is undamaged SEQUENCE OF INSTALLATION These instructions are also available from the Athena website:
Integrity Polygon and Round Top Installation and Finishing Instructions
 Integrity Polygon and Round Top Installation and Finishing Instructions 08/20/2004 70852 BEFORE YOU BEGIN IMPORTANT: Read these instructions thoroughly before beginning to install your Integrity Polygon
ASSEMBLY INSTRUCTIONS
 Quality Built In ASSEMBLY INSTRUCTIONS MK3 BASE SIZE 3380mm x 1715mm ASSEMBLY INSTRUCTIONS Tools Required: Drill Drill Bit 3.5mm Drill Bit 6mm (for clear roof panel only) Hex Drive 5/16 Riveter Hammer
Deauville Installation Guide
 vjul16 (for 17 or 24 mm Surface Wall Profiles) DO NOT ASSEMBLE WITHOUT FULLY READING THESE INSTRUCTIONS Page 2 Thank you for purchasing this Deauville shower enclosure. Please study these instructions
INSTALLATION GUIDE. Flat Roof Homesheds TM. Onto Concrete BEFORE YOU START TOOLS REQUIRED
 INSTALLATION GUIDE Flat Roof Homesheds TM Onto Concrete BEFORE YOU START It is important to check your Local Government Authority requirements before the installation of your new Stratco Flat Roof Homeshed.
CLEARSPAN GABLE STRATCO OUTBACK ASSEMBLY INSTRUCTIONS. WITH GAZEBO END ATTACHED PATIO
 CLEARSPAN GABLE WITH GAZEBO END ATTACHED PATIO STRATCO OUTBACK ASSEMBLY INSTRUCTIONS. Your supplementary guide to building an ATTACHED CLEARSPAN GABLE VERANDAH or PATIO WITH GAZEBO END This set of instructions
DUTCH GABLE FREESTANDING CARPORT
 DUTCH GABLE FREESTANDING CARPORT STRATCO OUTBACK ASSEMBLY INSTRUCTIONS. Your complete guide to building a FREESTANDING Outback DUTCH GABLE CARPORT BEFORE YOU START Carefully read these instructions. If
CURVED ROOF ASSEMBLY INSTRUCTIONS ATTACHED VERANDAH. Your supplementary guide to building an ATTACHED CURVED ROOF VERANDAH or PATIO BEFORE YOU START
 ROOF ATTACHED VERANDAH ASSEMBLY INSTRUCTIONS Your supplementary guide to building an ATTACHED ROOF VERANDAH or PATIO This set of instructions should be used in conjunction with the Stratco instruction
GABLE ROOF CARPORT RECOMMENDED INSTRUCTION MANUAL
 GABLE ROOF CARPORT RECOMMENDED INSTRUCTION MANUAL Table of Contents Introduction 2 Components 3 Step 1a Marking out the Perimeter of the Carport with Footing only 3 Step 2a Footing Set-Out for Concrete
Deauville Installation Guide
 vjul16 (for Recessed Wall Profiles) DO NOT ASSEMBLE WITHOUT FULLY READING THESE INSTRUCTIONS Page 2 Thank you for purchasing this Deauville shower enclosure. Please study these instructions carefully before
Log cabins. Pentagon log cabin models ASSEMBLY INSTRUCTIONS. Recommended tools Cordless screwdriver
 ASSEMBLY INSTRUCTIONS Log cabins Pentagon log cabin models Recommended tools Cordless screwdriver Spirit level Screw clamp Pliers Tape measure Hammer Generally two persons are required for the assembly;
Ultraroof380 Cornice Installation
 Ultraroof380 Cornice Installation The complete guide to installing Cornice onto an Ultraroof380 (2 high decorative Cornice) PLEASE READ BEFORE FITTING CORNICE PRE INSTALLATION INFORMATION Recommended tools
Installation Guide. Evolve bi-fold. 8. Door restrictor- optional p9. 1. Before you start p2. 9. Adjustment. 2. Measuring and surveying p2
 Evolve bi-fold Installation Guide 1. Before you start p2 8. Door restrictor- optional p9 2. Measuring and surveying p2 3. Configuration details p4 4. Installation p5 5. Glazing p5 6. Glazing packer details
MULTISPAN GABLE WITH HIP END ATTACHED PATIO
 MULTISPAN GABLE WITH HIP END ATTACHED PATIO STRATCO OUTBACK ASSEMBLY INSTRUCTIONS. Your supplementary guide to building an ATTACHED MULTISPAN GABLE VERANDAH or PATIO WITH HIP END This set of instructions
SLIDING MECHANISM TROLLEY CATCH TROLLEY ASSEMBLY FLOOR GUIDE
 Set A Set B PFD30 SG Fire Door Kit FITTING INSTRUCTIONS For use with 44mm thick doors only For Single and Double doors SUGGESTED TOOLS DRILL G-CLAMP TAPE MEASURE (Image for reference only) HACKSAW POCKET
INSTALLATION GUIDE. Outback Clearspan Gable BEFORE YOU START ADDITIONAL MATERIALS ADDITIONAL MATERIALS WITH COOLDEK ROOFING
 INSTALLATION GUIDE Outback Clearspan Gable WITH COOLDEK ROOFING BEFORE YOU START It is important to check your Local Government Authority requirements before the installation of your new Stratco Outback
Mounting systems for solar technology
 Mounting systems for solar technology ASSEMBLY INSTRUCTIONS Roof Fastener System CrossHook 2G GB Table of contents TABLE OF CONTENTS THE COMPANY SAFETY REGULATIONS MATERIALS REQUIRED TOOLS REQUIRED ASSEMBLY
Ensure there is reasonable access for materials and working space, ensure the shed site is level and consider the disposal of run-off water.
 INSTALLATION GUIDE TM Flat Roof Homesheds THE POTTER BEFORE YOU START It is important to check your Local Government Authority requirements before the installation of your new Stratco Potter Flat Roof
ALPINE TRAY. To get the best from this product please follow these recommendations.
 F I X I N G D E TA I L S ALPINE TRAY The standing seam roofing profile is designed to withstand some of New Zealand s harshest weather in our toughest environments. To get the best from this product please
SLIDING MECHANISM TROLLEY CATCH TROLLEY ASSEMBLY FLOOR GUIDE
 Set A Set B P7001 Standard Kit FITTING INSTRUCTIONS For use with 44mm thick doors only For Single and Double doors IF INSTALLING A TOUCH LATCH, PLEASE READ THE CORRESPONDING FITTING INSTRUCTIONS FIRST
Deluxe Cabana INSTALLATION INSTRUCTIONS. INSTALLATION Deluxe INSTRUCTIONS Cabana
 INSTALLATION Deluxe INSTRUCTIONS Cabana 1 Deluxe Cabana 10 Year Guarantee On Sanders workmanship Made in NZ Using NZ timber supplies 40+ Years Experience In business since 1975 Professional Install Available
Portofino Installation Guide
 vjul16 (for 17 or 24 mm Surface Wall Profiles) DO NOT ASSEMBLE WITHOUT FULLY READING THESE INSTRUCTIONS Page 2 Thank you for purchasing this Portofino shower enclosure. Please study these instructions
INSTALLATION INSTRUCTIONS LS X 12-2 X 7 1/2 FRAME LOAFING SHED
 INSTALLATION INSTRUCTIONS LS-12 12 X 12-2 X 7 1/2 FRAME ACTUAL FRAME BASE SIZE: 12 X 12-2 LOAFING SHED Our unique assembly process quickly transforms the individual pieces into a finished structure that
Zero Threshold TM. Hints and Tips Handbook. Birdlip. Burford. Blockley. Bourton
 Birdlip Burford Zero Threshold TM Hints and Tips Handbook Blockley www.edengreenhouses.com Bourton Customer Helpline: +44 (0)1242 676625 Mon Fri 9:00am 5:00pm mail@eden greenhouses.com EH 1.02 Dear Customer,
Conservatory roof system
 Conservatory roof system Designed for faster, smoother installation. Engineered for years of trouble-free performance. THE BETTER CHOICE EUROCELL CONSERVATORY ROOF SYSTEM From classical to contemporary,
Blokes Shed INSTALLATION INSTRUCTIONS Custom Design & Build. Nationwide Delivery
 Blokes Shed 10 Year Guarantee On Sanders workmanship Made in NZ Using NZ timber supplies 40+ Years Experience In business since 1975 Professional Install Available NZ wide Nationwide Delivery Available
utopia Window & Door Products Orangery Home Extension Products Conservatory Products Skylight Products
 Window & Door Products Orangery Home Extension Products Conservatory Products Skylight Products utopia Installation Guide Version 1.1 June 2011 Dear Customer, Thank you for choosing the Ultraframe Utopia
B A T H R O O M G L A S S
 mistley B A T H R O O M G L A S S vaug16 Page 2 Thank you for purchasing this Trinity shower screen. Please study these instructions carefully before assembly and installation and check all supplied parts
lindab we simplify construction LindabSandwichPanels Installation instructions PIR Panels
 lindab we simplify construction LindabSandwichPanels Installation instructions PIR Panels Assembly instructions Before you start Check that the panel support structures are level. Position the packages
HOW TO Fix Onduline Corrugated Bitumen Sheets
 HOW TO Fix Onduline Corrugated Bitumen Sheets BBA BRITISH BOARD OF AGREMENT CERTIFICATE NO. 87 / 1823 W ROOFING PLAN IT Roofing components: Ridge Roof decking Apex Verge Barge board Purlins / battens Rafters
PROFESSIONAL PITCHED ROOFING ANCILLARIES
 PROFESSIONAL PITCHED ROOFING ANCILLARIES MADE IN BRITAIN Before installing the Easy Roof System, please be aware of the following guidelines: The roof should be installed in the traditional way, with the
STEEL BUILDINGS RECOMMENDED INSTALLATION GUIDE
 STEEL BUILDINGS RECOMMENDED INSTALLATION GUIDE 3 TO 30 METRE SPAN FRAME FIRST METHOD SUPPLIED BY: Last update 2 May 2008 2008 FBHS (Aust) Pty Limited FBHS (Aust) Pty Limited ABN 83 126 232 504 trading