Feltkütur products Prod uct description Product capabilities Product properties Installation guide Dress it up in haute couture feltkutur.
|
|
|
- Blanche Walton
- 5 years ago
- Views:
Transcription


1 Feltkütur products Installation guide Product description Product capabilities Product properties Installation guide Dress it up in haute couture feltkutur.com
, which tend to create creases when folded.")
 Thicknesses: 6.")
2 Product description Düotex The Düotex is a halfway impregnated latex decorative felt. The resin properties allow to enhance the stiffness of the felt without adding low melt fibers (bicomponent fibers), which tend to create creases when folded. With the Düotex, you have a soft side free of latex which improves the look and feel. On the other side, the resin gives the structural properties and offers a great tackable property. Düotex - Panel sizing Panel size: 1.24m x 2.46m or 48.8 x 96.8 (±10%) Thicknesses: 6.4mm or ¼ (±10%) and 12mm or ½ (±10%) Available in 7 colors Ünitex The Ünitex was designed to offer high stiffness properties. The resin is applied through all the thickness of the felt, making the product tougher and a more abrasive resistant. There is no bi-component fibers in the content. The structural properties of the Ünitex allow to make standalone application. The Ünitex is lighter and more acoustical than the Tentest and offers better dimensional stability than wood fiber products. Easy to laminate with fabrics or felt like our Yürtex or it could be used as is. This product offers tackable properties on both sides. Ünitex - Panel sizing Panel size: 1.24m x 2.46m or 48.8 x 96.8 (±10%) Thicknesses: 7 mm or ¼ (±10%) and 12mm or ½ (±10%) Available in 7 colors Page 2 / 27
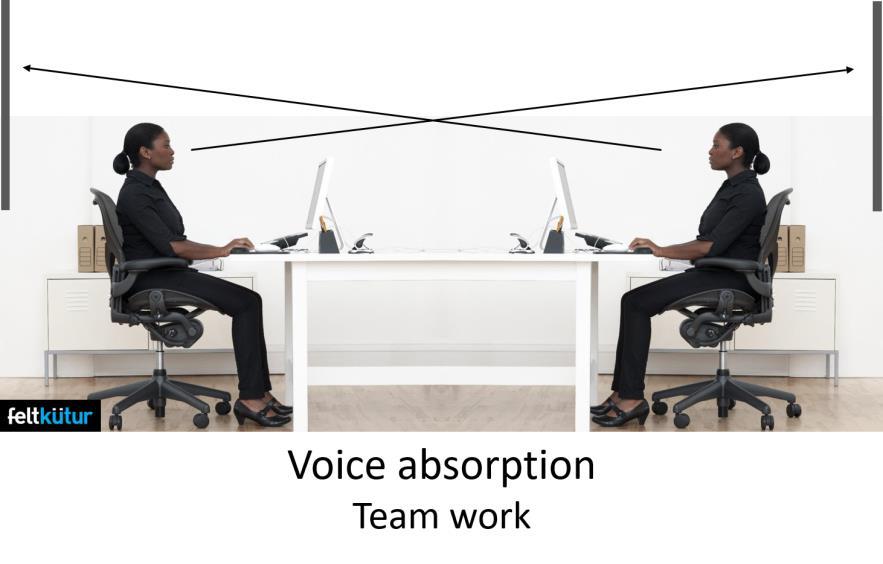
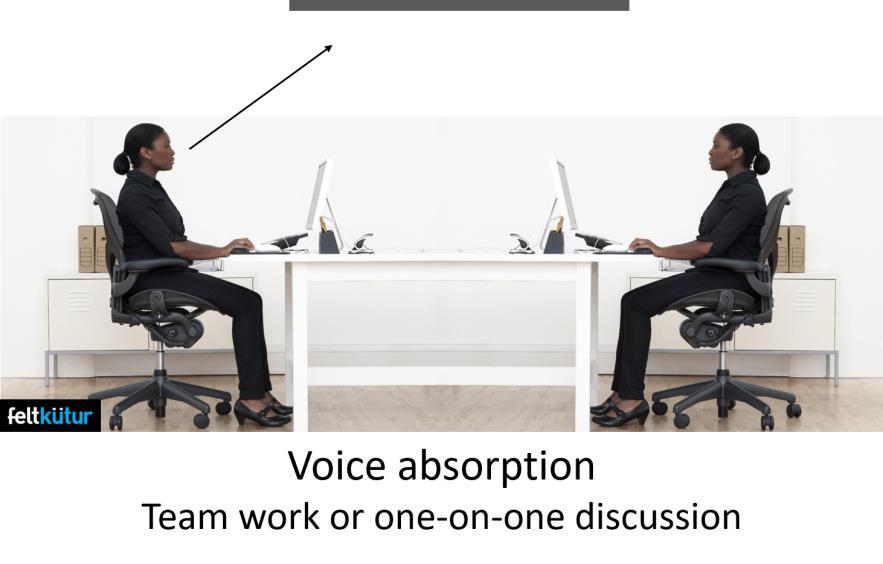
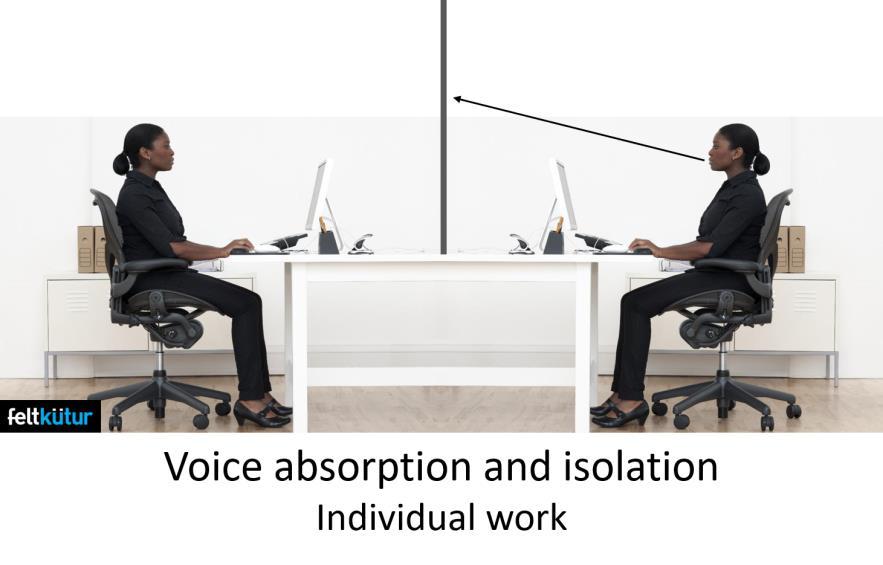
3 Tekboard The Tekboard was designed to offer high structural properties. The honeycomb core combined with either Ünitex or Düotex amplifies the acoustical properties. Two different technologies are available using that product ; Tekboard laminated with only Ünitex or Düotex alone amplifies the sound absorption properties (NRC) due to its honeycomb structure and Tekboard laminated with particle board surface and Ünitex or Düotex provides excellent sound transmission properties (STC). In addition to the structural properties this product offers tackable properties on both sides. Tekboard - Panel sizing Panel size: 1.24m x 2.46m or 48.8 x 96.8 (±10%) Thicknesses: 50mm or 2 (±10%) and 19mm or ¾ (±10%) Available in 7 colors Product properties Our Content The Düotex and the Ünitex have a 100% polyester (PET) content and may contain up to 50% of recycling polyester (PET) fibers depending on color properties. Fire Rating (Flame spread) The Düotex and the Ünitex are CLASS A rated by the ASTM E-84. Acoustical properties Users are beginning to make greater demands for quieter work environment, and because of this, designers have begun to manage airborne sound inside the office environment with greater knowledge and products. Thanks to the advanced engineering capabilities of Feltkütur s technology, what used to be thought of as an uncontrollable source of unwanted sound is now fair game in the request to reduce interior noise. With Feltkütur s knowledge, nothing has been left unexplored when it comes to finding new ways to ensure a quieter work environment experience. Page 3 / 27
 INDEX NO AIR GAP SAA 0.66 NRC 0.")
4 ASTM C423 DÜOTEX 6.4mm (¼ ) & ÜNITEX 7mm (¼ ) INDEX NO AIR GAP WITH 25.4mm (1 ) AIR GAP SAA NRC ASTM C423 TEKBOARD 50mm (2 ) INDEX NO AIR GAP SAA 0.66 NRC 0.66 STC 32 Page 4 / 27

5 ASTM C423 ÜNITEX & DÜOTEX 12mm (½ ) INDEX NO AIR GAP SAA 0.40 NRC 0.39 Page 5 / 27
6 Application Page 6 / 27

7 Page 7 / 27
8 Düotex & Ünitex installation on drywall Page 8 / 27
 Richelieu code:")


9 What you will need Hardware: Standoff Without Ring Quantity: ten (10) Richelieu code: BP For Düotex or Ünitex product 12mm thickness Standoff without Ring Cap included Quantity: 10 Richelieu code: BP For Düotex or Ünitex product 6.4mm thickness Tools: Page 9 / 27


10 1- Before cutting to the desired size, be sure to put soft foam kneepads to avoid damaging the product. 2- Cut to the desired size with a cutting knife. 3- Measure and mark where spacers will be placed, for a sheet of 4 'x 8', we will use ten (10) spacers. Page 10 / 27

.")

11 4- Drill the panel with a 7/32 '' drill bit. 5- Afterwards, place the Düotex or Ünitex sheet where you want to install it (use a level). 6- Ask someone to help hold the sheet in place, then use the drill to mark where the anchors should be screwed. Page 11 / 27


12 7- Use self-drilling anchors for gypsum, screw them into the wall where you made your marks before. 8- Unscrew the lower part of the spacer. 9- Install this part into the self-drilling anchors with the screws that are provided. Page 12 / 27


13 10- Separate the remaining two parts of the spacers, Remove the vinyl washers, we do not need them for this kind of installation. 11- Screw the second part of the spacers onto the lower part you have just installed. 12- Ask help from someone to reposition the Düotex or Ünitex panel where you will install it, and then, screw the last part of the spacers into the parts on the wall. Page 13 / 27


14 13- If some holes do not quite fit the wall mounted spacers, enlarge them with the drill using a larger drill bit, in this case 13/32 ''. 14- Final result: Page 14 / 27


15 Acoustic tile installation Page 15 / 27

16 *** We strongly suggest installing all tiles on our Düotex or Ünitex panel to ensure a great acoustic performance. Option 1: Screwing the tile What you will need *** Hardware: Metal Cover Cap Quantity: depends on the shape of the tile Richelieu code: #6 and #8 flat head screws Quantity: depends on the shape of the tile Tools: Page 16 / 27
 that")


17 1. Then you can add decorative Düotex or Ünitex panels (Acoustic tile) that will be screwed directly onto the other panel. 2. Installation is done with standard wood screws and chrome-plated screw caps. 3. Final result : Page 17 / 27
18 Option 2: Using Velcro to fix the tile What you will need Hardware: Metal VELCRO Cover Brand Cap Tape with Peel and Quantity Sticker adhesive : 4 Richelieu Quantity: code depends : on the shape of the tile Richelieu code: V Tools: Page 18 / 27
 using Velcro directly onto")

19 1. Then you can add decorative Düotex or Ünitex panels (Acoustic tile) using Velcro directly onto the other panel. 2. Cut the Velcro to the desired size. 3. Apply Velcro at desired locations. Page 19 / 27


20 4. Apply pressure on the Velcro. 5. Remove the protective film of the glue side. Page 20 / 27


21 6. Apply the acoustic tile to the wall and remove. The glue side of the Velcro must be applied on the Düotex or Ünitex panel. 7. Apply pressure to the Velcro and place the tile on the wall again. Page 21 / 27
22 Tekboard Edgebanding installation Page 22 / 27

23 What you will need Hardware: Adhesive 3M 3M code: 300MP Tools: Page 23 / 27


24 1- Place the Tekboard on a clear and hard surface to manipulate the product. 2- Apply the adhesive directly on the edge. Page 24 / 27


25 3- Use an exacto to be more precise for applying the adhesive. 4- Final result: Page 25 / 27
26 Product capabilities Mold-to-measure with thermoforming Düotex and Ünitex can be thermoformed into almost any three-dimensional shapes. Simply preheat it, then shape it by applying pressure in a cold mold. Hot air is generally used for preheating, but another option is infrared heaters in a conveyor oven or on a rotary molding table. It is possible to work with several different densities when molding. However, your options don t stop there: Düotex and Ünitex can be laminated with a variety of fabrics, other nonwoven, films and knitting. Pressure forming technology When Düotex and Ünitex are pressure formed between the male and female molds, the ideal wall thickness distribution is produced in the cross direction, thereby eliminating the need to stretch the material during the process. The material to be formed should be between 302 F and 375 F (150 C to 190 C), depending on its density and thickness. Cutting (table saw) We recommend coated blades. There are a few blades which are coated with Teflon (PTFE), in order to reduce friction. This type of coating can be very valuable, as the greatest amount of friction comes from debris captured between the blade plate and the material being cut. By coating the blade plate, this debris won t stick to the blade, causing it to be more easily ejected from the kerf. Moreover, there may be times where the material pinches the blade, even though the plate is thinner than the teeth. This type of problem is especially prevalent with hand-held circular saws and power miter saws. Speed The harder the material you are cutting, the slower the cut should be. We recommend a high-speed RPM. Since some types of saws don t have speed controls, one way of increasing cut speed is to use a blade with more teeth in case the requirements of finish are important. This will help prevent overheating. Remember, using rip blades for cross-cuts will tear the panels at the ends. Knife cutting Among all categories of testing, you will get better results for your cutting operations with steel Exacto blades. Page 26 / 27
27 Accessory by Section Wall system VELCRO Brand Tape with Peel and Stick Adhesive Metal Cover Cap Product number Width Type V ¾ in Hook Metal screw plug for #6 and #8 flat head screws Product number Diameter Drilling Diameter mm 12 mm Standoff Without Ring - Cap included Standoff without Ring Cap included For product thickness 8 mm to 12 mm. For product thicknesses 5mm to 8mm. Product number Height Product number Height BP /2 in BP /4 in BP /4 in BP /2 in Page 27 / 27
EchoPanel Panel Installation Guide
 Please read this application guide before beginning installation. This application guide is presented to help in the use of Kirei EchoPanel panels. Kirei accepts no responsibility for installation actions
WORKING of nidaplast
 nida 8/gb - 03.07.07 Technical Information. 2 WORKING of nidaplast nidaplast is a polypropylene honeycomb covered on both faces with a soft polyester nonwoven fabric. It is available in 2500 x 1200 mm
Kirei EchoPanel 7mm and 12mm Application Guide
 Kirei EchoPanel 7mm and 12mm Application Guide Note: Please read this application guide before beginning installation. This application guide is presented in good faith to help in the use of Kirei EchoPanel
VIEWpanel Technical Manual
 VIEWpanel Technical Manual VIEWpanel is a prefabricated panel comprising 0.21 aluminium skin (1100 alloy) both sides, apart from our lite grade, which is 0.12 aluminium skin both sides and a polyethylene
Installation Instructions
 Important 1. Acclimate materials 24 hrs before installation. Maintain temperature controlled environment after installation. 2. Install in accordance with manufacturer s installation instructions. Failure
Installation Instructions
 Important 1. Acclimate materials 24 hrs before installation. Maintain temperature controlled environment after installation. 2. Install in accordance with manufacturer s installation instructions. Failure
Splashback Installation Instructions
 Splashback Installation Instructions What is Akril? Akril is an Australian made environmentally friendly, highly engineered polymer, enhanced with colour. Quite simply, it offers a new source of design
EchoPanel 12mm PLAIN COLOURS PRODUCT SPECIFICATION APPLICATION GUIDE
 EchoPanel 12mm PLAIN COLOURS PRODUCT SPECIFICATION APPLICATION GUIDE What is EchoPanel? EchoPanel is a decorative panel substrate offering improved acoustic performance with a fabric like finish. It is
LED Thin Frame Fixed Frame Screen User Guide
 LED Thin Frame Fixed Frame Screen User Guide INTRODUCTION INTRODUCTION WARNING - Sharp Edges This product may contain sharp edges, please handle with care. Protective gloves are recommended. WARNING -
Bath Accessory Installation
 Bath Accessory Installation Step 1 - Clean surface using a clean dry cloth or use rubbing alcohol to remove any residue (wax, grease, solvents). Allow to dry one hour. Caution! DO NOT use any household
ECHOPANEL SPECIFICATIONS
 PANEL INSTALLATION GUIDE 7MM, 12MM, 24MM Note: Please read this application guide before beginning installation. This application guide is presented in good faith to help in the use of Kirei EchoPanel
Disassembly Instructions for Recycling June 10, 2010
 Disassembly Instructions for Recycling June 10, 2010 These instructions apply to all workstation and wall products. Disassembly Once workstations or walls are dismantled as described under Disassembly
McCue Bumper Installation Instructions
 McCue Bumper Installation Instructions McCue 8" Bumper Tools Required: Saw with 10-12" blade Tape measure Flat head screwdriver Phillips screw driver Pencil or chalk line Drill with Philips driver bit
Advanced engineering capabilities. Unlimited industrial applications.
 Advanced engineering capabilities. Unlimited industrial applications. INDUSTRIAL We re part of your everyday life The industrial platform offers an experience that confers tangible value added to our solutions.
Installation Guide. Pionite Decorative Surfaces One Pionite Road, Auburn, Maine PIONITE ( )
") Installation Guide A Subsidiary of Panolam Surface Systems SMPBRO00-012 6/14 Pionite decorative laminates are designed for finished interior surfaces which require high impact, wear and stain resistance
Installation Guide A Subsidiary of Panolam Surface Systems SMPBRO00-012 6/14 Pionite decorative laminates are designed for finished interior surfaces which require high impact, wear and stain resistance
Elara NanoEdge Fixed Frame Screen User Guide
 Elara NanoEdge Fixed Frame Screen User Guide INTRODUCTION INTRODUCTION WARNING This product may contain sharp edges, please handle with care. Protective gloves are recommended. A minimum of two people
Barn Door & Hardware Installation Guide
 Barn Door & Hardware Guide INTRODUCTION Thank you for purchasing our hardware. Our barn door and hardware will add a stunning accent to your living environment and maximize its space. This manual covers
Installation Manual for Thermo Panel
 Installation Manual for Thermo Panel 1 About Thermo Panel is a building wrap, insulation, air and water barrier, mold inhibitor and cold bridge eliminator all-in-one. Delivering an R-value of up to 5 on
September 10, 2009 Page 1 PRODUCT DESCRIPTION PRODUCT FEATURES
 September 10, 2009 Page 1 PRODUCT FEATURES BASIC USES/RELATED USES Interior decorative tile. Architectural tile for decorative wall surfaces, backsplashes and other applications. Custom architectural and
Installation Instructions 1500/1500W/G Wall Guard Important
 Important 1. Acclimate materials 24 hrs before installation. Maintain temperature controlled environment after installation. 2. Install in accordance with manufacturer s installation instructions. Failure
Installation Instructions Palladium Wall Panels - Demountable Factory Finished Edges and Field Cut Edges
 Please read all instructions before installing Palladium Wall Panel System. 1. Before installation: a. Acclimate Palladium Panels, reveals, adhesives and wall substrates to room temperature 24 hours before
Installation Guide. Capped Cellular PVC Fencing. Table of Contents. Storage and Handling Tools Needed Fence Layout and Locating Posts
 Capped Cellular PVC Fencing Installation Guide Table of Contents Storage and Handling Tools Needed Fence Layout and Locating Posts Installation instructions 4 x 4 Over Sleeve Post - 3.5 Rail Privacy Shadowbox
Outdoor Cooler Cart. Outdoor Cooler Cart Construction Instructions
 Outdoor Cooler Cart Outdoor Cooler Cart Construction Instructions Make the Legs and Side Panels. Cut the eight long and short leg pieces to length. See Material List on next page.. Apply a bead of glue
Processing and design Solid Textile Board
 Processing and design Solid Textile Board List of contents Introduction Kerfing Joints and assembly Increasing thickness and stiffness Edges Cutting Milling and drilling Three-dimensional pressing Surface
SHADOWBOX INSTALLATION FOR: Standard 6 H x 8 W Shadowbox Fence 5 x 5 Routed Posts Dog Ear or Straight-Edge Pickets 1.75 x 3.5 Rail
 SHADOWBOX INSTALLATION FOR: Standard 6 H x 8 W Shadowbox Fence 5 x 5 Routed Posts Dog Ear or Straight-Edge Pickets 1.75 x 3.5 Rail Storage and Handling Fence Preparation and Layout Locate and Set Posts
Dual Arm Tilt LCD Mount
 Installation Manual model # 51324 M o u n t i n g S y s t e m s Dual Arm Tilt LCD Mount Fits Displays 13 to 32 Supports Up to 50 lbs (23 kgs) Projection from Wall from 3 to 17 Meets VESA Standards 50/75/100,
INSTALLATION MANUAL STORAGE
 IMVersion 1.1 INSTALLATION MANUAL GENERAL GUIDE: The information in this IM is intended to serve as a general guide to proper installation with no warranties intended or implied. Prime Panels assumes no
Wall Panel Installation
 Wall Panel Installation Special care must be taken in handling of panels with grout lines, especially in cold weather. The indented grout lines are by necessity a little thinner than other areas of the
Digital Magnetics Support document
 Digital Magnetics Support document Digital Magnetics Change your graphics quickly. 01 / 02 Introduction DM 03 / 04 Support Ferro & Magnetic Base About DM 05 / 06 Support Flexible Ferrous films Digital
PRODUCT: LOKI INSTALLATION INSTRUCTIONS. Product is covered by U.S. patents. For more information visit
 R INSTALLATION INSTRUCTIONS PRODUCT: LOKI CONFIGURATION: SINGLE DOOR MOUNT: GLASS MOUNT Product is covered by U.S. patents. For more information visit www.krownlab.com . TOOLS + MATERIALS REQUIRED TOOLS
The Universal Table Saw Sled
 The Universal Table Saw Sled Do Precision Work Even with Inexpensive Table Saws! Table saw blades always tend to move the wood while the cut is being made. This is why it's so difficult to get accurate
NX8 SERIES 6-1/4 HANDRAIL W/ VINYL HANDGRIP
 6-1/4 HANDRAIL W/ VINYL HANDGRIP TYPICAL ASSEMBLY 5 2 BUTT JOINT 12 10 9 1 8 11 6 3 7 4 BUTT JOINT COMPONENT LIST 1 LEFT RETURN 7 UPPER IMPACT ABSORBER 2 RIGHT RETURN 8 LOWER IMPACT ABSORBER 3 OUTSIDE
Industrial Contractors Supplies, Inc.
 Industrial Contractors Supplies, Inc. - Dust Director Division - 15061 Route 30, N. Huntingdon, PA 15642 Phone: 412. 824. 6933 Fax: 412. 824. 4704 www.dustdirector.com 5" & 7" SURFACE DUST GUARDS MANUAL
Installation Instructions
 Aspex Digitally Printed Wall Art PL PREMIUM HEAVY DUTY ADHESIVE ASPEX WALL ART DOUBLE SIDED FOAM TAPE Installation of Aspex Digitally Printed Wall Art with Foam Tape and PL Premium Adhesive. Maximum size
Make every component count.
 Make every component count. Technical Bulletin Installation Instructions ABOUT THE MATERIAL The frame and material have been thoroughly tested for strength, durability and low maintenance, offering a never
HONEYCOMB SHADES. Cordless INSIDE MOUNT. A few simple tools are required: STANDARD HARDWARE OPTIONAL HARDWARE
 HONEYCOMB SHADES Cordless GETTING STARTED BRACKET INFORMATION A few simple tools are required: Steel Tape Measure Pencil Level (for outside mount) The brackets you received with your product are REQUIRED
Door Hinges Drill-in Hinges
 Drill-in hinge StarTec Frame part For timber lining frames For rebated doors Maintenance-free friction bearing To use in combination with receiver Max. door weight: 40 kg Knuckle: Ø15 mm Drilling bit Ø7.2
Installation Instructions
 Installation Instructions Follow these simple instructions to install your OneDayCab! IMPORTANT: Unpack and check shipment for damage. Verify color, size and parts before demolition. Installation of interiors
HOW TO MAKE GOLDSTONE STRINGER
 Devardi Glass And The Hothead Torch. :*:. Tutorial Series. :*:. HOW TO MAKE GOLDSTONE STRINGER Learn To Encase Luster and Opaque Rods and Then Pull Stringer TUTORIAL OVERVIEW In this tutorial you will
Installation Manual Flat Track Series
 Manual Flat Track Series Contents Safety...1 Parts...2 Hardware.......................................... 2 Tools Required..................................... 4.............................................
Urban. pat e n t p e n d i n g 2
 Urban by Urban EXTRUDED & CHAOTIC The Urban Ceiling System is a drop ceiling product series designed in partnership with MNML that transforms interiors through both cutting edge aesthetics and acoustical
Model 5400H / 7000H Illustrated Installation Instructions
 Model 5400H / 7000H Illustrated Installation Instructions Contractors Wardrobe DESIGNERS MANUFACTURERS 261 Avenue Hall Valencia, CA 91355 (661) 257-1177 (661) 257-4907 TOLL FREE: (800) CW-DOORS (800) 293-6677
3D LIGHTING DESIGN. Processing of ETTLIN LUX fabrics.
 3D LIGHTING DESIGN Processing of ETTLIN LUX fabrics www.lichtstrukturen.de contents basics 3 Cutting 4 Scissors Knife Rotary Cutter Band saw Ultrasonic cutting Laser cutting Sewing Workplace layout Open
MX8 SERIES 6-1/4 HANDRAIL W/ VINYL HANDGRIP
 6-1/4 HANDRAIL W/ VINYL HANDGRIP TYPICAL ASSEMBLY 5 2 BUTT JOINT 12 10 9 1 8 11 6 3 7 4 BUTT JOINT COMPONENT LIST 1 LEFT RETURN 7 UPPER IMPACT ABSORBER 2 RIGHT RETURN 8 LOWER IMPACT ABSORBER 3 OUTSIDE
WORK SURFACE I highly recommend getting an Olfa knife. It is difficult to cut 1/2 foamcore with just an Exacto. RAZOR KNIFE CUTTING MAT WIRE CUTTERS
 RAZOR KNIFE CUTTING MAT WIRE CUTTERS MARKING TOOLS PLIERS CIRCLE STENCIL SMALL WOOD SAW COMPASS 12 METAL RULER* > 16 RULER HOT GLUE GUN RIGHT TRIANGLE SCREWDRIVER Find a sturdy table that is in a well-lit
Note: Lay-Up Schedules.
 Fabrication Method This PDE fabrication presentation is designed to display elements of the fabrication processes with accompanying images to better visualize the fabrication process. Please make sure
Curium 19.4H Installation Instructions & Parts List
 Curium 19.4H Installation Instructions & Parts List Illustration Curium 19.4H Right Hand Page 1 of 21 30/06/2016 Revision 1.0 IMPORTANT This shower screen / enclosure must be installed by suitably qualified
Wall Installations. Chapter 16 Wall Installations 16. 1
 16 Wall Installations Chapter 16 Wall Installations 16. 1 Alterna Premium Groutable Tile Create decorative backsplashes, accent walls, or other focal points with any size Alterna 16" x 16", 8" x 16", 8"
1. TOOLS + MATERIALS REQUIRED
 R INSTALLATION INSTRUCTIONS PRODUCT: BALDUR + ODEN CONFIGURATION: BI-PARTING DOOR MOUNT: TOP MOUNT Product is covered by U.S. patents. For more information visit www.krownlab.com. TOOLS + MATERIALS REQUIRED
Installation Instructions Palladium 3D Hi Impact Wall System, Partial Height with Color Matched Caulk Joints
 Please read all instructions before installing Palladium 3D Hi Impact Wall System.. Before installation: a. Acclimate rigid sheet, Palladium 3D boards, adhesives and wall substrates to room temperature
INDUSTRIAL QUALITY SINCE CALL , or VISIT for more information.
 ALL- CIRCULAR SAW BLADE LINE-UP for more information. WOODWORKER SERIES BLADES FOR THE PROFESSIONAL WOODWORKER Century s Woodworker Series blades are manufactured to the highest standards of precision
Important Note: Why this guidebook is FREE?
 Easy DIY Murphy Bed Construction Guide 1 Important Note: This guide is a FREE SAMPLE of our Complete Construction Guidebook. With the help of this guide you will get familiar with the construction steps
SHIN KWANG HOT MELT CO., LTD.
 ADCOPOLY SHIN KWANG HOT MELT CO., LTD. Hot Melt Adhesive Copolymer Resin and Film Manufacturer Address : CHEOMDAN-RO 285, Danwon-Gu, Ansan City, Kyeonggi Province, South Korea (Seonggok Dong, Sihwa Industrial
Subject: Fabric studies. Unit 5 - Other textile fabrics. Quadrant 1 e-text
 Subject: Fabric studies Unit 5 - Other textile fabrics Quadrant 1 e-text Learning Objectives The learning objectives of this unit are: Understand fabrics made from fibres and yarns. Understand composite
ALIEN ENCLOSURES CAMARO AND FIREBIRD Trunk Panel Kit Instructions
 ALIEN ENCLOSURES 67-69 CAMARO AND FIREBIRD Trunk Panel Kit Instructions TYPICAL TOOLS & MATERIALS NEEDED FOR UPHOLSTERY 2 Yards of Main Panel Material 1.5 Yards of Backer Material 3 yards of foam backing
6 Segment Knot Pen. A Tutorial by: Larry Wirt A.K.A ribanett. This tutorial was downloaded from. The International Association of Penturners
 Segment Knot Pen A Tutorial by: Larry Wirt A.K.A ribanett This tutorial was downloaded from. The International Association of Penturners How I Make A Six-Segment Knot By: Larry Wirt (aka ribanett) This
INSTALLATION INSTRUCTIONS - CEILING POWER TRAK, HANGER HOOKS AND RACKS I. CONTENTS CEILING POWER TRAK KIT
 INSTALLATION INSTRUCTIONS - CEILING POWER TRAK, HANGER HOOKS AND RACKS I. CONTENTS CEILING POWER TRAK KIT QUANTITY DESCRIPTION 2 POWER TRAK, 5 FT LG 4 END CAPS, YELLOW 10 SCREWS, 1 5/8 LG 10 WASHERS, 5/8
SAW-PIERCING. 79. Fig. 29. Placing new blade in saw-frame.
 SAW-PIERCING. 79 First make a full-size drawing of the hinge, then by means of transfer paper transfer the design of the butt end to the copper or brass. Then lay out the knuckles as shown in Fig. 28,
Kirei EchoPanel 7mm and 12mm Application Guide
 Kirei EchoPanel 7mm and 12mm Application Guide Note: Please read this application guide before beginning installation. This application guide is presented in good faith to help in the use of Kirei EchoPanel
Installation Instructions for Mincey Marble Manufacturing s Standard 3-Piece Panels [Not Extending to the Ceiling]
![Installation Instructions for Mincey Marble Manufacturing s Standard 3-Piece Panels [Not Extending to the Ceiling]](/thumbs/90/104106060.jpg "Installation Instructions for Mincey Marble Manufacturing s Standard 3-Piece Panels [Not Extending to the Ceiling]") , inc. Mincey Marble Mfg., Inc. 4321 Browns Bridge Road Gainesville, GA 30504 Ph: 800.533.1806 Fx: 770.531.0935 www.minceymarble.com Installation Instructions for Mincey Marble Manufacturing s Standard
, inc. Mincey Marble Mfg., Inc. 4321 Browns Bridge Road Gainesville, GA 30504 Ph: 800.533.1806 Fx: 770.531.0935 www.minceymarble.com Installation Instructions for Mincey Marble Manufacturing s Standard
PRIVACY INSTALLATION FOR: Standard 6 H x 8 W Privacy Fence 4 x 4 Post Sleeve & Brackets Dog Ear or Straight-Edge Pickets 1.75 x 3.
 PRIVACY INSTALLATION FOR: Standard 6 H x 8 W Privacy Fence 4 x 4 Post Sleeve & Brackets Dog Ear or Straight-Edge Pickets 1.75 x 3.5 Rail Storage and Handling Fence Preparation and Layout Locate and Set
COMPOSITES LAB MANUAL
 COMPOSITES LAB MANUAL Version 1 Lab 6: Post-cure Processing The original version of this manual was a one student senior design project written by Katherine White, the Composite lab assistant, during Spring
User s manual. Proper handling and storage of panels will help you maintain the high performance level of Uniboard products.
 User s manual STORAGE AND HANDLING OF PANELS Proper handling and storage of panels will help you maintain the high performance level of Uniboard products. RECEIVING Receiving your panels is the first step
installation instructions WC Frame 1180mm with Dual Flush Cistern
 installation instructions WC Frame 1180mm with Dual Flush Cistern (C,D,E) K F/G N L M 12 13 14 16 1 2 11 A 5 6 Q O Y 3 C 10 E D B P,Z,AA R T V S 4 U 2 No. Part no. Description Quantity A WC Frame with
Post & Rail. Includes: Crossbuck, 2-Rail, 3-Rail and 4-Rail POST SUPPORT OPTIONS
 Post & Rail Includes: Crossbuck, 2-Rail, 3-Rail and 4-Rail STAGGER RAIL ENDS FOR GREATER STRENGTH ALLOW 1-1/2" GAP ON HINGE SIDE OF GATE AND 1-1/4" ON LATCH SIDE OF GATE HARDWARE DIG HOLES 30" MINIMUM
How-to-Install. Laminate Countertops and Sheet Laminate. FREE brochure Reverso en español
 FREE brochure Reverso en español How-to-Install Laminate Countertops and Easy to install instructions provided inside Multiple colors available for unique design options Durable and easy to care for Accessory
935 RODA VINESSE NEED INSTALLATION HELP? DOUBLE ROLLERS FRAMELESS DOOR INSTALLATION INSTRUCTIONS QCI XX/XX/XXXX. Call BASCO ( )
") INSTALLATION INSTRUCTIONS 935 RODA DOUBLE ROLLERS FRAMELESS DOOR NEED INSTALLATION HELP? Call 1-800-45-BASCO (452-2726) Monday - Friday VINESSE QCI0286 1 XX/XX/XXXX 935 Roda Parts List With double rollers
INSTALLATION INSTRUCTIONS 935 RODA DOUBLE ROLLERS FRAMELESS DOOR NEED INSTALLATION HELP? Call 1-800-45-BASCO (452-2726) Monday - Friday VINESSE QCI0286 1 XX/XX/XXXX 935 Roda Parts List With double rollers
Working with Wood and Wood Materials
 Working with Wood and Wood Materials Excerpt from the Bosch Encyclopedia of Power Tools. Written & Published by ROBERT BOSCH GmbH and Robert Bosch Tool Corporation. The grain direction of the fibers determines
Double Coated Tapes with Adhesive 300MP B 9690F LE
 3 Double Coated Tapes with Adhesive 300MP Technical Data October, 2002 Product Description These 3M Double Coated Tapes feature a thin polyester film for dimensional stability and improved handling with
Double Beam Freestanding Pergola Installation Guide
 Double Beam Freestanding Pergola Installation Guide Patent Pending. Copyright 2011 USAVinyl, LLC - All Rights Reserved The information contained in these instructions are proprietary to USAVinyl, LLC and
EchoPanel EchoScreen Installation Guide
 Please read this application guide before beginning installation. This installation guide is presented to help in the installation of Kirei EchoScreens. Kirei accepts no responsibility for installation
Wall Panel Installation Instructions
 Panel Installation Instructions Demolition - Common Tools Needed Reciprocating Saw Allen Wrench Set Hole Saw Set Pry Bar Dust Pan and Brush Putty Knife / Scraper Hex Bit Socket Set All Necessary Safety
Re-Upholstering the Honda Reflex Seat ( not including the backrest )
") Re-Upholstering the Honda Reflex Seat ( not including the backrest ) I bought my 2001 Honda Reflex in December, 2012. It came with the seat as shown in figure 1. Figure 1 There are ebay vendors who sell
Re-Upholstering the Honda Reflex Seat ( not including the backrest ) I bought my 2001 Honda Reflex in December, 2012. It came with the seat as shown in figure 1. Figure 1 There are ebay vendors who sell
Technical Tips. Using Bundle Breaker (rotary corrugated applications) In General, bundle breaker rule is determined based on the following criteria:
 In General, bundle breaker rule is determined based on the following criteria:") Technical Tips 080215_BBarticle Using Bundle Breaker (rotary corrugated applications) Bundle Breaker: a mechanical device designed specifically to separate ganged, multiout sheets after they have been
Technical Tips 080215_BBarticle Using Bundle Breaker (rotary corrugated applications) Bundle Breaker: a mechanical device designed specifically to separate ganged, multiout sheets after they have been
Product sheet 17/18. Solid Textile Board Acoustic Textile Felt
 Product sheet 17/18 Solid Textile Board Acoustic Textile Felt About Really Responding to the urgent global issue of waste, Really upcycles textiles to create materials that challenge the design and architecture
Tripanel Marine Technical Bulletin
 Tripanel Marine Technical Bulletin Figure 1 Cabinet joints can be accomplished by four methods: a) rabbet one panel to the proper thickness of joining panel and epoxy joint b) dado to thickness of joining
Flash Coving. Chapter 8 Flash Coving 8. 1
 8 Flash Coving Chapter 8 Flash Coving 8. 1 Flash Coving A. TOOLS In addition to the normal tools (knives, dividers, recess scribers, straightedges, rollers, trowels, etc.), other tools are also needed
Want to make a travel scope but too lazy to read the whole thing? Read this:
 My 114mm Travel Scope by Cyrille de Brebisson of Rhône-Alpes, France cyrille.de.brebisson@gmail.com During my last trip in the US, I was able to pick a 114mm/25.4mm primary/secondary mirror pair for 18$
Contents. pages 20-24: Installing Edge sinks into. custom laminate countertops page 8: Installing Edge sinks into postform laminate countertops
 Contents pages 2-8: Installing Edge sinks into custom laminate countertops page 8: Installing Edge sinks into postform laminate countertops pages 9-14: Installing Acrylic sinks into custom laminate countertops
Die Cutting an Introduction
 Die-cutting Exam expectations Die-cutting is a regular topic in the examination paper. Although the question only attracts a small numbers of marks it is an area which few candidates score. Die Cutting
Curium 19H Installation Instructions & Parts List
 Curium 19H Installation Instructions & Parts List Illustration Curium 19H Right Hand Page 1 of 15 01/07/2016 Revision 2.1 IMPORTANT This shower screen / enclosure must be installed by suitably qualified
Horizontal Cable Systems
 ALUMINUM RAILING INSTALLATION INSTRUCTIONS v2012 orizontal Cable Systems 1) Check Contents Of Packages: Verify that all parts have arrived and that they match the packing list. 1A) Coastal applications:
Makrolon Solid Polycarbonate Sheets
 1. General remarks Tools sheets can be machined using the standard tools commonly used for metal and woodworking. We recommend carbide-tipped tools. Above all, it is important to use sharp cutting tools
SINGLE TRACK BYPASS (patent pending) barn door hardware
 barn door hardware") SINGLE TRACK BYPASS (patent pending) barn door hardware Installation Manual What is included in your kit: Part number Part name Quantity 1 Inner door hanger 2 2 Outer door hanger 2 3 5/16 x 1.5 lag bolts
SINGLE TRACK BYPASS (patent pending) barn door hardware Installation Manual What is included in your kit: Part number Part name Quantity 1 Inner door hanger 2 2 Outer door hanger 2 3 5/16 x 1.5 lag bolts
PLEATED SHADE ARCH INSIDE MOUNT GETTING STARTED. A few simple tools are required: STANDARD HARDWARE
 HONEYCOMB AND PLEATED SHADE ARCH GETTING STARTED INSIDE MOUNT A few simple tools are required: HALF ARCH INSTALLATION Your half arch has been shipped in the closed osition. When fanned, the rails will
Chapter 18. Interior Doors
 Chapter 18. Interior Doors 18.1 SWINGING DOORS 18.2 SLIDING DOORS 18.3 BIFOLD DOORS Tools needed by volunteers: Hammer Nail apron Tape measure Square Pencil Tools and equipment needed: Extension cords
How to Build an Advanced Composite Clipboard
 How to Build an Advanced Composite Clipboard Tools and Equipment Measuring Tape Black Sharpie Silver Sharpie Rivet Puller Tile Saw or Hacksaw Drill and Drill Bits (5/32) Scissors Utility Knife Straight
TrendWall Floor-To-Ceiling Panels Installation Instruction
 TrendWall Floor-To-Ceiling Panels Installation Instruction TrendWall Components Covered by this Instruction: Crown (and accessories) Floor Plate Solid Panel Filler Panel Wall Channel Door Section Pilaster
How to install the Kreg Bench Klamp System with Klamp Plate on a workbench
 How to install the Kreg Bench Klamp System with Klamp Plate on a workbench Posted by Vince M, www.zonetravaux.fr http://www.zonetravaux.fr/2014/01/pince-plaque-serrage-kreg-etabli/ I built my workbench
Packing The Quad ESL-63 s with Home-Store Materials
 A u dio L ab s Packing The Quad ESL-63 s with Home-Store Materials Sheldon D. Stokes March 22, 2018 This document outlines a simple and relatively inexpensive way to pack a set of Quad ESL-63 s using materials
Section 914. JOINT AND WATERPROOFING MATERIALS
 914.01 Section 914. JOINT AND WATERPROOFING MATERIALS 914.01. General Requirements. Joint and waterproofing material for use in concrete construction must meet the requirements of this section. 914.02.
Pinewood Derby Display Case
 Pinewood Derby Display Case Optional Door Design by Neil Fern - Pack 187 Exterior Dimensions 23 ½ (H) X 10 ½ (W) X 3 ½ (D) Front Back OPTIONAL Door Finished Interior Dimensions 21 7/8 (H) X 9 (W) X 3 (D)
Stripping & Blanking Supplies
 Stripping & Blanking Supplies Stripping Pins Stripping Pins - available in the sizes and styles shown above. 50 mm tall (2 ). All base sizes are the same (4mm) for consistent drilling and laser cutting
Swell. pat e n t p e n d i n g
 Swell by Swell S C U L P TU R A L & TR A N S F O R M ATI V E The Swell Ceiling System is a drop ceiling product series that transforms office interiors through both cutting edge aesthetics and acoustical
The Astronomical League
 The Astronomical League www.astroleague.org Library Telescope Modifications Check the collimation with the eyepiece cap provided (the one with the hole in its center) before starting on any modifications.
Recaro sport seat strip down and rebuild
 Recaro sport seat strip down and rebuild So why do this, well I managed to find a set of Recaro s left in a wet shed for over 25 years and Rather than pay for someone to strip these down i decided to have
Melamine Plastic Laminate. Toilet Partition Installation Manual
 Melamine Plastic Laminate Toilet Partition Installation Manual PHONE: FAX: 1-866-317-2786 ATTENTION DO NOT MIX FASTENER PACKS EACH FASTENER PACK HAS THE NECESSARY BOLTS, BARRELS AND SCREWS TO INSTALL THE
Operating & Maintenance Instructions 320 Dome Blowing Unit
 Operating & Maintenance Instructions 320 Dome Blowing Unit Table of Contents 1. On Delivery... 2 2. General Information... 3 3. Dome Blowing Technique... 4 4. Other Shapes... 6 5. Machine Maintenance...
Volvo 1800 Smiths Gauge Face Overlay Installation By Dave Barton
 Volvo 1800 Smiths Gauge Face Overlay Installation By Dave Barton These face overlays are the product of a lot of research. They are printed with a special printer using waterproof and UV resistant ink
The Festival Assembly Instructions
 The Festival Assembly Instructions Toll Free: 866.768.8465 Hours: 9-5 Monday-Friday EST www.homeplacestructures.com Package ships as shown CONTACT INFORMATION: HomePlace Structures 301 Commerce Drive New