Wood characteristics - 1 -
|
|
|
- Alyson Blankenship
- 5 years ago
- Views:
Transcription
1 Wood characteristics Wood has a number of specific characteristics, which are natural and inherent to it. The biggest practical moment is, that the wood has its specific colour and density, also the effect of humidity result. In longitudinal cut most of the wood has a nice, decorative and often very appreciable cut-out which is called texture. Wood has a specific scent. The scent is given by attars, resins and fermented substances. New-mown wood gives a better scent. A very important attribute of the wood is to store and easily return the water. The bad attribute is to bloat and dry out. When wood is drying, it shrinks its linear measurements and volume decrease. When the wood absorbs humidity its linear measurements and volumes increase. Downsides of the wood are that it chaps and warps. When wood dries, humidity firstly evaporates from the surface, outer layers and only after from deeper inside layers. That is why, when the outer layers start to shrink, the inside layers, due to bigger wetness, oppose to drawing. Firstly the surface is chapping, next the inside. When wood dries it can have longitudinal or cross warp. Longitudinal: When dried straight balk bends, flat plank twists and gets the form of the propeller. Cross: When the form of woods cross-section is changing, quadratic balk becomes the balk with rectangular or rhomb cross-section, flat plank becomes hunched. Wood has a number of specific technological characteristics. It easily splits along the fibre, nicely holding metal fastenings, it can flex easily, is durable to depreciation. Screws hold in the wood extremely well. Screws have a much better grip with the wood than the nails, and they do not cut the strings. Peculiarity of the wood (taints): branchy wood, cracks, subnormal structure, infractions made by fungus and insects. Wood, as it is a product of biological origin, is so varied, that the concepts normal wood or subnormal wood often has a conditional complexion. On sawn-on wood and sawn timber assortment following fungus taints may occur: mould, brownness. Mould funguses generally do not affect physical and mechanical characteristics of the wood. When wood is affected by biological (fungus), physical (environmental temperature and humidity) and chemical factors it decomposes. Wood may last a long time, but volatile humidity and temperature of the environment reduces its lasting, because of that, a variety of cracks, which can damage the woods integrity,upspring, that facilitates woods infection with fungus, and its rapid development. The older the wood is, the better its timbers durability is. The most effective way to protect the wood from insect and decay is to soak it with special preparations, which are toxic to fungus and insects, - antiseptics
2 ATTENTION: These numbers correspond to numbers in the parts list you will receive in your log cabin booklet. Before construction please check the received parts against the parts list as it is more difficult to resolve issues during the construction stage. All parts of the log cabin are numbered. Baltic A 6x7 68 mm Position Name B width mm H Height mm L Length mm Q Foundation treated bearer Floor board (Tongue and Groove) a Floor board (Tongue and Groove) b Floor board (Tongue and Groove) c Floor board (Tongue and Groove) Floor strips a Floor strips b Floor strips Strip (for inside roof) various wall log a Colona (Pillar) Support for double roof a Support for double roof Roof board a Roof boards b Roof boards Fascia board a Fascia board strip b Roof strip Singe doors A 850X1860(double glazed) Single windows C 700X910(double glazed) 5 045a Double windows C 1380X910(double glazed) Single door strip (horizontal) a Single door strip (vertical) b Single window strip (horizontal) c Double/Single window strip (vertical) m m2
3 046d Double window strip (horizontal) Rain protection a Rain protection Frame for single door a Frame for single door b Frame for single window c Frame for single/double window d Frame for double window Metal staples for wall Metal corners for colona (Pillar) Column hight regulatory screw Rhombus Windows, doors furniture Décor (strip) for double windows a Décor (strip) for double windows
4 Assembly guide Baltic A 6x7 Assembling this Log Cabin Baltic A 6x7 should take place during dry weather only. If it starts to rain during the assembling process, the wood should be covered over. After completion, the cabin should be immediately protected with an appropriate paint or wood treatment. Before erecting this cabin it is important to make a firm base, ideally using concrete or concrete slabs. It is very important that the base corners must be at right angles it is completely level. Unless in the wall between windows and doors can be found space, in consequence water can get into the cabin. After completing the base the bearers, Pos. 003 are put into position following the Installation Guide diagrams, and then bolted into position. The space between impregnated floor joists must be kept exactly how is shown at the Foundation plans (according to the picture at page 4) - 4 -
5 The first two foundation treted bearer must be put together. On the axis 1, 3 and 4 must be put three foundation treted bearer together. And on the axis 2-2 foundation treated bearer must be put together. According to the picture
6 - 6 -

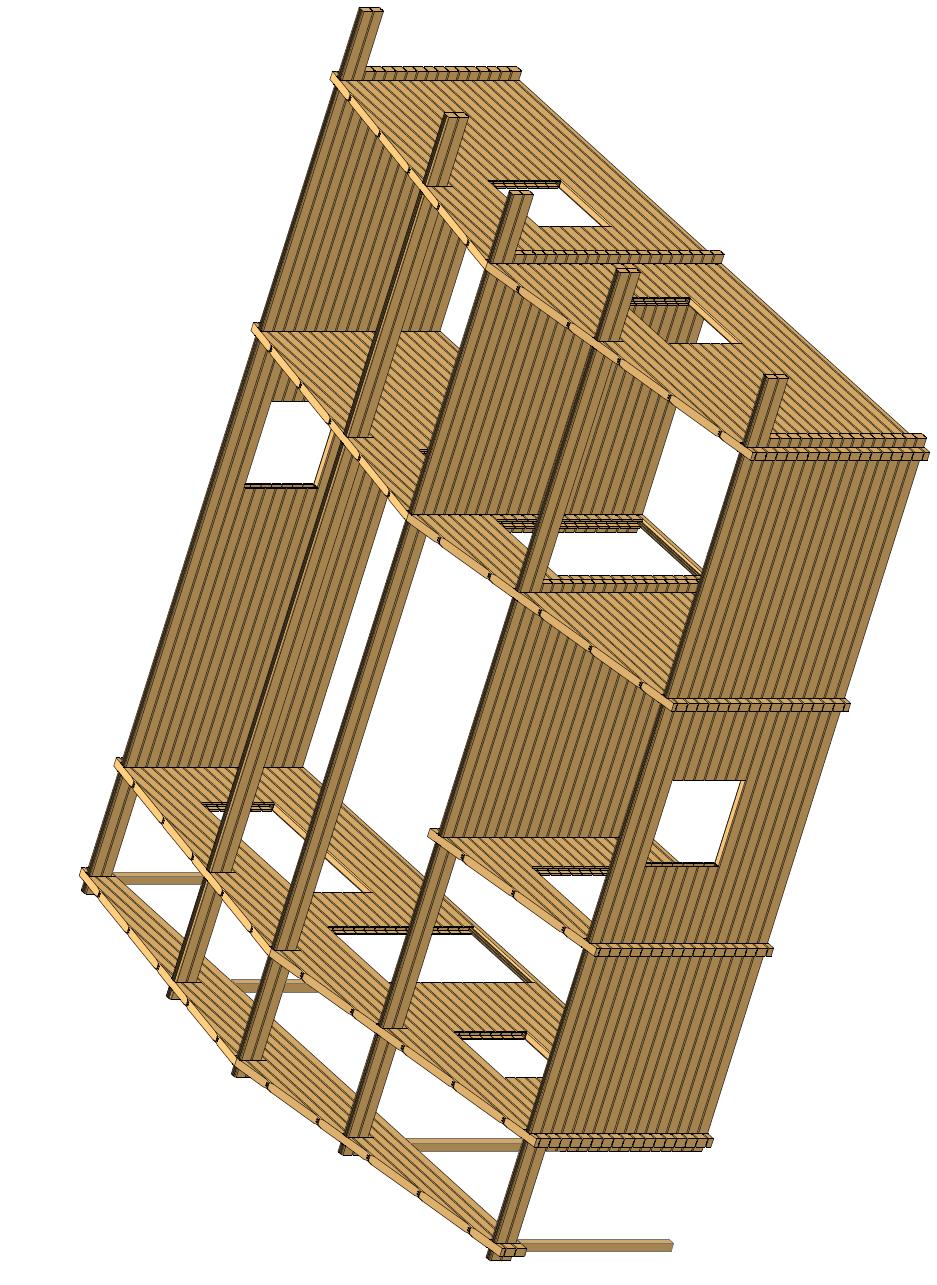
7 It is advisable to use a spirit level during the construction of the cabin. Using the Installation guide together with the Parts List for reference you can start erecting the walls. Beginning with part No. 1-1-DA, 1-2-BA, 1-3-DA, 1-4-DA for the walls and following the installation Guide, fit the boards one on top of the other. Ensuring the corners lock. Again it is advisable to use a spirit level during this process. ATTENTION: In the package you will find some boards for hammering wall boards. Don t hammer directly to the wall bard just with scutch. Please do it according to the picture

8 poz. 054 Please join punctured timbers, which are noted on pages: 15, 16, 17, 18 and

9 All parts of the log cabin are numbered. Wall on axis X1 Wall on axis A Wall on axis 2 Wall on axis B Wall on axis 3 Wall on axis Y1 Wall on axis C Wall on axis D Wall on axis 1 Wall on axis 4-9 -
10 - 10 -
11 - 11 -
12 - 12 -
13 - 13 -
14 - 14 -
15 These timbers must be joined using pos
16 These timbers must be joined using pos
17 These timbers must be joined using pos
18 These timbers must be joined using pos
19 - 19 -
20 These timbers must be joined using pos

21 When the external walls reach the height of the gables the doors can be installed. Now you can position the pre-fabricated gable, part No. from 18-1-DA to 23-1-C, from 18-2-BA to 21-2-B from 18-3-DA to 23-3-C, from 18-4-DA to 23-4-C, from 16-X1-DA to 23-X1-C. When the gable is in position the roof joists can be put in to place. This is followed by the roof boards pos. 037a, 037b, 037 which are screwed or nailed into place. This process should be done working from the front to the back. Please see at the picture below how you must put double roof. On the wall boards you must set support for double roof pos. 036 and 036a then nail roof boards. Pos. 036 support for double roof. For fitting the roof boards we recommend using roof board / mdf screws about 4, 5-5 cm in length. Please ensure that 2 screws are used to secure each individual board. Additional screws / roof tacks can be used to secure the middle of the board to the side roof joists for extra security. As soon as the roof is installed it should be sealed immediately with roofing felt and/or Bitumen tiles which are supplied as optional extras
22 When the tiles/felt is in place the border for the gables and eaves Pos. 039, 039a and 039b can be screwed or nailed into place. Floorboards pos. 008 is fitted last. These are screwed or nailed onto the bearers pos The roofing and flooring is commercial quality tongue and groove. The smooth planed side of the flooring boards should be placed upper- most. ATTENTION: Before you start the mounting the floor boards, please pay attention to the specification on the page


23 Doors and windows installation 1 step: Firstly from outside you have to put the window evenly the wall, in order to set the window/ door strip pos. 046 (pos. depends on the window/door size).according to the picture. 2 step: pos. 046 must be screw. According to the picture. Pos PDF created with pdffactory Pro trial version


24 3 step: pos. 049 must be put in the place from inside step by step. Firstly you have to put down and up, then in the both sides. According to the pictures. 4 step: pos. 046 must be screw from inside. According to the picture PDF created with pdffactory Pro trial version
25 ATTENTION: A decorative board between the windows (doors) can be additionally screwed, from inside, if needed. Pos. 071b for door and pos. 071, pos. 071a for window PDF created with pdffactory Pro trial version


26 Windows can be opened in one of two ways: firstly wide side to side action with window fully open. Secondly by means of a ventilation catch in order to allow a small amount of airflow into cabin. Ventilation please ensure that the window catch lever is in the right hand position PDF created with pdffactory Pro trial version


27 Slowly release the catch at the top of the window. The window will then tilt slightly inwards at the top for ventilation PDF created with pdffactory Pro trial version

28 The close the cabin doors please push the door handle from the horizontal position to vertical and back. This will close the door for locking purposes. To open the cabin door, unlock and then depress door handle downwards from horizontal to vertical pointing towards the ground. The cabin door will then open PDF created with pdffactory Pro trial version

29 - 7 - PDF created with pdffactory Pro trial version


30 - 8 - PDF created with pdffactory Pro trial version


31 - 9 - PDF created with pdffactory Pro trial version
32 Please note: Wood is a natural material, which comes with differing textures and colour nuances. These form part of the appeal and natural attraction to this product but also mean aesthetic variations. Complaints: If a cause for complaint should arise please follow this procedure: Inform your retailer and return your control list, describing the problem and making note of any parts nos. that may be damaged. As soon as we receive notification of a complaint we shall do our best to resolve the matter as quickly as possible. Guarantees are limited to the replacement of incorrect materials. We trust you enjoy your Log Cabin PDF created with pdffactory Pro trial version

33 LOG CABIN SHINGLE TILE INSTRUCTION ATTENTION: We are not responsible for water leakages due to incorrect tile installation or improper preparation of the roof deck. Please therefore read these instructions carefully. If you have any installation questions please ask us before starting. Sometimes a small deviation in colour of the tiles occurs between tiles in the same or different packs. This is not a defect of the material and is actually designed to increase the decorative beauty of the completed roof. In order to reduce colour difference during installation of the tiles, it is recommended to mix tiles from packs at random in order to create a mixed colour effect. Storage: Full pallets of tiles cannot be stored one on top of the other, otherwise this can compress the tiles into sticking to one another before use. In order to avoid shingles sticking to each other in a pack they should be protected from direct sunlight and any direct heat source. Each pack should be bent and shaken before opening, this helps to separate the shingles from each other. It is not recommended to walk on the roof in hot/sunny weather because the cover might be damaged. Special ladders should be used for this purpose. Usage of materials for roofing cover: Each pack of bourne or hexham tiles contains 3 m² of tile coverage (including overlapping). Each pack of ridge tiles contains 5m2 of tile coverage (including overlapping). When calculating the amount of materials needed for roofing cover it is necessary to evaluate the quantity of tiles required depending on the complexity, degree of slope and size of the roof. Please remember to calculate extra tiles required for wastage (between 5 15% extra) as it is always better to have too many than too few tiles. Extra spare tiles, if stored correctly, can be used to repair any areas of damage in the future. Installation of bitumen shingles: Initial row (tiles of ridges/cornice): Ridge/cornice tiles or the usual tiles (with the jagged edge cut off) are used for the initial row of tiles along both the eaves of the roof as well as the pitched cornice at the top. The silicon film should be removed from the under side of the tile prior to installation PDF created with pdffactory Pro trial version


34 Every tile should be nailed to the roof boards with wide headed galvanized roof tack nails. The number of nails depends on the pitch or slope of your roof. It is very important not to over hit the nails. They should be nailed in such a way that the head of the nail head is flush with the tile and not below the surface. The head of the nail should not puncture the surface of the shingle tile. The nails are put 2 3 cm from the edge of the tile. Picture on the left indicate the number of nails needed and where they should be applied at certain roof angle. The picture shows the topside of the tile, and the dotted line indicates the place of the adhesive bottom layer. Ridge/cornice tiles should be cut into three parts at the places of perforation and laid in a straight line with an overlap of 3 5 cm. They are fixed with two nails on each side of the slope. Installation should be performed against the prevailing direction of the wind PDF created with pdffactory Pro trial version
 Ventilation: The durability of the roof construction is longer if the roof has proper ventilation, especially over the usable attic.")
35 ATTENTION: if ridge cornice tiles are installed at the outside temperature lower than 10ºC it is recommended to bend them on a heated 10 cm diameter tube in order to avoid cracks. (See the picture on the left) Ventilation: The durability of the roof construction is longer if the roof has proper ventilation, especially over the usable attic. Tile Patterns: Please make sure that the individual tiles are NOT overlapped to cover the darker colour section. Please refer to the pictures for the correct spacing of tiles. If you assemble the tiles with a larger overlap than recommended you will not have enough tiles to complete your roof. Wes provide the correct quantity of tiles in order to cover your roof according to correct assembly. We strongly recommend to use wide headed (up with mm long) nails to fix the bitumen tiles. If you are going to put the tiles at lower than +15 degrees outside temperature, please preheat black sealing belt zones or use extra mastics to ensure waterproofing. In this case also recommend to keep tiles in warm temperature (inside) for 24 hours before installation. The cost of extra tiles and delivery will be paid for by the customer and not Eurovudas ltd PDF created with pdffactory Pro trial version

36 HEXHAM TILES PATTERN BOURNE TILE PATTERN If you have any questions about the installation process of your tiles please call to ask before starting. ATTENTION: We are not responsible for water leakages due to incorrect tile installation or improper preparation of the roof deck. Please therefore read these instructions carefully. If you have any installation questions please ask us before starting PDF created with pdffactory Pro trial version
.")
37 Attention: If in the list of details you found 4 peaces rhombes, two must be set at the front and at the back of house and the last two on the roof strips joint. If you found just two rhombes in the list of details such being the case you must put them at the front and the back of the house (according to the picture) PDF created with pdffactory Pro trial version
38 CONTROL LIST NUMBER: We want to thank you for this wooden garden house purchase. This house was manufactured using the highest technology. The quality was being checked at all times to a high standard. While packing, the number and quality of sections and parts are checked at different stages of manufacture, therefore keeping any problems to an absolute minimum. However, if it happens, the provider guarantees to replace any faulty parts. If you have any problems please present the documents of your purchase and the Control List to the seller. Please provide a description of the needing replacing. For client: Please send us digital photos of the defect parts too, if possible. Cabin model: Pos.number from list of detal Measurment Quantity Reason for request PDF created with pdffactory Pro trial version
 www.cabinsunlimited.co.uk 01362470075 info@cabinsunlimited.co.uk Wood characteristics Wood has a number of specific characteristics, which are natural and inherent to it. The biggest practical moment is,
Wood characteristics
 Wood characteristics Wood has a number of specific characteristics, which are natural and inherent to it. The biggest practical moment is, that the wood has its specific colour and density, also the effect
 www.cabinsunlimited.co.uk 01362470075 info@cabinsunlimited.co.uk Wood characteristics Wood has a number of specific characteristics, which are natural and inherent to it. The biggest practical moment is,
 www.cabinsunlimited.co.uk 01362470075 info@cabinsunlimited.co.uk Wood characteristics Wood has a number of specific characteristics, which are natural and inherent to it. The biggest practical moment is,
NP TD Wood characteristics The bad Downsides Peculiarity of the wood (taints)
") preparations, which are toxic to fungus and insects, - antiseptics. - 1 - Wood characteristics Wood has a number of specific characteristics, which are natural and inherent to it. The biggest practical
preparations, which are toxic to fungus and insects, - antiseptics. - 1 - Wood characteristics Wood has a number of specific characteristics, which are natural and inherent to it. The biggest practical
PDF created with pdffactory Pro trial version Wood characteristics - 1 -
 Wood characteristics Wood has a number of specific characteristics, which are natural and inherent to it. The biggest practical moment is, that the wood has its specific colour and density, also the effect
Wood characteristics
 Wood characteristics Wood has a number of specific characteristics, which are natural and inherent to it. The biggest practical moment is, that the wood has its specific colour and density, also the effect
 www.cabinsunlimited.co.uk 01362470075 info@cabinsunlimited.co.uk Wood characteristics Wood has a number of specific characteristics, which are natural and inherent to it. The biggest practical moment is,
Wood characteristics - 1 -
 Wood characteristics Wood has a number of specific characteristics, which are natural and inherent to it. The biggest practical moment is, that the wood has its specific colour and density, also the effect
PDF created with pdffactory Pro trial version
 Wood characteristics Wood has a number of specific characteristics, which are natural and inherent to it. The biggest practical moment is, that the wood has its specific colour and densit lso the effect
I. Architectural drawings. Pod 4x3 LTH (34)
") I. Architectural drawings Pod 4x3 LTH (34) 1 I.1. Building plan: 2 II. Assembly guide step by step 1. STEP (tools & care) To assemble the building you will need the following tools: 3 2. STEP Before erecting
I. Architectural drawings Pod 4x3 LTH (34) 1 I.1. Building plan: 2 II. Assembly guide step by step 1. STEP (tools & care) To assemble the building you will need the following tools: 3 2. STEP Before erecting
ASSEMBLY INSTRUCTIONS GARDEN SHED - ModernaDimensions: 10 x 10 (3/4 )
") ASSEMBLY INSTRUCTIONS GARDEN SHED - ModernaDimensions: 0 x 0 (/4 ) IMPORTANT Before beginning the assembly of your garden shed, please read the instructions carefully and follow them closely. By doing
ASSEMBLY INSTRUCTIONS GARDEN SHED - ModernaDimensions: 0 x 0 (/4 ) IMPORTANT Before beginning the assembly of your garden shed, please read the instructions carefully and follow them closely. By doing
GARDEN SHED - WALESDimensions: 10x10 (1 1/8')"
") ASSEMBLY INSTRUCTIONS GARDEN SHED - WALESDimensions: 0x0 ( /8')" IMPORTANT Before beginning the assembly of your garden shed, please read the instructions carefully and follow them closely. By doing so
ASSEMBLY INSTRUCTIONS GARDEN SHED - WALESDimensions: 0x0 ( /8')" IMPORTANT Before beginning the assembly of your garden shed, please read the instructions carefully and follow them closely. By doing so
GARDEN SHED OPTIMA 328Dimensions: 12x8; 10; 12 (1 1/8')"
") ASSEMBLY INSTRUCTIONS GARDEN SHED OPTIMA 38Dimensions: x8; 0; ( /8')" IMPORTANT Before beginning the assembly of your garden shed, please read the instructions carefully and follow them closely. By doing
ASSEMBLY INSTRUCTIONS GARDEN SHED OPTIMA 38Dimensions: x8; 0; ( /8')" IMPORTANT Before beginning the assembly of your garden shed, please read the instructions carefully and follow them closely. By doing
GARDEN SHED BRIGHTOLN
 ASSEMBLY INSTRUCTIONS GARDEN SHED BRIGHTOLN Dimensions: 10x10 (1 1/8") IMPORTANT Before beginning the assembly of your garden shed, please read the instructions carefully and follow them closely. By doing
PRODUCT NAME RENNES REFERENCE NUMBER 1
 PRODUCT NAME REFERENCE NUMBER RENNES 1 IMPORTANT (Read carefully before starting)! - The following instructions include both pictures (indicating every part by the digits see part list above) and illustrations.
Shingle Installation Guidelines
 Shingle Installation Guidelines General Guidelines Materials to be used Key definitions Cost of roofing Preparation of the roofing deck Materials used for roofing should conform to approved norms and regulations
LOG CABIN 40 ASSEMBLY INSTRUCTIONS
 LOG CABIN 40 ASSEMBLY INSTRUCTIONS 4000 mm x 300 mm Canopy 350 mm Veranda depth 500 mm Wall thickness 34 mm Nordic region spruce wall logs 34 mm x 35 mm Dimensions of base 3800 mm x 4500 mm including terrace
LOG CABIN 70 ASSEMBLY INSTRUCTIONS
 LOG CABIN 70 ASSEMBLY INSTRUCTIONS 400 mm x 400 mm Canopy 500 mm Veranda depth 500 mm Wall thickness 45 mm Nordic region spruce wall logs 45 mm x 35 mm Dimensions of base 3900 mm x 5400 mm including terrace
PRODUCT NAME DOUBLE CARPORT + SHED REFERENCE NUMBER 1
 PRODUCT NAME REFERENCE NUMBER 1 DOUBLE CARPORT + SHED IMPORTANT (Read carefully before starting)! - The following instructions include both pictures (indicating every part by the digits see part list above)
General Instructions 03WES0808-V1. Please retain product label and instructions for future reference
 General Instructions Please retain product label and instructions for future reference 03WES0808-V1 x2 All building s should be erected by two adults Winter = High Moisture = Expansion Summer = Low Moisture
3590x4190(5690)(12x14)
(12x14)") 28/09/2011 Instruction pack R11 3590x4190(5690)(12x14) 34mm NO OTHER PARTS REQUIRED CHECK ALL PARTS BEFORE ASSEMBLY OR EMPLOYING TRADESPEOPLE Building: Kinver 34 + 2.5m Ridge Building Size: 3590x4190(5690)(12x14)
28/09/2011 Instruction pack R11 3590x4190(5690)(12x14) 34mm NO OTHER PARTS REQUIRED CHECK ALL PARTS BEFORE ASSEMBLY OR EMPLOYING TRADESPEOPLE Building: Kinver 34 + 2.5m Ridge Building Size: 3590x4190(5690)(12x14)
WARNING. Not suitable for children under 36 months Contents
 For domestic and family use only Children of any age should not be left to play unsupervised Retain Instructions for future reference WARNING. Not suitable for children under 36 months Contents Length
General Instructions. Please retain product label and instructions for future reference 7X5 OVERLAP APEX
 General Instructions 7X5 OVERLAP APEX x2 Please retain product label and instructions for future reference All building s should be erected by two adults Winter = High Moisture = Expansion Summer = Low
BARDOLINE INSTALLATION INSTRUCTIONS
 BARDOLINE INSTALLATION INSTRUCTIONS www.onduline.com CONTENTS General conditions Material requirements Terms Estimating shingle requirements Roof preparation Shingle application 9 GENERAL CONDITIONS ONDULINE
Corner Potting Store Assembly Instructions
 Corner Potting Store Assembly Instructions English SS225E Before assembly We recommend that time is taken to read the instructions before starting assembly, then follow the easy step by step guide. The
Polytegola N. Bitumen Roof shingles. Application guide
 Polytegola N Bitumen Roof shingles Application guide Application manual POLYTEGOLA N CONTENT 1. Foreword - General conditions 3 2. POLYTEGOLA N designs 4 3. Roof pitches 5 4. Storage 5 5. Roof decking
Potting Store Assembly Instructions
 Before assembly We recommend that time is taken to read the instructions before starting assembly, then follow the easy step by step guide. The instruction sheet is only a guide to the assembly. Certain
N/A. General Instructions 14/01/2014. For Assistance Please Contact Customer Care on Overlap Cladding. Solid Sheet Roof.
 General Instructions 4/0/204 Please retain product label and instructions for future reference N/A Overlap Cladding Shiplap Cladding Fixed Windows Opening Windows No Windows Solid Sheet Floor T&G Floor
Playaway Swiss Cottage Assembly Instructions
 Playaway Swiss Cottage Assembly Instructions English SS288C IMPORTANT SAFETY INFORMATION Adult assembly is required. Checks and maintenance needs to be carried out on the main parts (fixings etc.) at regular
Log cabins. Pentagon log cabin models ASSEMBLY INSTRUCTIONS. Recommended tools Cordless screwdriver
 ASSEMBLY INSTRUCTIONS Log cabins Pentagon log cabin models Recommended tools Cordless screwdriver Spirit level Screw clamp Pliers Tape measure Hammer Generally two persons are required for the assembly;
N/A. General Instructions 14/01/2014. For Assistance Please Contact Customer Care on Overlap Cladding. Solid Sheet Roof.
 General Instructions 14/01/2014 Please retain product label and instructions for future reference N/A Overlap Cladding Shiplap Cladding Fixed Windows Opening Windows No Windows Solid Sheet Floor T&G Floor
Inspection Certificate Log cabin CLOCKHOUSE FRKK x400 cm, 44 mm
 Inspection Certificate Log cabin CLOCKHOUSE FRKK44-5540 550x400 cm, 44 mm The house you have purchased was manufactured in accordance with the high quality norms. The building unit has been carefully inspected
12x12 Shed Plans and Building Guide
 Page 1 Legal 2018 Zac Spade & Christopher D. Brown. All Rights Reserved For information about special discounts available for bulk purchases, sales promotions, fundraising and educational needs, contact
DUTCH GABLE FREESTANDING CARPORT
 DUTCH GABLE FREESTANDING CARPORT STRATCO OUTBACK ASSEMBLY INSTRUCTIONS. Your complete guide to building a FREESTANDING Outback DUTCH GABLE CARPORT BEFORE YOU START Carefully read these instructions. If
8x8 Shed Plans and Building Guide
 Page 1 Legal 2018 Zac Spade & Christopher D. Brown. All Rights Reserved For information about special discounts available for bulk purchases, sales promotions, fundraising and educational needs, contact
2.4 x 1.8 (8 x 6 ) Premier Shiplap Modular Shed Assembly Instructions
 Premier Shiplap Modular Shed Assembly Instructions") 2.4 x 1.8 (8 x 6 ) Premier Shiplap Modular Shed Assembly Instructions English SS197C Before assembly We recommend that time is taken to read the instructions before starting assembly, then follow the easy
2.4 x 1.8 (8 x 6 ) Premier Shiplap Modular Shed Assembly Instructions English SS197C Before assembly We recommend that time is taken to read the instructions before starting assembly, then follow the easy
SHINGLAS Bitumen tiles
 SHINGLAS Bitumen tiles Installation instructions Table of contents General instructions on the installation of bitumen shingles 1. Materials to be used 2. Key definitions 3. Cost of roofing Preparation
Installation manual Montageanleitung Notice de montage Istruzioni per il montaggio Monteringsanvisning
 Installation manual Montageanleitung Notice de montage Istruzioni per il montaggio Monteringsanvisning Pavilion PAY44-5742 Pavillon Pavillon Padiglione Lysthus Width 571 x Depth 421 x Height 371 cm Breite/Tiefe/Höhe
10x10 Shed Plans and Building Guide
 Page 1 Legal 2018 Zac Spade & Christopher D. Brown. All Rights Reserved For information about special discounts available for bulk purchases, sales promotions, fundraising and educational needs, contact
6x6 Shed Plans and Building Guide
 Page 1 Legal 2018 Zac Spade & Christopher D. Brown. All Rights Reserved For information about special discounts available for bulk purchases, sales promotions, fundraising and educational needs, contact
N/A. General Instructions. For Assistance Please Contact Customer Care on Overlap Cladding. Solid Sheet Roof. No Windows.
 General Instructions Please retain product label and instructions for future reference N/A Overlap Cladding Shiplap Cladding Fixed Windows Opening Windows No Windows Solid Sheet Floor T&G Floor Solid Sheet
Five Star Panel Installation Instructions
 Five Star Panel Installation Instructions How to Store Five Star Panels You will need to store FIVE STAR PANELS in dry place to prevent staining, deterioration and possibly void all warranties. Stand the
IDAHO ASSEMBLY INSTRUCTIONS. BASE SIZE: 1.800m x 1.200m
 IDAHO ASSEMBLY INSTRUCTIONS BASE SIZE: 1.800m x 1.200m IDAHO Tools Required: Battery Drill Riveter Hammer Tape Measure Ladder Skillsaw Level Square Drive Bit No.2 3/8 Hex Drive Bit 8mm Hex Drive Bit Drill
QUALITY GARDEN SHEDS AND WORKSHOPS
 QUALITY GARDEN SHEDS AND WORKSHOPS Important points to note: All buildings are fully guaranteed to be free from defects and faulty installation for a period of 12 months. We would like to remind customers
Shingle Installation Guide
 Installation Guide Roof Framing Information Installation Installation Accessory Installation Estimating Data General Information Roof Framing Information It is the responsibility or roofers, building contractors
NEVADA ASSEMBLY INSTRUCTIONS
 NEVADA ASSEMBLY INSTRUCTIONS BASE SIZE: 2.700m x 1.500m NEVADA Tools Required: Battery Drill Riveter Hammer Tape Measure Ladder Skillsaw Level Screwdriver - Flat 3/8 Hex Drive bit 8mm Hex Drive bit Drill
NewTech - CleverDeck Composite Decking Installation Guidelines
 NewTech - CleverDeck Composite Decking Installation Guidelines Composite decking has unique characteristics and requires specific fixing requirements that differ from timber. We strongly recommend that
Installation guide for 20/20
 Introduction The following installation instructions are recommended minimum requirements for the 20/20. The designer and fixer should ensure that tiles are installed in accordance with BS 5534; The British
PREMIUM LAMINATED ASPHALT SHINGLES Dallas, TX Tuscaloosa, AL Phillipsburg, KS
 Application Instructions for FORMERLY 50 THESE ARE THE MANUFACTURER S APPLICATION INSTRUCTIONS FOR THE ROOFING CONDITIONS DESCRIBED. TAMKO BUILDING PRODUCTS, INC. ASSUMES NO RESPONSIBILITY FOR LEAKS OR
GIRTS ON BACK OF BUILDING
 GIRTS ON BACK OF BUILDING ALL GIRTS ARE 1 1/2 SQUARE TUBE. GIRT LENGTHS FOR 12, 20, 24, AND 30 WIDE BUILDINGS: ON 12 WIDE BUILDINGS GIRTS ARE 67 3/4 LONG ON 20 WIDE BUILDINGS GIRTS ARE 56 3/4 LONG ON 24
QUALITY GARDEN SHEDS, WORKSHOPS & PLAYHOUSES HANDMADE IN WORCESTERSHIRE
 QUALITY GARDEN SHEDS, WORKSHOPS & PLAYHOUSES HANDMADE IN WORCESTERSHIRE Important points to note: All buildings are fully guaranteed to be free from defects and faulty installation for a period of 12 months.
Ulltraclad Aluminium Cladding. Contents. 1.0 General Information Design Information Installation Information 7. 4.
 Ulltraclad Aluminium Cladding Contents 1.0 General Information 2 2.0 Design Information 4 3.0 Installation Information 7 4.0 Maintenance 10 5.0 Health & Safety 10 1 1.0 General Information 1.1 Introduction
15mm Solid European Droploc Oak Fitting Guide & Warranty Information
 15mm Solid European Droploc Oak & Warranty Information Introduction Congratulations on your purchase of your brand new Timba Floor 15mm European Solid Oak Flooring. Prior to installation please examine
ROOF FRAMING INFORMATION BATTEN INSTALLATION CORONA SHAKE INSTALLATION ACCESSORY INSTALLATION ESTIMATING DATA GENERAL INFORMATION
 ROOF FRAMING INFORMATION BATTEN INSTALLATION CORONA SHAKE INSTALLATION ACCESSORY INSTALLATION ESTIMATING DATA GENERAL INFORMATION ROOF FRAMING INFORMATION It is the responsibility or roofers, building
BIKE STORE ASSEMBLY INSTRUCTIONS
 BIKE STORE ASSEMBLY INSTRUCTIONS AI-BST-28/02/11 Thank you and congratulations on the purchase of your Shire garden building. We believe that this product will give you many years of excellent service.
External cladding technical instructions
 External cladding technical instructions Contents External cladding technical instructions... 1 General... 2 Vertical cladding... 3 Horizontal cladding... 5 Lower end of the cladding and the plinth...
With Illustrations, Drawings & Step By Step Details. Click Here To Download 12,000 Shed Plans. 1 P a g e Download 12,000 More Shed Plans
 With Illustrations, Drawings & Step By Step Details Click Here To Download 12,000 Shed Plans 1 P a g e Download 12,000 More Shed Plans Table of Contents OVERVIEW... 3 MATERIALS & CUTTING LISTS... 4 DRAWINGS,
Instructions to Build Decking
 DIY Decking Kit - Just Add Timber Instructions to Build Decking with the KDK1E DIY Decking Kit Visit www.simplybuildit.co.uk for ideas, building plans and much more. before you get started... Buying Your
Instruction pack. 2960x4340
 R11 Instruction pack 28/09/2011 2960x4340 Supplied in 2 packs 28mm log CHECK ALL PARTS BEFORE ASSEMBLY OR EMPLOYING TRADESPEOPLE Building: Leygrove Building Size: 2960x4340 Date: 25-May-11 LOG 28mm MM
LVL8 H1.2 GENERAL FRAMING. Eco Friendly Revolutionary H1.2 Treatment Azotek by Zelam
 LVL8 H1.2 GENERAL FRAMING Eco Friendly Revolutionary H1.2 Treatment Azotek by Zelam NPIL/MARCH2015 Introduction to NelsonPine LVL8 H1.2 NelsonPine LVL is an engineered wood composite made from rotary peeled
Sheds Tanalised Tool Tidys & Kennels. Summerhouses. Playhouses. Quality Timber Products
 Sheds Tanalised Tool Tidys & Kennels Summerhouses Playhouses Welcome Shaws for Sheds was set up in the year 2000 and is a family run business. We pride ourselves on quality and care on every product made
Wallgard 1,3 product
 INSTALLATION INSTRUCTIONS Wallgard 1,3 product October 2015 GENERAL Application can be done to smooth, dry, clean, sound walls of concrete, plaster, hardboard, plywood and fibreboard. Board material must
TORLYS LEATHER PLANK INSTALLATION INSTRUCTIONS
 ENGLISH INSTRUCTIONS TORLYS LEATHER PLANK INSTALLATION INSTRUCTIONS Dear Customer, You have chosen a high quality TORLYS Leather floor, well suited for all residential application except bathrooms and
8 x 10 Timber-frame Garden Shed
 8 x 10 Timber-frame Garden Shed Includes: Step-By-Step Instructions, Complete Details & Materials Lists Timber-framing is a traditional building method that uses a simple framework of heavy timber posts
HERITAGE LAMINATED ASPHALT SHINGLES Frederick, MD
 Application Instructions for FORMERLY 30 THESE ARE THE MANUFACTURER S APPLICATION INSTRUCTIONS FOR THE ROOFING CONDITIONS DESCRIBED. TAMKO BUILDING PRODUCTS, INC. ASSUMES NO RESPONSIBILITY FOR LEAKS OR
6x6 Maximizer Storage Shed Assembly Manual Version #9 Feb 26th, 2015
 6x6 Maximizer Storage Shed Assembly Manual Version #9 Feb 26th, 2015 Thank you for purchasing a 6x6 Maximizer Storage Shed. Please take the time to identify all the parts prior to assembly. Please Note-
8x12 SpaceMaker Garden Shed Assembly Manual
 8x12 SpaceMaker Garden Shed Assembly Manual Version #6 Revised June / 2007 Thank you for purchasing a 8x12 SpaceMaker Garden Shed. Please take the time to identify all the parts prior to assembly. Safety
Egger Roofing Board Fast, Easy, Safe: With this board you can reach the top.
 Egger Roofing Board Fast, Easy, Safe: With this board you can reach the top. 1 2 Content Content 1 2 Roof Sheathing 4 Importance 4 EGGER Roofing Board 5 Benefits 5 Principles of the EGGER Roofing Board
Installation Instructions Sauna 9/2 with partition. W x D: 3760 x 3256 cm * 45 mm. Verif ication number
 Installation Instructions Sauna 9/2 with partition W x D: 3760 x 3256 cm * 45 mm Verif ication number 1 Contents General recommendations and important information 3 Information about wood used for constructing
N/A. General Instructions. For Assistance Please Contact Customer Care on Overlap Cladding. Solid Sheet Roof.
 General Instructions Please retain product lael and instructions for future reference N/A Overlap Cladding Shiplap Cladding Fixed Windows Opening Windows No Windows Solid Sheet Floor T&G Floor Solid Sheet
Best Barns. 10' x 12' the Cypress R. Assembly Book. revised September 29, 2016
 Best Barns Assembly Book revised September 29, 2016 the Cypress R 10' x 12' Manufactured by Reynolds Building Systems, Inc. 205 Arlington Drive - Greenville, PA 16125 This manual is copyrighted. Under
N/A. General Instructions. For Assistance Please Contact Customer Care on Overlap Cladding. Solid Sheet Roof.
 General Instructions Please retain product lael and instructions for future reference N/A Overlap Cladding Shiplap Cladding Fixed Windows Opening Windows No Windows Solid Sheet Floor T&G Floor Solid Sheet
Turada Hardwood Shingles and Shakes Installation instructions
 1. General 1.1 Maximum Exposure: Maximum exposure for wood shingles and shakes shall comply with Table 1 herein, unless specifically specified in the roof assemblies Product Approval. 1.2 Solid and Spaced
SANERI 3 º. Self-adhesive SBS-elastomer bitumen cap sheet
 SANERI 3 º Self-adhesive SBS-elastomer bitumen cap sheet 0809 www.katepal.fi 06 EN 13707 Producer: KATEPAL OY P. O. Box 33 FI-37501 LEMPÄÄLÄ FINLAND Tel. +358 (0)3 375 9111 Fax +358 (0)3 375 0974 E-mail:
Hip & Ridge Shingles Installation Instructions
 Hip & Ridge Shingles Installation Instructions WWW.MALARKEYROOFING.COM Directions for Applying Malarkey Hip & Ridge Shingles MALARKEY HIP AND RIDGE SHINGLE SPECIFICATIONS Malarkey Roofing Products manufacture
Best Barns. 10' x 16' the Elm R. Assembly Book. revised September 29, 2016
 Best Barns Assembly Book revised September 29, 2016 the Elm R 10' x 16' Manufactured by Reynolds Building Systems, Inc. 205 Arlington Drive - Greenville, PA 16125 This manual is copyrighted. Under the
DIRECTIONS FOR APPLICATION
 Instructions 1 General NOTICE: THESE SHINGLES MUST BE APPLIED TO CONFORM WITH ALL APPLICABLE BUILDING CODES. THESE DIRECTIONS REPRESENT COMMON AND ACCEPTED ROOFING PRACTICES. DEVIATIONS FROM THESE DIRECTIONS
8x4 SpaceSaver Garden Shed Assembly Manual
 8x4 SpaceSaver Garden Shed Assembly Manual Revision #8 July 5, 2010 Thank you for purchasing an 8x4 SpaceSaver Garden Shed. Please take the time to identify all the parts prior to assembly. Safety Points
SIDING INSTALLATION GUIDE
 READ THIS ENTIRE GUIDE CAREFULLY BEFORE INSTALLING NOBELIA SIDING. This installation guide applies to all NOBELIA siding profiles, including SPF tongue-and-groove and exposed nail siding. IMPORTANT: FAILURE
BBA BRITISH BOARD OF AGREMENT CERTIFICATE NO. 87 / 1823 / C
 Fixing Guide BBA BRITISH BOARD OF AGREMENT CERTIFICATE NO. 87 / 1823 / C Onduline Fixing Guide Introduction Onduline is the world s largest manufacturer of bituminous corrugated sheets. Onduline roofing
Best Barns. the Cypress R 10' x 16' Assembly Book. revised February 19, 2016
 Best Barns Assembly Book revised February 19, 2016 the Cypress R 10' x 16' Manufactured by Reynolds Building Systems, Inc. 205 Arlington Drive Greenville, PA 16125 724-646-3775 This manual is copyrighted.
eco-shake INSTALLATION INSTRUCTION
 1 eco-shake INSTALLATION INSTRUCTION NOTE: Shuffling the eco-shakes during installation may be necessary to obtain a uniform color throughout the roof. Due to the natural wood content in the ecoshakes,
FITTING INSTRUCTIONS FOR OFD SOLID OAK FLOORING
 FITTING INSTRUCTIONS FOR OFD SOLID OAK FLOORING SECTION 1 Installers Responsibility Pre-Installation SECTION 2 Glue Down (Solid & Engineered Flooring) SECTION 3 Secret Nailing (Solid & Engineered Flooring)
Assembly Guide - Alpine log cabin
 Assembly Guide - Alpine log cabin Please read your Instructions thoroughly and please retain for future reference Build within 1 month of receiving product Georgian Covers Full Boarded doors, Modern and
HOW TO Fix Onduline Corrugated Bitumen Sheets
 HOW TO Fix Onduline Corrugated Bitumen Sheets BBA BRITISH BOARD OF AGREMENT CERTIFICATE NO. 87 / 1823 W ROOFING PLAN IT Roofing components: Ridge Roof decking Apex Verge Barge board Purlins / battens Rafters
SG-30 A P P L I C A T I O N I N S T R U C T I O N S. Directions For Application
 1 2 3 General Instructions NOTICE: THESE SHINGLES MUST BE APPLIED TO CONFORM WITH ALL APPLICABLE BUILDING CODES. THESE DIRECTIONS REPRESENT COMMON AND ACCEPTED ROOFING PRACTICES. DEVIATIONS FROM THESE
Best Barns USA Assembly Book
 Best Barns USA Assembly Book Revised August 17, 2017 the Roanoke 16'x32' Building w/ full loft Manufactured by Reynolds Building Systems, Inc 205 Arlington Drive Greenville, PA 16125 This manual is copyrighted
Best Barns. 10' x 12' the Elm R. Assembly Book. revised September 29, 2016
 Best Barns Assembly Book revised September 29, 2016 the Elm R 10' x 12' Manufactured by Reynolds Building Systems, Inc. 205 Arlington Drive - Greenville, PA 16125 This manual is copyrighted. Under the
Assembly of Corner Arbour
 BUILT AROUND OUR REPUTATION PLEASE NOTE Wood is a natural product and is therefore prone to changes in appearance, including some warping, movement and splitting, particularly during unusual climatic conditions
HERITAGE LAMINATED ASPHALT SHINGLES Tuscaloosa, AL
 Application Instructions for THESE ARE THE APPLICATION INSTRUCTIONS FOR THE ROOFING CONDITIONS DESCRIBED. TAMKO BUILDING PRODUCTS, INC. SHALL NOT BE RESPONSIBLE FOR LEAKS OR OTHER ROOFING PROBLEMS RESULTING
DIRECTIONS FOR APPLICATION
 Instructions 1 General NOTICE: THESE SHINGLES MUST BE APPLIED TO CONFORM WITH ALL APPLICABLE BUILDING CODES. THESE DIRECTIONS REPRESENT COMMON AND ACCEPTED ROOFING PRACTICES. DEVIATIONS FROM THESE DIRECTIONS
Install your floor between 18 and 30 C.
 GOLDEN RULES 8-0 C Install your floor between 8 and 0 C. Quick-Step Livyn must be acclimatized in the room of installation between 8-0 C for a period of at least 8 hours before installation. This floor
6X3 Patio Garden Shed Assembly Manual
 Thank you for purchasing a 6x3 Patio Garden Shed. Please take the time to identify all the parts prior to assembly. Revision #4 July 6th, 2016 6X3 Patio Garden Shed Assembly Manual Please use Safety Eyewear
Laminate goes Wall. Installation documentation for wall panelling with gekko-system and Extravagant from CLASSEN.
 Laminate goes Wall The new panelling system for walls and ceilings from CLASSEN. Installation documentation for wall panelling with gekko-system and Extravagant from CLASSEN. Important information: Installing
video 10 YEAR GUARANTEE Durable and lightweight Guaranteed waterproof for 10 years Economical and easy to fix AVAILABLE IN A RANGE OF COLOURS
 INSTALLATION GUIDE AVAILABLE IN A RANGE OF COLOURS 10 YEAR GUARANTEE Durable and lightweight Guaranteed waterproof for 10 years Economical and easy to fix view installation video Roofing Shingles Ideal
The luxurious, rich look of genuine
 The luxurious, rich look of genuine Western Red Cedar www.thecedarshed.co.nz Introducing The Ultimate In Luxurious Storage... Known as the ultimate Timber storage building, The Cedar Shed has been manufactured
PREMIUM LAMINATED ASPHALT SHINGLES Frederick, MD
 Application Instructions for FORMERLY 50 THESE ARE THE MANUFACTURER S APPLICATION INSTRUCTIONS FOR THE ROOFING CONDITIONS DESCRIBED. TAMKO BUILDING PRODUCTS, INC. ASSUMES NO RESPONSIBILITY FOR LEAKS OR
Lillevilla mm x 4450 mm. Veranda depth 2000 mm Wall thickness 45 mm. Ground plan and foundation plan
 Lillevilla 65 4450 mm x 4450 mm Veranda depth 2000 mm Wall thickness 45 mm The photo is illustrative. Ground plan and foundation plan 4450 Placing the foundation beams 7 + 7 pcs. 1 2 3 4 5 6 7 2000 appr.
DIRECTIONS FOR APPLICATION
 Instructions 1 General NOTICE: THESE SHINGLES MUST BE APPLIED TO CONFORM WITH ALL APPLICABLE BUILDING CODES. THESE DIRECTIONS REPRESENT COMMON AND ACCEPTED ROOFING PRACTICES. DEVIATIONS FROM THESE DIRECTIONS