2 INTRODUCTION. In The Box
|
|
|
- Douglas Richardson
- 5 years ago
- Views:
Transcription

1 A 2698 DAB+/FM RDS Tuner Instruction Manual
2 CONTENTS Introduction and Features...1 Safety Instructions Remote Control Front Panel...6 Rear Panel and Antenna...7 Operations Troubleshooting Specifications and Warranty INTRODUCTION Congratulations on purchasing this tuner. It has been designed following an extensive research and development program that has culminated in what we regard as an exceptional hi-fi product. We trust that this system will give you hours of listening pleasure, and provide years of unparalleled performance. Please do not operate this product at high volume levels immediately after switching on. FEATURES DAB+ Digital Tuner / decoder FM Radio Tuner Station Presets (10 for DAB+, 10 for FM) Remote Control with Mute button DLS and RDS enabled Autoscan tuning feature for both DAB+ and FM (Seek) Jog wheel for tuning and volume control In The Box Tuner with power cord Remote Control with battery Instruction Manual 300Ω FM Antenna cable RCA audio cable 1.5m IMPORTANT: In this manual, wherever 'DAB' is found, it should be taken to refer to the internationally recognized DAB+ radio transmission standard protocol, which is an upgrade of the original DAB standard. DAB+ is the broadcasting technology being implemented in all of Australia's largest cities. The earliest standard transmission protocol designated for DAB is not broadcast in Australia.
3 SAFETY INSTRUCTIONS CAUTION: To reduce the risk of electric shock, do not remove cover. NO USER-SERVICEABLE PARTS INSIDE, REFER ANY SERVICING TO QUALIFIED SERVICE PERSONNEL. IMPORTANT SAFETY INSTRUCTIONS Read and keep these instructions available for future reference. For indoor use only. The unit must only be connected to a suitable mains power supply using the mains power lead provided. Protect the mains power cable from being damaged. To reduce the risk of fire or electrical shock, do not expose this unit to rain or the spillage of water or liquids of any kind. Do not place objects containing liquids on or near the apparatus. Unplug the unit from the wall socket during lightning storms and when it is not going to be used for a long period of time. Take care that foreign objects do not enter into the enclosure through any openings. If this should happen, refer to qualified service personnel before attempting to use. Ensure adequate ventilation - do not cover this unit with curtains, cloth mats etc. Do not install near any heat source, such as radiators, or other equipment that produces heat. Do not drop the unit. Clean the apparatus using a dry cloth to remove dust. The lightning flash symbol with the arrowhead within an equilateral triangle is intended to alert the user to the presence of non-insulated 'dangerous voltage' within the product's enclosure that may be sufficient to constitute a risk of electric shock to persons. The exclamation point within an equilateral triangle is intended to alert the user to important operating and maintenance instructions in the service literature relevant to this 3 appliance. A symbol for class II (double insulation) Information for the consumer Disposal of your old product Your product is designed and manufactured with high quality components, which can be recycled and reused. When this crossed out wheely bin symbol is attached to a product it means the product is covered by the European directive 2002/96/EC. Please make yourself aware of the local collection system for electrical and electronic products. Please act according to your local rules and do not dispose of your old products with your normal household waste. The correct disposal of your old product will help prevent potential negative consequences for the environment and human health. This product complies with European low voltage (73/23/EEC) and electromagnetic compatibility (89/336/EEC) directives.
4 Notes On Use Avoid high temperatures. Allow for sufficient heat dissipation when installed on a rack. Handle the power cord carefully. Hold the plug when unplugging the cord. Keep the set free from moisture, water and dust. Unplug the power cord when not using the set for long periods of time. *(For sets with ventilation holes) Do not obstruct the ventilation holes. 4 Do not let foreign objects in the set. Do not let insecticides, benzene or thinner come in contact with the set. Never disassemble or modify the set in any way.

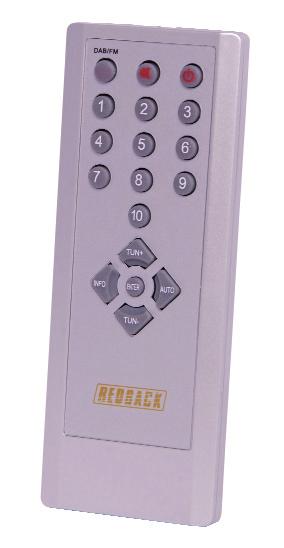
5 REMOTE CONTROL BATTERY INSTALLATION 1. Remove the battery compartment cover. 2. Insert 1 "CR2025" lithium battery. Make sure that the battery is inserted with the positive "+" and negative "-" poles positioned correctly. 3. Close the cover until it clicks. Note: If the distance required between the remote control unit and main unit decreases, the battery is exhausted. In this case, replace the battery Figure 1: Under side of remote control show battery compartment Precautions concerning batteries Be sure to insert the batteries with correct positive + and negative - polarities. When the remote control unit is not to be used for a long time (more than a month), remove the batteries from the remote control unit to prevent them from leaking. If a leak occurs, wipe away the liquid inside the battery compartment and replace the batteries with new ones. Do not heat or disassemble batteries and never dispose of old batteries by throwing them in a fire. REMOTE CONTROL - OPERATION By using the provided remote control unit, the system can be controlled from your listening position. To use the remote control unit, point it at the remote sensor window at the front of the receiver. Use the remote control unit within a range of about seven metres and an angle of up to 30 degrees aiming at the remote sensor. 5 Notes: Even if the remote control unit is operated within the effective range, remote control operation may be impossible if there are obstacles between the unit and the remote control. If the remote control unit is operated near other appliances which generate infrared rays, or if other remote control devices using infrared rays are used near the unit, it may operate incorrectly Functions 1. DAB/FM SELECTOR button: Press this to switch between DAB digital radio and FM analogue radio. Figure 2: Remote Control 2. MUTE button: Press once to activate MUTE function. Press again to cancel MUTE function. 3. STANDBY button: The Standby button turns the unit on or to standby mode. When the unit is in standby mode the LCD backlight is off and the power LED is red. 4. PRESET CHANNEL buttons: Press once to select preset station from 1 to 10, for both DAB+ and FM stations (10 presets for each band). Press and hold the numeric button to save a station frequency to that preset number. 5/7.TUN+/TUN- buttons: In DAB Mode: Press TUN+ or TUN- to scroll through the station list i.e. the names of the stations. In FM Mode: Press TUN+ or TUN- to scroll through the frequencies (in steps of 0.05MHz).
6 6. INFO button: This changes what information is displayed on line two of the LCD display in both DAB+ and FM modes. See section on LCD Display Information on page 8 for more details. Furthermore, by holding this button on the remote control for a few seconds while in DAB+ mode, the device will activate Manual Tuning for DAB+ stations (See Start Operations on page 8). 8. AUTO TUNE button: In DAB mode: Press once for quick scan mode. Hold for longer than two seconds to activate a full search across entire band(s). In FM mode: Press once to activate a 'seek' up through FM frequencies to find the next available station. Press and hold to activate a 'seek' down through FM frequencies to find the next available station. 9. ENTER button: In DAB mode: Confirm to select the station after scrolling through the station list. Press and hold for two seconds to switch 'AUTO ENTER' on/off. (Default is off). A message will appear on the screen to indicate the status of the AUTO ENTER function. [Bullets for text below] AUTO ENTER ON: No need to press ENTER button or rotary CONTROL knob on front panel to confirm the station selected after scrolling. AUTO ENTER OFF: Must press the ENTER button or the rotary CONTROL knob on front panel to confirm the station selected after scrolling. In FM mode: Press once to change audio mode. AUTO mode will automatically detect between stereo and mono broadcasts. Press again to activate mono mode, which will play all broadcasts in mono only. 6
7 FRONT PANEL CONTROL P1 P2 P3 P4 DAB/FM AUTO INFO Press to select DISPLAY: Indicates the tuning band (DAB+ / FM) and station name (or sometimes frequency for FM) on first line, and displays dynamic text (RDS or DLS) below on second line, which also displays other menu features Preset memory: numbered P1/P2/P3/P4. Press a button once to select a preset station already stored in a memory. Press and hold a button to save the tuned station's frequency to that preset number. 6. DAB/FM: Press this to switch between DAB+ radio and FM radio bands. 7. AUTO: In DAB mode: Press once for quick scan mode - secondary DAB+ stations ignored. Press and hold for longer than two seconds for full scan mode - all DAB+ station captured and stored. Takes approximately one minute In FM mode: Press once to activate a 'seek' up through FM frequencies to find the next available station. Press and hold for longer than two seconds to activate a 'seek' down through FM frequencies to find the previous available station. 8. INFO button: This changes what information is displayed on line two of the LCD display. See LCD Display Information section on page 8 for a full summary CONTROL: In DAB mode: Turn the rotary CONTROL knob clockwise to scroll up through station list. Turn the knob anticlockwise to scroll down through station list. Press once to select a required station. Press the knob and hold for two seconds to switch 'AUTO ENTER' on/off. AUTO ENTER on: no need to press rotary CONTROL knob on front panel to confirm the station selected after scrolling. AUTO ENTER off: must press rotary CONTROL knob on front panel to confirm the station selected after scrolling through the list of station names or frequencies (FM mode). Pressing the knob performs the same function as pressing ENTER button on the remote control. In FM mode: Turn knob clock wise to scroll up through frequencies, turn anticlockwise to scroll down through frequencies. Stop on a frequency that has a strong signal and commence listening. Press knob once to change the audio mode: AUTO: this will automatically detect between stereo and mono broadcasts Press again to activate mono mode- this will play all broadcasts in mono only. 10. POWER BUTTON: Switches the mains power on or off to internal components. 11. LED indicator: Glows blue when switched on, and red when in standby mode. Press STANDBY button on remote control to switch on again.

8 CAUTION RISK OF ELECTRIC SHOCK DO NOT OPEN L R AC240V Signal Output REAR PANEL 1. MAINS CABLE CONNECTION: Please ensure that the input cable strain relief bush is intact and has not been damaged. 2. WARNING ICONS: Please be aware that this unit contains high voltages, and should not be opened. See Safety Instructions at the beginning of this manual. 3. OPTICAL OUTPUT: SPDIF Digital audio output for connection to optical input on amplifiers. 4. ANALOGUE AUDIO OUTPUTS: For connection to line input RCA sockets on amplifiers Ω ANTENNA F-type socket: Pigtail antenna cable 300Ω with F-type connector provided for Band-III radio reception. R A 2698 Digital (DAB+) FM Tuner Power Rating: AC 240V 50Hz Max Power Consumption: 12W Distributed by Altronic Distributors www. altronics. com. au 5378 OPTICAL OUTPUT Antenna Antenna L Signal Output 8 Fixing the antenna The reception quality will be directly determined by the strength of the input signal. Although the location of the tuner in relation to the transmitter is the main factor, the positioning of the antenna and the length of wire or cable also play an important role. Below is the instruction for fixing the antenna. Adhesive tape Pigtail antenna provided for Band III 1. In either DAB+ or FM mode, press INFO button on remote until antenna icon and signal strength bar meter appears on the screen. 2. Move the antenna until you get the strongest possible signal. Antenna signal strength icon Note: Keep the antenna wire away from computers, televisions, telephones other cables and cords. In Australia the wire antenna is best placed vertically out of the back of the unit, preferably near (or even through) a window that faces in the direction of the station transmitters. To ensure the best possible signal reception, it is recommended to connect this antenna output to an external roof-top TV antenna, most or which are also suited for FM reception (cables and connectors not supplied). A good DAB+ reception will ensure a good FM radio signal reception, for both audio and RDS / DLS data.
9 OPERATIONS Start Operation: 1. Press the standby button on the remote control to turn on the unit. 2. Select either DAB+ or FM by pressing the DAB/FM button. 3. In DAB mode you need to perform a full scan before you can begin listening to any stations. Press and hold the AUTO button. (When the A2698 is first turned on after connecting the power and the antenna cable, the unit will normally do a full scan for DAB+ stations as soon as the unit is switched on.) This scan will take about a minute to complete. 4. To change the station, press the TUN+ or TUN- button on the remote control. 5. Manual tuning for DAB+ - Press and hold the INFO key on the remote control (pressing and holding the INFO button on the front panel will initiate a system reset - see next section) until 'Manual Tune' appears on line two of the display. Then press ENTER key and use TUN+ or TUN- key to select DAB stations by frequency and channel (5A to 13F).When a channel is highlighted, it will state the ensemble name (i.e. transmitter location). Press enter and the stations operating on that channel will be stored. Repeat for as many channels as are operating in your area. Some channels may not have any stations operating. System Reset: If you are having trouble with your unit or you have moved to another city or you wish to delete the station presets, perform a station reset using the following method: 1. Press and hold the INFO button on the front panel for two seconds. 2. Press the INFO button again. 'System Reset' will be displayed on the screen. 3. Press the ENTER button on the remote control or press the rotary CONTROL knob. 4. You will now have to rescan. In most cases the rescanning will commence automatically after reset. If not, press and hold AUTO button. 9 LCD Display Information: The LCD display has three areas of information decoded from digital data that is broadcast by most stations. Dynamic Label Segment (DLS) is the name of the encoded text data system for DAB+, while Radio Data System (RDS) is the name of the system used with analogue FM radio. Both systems are described below. Top Line centre shows the chosen preset memory number (eg. P04 for memory #4) Top left corner of LCD continually shows the name of the station now playing for both DAB+ and FM, and when tuning manually displays the FM frequency which scrolls up or down. Top right corner continually shows the mode - DAB+ or FM. The bottom line shows user selectable information. Press the INFO button to toggle between: DAB+ DLS Information: 1. Ensemble name: This tells you from which transmitter the signal comes. 2. Time and Date. 3. DLS - Dynamic Label Segment is information which may be transmitted by the station including: song title and artist, program information, news, sport and weather information, contact details (web, phone etc.). 4. Signal Strength - this is useful when trying to determine the best position for the unit and its antenna. This can also be available through FM RDS. 5. Program Type - describes the primary format or genre of a station i.e. Jazz, Rock, Talk, Classical etc. 6. Transfer rate displayed on screen as a number measuring kb/s e.g. 64 kb/s 7. Channel frequency displayed as a specific frequency in MHz. It may also show the word ʻStereoʼ
10 Commonly used FM RDS information codes: 1. PTY - Program Type (i.e. Station format or music genre); 2. PS - Program Service = Station ID or frequency; 3. CT - Clock Time and often date as well. 4. RT - Radio Text = Song title, Artist, Slogan, (scrolling) etc. 5. PI - Program Identity = either station call sign or frequency. Note: If the radio station in question has not activated and/or is not broadcasting DLS or RDS data, then the LCD will show nothing, no scrolling text etc. or it may just show the frequency or an error 'N/A' (Not Available) message. 10 Presets: The unit has 10 preset memories which can store 10 DAB+ and 10 FM stations of your choice with one-button recall operation. Please note that if you decide to store a secondary level DAB+ station, there is a possibility that this station will only be broadcast periodically. This means that when you recall the designated preset at some time in the future, either using the number pad on the remote control or the buttons on the front panel, it may no longer have any program or music content. It will then be necessary to retune to an alternative station and save it to that memory Station P04 DAB Station name Preset 4 Saved Preset 1 Saved To store a preset: 1. Tune the unit to the station required using either the remote control or the rotary control knob on the front panel. 2. Decide which preset you want to store this station on (for memories numbered five to 10, you must use the remote control number pad) 3. Hold down this preset for a period of a few seconds. 4. LCD display will read 'Preset X Saved', where 'X' is the number you pressed on remote control or front panel (for presets 1 to 4 only). When the preset saved message disappears, the preset memory number will remain displayed on the top line of the LCD e.g. ʻP04ʼ is displayed for a station present to memory 4. (See screen example above) If a preset does not have a station allocated to it, the LCD will read 'Preset X Free' if this button is pressed.
11 TROUBLE SHOOTING: Problem Possible Solution A. No sound output from the unit. 1. Ensure that connection leads to the amplifier are correct. 2. Check that the speakers are connected to the amplifier. 3. See that the power of the unit or connected amplifier is turned on. 4. Ensure that the unit has been able to locate the DAB+ stations. B. Display has gone blank or says 'Signal N/A' or 'Service N/A'. 1. Check that antenna is connected. 2. Ensure that DAB+ coverage exists in your area. 3. This may occur if a broadcaster changes the label of a service or removes a label whilst you are listening to it. The unit will try to retune to this station, or alternatively follow the procedure for auto tune. Note: DAB+ is available or soon to be available in Australia's largest cities. C. Cannot access secondary services. At the time of publishing this manual, not many secondary services are available, but this will increase as more DAB+ stations start broadcasting. If a secondary service station is available, the secondary indicator will be displayed next to the station name. 11 Problem Possible Solution D. Remote control does not work. 1. Check that the battery is inserted correctly. 2. Replace the remote control battery if it is old and degraded in responsiveness. 3. Turn the unit off then back on at the power point. E. DAB+ reception is poor. Cannot find any stations. 1. In a country that uses DAB+, make sure you first perform a full scan, not quick scan. 2. Make sure there is coverage in your area. F. Burbling sound on some stations. DAB+ like other digital media is good at producing quality audio from a low level signal, however if this signal level is too low a burbling sound can sometimes be heard. To reduce this effect, try repositioning your antenna to gain maximum signal strength. Or connect the unit to an external TV antenna. Think of the burbling sound with DAB+ as being similar to the audible hiss or static heard when an analogue FM signal is weak and unclear. G. A station or service can not be received when a preset button is pressed. 1. The station or service has not been preset. 2. Another station or service is preset. Preset the station or service again.
12 SPECIFICATIONS Digital (DAB+) and FM Tuner Frequency range:...dab+ BAND III: MHz (Ch 5A to 13F) Quick Scan range: mhz (Ch 7A to 13B) FM: MHz Audio output level:...800mv (RMS) Power supply:...ac 240V 50Hz Max power consumption:...12w Signal to noise ration:...>80db Frequency response:...20hz - 20kHz Channel separation:...>70db RF Sensitivity:...-97dBm Output:...RCA jacks at line level Antenna:...F-type connector 50Ω suiting 300Ω wire (supplied) or 75Ω coaxial cable for TV antenna (recommended for ideal reception) LCD:...Two lines, 16 characters each line, blue backlight Internal LCD contrast adjustment (Technicians only) NOTE: Specifications and design features are subject to modification without notice 12 Altronic Distributors warrants this product for one year from the date of purchase from Altronics or its resellers to the consumer. If this item is part of an installation, please contact the installer or supplier for your warranty. During the warranty period, we undertake to repair or replace your product at no charge if found to be defective due to a manufacturing fault. The warranty excludes damage by misuse or incorrect installation (i.e. failure to install and operate device according to specifications in the supplied instruction manual), neglect, shipping accident, or no fault found, nor by use in a way or manner not intended by the supplier. For repair or service please contact your PLACE OF PURCHASE. If this item was purchased directly from Altronics please make a warranty claim by: 1. FOR MAIL ORDER CUSTOMERS (includes school and trade orders), a) Ringing us on and quoting your tax invoice number. b) Upon contacting Altronics, we will issue an R.A. (Return Authorisation). As Altronics have a number of service agents throughout Australia, a copy of the R.A. will be ed, faxed or mailed to you with full instructions of how and where to send the goods. The freight for shipping goods back to Altronics for all repairs is at the customers expense. c) A copy of the R.A. form, (or at the very minimum, the R.A. number) must accompany the goods to effect the repair. d) Altronics will pay the return freight to the customer where the warranty claim has been accepted. e) Please quote the R.A. number in any correspondence to us. 2. FOR OVER THE COUNTER PURCHASES; to make a warranty claim, please return the goods to us in any of our stores, with a copy of your proof of purchase (tax invoice). a) Upon leaving the goods at one of our stores, an R.A. number will be issued to you. b) Once repaired, you will be contacted, advising that the goods are ready to be collected from the store. It is at Altronics discretion as to whether the goods will be repaired or replaced (whilst under warranty); and as to whether identical goods will be used to replace the item due to changes of models / products. Note: Under no circumstances should you attempt to repair the device yourself or via a non-authorised Altronics service centre, as this will invalidate the warranty! Our goods come with guarantees that cannot be excluded under the Australian Consumer Law. You are entitled to a replacement or refund for a major failure and for compensation for any other reasonably foreseeable loss or damage. You are also entitled to have the goods repaired or replaced if the goods fail to be of acceptable quality and the failure does not amount to a major failure. NOT FIELD SERVICEABLE. Distributed by Altronic Distributors Pty. Ltd. Perth. Western Australia. Phone: Fax: Internet:
Always there to help you. Register your product and get support at OR7200. Question? Contact Philips.
 Always there to help you Register your product and get support at www.philips.com/welcome Question? Contact Philips OR7200 User manual Contents 1 Safety 2 2 What's in the box 3 3 Connect power 4 4 Turn
AD U DAB/FM Tuner. Item ref: UK User Manual
 AD-100 1U DAB/FM Tuner Item ref: 952.979UK User Manual Caution: Please read this manual carefully before operating Damage caused by misuse is not covered by the warranty Introduction Thank you for choosing
DAB Clock Radio. Instruction Manual LCRDAB10
 DAB Clock Radio Instruction Manual LCRDAB10 LCRDAB10_IB_final111001_Zell.indd 1 LCRDAB10_IB_final111001_Zell.indd 2 Contents Unpacking... 5 Product Overview... 6 Front View... 6 Rear View... 6 Top View...
Always there to help you. Register your product and get support at AJB4300. Question? Contact Philips.
 Always there to help you Register your product and get support at www.philips.com/support Question? Contact Philips AJB4300 User manual Contents 1 Important 2 Safety 2 2 Your FM/DAB+ clock radio 3 Introduction
Register your product and get support at AE5430. EN User manual
 Register your product and get support at www.philips.com/welcome AE5430 User manual Concents 1 Important 4 Hearing Safety 4 English 2 Your FM/DAB+ radio 5 Introduction 5 What s in the box 5 Overview of
Stereo DAB+/FM Radio
 Stereo DAB+/FM Radio Contents Where to put your radio............................... 3 Setting up............................................ 3 Your Stereo DAB+ / FM radio.......................... 5 Using
DMP40. User Manual.
 DMP40 User Manual www.audac.eu ADDITIONAL INFORMATION This manual is put together with much care, and is as complete as could be on the publication date. However, updates on the specifications, functionality
TMP40. User Manual.
 TMP40 User Manual www.audac.eu ADDITIONAL INFORMATION This manual is put together with much care, and is as complete as could be on the publication date. However, updates on the specifications, functionality
A WORLD OF LISTENING WARNING: TO PREVENT FIRE OR ELECTRIC SHOCK HAZARD, DO NOT EXPOSE THIS PRODUCT TO RAIN OR MOISTURE.
 DDR-3 FM RDS/DAB digital radio A WORLD OF LISTENING THE LIGHTNING FLASH AND ARROW- HEAD WITHIN THE TRIANGLE IS A WARNING SIGN ALERTING YOU OF DANGEROUS VOLTAGE INSIDE THE RADIO. WARNING: TO PREVENT FIRE
Instruction Manual CDAB4312R
 Instruction Manual CDAB4312R Table of contents Accessories included...3 Overview of controls...3 Charging the CDAB4312R before use... 3 Charging the CDAB4312R before use (cont)... 4 Getting started...
PR200DAB DAB+/AM/FM RADIO USER MANUAL IMPORTANT! WARRANTY INFORMATION INSIDE. PLEASE READ. Trademark of TEAC Corporation JAPAN
 PR200DAB DAB+/AM/FM RADIO USER MANUAL IMPORTANT! WARRANTY INFORMATION INSIDE. PLEASE READ Trademark of TEAC Corporation JAPAN www.teac.com.au WARRANTY PROCEDURE v1.7b: July 2016 for 12M Replacement Please
Always there to help you. Register your product and get support at AE5220. Question? Contact Philips.
 Always there to help you Register your product and get support at www.philips.com/welcome Question? Contact Philips User manual AE5220 Contents 1 Important 2 Safety 2 Notice 2 English 2 Your FM/DAB radio
Always there to help you. Register your product and get support at AJB4700. Question? Contact Philips.
 Always there to help you Register your product and get support at www.philips.com/welcome Question? Contact Philips AJB4700 User Manual Contents 1 Important 3 2 Your FM/DAB+ clock radio 3 Introduction
CDAB-1 DAB/FM TUNER. PAGE No. CONTENTS GLOSSARY
 CDAB-1 DAB/FM TUNER CONTENTS Introduction What is DAB Safety Instructions Front Panel Controls Rear Panel Connections Remote Control Functions Installation and Position Fixing the Antenna Using the DAB
Model Number: GSDAB3004
 DAB/FM Digital Radio & Alarm Clock Model Number: GSDAB3004 Please read these instructions carefully and keep for future reference For Customer Services & Spare Parts please call 0845 209 7461 Opening times:
CAUTION : TO PREVENT ELECTRIC SHOCK, MATCH WIDE BLADE OF PLUG TO WIDE SLOT, FULLY INSERT.
 BSR-1 The Lightning flash with arrowhead symbol, with an equilateral triangle is intended to alert the user of the presence of uninsulated dangerous voltage within the product s enclosure that may be of
DAB-50. Operation Manual. DAB/FM Tuner
 DAB-50 Operation Manual DAB/FM Tuner POWER DAB-50 DAB/FM-TUNER CONTROL/TUNING PRESS TO SELECT ACCESSORIES Accessories x DAB-50 x Remote control x Batteries (Optional) x DAB/FM Antenna (Optional) x Operation
GMR1887DAB DAB Digital and FM Radio User Guide. IMPORTANT: Please read all instructions carefully before use and keep for future reference.
 GMR1887DAB DAB Digital and FM Radio User Guide IMPORTANT: Please read all instructions carefully before use and keep for future reference. Introduction Thank you for buying the GOODMANS DAB Digital and
Always there to help you. Register your product and get support at AE2430. User manual
 Always there to help you Register your product and get support at www.philips.com/support AE2430 User manual Contents 1 Important 2 Safety 2 Notice 3 2 Your Portable Radio 5 Introduction 5 What s in the
User manual. Register your product and get support at Clock Radio Radio-réveil AJB3000
 Clock Radio Radio-réveil User manual AJB3000 Register your product and get support at www.philips.com/support Contents 1 Important 1 Safety 1 Risk of swallowing batteries! 1 Notice 1 2 Your FM/DAB radio
AutoDAB Connect In-Car DAB Adapter User Guide
 AutoDAB Connect In-Car DAB Adapter User Guide www.autodab.com Table of Content INTRODUCTION... 1 CONTENTS OF PACKAGE... 2 INSTALLATION... 3 OPERATION CONTROLS... 8 STARTING UP THE SYSTEM... 11 USING REMOTE
ENGLISH PORTUGUÊS NEDERLANDS DAB200
 DEUTSCH ENGLISH FRANÇAIS NEDERLANDS ESPAÑOL PORTUGUÊS NORSK DAB200 Contents Introduction..... 2 What is DAB + Digital Radio?.... 2 Setting up..... 3 Backlit display.... 4 Using headphones...... 4 Your
You ll soon be enjoying your new DAB/FM Digital Radio.
 NE-3313 You ll soon be enjoying your new DAB/FM Digital Radio. It all begins here, with your instructions. Don t worry, there s nothing too technical coming up. Just simple, step-by-step guidance to get
Introduction and Contents
 1 Introduction and Contents Thank you for buying this Bush product, which is designed to give you many years of trouble-free service. You may already be familiar with using a similar unit, but please take
PREMIUMAUDIOVIDEOLIGHTINGANDPOWERPRODUCTS
 FACTOR ELECTRONICS PREMIUMAUDIOVIDEOLIGHTINGANDPOWERPRODUCTS VT-1 / VT-4 Professional Tuners With RBDS Owners Manual Owners Manual IMPORTANT NOTE: THIS OWNER'S MANUAL IS PROVIDED AS AN INSTALLATION AND
Notes on environmental protection:
 Notes on environmental protection: At the end of its useful life, this product must not be disposed off with regular household waste, but must be returned to a collection point for a recycling of electric
GDR750DAB GDR730DABSOL
 The DAB+ RECHARGEABLE & SOLAR DIGITAL RADIO GDR750DAB GDR730DABSOL The Gold Technical Support Line: 1902 215 259 Personal Product Support (Charges will apply at $2.95 per minute) 1 Introduction Thank you
700 Channel UHF Band True Diversity Wireless Microphone System. Operating Instructions
 Altronic Distributors warrants this product for 12 months from date of purchase from Altronics or its resellers to the consumer. If this item is part of an installation or another product, please contact
Portable Digital & FM Radio
 SHELFORD II Portable Digital & FM Radio SEL-DAB-CRM-2 UK Instructions Guide Contents Controls And Functions... 1 What s In he Box?...3 Support... 4 Instructions Guide...5 Basic Operation... 5 DAB/DAB+
Lanen True Diversity UHF Systems For electric and bass guitars: GB21 For Series 21 mics: UHF21. User Manual GB21 receiver/uhf21 transmitter
 Lanen True Diversity UHF Systems For electric and bass guitars: GB21 For Series 21 mics: UHF21 User Manual GB21 receiver/uhf21 transmitter Safety Information Thank you for purchasing this digital appliance.
Always there to help you. Register your product and get support at OR2200. Question? Contact Philips.
 Always there to help you Register your product and get support at www.philips.com/welcome Question? Contact Philips OR2200 User manual Contents 1 Safety 2 2 Your clock radio 3 Introduction 3 What's in
DIGITAL RADIO INCLUDING FM, DAB AND DAB+
 DIGITAL RADIO INCLUDING FM, DAB AND DAB+ INSTRUCTION MANUAL Safety Precautions To achieve the utmost in enjoyment and performance, and in order to become familiar with its features, please read this manual
Wireless Outdoor/Indoor Rechargeable Speaker System. User's Manual
 Wireless Outdoor/Indoor Rechargeable Speaker System User's Manual Contents 2 Specifications 3 Product Features 4 Introduction 5 Setting up Setting Up the Transmitter Locating the Transmitter Charging
Contents ... What is DAB + Digital Radio?... 2 Setting up... 3 Backlit display... 4 Using headphones... 4 Your radio Switch off...
 Contents Introduction... 2 What is DAB + Digital Radio?........... 2 Setting up........... 3 Backlit display.............. 4 Using headphones........... 4 Your radio... 5 Switch on........... 6 Telescopic
Always there to help you. Register your product and get support at AJ5305D_12. Question? Contact Philips.
 Always there to help you Register your product and get support at www.philips.com/welcome Question? Contact Philips AJ5305D_12 User manual Contents 1 Important 3 Safety 3 2 Your Docking Entertainment System
TU 970 OWNER S MANUAL
 TU 970 OWNER S MANUAL Power for the Digital Revolution Table of Contents 3 Introduction 4 Front Panel Controls 5 Rear Panel Connections 6 Remote Control Functions 7 Installation and Connections 8 Operation
DSP40. User Manual.
 DSP40 User Manual www.audac.eu ADDITIONAL INFORMATION This manual is put together with much care, and is as complete as could be on the publication date. However, updates on the specifications, functionality
CR31. Companion. Instruction Manual
 CR31 Companion Instruction Manual 910-244700-001 IMPORTANT SAFETY INSTRUCTION PLEASE READ CAREFULLY ALL THE FOLLOWING IMPORTANT SAFEGUARDS THAT ARE APPLICABLE TO YOUR EQUIPMENT 1. Read Instructions - All
User Guide. CR1101W DAB/FM Clock radio
 User Guide CR1101W DAB/FM Clock radio IMPORTANT SAFETY INFORMATION CAUTION! RISK OF ELECTRIC SHOCK DO NOT OPEN TO REDUCE THE RISK OF ELECTRIC SHOCK DO NOT REMOVE COVER (OR BACK) This symbol indicates that
ENVIRONMENTAL PROTECTION
 ENVIRONMENTAL PROTECTION Do not dispose of this product with the normal household waste at the end of its life cycle. Return it to a collection point for the recycling of electrical and electronic devices.
Always there to help you. Register your product and get support at AJ5305D/05. Question? Contact Philips.
 Always there to help you Register your product and get support at www.philips.com/welcome Question? Contact Philips AJ5305D/05 User manual Content 1 Important 2 Safety 2 2 Your Docking Entertainment System
Always there to help you. Register your product and get support at AE5220. Question? Contact Philips.
 Always there to help you Register your product and get support at www.philips.com/support Question? Contact Philips AE5220 User manual Contents 1 Important 2 Safety 2 Notice 2 2 Your FM/DAB radio 4 Introduction
plifier D-501 otion Am Tactile M
 Tactile Motion Amplifier D-501 IMPORTANT SAFETY INSTRUCTIONS WARNING: 1. Read and keep these instructions for future reference. 2. Do not use this apparatus near water. 3. Clean only with a dry cloth.
USER MANUAL KADABXXTBLA
 USER MANUAL KADABXXTBLA Instruction Manual KADABXXTBLA DAB+ and FM Radio Safety Precautions To achieve the utmost in enjoyment and performance, and in order to become familiar with its features, please
Important safety instructions
 MMR-88 Version 1 Important safety instructions 1. 2. 3. 4. 5. 6. 7. 8. 9. Please read these instructions carefully. Please keep these instructions for future reference. Heed all warnings Follow all instructions
AZATOM SONANCE T1 Digital Radio. DAB+/DAB/FM Radio Alarm Clock. User Manual. This manual is available to download online at
 AZATOM SONANCE T1 Digital Radio DAB+/DAB/FM Radio Alarm Clock User Manual This manual is available to download online at www.azatom.com Thank you for shopping with AZATOM Please read this manual carefully
Digital DAB and FM Radio
 CHESERON Digital DAB and FM Radio CB4-DAB-BLK Instructions Guide Contents Controls And Functions... 1 What s In he Box?... 4 Support...5 Instructions Guide... 6 Basic Operation... 6 DAB/DAB+ Radio... 7
Always there to help you. Register your product and get support at AJ3232. Question? Contact Philips.
 Always there to help you Register your product and get support at www.philips.com/support Question? Contact Philips AJ3232 User manual Contents 1 Important 2 Safety 2 2 Your clock radio 3 Introduction
IMPORTANT SAFETY INSTRUCTIONS
 WR-2 GB Version 1 IMPORTANT SAFETY INSTRUCTIONS 1. 2. 3. 4. 5. 6. 7. 8. 9. Read these instructions. Keep these instructions. Heed all warnings. Follow all instructions. Do not use this apparatus near water.
ENGLISH User s Guide. Safety & Regulatory Information
 ENGLISH User s Guide Creative SoundWorks 500DAB Information in this document is subject to change without notice and does not represent a commitment on the part of Creative Technology Ltd. No part of this
AM/FM SYNTHESIZER TUNER DT-920. TOA Corporation OPERATING INSTRUCTIONS
 OPERATING INSTRUCTIONS AM/FM SYNTHESIZER TUNER DT-920 Please follow the instructions in this manual to obtain the optimum results from this unit. We also recommend that you keep this manual handy for future
Always there to help you. Register your product and get support at AJ3400/79. Question? Contact Philips.
 Always there to help you Register your product and get support at www.philips.com/support Question? Contact Philips AJ3400/79 User manual Contents 1 Important 3 2 Your clock radio 4 What's in the box 4
User Manual. AZATOM Blackfriars DAB Speaker. This manual is available to download online at
 AZATOM Blackfriars DAB Speaker DAB+ / Calender / Clock / Alarm Clock / FM Radio / AUX-In User Manual This manual is available to download online at www.azatom.com Thank you for shopping with AZATOM Please
 Register your product and get support at www.philips.com/welcome AJH5100 EN User manual Contents 1 Important 3 Safety 3 2 Your clock radio 4 Introduction 4 What's in the box 4 Overview of the main unit
OXFORD MODEL: OXFORD OXFORD DAB+ FM RADIO USER MANUAL
 OXFORD MODEL: OXFORD USER MANUAL 1 2 3 Welcome Your Oxford DAB+ FM Radio 2.1 In The Box 2.2 Top View 2.3 Side View 2.4 Rear View Quick Setup 3.1 Power On and Autoscan 3.2 Changing DAB Stations 3.3 Scanning
General Safety Instructions
 General Safety Instructions Read this manual thoroughly before fist use and keep it in a safe place for future reference, along with the warranty card, purchase receipt and carton. The safety precautions
Your DAB+ Radios. Contents
 Your DAB+ Radios Contents Contents... 2 Introduction... 2 Safety Instructions... 3 Your DAB+... 4 What Is DAB+... 5 Getting Started... 6-7 Operating Instructions... 8-11 Warning /Troubleshooting/Specifications...
PR-D9CL. GB Version 1
 PR-D9CL GB Version 1 Table of contents Important safety instructions... 2-3 Controls... 4-6 Operating your radio Search tuning AM / FM... 8 Manual tuning AM / FM / Setting up the tuning step increment...
Always there to help you. Register your product and get support at ORD7300. Question? Contact Philips.
 Always there to help you Register your product and get support at www.philips.com/welcome Question? Contact Philips ORD7300 User manual Contents 1 Safety 2 2 Your docking system 4 Introduction 4 What's
DEUTSCH NORSK ENGLISH SVENSKA FRANÇAIS DANSK NEDERLANDS ČEŠTINA ITALANIO Hersteller UR190
 DEUTSCH ENGLISH FRANÇAIS NEDERLANDS ITALANIO NORSK SVENSKA DANSK ČEŠTINA Hersteller Wörlein GmbH Tel.: +49 9103/71670 Gewerbestrasse 12 Fax.: +49 9103/716712 D 90556 Cadolzburg Email. info@woerlein.com
Pair of PMR446 Two-Way Personal Radios Model: TP391
 Pair of PMR446 Two-Way Personal Radios Model: TP391 USER MANUAL MANUALE D USO MANUEL DE L UTILISATEUR BEDIENUNGSANLEITUNG MANUAL DE USUARIO MANUAL DO USUÁRIO HANDLEIDING BRUKSANVISNING P/N:086L004722-016
RCR-24 中文 GB. Version 1
 RCR-24 中文 GB Version 1 GB Please note not all AC adapters are alike. The AC adapter that is included with this radio is designed to be used exclusively with this device. Do not use an AC adapter that differs
PR-D5 中文 GB. Version 1
 PR-D5 中文 GB Version 1 1. 2. 3. Important safety instructions Read and understand all safety and operating instructions before the radio is operated. Retain instruction: The safety and operating instructions
Always there to help you. Register your product and get support at AJ3200. Question? Contact Philips.
 Always there to help you Register your product and get support at www.philips.com/support Question? Contact Philips AJ3200 User manual Contents 1 Important 2 Safety 2 2 Your clock radio 3 Introduction
Dual Alarm Clock Radio with Digital Tuning NRC-174. Instruction Manual Please read carefully before use and keep for future reference.
 Dual Alarm Clock Radio with Digital Tuning NRC-174 Instruction Manual Please read carefully before use and keep for future reference. Important Safety Information CAUTION RISK OF ELECTRIC SHOCK DO NOT
NS-HDTUNE HD Radio Tuner
 NS-HDTUNE HD Radio Tuner HD Radio Tuner Contents Insignia NS-HDTUNE HD Radio Tuner Introduction.................................... 3 Safety information.............................. 4 Features........................................
Always there to help you. Register your product and get support at AJ4300. Question? Contact Philips.
 Always there to help you Register your product and get support at www.philips.com/support Question? Contact Philips AJ4300 User manual Contents 1 Important 2 Safety 2 2 Your clock radio 3 Introduction
RU210. Dual Multi-UHF Wireless System. Item ref: UK, UK User Manual. Version 1.0
 RU210 Dual Multi-UHF Wireless System Item ref: 171.970UK, 171.971UK User Manual Version 1.0 Caution: Please read this manual carefully before operating Damage caused by misuse is not covered by the warranty
Always there to help you. Register your product and get support at AJ7045D. Question? Contact Philips.
 Always there to help you Register your product and get support at www.philips.com/welcome Question? Contact Philips AJ7045D User Manual Contents 1 Important 3 Risk of swallowing batteries 3 2 Your clock
EPA152/252/502. User Manual.
 EPA152/252/502 User Manual www.audac.eu ADDITIONAL INFORMATION This manual is put together with much care, and is as complete as could be on the publication date. However, updates on the specifications,
Always there to help you. Register your product and get support at AJ3400. Question? Contact Philips.
 Always there to help you Register your product and get support at www.philips.com/support Question? Contact Philips AJ3400 User manual Contents 1 Important 3 2 Your clock radio 4 What's in the box 4 3
DAB+ / FM Retro Radio
 INSTRUCTION MANUAL DAB+ / FM Retro Radio Model Number: ARDR-1116 ii Welcome Congratulations on choosing to buy a BAUHN product. All products brought to you by BAUHN are manufactured to the highest standards
Always there to help you. Register your product and get support at AJ3200. Question? Contact Philips.
 Always there to help you Register your product and get support at www.philips.com/support Question? Contact Philips AJ3200 User manual Contents 1 Important 2 2 Your clock radio 2 Introduction 2 What's
DT-800 中文 GB. Version 1
 DT-800 中文 GB Version 1 1. 2. 3. 4. 5. 6. 7. 8. 9. Important safety instructions Read and understand all safety and operating instructions before the radio is operated. Retain instructions: The safety and
Black Oak / Light Oak / Cherrywood Wireless Panel Speaker
 4015115/4015116/4015117 Black Oak / Light Oak / Cherrywood Wireless Panel Speaker With Infrared Remote Control USER GUIDE For use with: Introduction These 900 MHz stereo wireless speaker system uses the
User Manual. Internet Radio Adaptor with DAB and Bluetooth DBA-03R. (Additional powered speaker / active speaker is required to use this product)
") User Manual Internet Radio Adaptor with DAB and Bluetooth DBA-03R (Additional powered speaker / active speaker is required to use this product) Please read this user manual carefully before using receiver
User Manual Internet Radio Adaptor with DAB and Bluetooth DBA-03R (Additional powered speaker / active speaker is required to use this product) Please read this user manual carefully before using receiver
DEUTSCH ITALANIO ENGLISH NORSK FRANÇAIS DANSK NEDERLANDS Hersteller UR8200
 DEUTSCH ENGLISH FRANÇAIS NEDERLANDS ITALANIO NORSK DANSK Hersteller Wörlein GmbH Tel.: +49 9103/71670 Gewerbestrasse 12 Fax.: +49 9103/716712 D 90556 Cadolzburg Email. info@woerlein.com GERMANY Web: www.woerlein.com
Professional Power Amplifier HORIZON SERIES USER MANUAL. Content
 Professional Power Amplifier HORIZON SERIES USER MANUAL Thank you for buying this W Audio product. To take full advantage of this product, please keep this manual and read the operating instructions carefully.
Always there to help you. Register your product and get support at AJ3400/37. Question? Contact Philips.
 Always there to help you Register your product and get support at www.philips.com/support Question? Contact Philips AJ3400/37 User manual Contents 1 Important 3 Safety 3 2 Your clock radio 4 What's in
Register your product and get support at AJ7010. User manual
 Register your product and get support at AJ7010 EN User manual A o a b n m c d e f l k j i h g B a b c g f e d C D E F EN 1 Important Read these instructions. Heed all warnings. Follow all instructions.
Classic Series Public Address Amplifiers C10 & C20 Models
 Classic Series Public Address Amplifiers C10 & C20 Models Installation and Use Manual 2009 Bogen Communications, Inc. All rights reserved. Specifications subject to change without notice. 54-5978-01B 0901
A Channel Amplifier
 Installation Manual A2150 2 Channel Amplifier Table of Contents Installation Requirements and Recommendations 1 What s included 1 Speaker Wire Recommendations 1 Setup 2 Rack Mounting 2 Individually Protected
THANK YOU! Crush Micro PiX. Thank you for choosing Orange. You are now a member of the Legendary British Guitar Amplifier owners club!
 THANK YOU! Thank you for choosing Orange. You are now a member of the Legendary British Guitar Amplifier owners club! Since 1968 when the company was founded, Orange has been a pioneering force in the
EPA104/254. User Manual.
 EPA104/254 User Manual www.audac.eu ADDITIONAL INFORMATION This manual is put together with much care, and is as complete as could be on the publication date. However, updates on the specifications, functionality
RD-21 ROBERTS. FM RDS/DAB digital radio. Sound for Generations. Please read this manual before use
 ROBERTS Sound for Generations RD- FM RDS/DAB digital radio Please read this manual before use Contents Controls... Battery operation...3 Mains operation...3 Operating your radio - DAB...4 Selecting a station
Always there to help you. Register your product and get support at AJ2000. Question? Contact Philips.
 Always there to help you Register your product and get support at www.philips.com/support Question? Contact Philips AJ2000 User manual Contents 1 Important 2 Safety 2 2 Your clock radio 3 Introduction
PLA-240. Small Room Loop Amplifier System. USER Manual MAN 211A
 PLA-240 Small Room Loop Amplifier System USER Manual MAN 211A Overview Thank you for purchasing the PLA 240 Small Room Loop Amplifier System. The PLA 240 Loop System provides a practical solution for hearing
M-300 Mono power amplifier User s guide
 M-300 Mono power amplifier User s guide M-300 Mono power amplifier User s guide Specifications: Contents: Power output: 8Ω: 290W, 0.01% THD SPECIFICATIONS Page 2 Input impedance: Gain: 4Ω: 580W, 0.01%
ECA COMMERCIAL AMPLIFIER OWNER S MANUAL ECA-70MIXAMP V / 70V / 4Ω Amplifier ECA-70MIXAMP-1-60 OUTPUT LEVEL POWER MASTER MIC 1
 OWNER S MANUAL ECA COMMERCIAL AMPLIFIER ECA-MIXAMP--6 V / V / Ω Amplifier TEMP PROT OUTPUT LEVEL ECA-MIXAMP--6 6 POWER MIC MIC MIC MIC AUX AUX BASS TREBLE 5 5 5 5 5 6 6 6 6 6 MASTER 5 6 ON OFF + - + -
Handheld DAB+ Radio Operation Guide
 Important safety instructions These warnings have been provided in the interest of safety. You MUST read them carefully before using the radio: * This radio is not intended for use by persons (including
USER MANUAL. Model No.: DB-230
 USER MANUAL Model No.: DB-230 1 Location of controls 1. UP Press the button to select the different DAB station under DAB mode or press and hold to quick scan the FM station in upward frequency under FM
SAFETY INFORMATION 1 IMPORTANT SAFETY INSTRUCTIONS. 2 REMOTE CONTROLLER. 3 LOUDSPEAKER POSITIONING. 6 REAR PANEL INFORMATION. 8 - AUDIO CONNECTIONS
 CONTENTS SAFETY INFORMATION 1 IMPORTANT SAFETY INSTRUCTIONS. 2 REMOTE CONTROLLER.. 3 LOUDSPEAKER POSITIONING.. 4 FRONT PANEL INFORMATION 5 REMOTE CONTROL INFORMATION. 6 REAR PANEL INFORMATION.. 7 CONNECTIONS
ROBERTS RD-25. Sound for Generations. MW/FM RDS/DAB Digital Portable Radio. Please read this manual before use
 ROBERTS Sound for Generations RD-5 MW/FM RDS/DAB Digital Portable Radio Please read this manual before use Contents Controls... -4 Battery operation...5 Mains operation...5 Operating your radio - DAB...6
Register your product and get support at AJ3570. User manual
 Register your product and get support at AJ3570 EN User manual A n m l k j a i h g f e b c d B C D E a b SET TIME MIN +/- HR +/- HR c d MIN CLOCK F a b SET AL 1 SET AL 2 MIN +/- HR +/- HR c d MIN CLOCK
Register your product and get support at AE2430. User manual
 Register your product and get support at AE2430 EN User manual English 1 Important Safety Important Safety Instructions a b c d e f g h i j k Read these instructions. Keep these instructions. Heed all
User guide. DR1704 DAB Radio
 User guide DR1704 DAB Radio IMPORTANT SAFETY INFORMATION CAUTION! RISK OF ELECTRIC SHOCK DO NOT OPEN TO REDUCE THE RISK OF ELECTRIC SHOCK DO NOT REMOVE COVER (OR BACK) This symbol indicates that there
TX-5505 AM/FM STEREO TUNER
 5505(G) cover_cover.qxp 2010-07-20 오전 11:23 페이지 1 OPERATING INSTRUCTIONS TX-5505 AM/FM STEREO TUNER TX-5505(G)_ENG_100819_TX-5505(G)_ENG 2010-08-19 오후 5:31 페이지 2 Introduction READ THIS BEFORE OPERATING
Weather Alert Clock Radio with Flashing Beacon. Owner s manual
 Weather Alert Clock Radio with Flashing Beacon Owner s manual NEED HELP? CONTACT US. Etón Corporation, 1015 Corporation Way, Palo Alto, CA 94303, USA. 1-800-872-2228 (U.S.); 1-800-637-1648 (Canada); 650-903-3866
INSTRUCTION MANUAL LCS TX
 INSTRUCTION MANUAL LCS TX 4 Channel Transmitter LCS1 Single Channel Transmitter Cardio Theater Inc Service 1-800-776-6695 Sales 1-800-CARDIO-1 1 Introduction CONGRATULATIONS on your choice of this product
a u d i o p h i l e d i g i t a l - t o - a n a l o g u e c o n v e r t e r user guide
 DAC30 a u d i o p h i l e d i g i t a l - t o - a n a l o g u e c o n v e r t e r user guide Welcome! Welcome to the Primare DAC30! Your DAC30 is a fully balanced audiophile digitalto-analogue converter,