You ll soon be enjoying your new DAB/FM Digital Radio.
|
|
|
- Trevor Hines
- 6 years ago
- Views:
Transcription

1 NE-3313
2 You ll soon be enjoying your new DAB/FM Digital Radio. It all begins here, with your instructions. Don t worry, there s nothing too technical coming up. Just simple, step-by-step guidance to get you up and running quickly. Sound good? Then let s get started. Help and Guidance We re here to help you get the most from your DAB/FM Digital Radio. Should you require any guidance, a simple solution can often be found online at: If you still require further assistance, call one of our experts on If you require any technical guidance or find that your product is not operating as intended, a simple solution can often be found in the Troubleshooting
3 Contents Safety information Safety information 6 Getting to know your DAB/FM Digital Radio Ready? Let s begin 10 Product Overview 10 Connecting to the Mains Supply 11 SETTING THE CLOCK 13 Using your DAB/FM Digital Radio BASIC OPERATION - GETTING STARTED 16 USING THE RADIO - DAB MODE 17 USING THE RADIO - FM MODE 22 USING THE RADIO - PROGRAMMED STATION FUNCTION 25 SETTING AND USING THE ALARM 26 SETTING AND USING THE SLEEP FUNCTION 29 USING HEADPHONES (not included) 30 SETING THE DISPLAY ACKLIGHT LEVEL 31 CARE AND MAINTENANCE 31 Other information Specifications 34 Product support Troubleshooting 37 Help and assistance 38 Disposal 40 Guarantee 41 section of these instructions, or online at If you still require further assistance, call one of our experts on
4
5 Safety information 1
6 SAFETY Safety information Important - Please read these instructions fully before installing or operating FOR HOUSEHOLD AND INDOOR USE ONLY PLACE THE APPLIANCE ON A FLAT, STABLE SURFACE WITH ADEQUATE VENTILATION AND AWAY FROM OTHER SOURCES OF HEAT. MINIMUM DISTANCES AROUND THE APPLIANCE FOR ADEQUATE VENTILATION IS 10CM. DO NOT COVER OR RESTRICT VENTILATION OPENINGS. CHILDREN SHOULD BE SUPERVISED TO ENSURE THEY DO NOT PLAY WITH THE APPLIANCE, AND THE APPLIANCE AND CABLE SHOULD BE KEPT COMPLETELY OUT OF REACH OF YOUNG CHILDREN. THIS APPLIANCE IS NOT DESIGNED FOR USE BY CHILDREN, OR PERSONS WITH REDUCED PHYSICAL, SENSORY OR MENTAL CAPABILITIES, AND SHOULD NOT BE USED BY SUCH PERSONS UNLESS THEY CAN DO SO SAFELY. WHERE NECESSARY, SUCH PERSONS (OR ANYONE WITH LACK OF EXPERIENCE OR KNOWLEDGE) SHOULD FIRST BE GIVEN SUPERVISION OR INSTRUCTION CONCERNING USE OF THE APPLIANCE BY A PERSON RESPONSIBLE FOR THEIR SAFETY. FULLY UNWIND THE CABLE BEFORE PLUGGING IN AND ENSURE THE CABLE IS POSITIONED AWAY FROM AREAS WHERE IT IS LIKELY TO GET DAMAGED OR CAUSE A TRIP HAZARD. THE OUTPUT CORD OF THIS MAINS ADAPTOR CANNOT BE REPLACED. IN THE EVENT OF DAMAGE TO THE CABLE, JACK PLUG OR ADAPTOR, THE ENTIRE ADAPTOR UNIT SHOULD BE REPLACED. CONNECTIONS MUST ONLY BE MADE VIA THE MAINS ADAPTOR SUPPLIED, NEVER CONNECT THE APPLIANCE DIRECTLY TO THE 240V MAINS SUPPLY. NEVER USE THE ADAPTOR SUPPLIED WITH ANY OTHER APPLIANCE. THE MAINS ADAPTOR WILL BECOME WARM IN USE; DO NOT COVER OR PLACE ON OR NEAR SURFACES THAT COULD BE AFFECTED BY HEAT SUCH AS TABLE TOPS AND CARPETS. REMOVE MAINS ADAPTOR FROM SUPPLY IF APPLIANCE IS UNUSED 6 Safety information
7 Safety information Important - Please read these instructions fully before installing or operating FOR A LONG PERIOD OF TIME, AND DURING THUNDERSTORMS. DO NOT PULL ON THE CABLE TO DISCONNECT FROM MAINS SUPPLY. KEEP APPLIANCE, CABLE, MAINS ADAPTOR PLUG DRY AND AWAY FROM AREAS WHERE IT IS LIKELY TO GET SPLASHED. AVOIDUSING IN HOT, HUMID ENVIRONMENTS. DO NOT PLACE ITEMS WITH NAKED FLAMES OR CONTAINERS WITH LIQUIDS ON THIS APPLIANCE. SWITCH OFF AND UNPLUG WHEN NOT IN USE AND BEFORE CLEANING OR SERVICING THE APPLIANCE. SERVICING OF THIS APPLIANCE MUST ONLY BE CARRIED OUT BY A QUALIFIED ELECTRICIAN. ALWAYS ENSURE THE MAINS ADAPTOR PLUG IS READILY UNPLUGGABLE DO NOT USE WITH LOCKABLE SOCKETS OR PERMANENTLY WIRE TO MAINS. To prevent possible hearing damage. do not listen at high volume levels for long periods. Fully understand user manual before use. Ensure your player at low volume levels or power off before you leaving. The lightning flash with arrow-head symbol, within an equilateral triangle, is intended to alert the user to the presence of un-insulated "dangerous voltage" within the product's enclosure that may be of sufficient magnitude to constitute a risk of electric shoc The exclamation point within an equilateral triangle is intended to alert the user to presence of important operating and maintenance (servicing) instructions in the literature accompanying the appliance. CAUTION RISK OF ELECTRIC SHOCK DO NOT OPEN WARNING: TO REDUCE THE RISK OF ELECTRIC SHOCK, DO NOT REMOVE COVER (OR BACK). NO USER SERVICEABLE PARTS INSIDE, REFER SERVICING TO QUALIFIED SERVICE PERSONNEL. Safety information 7
8
9 Getting to know your DAB/FM Digital Radio 2
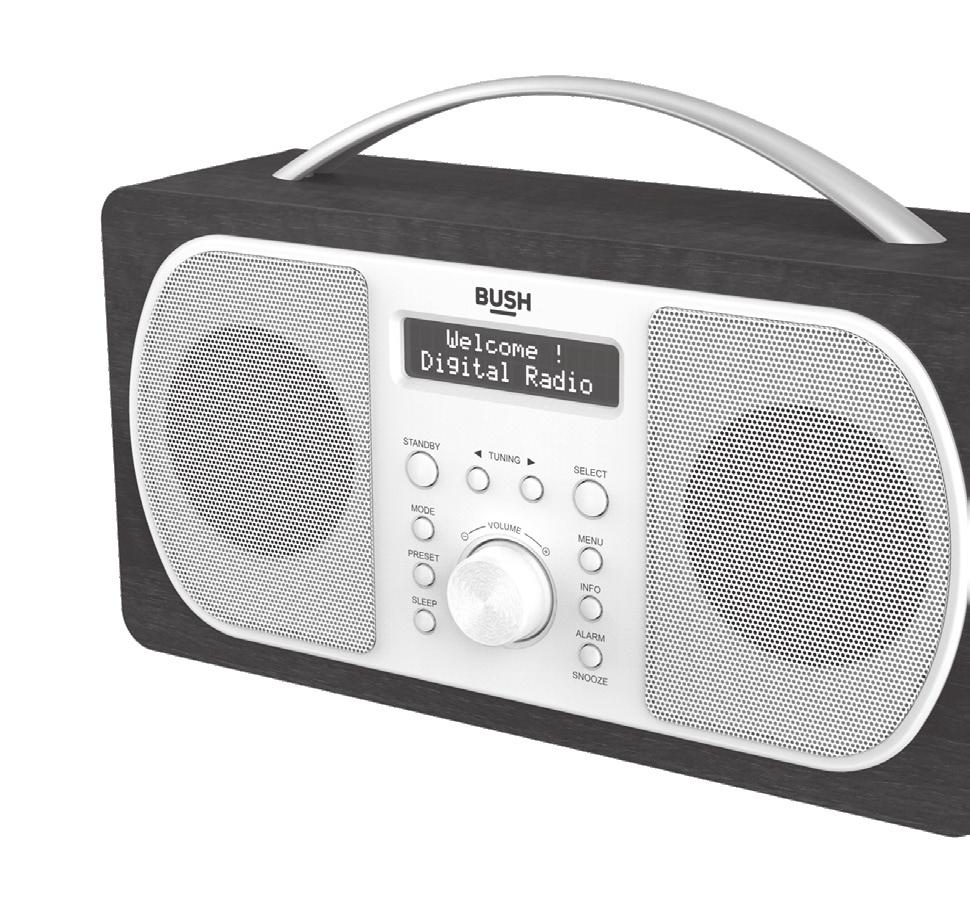
10 Getting to know your DAB/FM Digital Radio You ll be up and running in no time Ready? Let s begin... Please read these instructions carefully. They contain important information which will help you get the best from your product and ensure safe and correct installation and operation. If you require any further assistance, our technical experts are happy to help. For full details, refer to the product support section at the end of these instructions. Product Overview Front view 1. Speaker 2. Handle 3. Standby () button 4. Display 5. TUNNING button 6. TUNNING button 7. Select button 8. Mode button 9. Sleep button 10. Preset button 11. Volume knob 12. Info button 13. Alarm/Snooze button 14. Menu button 10 Getting to know your DAB/FM Digital Radio
11 Getting to know your DAB/FM Digital Radio You ll be up and running in no time Rear view 15. Telescopic antenna 16. Battery compartment 17. Headphone ( ) jack 18. DC in jack 19. Adaptor (not shown) Connecting to the Mains Supply AC Operation Before using, connect the supplied power cable to the mains cable socket at the rear of the unit and to the mains socket. Remarks: If the AC Adaptor voltage is over than 6V, it will possible make the main unit damage. Getting to know your DAB/FM Digital Radio 11
12 Getting to know your DAB/FM Digital Radio You ll be up and running in no time DC (battery) Operation To use the appliance with batteries ensure that the power cord is NOT connected to the mains and install the batteries into the battery compartment. 1. Slide off the battery compartment cover from the reverse of the radio. 2. Insert 4 x AA 1.5V alkaline batteries (not included) in accordance with the diagram in the battery compartment. Take care to observe the correct polarity (+/ -). 3. Refit the battery compartment cover. 4. Do not expose the batteries or the installed batteries to excessive heat (e.g. fire, sunshine or position close to radiators etc.). Notes: All DAB radio s use more power during use than traditional radios and so will run batteries down within a few hours. Therefore use of mains power (or rechargeable batteries) is recommended for extended listening. BATTERY SAFETY AND DISPOSAL CAUTION Danger of explosion if batteries are incorrectly fitted / replaced. Only use AA 1.5V batteries in this appliance. Be sure to insert batteries correctly taking care to observe the correct polarity (+ and -). Use only batteries of the same or equivalent type as recommended. Batteries should be replaced by an adult. Do not recharge non-rechargeable batteries. Remove rechargeable batteries from appliance before recharging. 12 Getting to know your DAB/FM Digital Radio
13 Getting to know your DAB/FM Digital Radio You ll be up and running in no time Never mix old and new batteries (replace all batteries at the same time). Never try to dismantle batteries. Do not short-circuit the supply terminals. Always remove exhausted or dead batteries from the product. Remove batteries from the product before extended storage. Dispose of batteries responsibly at local authority household waste recycling facility. DO NOT dispose of batteries in a fire as the batteries may explode. SETTING THE CLOCK The clock in this radio is equipped to receive a DAB and FM radio frequency time signal. 1. Place the appliance on a flat and stable surface. 2. Connect the mains lead into the socket at the rear of the radio, plug in and switch on at the mains. The display backlight will illuminate for a few seconds, a welcome message (fig.1) will appear in the display briefly and the clock (00:00:00) will flash in the display and a message time is not set will appear underneath. 3. If a DAB signal can be received in the area of operation after a short time the clock will automatically synchronise to the local time and then the unit will enter standby mode. Getting to know your DAB/FM Digital Radio 13
14
15 Using your 3 DAB/FM Digital Radio
16 Using your DAB/FM Digital Radio Let s get started BASIC OPERATION - GETTING STARTED 1. Place the appliance on a flat and stable surface. 2. Connect the mains lead into the socket at the rear of the radio, plug in and switch on at the mains. The display backlight will illuminate for a few seconds, a welcome message (fig.1) will appear in the display briefly and the clock (00:00:00) will flash in the display and a message time is not set will appear underneath. 3. Fully extend the telescopic antenna. 4. Press the STANDBY / ON ( ) button to turn the unit on, the DAB mode will automatically be selected and the radio will perform a full autoscan. The display will show Scanning, together with a slide bar (fig.2) that indicates the progress of the scan and the number of stations found so far. 5. Once the scan has finished, the radio will select the first alphanumerically found station. 6. Adjust the volume to the desired level by turning the VOLUME knob. Turn anticlockwise to reduce the volume and clockwise to increase the volume. 7. Press the TUNNING ( ) or ( ) buttons to scroll through the located stations. Once the station of choice is located, press the SELECT button to select the station. 8. Move the antenna or radio until the best reception is received. 9. To switch to FM radio, press the DAB/FM button. Press the button again to return to DAB. 10. To switch the radio into standby mode, press the STANDBY ( ) button. The radio will silence, the display will dim but the clock will still be displayed. 16 Using your DAB/FM Digital Radio
17 Using your DAB/FM Digital Radio Let s get started 11. To turn off the radio, unplug from the mains supply. USING THE RADIO - DAB MODE DAB differs from analogue radio; the separate signals from a number of stations are grouped together and transmitted as a single frequency. These groups are referred to as multiplexes and ensembles. Each time a group has been found the name of the group will be shown on the lower half of the display. DAB MODE - AUTO TUNE This function allows the radio to search automatically for DAB Band III channels. Press the MENU button to enter the tuning menu. 1. In DAB mode, press the MENU button until Full scan (fig.3) is displayed and press the SELECT button accept. The radio will start to scan, the display will show Scanning, together with a slide bar (fig.2) that indicates the progress of the scan and the number of stations found so far. 2. When the scan is finished the radio will return to the station played before the scan was initiated but any new stations found will have been added. DAB MODE MANUAL TUNE This function allows a specific or new ensemble to be manually added to the stations already available on the radio. Press the MENU button once to enter the tuning menu. 1. In DAB mode, press the MENU button and the press the TUNNING ( ) or ( ) buttons until Manual tune (fig.4) is displayed. Press the SELECT button to accept. Using your DAB/FM Digital Radio 17
18 Using your DAB/FM Digital Radio Let s get started 2. Use the press the TUNNING ( ) or ( ) buttons buttons until the desired frequency (e.g. fig. 5)is shown in the display and then press the SELECT button. The top line will now display the channel number, the frequency and name of the ensemble and the lower line will show the signal strength or service not available if the signal strength is too weak. 3. Press the SELECT button again to add the ensemble and automatically tune to the station. DAB MODE PRUNE This function allows all unavailable stations to be removed from the station list. Press the MENU button for about 2 seconds to enter the tuning menu Press the TUNNING ( ) or ( ) buttons until Prune is displayed and press the SELECT button to confirm Press the TUNNING ( ) or ( ) buttons to select <yes> to confirm and delete. If <no> is selected the operation will be cancelled. DAB MODE SECONDARY SERVICES Some stations include secondary services and when these are available a > symbol appears after the station name when searching the stations found list. These secondary services contain extra services that are related to the primary station, for example a sports station may want to add extra commentary. The secondary services are inserted directly after the primary station in the station list. To access this service, pres the SELECT button. When the secondary service ends, the unit will automatically switch back to the primary station. Using your DAB/FM Digital Radio
19 Using your DAB/FM Digital Radio Let s get started DAB DISPLAY MODES This function allows information relating to the current station to be shown in the second line of the display. Press the INFO button repeatedly to scroll through the following display modes (fig.6) fig.6 Ensemble / Multiplex (Group name) - the ensemble / multiplex is a group of station that are bundled and transmitted together in a single frequency. There are national and local multiplexes, local ones contain stations that are specific to the local area. Signal strength the display will show a slide bar to indicate the strength of the signal. The stronger the signal, the longer the bar. Signal error the display shows the stability and quality of the reception, 0=good. Time - the time will be automatically updated by the radio time signal. Date - the date will be automatically updated by the radio time signal. Audio bit rate the display will show the digital audio bit rate being received. Radio text - the broadcaster may include a scrolling message about the current programme. Programme type this describes the style / genre of the programme. If the information is not available the display will show <Programme type>. Channel number / frequency the display will show the channel Using your DAB/FM Digital Radio
20 Using your DAB/FM Digital Radio Let s get started number / frequency of the station being broadcast. Power status the display will show whether if the radio is being used on mains or battery. When in battery mode the display will show the battery capacity (21-100) DAB SET UP OPTIONS This function allows the DAB set up menu to be entered and a number of options to be changed. With the music of choice playing, press the MENU button until Full scan is displayed and then press the TUNNING ( ) or ( ) buttons to move through the menu options available and press the SELECT button to enter each option. Menu Options Full scan Initiates full DAB scan Manual tune Permits manual addition of DAB stations Prune Removes unavailable DAB stations System Time Set Time / Date hh:mm:dd: Auto update Update from any Update from DAB Update from FM No update Set 12/ Set date format dd/mm/yyyy mm/dd/yyyy Using your DAB/FM Digital Radio
21 Using your DAB/FM Digital Radio Let s get started Menu Sleep Off 10 mins 20 mins 30 mins 60 mins 70 mins 80 mins 90 mins Options Backlight Factory reset SW version Low Medium High Initiates reset Display software version DAB MODE - RESET If moving the radio to another location in the country the pre-tuned and stored DAB stations may no longer be available and it will be necessary to reset the radio back to the factory settings. 1. With the unit switched on, press the MENU button and the press the TUNNING ( ) or ( ) buttons until System is displayed. Press the SELECT button to accept. 2. Use the TUNNING ( ) or ( ) buttons until Factory reset (fig.7) is shown in the display and press the SELECT button to accept. Using your DAB/FM Digital Radio
22 Using your DAB/FM Digital Radio Let s get started 3. The display will now show Factory Reset? <No> Yes (fig. 8). Use the TUNNING ( ) or ( ) buttons until <Yes> is shown and then press the SELECT button to confirm. The radio will display Restarting. and will then go into standby mode. 4. Proceed as per section 6.1 to re-start the unit and scan for stations. Note All stored programmed stations will be lost during reset. USING THE RADIO - FM MODE FM MODE - TUNING 1. To select FM radio, press the MODE button, the display will show FM and then the frequency. 2. To activate auto search press the SELECT button or press and the TUNNING ( ) or ( ) buttons and the radio starts to scan up the frequency band, the display will show Scanning (fig.9), and it will stop automatically once a station has been found. 3. To search manually, press the TUNNING ( ) or ( ) buttons and immediately release to increment the frequency by 0.05MHz. 4. To change the audio mode (stereo or mono), press the MENU button and press the TUNNING ( ) or ( ) buttons until Audio setting is displayed. Press the SELECT button to accept. Use the TUNNING ( ) or ( ) buttons button to switch from Stereo allowed to Forced mono and again to switch back. If stereo 22 Using your DAB/FM Digital Radio
23 Using your DAB/FM Digital Radio Let s get started allowed is selected the radio will automatically switch between stereo and mono mode. Once the audio mode of choice is displayed, press the SELECT button to accept. 5. To set the scan criteria, press the MENU button and press the TUNNING ( ) or ( ) buttons until Scan setting is displayed. Press the SELECT button to accept. Use the TUNNING ( ) or ( ) buttons to switch from All stations to Strong stations and again to switch back. If strong stations is selected the radio will only scan for strong stations. Once the scan criteria of choice is displayed press the SELECT button to accept. 6. If an FM RDS (Radio Data Signal) is present, the display will automatically show the station name and radio text (if available). FM DISPLAY MODES This function allows information relating to the current station to be shown in the second line of the display. If the INFO button is then pressed repeatedly, the second line of the station display will scroll through the following modes with each subsequent press of the button (fig.10). Time - the time will be automatically updated by the radio time signal. Date - the date will be automatically updated by the radio time signal. Radio text - the broadcaster may include a scrolling message about the current programme. Programme type this describes the style / genre of the programme. If the information is not available the display will show <Programme type>. Using your DAB/FM Digital Radio 23
24 Using your DAB/FM Digital Radio Let s get started Audio mode the display will show if the station being received is stereo or mono. Frequency the display will show the frequency of the station being broadcast. Power status the display will show whether if the radio is being used on mains or battery. When in battery mode the display will show the battery capacity (21-100) FM SET UP OPTIONS This function allows the FM set up menu to be entered and a number of options to be changed. With the music of choice playing, press the MENU button until Scan setting is displayed and then press the TUNNING ( ) or ( ) buttons to move through the menu options available and press the SELECT button to enter each option. Menu Options Full scan Initiates full DAB scan Manual tune Permits manual addition of DAB stations Prune Removes unavailable DAB stations System Time Set Time / Date hh:mm:dd: Auto update Update from any Update from DAB Update from FM No update Set 12/ Set date format dd/mm/yyyy mm/dd/yyyy 24 Using your DAB/FM Digital Radio
25 Using your DAB/FM Digital Radio Let s get started Menu Sleep Off 10 mins 20 mins 30 mins 60 mins 70 mins 80 mins 90 mins Options Backlight Factory reset SW version Low Medium High Initiates reset Display software version USING THE RADIO - PROGRAMMED STATION FUNCTION This function allows up to 10 stations to be programmed into the memory and stored in DAB and FM modes. 1. Follow the directions above to select a radio station. 2. Press and hold the PRESET button until the display shows a flashing Preset store # empty (fig.11). 3. Use the TUNNING ( ) or ( ) buttons to select the preset storage location and then press the SELECT button to confirm.the station now Using your DAB/FM Digital Radio Preset Store < 1 : Empty > 25
26 Using your DAB/FM Digital Radio Let s get started broadcasting has now been stored in the selected location (fig.12). 4. Repeat the above steps to store Preset 1 further stations. Stored 5. To listen to the preset stations, press the PRESET button once and then use the TUNNING ( ) or ( ) buttons turn to select the desired location. The station name or frequency and preset location number will be displayed (fig.13) in the lower half of the display or if the preset has not been allocated, Preset empty will be shown. Preset Recall < 6 : BBC Radio 6 > Note If the unit is disconnected from the mains supply for any length of time and batteries are not installed; the programmed stations won t be lost. Each of the above steps need to be completed within 5 seconds of pressing the button, otherwise the screen will keep on flashing SETTING AND USING THE ALARM This unit has a dual alarm function. SETTING THE ALARM (in operational mode only) 1. Press the ALARM / SNOOZE button to enter the alarm menu, press the button ONCE to display Alarm 1 set up (fig. 14) and press the button TWICE to display Alarm 2 set up. Press the SELECT button to accept alarm of choice. 26 Using your DAB/FM Digital Radio
27 Using your DAB/FM Digital Radio Let s get started 2. After selecting the alarm of choice, the hour digits will flash in the display. Use the TUNNING ( ) or ( ) buttons to select the correct alarm wake up hour and press the SELECT button to confirm. The minute digits will start to flash. 3. Use the TUNNING ( ) or ( ) buttons to select the correct alarm minute and press the SELECT button to confirm. The alarm duration will be displayed. 4. Use the TUNNING ( ) or ( ) buttons to select the duration (90, 60, 45, 30, 15 minutes) of choice and press the SELECT button to confirm. The alarm source will be displayed. 5. Use the TUNNING ( ) or ( ) buttons to select the alarm source (Buzzer, DAB or FM) of choice and press the SELECT button to confirm. If a radio source is displayed the radio source will now be displayed. 6. Use the TUNNING ( ) or ( ) buttons to select the wake up station (last station listened to or DAB preset) of choice and press the SELECT button to confirm. The alarm frequency will now be displayed. 7. Use the TUNNING ( ) or ( ) buttons to select the alarm frequency (Daily, Once, Weekend, Weekdays) and press the SELECT button to confirm. If once is selected then use the TUNNING ( ) or ( ) buttons to set the date that the alarm is to activate. Please the select button to move to the next field in each case. When the date is set, the alarm volume will now be displayed. 8. Use the TUNNING ( ) or ( ) buttons to select the desired wake up volume and press the SELECT button to confirm. The alarm status will now be displayed. 9. Use the TUNNING ( ) or ( ) buttons to select the status of choice (Off or On) and press the SELECT button to confirm. This completes the set up procedure for the wake up mode. Note To set the wake up options for the second alarm, follow the above procedure using Alarm 2 from the alarm menu. Using your DAB/FM Digital Radio 27
28 Using your DAB/FM Digital Radio Let s get started ACTIVATING AND USING THE ALARM (in standby mode only) 1. Switch the radio into standby mode. 2. Press the ALARM / SNOOZE button to display the current status of the alarms (e.g. Alarm 1: on and Alarm 2:off). 3. Press the button again to change the status to the next one in the sequence below until the status of choice is displayed. Press the SELECT button to accept. An active alarm is indicated by a corresponding alarm icon (bell) in the display. 4. Once the alarm has been set and activated, when the time on the clock is the same as the alarm time that has been set, the alarm will sound and the volume will gradually increase in volume to the one that has been set. 5. The alarm will continue to sound and stop automatically after the time interval that has been set (step above). To silence the alarm, press the STANDBY ( ) button. If a repeat alarm has been set, the alarm indicator will remain illuminated and the alarm will sound again at the next programmed day unless the alarm has been turn off. 6. To activate the snooze function, press the ALARM / SNOOZE button when the alarm sounds. The alarm will silence, the display will display 28 the clock and the snooze interval remaining and the (Zz) indicator (fig. 16). The alarm will sound again Using your DAB/FM Digital Radio 07:03:45 Snooze 1:05
29 Using your DAB/FM Digital Radio Let s get started after approximately five minutes. 7. To extend the snooze interval from the default 5 minutes, press the snooze button repeatedly after the alarm has been activated to scroll through the options available (5, 10, 15 and 30 minutes). When the snooze interval of choice is displayed stop pressing the button and this interval will now be used as the default. The ALARM / SNOOZE button may be used repeatedly within the alarm activation time. To cancel the snooze function; press the STANDBY / ON ( ) button. 8. To turn off the alarm permanently, follow steps to until Alarm 1 off is displayed. Press on the SELECT button to select. The alarm is now off and the alarm symbol extinguishes. Note To activate the second alarm, follow the above procedure using Alarm 2 from the alarm menu. If both alarms have been activated, priority will be given to the alarm that has the earliest activation time. If the snooze function is used for the first alarm and the activation time of the second alarm is within this period, the second alarm will not activate. If setting two alarms with activation times within one hour of the other one, always ensure that the alarm is silenced using the STANDBY / ON ( ) button. SETTING AND USING THE SLEEP FUNCTION This function will switch off the main unit automatically after a preset time interval. 1. With the music of choice playing, press the MENU button and the press the TUNNING ( ) or ( ) buttons until System is displayed. Press the SELECT button to accept. Using your DAB/FM Digital Radio 29
30 Using your DAB/FM Digital Radio Let s get started 2. Use the TUNNING ( ) or ( ) buttons until Sleep is shown in the display and press the SELECT button to accept. 3. The display will now show Set sleep time? and the current sleep status (e.g. fig. 17). 4. Use the TUNNING ( ) or ( ) buttons until the preset times in the sequence below (fig.18). When the sleep interval of choice is shown, press the SELECT button to set. 5. The sleep timer is now activated 6. To cancel the sleep timer, press the MENU button and follow the directions above until Sleep off appears in the display. 7. To check the sleep timer status, follow steps 10.1 &10.2 above and the sleep interval remaining will be displayed. USING HEADPHONES (not included) A stereo headphone jack has been provided so that the set can be used without disturbing others. Plug in the headphones at the point marked on the back of the radio and adjust the listening volume to your chosen level. Excessive sound pressure from earphones and headphones can cause hearing loss. The speakers will not operate when earphones are fitted. 30 Using your DAB/FM Digital Radio
31 Using your DAB/FM Digital Radio Let s get started SETING THE DISPLAY ACKLIGHT LEVEL (in operational mode only) The light level for the display can be selected in operational modes (high, medium, low or off). 1. With the radio in operational mode, press the MENU button and the press the TUNNING ( ) or ( ) buttons until System is displayed. Press the SELECT button to accept. 2. Use the TUNNING ( ) or ( ) buttons until Backlight is shown in the display and press the SELECT button to accept. 3. Use the TUNNING ( ) or ( ) buttons until the backlight level of choice is displayed and then press the SELECT to confirm. Note Pressing any button on the unit will switch the backlight to the highest setting for five seconds. CARE AND MAINTENANCE Wipe external surfaces with a soft cloth. If the cabinet is very dirty, unplug from the mains supply and use a damp cloth soaked in a weak solution of washing up liquid and water. Allow it to dry thoroughly before reusing. Using your DAB/FM Digital Radio 31
32
33 Other information 4
34 Other information Helpful technical information Specifications Rated voltage (transformer) V~ 50/60Hz, 0.3A Transformer output 6V 1.5A Rated voltage (radio) Power consumption DC 6V (1.5V x 4 AA) 9W Power consumption (standby) 0.4W Class rating (transformer) 2 Audio output 2 x 2W RMS Radio DAB MHzFM MHz Operating conditions Temperature: 5 C to 35 C Humidity 5% to 90% Operating position Horizontal 34 Other information
35
36 Product support 5
37 Product support Help is always at hand Troubleshooting Observation The unit does not work (display not illuminated) The unit does not work on batteries No sound (display illuminated) Clock display flashes Radio reception noisy (FM) Radio reception stutters / bubbling sounds (DAB) Potential cause / solution Has the adaptor lead been correctly plugged into the mains and the DC input jack at the side of the unit? Does the socket that is being used have power? Has the power lead been removed from the back of the unit without the batteries being installed? Has the adaptor lead been removed from the radio? Are the batteries inserted correctly? Are the batteries exhausted? Is the volume set at minimum? Are headphones fitted in the phones jack? Indicates power has been interrupted and time signal has been lost. Switch on and tune in to a DAB station to automatically update the clock. Extend or adjust the position of the antenna or radio. FM stereo if weak switch to MONO as this requires less signal strength. Signal is weak. Extend the antenna or adjust the location of the radio. Positions higher up or nearer windows may improve reception. 37 Product support
38 Product support Help is always at hand Observation DAB service not available Alarm does not work Potential cause / solution This usually means that reception is weak, not that there is no service. Try re-orienting the antenna or moving the radio to a different location. Check that your local area has DAB coverage on postcodesearch/ Has the alarm been activated see section "ACTIVATING AND USING THE ALARM"(P28 )? Has the correct alarm been activated? Product support 38
39 Product support Help is always at hand Help and assistance If you require any technical guidance or find that your DAB/FM Digital Radio is not operating as intended, a simple solution can often be found in the Troubleshooting section of these instructions or online at If you still require further assistance, call one of our experts on To help give us give you a fast and efficient service please have the following information ready: Model Ref. Serial number You can find these on the rating plate - a small information panel (usually a sticker or metal plate) on the rear of your product. Date of purchase This will be shown on your receipt Local call rates applies* Line open 8am-7pm Monday to Saturday and 10am-4pm Sunday *Calls to Argos enquiry lines may attract a charge and set up fee from residential lines depending on your call plan/tariff. Mobile and other providers costs may vary, see for details. For security and training purposes, telephone calls to and from customer service centres may be recorded and monitored. Calls from Republic of Ireland will attract international call charges. 39 Product support
40 Product support Help is always at hand This appliance complies with the following EEC directives: 2006/95/EEC Low voltage directive 2004/108/EMC directive Disposal This symbol on the product or in the instructions means that your electrical and electronic equipment should be disposed at the end of its life separately from your household waste. There are separate collection systems for recycling in the EU. For more information, please contact the local authority or your retailer where you purchased the product. Notes for battery disposal The batteries used with this product contain chemicals that are harmful to the environment. To preserve our environment, dispose of used batteries according to your local laws or regulations. Do not dispose of batteries with normal household waste. For more information, please contact the local authority or your retailer where you purchased the product. All trademarks are the property of their respective owners and all rights are acknowledged. Product support 40
41 Product support Help is always at hand Call us now and activate your 12 month guarantee Thank you for choosing Bush. Your new product is guaranteed against faults and breakdowns for 12 months. Don t forget to register it with us today so we can provide you with our best possible after-sales service and useful updates. FREEPHONE* Lines are open 8am - 8pm, 365 days a year. *Calls may be recorded and monitored. Your Bush Guarantee This product is guaranteed for twelve months from the date of original purchase. Any defect that arises due to faulty materials or workmanship will be repaired free of charge (or if applicable the product will be replaced or the purchase price refunded) where possible during this period by the dealer from who your purchased the unit. The guarantee is subject to the following provisions: The guarantee does not cover accidental damage, misuse, cabinet parts, knobs or consumable items. The product must be correctly installed and operated in accordance with the instructions contained in the manual. It must be used solely for domestic purposes. The guarantee will be rendered invalid if the product is re-sold or has been damaged by inexpert repair. Specifications are subject to change without notice. Bush disclaim any liability for loss or damage arising from the breakdown of the product. This guarantee is in addition to and does not diminish your statutory or legal rights. 41 Product support Product support
42 Product support Help is always at hand Important Data Protection Information If you provide us with information about another person, you confirm that they have appointed you to act for them, to consent to the processing of their personal data including sensitive personal data and that you have informed them of our identity and the purposes (as set out in the Important Data Privacy notice displayed overleaf) for which their personal data will be processed. You are entitled to ask for a copy of the information we hold about you (for which we may charge a small fee) and to have any inaccuracies in your information corrected. For quality control and training purposes, we may monitor or record your communications with us. If your personal details change, if you change your mind about any of your marketing preferences or if you have any queries about how we use your information, please let us know by contacting our Data Protection Officer, Domestic & General, Leicester House 17 Leicester Street, Bedworth, Warwickshire CV12 8JP. Product support 42
43 Contact: Helpline:
Instruction manual WO322
 Instruction manual WO322 You ll soon be enjoying your new Retro Analogue Clock Radio. It all begins here, with your instructions. Don t worry, there s nothing too technical coming up. Just simple, step-by-step
Model Number: GSDAB3004
 DAB/FM Digital Radio & Alarm Clock Model Number: GSDAB3004 Please read these instructions carefully and keep for future reference For Customer Services & Spare Parts please call 0845 209 7461 Opening times:
ENGLISH PORTUGUÊS NEDERLANDS DAB200
 DEUTSCH ENGLISH FRANÇAIS NEDERLANDS ESPAÑOL PORTUGUÊS NORSK DAB200 Contents Introduction..... 2 What is DAB + Digital Radio?.... 2 Setting up..... 3 Backlit display.... 4 Using headphones...... 4 Your
USER MANUAL KADABXXTBLA
 USER MANUAL KADABXXTBLA Instruction Manual KADABXXTBLA DAB+ and FM Radio Safety Precautions To achieve the utmost in enjoyment and performance, and in order to become familiar with its features, please
Contents ... What is DAB + Digital Radio?... 2 Setting up... 3 Backlit display... 4 Using headphones... 4 Your radio Switch off...
 Contents Introduction... 2 What is DAB + Digital Radio?........... 2 Setting up........... 3 Backlit display.............. 4 Using headphones........... 4 Your radio... 5 Switch on........... 6 Telescopic
Instruction Manual CDAB4312R
 Instruction Manual CDAB4312R Table of contents Accessories included...3 Overview of controls...3 Charging the CDAB4312R before use... 3 Charging the CDAB4312R before use (cont)... 4 Getting started...
DIGITAL RADIO INCLUDING FM, DAB AND DAB+
 DIGITAL RADIO INCLUDING FM, DAB AND DAB+ INSTRUCTION MANUAL Safety Precautions To achieve the utmost in enjoyment and performance, and in order to become familiar with its features, please read this manual
Always there to help you. Register your product and get support at AJB4300. Question? Contact Philips.
 Always there to help you Register your product and get support at www.philips.com/support Question? Contact Philips AJB4300 User manual Contents 1 Important 2 Safety 2 2 Your FM/DAB+ clock radio 3 Introduction
AZATOM SONANCE T1 Digital Radio. DAB+/DAB/FM Radio Alarm Clock. User Manual. This manual is available to download online at
 AZATOM SONANCE T1 Digital Radio DAB+/DAB/FM Radio Alarm Clock User Manual This manual is available to download online at www.azatom.com Thank you for shopping with AZATOM Please read this manual carefully
Instruction manual. DAB/FM Radio with Bluetooth DAB30
 Instruction manual DAB/FM Radio with Bluetooth DAB30 Contents You ll soon be enjoying your new DAB/FM Radio with Bluetooth. It all begins here, with your instructions. Don t worry, there s nothing too
GMR1887DAB DAB Digital and FM Radio User Guide. IMPORTANT: Please read all instructions carefully before use and keep for future reference.
 GMR1887DAB DAB Digital and FM Radio User Guide IMPORTANT: Please read all instructions carefully before use and keep for future reference. Introduction Thank you for buying the GOODMANS DAB Digital and
User guide. DR1704 DAB Radio
 User guide DR1704 DAB Radio IMPORTANT SAFETY INFORMATION CAUTION! RISK OF ELECTRIC SHOCK DO NOT OPEN TO REDUCE THE RISK OF ELECTRIC SHOCK DO NOT REMOVE COVER (OR BACK) This symbol indicates that there
Introduction and Contents
 1 Introduction and Contents Thank you for buying this Bush product, which is designed to give you many years of trouble-free service. You may already be familiar with using a similar unit, but please take
DEUTSCH ITALANIO ENGLISH NORSK FRANÇAIS DANSK NEDERLANDS Hersteller UR8200
 DEUTSCH ENGLISH FRANÇAIS NEDERLANDS ITALANIO NORSK DANSK Hersteller Wörlein GmbH Tel.: +49 9103/71670 Gewerbestrasse 12 Fax.: +49 9103/716712 D 90556 Cadolzburg Email. info@woerlein.com GERMANY Web: www.woerlein.com
DEUTSCH NORSK ENGLISH SVENSKA FRANÇAIS DANSK NEDERLANDS ČEŠTINA ITALANIO Hersteller UR190
 DEUTSCH ENGLISH FRANÇAIS NEDERLANDS ITALANIO NORSK SVENSKA DANSK ČEŠTINA Hersteller Wörlein GmbH Tel.: +49 9103/71670 Gewerbestrasse 12 Fax.: +49 9103/716712 D 90556 Cadolzburg Email. info@woerlein.com
Instruction manual DAB-1507BT
 Instruction manual DAB-1507BT Contents You ll soon be enjoying your new Stereo DAB/FM Radio with Bluetooth. It all begins here, with your instructions. Don t worry, there s nothing too technical coming
User Guide. CR1101W DAB/FM Clock radio
 User Guide CR1101W DAB/FM Clock radio IMPORTANT SAFETY INFORMATION CAUTION! RISK OF ELECTRIC SHOCK DO NOT OPEN TO REDUCE THE RISK OF ELECTRIC SHOCK DO NOT REMOVE COVER (OR BACK) This symbol indicates that
DAB Clock Radio. Instruction Manual LCRDAB10
 DAB Clock Radio Instruction Manual LCRDAB10 LCRDAB10_IB_final111001_Zell.indd 1 LCRDAB10_IB_final111001_Zell.indd 2 Contents Unpacking... 5 Product Overview... 6 Front View... 6 Rear View... 6 Top View...
General Safety Instructions
 General Safety Instructions Read this manual thoroughly before fist use and keep it in a safe place for future reference, along with the warranty card, purchase receipt and carton. The safety precautions
Always there to help you. Register your product and get support at AJ4300. Question? Contact Philips.
 Always there to help you Register your product and get support at www.philips.com/support Question? Contact Philips AJ4300 User manual Contents 1 Important 2 Safety 2 2 Your clock radio 3 Introduction
Revival UNO. DAB / DAB+ / FM RDS portable digital radio. Please read this manual before use
 Revival UNO / + / FM RDS portable digital radio Please read this manual before use Contents Controls... 2-3 Battery operation...3 Using the buttons...3...4 Operating your radio -...5 Selecting a station
R9999 ROBERTS. PLL Synthesised 3 band radio with station name display. Sound for Generations. Please read this manual before use
 ROBERTS Sound for Generations R9999 PLL Synthesised 3 band radio with station name display Please read this manual before use Contents Important Information... 1 Automatic plug and play setup... 2 Controls...
Portable Digital & FM Radio
 SHELFORD II Portable Digital & FM Radio SEL-DAB-CRM-2 UK Instructions Guide Contents Controls And Functions... 1 What s In he Box?...3 Support... 4 Instructions Guide...5 Basic Operation... 5 DAB/DAB+
GDR750DAB GDR730DABSOL
 The DAB+ RECHARGEABLE & SOLAR DIGITAL RADIO GDR750DAB GDR730DABSOL The Gold Technical Support Line: 1902 215 259 Personal Product Support (Charges will apply at $2.95 per minute) 1 Introduction Thank you
USER MANUAL. Model No.: DB-230
 USER MANUAL Model No.: DB-230 1 Location of controls 1. UP Press the button to select the different DAB station under DAB mode or press and hold to quick scan the FM station in upward frequency under FM
Digital DAB and FM Radio
 CHESERON Digital DAB and FM Radio CB4-DAB-BLK Instructions Guide Contents Controls And Functions... 1 What s In he Box?... 4 Support...5 Instructions Guide... 6 Basic Operation... 6 DAB/DAB+ Radio... 7
ENVIRONMENTAL PROTECTION
 ENVIRONMENTAL PROTECTION Do not dispose of this product with the normal household waste at the end of its life cycle. Return it to a collection point for the recycling of electrical and electronic devices.
DAB+ / FM RDS digital clock radio with dual alarm
 ROBERTS Enjoy Listening DAB+ / FM RDS digital clock radio with dual alarm Please read this manual before use Contents Controls... -3 Using the clock radio for the fi rst time...4 Operating your clock radio...5
A WORLD OF LISTENING WARNING: TO PREVENT FIRE OR ELECTRIC SHOCK HAZARD, DO NOT EXPOSE THIS PRODUCT TO RAIN OR MOISTURE.
 DDR-3 FM RDS/DAB digital radio A WORLD OF LISTENING THE LIGHTNING FLASH AND ARROW- HEAD WITHIN THE TRIANGLE IS A WARNING SIGN ALERTING YOU OF DANGEROUS VOLTAGE INSIDE THE RADIO. WARNING: TO PREVENT FIRE
Always there to help you. Register your product and get support at AJ3232. Question? Contact Philips.
 Always there to help you Register your product and get support at www.philips.com/support Question? Contact Philips AJ3232 User manual Contents 1 Important 2 Safety 2 2 Your clock radio 3 Introduction
Instruction Manual DAB/FM Radio with Bluetooth
 Instruction Manual DAB/FM Radio with Bluetooth DAB/FM Radio with Bluetooth Contents Important safety information... 3 Instructions for use... 5 Check the package contents... 5 Where to put your Radio...
ROBERTS. DAB / DAB+ / FM RDS digital portable radio. Please read this manual before use
 ROBERTS DAB / DAB+ / FM RDS digital portable radio Please read this manual before use Contents Controls... 2-3 Battery operation...4 Using the AC adaptor...5 Operating your radio - DAB...6 Selecting a
Instruction Manual Please read carefully before use and keep for future reference.
 Easy-Read Dual Alarm Clock with Daily Repeat, Bluetooth, and USB Charge Port NRC-181 Instruction Manual Please read carefully before use and keep for future reference. Important Safety Information CAUTION
Register your product and get support at AE5430. EN User manual
 Register your product and get support at www.philips.com/welcome AE5430 User manual Concents 1 Important 4 Hearing Safety 4 English 2 Your FM/DAB+ radio 5 Introduction 5 What s in the box 5 Overview of
Important safety instructions
 RCR-29 GB Version 1 Important safety instructions VERY IMPORTANT PLEASE READ Sangean suggest that you keep your AC Adapter at least 12 inches away from the radio while listening to the AM Band. Your Sangean
RD-21 ROBERTS. FM RDS/DAB digital radio. Sound for Generations. Please read this manual before use
 ROBERTS Sound for Generations RD- FM RDS/DAB digital radio Please read this manual before use Contents Controls... Battery operation...3 Mains operation...3 Operating your radio - DAB...4 Selecting a station
User manual. Register your product and get support at Clock Radio Radio-réveil AJB3000
 Clock Radio Radio-réveil User manual AJB3000 Register your product and get support at www.philips.com/support Contents 1 Important 1 Safety 1 Risk of swallowing batteries! 1 Notice 1 2 Your FM/DAB radio
Always there to help you. Register your product and get support at AJ3200. Question? Contact Philips.
 Always there to help you Register your product and get support at www.philips.com/support Question? Contact Philips AJ3200 User manual Contents 1 Important 2 Safety 2 2 Your clock radio 3 Introduction
Always there to help you. Register your product and get support at AJ3200. Question? Contact Philips.
 Always there to help you Register your product and get support at www.philips.com/support Question? Contact Philips AJ3200 User manual Contents 1 Important 2 2 Your clock radio 2 Introduction 2 What's
RCR-24 中文 GB. Version 1
 RCR-24 中文 GB Version 1 GB Please note not all AC adapters are alike. The AC adapter that is included with this radio is designed to be used exclusively with this device. Do not use an AC adapter that differs
Always there to help you. Register your product and get support at AJ2000. Question? Contact Philips.
 Always there to help you Register your product and get support at www.philips.com/support Question? Contact Philips AJ2000 User manual Contents 1 Important 2 Safety 2 2 Your clock radio 3 Introduction
Dual Alarm Clock Radio with Digital Tuning NRC-174. Instruction Manual Please read carefully before use and keep for future reference.
 Dual Alarm Clock Radio with Digital Tuning NRC-174 Instruction Manual Please read carefully before use and keep for future reference. Important Safety Information CAUTION RISK OF ELECTRIC SHOCK DO NOT
Handheld DAB+ Radio Operation Guide
 Important safety instructions These warnings have been provided in the interest of safety. You MUST read them carefully before using the radio: * This radio is not intended for use by persons (including
Instruction Manual GB KH335BE / KH335WE. Portable DAB+ / DAB Radio
 Instruction Manual KH335BE / KH335WE Portable DAB+ / DAB Radio KH335BE KH335WE Contents SOME DOS AND DON TS ON THE SAFE USE OF EQUIPMENT... 5 Safety Warnings... 7 Unpacking... 9 Product Overview...10
ROBERTS. DAB / DAB+ / FM RDS digital portable radio. Please read this manual before use
 ROBERTS DAB / DAB+ / FM RDS digital portable radio Please read this manual before use Contents Controls... 2-3 Battery operation...4 Using the AC adaptor...5 Operating your radio - DAB...6 Selecting a
UR200SI / UR200WE ENGLISH
 ENGLISH Hersteller Wörlein GmbH Tel.: +49 9103/71670 Gewerbestrasse 12 Fax.: +49 9103/716712 D 90556 Cadolzburg Email. info@woerlein.com GERMANY Web: www.woerlein.com UR200SI / UR200WE ENVIRONMENTAL PROTECTION
R9939 ROBERTS. PLL Synthesised 3 band mains battery radio. Sound for Generations. Please read this manual before use
 ROBERTS Sound for Generations R999 PLL Synthesised band mains battery radio Please read this manual before use Contents Important Information... 1 Automatic FM setup... 2 Controls... - Display... Battery
DAB+ / FM Retro Radio
 INSTRUCTION MANUAL DAB+ / FM Retro Radio Model Number: ARDR-1116 ii Welcome Congratulations on choosing to buy a BAUHN product. All products brought to you by BAUHN are manufactured to the highest standards
CAUTION : TO PREVENT ELECTRIC SHOCK, MATCH WIDE BLADE OF PLUG TO WIDE SLOT, FULLY INSERT.
 BSR-1 The Lightning flash with arrowhead symbol, with an equilateral triangle is intended to alert the user of the presence of uninsulated dangerous voltage within the product s enclosure that may be of
Stereo DAB+/FM Radio
 Stereo DAB+/FM Radio Contents Where to put your radio............................... 3 Setting up............................................ 3 Your Stereo DAB+ / FM radio.......................... 5 Using
Always there to help you. Register your product and get support at AJ3400. Question? Contact Philips.
 Always there to help you Register your product and get support at www.philips.com/support Question? Contact Philips AJ3400 User manual Contents 1 Important 3 2 Your clock radio 4 What's in the box 4 3
Always there to help you. Register your product and get support at AJ3400/79. Question? Contact Philips.
 Always there to help you Register your product and get support at www.philips.com/support Question? Contact Philips AJ3400/79 User manual Contents 1 Important 3 2 Your clock radio 4 What's in the box 4
ROBERTS RD-25. Sound for Generations. MW/FM RDS/DAB Digital Portable Radio. Please read this manual before use
 ROBERTS Sound for Generations RD-5 MW/FM RDS/DAB Digital Portable Radio Please read this manual before use Contents Controls... -4 Battery operation...5 Mains operation...5 Operating your radio - DAB...6
OXFORD MODEL: OXFORD OXFORD DAB+ FM RADIO USER MANUAL
 OXFORD MODEL: OXFORD USER MANUAL 1 2 3 Welcome Your Oxford DAB+ FM Radio 2.1 In The Box 2.2 Top View 2.3 Side View 2.4 Rear View Quick Setup 3.1 Power On and Autoscan 3.2 Changing DAB Stations 3.3 Scanning
User Manual. AZATOM Blackfriars DAB Speaker. This manual is available to download online at
 AZATOM Blackfriars DAB Speaker DAB+ / Calender / Clock / Alarm Clock / FM Radio / AUX-In User Manual This manual is available to download online at www.azatom.com Thank you for shopping with AZATOM Please
Contents. Controls Stereo / Mono setting - FM Battery operation Scan sensitivity setting - FM Using the AC adaptor...
 DPR-69+ GB Contents Controls... 2-3 Battery operation... 4-5 Using the AC adaptor... 6 Lock switch... 6 Operating your radio - DAB... 7 Selecting a station - DAB... 8 Secondary services - DAB... 8 Display
DT-800 中文 GB. Version 1
 DT-800 中文 GB Version 1 1. 2. 3. 4. 5. 6. 7. 8. 9. Important safety instructions Read and understand all safety and operating instructions before the radio is operated. Retain instructions: The safety and
Always there to help you. Register your product and get support at AJ3400/37. Question? Contact Philips.
 Always there to help you Register your product and get support at www.philips.com/support Question? Contact Philips AJ3400/37 User manual Contents 1 Important 3 Safety 3 2 Your clock radio 4 What's in
Always there to help you. Register your product and get support at OR7200. Question? Contact Philips.
 Always there to help you Register your product and get support at www.philips.com/welcome Question? Contact Philips OR7200 User manual Contents 1 Safety 2 2 What's in the box 3 3 Connect power 4 4 Turn
Always there to help you. Register your product and get support at AE5220. Question? Contact Philips.
 Always there to help you Register your product and get support at www.philips.com/welcome Question? Contact Philips User manual AE5220 Contents 1 Important 2 Safety 2 Notice 2 English 2 Your FM/DAB radio
PR200DAB DAB+/AM/FM RADIO USER MANUAL IMPORTANT! WARRANTY INFORMATION INSIDE. PLEASE READ. Trademark of TEAC Corporation JAPAN
 PR200DAB DAB+/AM/FM RADIO USER MANUAL IMPORTANT! WARRANTY INFORMATION INSIDE. PLEASE READ Trademark of TEAC Corporation JAPAN www.teac.com.au WARRANTY PROCEDURE v1.7b: July 2016 for 12M Replacement Please
ROBERTS RD-22. Sound for Generations. FM RDS/DAB digital radio with. Please read this manual before use
 ROBERTS Sound for Generations Please read this manual before use RD-22 FM RDS/DAB digital radio with Contents Controls... 2-4 Remote handset battery replacement...5 Mains operation...5 Operating your radio
Your DAB+ Radios. Contents
 Your DAB+ Radios Contents Contents... 2 Introduction... 2 Safety Instructions... 3 Your DAB+... 4 What Is DAB+... 5 Getting Started... 6-7 Operating Instructions... 8-11 Warning /Troubleshooting/Specifications...
Always there to help you. Register your product and get support at AE2430. User manual
 Always there to help you Register your product and get support at www.philips.com/support AE2430 User manual Contents 1 Important 2 Safety 2 Notice 3 2 Your Portable Radio 5 Introduction 5 What s in the
Always there to help you. Register your product and get support at AJ5305D_12. Question? Contact Philips.
 Always there to help you Register your product and get support at www.philips.com/welcome Question? Contact Philips AJ5305D_12 User manual Contents 1 Important 3 Safety 3 2 Your Docking Entertainment System
Always there to help you. Register your product and get support at AE5220. Question? Contact Philips.
 Always there to help you Register your product and get support at www.philips.com/support Question? Contact Philips AE5220 User manual Contents 1 Important 2 Safety 2 Notice 2 2 Your FM/DAB radio 4 Introduction
 Register your product and get support at www.philips.com/welcome AJH5100 EN User manual Contents 1 Important 3 Safety 3 2 Your clock radio 4 Introduction 4 What's in the box 4 Overview of the main unit
Always there to help you. Register your product and get support at AJ7045D. Question? Contact Philips.
 Always there to help you Register your product and get support at www.philips.com/welcome Question? Contact Philips AJ7045D User Manual Contents 1 Important 3 Risk of swallowing batteries 3 2 Your clock
PR-D9CL. GB Version 1
 PR-D9CL GB Version 1 Table of contents Important safety instructions... 2-3 Controls... 4-6 Operating your radio Search tuning AM / FM... 8 Manual tuning AM / FM / Setting up the tuning step increment...
Radio BMR100 INSTRUCTION MANUAL. ENGLISH (Original instructions)
") ENGLISH (Original instructions) INSTRUCTION MANUAL Radio BMR00 WARNING: For your personal safety, READ and UNDERSTAND before using. SAVE THESE INSTRUCTIONS FOR FUTURE REFERENCE. Symbols The following show
ENGLISH (Original instructions) INSTRUCTION MANUAL Radio BMR00 WARNING: For your personal safety, READ and UNDERSTAND before using. SAVE THESE INSTRUCTIONS FOR FUTURE REFERENCE. Symbols The following show
Important safety instructions
 MMR-88 Version 1 Important safety instructions 1. 2. 3. 4. 5. 6. 7. 8. 9. Please read these instructions carefully. Please keep these instructions for future reference. Heed all warnings Follow all instructions
ENGLISH User s Guide. Safety & Regulatory Information
 ENGLISH User s Guide Creative SoundWorks 500DAB Information in this document is subject to change without notice and does not represent a commitment on the part of Creative Technology Ltd. No part of this
Register your product and get support at AJ7010. User manual
 Register your product and get support at AJ7010 EN User manual A o a b n m c d e f l k j i h g B a b c g f e d C D E F EN 1 Important Read these instructions. Heed all warnings. Follow all instructions.
User Manual. Internet Radio Adaptor with DAB and Bluetooth DBA-03R. (Additional powered speaker / active speaker is required to use this product)
") User Manual Internet Radio Adaptor with DAB and Bluetooth DBA-03R (Additional powered speaker / active speaker is required to use this product) Please read this user manual carefully before using receiver
User Manual Internet Radio Adaptor with DAB and Bluetooth DBA-03R (Additional powered speaker / active speaker is required to use this product) Please read this user manual carefully before using receiver
Always there to help you. Register your product and get support at OR2200. Question? Contact Philips.
 Always there to help you Register your product and get support at www.philips.com/welcome Question? Contact Philips OR2200 User manual Contents 1 Safety 2 2 Your clock radio 3 Introduction 3 What's in
DE1103 PLL FM STEREO/SW.MW.LW DUAL CONVERSION SYNTHESIZED WORLD RECEIVER OPERATION MANUAL
 DE1103 SYNTHESIZED WORLD RECEIVER SYNTHESIZED WORLD RECEIVER DE1103 OPERATION MANUAL INDEX POWER SUPPLY POWER SUPPLY... 1 POWER INDICATION... 3 BATTERY CHARGER... 4 BEFORE OPERATION..... 6 SET THE CLOCK...
RD-15 ROBERTS. DAB digital radio. Sound for Generations. Please read this manual before use
 ROBERTS Sound for Generations RD-5 DAB digital radio Please read this manual before use Contents Controls... Battery operation... 3 Mains operation... 3 Operating your radio - DAB... 4 Selecting a station
Controls. LCD display A B C D E F
 H205 Version 1 1 2 3 4 5 6 13 12 11 7 8 9 10 14 15 17 18 16 1 19 Controls 1 2 3 4 5 6 7 8 9 10 11 12 13 14 15 16 17 18 19 Carrying strap holder Preset 1 Preset 2 Preset 3/STEP button Preset 4 LCD display
Maximum DAB II USER MANUAL
 Maximum DAB II USER MANUAL BRUGERMANUAL G e t t i n g 1 external power connector Know your radio on /off switch aerial Rating plate (Underneath) LCD screen MENU button (see page 6) battery compartment
PR-D5 中文 GB. Version 1
 PR-D5 中文 GB Version 1 1. 2. 3. Important safety instructions Read and understand all safety and operating instructions before the radio is operated. Retain instruction: The safety and operating instructions
DAB / DAB+ / FM RDS digital portable radio. Please read this manual before use
 DAB / DAB+ / FM RDS digital portable radio Please read this manual before use Contents Controls...2-3 Battery operation using alkaline batteries...4 Battery operation using rechargeable batteries...5 Using
DAB / DAB+ / FM RDS digital radio. Please read this manual before use
 DAB / DAB+ / FM RDS digital radio Please read this manual before use Contents Controls...2-3 Battery operation using alkaline batteries...4 Battery operation using rechargeable batteries...5 Using the
Always there to help you. Register your product and get support at AJ5305D/05. Question? Contact Philips.
 Always there to help you Register your product and get support at www.philips.com/welcome Question? Contact Philips AJ5305D/05 User manual Content 1 Important 2 Safety 2 2 Your Docking Entertainment System
 Register your product and get support at www.philips.com/welcome Docking Entertainment System DC315 EN User manual 1 a f b c d e g h i j m k l EN 1 Important Safety Important Safety Instructions a Read
Always there to help you. Register your product and get support at AE5600. Question? Contact Philips.
 Always there to help you Register your product and get support at www.philips.com/support Question? Contact Philips AE5600 User manual Contents 1 Important 2 Safety 2 Notice 3 English 2 Your Portable
Quick Start Guide. P-TEC Gotthard
 Quick Start Guide P-TEC Gotthard Important Notice This product has been designed and manufactured so that it does not represent a personal safety hazard for the user. Any misuse can lead to electric shock
H201 中文 GB Version 1
 H201 中文 GB Version 1 Controls 1 2 3 4 5 6 7 8 9 10 11 12 13 14 15 16 17 LCD Display Preset stations (preset 3 also for tuning step change) Nap timer (Short timer) Power button Band and Time Set button
Always there to help you. Register your product and get support at AJB4700. Question? Contact Philips.
 Always there to help you Register your product and get support at www.philips.com/welcome Question? Contact Philips AJB4700 User Manual Contents 1 Important 3 2 Your FM/DAB+ clock radio 3 Introduction
ROBERTS. DAB / DAB+ / FM RDS Shower Radio with Bluetooth playback. Please read this manual before use
 ROBERTS / + / RDS Shower Radio with Bluetooth playback Please read this manual before use Contents Controls... 2-3 Battery operation...4 Display icons...5 Wall mounting...5 / wire aerial (inside the battery
Owner s Manual / Safety Instructions / Compliance Information A Boston P.O.P. Product Make it your own... Horizon Solo. An about-face in radio design
 Horizon Solo High Performance AM/FM Radio An about-face in radio design Owner s Manual / Safety Instructions / Compliance Information A Boston P.O.P. Product Make it your own... IMPORTANT SAFETY INSTRUCTIONS
IMPORTANT SAFETY INSTRUCTIONS
 WR-2 GB Version 1 IMPORTANT SAFETY INSTRUCTIONS 1. 2. 3. 4. 5. 6. 7. 8. 9. Read these instructions. Keep these instructions. Heed all warnings. Follow all instructions. Do not use this apparatus near water.
Blutune 5 / Blutune 6
 Blutune 5 / Blutune 6 / + / FM RDS / Bluetooth digital radio with clock and alarms Please read this manual before use Contents Blutune 5 & Blutune 6 controls... 2-4 Battery operation...5 Using the buttons...5...6
DX-395. FM/AM/SW1/SW2 PLL Synthesized Receiver OWNER S MANUAL. Cat. No Please read before using this equipment.
 20-225.fm Page 1 Wednesday, August 4, 1999 10:07 AM Cat. No. 20-225 OWNER S MANUAL Please read before using this equipment. DX-395 FM/AM/SW1/SW2 PLL Synthesized Receiver 20-225.fm Page 2 Wednesday, August
USER S GUIDE RP-3721 DIGITAL TUNING CLOCK RADIO
 USER S GUIDE RP-7 FCC INFORMATION This device complies with Part 5 of the FCC Rules. Operation is subject to the following two conditions: () This device may not cause harmful interference, and () this
AM/FM DUAL ALARM CLOCK RADIO WITH DIGITAL TUNING
 AM/FM DUAL ALARM CLOCK RADIO WITH DIGITAL TUNING USER MANUAL KT2051MBY THIS IS NOT A TOY! CAUTION: Electrically Operated Product Please use care when plugging AC adapter into AC outlet. WARNING TO PREVENT
CR31. Companion. Instruction Manual
 CR31 Companion Instruction Manual 910-244700-001 IMPORTANT SAFETY INSTRUCTION PLEASE READ CAREFULLY ALL THE FOLLOWING IMPORTANT SAFEGUARDS THAT ARE APPLICABLE TO YOUR EQUIPMENT 1. Read Instructions - All
USER S MANUAL. DAB+ Clock Radio Radius II
 DAB+ Clock Radio Radius II USER S MANUAL Thank you for purchasing this product. Please read this manual thoroughly before operating the unit, and keep it for future reference. WARNING LIGHTNING FLASH WITH
2 INTRODUCTION. In The Box
 A 2698 DAB+/FM RDS Tuner Instruction Manual CONTENTS Introduction and Features...1 Safety Instructions...2-3 Remote Control...4-5 Front Panel...6 Rear Panel and Antenna...7 Operations...8-9 Troubleshooting...10-11
Register your product and get support at DA1200. User manual
 Register your product and get support at DA1200 User manual Contents 1 Important 5 Safety 5 2 Your DAB+ digital radio 8 Introduction 8 What s in the box 8 Overview 9 3 Get started 11 Connect power 11
AD U DAB/FM Tuner. Item ref: UK User Manual
 AD-100 1U DAB/FM Tuner Item ref: 952.979UK User Manual Caution: Please read this manual carefully before operating Damage caused by misuse is not covered by the warranty Introduction Thank you for choosing