Introduction and Contents
|
|
|
- Annabella Bell
- 5 years ago
- Views:
Transcription

1 1
2 Introduction and Contents Thank you for buying this Bush product, which is designed to give you many years of trouble-free service. You may already be familiar with using a similar unit, but please take time to read these instructions. They are designed to familiarise you with the unit s many features and to ensure you get the very best from your purchase. Safety is important Your safety and the safety of others are important. Please therefore, ensure you read the Safety Instructions before you operate this unit. Warranty In the unlikely event that your product fails to work normally, please call the below free phone number to discuss the problem with one of our qualified service engineers. Australia. New Zealand Bush Warranty: Bush Warranty: Contents Introduction and Contents Safety Instructions 3 Your DAB+ Radio What is DAB Getting Started Using DAB+ Radio Using Presets 11 Using FM Radio System Setup Troubleshooting and Technical Specification Warranty
3 Safety Instructions Ensure that you read all of the safety instructions before using this unit. Safety Considerations Position the power cable and other connected cables so that they are not likely to be walked on, pinched or where items can be placed on or against them. Do not use the unit in humid or damp conditions. Do not allow the unit to get wet. Never allow children to insert foreign objects into holes or slots on the unit. Do not cover the ventilation with items such as tablecloths, curtains, etc. This may cause overheating. No naked flame sources, such as lit candles, should be placed on or near the unit. Do not expose the unit to dripping or splashing water, and no objects filled with liquids, such as vases, should be placed on or near the apparatus. Do not place the unit in closed cabinet without proper ventilation. Cleaning Disconnect the unit from the mains supply before cleaning. Do not use any liquids or aerosol cleaners, as this may damage the unit. Use a soft, dust free cloth. Servicing There are no user serviceable parts in the unit. When servicing, refer to qualified service professional. Consult your retailer if you are ever in doubt about the installation / operation / safety of the product. 3

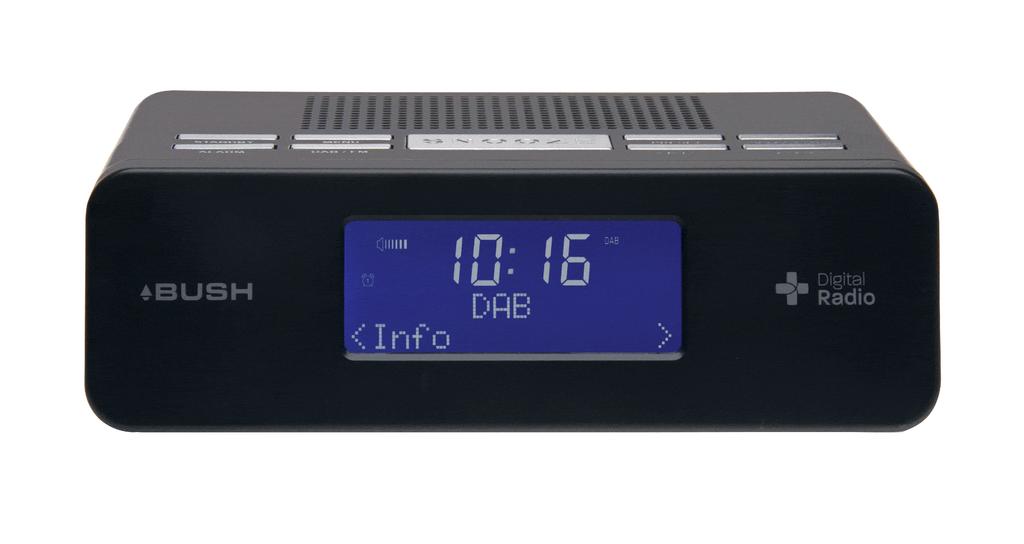
4 Your DAB+ Radio 1. PRESET Button 6. LCD Display 11. DC Jack 2. SELECT/NAV Button 7. DAB+/FM Button 12. Aerial 3. Button 8. ALARM Button 13. Headphone Jack 4. Button 9. STANDBY Button 5. SNOOZE Button 10. MENU Button Control STANDBY DAB+ and FM Press the Standby Button to turn the radio on or off. MENU Press the Menu Button to enter the Main Menu or select other menus. DAB+/FM Press the DAB+/FM Button to switch between DAB+ and FM modes. ALARM PRESET SELECT/NAV Press the Alarm Button once, to set alarm1 and press again to set alarm2. Press and hold the Preset Button to enter the preset options. (Note: for detail please refer page 11) Press the Select/Nav Button to an option or confirm. a. Press to decrease or increase the volume level b. In DAB+ mode, press the SELECT/NAV Button then press the or Buttons to select different DAB+ stations or options. c. In FM mode, press the SELECT/NAV Button, then press the or Buttons to adjust the FM frequency, or press and hold the or Buttons to auto search FM Stations. a. When alarm is activated, press the Snooze Button to delay the alarm for 5 minutes. b. Press the Snooze Button to set the radio sleep time. 4
5 What is DAB+ DAB+ was developed in Europe by a consortium of broadcasters and manufacturers. DAB+ uses digital compression techniques to transform the source material, i.e. music and speech, into better quality audio. Interference free reception Analogue systems suffer from an effect called multipath distortion. This is caused because waves do not behave in an orderly fashion, but bounce and reflect off buildings etc. DAB+ sees this as an advantage and uses the direct and reflected signals to actually reinforce the end result, allowing for better service more of the time. No need to re-tune A single DAB+ frequency can be used to cover the whole of the Australia, so solving many of the problems experienced with the earlier analogue system. DAB+ scans automatically and tunes-in all of the available stations in your area. Scolling text Broadcasters can transmit text to your radio. This way you can read the name of the DJ, artist, song title or any other information they choose. DAB+ coverage Check your local coverage at or alternatively text 0409-DRPLUS to receive an SMS confirming whether you reside in a DAB+ broadcast area. 5
 Power Adapter User Guide Positioning your DAB+ Radio Place your DAB+ Receiver on a flat / stable surface that is not subject to")
6 Getting Started Carefully remove your DAB+ Receiver from the box. You may wish to store the packaging for future use. In the Box Inside the box you will find: DAB+ Radio (Main Unit) Power Adapter User Guide Positioning your DAB+ Radio Place your DAB+ Receiver on a flat / stable surface that is not subject to vibrations. Avoid the following locations: Where the radio will be exposed to direct sunlight. Where the radio will be close to heat radiating sources. Where the humidity is high and ventilation is poor. Where it is dusty. Where it is damp or there is a possibility of water dripping or splashing onto unit. Adjusting the Aerial The aerial should be extended to ensure you receive the best reception possible in both DAB+ and FM radio modes. It may be necessary to alter the position of the DAB+ RADIO and /or aerial to achieve the best signal. Using Headphones You will require headphones fitted with a 3.5 mm diameter stereo plug. The headphone socket is located on the back of this unit. Headphones are not supplied with this DAB+ Receiver. Turning the Unit On/Off Connect the power adapter to the DC Jack on the back of the unit. Then insert the power adapter into the wall outlet. Turn the mains power on and then press the STANDBY Button to turn on the unit. Press the Standby Button to turn the unit to Standby. image. When you turn on your radio for the first time you will be presented with this 6

7 Getting Note: When you turn on the radio it will automatically search and store all the available stations. You should conduct an additional Full Scan to ensure all stations are picked up and stored. It is also recommended every few months to run a new scan to pick up any new DAB+ that may have begun broadcasting after purchasing your DAB+ radio. For initial use, conduct a full scan to auto search and store all DAB+ radio stations. Press the Menu Button and use the or Buttons to select the Full Scan option. Press the Select/NAV Button to confirm. The Full Scan may take you 1-2 minutes to complete, after all stations are stored you will Note: a. The DAB+ stations will be displayed and stored in alphanumeric order. The first station in the list will begin to play. b. If no DAB+ signal is found, it may be necessary for you to relocate your radio. 7
8 Using DAB+ Radio DAB+ Menu Options Volume Control Adjust the radio volume by pressing the or Buttons. 8
9 Using DAB++ Radio To View Station Information in DAB+ Mode Press the MENU Button then press the SELECT/NAV Button consecutively to show the different program information. Program Type (PTY): This is a description of the type of program provided by the DAB+ station or by the broadcaster. Signal Strength: Show a signal bar with the strength of the current station. Station Name: This will show the station that is broadcasting the program you are listening to. Frequency: This displays the station transmission frequency. Signal Error: This displays the signal error rate being received from 0 to 100. a. 0 means no error signal has been detected. b. While 100 means it is an extremely bad signal. Signal Information: This shows the digital bit rate and the signal mode. Time: This displays the time provided by the broadcaster. Date: This displays the date provided by the broadcaster. Dynamic Label Segment (DLS) This is scrolling text information supplied by the DAB+ station or by broadcaster. 9
10 Using DAB+ Radio To Show the Signal Strength in DAB+ Mode 1. Press the MENU Button during play, and Info will be displayed on the screen. Then press the SELECT/NAV Button to confirm. 2. Press the MENU Button and the SELECT/NAV Button repeatedly until Signal Strength is shown on the display. A signal bar will be displayed as shown below. The indicator on the signal bar shows the minimum acceptable signal Note: Stations with signal strength below the minimum signal level will not provide a steady stream of audio. DRC (Dynamic Range Control) You can set the level of the compression of stations to eliminate the differences in dynamic range or sound level between radio Note: Set DRC to off indicates no compression, set DRC to low indicates little compression, and set DRC to high shows maximum compression. 1. Press the MENU Button, then press the or Buttons to select the DRC menu. 2. Press the SELECT/NAV Button to confirm. 3. Press the or Button to select ideal DRC Mode. Press the SELECT/NAV Button to confirm. Prune Note: Pruning Radio order will remove inactive stations from the station list. 1. Press the MENU button, then press or to select Prune menu. 2. Press the SELECT/NAV button to confirm. 3. Press or to select Yes, and then press SELECT/NAV to confirm. 10

11 Using Presets Setting Station Presets Your radio can store 10 DAB+ & 10 FM station presets. To store Note: This is the same for DAB+ and FM Radio stations. 1. Press the DAB+/FM Button to select the mode you wish to set. 2. While playing your favourite station, press and hold the PRESET Button. 3. Press the or Button to cycle through the preset stations store numbers, Then select your preferred preset station number and press the SELECT/NAV Button to confirm. Playing a Preset Station To select a stored station: 1. Press the DAB+/FM Button to select the mode you wish to play. 2. Press the PRESET Button to enter Preset Recall setting. 3. Press the or Buttons to select your preset number and then press the SELECT/NAV Button to confirm. 11
 or it will play the last FM station you were listening to. 3. To manually change the FM frequency, press the SELECT/NAV Button and then immediately press the or to change the frequency by 0.")
12 Using FM Radio 1. Press the DAB+/FM Button to switch to FM Mode from DAB+ Mode. 2. Once in FM mode, it will start at the beginning of the FM frequency range (87.50MHz) or it will play the last FM station you were listening to. 3. To manually change the FM frequency, press the SELECT/NAV Button and then immediately press the or to change the frequency by 0.05MHz. 4. To auto-search in FM Mode, press the SELECT/NAV Button and then press and hold the or Buttons and it will skip forwards or backwards to the next available Note: 1. The display will show the frequency changing until it stops on the next station. 2. After it reaches the end of the frequency range, it goes back to the start. FM Menu Options 12
13 Using FM Radio To View Station Information in FM Mode Press the MENU Button then press the SELECT/NAV Button consecutively to show the different program information Program Type (PTY): This is a description of the type of program provided by the FM station or by the broadcaster. Station Name This displays the transmission (station name) of the station you are listening to. Audio Type This will display the audio type of the station you are listening to. It will either be stereo or Mono. Time: This displays the time provided by the broadcaster. Date: This displays date provided by the broadcaster. Radio Text This is scrolling text information supplied by the FM broadcasters. It may comprise of information on music titles or details of the program and is provided by the broadcaster. Scan Setting 1. Press the MENU Button, and then press or to select Scan Setting menu. 2. Press the SELECT/NAV Button to Note: You can choose between Strong Stations Only and All Stations. If you choose Strong Stations Only, the menu will show only the stations with strong signal strength. If you choose All Stations, all detected stations will be shown. 3. Press the or to select your preferred option, and then press the SELECT/NAV to confirm. 13
14 4. System Setup How to Enter System Setup 1. Press the MENU Button, and then press the or to select System Menu. 2. Press the SELECT/NAV Button to confirm. Once confirmed the below screen will show. 3. Press the or to cycle through the System Menu options, including Time, Backlight, Factory Reset and SW version. How to Set the Note: You can set the clock two ways - Manually or by Auto Update. 1. Select the System Menu and then select the Time Setting. Press the SELECT/NAV Button to confirm. Choose 12/24 Hour Format 1. Once in the Time System Menu, you can select to set the time in either 12 or 24 hour format. 2. Press the or Buttons to choose either 12 hour or 24 hour time, then press the SELECT/NAV to confirm. 14


15 System Setup Set Time / Date (Manually) 1. In the time menu, press or to select Set Time/Date option, then press the SELECT/NAV button to confirm. 2. Press the or Buttons to change the hours and then press the SELECT/NAV Button to confirm. 3. Press the or Buttons to change the minutes and then press the SELECT/NAV Button to confirm. Then you will be asked to set the date. Set Date Format 1. In the Time System Menu, press the or Buttons to select the set date option, then press the SELECT/NAV Button to Note: You can choose to set the date as either MM-DD-YYYY or DD-MM-YYYY. 2. Press the or Buttons to select the preferred date format and then press the SELECT/NAV Button to confirm. 3. Press the or to change the month or date and then press the SELECT/NAV Button to confirm. 4. Press the or to change the month or date and then press the SELECT/NAV Button to confirm. 5. Press the or to change the year and then press the SELECT/NAV Button to confirm. Auto Update 1. In the Time System Menu, press the or to select Auto Update option, and then press the SELECT/NAV Button to confirm. The Auto Update option will automatically update the date and time based on the information provided by the DAB+ Note: You can choose Auto update from DAB+ and No update. 2. Press the or to select Auto update from DAB+, then press the SELECT/NAV Button to confirm. 15

16 System Setup How to Set Note: Ensure that the time is set correctly before you set the Alarm. 1. Press the ALARM Button to select the Alarm Setting and to set alarm1 to set the alarm time you desire. If you wish to set alarm2, press the ALARM Button twice. 2. Press the SELECT/NAV to confirm to enter either alarm1 or alarm2. 3. Press the or to select Alarm option as on or off. Press the SELECT/NAV Button to confirm. 4. It will now ask you to set the Alarm time, press the or Buttons to alter the hour, and then the SELECT/NAV Button to confirm. Use the same method for setting the minutes. 5. Press the SELECT/NAV Button to confirm, then press the or to set the duration time of the alarm sound. You can select either 15, 30, 45, 60 or 90 Note: The alarm will sound until the selected duration time is finished. 6. Press the SELECT/NAV Button to confirm. Press the or Buttons to set the alarm source, you can choose between Buzzer, DAB+ or FM modes. 7. Press the SELECT/NAV Button to confirm. Press the or Buttons to set the frequency of alarm, you can choose between daily, weekdays, weekends or once. 16

17 System Setup 8. Press the SELECT/NAV Button to confirm. Press the or Buttons to set the alarm volume level. 9. Press the SELECT/NAV Button to confirm and Alarm Saved will display on the screen and is now set. You can also set Alarm 2 by following the same steps. SNOOZE 1. When the Alarm sounds and you wish to continue snoozing, press the SNOOZE Button to activate the snooze function and postpone alarm for 5 minutes. 2. The radio will go into Standby mode and start to count down the 5 minutes unit snooze is over, see below. 3. The Alarm will sound again after the snooze time has elapsed, at this time, if you press the SNOOZE Button again and it will count down for another 5 minutes. To Turn Off Alarm 1. Press the ALARM Button to enter alarm1 or Alarm2 setting. 2. Press the SELECT/NAV Button to confirm and change the Alarm status from on to off. Press the SELECT/NAV Button to confirm. Then follow the steps, until you reach Alarm Saved. How to Set Radio Sleep Time 1. Press the SNOOZE Button during play and the display will show - Set sleep time Sleep Off, make sure neither alarm is set when setting sleep time. 2. Press the SNOOZE Button repeatedly to select the Sleep time on and the amount of time before you wish the radio to automatically switch off. You can select - Sleep Off, 15, 30, 45, 60 or 90 minutes. 3. Press the SELECT/NAV Button to confirm, and then sleep icon will be displayed. 4. To view the set sleep time, press the SELECT/NAV Button. 5. Once set the radio will automatically turn to Standby mode after the set time has elapsed. 17
18 System Setup How to set Note: You can adjust the backlight level to High, Medium and Low. High backlight will make the backlight brightest and easy to view. Low backlight will dim the brightness using less power and making it less distracting at night. Setting Backlight for Power on Mode 1. In System Menu, select the Backlight Menu and press the SELECT/NAV Button to confirm. 2. In the Backlight Menu, use the or to select the Power On setting and press the SELECT/NAV Button to confirm. 3. Press the or Buttons select your ideal backlight option for Power On Mode; High, Low and Medium. Then press the SELECT/NAV Button to confirm. Setting the Backlight for Standby Mode 1. In System Menu, select the Backlight Menu and press the SELECT/NAV Button to confirm. 2. In the Backlight Menu, use the or to select the Standby Mode setting and press the SELECT/NAV Button to confirm. 3. Press the or Buttons select your ideal backlight option for Power On Mode; High, Low and Medium. Then press the SELECT/NAV Button to confirm. 18


19 System Setup How to Factory Note: Doing this will delete all the preset stations, alarms and time settings, and return the radio to its original factory settings. 1. Press the MENU Button and then press the or Buttons to select the System Menu. Press the SELECT/NAV Button to confirm, and then press the or to Factory Reset option. 2. Press the SELECT/NAV Button to confirm 3. Once selected you will be asked if you want to conduct a Factory Reset. Press the or Buttons to select Yes or NO. Then press the SELECT/NAV Button to confirm, and then radio will begin to reset. How to get SW Version 1. Once in System Menu, press the or to select SW version Setting. 2. Press the SELECT/NAV to confirm. You will now be able to view the software information of this radio. 19
20 Troubleshooting and Technical Specification Troubleshooting If a fault occurs, first check the points listed below before taking the set for repair. If you are unable to remedy a problem by following these hints, consult you retailer or service professional. WARNING: Under no circumstances should you try to repair the set yourself, as this would invalidate the warranty. PROBLEM POSSIBLE CAUSE REMEDY No sound Headphones maybe connected Volume not adjusted Power cord is not correctly connected Disconnect the headphones Adjust the Volume Connect the power cord properly Unit Buttons are not working Electrostatic discharge Turn off the unit, disconnect the mains plug, and reconnect after a few seconds Radio poor reception Weak radio aerial signal. Interference caused by the vicinity of electrical equipment like TVs, Video Recorders, Computer, Thermostats, Fluorescent Lamps (TL) engines etc. Aim the aerial for best reception, and ensure it is fully extended. Keep the unit away from other electrical equipment Technical Specification Specifications.. DAB+ and FM radio Speaker Power W Frequency Range.. FM: MHz DAB+: MHz LCD Display.... High resolution display Power Supply.. AC/DC Adaptor: DC 9V, 600mA Max Power Consumption... 5W Dimension mm x 122mm x 54mm 20
21 Warranty Please keep your receipt as proof of purchase. This product is warranted for any defect in materials or workmanship for one year after the original date of purchase. This product is for normal domestic and office use only. This warranty does not cover damage from misuse or neglect, accidental damage, vermin infestation, excessive voltages such us lightning or power surges or any alternation that affects the performance or reliability of the product. In the unlikely event that your product fails to work normally, please contact the Bush Warranty on (Australia) or (New Zealand) and have your receipt of purchase on hand. This warranty is subject to the following provisions: It is only valid within boundaries of the country of purchase The product must be correctly assembled and operated in accordance with the instructions contained in the manual This product must be used solely for domestic purposes The warranty does not cover accidental damage The warranty will be rendered invalid if the product is resold or has been damaged by inexpert repair The manufacturer disclaims any liability for incidental or consequential damaged This warranty is in addition to, and does not diminish, your statutory or legal rights. PO BOX 6287 Silverwater NSW Bush Warranty: Australia Bush Warranty: New Zealand 21
22 PO BOX 6287 Silverwater NSW
GDR750DAB GDR730DABSOL
 The DAB+ RECHARGEABLE & SOLAR DIGITAL RADIO GDR750DAB GDR730DABSOL The Gold Technical Support Line: 1902 215 259 Personal Product Support (Charges will apply at $2.95 per minute) 1 Introduction Thank you
GMR1887DAB DAB Digital and FM Radio User Guide. IMPORTANT: Please read all instructions carefully before use and keep for future reference.
 GMR1887DAB DAB Digital and FM Radio User Guide IMPORTANT: Please read all instructions carefully before use and keep for future reference. Introduction Thank you for buying the GOODMANS DAB Digital and
Your DAB+ Radios. Contents
 Your DAB+ Radios Contents Contents... 2 Introduction... 2 Safety Instructions... 3 Your DAB+... 4 What Is DAB+... 5 Getting Started... 6-7 Operating Instructions... 8-11 Warning /Troubleshooting/Specifications...
DIGITAL RADIO INCLUDING FM, DAB AND DAB+
 DIGITAL RADIO INCLUDING FM, DAB AND DAB+ INSTRUCTION MANUAL Safety Precautions To achieve the utmost in enjoyment and performance, and in order to become familiar with its features, please read this manual
USER MANUAL KADABXXTBLA
 USER MANUAL KADABXXTBLA Instruction Manual KADABXXTBLA DAB+ and FM Radio Safety Precautions To achieve the utmost in enjoyment and performance, and in order to become familiar with its features, please
Contents ... What is DAB + Digital Radio?... 2 Setting up... 3 Backlit display... 4 Using headphones... 4 Your radio Switch off...
 Contents Introduction... 2 What is DAB + Digital Radio?........... 2 Setting up........... 3 Backlit display.............. 4 Using headphones........... 4 Your radio... 5 Switch on........... 6 Telescopic
ENGLISH PORTUGUÊS NEDERLANDS DAB200
 DEUTSCH ENGLISH FRANÇAIS NEDERLANDS ESPAÑOL PORTUGUÊS NORSK DAB200 Contents Introduction..... 2 What is DAB + Digital Radio?.... 2 Setting up..... 3 Backlit display.... 4 Using headphones...... 4 Your
PR200DAB DAB+/AM/FM RADIO USER MANUAL IMPORTANT! WARRANTY INFORMATION INSIDE. PLEASE READ. Trademark of TEAC Corporation JAPAN
 PR200DAB DAB+/AM/FM RADIO USER MANUAL IMPORTANT! WARRANTY INFORMATION INSIDE. PLEASE READ Trademark of TEAC Corporation JAPAN www.teac.com.au WARRANTY PROCEDURE v1.7b: July 2016 for 12M Replacement Please
Model Number: GSDAB3004
 DAB/FM Digital Radio & Alarm Clock Model Number: GSDAB3004 Please read these instructions carefully and keep for future reference For Customer Services & Spare Parts please call 0845 209 7461 Opening times:
OXFORD MODEL: OXFORD OXFORD DAB+ FM RADIO USER MANUAL
 OXFORD MODEL: OXFORD USER MANUAL 1 2 3 Welcome Your Oxford DAB+ FM Radio 2.1 In The Box 2.2 Top View 2.3 Side View 2.4 Rear View Quick Setup 3.1 Power On and Autoscan 3.2 Changing DAB Stations 3.3 Scanning
DAB+ / FM RDS digital clock radio with dual alarm
 ROBERTS Enjoy Listening DAB+ / FM RDS digital clock radio with dual alarm Please read this manual before use Contents Controls... -3 Using the clock radio for the fi rst time...4 Operating your clock radio...5
AZATOM SONANCE T1 Digital Radio. DAB+/DAB/FM Radio Alarm Clock. User Manual. This manual is available to download online at
 AZATOM SONANCE T1 Digital Radio DAB+/DAB/FM Radio Alarm Clock User Manual This manual is available to download online at www.azatom.com Thank you for shopping with AZATOM Please read this manual carefully
USER S MANUAL. DAB+ Clock Radio Radius II
 DAB+ Clock Radio Radius II USER S MANUAL Thank you for purchasing this product. Please read this manual thoroughly before operating the unit, and keep it for future reference. WARNING LIGHTNING FLASH WITH
Always there to help you. Register your product and get support at AJB4300. Question? Contact Philips.
 Always there to help you Register your product and get support at www.philips.com/support Question? Contact Philips AJB4300 User manual Contents 1 Important 2 Safety 2 2 Your FM/DAB+ clock radio 3 Introduction
USER MANUAL. Model No.: DB-230
 USER MANUAL Model No.: DB-230 1 Location of controls 1. UP Press the button to select the different DAB station under DAB mode or press and hold to quick scan the FM station in upward frequency under FM
DAB450. DAB+/FM digital radio USER MANUAL IMPORTANT! WARRANTY INFORMATION INSIDE. PLEASE READ. Trademark of TEAC Corporation JAPAN
 DAB450 DAB+/FM digital radio USER MANUAL IMPORTANT! WARRANTY INFORMATION INSIDE. PLEASE READ Trademark of TEAC Corporation JAPAN www.teac.com.au WARRANTY PROCEDURE v1.5.2: DEC 2011 Please read the owner
DEUTSCH ITALANIO ENGLISH NORSK FRANÇAIS DANSK NEDERLANDS Hersteller UR8200
 DEUTSCH ENGLISH FRANÇAIS NEDERLANDS ITALANIO NORSK DANSK Hersteller Wörlein GmbH Tel.: +49 9103/71670 Gewerbestrasse 12 Fax.: +49 9103/716712 D 90556 Cadolzburg Email. info@woerlein.com GERMANY Web: www.woerlein.com
Digital DAB and FM Radio
 CHESERON Digital DAB and FM Radio CB4-DAB-BLK Instructions Guide Contents Controls And Functions... 1 What s In he Box?... 4 Support...5 Instructions Guide... 6 Basic Operation... 6 DAB/DAB+ Radio... 7
DEUTSCH NORSK ENGLISH SVENSKA FRANÇAIS DANSK NEDERLANDS ČEŠTINA ITALANIO Hersteller UR190
 DEUTSCH ENGLISH FRANÇAIS NEDERLANDS ITALANIO NORSK SVENSKA DANSK ČEŠTINA Hersteller Wörlein GmbH Tel.: +49 9103/71670 Gewerbestrasse 12 Fax.: +49 9103/716712 D 90556 Cadolzburg Email. info@woerlein.com
General Safety Instructions
 General Safety Instructions Read this manual thoroughly before fist use and keep it in a safe place for future reference, along with the warranty card, purchase receipt and carton. The safety precautions
Portable Digital & FM Radio
 SHELFORD II Portable Digital & FM Radio SEL-DAB-CRM-2 UK Instructions Guide Contents Controls And Functions... 1 What s In he Box?...3 Support... 4 Instructions Guide...5 Basic Operation... 5 DAB/DAB+
User guide. DR1704 DAB Radio
 User guide DR1704 DAB Radio IMPORTANT SAFETY INFORMATION CAUTION! RISK OF ELECTRIC SHOCK DO NOT OPEN TO REDUCE THE RISK OF ELECTRIC SHOCK DO NOT REMOVE COVER (OR BACK) This symbol indicates that there
CRX45iP USER MANUAL IMPORTANT! WARRANTY INFORMATION INSIDE. PLEASE READ. Trademark of TEAC Corporation JAPAN
 CRX45iP USER MANUAL IMPORTANT! WARRANTY INFORMATION INSIDE. PLEASE READ Trademark of TEAC Corporation JAPAN www.teac.com.au WARRANTY PROCEDURE v1.5.2: DEC 2011 Please read the owner s manual carefully
ROBERTS. DAB / DAB+ / FM RDS digital portable radio. Please read this manual before use
 ROBERTS DAB / DAB+ / FM RDS digital portable radio Please read this manual before use Contents Controls... 2-3 Battery operation...4 Using the AC adaptor...5 Operating your radio - DAB...6 Selecting a
User Guide. CR1101W DAB/FM Clock radio
 User Guide CR1101W DAB/FM Clock radio IMPORTANT SAFETY INFORMATION CAUTION! RISK OF ELECTRIC SHOCK DO NOT OPEN TO REDUCE THE RISK OF ELECTRIC SHOCK DO NOT REMOVE COVER (OR BACK) This symbol indicates that
Instruction Manual CDAB4312R
 Instruction Manual CDAB4312R Table of contents Accessories included...3 Overview of controls...3 Charging the CDAB4312R before use... 3 Charging the CDAB4312R before use (cont)... 4 Getting started...
User Manual. AZATOM Blackfriars DAB Speaker. This manual is available to download online at
 AZATOM Blackfriars DAB Speaker DAB+ / Calender / Clock / Alarm Clock / FM Radio / AUX-In User Manual This manual is available to download online at www.azatom.com Thank you for shopping with AZATOM Please
ROBERTS. DAB / DAB+ / FM RDS digital portable radio. Please read this manual before use
 ROBERTS DAB / DAB+ / FM RDS digital portable radio Please read this manual before use Contents Controls... 2-3 Battery operation...4 Using the AC adaptor...5 Operating your radio - DAB...6 Selecting a
Hyper-link ALL text to corresponding sections MODEL: GOSTR, GOCANDY, GODASH. DAB+ Digital Radio with Bluetooth and smartphone charging USER MANUAL
 GO Hyper-link ALL text to corresponding sections MODEL: GOSTR, GOCANDY, GODASH DAB+ Digital Radio with Bluetooth and smartphone charging USER MANUAL 1 Welcome 2 3 Your DAB+ Digital Radio 2.1 In The Box
Revival UNO. DAB / DAB+ / FM RDS portable digital radio. Please read this manual before use
 Revival UNO / + / FM RDS portable digital radio Please read this manual before use Contents Controls... 2-3 Battery operation...3 Using the buttons...3...4 Operating your radio -...5 Selecting a station
Always there to help you. Register your product and get support at OR7200. Question? Contact Philips.
 Always there to help you Register your product and get support at www.philips.com/welcome Question? Contact Philips OR7200 User manual Contents 1 Safety 2 2 What's in the box 3 3 Connect power 4 4 Turn
RD-21 ROBERTS. FM RDS/DAB digital radio. Sound for Generations. Please read this manual before use
 ROBERTS Sound for Generations RD- FM RDS/DAB digital radio Please read this manual before use Contents Controls... Battery operation...3 Mains operation...3 Operating your radio - DAB...4 Selecting a station
DAB Clock Radio. Instruction Manual LCRDAB10
 DAB Clock Radio Instruction Manual LCRDAB10 LCRDAB10_IB_final111001_Zell.indd 1 LCRDAB10_IB_final111001_Zell.indd 2 Contents Unpacking... 5 Product Overview... 6 Front View... 6 Rear View... 6 Top View...
Instruction Manual DAB/FM Radio with Bluetooth
 Instruction Manual DAB/FM Radio with Bluetooth DAB/FM Radio with Bluetooth Contents Important safety information... 3 Instructions for use... 5 Check the package contents... 5 Where to put your Radio...
Important safety instructions
 RCR-29 GB Version 1 Important safety instructions VERY IMPORTANT PLEASE READ Sangean suggest that you keep your AC Adapter at least 12 inches away from the radio while listening to the AM Band. Your Sangean
User Manual. Internet Radio Adaptor with DAB and Bluetooth DBA-03R. (Additional powered speaker / active speaker is required to use this product)
") User Manual Internet Radio Adaptor with DAB and Bluetooth DBA-03R (Additional powered speaker / active speaker is required to use this product) Please read this user manual carefully before using receiver
User Manual Internet Radio Adaptor with DAB and Bluetooth DBA-03R (Additional powered speaker / active speaker is required to use this product) Please read this user manual carefully before using receiver
Handheld DAB+ Radio Operation Guide
 Important safety instructions These warnings have been provided in the interest of safety. You MUST read them carefully before using the radio: * This radio is not intended for use by persons (including
ROBERTS. DAB / DAB+ / FM RDS Shower Radio with Bluetooth playback. Please read this manual before use
 ROBERTS / + / RDS Shower Radio with Bluetooth playback Please read this manual before use Contents Controls... 2-3 Battery operation...4 Display icons...5 Wall mounting...5 / wire aerial (inside the battery
You ll soon be enjoying your new DAB/FM Digital Radio.
 NE-3313 You ll soon be enjoying your new DAB/FM Digital Radio. It all begins here, with your instructions. Don t worry, there s nothing too technical coming up. Just simple, step-by-step guidance to get
Always there to help you. Register your product and get support at OR2200. Question? Contact Philips.
 Always there to help you Register your product and get support at www.philips.com/welcome Question? Contact Philips OR2200 User manual Contents 1 Safety 2 2 Your clock radio 3 Introduction 3 What's in
Register your product and get support at AE5430. EN User manual
 Register your product and get support at www.philips.com/welcome AE5430 User manual Concents 1 Important 4 Hearing Safety 4 English 2 Your FM/DAB+ radio 5 Introduction 5 What s in the box 5 Overview of
USER MANUAL KASPKI5WNGA
 USER MANUAL KASPKI5WNGA Safety Information 9. Do not defeat the safety purpose of the polarized or grounding - type plug. If the provided plug does not fit into your outlet, consult an electrician for
Stereo DAB+/FM Radio
 Stereo DAB+/FM Radio Contents Where to put your radio............................... 3 Setting up............................................ 3 Your Stereo DAB+ / FM radio.......................... 5 Using
Always there to help you. Register your product and get support at AJ5305D_12. Question? Contact Philips.
 Always there to help you Register your product and get support at www.philips.com/welcome Question? Contact Philips AJ5305D_12 User manual Contents 1 Important 3 Safety 3 2 Your Docking Entertainment System
Instruction Manual GB KH335BE / KH335WE. Portable DAB+ / DAB Radio
 Instruction Manual KH335BE / KH335WE Portable DAB+ / DAB Radio KH335BE KH335WE Contents SOME DOS AND DON TS ON THE SAFE USE OF EQUIPMENT... 5 Safety Warnings... 7 Unpacking... 9 Product Overview...10
User manual. Register your product and get support at Clock Radio Radio-réveil AJB3000
 Clock Radio Radio-réveil User manual AJB3000 Register your product and get support at www.philips.com/support Contents 1 Important 1 Safety 1 Risk of swallowing batteries! 1 Notice 1 2 Your FM/DAB radio
AM/FM DUAL ALARM CLOCK RADIO WITH DIGITAL TUNING
 AM/FM DUAL ALARM CLOCK RADIO WITH DIGITAL TUNING USER MANUAL KT2051MBY THIS IS NOT A TOY! CAUTION: Electrically Operated Product Please use care when plugging AC adapter into AC outlet. WARNING TO PREVENT
Always there to help you. Register your product and get support at AJ5305D/05. Question? Contact Philips.
 Always there to help you Register your product and get support at www.philips.com/welcome Question? Contact Philips AJ5305D/05 User manual Content 1 Important 2 Safety 2 2 Your Docking Entertainment System
AD U DAB/FM Tuner. Item ref: UK User Manual
 AD-100 1U DAB/FM Tuner Item ref: 952.979UK User Manual Caution: Please read this manual carefully before operating Damage caused by misuse is not covered by the warranty Introduction Thank you for choosing
Contents. Controls Stereo / Mono setting - FM Battery operation Scan sensitivity setting - FM Using the AC adaptor...
 DPR-69+ GB Contents Controls... 2-3 Battery operation... 4-5 Using the AC adaptor... 6 Lock switch... 6 Operating your radio - DAB... 7 Selecting a station - DAB... 8 Secondary services - DAB... 8 Display
USER MANUAL KADABXXSTDB
 USER MANUAL KADABXXSTDB Safety Information 9. Do not defeat the safety purpose of the polarized or grounding - type plug. a polarized plug has two blades with one wider than the other. A grounding type
 Register your product and get support at www.philips.com/welcome AJH5100 EN User manual Contents 1 Important 3 Safety 3 2 Your clock radio 4 Introduction 4 What's in the box 4 Overview of the main unit
PR-D9CL. GB Version 1
 PR-D9CL GB Version 1 Table of contents Important safety instructions... 2-3 Controls... 4-6 Operating your radio Search tuning AM / FM... 8 Manual tuning AM / FM / Setting up the tuning step increment...
DENVER CRP-514 ENGLISH FUNCTION AND CONTROLS
 DENVER CRP-514 ENGLISH FUNCTION AND CONTROLS 1. (AL1) ALARM 1 ON / OFF SET 2. > / TUNE +/ C-F/YEAR
ROBERTS RD-25. Sound for Generations. MW/FM RDS/DAB Digital Portable Radio. Please read this manual before use
 ROBERTS Sound for Generations RD-5 MW/FM RDS/DAB Digital Portable Radio Please read this manual before use Contents Controls... -4 Battery operation...5 Mains operation...5 Operating your radio - DAB...6
R9999 ROBERTS. PLL Synthesised 3 band radio with station name display. Sound for Generations. Please read this manual before use
 ROBERTS Sound for Generations R9999 PLL Synthesised 3 band radio with station name display Please read this manual before use Contents Important Information... 1 Automatic plug and play setup... 2 Controls...
DAB+ / FM Retro Radio
 INSTRUCTION MANUAL DAB+ / FM Retro Radio Model Number: ARDR-1116 ii Welcome Congratulations on choosing to buy a BAUHN product. All products brought to you by BAUHN are manufactured to the highest standards
Always there to help you. Register your product and get support at AJB4700. Question? Contact Philips.
 Always there to help you Register your product and get support at www.philips.com/welcome Question? Contact Philips AJB4700 User Manual Contents 1 Important 3 2 Your FM/DAB+ clock radio 3 Introduction
Always there to help you. Register your product and get support at AJ3400. Question? Contact Philips.
 Always there to help you Register your product and get support at www.philips.com/support Question? Contact Philips AJ3400 User manual Contents 1 Important 3 2 Your clock radio 4 What's in the box 4 3
Always there to help you. Register your product and get support at AJ3400/79. Question? Contact Philips.
 Always there to help you Register your product and get support at www.philips.com/support Question? Contact Philips AJ3400/79 User manual Contents 1 Important 3 2 Your clock radio 4 What's in the box 4
Maximum DAB II USER MANUAL
 Maximum DAB II USER MANUAL BRUGERMANUAL G e t t i n g 1 external power connector Know your radio on /off switch aerial Rating plate (Underneath) LCD screen MENU button (see page 6) battery compartment
Instruction manual WO322
 Instruction manual WO322 You ll soon be enjoying your new Retro Analogue Clock Radio. It all begins here, with your instructions. Don t worry, there s nothing too technical coming up. Just simple, step-by-step
PR-D5 中文 GB. Version 1
 PR-D5 中文 GB Version 1 1. 2. 3. Important safety instructions Read and understand all safety and operating instructions before the radio is operated. Retain instruction: The safety and operating instructions
A WORLD OF LISTENING WARNING: TO PREVENT FIRE OR ELECTRIC SHOCK HAZARD, DO NOT EXPOSE THIS PRODUCT TO RAIN OR MOISTURE.
 DDR-3 FM RDS/DAB digital radio A WORLD OF LISTENING THE LIGHTNING FLASH AND ARROW- HEAD WITHIN THE TRIANGLE IS A WARNING SIGN ALERTING YOU OF DANGEROUS VOLTAGE INSIDE THE RADIO. WARNING: TO PREVENT FIRE
Always there to help you. Register your product and get support at AJ3400/37. Question? Contact Philips.
 Always there to help you Register your product and get support at www.philips.com/support Question? Contact Philips AJ3400/37 User manual Contents 1 Important 3 Safety 3 2 Your clock radio 4 What's in
IMPORTANT SAFETY INSTRUCTIONS
 WR-2 GB Version 1 IMPORTANT SAFETY INSTRUCTIONS 1. 2. 3. 4. 5. 6. 7. 8. 9. Read these instructions. Keep these instructions. Heed all warnings. Follow all instructions. Do not use this apparatus near water.
Always there to help you. Register your product and get support at AE5220. Question? Contact Philips.
 Always there to help you Register your product and get support at www.philips.com/welcome Question? Contact Philips User manual AE5220 Contents 1 Important 2 Safety 2 Notice 2 English 2 Your FM/DAB radio
Instruction manual DAB-1507BT
 Instruction manual DAB-1507BT Contents You ll soon be enjoying your new Stereo DAB/FM Radio with Bluetooth. It all begins here, with your instructions. Don t worry, there s nothing too technical coming
Always there to help you. Register your product and get support at AJ3232. Question? Contact Philips.
 Always there to help you Register your product and get support at www.philips.com/support Question? Contact Philips AJ3232 User manual Contents 1 Important 2 Safety 2 2 Your clock radio 3 Introduction
RCR-24 中文 GB. Version 1
 RCR-24 中文 GB Version 1 GB Please note not all AC adapters are alike. The AC adapter that is included with this radio is designed to be used exclusively with this device. Do not use an AC adapter that differs
Blutune 5 / Blutune 6
 Blutune 5 / Blutune 6 / + / FM RDS / Bluetooth digital radio with clock and alarms Please read this manual before use Contents Blutune 5 & Blutune 6 controls... 2-4 Battery operation...5 Using the buttons...5...6
Quick Start Guide. P-TEC Gotthard
 Quick Start Guide P-TEC Gotthard Important Notice This product has been designed and manufactured so that it does not represent a personal safety hazard for the user. Any misuse can lead to electric shock
AM/FM ARMBAND RADIO WITH CLOCK AND ALARM SAB-55A USER MANUAL
 AM/FM ARMBAND RADIO WITH CLOCK AND ALARM SAB-55A USER MANUAL PLEASE READ THIS USER MANUAL COMPLETELY BEFORE OPERATING THIS UNIT AND RETAIN THIS BOOKLET FOR FUTURE REFERENCE. A IMPORTANT SAFETY INFORMATION
Instruction manual. DAB/FM Radio with Bluetooth DAB30
 Instruction manual DAB/FM Radio with Bluetooth DAB30 Contents You ll soon be enjoying your new DAB/FM Radio with Bluetooth. It all begins here, with your instructions. Don t worry, there s nothing too
Important safety instructions
 MMR-88 Version 1 Important safety instructions 1. 2. 3. 4. 5. 6. 7. 8. 9. Please read these instructions carefully. Please keep these instructions for future reference. Heed all warnings Follow all instructions
Big Knob Radio User s Guide Item Number: All brand names and trademarks are the property of their respective owners
 Big Knob Radio User s Guide Item Number: 11009726 All brand names and trademarks are the property of their respective owners Contents Overview...3 Quick Start Guide...3 Package Contents...3 Diagram of
Always there to help you. Register your product and get support at AJ4300. Question? Contact Philips.
 Always there to help you Register your product and get support at www.philips.com/support Question? Contact Philips AJ4300 User manual Contents 1 Important 2 Safety 2 2 Your clock radio 3 Introduction
Always there to help you. Register your product and get support at AJ7045D. Question? Contact Philips.
 Always there to help you Register your product and get support at www.philips.com/welcome Question? Contact Philips AJ7045D User Manual Contents 1 Important 3 Risk of swallowing batteries 3 2 Your clock
Controls. LCD display A B C D E F
 H205 Version 1 1 2 3 4 5 6 13 12 11 7 8 9 10 14 15 17 18 16 1 19 Controls 1 2 3 4 5 6 7 8 9 10 11 12 13 14 15 16 17 18 19 Carrying strap holder Preset 1 Preset 2 Preset 3/STEP button Preset 4 LCD display
DAB / DAB+ / FM RDS digital radio. Please read this manual before use
 DAB / DAB+ / FM RDS digital radio Please read this manual before use Contents Controls...2-3 Battery operation using alkaline batteries...4 Battery operation using rechargeable batteries...5 Using the
audio JCR-332 AM/FM Stereo CD Dual Alarm Clock Radio INSTRUCTION MANUAL
 audio WARNING TO PREVENT FIRE OR SHOCK HAZARD, DO NOT USE THIS PLUG WITH AN EXTENSION CORD, RECEPTACLE OR OTHER OUTLET UNLESS THE BLADES CAN BE FULLY INSERTED TO PRE- VENT BLADE EXPOSURE. TO PREVENT FIRE
Operating instruction Mode d emploi Instruccions de manejo Gebruiksaanwijzing Bedienungsanleitung GB F E NL D
 DAB Plus/FM RDS digital portable radio with built-in battery charger Radio portable numérique DAB Plus/FM RDS avec chargeur de batterie intégrée Radio portátil DAB Plus/FM RDS digital con cargador de batería
DAB / DAB+ / FM RDS digital portable radio. Please read this manual before use
 DAB / DAB+ / FM RDS digital portable radio Please read this manual before use Contents Controls...2-3 Battery operation using alkaline batteries...4 Battery operation using rechargeable batteries...5 Using
Always there to help you. Register your product and get support at AJ3200. Question? Contact Philips.
 Always there to help you Register your product and get support at www.philips.com/support Question? Contact Philips AJ3200 User manual Contents 1 Important 2 Safety 2 2 Your clock radio 3 Introduction
ENVIRONMENTAL PROTECTION
 ENVIRONMENTAL PROTECTION Do not dispose of this product with the normal household waste at the end of its life cycle. Return it to a collection point for the recycling of electrical and electronic devices.
Always there to help you. Register your product and get support at ORD7300. Question? Contact Philips.
 Always there to help you Register your product and get support at www.philips.com/welcome Question? Contact Philips ORD7300 User manual Contents 1 Safety 2 2 Your docking system 4 Introduction 4 What's
Register your product and get support at DA1200. User manual
 Register your product and get support at DA1200 User manual Contents 1 Important 5 Safety 5 2 Your DAB+ digital radio 8 Introduction 8 What s in the box 8 Overview 9 3 Get started 11 Connect power 11
ENGLISH User s Guide. Safety & Regulatory Information
 ENGLISH User s Guide Creative SoundWorks 500DAB Information in this document is subject to change without notice and does not represent a commitment on the part of Creative Technology Ltd. No part of this
UR200SI / UR200WE ENGLISH
 ENGLISH Hersteller Wörlein GmbH Tel.: +49 9103/71670 Gewerbestrasse 12 Fax.: +49 9103/716712 D 90556 Cadolzburg Email. info@woerlein.com GERMANY Web: www.woerlein.com UR200SI / UR200WE ENVIRONMENTAL PROTECTION
Always there to help you. Register your product and get support at AJ2000. Question? Contact Philips.
 Always there to help you Register your product and get support at www.philips.com/support Question? Contact Philips AJ2000 User manual Contents 1 Important 2 Safety 2 2 Your clock radio 3 Introduction
HDR-650. Instruction Manual. Digital AM/FM Receiver with HD Radio Technology. Please read this manual carefully before operation
 HDR-650 Digital AM/FM Receiver with HD Radio Technology Instruction Manual Please read this manual carefully before operation Precautions The lightning flash with arrowhead symbol within an equilateral
Always there to help you. Register your product and get support at AJ3200. Question? Contact Philips.
 Always there to help you Register your product and get support at www.philips.com/support Question? Contact Philips AJ3200 User manual Contents 1 Important 2 2 Your clock radio 2 Introduction 2 What's
Always there to help you. Register your product and get support at AE5220. Question? Contact Philips.
 Always there to help you Register your product and get support at www.philips.com/support Question? Contact Philips AE5220 User manual Contents 1 Important 2 Safety 2 Notice 2 2 Your FM/DAB radio 4 Introduction
 Register your product and get support at www.philips.com/welcome Docking Entertainment System DC315 EN User manual 1 a f b c d e g h i j m k l EN 1 Important Safety Important Safety Instructions a Read
DAB-FM Radio. Operating Instructions. Panasonic Corporation Web Site: RQTN0174 L0114CH0. Model No. RF-D10
 Operating Instructions DAB-FM Radio Model No. RF-D10 Thank you for purchasing this product. For optimum performance and safety, please read these instructions carefully. Please keep this manual for future
DAB / DAB+ / FM RDS / Bluetooth portable digital radio with clock and alarms RD70. Please read this manual before use
 DAB / DAB+ / FM RDS / Bluetooth portable digital radio with clock and alarms RD70 Please read this manual before use Contents Controls...2-3 Battery operation...3 Navigation controls...4...5 Operating
WOOFit DAB+ USER MANUAL
 WOOFit DAB+ USER MANUAL THANK YOU! Thank you for purchasing this WOOFit DAB+ Radio from SACKit. Please read the entire user manual before using the product, and save it for future reference. We reserve
R9939 ROBERTS. PLL Synthesised 3 band mains battery radio. Sound for Generations. Please read this manual before use
 ROBERTS Sound for Generations R999 PLL Synthesised band mains battery radio Please read this manual before use Contents Important Information... 1 Automatic FM setup... 2 Controls... - Display... Battery
RD-15 ROBERTS. DAB digital radio. Sound for Generations. Please read this manual before use
 ROBERTS Sound for Generations RD-5 DAB digital radio Please read this manual before use Contents Controls... Battery operation... 3 Mains operation... 3 Operating your radio - DAB... 4 Selecting a station
DX-395. FM/AM/SW1/SW2 PLL Synthesized Receiver OWNER S MANUAL. Cat. No Please read before using this equipment.
 20-225.fm Page 1 Wednesday, August 4, 1999 10:07 AM Cat. No. 20-225 OWNER S MANUAL Please read before using this equipment. DX-395 FM/AM/SW1/SW2 PLL Synthesized Receiver 20-225.fm Page 2 Wednesday, August