Here's our account of what we did. I'm also attaching some questions that were asked of us on our procedure and our answers, of course.
|
|
|
- Austen Singleton
- 5 years ago
- Views:
Transcription
1 Here's our account of what we did. I'm also attaching some questions that were asked of us on our procedure and our answers, of course. We took off the SS rubscrape all the way around and sanded off the bottom paint & barrier a couple of inches below the waterline so that we could get the primer/paint on those exposed areas. I did etch the boot stripe lines a little so that we wouldn't lose them, but it wasn't really necessary. Awgrip project on Sin Sal: This is all per the Awlgrip instructions and advice from two USPAINT reps. You can get a copy off the internet, They also have a number that you can call if you have questions (I had many). I'd leave a message and they'd get back to me with 15 mins. What I was calling them for was really for assurance that we were doing the right thing. Prior to sanding, we wiped down the surface with Awlgrip "Surface Cleaner, T0008". The instructions say that some people use Comet cleanser and 3M Scotchbrite pads to scrub the boat clean. Then sand, with 220 grit paper. We used Comet cleanser first, making sure that the water would not bead anywhere, then wiped with T0008. We used 150 grit sandpaper on a Porter orbital sander. Once we had all the hull "clean", we proceeded to repair dings, scratches and gelcoat imperfections, etc. The primer and paint will not cover it all up!! This is what took us the longest time in the whole project. Once the surface has been prepared to your liking, you're now ready to apply the prime coats. First, at least two coats of primer; "545 Epoxy Primer, D8001,"Converter, D3001", and "Reducer, T0031". If I was to paint again, I would put on three coats of primer (better base). I called the rep. at USPAINT and he advised me to roll on two or three coats of 545 without sanding. Once the second or third (final primer) coat has cured, you can sand the surface smooth... remembering not to sand too aggressively. We applied one coat per day. I would wait at least two days on the final coat before sanding. We were a little anxious to get on with the project and realized that the final coat was not ready to sand. I called the rep up and he did say to wait another day, because the temperature had fallen below 55 during the night. The curing process stops if that happens Your application depends on the temperature (and wind),of course, for the day you are applying the product. One person could easily apply the primer, as you don't have to be that careful with the application. You also would not have to have "just the right weather" to apply this stuff like you would on the topcoat application. Remember not to sand too aggressively, as you don't want to get back down to the gel coat, Follow the sanding by washing it down really good making sure the sanding residue is mostly gone and then do the solvent (T0008) cleaning, again! Prior to putting on the first topcoat, lightly wipe down with a tack cloth to remove any remaining dust, etc. file:///c /T34_tech_articles/awlgrip/text.txt[8/24/ :32:23 PM]
2 Now, apply the topcoats in the color of your choice. (Minimum of two... I would go three for a better base in case of future repairs). The instructions say that if you apply the second coat within 18 hours, or something like that, you do not need to sand between coats. We did lightly sand after the first coat. It does not actually take that much time to lightly sand the boat, and actually you only really want to "scuff" the gloss off. BUT... don't forget to clean it again with the T0008 and then follow up with the tack cloth. I used a 7" foam roller to apply the topcoat and made approximately two vertical passes. At that point Donna would then lightly tip the paint vertically, top to bottom, top to bottom. This brings down any excess paint to help prevent sagging, runs, etc. The cove strip presented a problem because it accumulated paint, but we both had to keep a sharp eye on that. You can go back for only a couple of seconds then DON'T TOUCH IT! It'll make a bigger mess of it. Once you get going, you learn what you have do and how!!! Awlgrip says to tip with a very good (badger, etc.) bristle brush, but we used a 2" foam brush. The solvent in the paint will eventually dissolve the glue in the foam brush, but not the foam. When Donna noticed that she would throw is down and reach in her back pocket and get another one. One foam brush was good for about 1/4 to a 1/3 of the boat. You must remember to "wet" it pretty good before continuing the tipping. I have heard other people say that using a bristle brush is too much trouble. Don't forget you will also need good breathing masks, as the paint is quite toxic. We also had glasses and latex gloves on. The Awlgrip paint, when mixed, is rather thin and covers a pretty good size area. A lot more than you would think. Not knowing what we really needed on the initial topcoat, I mixed 32 oz. of topcoat, 16 oz. of converter (equaling 48 oz.) and at a 25 per cent ratio of reducer (12 oz.), we came up with 60 oz. total. We had about half of it left over when we were done on the first coat. On the second coat we only mixed a total of 32 oz. (16,8,8)and it did our 34 with an oz. left over. Perfect!! We went 8oz or 1/3 on the reducer this time because it was warmer and slight breeze. We bought a gallon of primer, and a gallon of topcoat. We used half, or so, of the primer, and as I recall, half of the gallon of topcoat, also. I bought a quart of black topcoat for the boot stripe and cove. I spilled about half of the black when the can slipped out of my hand... $20 into the gravel!!! :-( A friend let us borrow three saw horses and a big 2 x 12 x 12 (reinforced) and it was a life saver. They were the right height so that we could roll & tip from the bottom of the toe rail down to just below the waterline. We were able do a lot before we had to get down and reposition it for the next area. For the stern and the stem areas we used a couple of step ladders. The best advice that I can give you is to ask all your friend (and non-friends) to stay away while you undertake the topcoat application. You MUST concentrate and any distraction will hurt your project, believe me!!! Then you get those that stand away and talk about what you are doing, etc., but you can't do anything about that. We did have one person that would not leave and kept saying what a great job we were doing. Wellllll, we had runs where we were painting while he was there!!! #$@*&!@ I hope I have given you some of the info you wanted to hear. Look it over, and if file:///c /T34_tech_articles/awlgrip/text.txt[8/24/ :32:23 PM]
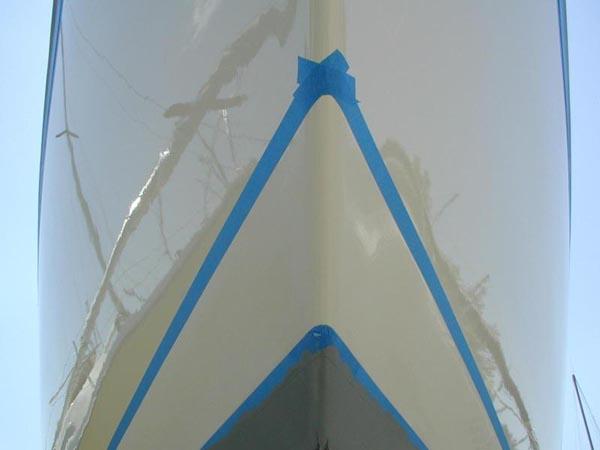
3 you need more info on the process let us know. Max & Donna Sin Sal T34C #377 Donna's Q&A: I'll try to answer the questions we received the best I can. How many coats of Awlgrip did you use? We used two coats of Awlgrip. Had we more time, I would have prefered to have three. Three coats of Awlgrip allows room for repairs (sanding, feathering, and buffing) if and when you get a ding or scratch. Did you use a china bristle or badger brush? Neither! Believe it or not, we used a 2" foam brush to tip out the paint. I found it best to change to a new brush at least every quarter of the boat. They tend to fill up with paint and cause runs. Sometimes I would squeeze excess paint out with my fingers if my supply of foam brushes was low. I assume you used the 3" rollers? We used 7" foam rollers for the rolling. We're having issues with airborn pollen becoming lodged in the paint; any thoughts on that? We are lucky we don't have the airborne pollen here. Other than painting inside or waiting until the pollen has stopped, I don't know what to do. Fighting the elements is definitely difficult. We've done one coat which, as he said, got rained on. So we're sanding a great deal of it off. The first coat loooked great for a few minutes, though! You COULD see brush strokes a little when you were a foot away, but at 10 feet away it looked perfect. How is yours up close? The Awlgrip flowed out to a mirror finish. At first, we could see the brush stokes, then after a few minutes they just disappeared! We found the Awlgrip flows best if the previous coat, whether it is primer or topcoat, is cured about 48 hours. I know the instructions say it cures in 12 hours and is ready for the next coat, but, we found better results letting it cure another day before sanding for the next coat. You don't want the paint to gum at all when sanding. Just wondering if there are any lessons learned that we can use for the next coat. Max did the rolling and followed directly behind with the tipping. He would usually roll 1-2 rows vertically and wait as I tipped vertically. As he waited he keep and I out for runs that would develop. You can go back about 5 feet and retip to catch runs, but, once you are well beyond an area its best to just let it go. We started at the bow and worked our way around port to the port quarter. Then we did the stern, and picked up again with the starboard quarter, working up the starboard side to the bow. Everything bended well. Having a scaffolding really helped so we didn't have to manuever ladders around. The regular blue tape actually worked better than the green fine line tape. Awlgrip is very thin and watery and tends to work under the tape. Be sure file:///c /T34_tech_articles/awlgrip/text.txt[8/24/ :32:23 PM]
4 to press the tape edges firmly down. When we pulled the tape off the boot and cove strip, we had to do a little cleaning to the edges where paint did seep under. It takes longer than you think. We thought we'd pull the tape off and voila! But no, it took two hours cleaning the seeping paint from the edges. Some required careful scraping with a knife edge to remove the dried paint. If it was wet, Acetone worked well and will not hurt the topcoat. This can be messy. We are hoping that it will need only one more coat, because the weather is supposed to be rainy for another week and we're scheduled to launch the 25th!!! Not leaving us very many days to have calm, overcast, windless weather!!! Of course it's blue, which I hear is more tricky anyway... How soon after completion did you launch? The hull had two weeks to cure and the boot stripe had one week to cure before launch. The launch straps didn't appear to hurt the one week cured boot. We didn't intentionally wait two weeks for the hull, it's just that we finished painting the hull one weekend, came up the next and finsihed the boot stripes, came up the next and launched. But, I would wait at least a week. We are worried about having fenders against the hull for stepping the mast if its only, say 7 days after we're done painting. Will it be cured hard enough at that point? It probably should be fine. Hope this answers some of the more common questions. Feel free to ask more. Your paint job should turn out great. There's a great satisfaction in doing work like this yourself! Donna Sin Sal T34C #377 file:///c /T34_tech_articles/awlgrip/text.txt[8/24/ :32:23 PM]


. I'd leave a message and they'd typically get back to me with 15 minutes.")

5 Awlgrip Roll and Tip T34C Repainting Photos and text by Max Guzman and Donna Delahanty Guzman, Sin Sal, 1976 T34C #377 Click any image for a larger view Awlgrip Roll and Tip Here's our account of what we did. I'm also attaching some questions that were asked of us on our procedure and our answers, of course. We took off the SS rubstrake all the way around and sanded off the bottom paint & barrier a couple of inches below the waterline so that we could get the primer and paint on those exposed areas. I did etch the boot stripe lines a little so that we wouldn't lose them, but it wasn't really necessary. The First Coat Initial Coat - Bow Awgrip project on Sin Sal: This is all per the Awlgrip instructions and advice from two USPAINT reps. You can get a copy off the internet, They also have a number that you can call if you have questions (I had many). I'd leave a message and they'd typically get back to me with 15 minutes. Prior to sanding, we wiped down the surface with Awlgrip "Surface Cleaner, T0008". The instructions say that some people use Comet cleanser and 3M Scotchbrite pads to scrub the boat clean. Then sand with 220 grit paper. We used Comet cleanser first, making sure that the water would not bead anywhere, then wiped with T0008. We used 150 grit sandpaper on a Porter orbital sander. Along the Starboard Side Once we had all the hull "clean", we proceeded to repair dings, scratches and gelcoat imperfections, etc. The primer and paint will not cover it all up!! This is what took us the longest time in the whole project. Once the surface has been prepared to your liking, you're now ready to apply the primer coats. First, at least two coats of primer; "545 Epoxy Primer, D8001, "Converter, D3001", and "Reducer, T0031". If I were to paint again, I would put on three coats of primer (better base). I called the representative at USPAINT and he advised me to roll on two or three coats of 545 without sanding. Once the second or third (final primer) coat has cured, you can sand the surface smooth... remembering not to sand too aggressively. file:///c /T34_tech_articles/awlgrip/index.htm[8/24/ :32:24 PM]

, of course, for the day you are applying the product.")

 cleaning, again!")
6 Awlgrip Roll and Tip Aft Detail Port Quarter Stern Cove Stripe taping Boot Stripe Taping We applied one coat per day. I would wait at least two days on the final coat before sanding. We were a little anxious to get on with the project and realized that the final coat was not ready to sand. I called the rep again and he did say to wait another day, because the temperature had fallen below 55 during the night. The curing process stops if that happens Your application depends on the temperature (and wind), of course, for the day you are applying the product. One person could easily apply the primer, as you don't have to be that careful with the application. You also would not have to have "just the right weather" to apply this stuff like you would on the topcoat application. Remember not to sand too aggressively, as you don't want to get back down to the gel coat. Follow the sanding by washing it down really good making sure the sanding residue is mostly gone and then do the solvent (T0008) cleaning, again! Prior to putting on the first topcoat, lightly wipe down with a tack cloth to remove any remaining dust, etc. Now, apply the topcoats in the color of your choice. (Minimum of two... I would go three for a better base in case of future repairs). The instructions say that if you apply the second coat within 18 hours, or something like that, you do not need to sand between coats. We did lightly sand after the first coat. It does not actually take that much time to lightly sand the boat, and actually you only really want to "scuff" the gloss off. BUT... don't forget to clean it again with the T0008 and then follow up with the tack cloth. I used a 7" foam roller to apply the topcoat and made approximately two vertical passes. At that point Donna would then lightly tip the paint vertically, top to bottom, top to bottom. This brings down any excess paint to help prevent sagging, runs, etc. The cove stripe presented a problem because it accumulated paint, so we both had to keep a sharp eye on that. You can go back for only a couple of seconds then DON'T TOUCH IT! It'll make a bigger mess of it. Once you get going, you learn what you have do and how! Awlgrip says to tip with a very good (badger, etc.) bristle brush, but we used a 2" foam brush. The solvent in the paint will eventually dissolve the glue in the foam brush, but not the foam. When Donna noticed that she would throw is down and reach in her back pocket and get another one. One foam brush was good for about 1/4 to a 1/3 of the boat. You must remember to "wet" it pretty good before continuing the tipping. I have heard other file:///c /T34_tech_articles/awlgrip/index.htm[8/24/ :32:24 PM]

and it did our 34 with an oz. left over. Perfect!")

 and it was a life saver.")

7 Awlgrip Roll and Tip people say that using a bristle brush is too much trouble. Ready to Stripe View from the Side Don't forget you will also need good breathing masks, as the paint is quite toxic. We also had glasses and latex gloves on. The Awlgrip paint, when mixed, is rather thin and covers a pretty good sized area - a lot more than you would think. Not knowing what we really needed on the initial topcoat, I mixed 32 oz. of topcoat, 16 oz. of converter (equaling 48 oz.) and at a 25 percent ratio of reducer (12 oz.), we came up with 60 oz. total. We had about half of it left over when we were done with the first coat. On the second coat we only mixed a total of 32 oz. (16,8,8)and it did our 34 with an oz. left over. Perfect!! We went 8oz or 1/3 on the reducer this time because it was warmer with a slight breeze. We bought a gallon of primer, and a gallon of topcoat. We used half, or so, of the primer, and as I recall, half of the gallon of topcoat, also. I bought a quart of black topcoat for the boot stripe and cove. I spilled about half of the black when the can slipped out of my hand... $20 into the gravel! :-( Waterline Detail Stern Detail A friend let us borrow three saw horses and a big 2 x 12 x 12 (reinforced) and it was a life saver. They were the right height so that we could roll & tip from the bottom of the toe rail down to just below the waterline. We were able do a lot before we had to get down and reposition it for the next area. For the stern and the stem areas we used a couple of step ladders. The best advice that I can give you is to ask all your friends (and non-friends) to stay away while you undertake the topcoat application. You MUST concentrate and any distraction will hurt your project, believe me! Then you get those that stand away and talk about what you are doing, etc., but you can't do anything about that. We did have one person that would not leave and kept saying what a great job we were doing. Wellllll, we had runs where we were painting while he was there! #$@*&!@ Well, I hope I have given you some of the info you'll need if you decide to repaint yourself. Look it over, and if you need more info on the process let us know. Max & Donna, Sin Sal, T34C #377 file:///c /T34_tech_articles/awlgrip/index.htm[8/24/ :32:24 PM]
 if and when you get a ding or scratch. Lookin' Good.")

8 Awlgrip Roll and Tip Time to Relax Donna's Q&A: I'll try to answer the questions we received the best I can. How many coats of Awlgrip did you use? We used two coats of Awlgrip. Had we more time, I would have prefered to have three. Three coats of Awlgrip allows room for repairs (sanding, feathering, and buffing) if and when you get a ding or scratch. Lookin' Good... Did you use a china bristle or badger brush? Neither! Believe it or not, we used a 2" foam brush to tip out the paint. I found it best to change to a new brush at least every quarter of the boat. They tend to fill up with paint and cause runs. Sometimes I would squeeze excess paint out with my fingers if my supply of foam brushes was low. I assume you used the 3" rollers? We used 7" foam rollers for the rolling. Ready to Launch! We're having issues with airborne pollen becoming lodged in the paint; any thoughts on that? We are lucky we don't have the airborne pollen here. Other than painting inside or waiting until the pollen has stopped, I don't know what to do. Fighting the elements is definitely difficult. We've done one coat which got rained on. So we're sanding a great deal of it off. The first coat looked great for a few minutes, though! You COULD see brush strokes a little when you were a foot away, but at 10 feet away it looked perfect. How is yours up close? The Awlgrip flowed out to a mirror finish. At first, we could see the brush stokes, then after a few minutes they just disappeared! We found the Awlgrip flows best if the previous coat, whether it is primer or topcoat, is cured about 48 hours. I know the instructions say it cures in 12 hours and is ready for the next coat, but, we found better results letting it cure another day before sanding for the next coat. You don't want the paint to gum at all when sanding. Just wondering if there are any lessons learned that we can use for the next coat. Max did the rolling and followed directly behind with the tipping. He would usually roll 1-2 rows vertically and wait as I tipped vertically. As he waited he kept an eye out for runs that would develop. You can go back about 5 feet and re-tip to catch runs, but, once you are well beyond an area it's best to just let it go. file:///c /T34_tech_articles/awlgrip/index.htm[8/24/ :32:24 PM]
9 Awlgrip Roll and Tip We started at the bow and worked our way around port to the port quarter. Then we did the stern, and picked up again with the starboard quarter, working up the starboard side to the bow. Everything blended well. Having a scaffolding really helped so we didn't have to maneuver ladders around. The regular blue tape actually worked better than the green fine line tape. Awlgrip is very thin and watery and tends to work under the tape. Be sure to press the tape edges firmly down. When we pulled the tape off the boot and cove stripe, we had to do a little cleaning to the edges where paint did seep under. It takes longer than you think. We thought we'd pull the tape off and voila! But no, it took two hours cleaning the seeping paint from the edges. Some required careful scraping with a knife edge to remove the dried paint. If it was wet, Acetone worked well and will not hurt the topcoat. This can be messy. We are hoping that our boat will need only one more coat, because the weather is supposed to be rainy for another week, not leaving us very many days to have calm, overcast, windless weather. How soon after completion did you launch? The hull had two weeks to cure and the boot stripe had one week to cure before launch. The launch straps didn't appear to hurt the one week cured boot. We didn't intentionally wait two weeks for the hull, it's just that we finished painting the hull one weekend, came up the next and finished the boot stripes, came up the next and launched. But, I would wait at least a week. We are worried about having fenders against the hull for stepping the mast if it's only, say 7 days after we're done painting. Will it be cured hard enough at that point? It probably should be fine. These were some of the questions we received. Feel free to ask more. There's a great satisfaction in doing work like this yourself! Donna, Sin Sal, T34C #377 file:///c /T34_tech_articles/awlgrip/index.htm[8/24/ :32:24 PM]
10

11

12

13

14

15

16

17

18

19

20

21

22

23

24
Block Sanding Primer Dos and Don ts Transcript
 Block Sanding Primer Dos and Don ts Transcript Hey, this is Donnie Smith. And welcome to this lesson on block sanding primer. In this lesson, we're going to give you some of the do's and some of the don
BLADE REPAIR INSTRUCTION BOOKLET
 BLADE REPAIR INSTRUCTION BOOKLET Contents Section I: Section II: Section III: Section IV: Section V: Section VI: Removing a Blade Refer to this section if you need to remove the blade from an oar shaft.
Restoring the Bouyancy Tanks on 6878
 Restoring the Bouyancy Tanks on 6878 On March 31, 2001 I became the proud owner of Albacore 6878, a Skeene built in 1980. The boat was in pretty good shape, but like many Skeene and Ontario Yachts (non-foam
Get the benefits of oil with the ease of latex
 One of the most rewarding home improvement projects is putting a fresh coat of paint on your kitchen cabinets. A new color brightens up your kitchen, and can give it a complete updated look. But at the
Quality Marine Equipment Since Antifouling Paint For Metal Under The Waterline ROLLER. Application Instructions.
 Quality Marine Equipment Since 1981 Antifouling Paint For Metal Under The Waterline ROLLER Application Instructions www.antifoulingpaint.net THANK YOU! Thank you for selecting Velox Plus Antifouling Paint
Product Data Sheet Awlwood MA Primers OJ3809 / OJ9809 / OJ7809 Specification Data
 Specification Data Packaging: Product Code: Cleaning: Available in 1 quart packs OJ3809 Clear; OJ9809 Yellow; OJ7809 Red OT0200 Awlwood MA Brush Cleaner Volume Solids: 45% Specific Gravity: OJ3809-1.013
Paint Spraying: Spray gun parts Student A:
 Paint Spraying: Spray gun parts Student A: You need to replace some parts for your spray gun. However, you don t know the name of the part, or the part number. Telephone a paint gun supplier and order
APPLICATION NOTE - SR001. Cold Weather Application
 APPLICATION NOTE - SR001 Cold Weather Application Silent Running is best applied with the ambient, material and substrate temperature in the range of 65-85 degrees F. Lower temperatures will result in
BRUSH APPLICATION INSTRUCTIONS
 QUALITY MARINE EQUIPMENT SINCE 1981 Antifouling Paint For Metal Under The Waterline BRUSH APPLICATION INSTRUCTIONS www.antifoulingpaint.net TABLE OF CONTENTS Humidity & Drying Metal Surfaces... 1 Coverage
Paint and Decals. Adequate ventilation is required when working in a confined area with paint and paint-related chemicals.
 Service Guide Paint Repair Paint and Decals Utilimaster recommends that a professional body shop do all paint repairs. The service technician should read this entire procedure before working on the vehicle.
Pettit Technical Bulletin Applying Topside Finishes
 What s better than a boat that looks good? The answer is simple, a boat that looks good and has superior protection from the elements all season long. Topside finishes do exactly that; provide your boat
Max Launch Abort System Prod. No *Kevlar is a registered trademark of Dupont
 Flying Model Parts List Max Launch Abort System Prod. No. 3014 A 11820 - Body Tube 3.5 Diam x 5.5" Long B 11824 - Orange Capsule Base Shoulder Ring C 16032 - Laser-cut Ring motor mount rear D 16033 - Laser-cut
1Use the metal file to smooth
 Yamato: Step-by-step 85 Parts of the bridge and the hull a b c d e f a Part of the bridge b Part of the bridge c Part of the bridge d Radar x 2 e Part of the bridge x 2 f Wire Recommended tools and materials
TOOLS & SUPPLIES (Included in ProTops Tool Kit)
") TOOLS & SUPPLIES (Included in ProTops Tool Kit) Clean Paint/Mixing Sticks Graduated Mixing Buckets Standard Mixing Cups Nylon Paint Brush Propane Torch 3M Masking Gun Masking Film & Painter s Tape Disposable
TOOLS & SUPPLIES (Included in ProTops Tool Kit) Clean Paint/Mixing Sticks Graduated Mixing Buckets Standard Mixing Cups Nylon Paint Brush Propane Torch 3M Masking Gun Masking Film & Painter s Tape Disposable
Shutter Installation Instructions
 Shutter Installation Instructions ITEMS YOU WILL NEED: Tape measure Framing square Screw gun Circular saw Caulk gun PL premium adhesive Exterior grade screws 1 ¾" Safety glasses Putty knife Window and
Building the Bell Tower
 Building the Bell Tower Mold #55 does not contain all of the blocks to build this tower. You will need extra regular blocks (1/2" x 1/2" x 1") and square blocks (1/2" x 1/2" x 1/2"). These blocks can be
 705.796.2282 www.freshlookpaintingbarrie.com 10 STEPS TO A PERFECT PAINT JOB 1. Choose the perfect colour Regardless of the quality of the paint job, you are not going to be happy unless the colour, tone
COMPOSITES LAB MANUAL
 COMPOSITES LAB MANUAL Version 1 Lab 3: Surface Preparation, Wet Layup, and Vacuum Bagging The original version of this manual was a one student senior design project written by Katherine White, the Composite
B. Painting: Boat by Frankie Novak. Western Reserve Model Yacht Club Finishing Your Soling One Meter. From simplest to most complex. A.
 Western Reserve Model Yacht Club Finishing Your Soling One Meter From simplest to most complex A. Simplest: 1. Of course, leaving the hull and deck as is (white styrene) is the easiest route to take. The
20th ANNUAL SKILLS MANITOBA COMPETITION PAINT COMPETITON COMPETITION DESCRIPTION
 20th ANNUAL SKILLS MANITOBA COMPETITION PAINT COMPETITON COMPETITION DESCRIPTION Break down of Students into 2 groups of 8 competitors maximum 4 Secondary and 4 Post- Secondary (2 ½ hour time blocks morning
Install Instructions for Solano Jurastone #4012 Mantel
 Install Instructions for Solano Jurastone #4012 Mantel Please read this manual before installing the suite. This manual should remain with the homeowner. Updated 12/03/12 NOTE the installation requirements
APPLICATION NOTE - SR001. Cold Weather Application
 APPLICATION NOTE - SR001 Cold Weather Application Silent Running is best applied with the ambient, material and substrate temperature in the range of 65-85 degrees F. Lower temperatures will result in
Quality Marine Equipment Since Antifouling Paint For Metal Under The Waterline SPRAY. Application Instructions.
 Quality Marine Equipment Since 1981 Antifouling Paint For Metal Under The Waterline SPRAY Application Instructions www.antifoulingpaint.net Thank you for selecting Velox Plus Antifouling Paint to protect
Supplies required to build a cardboard boat. (SAMPLE BOAT)
") ! 1 Supplies required to build a cardboard boat. (SAMPLE BOAT) 1. A sharp cutting tool 2. 1 quart (or more) of contact cement - (Gallon size shown) 3. 2 tubes (or more) of construction adhesive (like Liquid
! 1 Supplies required to build a cardboard boat. (SAMPLE BOAT) 1. A sharp cutting tool 2. 1 quart (or more) of contact cement - (Gallon size shown) 3. 2 tubes (or more) of construction adhesive (like Liquid
Rosalina Accessories Tutorial Version March 2011 Martyn
 Rosalina Accessories Tutorial Version 1.0 - March 2011 Martyn Star Brooch Feel free to experiment with these dimensions, you should make a template you are happy with, the method still works. 1) Creating
Baba 30 Butterfly Hatch Repair in 17 or so not-so-easy steps Part I. Rick Beddoe s/v Soñadora
 Baba 30 Butterfly Hatch Repair in 17 or so not-so-easy steps Part I Rick Beddoe s/v Soñadora Introduction Butterfly hatches on any boat are notorious for leaks. However, they are also noted for their attractiveness.
Tape Measure Metal Clippers Screw Bit Set With Extensions
 IMPORTANT: Read through instructions thoroughly before beginning to replace any damaged material. Minor damage can be fixed with a fiberglass repair kit and color matched paint. Tools Required Tape Measure
MUDGUN Drywall Finishing System
 Watch the demonstration video online at hydetools.com MUDGUN Drywall Finishing System Quick Start Guide Hyde Tools, Inc. / A Hyde Group Company / 800-872-4933 / custrelations@hydetools.com / hydetools.com
3Insert the second rod no. 4
 Yamato: Step-by-step 37 The stern block and searchlight control towers a b c d e f Recommended tools and materials Wood glue Sandpaper (no. 800 grain) Metal file Putty Craft knife For metal: Super Glue
Sketchpaint. Ideal for turning any smooth surface into a whiteboard. Ready to use in 5 days
 Sketchpaint Ideal for turning any smooth surface into a whiteboard SketchPaint - A whiteboard straight out of a tin! White Gloss or Transparent Finish Simple application Tin size available: 3m² or 6m²
5If the protruding part is. 6Place 1 as is shown in the. 7Place what was assembled
 Yamato: Step-by-step 49 The base of the bridge and strakes a c b d a Base of the bridge b Base of the bridge c Base of the bridge d Strakes x 10 THE BASE OF THE BRIDGE 1Smooth 1 to 3, first using the metal
Lots of paints Several brushes from 000 to? Exacto knife. 200 grit sandpaper Bel-Decal Sheets Spray Primer
 Tools Lots of paints Several brushes from 000 to? Exacto knife 200 grit sandpaper Bel-Decal Sheets Spray Primer Brass Rod and a Drill bit that matches Super Glue Sculpy Putty the same size 3/16 suggested
TM TM MESSAGE CENTRE
 TM TM MESSAGE CENTRE Safety First! Use eye protection, always! Use ear protection with loud power tools Stay with children while they work! Follow tool manufacturers safety guidelines Page 1 TOOLS Drill
#85-2-5A: PAINT STRIPPING AND FINISH ANALYSIS AND CORRECTION - (Aug 7, 1985)
") #85-2-5A: PAINT STRIPPING AND FINISH ANALYSIS AND CORRECTION - (Aug 7, 1985) "Please discard previous bulletin 85-2-5 due to this updated information." The corrosion protection provided by the factory
#85-2-5A: PAINT STRIPPING AND FINISH ANALYSIS AND CORRECTION - (Aug 7, 1985) "Please discard previous bulletin 85-2-5 due to this updated information." The corrosion protection provided by the factory
UNIT 11: PAINTING, STAINING, AND FINISHING
 KEY CONCEPTS 1. Equipment needed 2. Primary kinds of Paint: Interior/Exterior 3. Primary kinds of Stain: Interior/Exterior 4. Proper application techniques: Paint/Stain/Finish 5. Equipment care and clean
Tabletop Epoxy Resin Instruction Guide
 Table Top Epoxy Full Instructional Guide WARNING! You should read through ALL of these instructions BEFORE starting. These instructions are intended for Bar Tops, Table Tops, Artwork and Countertop applications.
Please read and understand all instructions before building!
 AGM-256 Pit Bull This kit contains all the parts necessary* to build a flying high power rocket: 1) Pre-slotted main airframe 1) Pre-slotted boat tail 1) Nose cone 4) Main fins 4) Canard fins 1) Piston
Full Size Slatted Headboard [1]
![Full Size Slatted Headboard [1]](/thumbs/86/94948649.jpg "Full Size Slatted Headboard [1]") [1] Submitted by CassieD [2] on Mon, 2011-08-22 22:15 [1] Additional Photos [3] Page 1 of 13 [4] Summary: I wanted a headboard that was simple, easy to build from stock, and made from hardwood. Problem
[1] Submitted by CassieD [2] on Mon, 2011-08-22 22:15 [1] Additional Photos [3] Page 1 of 13 [4] Summary: I wanted a headboard that was simple, easy to build from stock, and made from hardwood. Problem
Making your Rudder Cassette
 Making your Rudder Cassette A list of the stuff you ll need The row of materials below is laid out in the order of application. The foam blank shown on the right is available from Bob at www.flyingfoam.com
Sutherland Welles Ltd.
 Sutherland Welles Ltd. FLOOR INSTRUCTIONS MURDOCH S SYSTEM Floor Sanding Prep Murdoch s Uralkyd 500 Floor Finish Sanding Process First Sanding The initial cut either removes finish from an existing floor
Magnetpaint & Sketchpaint
 Magnetpaint & Sketchpaint Turn any smooth surface into a magnetically receptive whiteboard MagnetPaint is an exciting product that allows you to paint your own magnetic surface on any flat area. SketchPaint
Authors: Max Guzman, Donna Delahanty Guzman, Steve Hottinger. Teak & Aspen Sole Installation
 Forward Authors: Max Guzman, Donna Delahanty Guzman, Steve Hottinger Teak & Aspen Sole Installation The original teak plywood floor on our 1976 T34C needed an extreme makeover. The dark stained areas refused
Nanton Grain Mill Assembly
 ( 1 ) Nanton Grain Mill Assembly Locate package for assembling storage building. These are cut from 1/8 masonite. Inspect and lightly sand edges where it will be bonded. Use white glue or CA glue to bond.
Cardboard Model Buildings
 Cardboard Model Buildings Get more model kits from http://www.modelbuildings.org PRINTING & ASSEMBLY TIPS: These OO designs can easily be resized by reducing the print percentage as follows: OO scale is
Tools and Tips: ( 1 )
") Tools and Tips: As you build instructions will show in my many picture manual how to assemble. You can use your own methods as you desire, my results are very good. A smooth, flat work surface is very
Tools and Tips: As you build instructions will show in my many picture manual how to assemble. You can use your own methods as you desire, my results are very good. A smooth, flat work surface is very
INSTRUCTIONS FOR REFINISHING A UBERTI STOCK.
 INSTRUCTIONS FOR REFINISHING A UBERTI STOCK. I have been refinishing gunstocks for 30 years on and off. Over the past several years I have done quite a few Uberti rifles and handgun grips to get the red
HOGNOSE PSALTERY KIT Assembly Instructions
 HOGNOSE PSALTERY KIT Assembly Instructions WOOD PARTS 1 Plywood Top (Soundhold Pre-Cut) 1 Plywood Bottom 2 Pin Blocks 1 Short Side 1 Long Side 1 Bridge 1 Scrap of Plywood HARDWARE 1 L-Handle Tuning Wrench
Building the Wee Lassie Canoe. A Michigan Woodworkers Guild Presentation by Bob Mills
 Building the Wee Lassie Canoe A Michigan Woodworkers Guild Presentation by Bob Mills So you want to build a boat, eh? Ok, how about this for starters? Carved by Livio De Marchi, Woodcarver Extraordinaire
Building the Gothic Church
 Building the Gothic Church Mold #54 does not contain all of the blocks to build this church. You will need extra regular blocks (1/2" x 1/2" x 1") and square blocks (1/2" x 1/2" x 1/2"). These blocks can
HR175 Sash Replacement Kit Installation Instructions
 HR175 Sash Replacement Kit Installation Instructions IMPORTANT: Please read before you begin. Weather Shield HR175 Sash Replacement Kits Important: Thoroughly read and follow these instructions, failure
Install Instructions for Corvallis Jurastone #4008 Mantel
 Install Instructions for Corvallis Jurastone #4008 Mantel Please read this manual before installing the suite. This manual should remain with the homeowner. Updated 12/03/12 NOTE the installation requirements
One Piece Fiberglass Mold Construction
 One Piece Fiberglass Mold Construction (This is just a SAMPLE of the Main Manual) Simple Fiberglass Molds Can Be Used For Making Duplicate Parts For Many Applications Including Hobby & Automotive. This
3Position the hull of the ship as
 Yamato: Step-by-step 25 The hull and stern deck c b d a b d c e e f a Rear frame b Stern deck x 2 c Stern deck x 2 d Side wall x 2 Wood glue Sandpaper (no. 400 grain) Craft knife Pliers d Side wall x 2
Did I say that proper cleaning is important? I am going to start this module off with that.
 PREPARATION It All Starts Here Featheredging, Masking, Primer, Block Sanding, Final Sanding One of the most important, or perhaps the most important, things you need to do when painting a car is to properly
VELOX PLUS APPLICATION INSTRUCTIONS QUALITY MARINE EQUIPMENT SINCE 1981
 VELOX PLUS APPLICATION INSTRUCTIONS QUALITY MARINE EQUIPMENT SINCE 1981 VELOX PLUS TECHNICAL INFORMATION Please read all information and application instructions before beginning. Coverage Estimates Normal
Mold Release, Break-In, Maintenance and Storage. Linda Bergstrom
 Mold Release, Break-In, Maintenance and Storage Linda Bergstrom Mold Release Requirements Form a barrier between the mold and molded part Provide a lubricating film which allows the molded part to be easily
Tools and Tips: ( 1 )
") Tools and Tips: As you build instructions will show in my many picture manual how to assemble. You can use your own methods as you desire, my results are very good. A smooth, flat work surface is very
Tools and Tips: As you build instructions will show in my many picture manual how to assemble. You can use your own methods as you desire, my results are very good. A smooth, flat work surface is very
Install Instructions for Torrance Jurastone #4004 Mantel
 Install Instructions for Torrance Jurastone #4004 Mantel Please read this manual before installing the suite. This manual should remain with the homeowner. 20/05/11 Fires of Tradition assumes no responsibility
PROVIDED BY WINDY URTINOWSKI AND REPRESENT HIS PROCEDURE FOR OBTAINING A SUPERIOR FINISH USING BRODAK DOPE
 PROVIDED BY WINDY URTINOWSKI AND REPRESENT HIS PROCEDURE FOR OBTAINING A SUPERIOR FINISH USING BRODAK DOPE The TARGET is for a GREAT FINISH with 6-7 OUNCES of weight FROM BARE WOOD TO READY FOR SILVER
IDEAPAINT SUBSTRATE SPECIFIC INSTALLATION INSTRUCTIONS
 INSTALLATION INSTRUCTIONS OVER CHALKBOARD 1. Clean chalkboard surface thoroughly with soap and water! " Use acetone or other solvent cleaner if necessary! " Allow to dry thoroughly 3. Prime surface with
Safety First! Review the Safety Checklist before performing tasks in this chapter.
 Chapter 15. Painting 15.1 PREPARATION 15.2 PRIMING, PAINTING AND STAINING 15.3 CLEAN-UP 15.4 PREPARATION FOR NEXT BUILD DAY Tools needed by volunteers: Tools and equipment needed: Saw bucks Extension cords
How to make climbing grips. By,
 How to make climbing grips By, Items needed: * Items may be needed depending on your preference. - Carving Foam - Level Table - Cardboard - Pen - Ruler - Straight Edge - Box cutter - Hot melt glue gun
Obtained from. Omarshauntedtrail.com
 BORN2HAUNT.COM http://www.born2haunt.com/batsreasy01.html Bats R Easy Here is another way to make bats with foam and wire. The first thing I did was cut a piece of scrap foam to the size I wanted 5" long,
Step by Step Wing Bagging
 Step by Step Wing Bagging By Evan Shaw 073 589 9339 evanevshaw@gmail.com Preparing the Leading Edge 1. Cut cores. (Cutting of wing cores is covered in another article elsewhere) 2. Sand the LE to a nice
Central New York Rocket Team Challenge 2018 Rocket Assembly Instructions
 Central New York Rocket Team Challenge 2018 Rocket Assembly Instructions Note: These instructions vary from those provided by the manufacturer of the rocket kits. There is also considerable varying discussion
Toy Hay Bales for Horse Stable for American Girl or 18" Dolls [1]
![Toy Hay Bales for Horse Stable for American Girl or 18 Dolls [1]](/thumbs/85/92245781.jpg "Toy Hay Bales for Horse Stable for American Girl or 18 Dolls [1]") Toy Hay Bales for Horse Stable for American Girl or 18" Dolls [1] Submitted by Ana White [2] on Sat, 2012-12-22 13:59 [1] Additional Photos [3] [4] Page 1 of 17 [5] [6] [7] These were so fun and cute to
Toy Hay Bales for Horse Stable for American Girl or 18" Dolls [1] Submitted by Ana White [2] on Sat, 2012-12-22 13:59 [1] Additional Photos [3] [4] Page 1 of 17 [5] [6] [7] These were so fun and cute to
Finishes and Finishing Techniques
 Finishes and Finishing Techniques TED 126 Spring 2007 Review pages 147-150, 284-294 Finishes and finishing techniques The finishing process to choose depends partly on the type of wood and the appearance
Sawn Baluster Sizing and Installation Guide
 Sawn Baluster Sizing and Installation Guide Welcome to the Durabrac sizing and installation guide for Sawn Balusters. This guide has been prepared to answer any questions you may have about our Sawn Balusters
TAPE & GLUE PROCESS Version: Jun. 2011
 FREE to print TAPE & GLUE PROCESS Version: Jun. 2011 The following small boat assembly process was developed out of the need for an easy, lightweight, cost effective and health friendly method of providing
PBWWinc. Technical Data Sheet. GERLINE Gameline Paint Instructions for Sport Flooring. General Guidelines:
 PBWWinc. 1 Technical Data Sheet GERLINE Gameline Paint Instructions for Sport Flooring General Guidelines: 1) Close the facility to all traffic before starting any work on the game lines. Close all doors
Installation Instructions
 Please read all instructions before installing products. STORAGE: Keep crates in the upright position. When unpacking, store panels flat in a clean dry place. BEFORE INSTALLATION: Check for damage that
Building Base Cabinets [1]
![Building Base Cabinets [1]](/thumbs/72/66582577.jpg "Building Base Cabinets [1]") [1] Submitted by Ana White [2] on Thu, 2013-11-14 15:07 [1] Seven sheets of PureBond plywood [3] and $200 in popular boards. Page 1 of 42 Yep, that's what it took to take this blank space... And turn it
[1] Submitted by Ana White [2] on Thu, 2013-11-14 15:07 [1] Seven sheets of PureBond plywood [3] and $200 in popular boards. Page 1 of 42 Yep, that's what it took to take this blank space... And turn it
Instructions for Making Repairs to 3M 8681HS Blade Tapes Installed on Enstrom Helicopter Blades.
 REPORT NO: TITLE: Instructions for Making Repairs to 3M 8681HS Blade Tapes Installed on Enstrom Helicopter Blades. MODEL NO: All PREPAIRED BY: P.B. dupont CHECKED BY: APPROVED BY: 1. SCOPE This specification
The Most Beautiful, Longest-Lasting, High Gloss Shine for Brightwork VARNISH
 The Most Beautiful, Longest-Lasting, High Gloss Shine for Brightwork VARNISH P R O D U C T S A N D A P P L I C A T I O N S Exquisitely varnished wood is the reflection of the most beautifully maintained
PBWWinc. GEN-U-LINE 4000 Series Application Guide. Technical Data Sheet. General Guidelines:
 PBWWinc. 1 GEN-U-LINE 4000 Series Application Guide Technical Data Sheet General Guidelines: 1) Close the facility to all traffic before starting any work on the game lines. Close all doors and windows
Mirrorcraft Project Especially for Dogs
 Mirrorcraft Project Especially for Dogs DIY Customized Pet Mirror Make a mirror photo frame to Display your Pets Photo Irene Jacobs April 2007 Mirrorcraft is a fun craft to easily create you own customized
San Felipe: Step by Step Pack 3
 Pack 3 Your parts Bulwarks Gun port covers x 2 Tools and equipment Wood glue Sandpaper Brushes Wood stain Hammer Pin pusher/nails Razor saw a Remove the longer bulwark and test-fit it in place at the bow
Insta-DE Series Soft- padded Dry- erase Whiteboard Projection Screen
 Insta-DE Series Soft- padded Dry- erase Whiteboard Projection Screen User s Guide Product Features Ø Award winning and GREENGUARD certified VersaWhite material. Ø 1.1 gain with 180 degree wide viewing
Insta-DE2a/2aF Series
 Insta-DE2a/2aF Series Self-Adhesive Dry-EraseFront Projection Screen Film with Frame Border and Pen Tray User s Guide Thank you for choosing the Insta-DE2a Series dry-erase whiteboard projection screen!
Eco Office File Base. Materials and Tools: Free Plans to build an office file cabinet base
 Materials and Tools: Materials: 1 - Sheet 3/4 PureBond Hardwood Plywood (Available at the Home Depot) 1 - Sheet 1/4 PureBond Hardwood Plywood (Available at the Home Depot) 3-21 Drawer Slides, Euro Style
Antique Trunks: Refinish, Repair, Restore, Revised and Expanded
 15. Patch any holes on the inside of the trunk: There will often be splits or holes on the inside of the trunk that may or may not be visible from the outside. Most often they are holes left by the removal
DAP Latex Window Glazing
 DAP Latex Window Glazing PRODUCT DESCRIPTION DAP Latex Window Glazing is a ready-to-use glazing compound that may be used for face glazing single pane glass in wood or metal window frames. Its spout allows
Chapter # 002 : Creating Threaded Metal Anchoring Points in Fiberglass Foam Structures
 Chapter # 002 : Creating Threaded Metal Anchoring Points in Fiberglass Foam Structures The following is a method of creating permanent, threaded, metal anchor point in a foam & fiberglass structure. The
Obtained from Omarshauntedtrail.com
 http://www.halloweenforum.com/tutorials step step/78830 boogedy latexing corpsing painting.html Boogedy: Latexing, Corpsing and Painting Posted by: Terra Here's how I took a raw Boogedy form from Fright
caulking gun pocket duster brush wire brush filament brush comb ladder bucket canvas drop sheet plastic protection sheet rollers roller frame
 checklist Here at Rokset we know that for the best paint finish you need quality equipment. We have created a painters checklist to assist you before you start your painting job so that you have all the
#70 grit sand Putty knives, sized as needed #1 fine gray sand Corner tools Milestone acrylic liquid
 Countertops Supplies Tools White and/or gray Milestone cement 12 inch steel trowel #70 grit sand Putty knives, sized as needed #1 fine gray sand Corner tools Milestone acrylic liquid Hock Universal tints
EXTERIOR PAINTING
 SECTION 099113 - EXTERIOR PAINTING PART 1 - GENERAL 1.1 RELATED DOCUMENTS A. Drawings and general provisions of the Contract, including General and Supplementary Conditions and Division 01 Specification
176 S. New Holland Road Gordonville, PA Tel: Fax: Eagles Nest
 176 S. New Holland Road Gordonville, PA 17529 Tel: 717-768-0066 Fax: 717-768-8569 A S S E M B LY M A N U A L Eagles Nest Eagles Nest Assembly Manual revised 9/2/05 Dear Customer, Thank you for your purchase
1Take the keel (3) and
 and") 1 The hull and the bridge 1Take the keel (3) and apply PVA wood glue in the second slot from the left: a toothpick may make it easier. Take care: the left end is the one that has a projection. THE HULL
1 The hull and the bridge 1Take the keel (3) and apply PVA wood glue in the second slot from the left: a toothpick may make it easier. Take care: the left end is the one that has a projection. THE HULL
CAUTIONS / INSTRUCTIONS
 CAUTIONS / INSTRUCTIONS EPOXY Epoxy is used for many purposes in the building of your boat. It is used to join wood, bond fiberglass, fill gaps, and seal the wood. We supply epoxy from Raka Boat Building
Above are the offsets for the plywood panels.
 DinkyDink Plans Bottom Panel Half Station X Y X2 Y2 1 1/4 3/4 0 11 5/16 2 4 9/16 4 12 9/16 3 11 11/16 1/4 11 7/16 14 1/2 4 18 5/8 1/16 18 5/8 15 11/16 5 25 3/4 0 25 3/4 16 5/16 6 32 13/16 0 32 13/16 16
1Smooth pieces 4, 5 and 6, using
 Yamato: Step-by-step 109 Machine-guns, anti-aircraft guns and decking h e f a b c g d e f a Anti-aircraft gun base x 2 b Anti-aircraft gun (bottom) x 2 c Anti-aircraft gun (top) x 2 d Machine-gun base
Hatch Installation For Pygmy Solo and Double Kayaks
 Introduction/Overview Hatch Installation For Pygmy Solo and Double Kayaks The hatch kit consists of several wooden lips, strapping and hardware. The hatch is constructed by cutting a hole in your deck,
Cobra X Q Construction Tips Construction: Bel y pan
 Cobra X Q Construction Tips : The white plastic in this kit is high impact styrene. It can be painted with most types of coatings if light coats are applied this is necessary due to the thickness of the
SnotTape. Because it s hard to paint a clean line.
 User Manual SnotTape. Because it s hard to paint a clean line. It s not tape. Get it? It s SnotTape. It s a patented paint barrier that addresses the real reason it s so hard to paint a clean edge gaps
ARTIST IN TRAINING. by Leslie Smith
 ARTIST IN TRAINING by Leslie Smith EXCLUSIVE Artist In Training by Leslie Smith After all my years of practicing painting all my hard work and Lovey comes along and is a natural. She just jumps right in
1983 Jaguar XJS Interior Wood Trim Repair and Refinishing
 The following describes and shows one method of wood trim repair/restoration/refinishing for wood trim on Jaguar cars, specifically this 1983 Jaguar XJS, although the wood trim should be the same in all
Filling the cracks. Grinding and sanding. velomobiel.nl
 Filling the cracks We have published a manual on how to repair the laminate before, now it's time to smoothen the outside of the repair. This nose damage (picture ) has been repaired from the inside. The
Tips & Tricks using Part 24
 Tips & Tricks using Part 24 Finishing the River Sections... 2 Making Tentacles... 4 Making Fish... 6 Adding the Water... 8 Making the Plank Bridge... 13 Making Crystal Piles... 15 Finishing Various Accessories...
Beams INSTALLATION INSTRUCTIONS
 Beams INSTALLATION INSTRUCTIONS Page 1 of 1 You may wish to paint, stain or faux finish your decorative millwork piece prior to installation. This can speed up installation and reduce errors (spilling