25 Cadogan Square - Repairs and re-plastering to Laths and lime plasters
|
|
|
- Anthony Chase
- 5 years ago
- Views:
Transcription
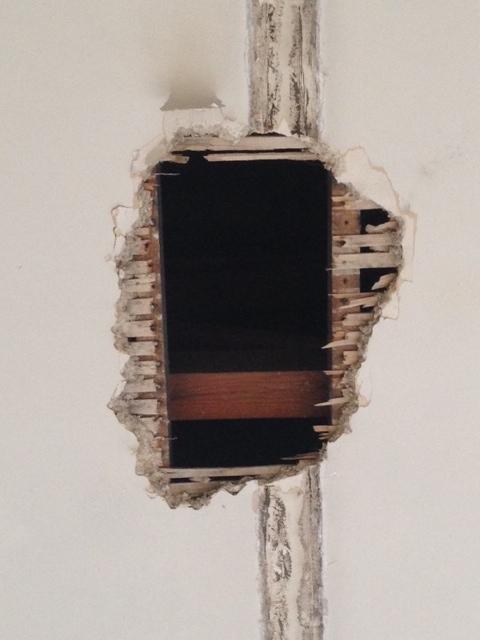
1 25 Cadogan Square - Repairs and re-plastering to Laths and lime plasters Proposed areas: GF Front Entrance Ceiling level, repair to LHS of entrance door Image 1 GF Living Room Ceiling level, repair to full width of room Image 2 1F Living Room - Ceiling level, repair to open sections Image 3 1F Hallway - Ceiling level, repair to open sections Image 4 1F Bedroom 1 - Ceiling level, repair to open section Image 5 Work Method Statement. 1/. Preparation of ceiling. 2/. Fixing wire and treatment of laths. 3/. Application of pricking up or scratch coat. 4/. Application of set coat. 1/. Clean all old plaster from between the laths and vacuum to remove dust. Cut the edges of any existing plaster to halfway of the nearest joist; angle the cut on the old plaster at 45 degrees so the new material is applied over the bevel holding the edge of the original plaster in place. Ensure that all laths are securely fixed, re-nail where necessary. NOTE. Repairs would normally be carried out following the reinstatement of the key to the rest of the ceiling. Reinstatement results in the original ceiling being up to three times stronger than the original ceiling and resistant to affects caused by water leaks. 2/. To remove the absorption from the laths spray with "Westox RAP primer" thoroughly wetting the laths top and bottom, also soak the exposed edges of the plaster around the repair with the primer to "kill" the suction, as an added precaution attach 1 inch galvanized chicken wire over the entire area to be re-plastered to provide an additional key and prevent cracking, fix the wire using galvanized nails or screws keeping the wire tight, use copper wire to fix the centre areas of the wire to the laths to prevent sagging. NOTE. Although not widely published or mentioned in plaster restoration books wooden laths required soaking prior to fixing, soaking laths makes them easier to cut with a lath hammer, prevents splinters in the fingers during fixing, makes them easier to nail with less splitting and prevents the expansion of laths following the application of wet plaster which causes key breakage. Lime plasters are badly affected by too much suction so it is important that all suction is controlled. PLASTERING Traditional Plastering Specification MATERIALS Plastering Sand. Pitt sand is preferred. Slaked Lime Putty (minimum 14 days old) (If hydrated bag lime is used pre-soaking to a putty is necessary to provide the correct volumes) Meta Kaolin (Pozzuolan) Cow hair or synthetic fibers for reinforcing.
2 PREPARATION OF MATERIALS Roughly mix the sand and lime together at the ratio of 3 parts sand to 1 part lime and 1 part of teased hair. (all parts are by volume and the same part measurement should be used for each component) Mix by placing 1 portion of lime into a mixer with water and the fibers followed by three portions of sand, tip out after turning over 6 or 7 times. Form a pile of the material until enough mortar has been mixed that is required for the render and float coats. Cover the pile with a plastic sheet and leave for a minimum of 14 days before using if the lime has not been previously aged.(all measuring should be with gauging boxes, not shovels) MORTAR. Take 3 portions of the mixed material (e.g. 3 x 20 litres) this measure will consist of 60 litres of sand and 20 litres of lime. To this add 25% (Meta Kaolin) to lime by volume (5 litres). Add water and mix to a usable consistency. LIME SET COAT The basic components of a lime set coat is a reverse of the scratch and float coats, ie, 3 parts sand 1 part lime mortar to 3 parts lime to 1 part sand, set coat adjustment might be required depending on the sand and 5 parts lime to 2 parts sand is often the required mix after good clean pit sand is passed through a 300 micron sieve. On small areas we recommend the Multi-Finish set plaster for setting the patches. This is a lime and gypsum based plaster that is compatible with the new lime render and the existing plasters and would be simpler to use than a lime set. The use of lime set coats in patching small areas can prove to be very difficult. 3/. Mix the lime plaster in a clean mixing vessel using clean water, mix to a usable consistency and apply a scratch coat directly over the laths at a 45 degree angle to the laths so the plaster passes through the wire and laths curling over to form a key on the back of the laths, apply so approximately 5 to 8mm of the plaster is left on the underside of the laths, allow for initial set and scratch thoroughly ready for the following float coat. After the material has cured for several days mix fresh mortar and fill the area to be repaired or form screeds around the perimeter of the ceiling at the required finished level, if plastering a large area form box screeds to the perimeter screeds, fill between the screeds and rule and devil float to a flat keyed surface ready for the following set coat. NOTE. When carrying out small repairs and because of the time constraints it is quite common for the plasterer to use "gauged stuff". Gauged stuff is taking a portion of coarse stuff, forming a ring on the mortar board, filling with water and adding some gypsum plaster, the materials are mixed together and immediately applied to the laths in the same manner in place of straight the lime mortar, the addition of gypsum causes the mortar to set quickly so the scratch coat can be applied and scratched ready for the float coat within ½ an hour, the float coat is also applied using "gauged stuff" and ready for a gypsum set coat after another 1 hour. The set coat is applied and finished in the normal manner to a smooth flat surface ready for painting. 4/. If a lime set is preferred allow three or 4 days before applying the lime set over the float coat (Depending on the drying conditions) SET COAT In a suitable mixing vessel, place 3 portions of lime to 1 portion of sand, add 20% Meta kaolin to lime by volume and mix to a usable consistency. Apply the mix to the float coat in an even coat at the approximate thickness of 3 to 4mm. After the initial application, lay the material flat and scour the surface with water and a wooden float to compact the material and prevent crazing. (If crazing occurs, increase the portion of sand to 1½ or 2 parts). When the material is well


3 compacted, apply a laying in coat tightly over the surface to fill any voids and finish with a steel trowel and water to a smooth even surface and leave ready for painting. The addition of Meta Kaolin is probably not necessary in colder climates and aerial lime can be used on its own, premature drying will "kill" the set of aerial lime and any strength will rely on compaction. As mentioned above lime set can be extremely difficult on small areas so using alternative materials can shorten the time and make the job easier if acceptable. Whichever method is chosen the repair method should be documented for future reference. Image 1 Image 2


4 Image 3 Image 4
5 Image 5
#70 grit sand Putty knives, sized as needed #1 fine gray sand Corner tools Milestone acrylic liquid
 Countertops Supplies Tools White and/or gray Milestone cement 12 inch steel trowel #70 grit sand Putty knives, sized as needed #1 fine gray sand Corner tools Milestone acrylic liquid Hock Universal tints
(H) PAINTING LIST OF BUREAU OF INDIAN STANDARD CODE OF PRACTICE (ISI)
 PAINTING LIST OF BUREAU OF INDIAN STANDARD CODE OF PRACTICE (ISI)") (H) PAINTING LIST OF BUREAU OF INDIAN STANDARD CODE OF PRACTICE (ISI) 6278 : Code of Practice for white washing and colour washing. 2932 : Enamel and synthetic, exterior (a) Undercoating (b) Finsihing.
(H) PAINTING LIST OF BUREAU OF INDIAN STANDARD CODE OF PRACTICE (ISI) 6278 : Code of Practice for white washing and colour washing. 2932 : Enamel and synthetic, exterior (a) Undercoating (b) Finsihing.
PROJECT PLANS ROLLING LAUNDRY SORTER
 R PROJECT PLANS ROLLING LAUNDRY SORTER Sorting laundry certainly doesn t rank high on anyone s list. So, anything that makes this task easier is welcome. If that functionality can be mixed with a bit of
Repairing Sheet-Molded Compound (SMC) With Epoxy
 With Epoxy") Repairing Sheet-Molded Compound (SMC) With Epoxy 1. Properties: A. It does not dent. B. It does not rust C. Panels are formed using a flat sheet or compound that is heat molded in a press. 2. Preparation
Repairing Sheet-Molded Compound (SMC) With Epoxy 1. Properties: A. It does not dent. B. It does not rust C. Panels are formed using a flat sheet or compound that is heat molded in a press. 2. Preparation
EWI Install Guide. Thin Coat Render
 EWI Install Guide Thin Coat Render STEP 1 Substrate Preparation As with any construction project, preparation is extremely important. Before applying any insulation to the substrate, it needs to be examined
PREMIUM CONCRETE COUNTERTOP MIX INSTALLATION INSTRUCTIONS
 PREMIUM CONCRETE COUNTERTOP MIX INSTALLATION INSTRUCTIONS High Strength Fast Setting Pourable Helpful Items: TCC Materials February 09 Version 2.0 Tools Required: Concrete mixer or ½ drill (600 RPM or
How to repair a wall or ceiling FREE
 How to repair a wall or ceiling FREE How to repair a wall or ceiling This guide shows how to repair walls and ceilings throughout the guide we only refer to walls but the same principles apply to ceiling
SVQ Level 3 Plastering Skills Test Information for Employers and Apprentices
 SVQ Level 3 Plastering Skills Test Information for Employers and Apprentices Guidelines: Version 034-01/140213 1. The Skills Test for Plastering must be taken by apprentices approaching the end of their
Cabonyx Installation Manual
 Cabonyx Installation Manual Content Deck-Nyx and Plan-Nyx Installation Page 1 Flooring Products Page 1 Accessories Page 1 Installation Tools Page 2 Preparing Sub-structure Page 2 Installation Page 4 Cautions
rondo exangle drywall finishing sections
 rondo exangle drywall finishing sections SUMMARY The EXANGLE range of building board finishing profiles are designed to give plasterers a clean, defined edge on straight or curved details for internal
Durabrac Gable Bracket Installation Guide
 Durabrac Gable Bracket Installation Guide Durabrac vinyl gable brackets are manufactured from high quality natural white vinyl with UV inhibitors. There are currently six styles and three sizes to choose
Roll Out Vinyl Installation Guide
 Sub-floor Requirements The contractor performing the installation of the performance vinyl flooring must ensure the proper quality of the sub-floor. The sub-floor must be clean, smooth, permanently dry,
3 Simple Steps to a Beautiful Tile Surface. Tec Skill Set How-To Project Guide Floor Tile 1. PREPARE THE SURFACE 2. SET THE TILE. Reverso en español
 Reverso en español Tec Skill Set How-To Project Guide Floor Tile 3 Simple Steps to a Beautiful Tile Surface 1. PREPARE THE SURFACE 2. SET THE TILE 3. Grout AND CAULK H.B. Fuller Construction Products Inc.
MANUFACTURING AND SPECIFICATIONS OF PREFABRICATED OF FERROCEMENT DOORS
 MANUFACTURING AND SPECIFICATIONS OF PREFABRICATED OF FERROCEMENT DOORS Tency Baetens Auroville Building Centre (AVBC) Auroville 605 101 India A ferrocement door is easy to manufacture, the prefabricated
Heritage Cob and Lime Price List 2017 All prices exclude VAT
 Heritage Cob and Lime Price List 2017 All prices exclude VAT TEL: 01237 477431 Due to NEW Health & Safety Regulations all bulk bag mortars delivered by tail lift vehicles must not exceed 750 kg & must
UNIT 11: PAINTING, STAINING, AND FINISHING
 KEY CONCEPTS 1. Equipment needed 2. Primary kinds of Paint: Interior/Exterior 3. Primary kinds of Stain: Interior/Exterior 4. Proper application techniques: Paint/Stain/Finish 5. Equipment care and clean
Regulator installation guide Air Arms S4xx/S5xx
 Welcome to Huma-Air. We design and manufacture brand- and model specific precision regulators for PCP air rifles. By using only the highest quality materials such as aircraft grade aluminum, aluminumbronze,
Hand Tool Identification Worksheet. Name: Screw driver. Purpose: To turn the screws. Name: chisels. Purpose: To remove/chip away materials
 Hand Tool Identification Worksheet Name: Screw driver Purpose: To turn the screws Safety Facts: Don t use for prying or as a chisel Name: chisels Purpose: To remove/chip away materials Safety Facts: Always
Union County Vocational - Technical Schools Scotch Plains, New Jersey
 SECTION 099123 - INTERIOR PAINTING PART 1 - GENERAL 1.1 RELATED DOCUMENTS A. Drawings and general provisions of the Contract, including General and Supplementary Conditions and Division 01 Specification
Installation Instructions
 www.marlite.com Effective Date 03/01/2018 ARTIZAN FRP, SYMMETRIX FRP, ENVUE FRP, STANDARD FRP Installation Instructions Statements expressed in this technical bulletin are recommendations for the application
Dry Powder Products Natural Hydraulic Lime ( Buxton Premium NHL) 25KG White Peak NHL White Peak NHL Limbux Hydrated Lime 9.
 25KG White Peak NHL White Peak NHL Limbux Hydrated Lime 9.") Heritage Cob and Lime Price List 2018 TEL: 01237 477431 All prices exclude VAT Due to NEW Health & Safety Regulations all bulk bag mortars delivered by tail lift vehicles must not exceed 750 kg & must
Heritage Cob and Lime Price List 2018 TEL: 01237 477431 All prices exclude VAT Due to NEW Health & Safety Regulations all bulk bag mortars delivered by tail lift vehicles must not exceed 750 kg & must
Blue Barrier Flash N Wrap 2400
 Tools/Materials Needed 2- or 5-gallon pail of Poly Wall Blue Barrier Flash N Wrap 2400 10.1 oz caulking or 20 oz. sausage tube of Poly Wall Blue Barrier Joint Filler 2200 Caulking gun Chip Brush 4- or
IGGA Guide Specification: Dowel Bar Retrofit (DBR) Introduction
 Introduction") IGGA Guide Specification: Dowel Bar Retrofit (DBR) Introduction This standard developed by the International Grooving and Grinding Association (IGGA) specifies the procedures for construction of dowel
IGGA Guide Specification: Dowel Bar Retrofit (DBR) Introduction This standard developed by the International Grooving and Grinding Association (IGGA) specifies the procedures for construction of dowel
COMPOSITE SIDING INSTALLATION GUIDE
 CENTURY HOME LIVING COMPOSITE SIDING INSTALLATION GUIDE Read all instructions prior to installing any siding product. Failure to install and finish this product in accordance with all local building codes,
Painting Pitched Roofs
 4 Tutorial 4 Painting Pitched Roofs Tile & Galvanized Iron Paint Academy Determining your product requirement: Measure area to which paint is to be applied. Depending on surface to which the product is
Sawn Baluster Sizing and Installation Guide
 Sawn Baluster Sizing and Installation Guide Welcome to the Durabrac sizing and installation guide for Sawn Balusters. This guide has been prepared to answer any questions you may have about our Sawn Balusters
Cove and Cornice Decorative room features
 GYPROC Cove and Cornice Decorative room features 1 2 3 4 1 2 3 4 Gyproc Cove with one Cornice Strip on ceiling and wall. Gyproc Cove with twocornice Strips on ceiling and wall. Gyproc Cove with one Cornice
PRO CYC PRO CYC, INC. SYSTEM SUPER 3EZ
 ASSEMBLY INSTRUCTIONS SYSTEM SUPER 3 EZ Congratulations on your decision to use the world s most advanced and user-friendly cyclorama system. We have taken a great deal of care to create and ship your
Antique Trunks: Refinish, Repair, Restore, Revised and Expanded
 15. Patch any holes on the inside of the trunk: There will often be splits or holes on the inside of the trunk that may or may not be visible from the outside. Most often they are holes left by the removal
RhinoArt Decor Polystyrene Mouldings
 C Art 12/8/08 2:31 PM Page 2 RhinoArt Decor Polystyrene Mouldings CORNICES Made of high density POLYSTYRENE for a perfectly smooth surface. RhinoArt Decor adhesive covers 8-10 linear metres per kg. 62
Flooring. Technical specifications plus acclimatisation, laying preparations and after-care instructions
 Flooring Technical specifications plus acclimatisation, laying preparations and after-care instructions Whippletree flooring is a natural product that, from one season to the next, will display a marginal
Au. di VoglFuge data sheet
 Head Office 17 19 David Lee Road Hallam Victoria 3803 PO Box 1143 Narre Warren MDC 3805 T 03 9796 3333 WA/SA Region PO Box 710 Joondalup DC 6919 T 08 6323 5662 atkar.com.au TM Au. di VoglFuge data sheet
PRO CYCTM PRO CYC, INC. SYSTEM 1.5 FS
 ASSEMBLY INSTRUCTIONS Congratulations on your decision to use the world s most advanced and user-friendly cyclorama system. We have taken a great deal of care to create and ship your cyc, so please take
Repairs. Chapter 10 Repairs 10. 1
 10 Repairs Chapter 10 Repairs 10. 1 Repairs As an installer, you will probably be called upon to repair damage to a resilient floor. Here are some of the most common problems and the recommended repairs
1. INTRODUCTION 2. REFERENCE SPECIFICATIONS. Page -1- Bonding and Grouting
 Page -1-1. INTRODUCTION 1.1 Scope This specification covers non-shrink and epoxy grouting of structural column base plates and equipment bases, Portland cement grout for minor elements and bonding agents
Before the VideoScanner is ready for use, one 9-volt battery must be installed.
 VideoScanner 5.5 Components 1. Metal Sensor 2. LCD Display 3. Activation/Mode Change Switch 4. Battery Door LCD Display Components 1. DeepScan Mode Indicator 2. Stud Scanner Mode Indicator 3. Metal Mode
PAT installation of a Sun Dome over a in-ground
 PAT. 3766573 Installation of Sun Domes for in-ground pool GENERAL INSTRUCTIONS: STEP 1. Read thru the entire instructional materials before beginning any installation. You will find that the installation
installation guide TASMANIAN HARDWOOD OVERLAY FLOORING
 TASMANIAN HARDWOOD OVERLAY FLOORING installation guide These instructions apply to quality Tasmanian strip flooring used as an overlay on a structural substrate in residential applications. nail glue SHEET
PRESTON HEALTH SERVICES ARCHITECT'S NO MITCHELL-HOLLINGSWORTH NURSING & REHAB
 SECTION 09 9123 - INTERIOR PAINTING PART 1 - GENERAL 1.1 RELATED DOCUMENTS A. Drawings and general provisions of the Contract, including General and Supplementary Conditions and Division 01 Specification
installation manual m y w a l l a r t. c o m
 installation manual Step 1 Step 2 Acclimate panels for 48 hours in the environment and temperature they will be installed in. Step 3 Install over relatively smooth flat surfaces, all major holes or major
Related Articles: Index of Siding and Exterior Trim Articles Index of Window Articles
 Garage Remodel: In This Article: Case 1: Vinyl Window, New Sill Case 2: Aluminum Window, Old Sill Caulking Notes On Using Treated Yellow Pine Tools and Materials Related Articles: Index of Siding and Exterior
Installing 3M DI-NOC Architectural Finishes on Doors
 Installation Guide Revision C, September 2017 Introduction The purpose of this installation guide is to establish a 3M-recommended procedure for installing 3M DI-NOC Architectural Finishes (the Product
GYPROC. Cove and Cornice Decorative room features....made easy
 GYPROC Cove and Cornice Decorative room features...made easy 1 2 3 4 1 2 3 4 Gyproc Cove with one Cornice Strip on ceiling and wall. Gyproc Cove with two Cornice Strips on ceiling and wall. Gyproc Cornice
Noville School Diorama Part 4 Making the Floors and Plastering the Walls and Ceilings
 Noville School Diorama Part 4 Making the Floors and Plastering the Walls and Ceilings Moulds and Materials Making the Floors Plastering the Ceiling Plastering the Walls Installing the Ceiling and Floor
INSTALLATION GUIDE. Preparation. Subfloor Preparation. Installation of Vapour Barrier Paper (asphalt-free) Model repair and maintenance kit
 Model repair and maintenance kit") INSTALLATION GUIDE pg and model solid ing The investment that ing represents in the home is an important one and customers want their ing to last. In light of this fact, the importance of product quality
INSTALLATION GUIDE pg and model solid ing The investment that ing represents in the home is an important one and customers want their ing to last. In light of this fact, the importance of product quality
SECTION MANHOLES
 SECTION 33 05 13 MANHOLES PART 1 GENERAL 1.01 SECTION INCLUDES A. CONTRACTOR shall furnish and install precast concrete manhole base, sections, adjusting rings, steps, and manhole ring and cover, complete.
INSTALLATION INSTRUCTIONS FOR FLUSH MOUNT FIXTURES
 Kurt Versen Company Point Source Lighting Models with Round Apertures 10 Charles Street Westwood, New Jersey 1 PLEASE READ THIS ENTIRE INSTRUCTION SHEET BEFORE INSTALLATION. 2 DISCONNECT ELECTRICAL POWER
B. Samples: For each exposed product and for each color and texture specified.
 SECTION 095113 -ACOUSTICAL PANEL CEILINGS PART 1- GENERAL 1.1 SUMMARY Section includes acoustical panels and exposed suspension systems for ceilings. Work is limited to modification of existing acoustical
Beams INSTALLATION INSTRUCTIONS
 Beams INSTALLATION INSTRUCTIONS Page 1 of 1 You may wish to paint, stain or faux finish your decorative millwork piece prior to installation. This can speed up installation and reduce errors (spilling
Building Instructions
 Building Instructions Tools Required Tape measure Straight edge Pencil/pen Jigsaw Table Saw Circular Saw Electric drill 1 Hole saw bit Saw horses/table Protractor Staple gun Caulk gun Paint brush Wrenches
Three layer Felt Roofing using cold applied adhesive
 Three layer Felt Roofing using cold applied adhesive Useful tips - Skill level - Safety - Felt Roofing Materials - Tools and Equipment Laying a felt roof is within the capabilities of most diy people providing
Five Star Panel Installation Instructions
 Five Star Panel Installation Instructions How to Store Five Star Panels You will need to store FIVE STAR PANELS in dry place to prevent staining, deterioration and possibly void all warranties. Stand the
How to Rehandle and Repair that Old Hammer - a Step by Step Tutorial by Bob Sturgeon
 How to Rehandle and Repair that Old Hammer - a Step by Step Tutorial by Bob Sturgeon There is a world of old collectible and user hammers out there floating around just waiting to be resurrected. Hammers
Plexidor Pet Door Wall Kit Instruction for All Sizes Plexidor : S, M, L, XL; BiteGuard KennelPlex TM 1113,1418, 1419 & 1825 and Plexidor Electronic LG
 Plexidor Pet Door Wall Kit Instruction for All Sizes Plexidor : S, M, L, XL; BiteGuard KennelPlex TM 1113,1418, 1419 & 1825 and Plexidor Electronic LG Congratulations on your purchase of the Plexidor Pet
Install Like the Pros
 CertainTeed Install Like the Pros Drywall Installation Guide GETTING STARTED RIGHT Use the right products For the best, lasting results choose the right CertainTeed gypsum board for the job you re planning.
1 SLABBING, RENDERING, FLOATING AND SKIMMING
 TRADE OF PLASTERING PHASE 2 Module 1 SLABBING, RENDERING, FLOATING AND SKIMMING UNIT: 10 Produced by In cooperation with subject matter expert: Terry Egan Some images & text courtesy of Gypsum Industries
Palladian/ Keystone Models 202/204 Maintenance Kit
 Palladian/ Keystone Models 202/204 Maintenance Kit Please read all of the instructions before you begin. Confirm that you have all the necessary tools and parts required. Allow about one hour to complete
U. M. ARMY Texas Conference. Wheel Chair Ramp Manual
 U. M. ARMY Texas Conference Wheel Chair Ramp Manual June 2014 U. M. ARMY Texas Conference Building & Repair Tips Wheelchair Ramps Complete a site survey to determine the design and layout of the ramp.
MAINTENANCE GUIDE: Interior
 Ferrous Metal Enclosed Offices Leasing Ofices Lunchrooms Meeting & Conference Rooms Office Doors & Door Jambs On previously painted surfaces, wash to remove dirt, grease, oil, mildew, and other contaminants.
10 Octagon Cedar Gazebo Assembly Instructions
 10 Octagon Cedar Gazebo Assembly Instructions Toll Free: 866.768.8465 Hours: 9-5 Monday-Friday EST www.homeplacestructures.com Package ships as shown revised 06/22/09 10 Cedar Gazebo Assembly Instructions
Installation Instructions for Standard Lap and Self-Aligning Lap Siding
 Installation Instructions for Standard Lap and Self-Aligning Lap Siding 7/16 in. Standard Laps Include: All Old Mill Widths, Cedar Shake Lap and Smooth Lap 1/2 in. Self-Aligning Include: 8 in. and 12 in.
Table of Contents F Series Frames
 Table of Contents F Series Frames How to Order Frames... F 1 F Series Spec Sheet... F 2 F Series Profiles 1 of 6... F 3 F Series Profiles 2 of 6... F 4 F Series Profiles 3 of 6... F 5 F Series Profiles
GREEN WORLD LUMBER GENUINE MAHOGANY DECKING INSTALLATION GUIDE
 GREEN WORLD LUMBER GENUINE MAHOGANY DECKING INSTALLATION GUIDE Genuine Mahogany is among the most durable natural wood decking available. When properly installed and maintained, you should have a beautiful
Tackling America s To- Do List: Project Steps
 Tackling America s To- Do List: Installing Shoe Molding Living Room/ Bedroom - Dremel 8200 Rotary Tool - 2500-01 Multi- Vise - 407 Sanding Drum - 430 Sanding Drum (optional) - Wall adhesive - 2500-01 Multi-
INSTALLATION INSTRUCTIONS FOR FLUSH MOUNT FIXTURES
 Kurt Versen Company Point Source Lighting 10 Charles Street Westwood, New Jersey Models with Square or Rectangular Apertures 1 PLEASE READ THIS ENTIRE INSTRUCTION SHEET BEFORE INSTALLATION. 2 DISCONNECT
2K weather resistance clear coat A850
 Clear coat Donglai Coating Technology (Shanghai) Co., Ltd. 2K weather resistance clear coat A850 Description High-build, two-component clear coat designed for universal application and optimal appearance
HOW TO INSTALL ELITE PANELED WAINSCOTING Using X-Rails with Either Raised, Flat or Beaded Panels
 HOW TO INSTALL ELITE PANELED WAINSCOTING Using X-Rails with Either Raised, Flat or Beaded Panels 1. First, remove the cover plates from all electrical outlets. All baseboards should also be removed; the
DULUX UNIVERSAL UNDERCOAT
 TECHNICAL DATA SHEET Version 1 2015 JUNE THIS ISSUE SUPERSEDES ALL PREVIOUS PUBLICATIONS PRODUCT DESCRIPTION Intermediate coating for use under decorative topcoats, for interior and exterior use PRODUCT
How to Build Good Decks..
 How to Build Good Decks.. Worldwide Sleeping Company, Inc Cary, North Carolina Decking Overview.. Decking Overview.. more Decking Joist.... Joist Hanger Ledger Lag Screw House Wall Decking House Floor
Please read and review installation instructions completely before proceeding with the actual installation.
 INSTALLATION INSTRUCTIONS Important / Read First Please read and review installation instructions completely before proceeding with the actual installation. Owner / Installer responsibility The installer
SECTION PAINTING
 SECTION 09900 PAINTING PART 1 - GENERAL 1.1 SECTION INCLUDES A. This Section includes surface preparation, painting, and finishing of new and existing wood, interior and exterior surfaces including the
1-1/4" Microstar Gerbs
 Volume 6, Issue 2 Beginner Project... Page 1 1-1/4" Microstar Gerbs Figure 1: 10-20m titanium turnings and micro stars. Figure 2: Rolling the casing from poster board. Materials: (1) 44" long x 7" wide
INSTALLATION GUIDE. Preparation The environment
 INSTALLATION GUIDE PG-MODEL HARDWOOD FLOORING The investment that ing represents in the home is an important one and customers want their ing to last. In light of this fact, the importance of product quality
Installation Instructions
 GENERAL INSTALLATION INFORMATION To ensure maximum performance from your A 2 bath fixture, please read and follow the instructions and cautions. Carefully inspect the new fixture for any shipping damage.
1. PREPARATION OF THE SUBSTRATE CLIMATIC CONDITIONS MARKING THE POSITION CUTTING GLUING 17 18
 INDEX MOUNTING 1. PREPARATION OF THE SUBSTRATE 4 2. CLIMATIC CONDITIONS 4 3. MARKING THE POSITION 4 5 4. CUTTING 6 5. GLUING 6 7 6. TREATMENT OF THE JOINTS 7 7. MECHANICAL FASTENING 8 8. CONTACT SURFACE
Chapter 17 - Porch Trim
 Chapter 17 - Porch Trim Contents Chapter 17 - Porch Trim... 17-1 Timing & Prerequisites... 17-2 Trim on Porch Beams (Volunteer)... 17-4 Smart Trim on the Bottom of the Beam... 17-4 Smart Trim on the Inside
PAINTING PAINTING
 09920 - PAINTING 09920-1 PART ONE: GENERAL PAINTING 1.1 Description 1.1.1 Work of this Section, as shown or specified, shall be provided by the Interior Contractor and shall be in accordance with the requirements
Loose Lay Luxury Vinyl Plank
 Loose Lay Luxury Vinyl Plank FLEX COLLECTION Installation & maintenance * PLEASE READ CAREFULLY * Installation, maintenance & warranty guideline for loose lay luxury vinyl products. Adherence to This guideline
Nanton Grain Mill Assembly
 ( 1 ) Nanton Grain Mill Assembly Locate package for assembling storage building. These are cut from 1/8 masonite. Inspect and lightly sand edges where it will be bonded. Use white glue or CA glue to bond.
SIM. Mass Loaded Vinyl
 Mass Loaded Vinyl SIM Soundproofing INSTALLATION Manual When building sound isolated walls, floors and ceilings, we want to introduce significant non-resonant mass. MLV is an excellent source for this
50948-RHN Putney. 06 January This document includes: Aluminium strip/ sheet coverings/ flashings 1. Code Section Revision Dated
 50948-RHN Putney 06 January 2018 This document includes: Code Section Revision Dated H72 Aluminium strip/ sheet coverings/ flashings 1 Table of Contents Title H72 Aluminium strip/ sheet coverings/ flashings
1. Architectural precast concrete cladding units.
 SECTION 034500 - PRECAST ARCHITECTURAL CONCRETE PART 1 - GENERAL 1.1 SUMMARY A. This Section includes the following: 1. Architectural precast concrete cladding units. 1.2 DEFINITION A. Design Reference
Keeping Water Out of. Stucco Walls. by Gene Summy. Assume that the cladding will leak, but make sure the envelope is watertight
 Keeping Water Out of Stucco Walls by Gene Summy Assume that the cladding will leak, but make sure the envelope is watertight Three-coat stucco is the most common exterior cladding here in Southern California;
2. Sanding the Modules Sand the entire surface of each cyc module with 60-grit sandpaper. This will provide for better paint adhesion.
 ASSEMBLY INSTRUCTIONS SYSTEM 4 BI (Built-In) Congratulations on your decision to use the world s most advanced and user-friendly cyclorama system. We have taken a great deal of care to create and ship
INSTALLATION INSTRUCTIONS for Wood Bay or Bow Windows with Nailing Fin or Exterior Trim (JII032)
") for Wood Bay or Bow Windows with Nailing Fin or Exterior Trim (JII0) Thank you for selecting JELD-WEN products. Attached are JELD-WEN s recommended installation instructions for wood and clad wood bay
for Wood Bay or Bow Windows with Nailing Fin or Exterior Trim (JII0) Thank you for selecting JELD-WEN products. Attached are JELD-WEN s recommended installation instructions for wood and clad wood bay
Written by Administrator Monday, 29 November :54 - Last Updated Thursday, 02 December :00
 Security Screen Doors One of the most important decisions you will make in acquiring your door will the selection of the finish for your door. Two similar doors will seem very different depending on the
Eaves Lining Installation Guide
 Eaves Lining Installation Guide feb 13 Design Pine Eaves Lining - Installation Like most building products, Design Pine eaves lining has both advantages and limitations therefore a clear understanding
NEVADA ASSEMBLY INSTRUCTIONS
 NEVADA ASSEMBLY INSTRUCTIONS BASE SIZE: 2.700m x 1.500m NEVADA Tools Required: Battery Drill Riveter Hammer Tape Measure Ladder Skillsaw Level Screwdriver - Flat 3/8 Hex Drive bit 8mm Hex Drive bit Drill
BUILDING A TREE BENCH
 INSTRUCTIONS FOR A In just a few steps, we show you how to build your own tree bench and paint it perfectly. 1 SIDE PIECES OF THE SEATING SURFACE Purchase the materials from the enclosed list. Draw a 10
HR175 Sash Replacement Kit Installation Instructions
 HR175 Sash Replacement Kit Installation Instructions IMPORTANT: Please read before you begin. Weather Shield HR175 Sash Replacement Kits Important: Thoroughly read and follow these instructions, failure
Etanorm, RPH, Multitec, CPK, Movitec, Ama-Porter, UPA. Circulator, service water (Rio series) and in-line pumps (Etaline, Trialine)
 and in-line pumps (Etaline, Trialine)") 1 1. General In order to showcase the high standard of quality of KSB products at trade fairs, exhibits must always be in a perfect condition. On principle, there must be no difference in appearance between
1 1. General In order to showcase the high standard of quality of KSB products at trade fairs, exhibits must always be in a perfect condition. On principle, there must be no difference in appearance between
INSTALLATION MANUAL STORAGE
 IMVersion 1.1 INSTALLATION MANUAL GENERAL GUIDE: The information in this IM is intended to serve as a general guide to proper installation with no warranties intended or implied. Prime Panels assumes no
 http://www.hypertufabooks.com http://www.the-artistic-garden.com Feel Free to Pass this ebook On to Your Friends or Make it Available for Download on Your Website or Offer it as a Gift to Your Ezine Subscribers.
INSTALLATION INSTRUCTIONS FOR ELKALAMINATE. IN ORDER TO OBTAIN A GOOD RESULT, WE ADVISE TO FOLLOW ALL GIVEN INSTRUCTIONS CAREFULLY.
 INSTALLATION INSTRUCTIONS FOR ELKALAMINATE. IN ORDER TO OBTAIN A GOOD RESULT, WE ADVISE TO FOLLOW ALL GIVEN INSTRUCTIONS CAREFULLY. PREPARATION Let the planks acclimatize for 48 hours in the unopened packaging
Aerospace Speciality Products
 Specifications:! Length: 18.75"/47.6 cm! Diameter: 0.98"/24.9 mm! Weight: 1.5 oz/44 gm! Streamer Recovery! Recommended Engines:!! A8-3; B4-4; B6-4; C6-5! Skill Level: Beginner This is a model rocket kit
Prior to servicing the vehicle, refer to Knowledge Center for the most up to date version of your shop manual.
 December 4, 2013 Subject:SPARK - Fixing Scratches and Repairing the Hull No. 2014-7 Prior to servicing the vehicle, refer to Knowledge Center for the most up to date version of your shop manual. MODEL
3Insert the second rod no. 4
 Yamato: Step-by-step 37 The stern block and searchlight control towers a b c d e f Recommended tools and materials Wood glue Sandpaper (no. 800 grain) Metal file Putty Craft knife For metal: Super Glue
Installation Guide Acoustic Wall Panel
 Installation Guide Acoustic Wall Panel Contents Preface 2 Adhesive Method 3 Fast Mount Method 4 Adhesive Method 5 Direct Fix Method 6 Magnet Method 7 Preface Wall Preparation Before beginning the installation
PRO CYC PRO CYC, INC. SYSTEM SUPER 1.5QS
 Assembly Instructions System Super 1.5QS Congratulations on your decision to use the world s most advanced and user-friendly cyclorama system. We have taken a great deal of care to create and ship your
HeatBoard Joisted Floor System
 Design HeatBoard Joisted Floor System The Floor Heating Warehouse Underfloor Heating using Heatboard Slotted and Turning Boards is intended for installation on standard wood joist floors of a max. 600mm