IKO0716 July Roofing Shingles. Selector & Fixing Guide
|
|
|
- Deirdre Vivian Nash
- 5 years ago
- Views:
Transcription


1 IKO0716 July 2016 Roofing Shingles Selector & Fixing Guide


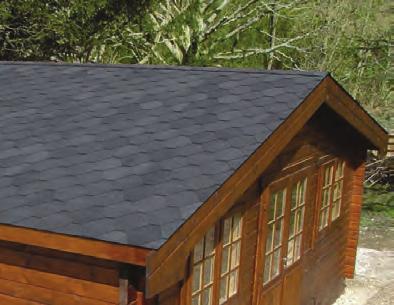
2 Durable, waterproof and beautiful Protecting what s under your roof from the elements is simplicity itself with IKO Roofing Shingles. Roofing Shingles make ideal roofing; they are attractive, easy to install and are perfect for use on a range of buildings. Durable and aesthetic, they can be used on new building projects or for refurbishing everything from stables, gazebos, beach huts, chalets, summerhouses and sports pavilions to garden buildings. They can also be used as vertical cladding. Roofing Shingles are suitable for use on any building, temporary or permanent, domestic or commercial, habitable or recreational with a roof pitch from 15 to vertical. The simplest of makeovers can be completed by following the fixing instructions. Roofing Shingles provide a long lasting, highly decorative, weatherproof roof finish in a variety of pitched roof situations. Technology at its best Roofing Shingles are supplied in packs of individual strips, available in two shapes - Armourglass Square Butt or Armourshield Hexagonal: They consist of a glass fibre base, coated with oxidised bitumen and surfaced with attractive coloured mineral granules. Benefits Long lasting Economical Attractive appearance Choice of colours Choice of shapes Easy to install Lightweight Proven waterproofing performance SAA fire rating Non-rotting glass fibre base UV resistant decorative mineral surfacing Complies with European Standard EN544. Class1 2 Technical:

. Armourshield Hexagonal Roofing Shingles 1000mm 318mm 80mm Nail Positions Tabs 135mm to the weather with a fixed headlap of 50mm.")
3 Product Range Armourglass Square Butt Roofing Shingles 336mm 1000mm Nail Positions Use 20mm large head galvanised clout nails. Increased gauge for sites of severe exposure will increase headlap from 50mm to 76mm. Adhesive Strips The tabs will self bond in summer conditions. In colder conditions the bond will take longer to be effective. Therefore blobs of IKOpro Lap Mastic should be applied below each corner of the tabs. Tabs Gauge 143mm (reduce to 130mm on sites of severe exposure). Armourshield Hexagonal Roofing Shingles 1000mm 318mm 80mm Nail Positions Tabs 135mm to the weather with a fixed headlap of 50mm. Roofing Shingles Roof area coverage Pack Contents Weight Number of strips Strips Length Width Tabs Armourglass Square Butt 3.0m kg 21 1m 336mm 4 Armourshield Hexagonal 3.0m kg 22 1m 318mm 3 IKOpro Lap Mastic IKOpro HP Cold Adhesive Cartridge size 310ml - Allow 1 1 / 2 cartridges per pack of shingles to cover nail heads. Where sites are subject to severe exposure, allow an additional 2 cartridges per pack of square butt shingles for the blobs of adhesive at the corners tabs IKOpro HP Cold Adhesive: 5 litre, 25 litre tins Fully bonding coverage (for bonding IKO Glass Fibre Underlay 20m (Type 3B) at valley shingles), allow 5 litres per 8m 2 Roll Length Roll Width Roll Weight IKO Glass Fibre Underlay (Type 3B) 20m 1m 36kg 3

 use 8 nails per shingle, placing one fixing nail 25mm from each end and 2 nails per cutout, spaced 25mm left and right above each")
4 Fixing Instructions Helpful fixing guidelines For standard conditions and roof slopes (15 o to 85 o pitch): Place one fixing nail 25mm from each end and one fixing nail directly above the centre line of each cut-out. All fixings should be on a line 25mm above the top of the cut-out. Proper fixing increases the strength and wind resistance of the shingle roof; so do not skimp on fixings. If a fixing will not enter the decking, use another in a nearby location. In very severe exposure areas and on steep roofs (60-85 o pitch) use 8 nails per shingle, placing one fixing nail 25mm from each end and 2 nails per cutout, spaced 25mm left and right above each cut-out. In severe weather, a small blob of IKOpro Lap Mastic must be applied beneath the corners of each tab and over each nail head, for additional security before the heat of the sun activates the self-seal patches. Always leave a 2mm gap between the ends of individual shingles, to allow for minor adjustments in alignment. If shingles are to be used on a habitable building that is subject to the Building Regulations, then they should be installed in accordance with BS 5534: 2003 Code of Practice for slating and tiling (including shingles). Understand Your Roof Pitch Knowing your roof pitch - the angle at which your roof slopes or pitches - enables you to best plan your project and determine the correct layers of underlay membrane to use. Roofing Shingles are designed for application on pitched roofs 15 o and over, both habitable and non habitable buildings. For non-habitable buildings of all roof pitches, a single layer of IKO Glass Fibre Underlay 20m (Type 3B) should be used as an underlay. This is laid parallel to the eaves with a 75mm side overlap and 100mm end laps. It is fixed using large headed clout nails at 300mm c/c along the lower edge and down all sloping sides. For habitable buildings with a roof laid to pitch of 15 o to 20 o two layers of IKO Glass Fibre Underlay 20m (Type 3B) must be used as preparation before fixing the shingles. The first is laid as above. The upper layer is laid staggered to the first and fully bonded with roofing felt adhesive. For habitable buildings with a roof laid to pitch of 21 o and above a single layer of IKO Glass Fibre Underlay 20m (Type 3B) must be used as an underlay. If your building is subject to Building Regulations, then please contact IKO Technical Services for further guidance. Square Butt Roofing Shingles Instructions for fitting shingles on garden sheds and similar buildings Step 1 Prepare the roof decking on to which you are fixing the shingles Check that the roof decking of your structure is sound, clean, dry and stable before starting. Step 2 Fix the felt underlay An underlay consisting of rot proof IKO Glass Fibre Underlay 20m (Type 3B) should always be fixed below the shingles. Starting at the eaves and working up the slope of the roof, unroll the IKO Glass Fibre Underlay parallel to the eaves. The underlay should extend beyond the roof edges and turn down the external edges by 50mm. Tack into position at 300 c/c along the lower edge and down all sloping sides. End laps should be 100mm and the vertical overlap 100mm. 4 Technical:


5 Step 3 Make and fix the shingles strips for sloping verges First make the shingle strips for the sloping verges. When using the Square Butt Shingles cut off the tabs from a single shingles strip to create the sloping verge-edging pieces. You may prefer to cut through the shingle from the back and cut onto a board so as not to damage the knife blade or anything underneath. These verge-edging pieces should be applied first and positioned extending 50mm beyond the edge of the roof. If a barge board is present on a garden building, it should be removed and reinstated when the shingles have been installed. Gently fold these verge pieces over the roof edge, taking care to warm the material first in cold conditions so it is more pliable, nailing at 50mm centres. At the corners cut the Roofing Shingles to allow an overlap when folded around the corner and nail this in position. Step 4 Position the eaves shingle strips For the eaves sections use a full shingle strip, turned with the tabs facing up the roof. Position these strips overhanging the roof edge by 50mm. Starting at the left hand eaves corner, place the reversed shingle on to the roof extending 50mm beyond both edges (for ease of detailing at the corner, cut away the edge at an angle as seen in Fig. 1). At the joints between individual shingle strips, use the tabs (that were previously cut to make the verge edging ) as soaker pieces. Place the eaves strips in position and gently fold over the roof edge and nail into final position. Ideally nails should be placed 25mm from each end, just below the line of the cut-outs, with three more nails on a horizontal line between the first two immediately below each cut-out. Holding the shingle in position with one hand, gently fold the overhang over the edge of the roof, extending beyond the underside of the decking to form a drip edge. Once folded, nail fix at 50mm centres. Continue along the eaves of the roof in the same manner, using the tabs previously cut off of the shingles for the sloping verge as soaker pieces between each shingle strip. You should cut away the corner of the shingle at an angle to prevent a build-up of laps. Now all your perimeter detailing should be complete verges, corners and eaves. Fig

, and continue with full shingles for the rest of the course. Leave a 2mm gap between shingle strips. See Fig. 2. Repeat this for all odd numbered courses.")


6 Step 5 Alignment of the first shingle course Now set out the position for the first shingle course using either a chalk line or straight edge approximately 5mm from the roof edge. Step 6 Position and fix the first shingle course Trim half, that is 125mm from the verge tab of the first shingle course (row), and continue with full shingles for the rest of the course. Leave a 2mm gap between shingle strips. See Fig. 2. Repeat this for all odd numbered courses. Fig. 2 Step 7 Position and fix the higher courses Use whole shingle strips for the placing of the second and all further even numbered courses creating a staggered effect as shown in the illustration. See Fig. 3. For normal fixing, shingles should be nailed 25mm above each cut-out and 25mm in from each edge. Continue to fix the shingle strips up the roof, creating a staggered effect. The bottom edge should just overlap the top of the cut-outs of the underlying shingles so that there will be approximately 145mm of each shingle exposed. Roofing adhesives can be used sparingly, covering the nail heads of individual fixing points and in the corner of each tab. This also gives added security in exposed locations. Fig. 3 6 Technical:


.")


7 Step 8 Cut roofing shingles to create ridge shingles To finish the roof we make the ridge capping. For the ridge, Roofing Shingles must be cut from the shingle strips, inline with the cut-outs. See Fig. 4. Four ridge shingles can be cut from each shingle strip. Shingles can be more readily cut if scored on the back, allowing the shingle to separate away easily. Alternatively you can cut from the front, or mineral side (as shown). To assist in making the ridge shingles lay flat, make secondary cut lines as shown in the illustration. Fig. 4 Step 9 Alignment of the ridge shingles Use a chalk-line or straight edge to ensure the correct positioning of the individual ridge shingles. Step 10 Position and fixing of ridge shingles On the ridge of the roof each ridge shingle should overlap the previous one, as shown, exposing approximately 145mm. Step 11 Seal the lap joints in the ridge shingles A bead of IKOpro Lap Mastic should be used to seal the joint. Bed down onto 25mm strips of IKOpro Lap Mastic to seal the open ends. Fig

8 Step 12 Position and fix of the ridge shingles Continue to fix the ridge shingles along the roof ridge, bending lengthways down the centre to achieve equal exposure on both sides of the ridge as shown in Fig. 5. In cold weather remember to warm the shingles before folding. Seal the lap and nail fixing on both sides. Shingle application in valleys Cover the valley with the 1m wide IKO Glass Fibre Underlay 20m (Type 3B). Vertical laps if unavoidable should be a minimum of 300mm and sealed with IKOpro Lap Mastic. Nail at 400mm intervals 25mm from the edge. Then lay the main roof underlay so that it goes over the valley and overlaps the adjacent roof plane by 300mm. Cut this parallel to the valley then seal with IKOpro Lap Mastic. The underlay on the opposite roof plane would similarly overshoot the valley by 300mm and would also be cut parallel and then sealed with IKOpro Lap Mastic. Do not nail within 150mm of the valley centreline. For best performance, start applying shingles on the roof plane with the lower slope or biggest surface. The starter strip must be woven (extend 250mm onto adjoining roof plane). Do not nail within 150mm of the valley centreline. Use one extra nail at the end of each shingle crossing the valley. After completing this roof plane, snap a chalk line 50mm from the centre line on the roof plane still to cover. Apply the shingles onto the second plane, trim shingles to the line and cut a 50mm triangle off the top corner to direct water into the valley. Glue the valley end of each shingle with IKOpro Lap Mastic. Do not nail within 150mm of the valley centreline. Always arrange layers so that water can run unobstructed to the gutter. Step 13 The Completed Job IKO Roofing Shingles provide a long lasting, attractive, decorated waterproofing finish to a wide variety of garden buildings. 8 Technical:


9 Hexagonal Roofing Shingles Fixing Hexagonal Roofing Shingles - A few differences Using Hexagonal Shingles is similar, but differences arise because unlike the Square Butt Shingles, Hexagonal Roofing Shingles have an adhesive surface on the reverse of each tab, protected by removable film. Prepare your roof deck with underlay as detailed for Square Butt Roofing Shingles. Creating the verge-edging pieces means cutting off the hexagonal tabs from a shingles strip and removing the release film. When positioning the verge edging piece, it is again important to allow a 50mm overhang at all edges. Remember to use a full shingle, turned with the tabs facing up the roof, overhanging the roof edge by 50mm. At joints between individual shingles strips, use one of the 3 hexagonal tabs (that has been cut off when you made the verge edging) as a soaker piece as shown in Fig. 6. Fig. 6 Folding the Eaves Roofing Shingle Now gently fold the verge pieces over the roof edge, taking care to warm the shingles in cold conditions. As shown correctly position the eaves shingle, gently fold over the roof edge and nail in position, cutting the corner details allowing overlaps to be folded around the corners before nailing into position. Removal of the release backing Before applying any Hexagonal Roofing Shingles always remove the release sheet backing to expose the heat activated adhesive coating. But do not remove the backing until you are ready to fix the shingle. 9


10 Alignment of the first shingle course In order to position and fix the first shingle course, trim 166mm from the verge tab of the first shingle course. Repeat this for all odd numbered courses. Set out the position for the first shingle course so that the edge of the shingle strip is aligned 5mm from the edge of the roof. Ensure that the shingle cut-out of the first shingle course aligns with the reversed shingle tab from the eaves shingle strip. Position and fix the higher roofing shingles courses. Next position and fix subsequent courses For the second course, continue with full shingles strips for the rest of the course. Use whole shingles for the second and all even numbered courses. For normal fixing, shingles should be nailed 25mm in from each edge and above each cut-out, along a line 25mm above the cut-outs. Now for the remaining courses, simply continue to fix the shingle strips up the roof, creating a staggered effect, as seen here. The bottom edge should just overlap the top of the cut-outs of the underlying shingles so that there will be approximately 135mm of each shingle exposed. Use IKOpro Lap Mastic to cover the nail heads of individual fixing points and in the corner of each tab, for added security in exposed locations, prior to heat activation of the tab coating. Finally to finish the roof ridge capping, the ridge shingles must be cut from the shingle strips, inline with the centre of the cut-outs. Three ridge shingles can be cut from each Hexagonal Shingle strip. These ridge shingles should be nailed both sides of the ridge apex and nail fixings covered by the next ridge shingle. The Completed Job IKO Hexagonal Roofing Shingles provide a long lasting attractive decorative waterproofing finish to a wide variety of garden buildings. 10 Technical:
.")
.")


11 Additional Information Roof Ventilation When Roofing Shingles are used on heated buildings or insulated roofs, ventilation of the void space must be provided. For cold roofs ventilation should be at least equal to continuous strip 10mm wide (Ref: BS 5250:2002). Additional Weather Considerations Whilst Roofing Shingles are designed for application on pitched roofs of 15º and over, in severe exposed locations it is recommended that the roof pitch should be a minimum of 30. Exposure categories as defined in BS5628: Part 3. Fire Designation SAA fire rating (BS 476: Part 3:2004). Armourglass and Armourshield Roofing Shingles nailed to the substrates listed below achieve an external SAA rating when tested to BS 476:Part 3:2004 as required by the current building regulations. Building Regulations Armourglass and Armourshield Roofing Shingles comply with Building Regulations: England, Wales, Scotland and Northern Ireland. However, they must be installed in accordance with BS 5534: 2003 Code of Practice for Slating and Tiling (including Shingles). Contact IKO Technical Services for guidance. Suitable Decking The following decking materials are suitable for the fixing of roof shingles. Exterior grade plywood (18mm) OSB 3 Conditioned Boarding (18mm) Plain edge timber boarding (25mm) Note: Chipboard (including pre-felted) is not recommended as decking. Storage Store shingles inside a ventilated area. Do not stack Square Butt Shingles more than 16 packs high and Hexagonal Shingles more than 14 packs high. Pallet loads must not be stacked directly upon each other. Store away from direct heat and sunlight. In cold weather, store packs inside before use and gently warm before folding. A roofing shingle pack weighs between 28.5kg and 32.4kg depending on the product type. The usual precautions should be taken when handling heavy objects. Handling Handle Roofing Shingle strips carefully in cold weather to prevent cracking or breaking, and in hot weather to protect edges. Do not drop packs on their edges. Fixing To improve adhesion of the shingles strips, the Armourglass Square Butt Shingles have a heat sensitive bituminous strip on the top side. The Armourshield Hexagonal Shingles have an adhesive surface on the reverse of each tab, protected with a removable film. Square Butt Roofing Shingles The polythene film strip on the back of the Square Butt Shingles prevents them sticking together during transit and storage. Do not attempt to remove the film. Hexagonal Roofing Shingles The release sheet must be removed from the back of the Hexagonal Shingles. Roofing Shingles Colour Selector Square Butt Shingles Armourglass Forest Green Armourglass Tile Red Armourglass Slate Grey Armourglass Dual Brown Armourglass Black Hexagonal Shingles Armourshield Forest Green Armourshield Tile Red Armourshield Granite Grey Armourshield Dual Brown Armourshield Black 11

12 View our online installation video at IKO PLC Sales Support Northern Ireland Ireland Appley Lane North t: Sanda Road 502 Northwest Business Park Appley Bridge f: Whitehouse, Newtownabbey Ballycoolin Wigan County Antrim BT37 9UB Dublin 15 Lancashire WN6 9AB Member of the IKO Group Technical Services t: t: f: t: f: July 2016 Whilst every care is taken to see that the information given in this literature is correct and up to date it is not intended to form part of any contract or give rise to any collateral liability, which is hereby specifically excluded. Intending purchasers of our materials should therefore verify with the company whether any changes in our specification or application details or otherwise have taken place since this literature was issued.
BARDOLINE INSTALLATION INSTRUCTIONS
 BARDOLINE INSTALLATION INSTRUCTIONS www.onduline.com CONTENTS General conditions Material requirements Terms Estimating shingle requirements Roof preparation Shingle application 9 GENERAL CONDITIONS ONDULINE
video 10 YEAR GUARANTEE Durable and lightweight Guaranteed waterproof for 10 years Economical and easy to fix AVAILABLE IN A RANGE OF COLOURS
 INSTALLATION GUIDE AVAILABLE IN A RANGE OF COLOURS 10 YEAR GUARANTEE Durable and lightweight Guaranteed waterproof for 10 years Economical and easy to fix view installation video Roofing Shingles Ideal
Polytegola N. Bitumen Roof shingles. Application guide
 Polytegola N Bitumen Roof shingles Application guide Application manual POLYTEGOLA N CONTENT 1. Foreword - General conditions 3 2. POLYTEGOLA N designs 4 3. Roof pitches 5 4. Storage 5 5. Roof decking
SANERI 3 º. Self-adhesive SBS-elastomer bitumen cap sheet
 SANERI 3 º Self-adhesive SBS-elastomer bitumen cap sheet 0809 www.katepal.fi 06 EN 13707 Producer: KATEPAL OY P. O. Box 33 FI-37501 LEMPÄÄLÄ FINLAND Tel. +358 (0)3 375 9111 Fax +358 (0)3 375 0974 E-mail:
Cambridge English Application Instructions
 Cambridge English Application Instructions ROOF SLOPE: Never apply asphalt shingles to roof slopes less than 2:12. For slopes 2:12 to 4:12 (LOW SLOPE), see special underlayment requirements outlined below.
HOW TO Fix Onduline Corrugated Bitumen Sheets
 HOW TO Fix Onduline Corrugated Bitumen Sheets BBA BRITISH BOARD OF AGREMENT CERTIFICATE NO. 87 / 1823 W ROOFING PLAN IT Roofing components: Ridge Roof decking Apex Verge Barge board Purlins / battens Rafters
ROOFING APPLICATION STANDARD (RAS) No. 115 STANDARD PROCEDURES FOR ASPHALTIC SHINGLE INSTALLATION
 No. 115 STANDARD PROCEDURES FOR ASPHALTIC SHINGLE INSTALLATION") ROOFING APPLICATION STANDARD (RAS) No. 115 STANDARD PROCEDURES FOR ASPHALTIC SHINGLE INSTALLATION 1. Scope 4. Underlayment 2. 1.1 This roofing application standard has been developed to provide a responsive
ROOFING APPLICATION STANDARD (RAS) No. 115 STANDARD PROCEDURES FOR ASPHALTIC SHINGLE INSTALLATION 1. Scope 4. Underlayment 2. 1.1 This roofing application standard has been developed to provide a responsive
1 Roof Substrate (Deck) OWENS CORNING BERKSHIRE SHINGLES INSTALLATION INSTRUCTIONS
 OWENS CORNING BERKSHIRE SHINGLES INSTALLATION INSTRUCTIONS") General This Installation Instruction document for Owens Corning Berkshire roofing shingles is to be read in conjunction with the Installation information printed on each packet of shingles along with
General This Installation Instruction document for Owens Corning Berkshire roofing shingles is to be read in conjunction with the Installation information printed on each packet of shingles along with
The stylish light weight bitumen shingle tile strip roofing system Design and installation manual
 CI SfB (4-) Nn2 BARDOLINE Shingles By Onduline The stylish light weight bitumen shingle tile strip roofing system Design and installation manual Complementary leaflet to the Bardoline instructional film
Three layer Felt Roofing using cold applied adhesive
 Three layer Felt Roofing using cold applied adhesive Useful tips - Skill level - Safety - Felt Roofing Materials - Tools and Equipment Laying a felt roof is within the capabilities of most diy people providing
Shingle Installation Guidelines
 Shingle Installation Guidelines General Guidelines Materials to be used Key definitions Cost of roofing Preparation of the roofing deck Materials used for roofing should conform to approved norms and regulations
REDLAND DRY VALLEY. Installation Instructions for Redland Dry Valley. Version: 6. Date: May Redland Technical Solutions
 REDLAND DRY VALLEY Installation Instructions for Redland Dry Valley Version: 6 Date: May 2013 Author: Department: Redland Technical Solutions Redland Technical Solutions 1 Introduction 1.1 TECHNICAL DATA
The Expert Application Guide
 The Expert Application Guide The Expert Application Guide - 1 - www.iko.be The Expert Application Guide PAGE FOREWORD INTRODUCTION SHINGLES PRODUCT INFORMATION 1 ADVANTAGES OF SHINGLES 2 A FEW ESSENTIAL
eco-shake INSTALLATION INSTRUCTION
 1 eco-shake INSTALLATION INSTRUCTION NOTE: Shuffling the eco-shakes during installation may be necessary to obtain a uniform color throughout the roof. Due to the natural wood content in the ecoshakes,
Installation guide for 20/20
 Introduction The following installation instructions are recommended minimum requirements for the 20/20. The designer and fixer should ensure that tiles are installed in accordance with BS 5534; The British
Hatteras Shingles. CertainTeed Shingle Applicator s Manual. YOUR OBJECTIVE: To learn the correct procedures for installing Hatteras shingles
 CertainTeed Applicator s Manual Hatteras s 14 YOUR OBJECTIVE: To learn the correct procedures for installing Hatteras shingles HATTERAS SHINGLES Hatteras shingles are a premium oversize (18" x 36") roofing
Installation Guide. Guardian Slate Roof System. England, Scotland & Wales
 Installation Guide Guardian Slate Roof System England, Scotland & Wales March 2016 Product Information Construction: Manufactured from resin bonded crushed limestone Size (slate): 445 x 294mm (ridgecap):
C e r t a i n T e e d S h i n g l e A p p l i c a t o r s M a n u a l. and Carriage House STEEP. Slope Application. (over 21/12)
") C e r t a i n T e e d S h i n g l e A p p l i c a t o r s M a n u a l Grand Manor 16 and Carriage House YOUR OBJECTIVE: To learn the correct method of installing each of these roofing products. These shingles
C e r t a i n T e e d S h i n g l e A p p l i c a t o r s M a n u a l Grand Manor 16 and Carriage House YOUR OBJECTIVE: To learn the correct method of installing each of these roofing products. These shingles
SUPER-UNDERLAY SHEET
 SUPER-UNDERLAY SHEET SBS modified bitumen underlay sheet Producer: KATEPAL OY P.O.Box 33 FI-37501 LEMPÄÄLÄ FINLAND Telephone +358 3 375 9111 Telefax +358 3 375 0974 E-mail: katepal@katepal.fi www.katepal.fi
StormMaster Slate General Instructions 1.) GENERAL INSTRUCTIONS 2.) ROOF DECK VENTILATION 3.) ROOF DECK
 GENERAL INSTRUCTIONS 2.) ROOF DECK VENTILATION 3.) ROOF DECK") StormMaster Slate General Instructions IMPORTANT: THE STATEMENTS EXPRESSED ON THIS PAGE ARE THE RECOMMENDATIONS FOR THE APPLICATION OF THE ROOFING PRODUCTS AS OUTLINED AND ILLUSTRATED. ANY DEVIATION FROM
StormMaster Slate General Instructions IMPORTANT: THE STATEMENTS EXPRESSED ON THIS PAGE ARE THE RECOMMENDATIONS FOR THE APPLICATION OF THE ROOFING PRODUCTS AS OUTLINED AND ILLUSTRATED. ANY DEVIATION FROM
A P P L I C A T I O N I N S T R U C T I O N S
 1 2 3 General Instructions NOTICE: THESE SHINGLES MUST BE APPLIED TO CONFORM WITH ALL APPLICABLE BUILDING CODES. THESE DIRECTIONS REPRESENT COMMON AND ACCEPTED ROOFING PRACTICES. DEVIATIONS FROM THESE
1 Exam Prep NRCA Roofing Manual: Steep-Slope Roof Systems 2013 Tabs and Highlights
 1 Exam Prep NRCA Roofing Manual: Steep-Slope Roof Systems 2013 Tabs and s These 1 Exam Prep Tabs are based on the National Roofing Contractors Association (NRCA) manual listed below: Steep-Slope Roof Systems
AIA Specification. Section Slate Shingles PART 1 GENERAL
 AIA Specification Section 07315 Slate Shingles PART 1 GENERAL 1.1 RELATED DOCUMENTS A. Drawings and general provisions of the Contract, including General and Supplementary Conditions and Division 1 Specification
3-Tab Shingle Instructions DURA-SEAL 20 DURA-SEAL 25
 3-Tab Shingle Instructions DURA-SEAL 20 DURA-SEAL 25 1 Directions For Applying Malarkey 3-Tab Shingles GENERAL INSTRUCTIONS Install Malarkey 3-tab shingles according to building code and local amendments.
DIRECTIONS FOR APPLICATION
 Instructions 1 General NOTICE: THESE SHINGLES MUST BE APPLIED TO CONFORM WITH ALL APPLICABLE BUILDING CODES. THESE DIRECTIONS REPRESENT COMMON AND ACCEPTED ROOFING PRACTICES. DEVIATIONS FROM THESE DIRECTIONS
TECHNICAL BULLETIN 28
 November 2015 TECHNICAL BULLETIN 28 INCLINED PREFORMED GRP VALLEY TROUGHS 1. BACKGROUND 1.1 Preformed GRP (Glass Reinforced Polyester) Valley Troughs have been used successfully in the roofing industry
OWENS CORNING LAMINATE SHINGLES INSTALLATION INSTRUCTIONS
 General This Installation Instruction document for Owens Corning asphalt roofing shingles is to be read in conjunction with the Installation information printed on each packet of shingles along with the
Bitumen Roofshingles ARMOURVENT MULTI APPLICATION GUIDE VENTILATION
 Bitumen Roofshingles ARMOURVENT MULTI APPLICATION GUIDE VENTILATION WHY VENTILATE A SHINGLE ROOF? Unventilated shingle roofs will cause high temperatures inside. This will age the shingles much quicker
Dry Verge System. For more information on CEMEX visit
 Dry Verge System The Russell Dry Verge System is a high quality purpose designed mechanically fixed and mortarless verge finish which requires no maintenance. It comprises of: Individual units for left
SG-30 A P P L I C A T I O N I N S T R U C T I O N S. Directions For Application
 1 2 3 General Instructions NOTICE: THESE SHINGLES MUST BE APPLIED TO CONFORM WITH ALL APPLICABLE BUILDING CODES. THESE DIRECTIONS REPRESENT COMMON AND ACCEPTED ROOFING PRACTICES. DEVIATIONS FROM THESE
DIRECTIONS FOR APPLICATION
 Instructions 1 General NOTICE: THESE SHINGLES MUST BE APPLIED TO CONFORM WITH ALL APPLICABLE BUILDING CODES. THESE DIRECTIONS REPRESENT COMMON AND ACCEPTED ROOFING PRACTICES. DEVIATIONS FROM THESE DIRECTIONS
Armourvent Multi application guide
 application guide CONTENTS Why ventilate a shingle roof 2 A balanced system: the key to proper roof ventilation 3 Calculating the net free area of vent openings 4 Installation of IKO 6 Ridge vent installation
Application instructions
 Application instructions ASPHALT SHINGLES SECTION 3 GENERAL INSTRUCTIONS 3.1 General Directions A Nail Requirements B Asphalt Plastic Cement C Protective Tape D Application on slopes 15/12 E High Wind
AQUAGARD EPDM FLAT ROOFING SYSTEMS INSTALLATION GUIDE THE MECHANICALLY FIXED SYSTEM
 AQUAGARD EPDM FLAT ROOFING SYSTEMS INSTALLATION GUIDE THE MECHANICALLY FIXED SYSTEM The following guide covers the technique for the Mechanically Fixed System. This system is best employed when an overlay
Shingle Installation Guide
 Installation Guide Roof Framing Information Installation Installation Accessory Installation Estimating Data General Information Roof Framing Information It is the responsibility or roofers, building contractors
SOPRATUILE ROOFING SHINGLES
 ROOFING SHINGLES : For appealing roofs. Lichen grey is a bituminous shingle with a glass fibre mat reinforcement intended for covering roofs with a pitch of over 20%. is fitted by nailing to a continuous
Brava Old World Slate Installation Guide
 Brava Old World Slate Installation Guide Brava Roof Tile Phone: 844-290-4196 www.bravarooftile.com This document includes the recommended and suggested installation procedures for Brava Old World Slate
I. Architectural drawings. Pod 4x3 LTH (34)
") I. Architectural drawings Pod 4x3 LTH (34) 1 I.1. Building plan: 2 II. Assembly guide step by step 1. STEP (tools & care) To assemble the building you will need the following tools: 3 2. STEP Before erecting
I. Architectural drawings Pod 4x3 LTH (34) 1 I.1. Building plan: 2 II. Assembly guide step by step 1. STEP (tools & care) To assemble the building you will need the following tools: 3 2. STEP Before erecting
ROOF FRAMING INFORMATION BATTEN INSTALLATION CORONA SHAKE INSTALLATION ACCESSORY INSTALLATION ESTIMATING DATA GENERAL INFORMATION
 ROOF FRAMING INFORMATION BATTEN INSTALLATION CORONA SHAKE INSTALLATION ACCESSORY INSTALLATION ESTIMATING DATA GENERAL INFORMATION ROOF FRAMING INFORMATION It is the responsibility or roofers, building
Laminated Shingles. Landmark Series and Landmark TL. CertainTeed Shingle Applicator s Manual
 CertainTeed Shingle Applicator s Manual Laminated Shingles 12 Landmark Series and Landmark TL YOUR OBJECTIVE: To learn the correct procedure for installing Laminated shingles. LANDMARK SERIES AND LANDMARK
Grand Manor Carriage House and Centennial Slate 16 YOUR OBJECTIVE: To learn the correct method of installing each of these roofing products.
 CertainTeed Shingle Applicator s Manual Grand Manor Carriage House and Centennial Slate 16 YOUR OBJECTIVE: To learn the correct method of installing each of these roofing products. 90 STEEP Slope Application
technical bulletin Roofline Installation Details No.7 Fascia Installation Details Typical Eaves Details K16 Fascia & 9mm Vented Soffit
 Roofline Installation Details This is intended to provide you with a brief overview of the popular products in Kestrel s Roofline range, where they can be used and the main criteria for installation. Typical
PROFESSIONAL PITCHED ROOFING ANCILLARIES
 PROFESSIONAL PITCHED ROOFING ANCILLARIES MADE IN BRITAIN Before installing the Easy Roof System, please be aware of the following guidelines: The roof should be installed in the traditional way, with the
Asphalt Shingle Installation at Roof Edges, Intersections and Valleys
 & Asphalt Shingle Installation at Roof Edges, Intersections and Valleys Abstract This updated document is intended to provide additional guidance and options for asphalt shingle installations at roof edges,
DIRECTIONS FOR APPLICATION
 Instructions 1 General NOTICE: THESE SHINGLES MUST BE APPLIED TO CONFORM WITH ALL APPLICABLE BUILDING CODES. THESE DIRECTIONS REPRESENT COMMON AND ACCEPTED ROOFING PRACTICES. DEVIATIONS FROM THESE DIRECTIONS
How To Install Asphalt Shingles. Part 1 of 3: Preparing the Roof. Tutorial
 Tutorial How To Install Asphalt Shingles Installing new shingles yourself can save considerable time and money, and you can follow the same steps they do to achieve the same professional look. Re-doing
F-WAVE REVIA SYNTHETIC ROOFING SHINGLES
 F-WAVE REVIA SYNTHETIC ROOFING SHINGLES Installation Manual for Steep-Slope Residential Installations For support with all other Steep-Slope Installations, please call F-Wave Technical Support at 888-GO-FWAVE.
Slate Shingle Specifications
 Slate Shingle Specifications California Slate is a proud member of the Slate Roofing Contractors Association of North America, Inc. (SRCA) which publishes Section 07310 Slate Shingles setting forth architectural
Roll-Fix Kit The complete dry hip kit RFIG
 H I P Roll-Fix Kit The complete dry hip kit RFIG.045-0906-1 Roll-Fix is a quick and simple dry-fix roofing kit for hips. l Quick and easy to install no special tools required l Universal application fits
Special Roofs and Vertical Slating
 Special Roofs and Vertical Slating Roofs falling into the category of "special" roofs have the following characteristics: (a) any roof slope equal to or greater than the minimum pitch for the size of slate
technical bulletin Roofline Installation Details No.7 Fascia Installation Details Typical Eaves Details K16 Fascia & 9mm Vented Soffit
 Roofline Installation Details This is intended to provide you with a brief overview of the popular products in Kestrel s Roofline range, where they can be used and the main criteria for installation. Typical
SmartVent Eave Edge Installation Instructions
 SmartVent Eave Edge Installation Instructions STEP 1: Cut a slit 1 wide (or a series of 1 ¾ holes at 3 on center) into the roof decking 6 to 7 up from the drip edge. SmartVent is rated 9NFA. Ensure drip
LAMINATED SHINGLES CERTAINTEED SHINGLE APPLICATOR S MANUAL SUPPLEMENT
 15 CERTAINTEED SHINGLE APPLICATOR S MANUAL SUPPLEMENT LAMINATED SHINGLES 90 YOUR OBJECTIVE: To learn the correct procedure for installing Laminated shingles. ENGLISH DIMENSIONS LANDMARK SERIES WOODSCAPE
HERITAGE LAMINATED ASPHALT SHINGLES Frederick, MD
 Application Instructions for FORMERLY 30 THESE ARE THE MANUFACTURER S APPLICATION INSTRUCTIONS FOR THE ROOFING CONDITIONS DESCRIBED. TAMKO BUILDING PRODUCTS, INC. ASSUMES NO RESPONSIBILITY FOR LEAKS OR
Roofing Training - Basics. Sandy Wesch
 Roofing Training - Basics Sandy Wesch Tools Hammer Measuring Tape Chalk Line & Chalk Speed Square Framing Square Utility Knife Metal Snips Extension Ladder(s) 2 Safety Any tools or material up on the roof
COMPOSITE SIDING INSTALLATION GUIDE
 CENTURY HOME LIVING COMPOSITE SIDING INSTALLATION GUIDE Read all instructions prior to installing any siding product. Failure to install and finish this product in accordance with all local building codes,
The City of Winnipeg SHINGLE ROOF REPLACEMENT Section Replacement of Shingle Roof - Louis Riel Library Page 1 of 5 Bid Opp. No.
 Replacement of Shingle Roof - Louis Riel Library Page 1 of 5 PART 1 GENERAL 1.1 SCOPE OF WORK.1 Total roof area approximately 1,312 m 2. The Work includes, but is not limited to:.1 Removal and disposal
Installation Instructions
 Installation Instructions ROLL VENT STANDARD / METRIC Page Installation Considerations 3 Roll Vent Standard General Installation 4 Roll Vent Metric General Installation 5 Steep Pitch Guidelines 6 Asphalt
CAMBRIDGE XPRESS Most efficient laminated shingle in the world
 Most efficient laminated shingle in the world Cambridge Xpress, express your individuality Cambridge Xpress Get the -advantage: Your benefits Most efficient laminated shingle in the world: larger shingle
STORMMASTER SHAKE GENERAL INSTRUCTIONS
 STORMMASTER SHAKE GENERAL INSTRUCTIONS IMPORTANT: THE STATEMENTS EXPRESSED ON THIS PAGE ARE THE RECOMMENDATIONS FOR THE APPLICATION OF THE ROOFING PRODUCTS AS OUTLINED AND ILLUSTRATED. ANY DEVIATION FROM
TYPICAL BARGE DETAIL - CROSS SECTION
 SELECTED OWENS CORNING ASPHALT SHINGLES APPLY A BEAD OF BITUMASTIC ADHESIVE/SEALANT METAL BARGE DRIP EDGE FLASHING No15 RAG FELT ROOF UNDERLAY PLYWOOD ROOF FRAME BARGE BOARD SOFFIT LINING (IF APPLICABLE)
Recommended Slating Tools
 Recommended Slating Tools Product Size L Sketch of Article No. Description 60-070 Scriber 60-00 Slater s Hammer 60-00 Slater Ripper 60-080 Parallel Shears 60-0 Slate Cutter Kwiksnip Slate Guuillotine Slate
Installation Guide. Titan Old World Slate REV Titan Manufacturing Phone: (407) Fax: (866)
 Fax: (866)") Installation Guide Titan Old World Slate REV70908 Titan Manufacturing Phone: (407) 587-5492 Fax: (866) 741-2147 www.titanroofsystems.com This document includes the recommended and suggested installation
Installation Guide Titan Old World Slate REV70908 Titan Manufacturing Phone: (407) 587-5492 Fax: (866) 741-2147 www.titanroofsystems.com This document includes the recommended and suggested installation
Timberline and Sovereign Expanded Fastener Placement Area
 Timberline and Sovereign Expanded Fastener Placement Area Information Sheet Updated: 2004 Quality You Can Trust Since 1886... From North America s Largest Roofing Manufacturer Less Fastening Hassles! Announcing
15 YEAR GUARANTEE. Made from lightweight high grade steel with Aluzinc coating for incredible strength and weather protection
 INSTALLATION GUIDE EASY TO BUILD STRONG & SECURE POPULAR TILE SHAPE 15 YEAR GUARANTEE Made from lightweight high grade steel with Aluzinc coating for incredible strength and weather protection Once you
Elastomer bitumen roofing shingles. Product information and installation instructions
 Elastomer bitumen roofing shingles Product information and installation instructions SuperKatepal elastomer bitumen roofing shingles Contents Attention! You can always find the newest version of these
Inspire Slate Starter Piece Hip and Ridge. 13 1/2" Height: 13 ½" Width: 12" Squares/ Pallet. Bundles/ Square
 December 2017 Classic Slate Application Guidelines Only Basic Roofing Tools Required Hand fastened or fastened with a pneumatic nail gun Utility knife or a standard circular saw Tape measure, pry bar,
PROJECT INSTRUCTIONS Roofing
 PROJECT INSTRUCTIONS Roofing This handout outlines some basic regulations contained within the 2015 Minnesota State Building Code, as well as other good building practices. However, this handout is not
Inspire Aledora Slate Application Guidelines
 July 2014 Inspire Aledora Slate Application Guidelines Only Basic Roofing Tools Required Hand fastened or fastened with a pneumatic nail gun Utility knife or a standard circular saw Tape measure, pry bar,
Installation Instructions
 Installation Instructions RAPID RIDGE STANDARD / 7 / METRIC Page Installation Considerations 3 Rapid Ridge Standard General Installation 4 Rapid Ridge Metric General Installation 5 Rapid Ridge 7 General
ROOFING APPLICATION STANDARD (RAS) No. 130
 No. 130") ROOFING APPLICATION STANDARD (RAS) No. 130 1. Scope 1.1 This application Standard provides the minimum installation criteria for wood shingles and shakes. 2. Definitions 2.1 For definitions of terms used
ROOFING APPLICATION STANDARD (RAS) No. 130 1. Scope 1.1 This application Standard provides the minimum installation criteria for wood shingles and shakes. 2. Definitions 2.1 For definitions of terms used
Turada Hardwood Shingles and Shakes Installation instructions
 1. General 1.1 Maximum Exposure: Maximum exposure for wood shingles and shakes shall comply with Table 1 herein, unless specifically specified in the roof assemblies Product Approval. 1.2 Solid and Spaced
DaVinci SlateTM INSTALLATION
 DaVinci SlateTM INSTALLATION GUIDE DaVinci Slate is a synthetic slate carefully engineered to provide the authentic look and durability of natural slate... at a fraction of the cost and weight. Special
GlassMaster General Instructions - Ardmore, OK & Hampton, GA <br /> Atlas Roofing
 GlassMaster General Instructions - Ardmore, OK & Hampton, GA (For Metric Size Franklin, OH Instructions Click Here) IMPORTANT: THE STATEMENTS EXPRESSED ON THIS WRAPPER ARE THE RECOMMENDATIONS FOR THE APPLICATION
Artificial Grass. Fitting Guide
 Artificial Grass Fitting Guide Quick Start Artificial grass is quick and easy to fit, we have a quick-start guide below or continue on for a more in depth how-to guide. We recommend you have a quick read
15 YEAR GUARANTEE. Tough and long lasting Guaranteed waterproof for 15 years Economical and easy to fix AVAILABLE IN A RANGE OF COLOURS
 INSTALLATION GUIDE AVAILABLE IN A RANGE OF COLOURS 15 YEAR GUARANTEE Tough and long lasting Guaranteed waterproof for 15 years Economical and easy to fix Coroline corrugated bitumen sheet is a tough lightweight
ONDUVILLA. The Attractive Alternative to Shingles I N S T A L L A T I O N I N S T R U C T I O N S
 ONDUVILLA The Attractive Alternative to Shingles I N S T A L L A T I O N I N S T R U C T I O N S 1 INSTALLATION INSTRUCTIONS Even though ONDUVILLA is easy to install, it is important to read through these
ROOFING APPLICATION STANDARD (RAS) No. 130 INSTALLATION CRITERIA FOR WOOD SHINGLES AND SHAKES APPLICATION
 No. 130 INSTALLATION CRITERIA FOR WOOD SHINGLES AND SHAKES APPLICATION") ROOFING APPLICATION STANDARD (RAS) No. 130 INSTALLATION CRITERIA FOR WOOD SHINGLES AND SHAKES APPLICATION 1. 2. 3. Scope 1.1 This application standard provides the minimum installation criteria for wood
ROOFING APPLICATION STANDARD (RAS) No. 130 INSTALLATION CRITERIA FOR WOOD SHINGLES AND SHAKES APPLICATION 1. 2. 3. Scope 1.1 This application standard provides the minimum installation criteria for wood
Tuff-Rib Install Guide
 Install Guide bestbuymetalroof.com Page 2 of 27 Page 3 of 27 1. Page 4 2. a. Installation Guide b. Panel Squaring Pages 5, 6 Pages 7, 8 3. Pages 9, 10 4. a. Fascia (optional) b. Eave / 1.5x3.5 Angle c.
EASY SLATE FIXING GUIDE
 EASY SLATE FIXING GUIDE July 2017 Product Information No Special Tools Required Hand fastened (hammered) or fastened with a pneumatic nail gun. Sharp utility blade or a standard circular saw. Tape measure,
Gambrel Barn Construction Manual 8x8 through 16x24 Units
 Gambrel Barn Construction Manual 8x8 through 16x24 Units Tools Needed: Cordless drill (12V or higher) #2 square drive bit Hammer 6 step ladder Tape measure Square utility knife w/ blade & hook blade Little
PREMIUM LAMINATED ASPHALT SHINGLES Dallas, TX Tuscaloosa, AL Phillipsburg, KS
 Application Instructions for FORMERLY 50 THESE ARE THE MANUFACTURER S APPLICATION INSTRUCTIONS FOR THE ROOFING CONDITIONS DESCRIBED. TAMKO BUILDING PRODUCTS, INC. ASSUMES NO RESPONSIBILITY FOR LEAKS OR
BBA BRITISH BOARD OF AGREMENT CERTIFICATE NO. 87 / 1823 / C
 Fixing Guide BBA BRITISH BOARD OF AGREMENT CERTIFICATE NO. 87 / 1823 / C Onduline Fixing Guide Introduction Onduline is the world s largest manufacturer of bituminous corrugated sheets. Onduline roofing
Capstone Application Instructions
 Capstone Application Instructions Information Sheet Updated: 2007 Quality You Can Trust Since 1886... From North America s Largest Roofing Manufacturer L IFETIME D ESIGNER S HINGLES APPLICATION INSTRUCTIONS
Installation Manual. Future Roof Shingle / Slate Products
 Installation Manual Future Roof Shingle / Slate Products REVISED 14/09/2010 Future Roof Shingle Installation Manual is a component of Future Roof, Inc. and as such is intended to be used with Future Roof
Re-Roofing Policy SPECIAL REQUIREMENTS AND NOTES
 CITY OF MANTECA COMMUNITY DEVELOPMENT DEPARTMENT 1001 West Center Street Manteca, CA 95337 FAX (209) 923-8949 Building Safety Division (209) 456-8550 Planning Division (209) 456-8500 Public Works/Engineering
installation guide Villa
 installation guide Villa Table of Contents Introduction............................. 2 Safety................................... 2 Tools.................................... 2 Codes & Requirements....................
Five Star Panel Installation Instructions
 Five Star Panel Installation Instructions How to Store Five Star Panels You will need to store FIVE STAR PANELS in dry place to prevent staining, deterioration and possibly void all warranties. Stand the
Installation Instructions Split Shake, Staggered Shake, Shingle, Perfection Shingle, and Shapes
 Installation Instructions Split Shake, Staggered Shake, Shingle, Perfection Shingle, and Shapes General Guidelines These instructions show one type of installation and are intended for the professional
SLATE & SHINGLE INSTALLATION
 EAVE EDGE Apply a small strip of roofing paper to the bottom of eave. Eave flashing is attached to substrate with roofing nails every 9". Install underlayment over entire roof. (See Fig. 1) PAGE 1 Bend
Hip & Ridge Shingles Installation Instructions
 Hip & Ridge Shingles Installation Instructions WWW.MALARKEYROOFING.COM Directions for Applying Malarkey Hip & Ridge Shingles MALARKEY HIP AND RIDGE SHINGLE SPECIFICATIONS Malarkey Roofing Products manufacture
Ekoroof LiteTile Dimensions
 Ekoroof LiteTile Dimensions 7 3 3.5 Height 40 Width 20 Length Weight per Panel: 3 kg / 6.61 lbs 2 2 Area per panel 800 in / 5.55 ft 2 Panels per Square: 20 (including overlap, for a 100 ft covered area)
I n s t a l l i n g Enviroshingle APPLICATION INSTALLATION GUIDELINE
 I n s t a l l i n g Enviroshingle APPLICATION INSTALLATION GUIDELINE home This Guideline and Installation Diagram have been designed for printability for your convenience. To ensure this we have maintained
StormMaster Shake GENERAL INSTRUCTIONS For Spanish Instructions Click Here (Para las Instrucciones Españolas Haga Clic Aquí)
") StormMaster Shake GENERAL INSTRUCTIONS For Spanish Instructions Click Here (Para las Instrucciones Españolas Haga Clic Aquí) IMPORTANT: THE STATEMENTS EXPRESSED ON THIS PAGE ARE THE RECOMMENDATIONS FOR
StormMaster Shake GENERAL INSTRUCTIONS For Spanish Instructions Click Here (Para las Instrucciones Españolas Haga Clic Aquí) IMPORTANT: THE STATEMENTS EXPRESSED ON THIS PAGE ARE THE RECOMMENDATIONS FOR
Application instructions
 SECTION 5 LAMINATE SHINGLES 5.0 Weather-Tite TM : Sealant Bands / Release Tapes 5.1 East : Everest 42 and Mystique 42 5.2 West : Mystique 42 and Vangard 42 IR 5.3 East / West: Manoir 5.0 Weather-Tite TM
6 STEP INSTALLATION GUIDE BY DCI
 6 STEP INSTALLATION GUIDE BY DCI STEP 1 (Ensure metal drip edge was previously installed.) Begin by cutting a slit 1 wide (or a series of 1 ¾ holes 3 on center) into the roof decking 6 to 7 up from the
b) Symphony comes pre-packaged in color and width blends. There is no need to mix Symphony at the job site. Currently Symphony is available in the
 Symphony comes pre-packaged in color and width blends. There is no need to mix Symphony at the job site. Currently Symphony is available in the") PART 1 GENERAL 1) DESCRIPTION a) CertainTeed Symphony TM composite slate is an innovative roofing product that simulates the appearance, texture, and contours of traditional natural slate. It is a carefully
PART 1 GENERAL 1) DESCRIPTION a) CertainTeed Symphony TM composite slate is an innovative roofing product that simulates the appearance, texture, and contours of traditional natural slate. It is a carefully
Installation Guide. Step 3. Valley Flashing. Step 7. Transition Flashings and Accessories. Step 6. Hip and Ridge Installation
 Step 7. Transition s and Accessories Step 3. Valley Step 6. Hip and Ridge Installation Step 2. Rake Trim Step 5. Installing the Shingles Step 1. Eave Starter Installation Step 4. Endwall s Installation
How-To-build guide Garden shed
 How-To-build guide Garden shed What you can build using this guide This guide will show you how to build a re-locatable garden shed. Before you begin building Contact your local territorial authority to