I. Architectural drawings. Pod 4x3 LTH (34)
|
|
|
- Sybil Fitzgerald
- 5 years ago
- Views:
Transcription
1 I. Architectural drawings Pod 4x3 LTH (34) 1
2 I.1. Building plan: 2


3 II. Assembly guide step by step 1. STEP (tools & care) To assemble the building you will need the following tools: 3


4 2. STEP Before erecting this building it is important to make a firm base, ideally using concrete or concrete slabs. It is very important that the base corners must be at right angles it is completely level. Unless in the wall between windows and doors can be found space, in consequence water can get into the cabin. It is very important! Foundation ground must be leveled horizontally, and all four corners must be the stat of 90 degrees. MUST use a spirit level and measure the diagonal from corner to corner! 4


5 3. STEP Assembling this building should take place during dry weather only. If it starts to rain during the assembling process, the wood should be covered over. Opening the packing house and parts sorting by position, and house walls sorted by walls axis. Position from the parts list Wall barcode explanation Detail dimensijon Wall row number Axis With which axis intersect Detail barcode explanation Position from the parts list Detail dimension Detail position Details quantities numbering 5
6 ATTENTION: These numbers correspond to numbers in the parts list you will receive in your log cabin booklet. Before construction please check the received parts against the parts list as it is more difficult to resolve issues during the construction stage. All parts of the log cabin are numbered. A parts list of the position Pod 4x3 LTH (34) Position Name L Length Q M2 mm 003. Foundation treated bearer a Foundation treated bearer Floor board , trims for flooring a trims for flooring Strip (for inside roof) Various wall log 34x a Various wall log 34x Roof board , Fascia board a Fascia board b Fascia board c Fascia board d Fascia board e Fascia board Strip Double outside door 1295x1860mm Single window 700x910mm Single window strip (horizontal) a Single window strip (vertical) b Double door strip (horizontal) c Double door strip (vertical) Screw for walls 6x a Screw set b Screw 5x

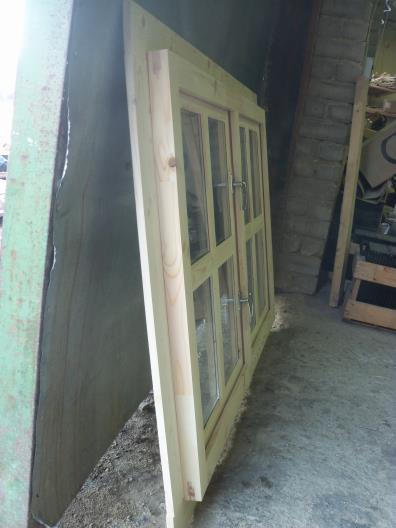
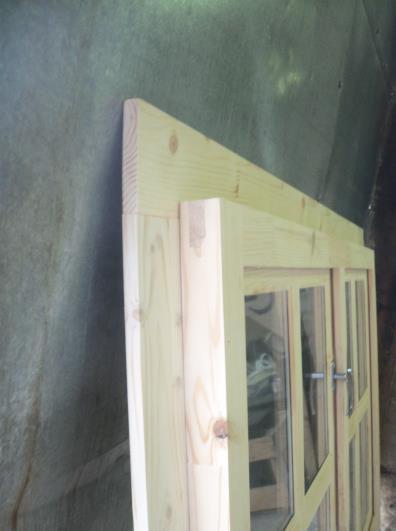
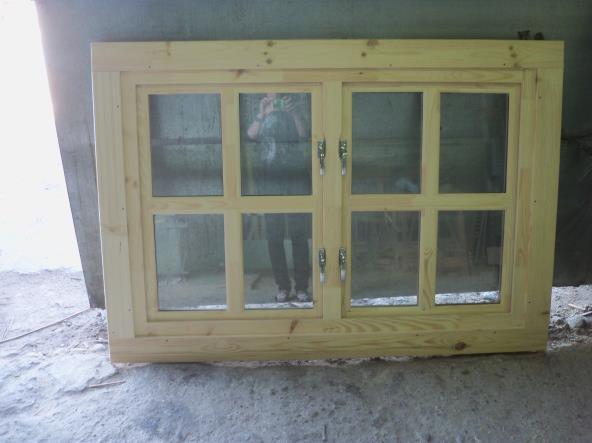
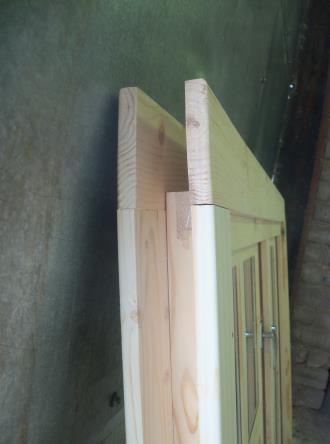
7 070. Screw a Door/window hardvare b Door/window hardvare c Door/window hardvare d Door/window hardvare STEP According to plan axis, will be assembled structure: After completing the base the bearers, Pos. 003 are put into position following the Installation Guide diagrams, and then bolted into position. The space between impregnated floor joists must be kept exactly how is shown at the 7


8 3417 Foundation plans. The first two and the last two impregnated logs must be put together. According to the picture. Position 003 B A


9 Screw Installation. At equal distances, drill a pilot hole with a 5mm drill bit in to the timber boards as directed in the diagrams below. With the screw s supplied, place them in to the holes and secure tightly. The number of screws to use for certain wall you will find at wall layout picture. Make sure that the screw s are screwed in to the timber straight, and are slightly sunk below the level of the timber, this will ensure the boards butt together tightly. 9
10 Wall in axis 1 Pos 060b We recommend 56 screws (5x80) 060b to this wall. 10
11 Wall in axis 2 Pos 060b We recommend 56 screws (5x80) 060b to this wall. 11
12 Wall in axis A We recommend 31 screws (6x200) to this wall. Pos
13 Wall in axis B We recommend 28 screws (6x200) to this wall. Pos


14 5. STEP Screw up around window frames strips and screw up handles. Position 046 b Position 046 c 14
15 15


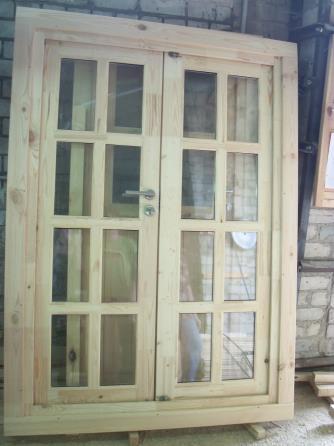
16 6. STEP Screw up aruond door frames strips, put the lock and twisted handle. Position 046 Position 046 a 16
.")
17 ATTENTION: Door latches (zippers) should be at the side, as is shown in the photos (on the opposite side of the door lock). View from inside door: Door lock Zippers 17


18 View from outside door: Zipper must be on this side from inside Door hinges Hinge on door leaf Hinge on door frame Door hinge view from outside 18

19 Position


20 7. STEP Window frames and door frames which are screw up around strips, put in a constructive: 20

21 LOG CABIN SHINGLE TILE INSTRUCTION ATTENTION: We are not responsible for water leakages due to incorrect tile installation or improper preparation of the roof deck. Please therefore read these instructions carefully. If you have any installation questions please ask us before starting. Sometimes a small deviation in colour of the tiles occurs between tiles in the same or different packs. This is not a defect of the material and is actually designed to increase the decorative beauty of the completed roof. In order to reduce colour difference during installation of the tiles, it is recommended to mix tiles from packs at random in order to create a mixed colour effect. Storage: Full pallets of tiles cannot be stored one on top of the other, otherwise this can compress the tiles into sticking to one another before use. In order to avoid shingles sticking to each other in a pack they should be protected from direct sunlight and any direct heat source. Each pack should be bent and shaken before opening, this helps to separate the shingles from each other. It is not recommended to walk on the roof in hot/sunny weather because the cover might be damaged. Special ladders should be used for this purpose. Usage of materials for roofing cover: Each pack of bourne or hexham tiles contains 3 m² of tile coverage (including overlapping). Each pack of ridge tiles contains 5m2 of tile coverage (including overlapping). When calculating the amount of materials needed for roofing cover it is necessary to evaluate the quantity of tiles required depending on the complexity, degree of slope and size of the roof. Please remember to calculate extra tiles required for wastage (between 5 15% extra) as it is always better to have too many than too few tiles. Extra spare tiles, if stored correctly, can be used to repair any areas of damage in the future. Installation of bitumen shingles: Initial row (tiles of ridges/cornice): Ridge/cornice tiles or the usual tiles (with the jagged edge cut off) are used for the initial row of tiles along both the eaves of the roof as well as the pitched cornice at the top. 21


22 The silicon film should be removed from the under side of the tile prior to installation. Every tile should be nailed to the roof boards with wide headed galvanized roof tack nails. The number of nails depends on the pitch or slope of your roof. It is very important not to over hit the nails. They should be nailed in such a way that the head of the nail head is flush with the tile and not below the surface. The head of the nail should not puncture the surface of the shingle tile. The nails are put 2 3 cm from the edge of the tile. Picture on the left indicate the number of nails needed and where they should be applied at certain roof angle. The picture shows the topside of the tile, and the dotted line indicates the place of the adhesive bottom layer. Ridge/cornice tiles should be cut into three parts at the places of perforation and laid in a straight line with an overlap of 3 5 cm. They are fixed with two nails on each side of the slope. Installation should be performed against the prevailing direction of the wind. 22
 Ventilation: The durability of the roof construction is longer if the roof has proper ventilation, especially over the usable attic.")
23 ATTENTION: if ridge cornice tiles are installed at the outside temperature lower than 10ºC it is recommended to bend them on a heated 10 cm diameter tube in order to avoid cracks. (See the picture on the left) Ventilation: The durability of the roof construction is longer if the roof has proper ventilation, especially over the usable attic. Tile Patterns: Please make sure that the individual tiles are NOT overlapped to cover the darker colour section. Please refer to the pictures for the correct spacing of tiles. If you assemble the tiles with a larger overlap than recommended you will not have enough tiles to complete your roof. We provide the correct quantity of tiles in order to cover your roof according to correct assembly. We strongly recommend to use wide headed (up with mm long) nails to fix the bitumen tiles. If you are going to put the tiles at lower than +15 degrees outside temperature, please preheat black sealing belt zones or use extra mastics to ensure waterproofing. In this case also recommend to keep tiles in warm temperature (inside) for 24 hours before installation. The cost of extra tiles and delivery will be paid for by the customer. 23


24 HEXHAM TILES PATTERN BOURNE TILE PATTERN If you have any questions about the installation process of your tiles please call to ask before starting. ATTENTION: We are not responsible for water leakages due to incorrect tile installation or improper preparation of the roof deck. Please therefore read these instructions carefully. If you have any installation questions please ask us before starting. 24

25 25


26 Floor boards installation: 8. STEP Position 009 deep inside house Position 009a width inside house Position STEP Pos. 010 Strip for inside roof to cover openings between apex and wall boards. Roof boards Gable Pos. 010 Wall 26
27 III. Quality certification and product maintenance after the installation configuration III.A. Comtrol Certificate The house you have purchased was manufactured in accordance with the high quality norms. The building unit has been carefully inspected and packed. In order to avoid possible during the assembly carried out by yourself or the building company of your choice, we recommend that you inspect the delivery for its completeness in accordance with the list of the pienes before assembly. This inspection must be carried out within 14 days after delivery to your place. Warranly claims are limited to the exchange of defective materials. Defective building parts, which have already been used or painted, are excluded from being replaced. All further claims are excluded! In cases of complaints, please pay attention to the following procedures : Please present this inspection certificate along with the sales receipt to your place of purchase. Only in cases where these documents are presented will the complaint be dealt with quickly and without complications. Unique number: If you have any questions please contact with us per support@eurowood.lt Cabin model: Pos.number from list of detal Measurment Quantity Reason for request 27
PDF created with pdffactory Pro trial version Wood characteristics - 1 -
 Wood characteristics Wood has a number of specific characteristics, which are natural and inherent to it. The biggest practical moment is, that the wood has its specific colour and density, also the effect
Wood characteristics
 Wood characteristics Wood has a number of specific characteristics, which are natural and inherent to it. The biggest practical moment is, that the wood has its specific colour and density, also the effect
Wood characteristics
 Wood characteristics Wood has a number of specific characteristics, which are natural and inherent to it. The biggest practical moment is, that the wood has its specific colour and density, also the effect
 www.cabinsunlimited.co.uk 01362470075 info@cabinsunlimited.co.uk Wood characteristics Wood has a number of specific characteristics, which are natural and inherent to it. The biggest practical moment is,
 www.cabinsunlimited.co.uk 01362470075 info@cabinsunlimited.co.uk Wood characteristics Wood has a number of specific characteristics, which are natural and inherent to it. The biggest practical moment is,
Wood characteristics - 1 -
 Wood characteristics Wood has a number of specific characteristics, which are natural and inherent to it. The biggest practical moment is, that the wood has its specific colour and density, also the effect
NP TD Wood characteristics The bad Downsides Peculiarity of the wood (taints)
") preparations, which are toxic to fungus and insects, - antiseptics. - 1 - Wood characteristics Wood has a number of specific characteristics, which are natural and inherent to it. The biggest practical
preparations, which are toxic to fungus and insects, - antiseptics. - 1 - Wood characteristics Wood has a number of specific characteristics, which are natural and inherent to it. The biggest practical
 www.cabinsunlimited.co.uk 01362470075 info@cabinsunlimited.co.uk Wood characteristics Wood has a number of specific characteristics, which are natural and inherent to it. The biggest practical moment is,
Wood characteristics - 1 -
 Wood characteristics Wood has a number of specific characteristics, which are natural and inherent to it. The biggest practical moment is, that the wood has its specific colour and density, also the effect
PDF created with pdffactory Pro trial version
 Wood characteristics Wood has a number of specific characteristics, which are natural and inherent to it. The biggest practical moment is, that the wood has its specific colour and densit lso the effect
 www.cabinsunlimited.co.uk 01362470075 info@cabinsunlimited.co.uk Wood characteristics Wood has a number of specific characteristics, which are natural and inherent to it. The biggest practical moment is,
Shingle Installation Guidelines
 Shingle Installation Guidelines General Guidelines Materials to be used Key definitions Cost of roofing Preparation of the roofing deck Materials used for roofing should conform to approved norms and regulations
PRODUCT NAME RENNES REFERENCE NUMBER 1
 PRODUCT NAME REFERENCE NUMBER RENNES 1 IMPORTANT (Read carefully before starting)! - The following instructions include both pictures (indicating every part by the digits see part list above) and illustrations.
Inspection Certificate Log cabin CLOCKHOUSE FRKK x400 cm, 44 mm
 Inspection Certificate Log cabin CLOCKHOUSE FRKK44-5540 550x400 cm, 44 mm The house you have purchased was manufactured in accordance with the high quality norms. The building unit has been carefully inspected
PRODUCT NAME DOUBLE CARPORT + SHED REFERENCE NUMBER 1
 PRODUCT NAME REFERENCE NUMBER 1 DOUBLE CARPORT + SHED IMPORTANT (Read carefully before starting)! - The following instructions include both pictures (indicating every part by the digits see part list above)
Best Barns. the Cypress R 10' x 16' Assembly Book. revised February 19, 2016
 Best Barns Assembly Book revised February 19, 2016 the Cypress R 10' x 16' Manufactured by Reynolds Building Systems, Inc. 205 Arlington Drive Greenville, PA 16125 724-646-3775 This manual is copyrighted.
Best Barns. 10' x 12' the Cypress R. Assembly Book. revised September 29, 2016
 Best Barns Assembly Book revised September 29, 2016 the Cypress R 10' x 12' Manufactured by Reynolds Building Systems, Inc. 205 Arlington Drive - Greenville, PA 16125 This manual is copyrighted. Under
Best Barns. 10' x 16' the Elm R. Assembly Book. revised September 29, 2016
 Best Barns Assembly Book revised September 29, 2016 the Elm R 10' x 16' Manufactured by Reynolds Building Systems, Inc. 205 Arlington Drive - Greenville, PA 16125 This manual is copyrighted. Under the
General Instructions 03WES0808-V1. Please retain product label and instructions for future reference
 General Instructions Please retain product label and instructions for future reference 03WES0808-V1 x2 All building s should be erected by two adults Winter = High Moisture = Expansion Summer = Low Moisture
General Instructions. Please retain product label and instructions for future reference 7X5 OVERLAP APEX
 General Instructions 7X5 OVERLAP APEX x2 Please retain product label and instructions for future reference All building s should be erected by two adults Winter = High Moisture = Expansion Summer = Low
Best Barns. 10' x 12' the Elm R. Assembly Book. revised September 29, 2016
 Best Barns Assembly Book revised September 29, 2016 the Elm R 10' x 12' Manufactured by Reynolds Building Systems, Inc. 205 Arlington Drive - Greenville, PA 16125 This manual is copyrighted. Under the
GARDEN SHED BRIGHTOLN
 ASSEMBLY INSTRUCTIONS GARDEN SHED BRIGHTOLN Dimensions: 10x10 (1 1/8") IMPORTANT Before beginning the assembly of your garden shed, please read the instructions carefully and follow them closely. By doing
LOG CABIN 40 ASSEMBLY INSTRUCTIONS
 LOG CABIN 40 ASSEMBLY INSTRUCTIONS 4000 mm x 300 mm Canopy 350 mm Veranda depth 500 mm Wall thickness 34 mm Nordic region spruce wall logs 34 mm x 35 mm Dimensions of base 3800 mm x 4500 mm including terrace
LOG CABIN 70 ASSEMBLY INSTRUCTIONS
 LOG CABIN 70 ASSEMBLY INSTRUCTIONS 400 mm x 400 mm Canopy 500 mm Veranda depth 500 mm Wall thickness 45 mm Nordic region spruce wall logs 45 mm x 35 mm Dimensions of base 3900 mm x 5400 mm including terrace
3590x4190(5690)(12x14)
(12x14)") 28/09/2011 Instruction pack R11 3590x4190(5690)(12x14) 34mm NO OTHER PARTS REQUIRED CHECK ALL PARTS BEFORE ASSEMBLY OR EMPLOYING TRADESPEOPLE Building: Kinver 34 + 2.5m Ridge Building Size: 3590x4190(5690)(12x14)
28/09/2011 Instruction pack R11 3590x4190(5690)(12x14) 34mm NO OTHER PARTS REQUIRED CHECK ALL PARTS BEFORE ASSEMBLY OR EMPLOYING TRADESPEOPLE Building: Kinver 34 + 2.5m Ridge Building Size: 3590x4190(5690)(12x14)
6x6 Maximizer Storage Shed Assembly Manual Version #9 Feb 26th, 2015
 6x6 Maximizer Storage Shed Assembly Manual Version #9 Feb 26th, 2015 Thank you for purchasing a 6x6 Maximizer Storage Shed. Please take the time to identify all the parts prior to assembly. Please Note-
N/A. General Instructions 14/01/2014. For Assistance Please Contact Customer Care on Overlap Cladding. Solid Sheet Roof.
 General Instructions 4/0/204 Please retain product label and instructions for future reference N/A Overlap Cladding Shiplap Cladding Fixed Windows Opening Windows No Windows Solid Sheet Floor T&G Floor
WARNING. Not suitable for children under 36 months Contents
 For domestic and family use only Children of any age should not be left to play unsupervised Retain Instructions for future reference WARNING. Not suitable for children under 36 months Contents Length
N/A. General Instructions 14/01/2014. For Assistance Please Contact Customer Care on Overlap Cladding. Solid Sheet Roof.
 General Instructions 14/01/2014 Please retain product label and instructions for future reference N/A Overlap Cladding Shiplap Cladding Fixed Windows Opening Windows No Windows Solid Sheet Floor T&G Floor
Corner Potting Store Assembly Instructions
 Corner Potting Store Assembly Instructions English SS225E Before assembly We recommend that time is taken to read the instructions before starting assembly, then follow the easy step by step guide. The
Installation manual Montageanleitung Notice de montage Istruzioni per il montaggio Monteringsanvisning
 Installation manual Montageanleitung Notice de montage Istruzioni per il montaggio Monteringsanvisning Pavilion PAY44-5742 Pavillon Pavillon Padiglione Lysthus Width 571 x Depth 421 x Height 371 cm Breite/Tiefe/Höhe
8x12 SpaceMaker Garden Shed Assembly Manual
 8x12 SpaceMaker Garden Shed Assembly Manual Version #6 Revised June / 2007 Thank you for purchasing a 8x12 SpaceMaker Garden Shed. Please take the time to identify all the parts prior to assembly. Safety
GIRTS ON BACK OF BUILDING
 GIRTS ON BACK OF BUILDING ALL GIRTS ARE 1 1/2 SQUARE TUBE. GIRT LENGTHS FOR 12, 20, 24, AND 30 WIDE BUILDINGS: ON 12 WIDE BUILDINGS GIRTS ARE 67 3/4 LONG ON 20 WIDE BUILDINGS GIRTS ARE 56 3/4 LONG ON 24
Assembly Book. the Brandon Building Size 12' x 20' Revised September 13, 2017
 Assembly Book Revised September 13, 2017 the Brandon Building Size 12' x 20' Manufactured by Reynolds Building Systems, Inc. 205 Arlington Drive Greenville, PA 16125 This manual is copyrighted. Under the
How to make a Wendy house Part One: The Floor and the Frame
 How to make a Wendy house Part One: The Floor and the Frame The Wendy House. This wendy house is basically a playhouse with a few feminine touches added. A wendy house can give children hours of enjoyment.
ASSEMBLY INSTRUCTIONS GARDEN SHED - ModernaDimensions: 10 x 10 (3/4 )
") ASSEMBLY INSTRUCTIONS GARDEN SHED - ModernaDimensions: 0 x 0 (/4 ) IMPORTANT Before beginning the assembly of your garden shed, please read the instructions carefully and follow them closely. By doing
ASSEMBLY INSTRUCTIONS GARDEN SHED - ModernaDimensions: 0 x 0 (/4 ) IMPORTANT Before beginning the assembly of your garden shed, please read the instructions carefully and follow them closely. By doing
BARDOLINE INSTALLATION INSTRUCTIONS
 BARDOLINE INSTALLATION INSTRUCTIONS www.onduline.com CONTENTS General conditions Material requirements Terms Estimating shingle requirements Roof preparation Shingle application 9 GENERAL CONDITIONS ONDULINE
IDAHO ASSEMBLY INSTRUCTIONS. BASE SIZE: 1.800m x 1.200m
 IDAHO ASSEMBLY INSTRUCTIONS BASE SIZE: 1.800m x 1.200m IDAHO Tools Required: Battery Drill Riveter Hammer Tape Measure Ladder Skillsaw Level Square Drive Bit No.2 3/8 Hex Drive Bit 8mm Hex Drive Bit Drill
N/A. General Instructions. For Assistance Please Contact Customer Care on Overlap Cladding. Solid Sheet Roof. No Windows.
 General Instructions Please retain product label and instructions for future reference N/A Overlap Cladding Shiplap Cladding Fixed Windows Opening Windows No Windows Solid Sheet Floor T&G Floor Solid Sheet
2.4 x 1.8 (8 x 6 ) Premier Shiplap Modular Shed Assembly Instructions
 Premier Shiplap Modular Shed Assembly Instructions") 2.4 x 1.8 (8 x 6 ) Premier Shiplap Modular Shed Assembly Instructions English SS197C Before assembly We recommend that time is taken to read the instructions before starting assembly, then follow the easy
2.4 x 1.8 (8 x 6 ) Premier Shiplap Modular Shed Assembly Instructions English SS197C Before assembly We recommend that time is taken to read the instructions before starting assembly, then follow the easy
SHINGLAS Bitumen tiles
 SHINGLAS Bitumen tiles Installation instructions Table of contents General instructions on the installation of bitumen shingles 1. Materials to be used 2. Key definitions 3. Cost of roofing Preparation
Best Barns USA Assembly Book
 Best Barns USA Assembly Book Revised September 12, 2017 the Easton 12'x 16' Manufactured by Reynolds Building Systems, Inc. 205 Arlington Drive - Greenville, PA 16125 This manual is copyrighted. Under
Grand Garden Chalet 6X3 Assembly Manual
 Revision #11 June 15, 2010 Grand Garden Chalet 6X3 Assembly Manual Thank you for purchasing a Grand Garden Chalet. Please take the time to identify all the parts prior to assembly. Please use Safety Eyewear
GARDEN SHED - WALESDimensions: 10x10 (1 1/8')"
") ASSEMBLY INSTRUCTIONS GARDEN SHED - WALESDimensions: 0x0 ( /8')" IMPORTANT Before beginning the assembly of your garden shed, please read the instructions carefully and follow them closely. By doing so
ASSEMBLY INSTRUCTIONS GARDEN SHED - WALESDimensions: 0x0 ( /8')" IMPORTANT Before beginning the assembly of your garden shed, please read the instructions carefully and follow them closely. By doing so
Best Barns USA. Regency Deluxe. 8' x 12' Assembly Book. revised February 15, 2017
 Best Barns USA Assembly Book revised February 15, 2017 Regency Deluxe 8' x 12' Manufactured by Reynolds Building Systems, Inc. 205 Arlington Drive, Greenville, PA 16125 This manual is copyrighted. Under
Instruction pack. 2960x4340
 R11 Instruction pack 28/09/2011 2960x4340 Supplied in 2 packs 28mm log CHECK ALL PARTS BEFORE ASSEMBLY OR EMPLOYING TRADESPEOPLE Building: Leygrove Building Size: 2960x4340 Date: 25-May-11 LOG 28mm MM
Potting Store Assembly Instructions
 Before assembly We recommend that time is taken to read the instructions before starting assembly, then follow the easy step by step guide. The instruction sheet is only a guide to the assembly. Certain
DUTCH GABLE FREESTANDING CARPORT
 DUTCH GABLE FREESTANDING CARPORT STRATCO OUTBACK ASSEMBLY INSTRUCTIONS. Your complete guide to building a FREESTANDING Outback DUTCH GABLE CARPORT BEFORE YOU START Carefully read these instructions. If
Assembly Book. the Brandon. Building Size 12'x12' or 12'x16' Revised September 13, 2017
 Assembly Book Revised September 13, 2017 the Brandon Building Size 12'x12' or 12'x16' Manufactured by Reynolds Building Systems, Inc. 205 Arlington Drive Greenville, PA 16125 This manual is copyrighted.
8x4 SpaceSaver Garden Shed Assembly Manual
 8x4 SpaceSaver Garden Shed Assembly Manual Revision #8 July 5, 2010 Thank you for purchasing an 8x4 SpaceSaver Garden Shed. Please take the time to identify all the parts prior to assembly. Safety Points
Shingle Installation Guide
 Installation Guide Roof Framing Information Installation Installation Accessory Installation Estimating Data General Information Roof Framing Information It is the responsibility or roofers, building contractors
NEVADA ASSEMBLY INSTRUCTIONS
 NEVADA ASSEMBLY INSTRUCTIONS BASE SIZE: 2.700m x 1.500m NEVADA Tools Required: Battery Drill Riveter Hammer Tape Measure Ladder Skillsaw Level Screwdriver - Flat 3/8 Hex Drive bit 8mm Hex Drive bit Drill
DIRECTIONS FOR APPLICATION
 Instructions 1 General NOTICE: THESE SHINGLES MUST BE APPLIED TO CONFORM WITH ALL APPLICABLE BUILDING CODES. THESE DIRECTIONS REPRESENT COMMON AND ACCEPTED ROOFING PRACTICES. DEVIATIONS FROM THESE DIRECTIONS
Best Barns USA. the Danbury 8' x 12' Assembly Book. Revised February 17, 2017
 Best Barns USA Assembly Book Revised February 17, 2017 the Danbury 8' x 12' Manufactured by Reynolds Building Systems, Inc. 205 Arlington Drive, Greenville, PA 16125 This manual is copyrighted. Under the
Manufactured by Reynolds Building Systems, Inc.
 up EZ Sheds Assembly Book the Ashbury January 19, 2008 8' x 12' Manufactured by Reynolds Building Systems, Inc. 205 Arlington Drive Greenville, PA 16125 724-646-3775 This manual is copyrighted. Under the
Gambrel Barn with Overhang Manual
 Tools Needed: -Cordless Drill (12V or higher) -#2 Square Drive Bit -Hammer -6 Step Ladder -Tape Measure -Square utility knife w/ blade & hook blade -Speed Square Little Cottage Co. PO Box 455 Berlin, OH
Garden Chalet 4X2 Assembly Manual
 Revision #6 April 12th, 2010 Garden Chalet 4X2 Assembly Manual Thank you for purchasing a 4x2 Garden Chalet. Please take the time to identify all the parts prior to assembly. Please use Safety Eyewear
Grand Garden Chalet 6X3 Assembly Manual - Costco
 Revision #16 March 22nd, 2013 Grand Garden Chalet 6X3 Assembly Manual - Costco Thank you for purchasing a Grand Garden Chalet. Please take the time to identify all the parts prior to assembly. Please use
Playaway Swiss Cottage Assembly Instructions
 Playaway Swiss Cottage Assembly Instructions English SS288C IMPORTANT SAFETY INFORMATION Adult assembly is required. Checks and maintenance needs to be carried out on the main parts (fixings etc.) at regular
6X3 Patio Garden Shed Assembly Manual
 Thank you for purchasing a 6x3 Patio Garden Shed. Please take the time to identify all the parts prior to assembly. Revision #4 July 6th, 2016 6X3 Patio Garden Shed Assembly Manual Please use Safety Eyewear
A P P L I C A T I O N I N S T R U C T I O N S
 1 2 3 General Instructions NOTICE: THESE SHINGLES MUST BE APPLIED TO CONFORM WITH ALL APPLICABLE BUILDING CODES. THESE DIRECTIONS REPRESENT COMMON AND ACCEPTED ROOFING PRACTICES. DEVIATIONS FROM THESE
DIRECTIONS FOR APPLICATION
 Instructions 1 General NOTICE: THESE SHINGLES MUST BE APPLIED TO CONFORM WITH ALL APPLICABLE BUILDING CODES. THESE DIRECTIONS REPRESENT COMMON AND ACCEPTED ROOFING PRACTICES. DEVIATIONS FROM THESE DIRECTIONS
Best Barns USA. the Brookhaven 10' x 16' Assembly Book. revised March 23, 2016
 Best Barns USA Assembly Book revised March 23, 2016 the Brookhaven 10' x 16' Manufactured by Reynolds Building Systems, Inc. 205 Arlington Drive Greenville, PA 16125 724-646-3775 This manual is copyrighted.
ROOF FRAMING INFORMATION BATTEN INSTALLATION CORONA SHAKE INSTALLATION ACCESSORY INSTALLATION ESTIMATING DATA GENERAL INFORMATION
 ROOF FRAMING INFORMATION BATTEN INSTALLATION CORONA SHAKE INSTALLATION ACCESSORY INSTALLATION ESTIMATING DATA GENERAL INFORMATION ROOF FRAMING INFORMATION It is the responsibility or roofers, building
GARDEN SHED OPTIMA 328Dimensions: 12x8; 10; 12 (1 1/8')"
") ASSEMBLY INSTRUCTIONS GARDEN SHED OPTIMA 38Dimensions: x8; 0; ( /8')" IMPORTANT Before beginning the assembly of your garden shed, please read the instructions carefully and follow them closely. By doing
ASSEMBLY INSTRUCTIONS GARDEN SHED OPTIMA 38Dimensions: x8; 0; ( /8')" IMPORTANT Before beginning the assembly of your garden shed, please read the instructions carefully and follow them closely. By doing
Hip & Ridge Shingles Installation Instructions
 Hip & Ridge Shingles Installation Instructions WWW.MALARKEYROOFING.COM Directions for Applying Malarkey Hip & Ridge Shingles MALARKEY HIP AND RIDGE SHINGLE SPECIFICATIONS Malarkey Roofing Products manufacture
Grand Garden Chalet 6X3 Assembly Manual
 Revision #8 November 1, 2009 Grand Garden Chalet 6X3 Assembly Manual Thank you for purchasing a Grand Garden Chalet. Please take the time to identify all the parts prior to assembly. Please use Safety
Best Barns USA Assembly Book
 Best Barns USA Assembly Book Revised November 27, 2013 the Easton - R 12'x 20' Manufactured by Reynolds Building Systems, Inc. 205 Arlington Drive Greenville, PA 16125 724-646-3775 This manual is copyrighted.
Best Barns USA Assembly Book
 Best Barns USA Assembly Book Revised September 12, 2017 the Denver 12' x 16' Manufactured by Reynolds Building Systems, Inc. 205 Arlington Drive Greenville, PA 16125 This manual is copyrighted. Under the
Best Barns USA Assembly Book Revised November 3, 2016
 Best Barns USA Assembly Book Revised November 3, 2016 the Aspen II 12' x 8' Manufactured by Reynolds Building Systems, Inc. 205 Arlington Drive, Greenville, PA 16125 This manual is copyrighted. Under the
Best Barns USA Assembly Book
 Best Barns USA Assembly Book Revised November 20, 2013 the Easton - R 12'x 16' Manufactured by Reynolds Building Systems, Inc. 205 Arlington Drive Greenville, PA 16125 724-646-3775 This manual is copyrighted.
Best Barns USA. the Danbury - R 8' x 12' Assembly Book. Revised September 30, 2016
 Best Barns USA Assembly Book Revised September 30, 2016 the Danbury - R 8' x 12' Manufactured by Reynolds Building Systems, Inc. 205 Arlington Drive Greenville, PA 16125 724-646-3775 This manual is copyrighted.
Chapter 12 - Windows and Doors
 Chapter 12 - Windows and Doors Contents Chapter 12 - Windows and Doors... 12-1 Timing & Prerequisites... 12-2 Verifying Windows and Doors Orders... 12-3 Windows... 12-4 Prepare the Window Openings... 12-4
Country Cabin. Assembly Manual. HomePlace Structures
 Country Cabin Assembly Manual Country Cabin Assembly Manual revised 3/20/10 Dear Customer, Thank you for your purchase of our Country Cabin. The craftsmanship and detail in this building is unmatched.
Polytegola N. Bitumen Roof shingles. Application guide
 Polytegola N Bitumen Roof shingles Application guide Application manual POLYTEGOLA N CONTENT 1. Foreword - General conditions 3 2. POLYTEGOLA N designs 4 3. Roof pitches 5 4. Storage 5 5. Roof decking
Best Barns USA Assembly Book
 Best Barns USA Assembly Book Revised August 17, 2017 the Roanoke 16'x32' Building w/ full loft Manufactured by Reynolds Building Systems, Inc 205 Arlington Drive Greenville, PA 16125 This manual is copyrighted
Best Barns USA. Assembly Book. 12'x 16' the Millcreek. Revised September 19, 2017
 Assembly Book Best Barns USA Revised September 19, 2017 the Millcreek 12'x 16' Manufactured by Reynolds Building Systems, Inc 205 Arlington Drive Greenville, PA 16125 This manual is copyrighted Under the
10 Wide AMATEUR CEDAR GREENHOUSE
 10 Wide AMATEUR CEDAR GREENHOUSE ASSEMBLY INSTRUCTIONS Our Help Line provides support and advice to customers of Summer Greenhouses after ordering. For advice before you buy phone us free 7 days a week
Classic Saltbox Manual
 Tools Needed: -Cordless Drill (12V or higher) -#2 Square Drive Bit -Hammer -6 Step Ladder -Tape Measure -Utility knife w/ blade & hook blade -Speed Square -5/16 Wood Drill bit Little Cottage Co. PO Box
12x8 Cabana Garden Shed Assembly Manual
 12x8 Cabana Garden Shed Assembly Manual Revision #15 Feb 13th, 2015 Thank you for purchasing our 12x8 Cabana Garden Shed. Please take the time to identify all the parts prior to assembly. Safety Points
QUALITY GARDEN SHEDS AND WORKSHOPS
 QUALITY GARDEN SHEDS AND WORKSHOPS Important points to note: All buildings are fully guaranteed to be free from defects and faulty installation for a period of 12 months. We would like to remind customers
Best Barns USA Assembly Book
 Best Barns USA Assembly Book Revised September 19, 2017 the Woodville 10' x 12' Manufactured by Reynolds Building Systems, Inc. 205 Arlington Drive Greenville, PA 16125 This manual is copyrighted. Under
Finnlife. Build guide, parts and plans list. Model:
 Log Finnlife cabins Build guide, parts and plans list Model: 144771 A.0. Introduction Those lazy summer afternoons may be beckoning, but don t rush to build your Finnlife Log Cabin. Take the time to understand
Tuff-Rib Install Guide
 Install Guide bestbuymetalroof.com Page 2 of 27 Page 3 of 27 1. Page 4 2. a. Installation Guide b. Panel Squaring Pages 5, 6 Pages 7, 8 3. Pages 9, 10 4. a. Fascia (optional) b. Eave / 1.5x3.5 Angle c.
E N G L I S H GARDEN SHED. Assembly Instructions. Suitable for Models WITH VARYING DEPTHS
 GARDEN SHED Assembly Instructions Suitable for Models 6' Wide 8' Wide 0' Wide WITH VARYING DEPTHS GI0003 November 0 INSTALLATION ADVICE It's Not That Difficult! The construction of your shed isn't as complicated
Gambrel Barn Construction Manual 8x8 through 16x24 Units
 Gambrel Barn Construction Manual 8x8 through 16x24 Units Tools Needed: Cordless drill (12V or higher) #2 square drive bit Hammer 6 step ladder Tape measure Square utility knife w/ blade & hook blade Little
SAMPLE INSTRUCTIONS. Best Barns USA Assembly Book. the Belmont with pocket doors. Building Size 12'x16' or 12'x20' Revised January 10, 2012
 Best Barns USA Assembly Book Revised January 10, 2012 SAMPLE INSTRUCTIONS the Belmont with pocket doors Building Size 12'x16' or 12'x20' Manufactured by Reynolds Building Systems, Inc. 205 Arlington Drive
CHECK ALL PARTS BEFORE ASSEMBLY OR EMPLOYING TRADESPEOPLE
 R11 Instruction pack 01/03/2012 Rowney/Villandry 2960x4340 Supplied in Two Packs 28mm log CHECK ALL PARTS BEFORE ASSEMBLY OR EMPLOYING TRADESPEOPLE Building: Rowney/Villandry Building Size: 2960x4340
Best Barns USA Assembly Book
 Best Barns USA Assembly Book Revised September 13, 2017 the North Dakota with pocket doors 12' x 20' Manufactured by Reynolds Building Systems, Inc. 205 Arlington Drive Greenville, PA 16125 This manual
Best Barns USA Assembly Book
 Best Barns USA Assembly Book Revised September 13, 2017 the North Dakota with pocket doors Manufactured by Reynolds Building Systems, Inc. 205 Arlington Drive Greenville, PA 16125 Building Size 12'x12'
QUALITY GARDEN SHEDS, WORKSHOPS & PLAYHOUSES HANDMADE IN WORCESTERSHIRE
 QUALITY GARDEN SHEDS, WORKSHOPS & PLAYHOUSES HANDMADE IN WORCESTERSHIRE Important points to note: All buildings are fully guaranteed to be free from defects and faulty installation for a period of 12 months.
How To Build Decorative. Timber Awnings
 How To Build Decorative Timber Awnings How to build a timber awning FOREWORD Timber awnings are a visually pleasing form of window shading. Properly built timber awnings can add value to your property
Best Barns USA Assembly Book
 Best Barns USA Assembly Book Revised October 11, 2018 the Woodville 10' x 16' Manufactured by Reynolds Building Systems, Inc. 205 Arlington Drive Greenville, PA 16125 This manual is copyrighted. Under
Installation guide for 20/20
 Introduction The following installation instructions are recommended minimum requirements for the 20/20. The designer and fixer should ensure that tiles are installed in accordance with BS 5534; The British
Assembly Book. 10' x 16' the Cambridge II. revised July 15, 2014
 Assembly Book revised July 15, 2014 the Cambridge II 10' x 16' Manufactured by Reynolds Building Systems, Inc. 205 Arlington Drive Greenville, PA 16125 724-646-3775 This manual is copyrighted. Under the
Chapter 12 - Windows and Doors
 Chapter 12 - Windows and Doors Contents Chapter 12 - Windows and Doors... 12-1 Timing & Prerequisites... 12-2 Verifying Windows and Doors Order... 12-3 Windows... 12-4 Prepare the Window Openings... 12-4
Best Barns USA Assembly Book
 Best Barns USA Assembly Book Revised September 19, 2017 the Millcreek 12'x 20' Manufactured by Reynolds Building Systems, Inc 205 Arlington Drive Greenville, PA 16125 This manual is copyrighted Under the
Best Barns USA Assembly Book
 Best Barns USA Assembly Book Revised September 19, 2016 the Meadowbrook-R 12' x 10' Manufactured by Reynolds Building Systems, Inc. 205 Arlington Drive Greenville, PA 16125 724-646-3775 This manual is
Best Barns USA Assembly Book
 Best Barns USA Assembly Book Revised September 19, 2016 the Meadowbrook-R 16' x 10' Manufactured by Reynolds Building Systems, Inc. 205 Arlington Drive Greenville, PA 16125 724-646-3775 This manual is
8x8 Shed Plans and Building Guide
 Page 1 Legal 2018 Zac Spade & Christopher D. Brown. All Rights Reserved For information about special discounts available for bulk purchases, sales promotions, fundraising and educational needs, contact