TUBULAR FRONT END KIT INSTALLATION INSTRUCTIONS MUSTANG
|
|
|
- Meredith Howard
- 5 years ago
- Views:
Transcription


1 TUBULAR FRONT END KIT INSTALLATION INSTRUCTIONS MUSTANG


2 Pre-Installation Notes & Recommendations: Before disassembly, remove anything within the engine bay that can be removed; this will give the most room to perform the installation. Disconnect the lights from the wiring harness. Spray penetrating lubricant on any suspect fasteners.


3 1.) Remove Front Bumper: Remove flanged nuts attaching each side of the bumper to the front fenders. Remove flanged nuts attaching headlight housing to front sub frame. Unbolt upper bumper supports from radiator core support. Unbolt the hood latch from its mount and remove the pull-cable from it. Once removed pull the cable out of the front sub-frame and tuck it out of the way. Once bumper cover has been taken off, the bumper core can be removed via (8) bolts. Remove and discard.

.")
4 2.) Remove Fenders For the Fox-Body Mustangs, unbolt the front fender brace that ties back to the sub frame see circled item below. Remove the fasteners from the following locations: o Top of fender along engine bay o Bottom rear of fender at body o Inside of door jamb (see picture of frame tab below). This bolt must be removed with the door open, from inside the cab we recommend using a 6 or longer socket & extension to reach it. o Inside the wheel wells where the plastic inner fender attaches.


5 Once the fenders are off, you can remove the washer fluid reservoir, horns, cruise control assembly & bracket at your discretion. The passenger side houses the vacuum reservoir remove if you wish.

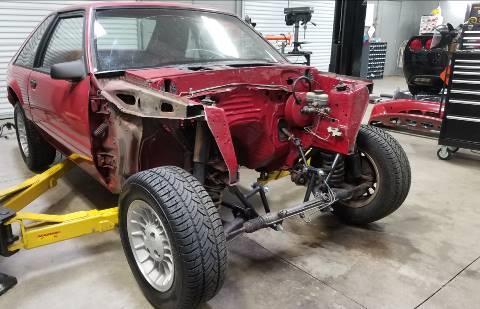
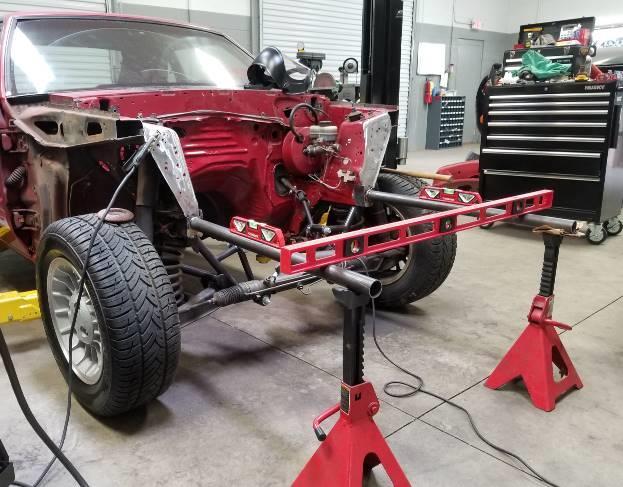
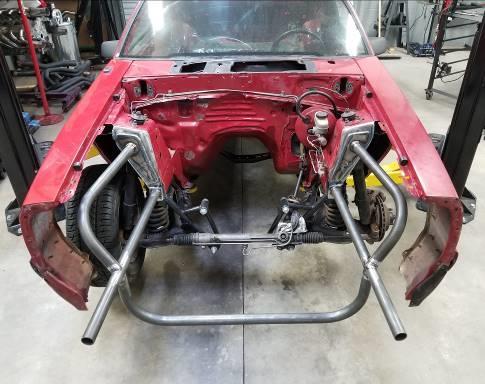
6 Below is the stripped front end; at this point it is highly recommended to clean the engine bay and inner fender areas where cutting and welding will take place.

7 3.) Cut the Front Sub-Frame: At this point it s pertinent to note that the frame can be cut by a variety of methods abrasive wheel, reciprocating saw, plasma-cutter, etc. - all of which will net the desired result. The example shown in these instructions is a combination of abrasive cut-off wheel and reciprocating saw, which many DIY-er s will most probably use. ***Note the following dimensions*** For short (25 ) frame bars = cut frame 7 from face of shock tower box. For long (32 ) frame bars = cut frame flush at shock tower box (as shown). Begin by marking a line down the inside of the fender, just in front of the shock tower box. Follow the curve of the body, then project across the boxed frame section and down. For this installation the frame will be cut flush at the tower.


8 Once the cut-lines have been marked, begin the cut at the top of the sub-frame with the cut-off wheel, making a 2-3 long cut on the inside face. This will allow the reciprocating saw blade to be inserted and aligned properly.


9 Cut the rest with the reciprocating saw; as shown below, it is recommended to cut the boxed frame square to the formed rail, and the upper fender boxed-section square to the body. (This is personal preference)

10 Once the front sub-frame has been cut off, sand, deburr and clean the cut sheet metal edges. This will also allow you to even up any irregularities in the cut and remove sharp corners made from the manufacturing process where the sheet metal has been joined.
11

 to allow the frame bar plate to rest in")
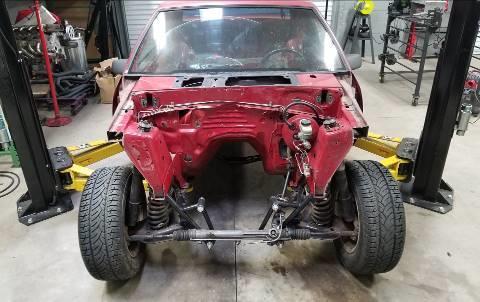
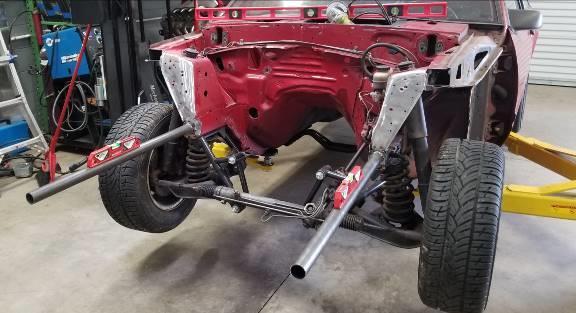
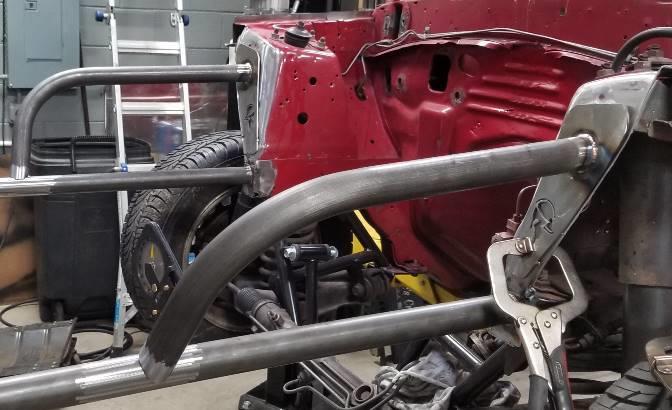
12 4.) Position & Tack Tube Frame Rails: Begin the assembly process by removing all of the paint from the attachment areas on the front end. We recommend a disc sander or abrasive flap-wheel. Be sure to sand through the manufacturer s rust prohibitive coating, and ensure that the base metal is clean before welding. Once sanded, use a wire brush to hit the hard to reach places near the punched holes and inside corners where the sander could not reach. Pro-Tip: to aid in positioning the front frame-bars to the formed frame, we cut back the outer vertical portion of the frame rail U shape (inside shown) to allow the frame bar plate to rest in place. (This car previously had motor mounts added and removed, leaving a nearly rusted-through frame section which we had to repair.)

13 Using a jack-stand, place each frame bar assembly into position. If you choose to not cut back the formed frame on the car, you will need to find a means of holding the frame plate in position. Take a 4ft level or long straight-edge and hold against the inside of the frame rail. Set the frame bars angled outward slightly more than the line the frame rails make, equally on both sides. At this point in the installation, the angle isn t critical as the radiator support bar will lock in that width and angle once it s tacked in.


14 To match the frame bar elevation angle to the chassis, use a level or angle-finder to measure the position of the car the circled spot below is a good reference point. Duplicate that measurement on the frame bar by raising or lowering the jack-stand until it matches. If available, use a level on each tube at the same time. Once the frame bars are set, tack them into position.
15

16


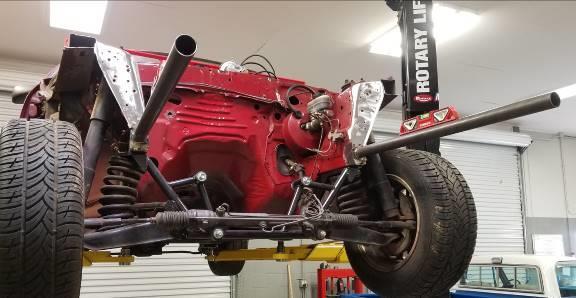
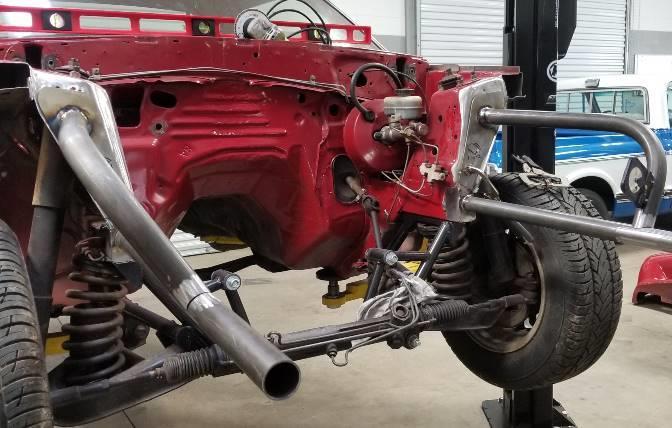
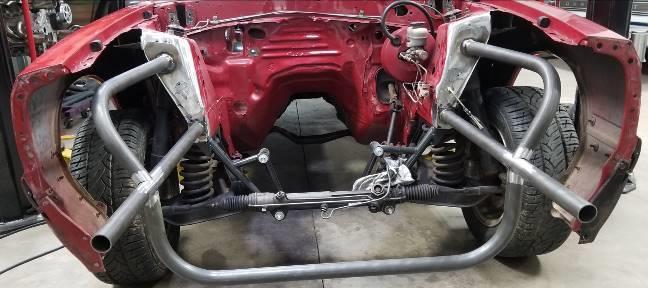
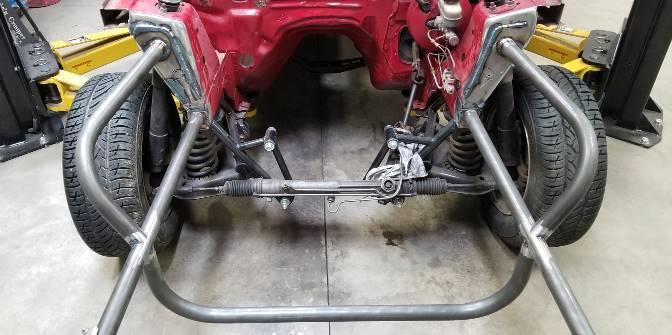
17 5.) Position & Tack Tower Bars: The tower bars are intended to be installed at 58 from horizontal (32 from vertical). Position the tower plate on the shock tower box, using a clamp to hold in place as you set the position. Simultaneously fit the tube notch to the frame rail tube, and center/fit flush the tower plate on the shock tower. Note: it will not sit completely flat you are looking for a best fit scenario. This will be addressed once final welding begins.
18


19 Once fitted appropriately, tack weld each tower plate to the shock tower as shown in the pictures below. Next, tack weld the tower bars to the frame bars

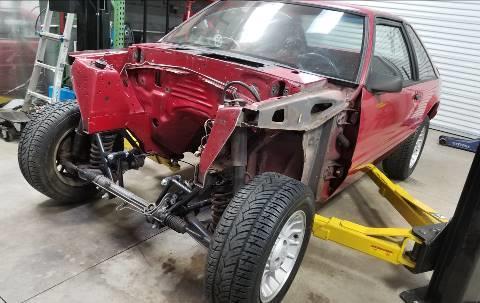
20 6.) Position & Tack Radiator Support Bar: The notches on the radiator support bar are angled to match the taper of the frame bars, instead of being square to the tube. Note the orientation when installing. Place the radiator support bar under the frame bars, and align with the intersection of the tower bars. o NOTE: The radiator bar can be positioned forward or behind the tower bar junction if desired, however the angle of the frame bars must be changed to accommodate the distance between If using a floor jack, apply very light pressure to raise and hold bar in place but not so much that you break the tacks on the other parts. NOTE: if the frame bars don t line up exactly with the radiator support bar, GINGERLY spread (or close) the frame bars enough to jack the radiator bar into place. This will most likely require a helper or some creative ratchet-strapping, but it s doable.


21 Tack both ends of the radiator bar in place, on the inside and outside of the notch.


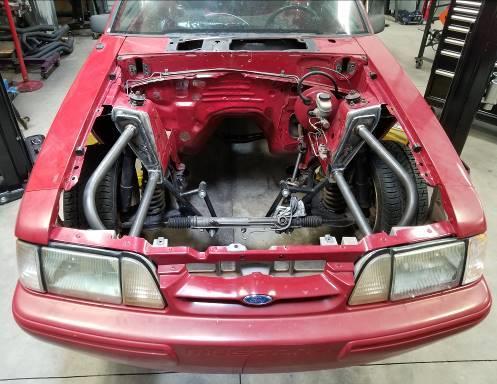
22 At this point it s good to temporarily hang the fenders to check the alignment before final welding of the assembly.


23


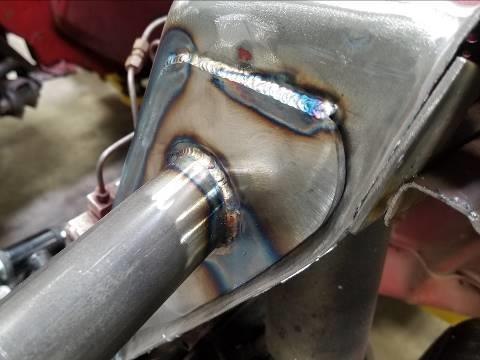
24 7.) Final Welding: After confirming the fitment of the tube assembly, begin final welding with the tower plates. Start by welding ½ long stitch welds working from the inside-bottom to the top, spacing them a few inches apart. If necessary, use a clamp to pull the plate and tower together as you work your way up and around the top of the plate.

25 Weld perimeter of tower plates. For the installation shown we welded in a counterclockwise path on the passenger side, and clockwise on the driver side.
26


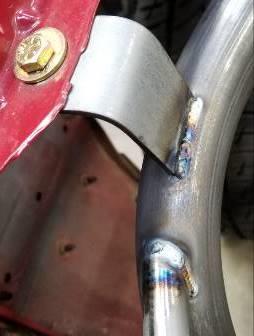
27 Weld tower bars and radiator bar. Finally, fill in the gap left between the shock tower box and the frame tube mounting plate on both sides.

28 Below, Stephen is shown testing the structural integrity of the assembly. It passed inspection. Never a dull moment around the shop


29 8.) Deburr frame weld joints: Using a 3 flap wheel, sand the weld joints where the frame plates meet the body.
30
31
32


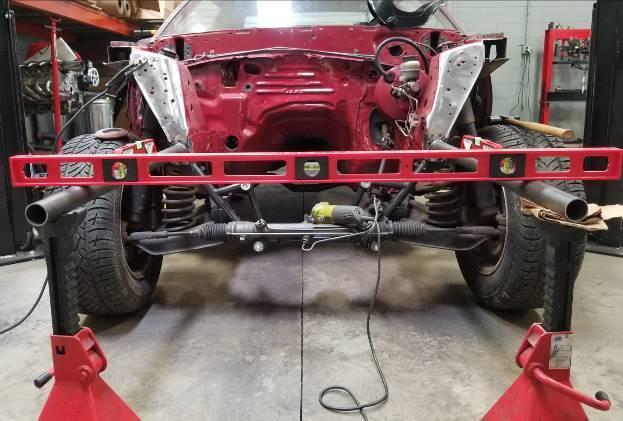
33 9.) Attach Bumper Support Bar & Tabs: Fasten each of the (4) supplied mounting tabs to the fenders and bumper support. o Fender tabs fasten with the legs pointed down to the tower bars. o Bumper tabs fasten with the legs pointed up to the bumper support bar. Position bumper support bar as shown in the picture below, centering the notches on the tower bars and level just behind and above the headlight assemblies. Once positioned, the end of the bumper mount tabs need to be touching the bumper bar. Tack tabs and bumper support bar in place, and check fitment.


34 Once fitted appropriately, weld in place.

35 This completes your RSM Tubular Front End Kit installation The rest is up to you!
YJ DeFenders. These installation instructions apply to the following Poison Spyder products:
 INSTALLATION INSTRUCTIONS INST-13-02-070_A YJ DeFenders IMPORTANT: Thank you for purchasing this Poison Spyder product. Please read through this entire document before proceeding with installation. If
CUT OUT FLARES INSTALLATION INSTRUCTIONS FOR 20017, 20018, F100-F150 F250-F350 P.U. & BRONCO CUT OUTS
 20017 04/22/03 REV-A CUT OUT FLARES INSTALLATION INSTRUCTIONS FOR 20017, 20018, F100-F150 F250-F350 P.U. & BRONCO CUT OUTS Tools Required for Installation: (A) 3/16 Drill Bit (B) Pop-Rivet Gun (C) Air
Important Note. Tools Required: Welder capable of fully welding 10 GA.135 steel
 INSTALLATION INSTRUCTIONS Frame Reinforcement Kit 11102 (Patent Pending) 1964-67 GM A-Body Coupe/2dr Sedan Read Instructions FULLY before starting Installation Important Note Installation of this kit requires
Important Note. Tools Required: Welder capable of fully welding 10 GA.135 steel
 INSTALLATION INSTRUCTIONS Frame Reinforcement Kit 11100 (Patent Pending) 1968-72 GM A-Body Coupe/Sedan Read Instructions FULLY before starting Installation Important Note Installation of this kit requires
Ford F150 Front Bumper
 2009-2011 Ford F150 Front Bumper Warning! Read the instructions completely before beginning the installation. Before tightening bolts, drilling or cutting where required, check to make sure that there
Installation for Full Size Polaris Ranger Crew Doors
 Installation for Full Size Polaris Ranger Crew Doors Order of Installation: Heater Doors Wiper on to Windshield Windshield Top & Back Panel Note: Most of the steps in these instructions need to be repeated
6625 WEST WILSHIRE BLVD. OKLAHOMA CITY, OK (405) FAX (405)
 FAX (405)") INSTALLATION INSTRUCTIONS FOR BEDSIDE INNER REPAIR PANELS 67-72 GM FLEETSIDES This instruction illustrates the removal and replacement of the often rusted and damaged lower inner flanges on the 1967-1972
INSTALLATION INSTRUCTIONS FOR BEDSIDE INNER REPAIR PANELS 67-72 GM FLEETSIDES This instruction illustrates the removal and replacement of the often rusted and damaged lower inner flanges on the 1967-1972
INSTALLATION INSTRUCTIONS
 INSTALLATION INSTRUCTIONS Trans4mer Grille Guard/Winch Mount For Toyota Tundra Kit 68505 This WARN Trans4mer system can be customized to give your Toyota Tundra a wide variety of looks, front-end protection
MM Strut Tower Brace, Cobra (MMSTB-7)
") The MM strut Tower Brace attaches to each strut tower and to the firewall. 3430 Sacramento Dr., Unit D San Luis Obispo, CA 93401 Telephone: 805/544-8748 Fax: 805/544-8645 www.maximummotorsports.com MM
The MM strut Tower Brace attaches to each strut tower and to the firewall. 3430 Sacramento Dr., Unit D San Luis Obispo, CA 93401 Telephone: 805/544-8748 Fax: 805/544-8645 www.maximummotorsports.com MM
Ford Pick Up Rear leaf Spring Kit Installation Instructions
 1948-1956 Ford Pick Up Rear leaf Spring Kit Installation Instructions 1-800-984-6259 www.totalcostinvolved.com Parts 48 inch leaf (2) springs (4) U-bolts 3/8-24 x l 1/4bolts (16) & nuts (2) 1/2-20 x 4
INSTALLATION INSTRUCTIONS 3"/4 BENT END SIDEBARS FORD F-150 SUPERCREW PART # DZ /DZ
 INSTALLATION INSTRUCTIONS 09-12 FORD F-150 SUPERCREW PART # DZ 372697/DZ 372699 PARTS LIST: 1 Driver/Left Sidebar 4 1/2 Lock Washers 1 Sidebar 4 12mm x 32mm OD x 3mm Flat Washers 1 Driver/Left Mounting
INSTALLATION GUIDE PREMIUM FRONT BUMPER. AEV30103AE Last Updated: 09/08/14 US PATENTS: D683281, D CHINESE PATENT: ZL
 PREMIUM FRONT BUMPER US PATENTS: D683281, D697842 CHINESE PATENT: ZL 2012 3 0026081.4 AEV30103AE Last Updated: 09/08/14 INSTALLATION GUIDE PLEASE READ BEFORE YOU START TO GUARANTEE A QUALITY INSTALLATION,
k 5356 PINE AVE FRESNO, CA USA TOLL FREE: 877.4X4.TOYS WORLDWIDE:
 tacoma front shackle kit 110821-1-k kit contents 5356 PINE AVE FRESNO, CA 93727 USA TOLL FREE: 877.4X4.TOYS WORLDWIDE: 559.252.4950 WWW.TRAIL-GEAR.COM recommended tools Loctite Cutoff Wheel Welder Grinder
INSTALLATION INSTRUCTIONS
 INSTALLATION INSTRUCTIONS Trans4mer Grille Guard/Winch Mount Kit 645 For Chevrolet Silverado 500HD & 3500 This WARN Trans4mer system can be customized to give your Chevy Silverado a wide variety of looks,
Race Splitter Upgrade Kit Installation Instructions
 Race Splitter Upgrade Kit Installation Instructions Eric Hazen Rev. 1 Overview: Detailed instructions on installing the FT86 Speed Factory Race Splitter Upgrade Kit on a BRZ; FR-S grills are different
INSTALLATION INSTRUCTIONS
 INSTALLATION INSTRUCTIONS Trans4mer Grille Guard/Winch Mount Kit 6367 For Chevrolet Silverado 1500, Suburban 1500 and Tahoe As you read these instructions, you will see NOTES, CAUTIONS and WARNINGS. Each
RangerWare Fiberglass Door System Installation Instructions P/N
 Page 1 of 9 RangerWare Fiberglass Door System Installation Instructions P/N 2878016 ORDER OF INSTALLATION Note: To assure proper order, read all Accessory Installation Instructions before beginning. 1.
THIS KIT INCLUDES: 8 M8-1.25X40MM BOLTS WITH WASHERS 8 M8-1.25X30MM BOLTS WITH WASHERS RIGHT AND LEFT HINGE
 Sal es@lambodoorscanada. com 2407A Kal adarave,ottawa,on K1V 8B9 THIS KIT INCLUDES: 8 M8-1.25X40MM BOLTS WITH WASHERS 8 M8-1.25X30MM BOLTS WITH WASHERS RIGHT AND LEFT HINGE 2 SHOCKS 565 PSI 2 SHOULDER
CORVETTE CORVETTE REV: Made in USA U.S. PATENT #6,808,223; #6,845,547; #7,140,075; #7,059,655 and other patents pending.
 CORVETTE 2005-2006 CORVETTE 2005-2007 REV: 7-2-07 Made in USA U.S. PATENT #6,808,223; #6,845,547; #7,140,075; #7,059,655 and other patents pending. Page 1 of 12 CORVETTE C6 2005-2007 THIS KIT INCLUDES:
`48-`56 Ford Pickup Rear leaf Spring Kit Installation Instructions Tech Line:
 `48-`56 Ford Pickup Rear leaf Spring Kit Installation Instructions Tech Line: 1-855-693-1259 www.totalcostinvolved.com CHECK ALL PARTS INCLUDED IN THIS KIT TO THE PARTS LIST BEFORE INSTALLING THE KIT.
N. 15th Street, Middlesboro, KY FLIP TARP DUMP BODY INSTALLATION INSTRUCTIONS
 1-800-248-7717 1002 N. 15th Street, Middlesboro, KY 40965 FLIP TARP DUMP BODY INSTALLATION INSTRUCTIONS Congratulations on your purchase of a Mountain Flip Tarp Dump Body tarping system. With tarping systems
WARNING!! DO NOT LIFT DOORS UP WHEN THE HOOD IS OPEN. THE DOORS WILL HIT THE HOOD!
 WARNING!! DO NOT LIFT DOORS UP WHEN THE HOOD IS OPEN. THE DOORS WILL HIT THE HOOD! THIS KIT INCLUDES: 4 M8-1.25X30MM BOLTS WITH WASHERS 12 M8-1.25X40MM BOLTS WITH WASHERS 2 SHOULDER BOLTS WITH RIGHT AND
Jeep Cherokee 4-Door XJ Set Part # Rev
 Jeep Cherokee 4-Door XJ Set Part # 10911 Rev-14 04-05-10 Step 1: Prior to Installation: A) Bushwacker only approves installing the flares according to these written instructions with the hardware provided.
Part # 4463 & Ford Mustang C-Series Upper & Lower Grilles
 Rev. 3/18 Page 1 Part # 4463 & 4464 2018 Ford Mustang C-Series Upper & Lower Grilles Notice: Install new, parts according to these instructions! Altered Parts are Non-Refundable! Part #4464 Notice: Part
Page 1 of 12 GENERAL INSTRUCTIONS KHJKK Installation
 Page 1 of 12 KHJKK PICTURE ABOVE IS THE UNIVERSAL KIT; YOUR KIT MAY BE DIFFERENT. THIS KIT INCLUDES: 8 M8-1.25X30MM BOLTS WITH WASHERS 8 M8-1.25X40MM BOLTS WITH WASHERS 2 PINS RIGHT AND LEFT HINGE ASSEMBLY
INSTALLATION INSTRUCTIONS
 INSTALLATION INSTRUCTIONS Trans4mer Grille Guard/Winch Mount Kit 7646 & 766 For GMC Sierra 500 As you read these instructions, you will see NOTES, CAUTIONS and WARNINGS. Each message has a specific purpose.
Installation Instructions Universal Crossmember Kit - 60 Track Width BEFORE Measure Twice, Weld Once! II
 Installation Instructions Universal Crossmember Kit - 60 Track Width Please read these instructions completely BEFORE starting your installation. Remember the basic rule for a successful installation:
INSTALLATION INSTRUCTIONS
 INSTALLATION INSTRUCTIONS Trans4mer Grille Guard/Winch Mount Kit 6334 For Chevrolet Silverado 500HD & 3500 This WARN Trans4mer system can be customized to give your Chevy Silverado a wide variety of looks,
Ford Ranger / Bronco II Set Part # Rev B 5-04
 Ford Ranger / Bronco II Set Part # 21008 Rev B 5-04 Step 1: Prior to Installation: A) Fit: Verify the fit of the flares to vehicle. (Some filing, sanding, or cutting may be necessary to ensure proper fit).
Place the vehicle on a hard level surface and use an appropriate jack and jack stands to raise the vehicle of the ground.
 1937-1939 Chevy Truck Rear Air Bag 4 - Link Kit Installation Instructions 1-866-925-1101 www.totalcostinvolved.com CHECK ALL PARTS INCLUDED IN THIS KIT TO THE PARTS LIST BEFORE INSTALLATING OF THE KIT.
Body Repair. Collision Repair. Specification. Fastener Specifications Fastener Specifications. Blind Rivet. Flow Drill Screw (FDS) Torque FDS
 Torque FDS") Body Repair Collision Repair Specifications Fastener Specifications Fastener Specifications Application Specification Metric English Cross-Car Brace Mounting Bolts 25 Y 18 lb ft Windshield Frame Mounting
Body Repair Collision Repair Specifications Fastener Specifications Fastener Specifications Application Specification Metric English Cross-Car Brace Mounting Bolts 25 Y 18 lb ft Windshield Frame Mounting
TOOLS REQUIRED FOR INSTALLATION: AIR RACHET, GRINDER AND CUTTER.
 THIS KIT INCLUDES: 16 M8-1.25X30MM BOLTS WITH WASHERS 2 SHOCKS 565 PSI RIGHT AND LEFT HINGE ASSEMBLY 2 SHOULDER BOLTS 2 PINS TOOLS REQUIRED FOR INSTALLATION: AIR RACHET, GRINDER AND CUTTER. 7/23, 10MM,
Rubber Grommet, 36 pcs. 3/4 Screw, 10 pcs. Nut, 10 pcs
 Jeep Cherokee ZJ Set Part #10916-07 Rev-2 03-11-10 THESE INSTRUCTIONS INVOLVE CUTTING THE FENDERS OF THE VEHICLE. IT IS IMPORTANT TO READ ALL INSTRUCTIONS PRIOR TO THE CUTTING AND INSTALLATION OF THESE
INSTALLATION INSTRUCTIONS DODGE RAM 2 & 4WD 1500 PART # P5058
 INSTALLATION INSTRUCTIONS 2009-13 DODGE RAM 2 & 4WD 1500 PART # P5058 PARTS LIST: Qty Description Qty Description 1 Grille Guard 12 12-1.75mm Hex Nuts 2 Upper Frame Mounting s (for trucks without tow hooks
INSTALLATION INSTRUCTIONS
 INSTALLATION INSTRUCTIONS Trans4mer Grille Guard/Winch Mount Kit 60036 (Black) & 60037 (Chrome) For Chevrolet Silverado 3/4 Ton Trucks (Not suitable for Winches larger than,000 lbs.) As you read these
Paco Motorsports Strong Arms X
 Paco Motorsports Strong Arms 13-101X Thanks for purchasing our Strong Arms. These braces reinforce the frame horns that support the engine and transfer all of the cornering and road impact loads into the
BX1956 Installation Instructions Chrysler PT Cruiser (Include Turbo)
") BX1956 Installation Instructions 2001-04 Chrysler PT Cruiser (Include Turbo) Serial No. The front fascia and metal bumper are removed for baseplate installation. Factory metal bumper will not be reinstalled.
BX1956 Installation Instructions 2001-04 Chrysler PT Cruiser (Include Turbo) Serial No. The front fascia and metal bumper are removed for baseplate installation. Factory metal bumper will not be reinstalled.
INSTALLATION INSTRUCTIONS
 INSTALLATION INSTRUCTIONS Trans4mer Grille Guard/Winch Mount For Chevrolet Silverado 1500HD & 2500 Kit 68162 This WARN Trans4mer system can be customized to give your Chevy Silverado a wide variety of
OTHER TOOLS MAY BE NEEDED DEPENDING ON YOUR VEHICLE.
 THIS KIT INCLUDES: 16 M8-1.25X40MM BOLTS WITH WASHERS 2 SHOCKS 720 PSI RIGHT AND LEFT HINGE ASSEMBLY 2 SHOULDER BOLTS 2 PINS TOOLS REQUIRED FOR INSTALLATION: AIR RACHET, GRINDER AND CUTTER. 10MM, 11MM,
JK Rear Crusher Flares
 INSTALLATION INSTRUCTIONS INST-17-05-010_A JK Rear Crusher Flares IMPORTANT: Thank you for purchasing this Poison Spyder product. Please read through this entire document before proceeding with installation.
INSTALL INSTRUCTIONS: FRAME REPAIR KIT
 INSTALL OF FRAME REPAIR KIT (523-203) Ford Ranger 2004 1993 General Tech Tips: Disconnect and Remove Battery Remove fuel tank and clamp, or disconnect fuel lines. Double check for leaking fuel. Ensure
Jeep Cherokee Door XJ Set Part # Revision J
 Jeep Cherokee 84-96 4 Door XJ Set Part # 10911 Revision J 6-5-06 Step 1: Prior to Installation: A) Fit: Verify the fit of the flares to vehicle. (Some filing, sanding, or cutting may be necessary to ensure
INSTALLATION INSTRUCTIONS KK-K9-C12-K CHEVY IMPALA
 INSTALLATION INSTRUCTIONS KK-K9-C12-K 2000-2005 CHEVY IMPALA READ ALL INSTRUCTIONS PRIOR TO INSTALLATION TOOLS REQUIRED: Power Drill Drill bits1/4 and 5/32 7/l6 wrench and socket 15,18 and\or 19mm socket
JK Crusher Corners. *Includes ONE of the Hardware Kits (not both)
") INSTALLATION INSTRUCTIONS INST-18-05-020_A JK Crusher Corners IMPORTANT: Thank you for purchasing this Poison Spyder product. Please read through this entire document before proceeding with installation.
INSTALLATION INSTRUCTIONS INST-18-05-020_A JK Crusher Corners IMPORTANT: Thank you for purchasing this Poison Spyder product. Please read through this entire document before proceeding with installation.
RBP-1215B-RX DODGE RAM QUAD CAB RX3
 RBP-1215B-RX3 2002-2017 DODGE RAM 15-3500 QUAD CAB RX3 Passenger side RX-3 Side Step Drill Template Passenger side rear Modular Bracket (6) L Support Brackets Driver side rear Modular Bracket Driver side
Please read BOTH these Installation Instructions and the General Towing Instructions before attempting to install or operate this equipment.
 Serial Number Please read BOTH these and the General Towing Instructions before attempting to install or operate this equipment. 1. Blue Ox towing products and accessories are intended to be installed
INSTALLATION INSTRUCTIONS
 INSTALLATION INSTRUCTIONS Trans4mer Grille Guard/Winch Mount For GMC Sierra 2500HD & 3500, + 03 Kit 76248/76249 This WARN Trans4mer system can be customized to give your Chevy Silverado a wide variety
Before returning this product to the store of purchase
 Before returning this product to the store of purchase Contact Dee Zee if you experience the following problems: Missing Parts Installation Problems/Questions Warranty Questions 1.800.779.2102 Hours of
Oxford Stalls Installation Instructions
 Oxford Stalls Installation Instructions RAMM Horse Fencing and Stalls 13150 Airport Hwy. Swanton, OH 43558-9615 1-800-434-8456 Rev. 8/15/17 Before You Start Typical stall sizes are 10 x 10, 12 x 12 or
Installation Instructions Kit, Base Rail Bracket Part # 31413
 Installation Instructions Kit, Base Rail Bracket Part # 31413 Dealer / Installer: Provide a copy of these Instructions to the end user of this product. These Instructions provide important operating and
INSTALLATION INSTRUCTIONS
 Do not attempt to install this product on any vehicle other than the one it is designed for and listed above! Parts List 10 3/8 X 1 1/4 Hex Bolt 10 3/8 Lock Washer 4 3/8 Hex Nut 4 3/8 Flat Washer 2 3169)
General Prisoner Transport Install Instructions PT-2-INST
 General Prisoner Transport Install Instructions PT-2-INST 50 or 60 high x 80, 100 & 120 inch long / Double Compartment Inserts Also refer to PT-A-3XX instructions for vehicle specific mounting measurements
BX1956 Installation Instructions Chrysler PT Cruiser (Include Turbo)
") BX1956 Installation Instructions 2001-04 Chrysler PT Cruiser (Include Turbo) Serial No. The front fascia and metal bumper are removed for baseplate installation. Factory metal bumper will not be reinstalled.
BX1956 Installation Instructions 2001-04 Chrysler PT Cruiser (Include Turbo) Serial No. The front fascia and metal bumper are removed for baseplate installation. Factory metal bumper will not be reinstalled.
======================================================================================== ( DR / DR) JK WRANGLER MOD RACK
 JK WRANGLER MOD RACK") (10984 4DR / 10982 2DR) JK WRANGLER MOD RACK INSTALLATION SHEET Important Notes: Some brands of windshield light brackets and snorkels may not be compatible with the 10984 MOD Rack System. Body lifts are
(10984 4DR / 10982 2DR) JK WRANGLER MOD RACK INSTALLATION SHEET Important Notes: Some brands of windshield light brackets and snorkels may not be compatible with the 10984 MOD Rack System. Body lifts are
INSTALLATION INSTRUCTIONS
 INSTALLATION INSTRUCTIONS Trans4mer Grille Guard/Winch Mount Kit 76139 & 7643 For Chevrolet Silverado 1500 As you read these instructions, you will see NOTES, CAUTIONS and WARNINGS. Each message has a
2010+ Dodge Ram 2500/3500 Front Bumper Install Instructions
 2010+ Dodge Ram 2500/3500 Front Bumper Install Instructions Warning! Read the instructions completely before beginning the installation. Before tightening bolts, drilling or cutting where required, check
Please read BOTH these Installation Instructions and the General Towing Instructions before attempting to install or operate this equipment.
 Serial Number 2012 Hyundai Accent (No Foglights) Please read BOTH these and the General Towing Instructions before attempting to install or operate this equipment. 1. Blue Ox towing products and accessories
Elite Series Fender Flares
 Page 1 of 8 Installation Instructions I - Sheet Number I606RPG Rev.B Important Safety Information Tools Required Contents Elite Series Fender Flares Preparation Before Painting / Installation NOTE Actual
2015 GMC Yukon. Upper Class Grille Insert
 Upper Class Grille Insert TOOLS REQUIRED: Flat Head Screwdriver Long Flat Head Screwdriver Phillips Screwdriver 7mm Socket 10mm Socket Ratchet & Extensions 3/16 Drill Bit Power Drill Cutting Wheel or Saw
FENDER FLARE INSTALLATION
 Customer Support TM FENDER FLARE INSTALLATION TG-FF8C4108 IMPORTANT TYGER only approves the installation according to our instructions with the hardware provided. WARNING Failure to complete the installation
Please read BOTH these Installation Instructions and the General Towing Instructions before attempting to install or operate this equipment.
 2005-08 Pontiac G6 GT Please read BOTH these and the General Towing Instructions before attempting to install or operate this equipment. 1. Blue Ox towing products and accessories are intended to be installed
SAFETY THIS PRODUCT IS FOR OFFROAD USE ONLY. ALL LIABILITY FOR INSTALLATION AND USE RESTS WITH THE OWNER.
 SAFETY Your safety and the safety of others is very important. In order to help you make informed decisions about safety, we have provided installation instructions and other information. These instructions
Hardware and Components:
 Hardware and Components: (A) 5/16 x 2 Hex Bolt (B) 5/16 x 2-1/4 Hex Bolt (C) 5/16 x 2-1/2 Hex Bolt (D) 4X 5/16 x 3/4 Hex Bolt (E) 4X 5/16 x 1-1/4 Hex Bolt (F) 11X 5/16 Flat Washer (G) 12X 5/16 Nylock Nut
FRAME BRACKET. Doing Our Best to Provide You the Best. Ford. Page 1. BOlT TORQUE SPECIFICATIONS HJ31000,Rev 0
 2-13 HJ31000,Rev 0 Ford BOlT TORQUE SPECIFICATIONS METRIC BOlTS Size Grade Torque 8mm 8.8 23 ft/lbs. 10mm 8.8 45 ft/lbs. 12mm 8.8 78 ft/lbs. 14mm 8.8 125 ft/lbs. STANDARD BOlTS Size Grade Torque 5/16 5
INSTALLATION INSTRUCTIONS GRILLE GUARD RAM 1500 PART # 5058/5058-2
 INSTALLATION INSTRUCTIONS GRILLE GUARD PART # 5058/5058-2 PARTS LIST: Qty Description Qty Description 1 Grille Guard 8 12-1.75mm x 35mm Hex Bolts 2 Upper Frame Mounting s (for trucks without tow hooks
RH-412 STEEL DOORS INSTALLATION INSTRUCTIONS
 RH-412 STEEL DOORS INSTALLATION INSTRUCTIONS By following the steps outlined below, the assembly, installation and adjustment of the steel doors, will be a simple process. Let s start with the Driver Side.
CLUB-SPORT ROLL BAR: Volkswagen Mk4 Golf
 HPA Motorsports Inc. 604-888-7274 www.hpamotorsport.com CLUB-SPORT ROLL BAR: Volkswagen Mk4 Golf Congratulations on the purchase of your Club-Sport Roll Bar from HPA Motorsports! The engineering elements
Installation Instructions
 TOYOTA 16K Industry Standard Rail Custom Mounting Kit #2748 Gross Trailer Weight (Maximum)...16,000 lbs. Vertical Load Weight (Max. Pin Weight)...4,000 lbs. SYSTEM TOW CAPACITY Please note, in order to
Chevy Colorado. INSTALLATION GUIDE Front Bumper
 Chevy Colorado INSTALLATION GUIDE Front Bumper FIG 1A First, we ll start by removing the small allen bolts from the inside fender wells that hold the stock front bumper in place. FIG 1B You will also need
CONTENTS TOOL LIST U P S I D E I N N O V A T I O N S, L L C RAMP AND STEP SYSTEM ASSEMBLY INSTRUCTIONS. Revised: June 2013
 U P S I D E I N N O V A T I O N S, L L C RAMP AND STEP SYSTEM ASSEMBLY INSTRUCTIONS TOOL LIST Required Tools: - Reciprocating Saw with Metal Cutting Blade - Drill - 7/16 Drill Bit for Metal Drilling -
Jeep. Cut-Out Fender Flares Set of 4. Included in Hardware Kit: Set Part # Rev-8 06/29/16 STEP 1 PRIOR TO INSTALLATION
 STEP 1 PRIOR TO INSTALLATION A) Bushwacker only approves installing the flares according to these written instructions with the hardware provided. WARNING: Failure to install according to these instructions
Jeep. Cut-Out Fender Flares Set of 4. Included in Hardware Kit:
 STEP 1 PRIOR TO INSTALLATION A) Bushwacker only approves installing the fl ares according to these written instructions with the hardware provided. WARNING: Failure to install according to these instructions
Assembly Instructions 10 X 10 Aluminum Frame Building
 Assembly Instructions 10 X 10 Aluminum Frame Building 27 97 9 8 47 36 74 52 10 10 X 10 Square Building W/ Dome Includes: The Steel Entry Door with a Dead Bolt Lock assembly and Aluminum Door Frame. Metal
Locker Pedestal Installation Instructions
 Locker Pedestal Installation Instructions LK-PED-INST-0314r1 Parts List Single Pedestal Back to Back Pedestal Horizontal Support Tube TS-169 Post Flange TS-190 Post Cap Fasteners Provided: #8 x ¾ round
OPEN FENDER MANUAL Installation Instructions Open Fender System Product Number: TF4100/TF4110 Application: 2017 FORD F250/350
 OPEN FENDER MANUAL 2018 Installation Instructions Open Fender System Product Number: TF4100/TF4110 Application: 2017 FORD F250/350 SAFETY Your safety and the safety of others is very important. In order
INSTALLATION INSTRUCTIONS
 INSTALLATION INSTRUCTIONS SNYPER TUBULAR FENDERS APPLICATION: 2007-2017 Jeep Wrangler JK PART NUMBER: 62-1005, 62-1015 ITEM QUANTITY DESCRIPTION TOOLS NEEDED 1,2 2 FRONT FENDERS, DRIVER (1) AND PASSENGER
JK Brawler Rockers. *Includes ONE of the Hardware Kits (not both)
") INSTALLATION INSTRUCTIONS INST-17-08-200_A JK Brawler Rockers IMPORTANT: Thank you for purchasing this Poison Spyder product. Please read through this entire document before proceeding with installation.
INSTALLATION INSTRUCTIONS INST-17-08-200_A JK Brawler Rockers IMPORTANT: Thank you for purchasing this Poison Spyder product. Please read through this entire document before proceeding with installation.
INSTALLATION GUIDE TOYOTA 4 RUNNER (2013+) REAR BUMPER
 REAR BUMPER") INSTALLATION GUIDE TOYOTA 4 RUNNER (2013+) REAR BUMPER CONTENTS CONTENTS Rear Bumper (base or dual arm) Installation...................................... 2 Dual Swing Installation..........................................................
INSTALLATION GUIDE TOYOTA 4 RUNNER (2013+) REAR BUMPER CONTENTS CONTENTS Rear Bumper (base or dual arm) Installation...................................... 2 Dual Swing Installation..........................................................
CHEVY 4100/4400 SUPERRAIL MOUNTING KIT WITH ADAPTER FOR B&W GOOSENECK PART #4432
 CHEVY 4100/4400 SUPERRAIL MOUNTING KIT WITH ADAPTER FOR B&W GOOSENECK PART #4432 Installation Instructions SPECIFICATIONS Fits 2011-2018 Chevy 2500 & 3500 Short Bed Mounts to B&W gooseneck part #1011 Hitch
Rugged Ridge Body Armor Guard Kit, 5 Pieces, Black (07-Current JK 4-door)
") Rugged Ridge Body Armor Guard Kit, 5 Pieces, Black (07-Current JK 4-door) Installation Time: 60 Minutes Tools Required: Notes: Phillips head screwdriver 3/8 socket or Flat head screwdriver 1/2 socket 7
Rugged Ridge Body Armor Guard Kit, 5 Pieces, Black (07-Current JK 4-door) Installation Time: 60 Minutes Tools Required: Notes: Phillips head screwdriver 3/8 socket or Flat head screwdriver 1/2 socket 7
WARNING Honda Pilot Installation Instructions BX2244. Serial Number
 Please read BOTH these and the General Instructions before attempting to install or operate this equipment. Serial Number 1. Blue Ox towing products and accessories are intended to be installed by Blue
Please read BOTH these Installation Instructions and the General Instructions prior to installing or operating this equipment.
 2012-14 Chevy Captiva Sport Attachment Tab Height: 21-1/2 Serial Number Attachment Tab Width: 18-1/2 Please read BOTH these and the General Instructions prior to installing or operating this equipment.
Assembly Instructions 10 X 10 Aluminum Roof Support
 Assembly Instructions 10 X 10 Aluminum Roof Support Aluminum Roof Support Bolt Package 16-5/16 X 2 ¼ SS Bolt 24-5/16 X 1 SS Bolt 40-5/16 SS Nylon Lock Nuts 16-5/16 SS Flat Washers 28-4 ½ Wood Screws 36-1
Installation Instructions
 DODGE 16K Industry Standard Rail Custom Mounting Kit #2728 Gross Trailer Weight (Maximum)...16,000 lbs. Vertical Load Weight (Max. Pin Weight)...4,000 lbs. SYSTEM TOW CAPACITY Please note, in order to
Jeep. Cut-Out Fender Flares Set of 4. Included in Hardware Kit: Set Part # Rev-6 7/20/15 For complete fitment info visit :
 Jeep Cut-Out Fender Flares Set of 4 STEP 1 PRIOR TO INSTALLATION A) Bushwacker only approves installing the fl ares according to these written instructions with the hardware provided. WARNING: Failure
Installation Instructions for Lambo Door Mechanism. 1. Lift the hood and remove left and right shield of front wheel.
 Installation Instructions for Lambo Door Mechanism 1. Lift the hood and remove left and right shield of front wheel. 2. With the door open pull out the rubber hose connecting the door and the door frame,
WATSON RACING 4- & 6-POINT ROLL BAR Mustang Coupe p/n WR-BOLTINCAGE p/n WR-BOLTINCAGE6PT
 WATSON RACING 4- & 6-POINT ROLL BAR 2005-2014 Mustang Coupe p/n WR-BOLTINCAGE p/n WR-BOLTINCAGE6PT The Watson Racing 4-Point & 6-Point Roll Bars were designed for superior strength while allowing for installation
MODULAR BUMPER INSTALLATION MANUAL
 MODULAR BUMPER INSTALLATION MANUAL Parts List* 1 Center section 1 Side extension, passenger / right 1 Side extension, driver / left 1 Side cap, passenger / right 1 Side cap, driver / left 1 Brush guard,
GMC Cut-Out Fender Flares Set of 4
 GMC Cut-Out Fender Flares Set of 4 STEP 1 PRIOR TO INSTALLATION A) Bushwacker only approves installing the fl ares according to these written instructions with the hardware provided. WARNING: Failure to
PROVEN WORLDWIDE SNORKEL FOR CHEVY COLORADO NEW PRODUCT
 AEV30272AC Last Updated: 10/09/18 PROVEN WORLDWIDE SNORKEL FOR CHEVY COLORADO NEW PRODUCT Please visit www.aev-conversions.com to view the most current installation guide for this product. This is a new
Please read BOTH these Installation Instructions and the General Instructions prior to installing or operating this equipment.
 Attachment Tab Height: 13 Attachment Tab Width: 24 Please read BOTH these and the General Instructions prior to installing or operating this equipment. Serial Number 1. Blue Ox towing products and accessories
INSTALLATION INSTRUCTIONS
 INSTALLATION INSTRUCTIONS Trans4mer Grille Guard/Winch Mount Kit 37133 (Black) for Ford Ranger As you read these instructions, you will see NOTES, CAUTIONS and WARNINGS. Each message has a specific purpose.
BX2520 Installation Instructions 2004 Mazda 3
 BX2520 Installation Instructions 2004 Mazda 3 Serial No. The headlight assembly, front fascia, horn bracket and windshield washer reservoir are removed for baseplate installation. Drilling is required.
TOYOTA CAMRY LIP SPOILER Preparation
 Preparation Part Number: PT29A-03070-XX Kit Contents 1 1 Lip Spoiler 2 1 Hardware Bag Hardware Bag Contents 1 2 M6 Nuts 2 2 M6 Bolts Additional Items Required For Installation 1 1 Installation Kit, P/N
INSTALL INSTRUCTIONS
 Jeep JK Rear Corner Skins Product : JK200,JK201,JK202,JK203 Applica on : 2007+ Jeep Wrangler JK ( 2 Door and 4 Door ) Page ( 1 of 6 ) I WARNING Read the instruc ons completely before beginning installa
SAFETY. Read and understand all safety precautions and instructions before installing this product.
 SAFETY Your safety and the safety of others is very important. In order to help you make informed decisions about safety, we have provided installation instructions and other information. These instructions
ASSEMBLY INSTRUCTIONS FOR MAR-K BEDSIDES AND GM FLUSH TAILGATE WITH HANDLE
 ASSEMBLY INSTRUCTIONS FOR MAR-K BEDSIDES AND 41-53 GM FLUSH TAILGATE WITH HANDLE Build the box assembly according to the MAR-K assembly instructions. When installing the tailgate and latching mechanisms
INSTRUCTIONS. INTERCOOLER UPGRADE BMW E82 135i 2008-
 INSTRUCTIONS INTERCOOLER UPGRADE BMW E82 135i 2008- Parts Included: - Intercooler - 4 door shield - 2-45 degree Silicone Hoses ( 2.5 x 3 ) - 1 2.5x3 silicone straight hose. - 1 45 degree aluminum pipe
INSTALLATION INSTRUCTIONS
 INSTALLATION INSTRUCTIONS Trans4mer Mounting System Dodge Ram Kit No. 65220, 73132, 75525, 76253 (black) or 65221, 73133, 75530, 76254 (stainless) As you read these instructions, you will see NOTES, CAUTIONS
INSTALLATION INSTRUCTIONS WINCH MOUNTING PLATE Part Number: Application: 2007 JEEP JK WRANGLER
 INSTALLATION INSTRUCTIONS WINCH MOUNTING PLATE Part Number: 74247 Application: 2007 JEEP JK WRANGLER Your safety, and the safety of others, is very important. To help you make informed decisions about