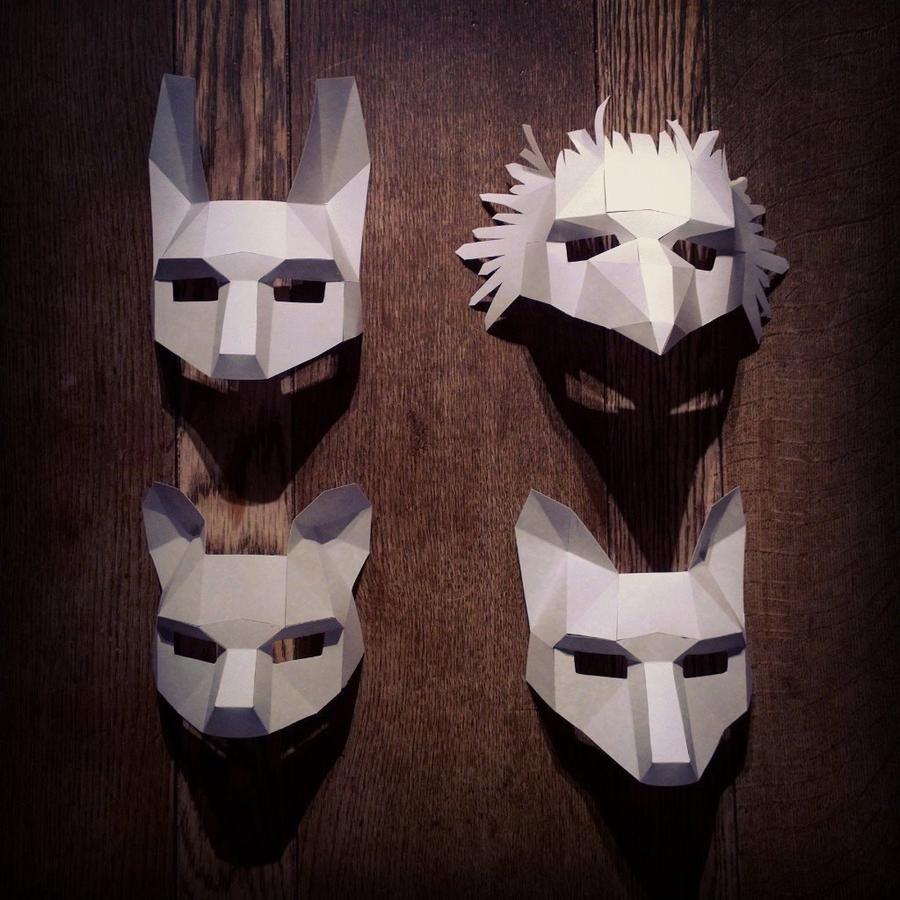
Survival Project. Unit 4 Concept Art. PO2: Understand industry tools and techniques for creating concept art
|
|
|
- Mark Greene
- 5 years ago
- Views:
Transcription
1 Survival Project Unit 4 Concept Art PO2: Understand industry tools and techniques for creating concept art


2


3

4 Unit 4 PO2 - P4 Organising Digital Workspace Window Positioning Create different documents that you can click between whenever you need to. Keep the documents at the top of the page grouped together, not in different windows. Use the zoom with ALT and the roller on the mouse to make sure your work is precise.

5 Unit 4 PO2 - P4 Organising Digital Workspace Window Positioning Drag images down from the top bar to sort them on the main screen. Arrange them equally into the screen so you can see all of them and be able to easily access them.

6 Unit 4 PO2 - P4 Organising Digital Workspace Window Positioning Label your layers with whats on them so you can easily identify them. You can lock certain layers so you don't accidentally draw on them.

7 P5 Task - Survival Project Unit 4 Survival Project Unit 4 Clone Stamp tool: Press Alt + click on an area you want to copy and then hover over the certain place you need it to be copied to and click to apply it. For this you can also change the size and intensity of the brush to change how it looks.

8 P5 Task - Survival Project Unit 4 Survival Project Unit 4 Crop tool: To crop select this button Drag the cropping tool to the Desired size that you want your Image to be and then double click on the image which then saves the crop you have just done. You can always come back and change your crop on the image as well if it s not what you wanted.

9 P5 Task - Survival Project Unit 4 Survival Project Unit 4 Sharpen tool: Go to filter, sharpen and then sharpen, after you click this it will sharpen the whole image, you can also edit the intensity of this within the settings. Sharpen makes the lines and colours in your image more bold and strong.
10 P5 Task - Survival Project Unit 4 Survival Project Unit 4 Dodge tool: Click the button that looks like a hand making a O shape and this will bring up a circle that you can use to blend certain areas of the photo.

11 P5 Task - Survival Project Unit 4 Survival Project Unit 4 Healing brush tool: Click the bandage shaped icon, the click the one which says healing brush tool, this will allow you to blend in/fix any mistakes that you have made on your image such as using a dark colour on the skin which can then be blended with this tool by holding alt and clicking.

12 P5 Task - Survival Project Unit 4 Survival Project Unit 4 Text tool: Click the icon that is a T shape, then drag out your text box to how big you want it and where you want it placed. Next you can change the size and font of the text at the top of the window.

13 P5 Task - Survival Project Unit 4 Survival Project Unit 4 Gradient tool: Click the rectangle with different shades of gray, this will bring up a gradient, click on which one you want, you can also change the colours of the gradient with the colour selector at the side,then click and drag your gradient.

14 P5 Task - Survival Project Unit 4 Survival Project Unit 4 Blur tool: Click the button that looks like a water droplet, then you can change the intensity and size at the top bar and blur out certain areas of the photo you want to.

15 P5 Task - Survival Project Unit 4 Survival Project Unit 4 Lasso tool: Click the button that looks like a loop, select the lasso tool and the draw with it to select the area of the picture that you need to work with.

16 P5 Task - Survival Project Unit 4 Survival Project Unit 4 Eyedropper tool: Click the tipet shaped icon, click the eyedropper tool and then go over your image and select which colour you require.

17 P5 Task - Survival Project Unit 4 Survival Project Unit 4 Selection tool: Click the rectangular shaped tool, select which shape you want to use for selection and then drag it over your image on where you need selected.

18 P5 Task - Survival Project Unit 4 Survival Project Unit 4 Move tool: Click the icon with 4 arrows that looks like a compass and then you can drag around what you have selected to move it to a desired space.
19
20

21 Unit 4 PO2 - M3 Advantages of Digital Painting Toolsets Digital colour palettes: Advantages You have access to a wide range of colours that you can save in a pallet and each colour has a number which you can note down if you frequently use that colour.
22 Unit 4 PO2 - M3 Advantages of Digital Painting Toolsets Digital brushes: Advantages You have a wide selection of multiple different brushes on photoshop which you can change the size and colour of without any hassle of cleaning the brush or buying multiple of the same brush in different sizes.

23 Unit 4 PO2 - M3 Advantages of Digital Painting Toolsets Digital Text Tool: Advantages You can have multiple types of fonts and different sizes of text whereas you would have to draw them out on paper this is more time efficient and neat.

24 P6 Task - Survival Project Unit 4 PO2 During this design i used multiple different brushes such as the normal brush, the pen and the air brush.


25 To add effects that i can undo without affecting the other areas i added layers to do things such as shadows, which i changed the opacity of and glowing areas.
26 I used the pen tool to draw a path, stroked the path and then deleted the path so that it would leave the brush colour behind of where i drawn, this then helped me with keeping the lines neat.

27 P7 Task - Survival Project Unit 4 PO2 Composition:In the background there is multiple broken buildings and a ferris wheel, both using the colour dark gray which juxtaposes the bright pastel gradient background which consists of blues, purples and pinks.in the mid ground there are multiple sunken cars and buildings that are collecting greenery on them, the buildings are mostly grey and the cars are a mustard yellow and a dull red, they are sunken in a dull blue and gray river. In the foreground there is a sunken ship and a rusted train that has crashed into a pile of black rubble. Perspective: The scene appears to be in a straight forward view which emphasises the dystopian destruction of this scene. Proportion: the background takes up most of the image and belittles the other objects involved within. Digital Art Techniques: For the background they have used a cloud brush to make the clouds and then have used a blending brush to smooth it out. They have used a sponge brush to make the rubble in the foreground and have made a reflection in the lake.

28 Composition: In the background there is a dark cloud that is swirling in the wind which is making a hurricane of mist and there are buildings in the background which seem to be ancient which are in a red sunset sky. In the mid ground there is a black mist that is covering the statue in the background. In the foreground there is a big orc with a staff made from stone, his chest is glowing neon blue and he is wearing a torn purple cloak over his head. Perspective: This is taken from a low angle which emphasises the danger and threat from the character and the storm that is brewing behind. Proportion: The orc in the foreground makes the buildings in the background look small in proportion to it and its staff. Digital Art Techniques: They have used a cloud or airbrush tool for the smoke and have used the same neon blue colour with a changed opacity to make the chest look like its glowing.


29 Unity Survival Project This is my environment in Unity for my survival project.


30 Health Bar For the health bar design i have drawn on a transparent background, used a green background as the bar and have drawn a heart to symbolise the health. The first picture is the health bar full, the second is the health bar after the health has decreased.


31 Inventory For the inventory design I tried to stick to the Japanese traditional design of sakura flowers and vines and made them wrap around the boxes of the inventory. When the character collects an item the score for the amount of that object will increase and will increase the character health.


32 Main Menu For the main menu design i made a Japanese shrine with a black to white gradient and with maroon buttons which when clicked will direct the user to the valid place. I have added instructions at the top so that what you need to do to open certain interfaces is more clear. When the start button is clicked the game will start, the quit button exits the program and the settings brings up a settings menu.
33 Collect Item Script The purpose of the collect item script is that when the user collides with the block it picks it up and adds 1 each time to the score in the inventory when they are collected. I have coded this for each block that has a different name in the hierarchy, for example Destroy(other.gameObject); scorescript.bluepotionno += 1; This code adds one when the block is walked into, to make this work for all the other objects I would change the bluepotion to something else.
34 Health Bar Script The health bar script shows that the health starts at 100 and decreases by 0.01 each second that the bar continues to go down.
35 Walk Script The walk script acts with the health bar so if the character loses health they walk slower and if they gain/or are at 100% health then they walk normally.

36 Score Script The score script has multiple purposes, it shuts down the main menu when m is clicked, opens the inventory with i and allows the user to collide with the named objects in the terrain.

37 As Aaron is walking around in the environment there is toxic gas in the air, his health will slowly decrease but will increase when he finds a mask, it will also decrease when he gets attacked.


38 M2 Screenshots and annotated code that demonstrate that 2 attributes have changed as a result of pickups (eg inventory and health bar changing when item is picked up) When the character collects and item the score increases from 0-1, this also increases the health of the character back to 100.
Introduction to Photoshop
 Introduction to Photoshop Instructional Services at KU Libraries A Division of Information Services www.lib.ku.edu/instruction Abstract: This course covers the basics of Photoshop, including common tools
Digital Design and Communication Teaching (DiDACT) University of Sheffield Department of Landscape. Adobe Photoshop CS5 INTRODUCTION WORKSHOPS
 University of Sheffield Department of Landscape. Adobe Photoshop CS5 INTRODUCTION WORKSHOPS") Adobe INTRODUCTION WORKSHOPS WORKSHOP 1 - what is Photoshop + what does it do? Outcomes: What is Photoshop? Opening, importing and creating images. Basic knowledge of Photoshop tools. Examples of work.
Adobe INTRODUCTION WORKSHOPS WORKSHOP 1 - what is Photoshop + what does it do? Outcomes: What is Photoshop? Opening, importing and creating images. Basic knowledge of Photoshop tools. Examples of work.
Getting Started. 1. Double click on the eye con. 2. Single click on File, then new, then OK. Click here.
 Getting Started 1. Double click on the eye con. 2. Single click on File, then new, then OK. Click here. What is Photoshop? Photoshop is a program that lets you make pictures. You can put away your markers
Adobe PhotoShop Elements
 Adobe PhotoShop Elements North Lake College DCCCD 2006 1 When you open Adobe PhotoShop Elements, you will see this welcome screen. You can open any of the specialized areas. We will talk about 4 of them:
ITEC185 INTRODUCTION TO DIGITAL MEDIA
 1 ITEC185 INTRODUCTION TO DIGITAL MEDIA ADOBE PHOTOSHOP ITEC185 - Introduction to Digital Media ITEC185 - Introduction to Digital Media 2 What is Adobe Photoshop? Photoshop is the leading professional
GIMP (GNU Image Manipulation Program) MANUAL
 MANUAL") Selection Tools Icon Tool Name Function Select Rectangle Select Ellipse Select Hand-drawn area (lasso tool) Select Contiguous Region (magic wand) Selects a rectangular area, drawn from upper left (or lower
Selection Tools Icon Tool Name Function Select Rectangle Select Ellipse Select Hand-drawn area (lasso tool) Select Contiguous Region (magic wand) Selects a rectangular area, drawn from upper left (or lower
Overview: Getting to Know the Work Area Design and Print Module 1 of 20
 Adobe Train the Teacher modules written and edited by the T3 curriculum team. Janet Davis Abigail Rudner Steve Tatum Chris Faust Lesson overview: This module provides a basic overview of the workspace,
ADOBE PHOTOSHOP CS TUTORIAL
 ADOBE PHOTOSHOP CS TUTORIAL A D O B E P H O T O S H O P C S Adobe Photoshop CS is a popular image editing software that provides a work environment consistent with Adobe Illustrator, Adobe InDesign, Adobe
Learning Photo Retouching techniques the simple way
 Learning Photo Retouching techniques the simple way Table of Contents About the Workshop... i Workshop Objectives... i Getting Started... 1 Photoshop Workspace... 1 Setting up the Preferences... 2 Retouching
Extreme Makeovers: Photoshop Retouching Techniques
 Extreme Makeovers: Table of Contents About the Workshop... 1 Workshop Objectives... 1 Getting Started... 1 Photoshop Workspace... 1 Retouching Tools... 2 General Steps... 2 Resolution and image size...
Photoshop 1. click Create.
 Photoshop 1 Step 1: Create a new file Open Adobe Photoshop. Create a new file: File->New On the right side, create a new file of size 600x600 pixels at a resolution of 300 pixels per inch. Name the file
Adobe Photoshop CS5 Tutorial
 Adobe Photoshop CS5 Tutorial GETTING STARTED Adobe Photoshop CS5 is a popular image editing software that provides a work environment consistent with Adobe Illustrator, Adobe InDesign, Adobe Photoshop
Downloaded From : Working with Photoshop 7.0
 Adobe Photoshop 1. Introduction What is Adobe Photoshop? Adobe Photoshop is a web designing software used for giving effects and filters to an image to make it more appealing and attractive. Brought out
By Washan Najat Nawi
 By Washan Najat Nawi how to get started how to use the interface how to modify images with basic editing skills Adobe Photoshop: is a popular image-editing software. Two general usage of Photoshop Creating
ADDING A RAINBOW TO A PHOTOGRAPH
 ADDING A RAINBOW TO A PHOTOGRAPH This assignment will cover how to add a simple rainbow (or if you want to go crazy, a double rainbow) to any photograph. This will give us some great work with gradients,
Making Selections: 3 Ways to isolate an area in an image: Layer Mask : Mask the part of the layer you don t want to be visible
 3 Ways to isolate an area in an image: Layer Mask : Mask the part of the layer you don t want to be visible Eraser Tool: Erase the areas of an image or layer you don t want to be visible Make a Selection:
Using Photoshop Elements
 Using Photoshop Elements Created By: Rick Williams August 2004 Table of Contents Photoshop Element Tools...Page 1 Tool Descriptions... Page 3 Starting Photoshop Elements... Page 7 Resizing an Image...
Adobe Photoshop CC 2018 Tutorial
 Adobe Photoshop CC 2018 Tutorial GETTING STARTED Adobe Photoshop CC 2018 is a popular image editing software that provides a work environment consistent with Adobe Illustrator, Adobe InDesign, Adobe Photoshop,
Unit 7 : Image Painting, Editing and Layers
 Unit 7 : Image Painting, Editing and Layers Introduction This Unit describes about various painting tools; such as selection, cropping and measuring tools, retouching, drawing and type tools, Navigation
Quick Mask Setting Up your Work Environment Setting Up the Quickmask Parameters
 Quick Mask Quickmask gets its name from the fact that as you create your selection area, Photoshop masks that area off, tinting it with a colored mask to show what has been selected. When you're finished
Using layer masks to remove backgrounds with Photoshop CS5 and CS6
 Using layer masks to remove backgrounds with Photoshop CS5 and CS6 Use layer masks to combine these pictures into this You will learn: 1. Layers and layer masks 2. Brushes 3. Layer styles 4. Type tool
How to Create a Landscape Wallpaper for your Desktop
 How to Create a Landscape Wallpaper for your Desktop Why not create a vector landscape wallpaper? In this simple tutorial, you will learn how to create an eye-appealing wallpaper quickly and effectively.
Types of Mask. Layer masks
 Photoshop Layer Mask Features Non destructive (does not delete pixels) until applied Uses brush tool which is configurable Can be added to any layer (except Background unless double click to unlock) including
All Creative Suite Design documents are saved in the same way. Click the Save or Save As (if saving for the first time) command on the File menu to
 command on the File menu to") 1 The Application bar is new in the CS4 applications. It combines the menu bar with control buttons that allow you to perform tasks such as arranging multiple documents or changing the workspace view.
1 The Application bar is new in the CS4 applications. It combines the menu bar with control buttons that allow you to perform tasks such as arranging multiple documents or changing the workspace view.
PHOTOSHOP & ILLUSTRATOR BOOTCAMP
 FALL 2014 - ELIZABETH LIN PHOTOSHOP & ILLUSTRATOR BOOTCAMP ILLUSTRATOR ALIGNMENT To access the alignment panel, go to Window -> Align. You should see a panel like the one below. This panel allows you to
Introduction to Layers
 Introduction to Layers By Anna Castano A layer is an image or text that is piled on top of another. There are many things you can do with layer and it is easy to understand how it works. Through the introduction
Photoshop Elements 3 Graphics
 Photoshop Elements 3 Graphics So far we have concentrated on modifying photographs. Photoshop Elements also can be used to create and modify graphics images that do not necessarily begin with a photograph.
Welcome to Photoshop CS
 Chapter 1 Welcome to Photoshop CS COPYRIGHTED MATERIAL Photoshop CS is the latest version of Photoshop, Adobe s powerful image-editing program. It s part of Adobe s Creative Suite, a package of design
Contents. Introduction
 Contents Introduction 1. Overview 1-1. Glossary 8 1-2. Menus 11 File Menu 11 Edit Menu 15 Image Menu 19 Layer Menu 20 Select Menu 23 Filter Menu 25 View Menu 26 Window Menu 27 1-3. Tool Bar 28 Selection
Creating Pastel Images and other effects in Photoshop
 Creating Pastel Images and other effects in Photoshop Martin Addison 2015 Creating pastel images Page 1 Martin Addison FRPS Using White Layers in Photoshop 1. Create a new empty Layer 2. Edit> Fill 3.
Learning Adobe Photoshop CS6
 Module 1 Contents Chapter 1: Introduction to Photoshop Loading Photoshop...1-1 The Tools Panel...1-2 Using the Tools...1-3 The Panel Group...1-5 Layers...1-6 Loading a Sample File...1-6 Looking at the
The toolbar in Pixlr Editor always appears on the left-hand side, although you can drag it anywhere you like.
 The toolbar in Pixlr Editor always appears on the left-hand side, although you can drag it anywhere you like. Crop (Shortcut: C) Reframe your entire canvas to a desired size and remove everything else.
Texts and Resources: Assessments: Freefoto.com Group Photo Projects
 Effective Date: 2009-10 Name of Course: Digital Photography Grade Level: 9-12 Department: Industrial Technology and Engineering Length of Course: 30 cycles Instructional Time: 180 days Period Per Cycle:
Introduction to Adobe Photoshop 5.0
 Introduction to Adobe Photoshop 5.0 Fall 2000 Prepared by Soumaia Ahmed Al Ayyat Adobe Photoshop is a powerful, professional image-processing tool. It processes a variety of image formats. The quality
An Introduction to Photoshop 6. Photoshop. retouching applications. images, Lightweight version: Photoshop Elements
 An Introduction to Photoshop 6 Gustav Taxén gustavt@nada.kth.se 2D1640 Grafik och Interaktionsprogrammering VT 2006 Photoshop One of the world s best known image retouching applications Current version
PHOTOSHOP DESIGN EFFECTS FOR INTERMEDIATE TO ADVANCED USERS
 PHOTOSHOP DESIGN EFFECTS FOR INTERMEDIATE TO ADVANCED USERS Copyright 2012, National Seminars Training Introduction This class is all about design effects in Adobe Photoshop. For example, let s say that
PHOTOSHOP BASICS: VINTAGE PHOTO FIXES
 PHOTOSHOP BASICS: VINTAGE PHOTO FIXES Course Topics: Photo Adjustments Photo Editing Tools Layers What is Photoshop Elements? Photoshop Elements is a streamlined version of Adobe Photoshop CC. Despite
Adobe Photoshop The program: The Menus: Computer Graphics I- Final Review
 Computer Graphics I- Final Review The written portion of your final exam will be 25 multiple choice questions and one free response. Some parts of the exam will be related to examples, images and pictures.
Introduction to Photoshop
 Introduction to Photoshop Photoshop Creative Cloud (CC) Start -> All Programs -> Classes -> Web Expressions -> Tutorials Google Photoshop CC tutorial Color Replacement Image -> Adjustments -> Replace
Retouching Portraits in Photoshop
 Retouching Portraits in Photoshop I Removing Blemishes When removing blemishes, acne or other imperfections on the skin, our goal is to maintain as much of the original skin texture as possible. That way,
Adobe Photoshop CS5 Layers and Masks
 Adobe Photoshop CS5 Layers and Masks Email: training@health.ufl.edu Web Page: http://training.health.ufl.edu Adobe Photoshop CS5: Layers and Masks 2.0 Hours The workshop will cover creating and manipulating
This tutorial will show you how to use artistic grunge overlays to transform your photos into works of art.
 ARTISTIC GRUNGE OVERLAYS For all photo editing software that supports PNG files If you have any questions, please feel free to contact me at kim@photosbykimhill.com. This tutorial will show you how to
GETTING STARTED. 0 P a g e B a s i c s o f A d o b e P h o t o s h o p A g a P r i v a t e I n s t i t u t e f o r c o m p u t e r s c i e n c e
 GETTING STARTED 0 P a g e B a s i c s o f A d o b e P h o t o s h o p Adobe Photoshop: is a popular image editing software that provides a work environment consistent with Adobe Illustrator, Adobe InDesign,
XXXX - ILLUSTRATING FROM SKETCHES IN PHOTOSHOP 1 N/08/08
 INTRODUCTION TO GRAPHICS Illustrating from sketches in Photoshop Information Sheet No. XXXX Creating illustrations from existing photography is an excellent method to create bold and sharp works of art
Tablet overrides: overrides current settings for opacity and size based on pen pressure.
 Photoshop 1 Painting Eye Dropper Tool Samples a color from an image source and makes it the foreground color. Brush Tool Paints brush strokes with anti-aliased (smooth) edges. Brush Presets Quickly access
Essential Post Processing
 Essential Post Processing By Ian Cran Preamble Getting to grips with Photoshop and Lightroom could be described in three stages. One is always learning and going through stages but there are three main
Exploring Photoshop Tutorial
 Exploring Photoshop Tutorial Objective: In this tutorial we will create a poster composed of three distinct elements: a Bokeh, an image and title text. The Bokeh is an effect which is sometimes seen in
Using Adobe Photoshop
 Using Adobe Photoshop 6 One of the most useful features of applications like Photoshop is the ability to work with layers. allow you to have several pieces of images in the same file, which can be arranged
PhotoFiltre. Reverse foreground/background colors. Background & foreground colors. Set default foreground/background colors. Color choice palette
 PhotoFiltre BASIC TOOLS PALETTE Background & foreground colors Reverse foreground/background colors Set default foreground/background colors Color choice palette Toggle through color choice palettes Selection
Using Adobe Photoshop
 Using Adobe Photoshop 8 In the last section we looked at adjusting colours to improve your image. In this section we ll look at various ways of touching up your images to fix problems with the images or
Rendering a perspective drawing using Adobe Photoshop
 Rendering a perspective drawing using Adobe Photoshop This hand-out will take you through the steps to render a perspective line drawing using Adobe Photoshop. The first important element in this process
Photoshop CC: Essentials
 Photoshop CC: Essentials Summary Workspace Overview... 2 Exercise Files... 2 Selection Tools... 3 Select All, Deselect, And Reselect... 3 Adding, Subtracting, and Intersecting... 3 Working with Layers...
Introduction to Photoshop Elements
 John W. Jacobs Technology Center 450 Exton Square Parkway Exton, PA 19341 610.280.2666 ccljtc@ccls.org www.ccls.org Facebook.com/ChesterCountyLibrary Introduction to Photoshop Elements Chester County Library
The original image. Let s get started! The final rainbow effect. The photo sits on the Background layer in the Layers panel.
 Add A Realistic Rainbow To A Photo In this Photoshop photo effects tutorial, we ll learn how to easily add a rainbow, and even a double rainbow, to a photo! As we ll see, Photoshop ships with a ready-made
Mullingar Camera Club Basic introduction to Digital Printing using Photoshop CC.
 Mullingar Camera Club Basic introduction to Digital Printing using Photoshop CC. Table of Contents Course aims: 1 Course presentation notes: 1 Introducing Photoshop: 1 Adjusting the Brightness or Contrast
Digital Imaging - Photoshop
 Digital Imaging - Photoshop A digital image is a computer representation of a photograph. It is composed of a grid of tiny squares called pixels (picture elements). Each pixel has a position on the grid
Approaching Photoshop Efforts With an Eye toward Layers A Step-by-Step Procedure Explained
 Approaching Photoshop Efforts With an Eye toward Layers A Step-by-Step Procedure Explained By: Marty Kesselman June 3, 2009 We keep talking about layers and that they are useful and important to use in
Project 8: Nice Close-Up
 ps7ie_p08_b.qxd 11/18/02 3:25 PM Page 74 ps7ie_p08_b.qxd 11/18/02 3:25 PM Page 75 Photoshop 7 Image Effects In this project, work with a picture that was taken at an angle for effect. Correct and crop
GRINDHOUSE MOVIE POSTERS
 Follow the instructions below to create a grindhouse style movie poster for your short film. You can also see a detailed video tutorial here: http://www.youtube.com/watch?v=-drhbfvhft0 GOOD LUCK!! CREATING
IMAGE CORRECTION. You can find this and more information with video tutorials at
 IMAGE CORRECTION You can find this and more information with video tutorials at http://www.adobe.com/support/photoshop/ P H O T O S H O P T O O L S CLONE STAMP TOOL The Clone Stamp tool paints one part
Bramhall Photographic Society
 Bramhall Photographic Society PHOTOSHOP ELEMENTS ADJUSTMENT LAYERS EXPLAINED (WHAT THEY DO) (This technique will work in any version of Elements although the screenshots may vary slightly) There are a
Photoshop CC 2018 Essential Skills
 Photoshop CC 2018 Essential Skills Adobe Photoshop Creative Cloud 2018 University Information Technology Services Learning Technology, Training, Audiovisual and Outreach Copyright 2018 KSU Division of
18 / CLONING 1 CLONE CLONE TOOL
 18 / CLONING 1 In this section we will learn about the clone tool while using it enhance the message, as well as the appearance of a picture. At the end of the section you will find information about groups
Introduction to Photoshop: Basic Editing & Prepare Images for the Web
 Introduction to Photoshop: Basic Editing & Prepare Images for the Web 1 LEARNING OBJECTIVES Basic tools in Photoshop & Use of Bridge Prepare images for print and web use TOPICS COVERED Photoshop Interface
VERY. Note: You ll need to use the Zoom Tools at the top of your PDF screen to really see my example illustrations.
 VERY This tutorial is written for those of you who ve found or been given some version of Photoshop, and you don t have a clue about how to use it. There are a lot of books out there which will instruct
Advanced Photography. Topic 3 - Photoshop Filters. Learning Outcomes
 Topic 3 - Photoshop Filters Learning Outcomes In this lesson, we're going to take a look at some techniques that make use of some of the more practical filters. We are also going to learn how to convert
photoshop filters kelly ludwig assistant professor
 photoshop filters kelly ludwig assistant professor sharpening images reducing noise correcting distortions in images practical filters There are over 100 filters that ship with Photoshop and they're all
File menu. Open, close, save, print, place, import etc...
 File menu Open, close, save, print, place, import etc... This saves files under the same name and format. You will replace the original file with the new one. Once you have clicked the button and closed
 Retouching Your Images: Have you ever seen an amazing photo but could never figure out how it was taken? A good photographer can accomplish this. And if not, has tools for correcting many kinds of imperfections,
Photoshop Elements Hints by Steve Miller
 2015 Elements 13 A brief tutorial for basic photo file processing To begin, click on the Elements 13 icon, click on Photo Editor in the first box that appears. We will not be discussing the Organizer portion
Create a Beautiful Abstract Portrait in Photoshop - Psd Premium Tutorial
 Create a Beautiful Abstract Portrait in Photoshop - Psd Premium Tutorial By: Wojciech Pijecki In this tutorial we will combine several stock images to create an artistic, abstract portrait of a woman.
Photoshop: a Beginner s course. by: Charina Ong Centre for Development of Teaching and Learning National University of Singapore
 Photoshop: a Beginner s course by: Charina Ong Centre for Development of Teaching and Learning National University of Singapore Table of Contents About the Workshop... 1 Prerequisites... 1 Workshop Objectives...
Key Terms. Where is it Located Start > All Programs > Adobe Design Premium CS5> Adobe Photoshop CS5. Description
 Adobe Adobe Creative Suite (CS) is collection of video editing, graphic design, and web developing applications made by Adobe Systems. It includes Photoshop, InDesign, and Acrobat among other programs.
Add Rays Of Sunlight To A Photo With Photoshop
 Add Rays Of Sunlight To A Photo With Photoshop Written by Steve Patterson. In this photo effects tutorial, we'll learn how to easily add rays of sunlight to an image, a great way to make an already beautiful
An Introduction to Layers, Masks and Channels in Photoshop
 An Introduction to Layers, Masks and Channels in Photoshop Roy Killen, GMAPS, EFIAP, GMPSA (c) 2017 Roy Killen Layers, Masks and Channels Page 1 Two approaches to image editing When images are edited in
Town and Village Tutorial
 Town and Village Tutorial For Adobe Photoshop by Lerb This tutorial will take you through the basic techniques I use when creating village and town maps in Adobe Photoshop. The techniques can also be used
Photoshop Elements for Genealogists Part 1
 Photoshop Elements for Genealogists Part 1 By Barry J. Ewell Topics Covered Photoshop Elements Workspace Exploring the Tools Quick Fix Preview Photoshop Elements Workspace Workspace File Edit Image Enhance
Glowing Surreal Planet Design. Final Image Preview
 Glowing Surreal Planet Design Final Image Preview. Step 1 First, go to the S:\ drive and locate the folder called Glowing Planet Design. Copy the City Skyline file and paste it in your Glowing Planet Design
Create an Amazing Surreal-Style Treehouse in Photoshop Photoshop Tutorials
 Download the PSD Surreal Treehouse.zip 23.59 MB Download from Website Surreal Treehouse Photoshop Tutorial Tutorial Resources Tree Houses Thanks archetype, Deviantart Bonsai Tree Thanks fabemiko, Deviantart
A quick note: We hope that you will find something from the Tips and Tricks that will add a little pizazz to your yearbook pages!
 A quick note: The following pages are tips and tricks for Basic Photoshop users. You may notice that some instructions indicate that non-awpc fonts were used, and that some colors were created using the
In Photoshop you can change the size of an image by going to:
 Change an images size In Photoshop you can change the size of an image by going to: Image Image Size and change the dimensions of the pictures in pixels. Once you adjust the top number the bottom number
Editing Using Photoshop CS5
 The Photoshop CS4 Editing Workspace - shown is the document (image) window, ToolBox, Info, Navigator, History, Adjustments and Layers Palettes, Windows Menus and Options Bar (on top). USING THE LAYERS
The horse image used for this tutorial comes from Capgros at the Stock Exchange. The rest are mine.
 First off, sorry to those of you that are on the mailing list or RSS that get this twice. I m finally moved over to a dedicated server, and in doing so, this post was lost. So, I m republishing it. This
Adobe Photoshop CS2 Workshop
 COMMUNITY TECHNICAL SUPPORT Adobe Photoshop CS2 Workshop Photoshop CS2 Help For more technical assistance, open Photoshop CS2 and press the F1 key, or go to Help > Photoshop Help. Selection Tools - The
Digital Photography 1
 Digital Photography 1 Photoshop Lesson 3 Resizing and transforming images Name Date Create a new image 1. Choose File > New. 2. In the New dialog box, type a name for the image. 3. Choose document size
Lesson 16 Text, Layer Effects, & Filters
 Lesson 16 Text, Layer Effects, & Filters Digital Media I Susan M. Raymond West High School In this tutorial, you will: Create a Type Layer Add and Format Type within a Type Layer Apply Layer Effects Apply
Professional Photograph Restoration 50 Points
 Professional Photograph Restoration 50 Points In this tutorial, we'll take an in-depth look at restoring an old torn photograph. Restoring old family photos is something that you can do for your relatives
Improve your photos and rescue old pictures
 PSPRO REVISTED Nov 5 2007 Page 1 of 7 Improve your photos and rescue old pictures This guide gives tips on how you can use Paint Shop5 and similar free graphic programmes to improve your photos. It doesn
Photoshop CC Editing Images
 Photoshop CC Editing Images Rotate a Canvas A canvas can be rotated 90 degrees Clockwise, 90 degrees Counter Clockwise, or rotated 180 degrees. Navigate to the Image Menu, select Image Rotation and then
Students will be able to create movement through the use of line or implied line and repetition.
 Title of Unit Digital Imaging Title of Lesson Self Portrait Montage in Photoshop Course Graphic Design 1 Instructor Heidi Stachulak hstachulak@hf233.org Objectives: Composition Students will be able to
UNDERSTANDING LAYER MASKS IN PHOTOSHOP
 UNDERSTANDING LAYER MASKS IN PHOTOSHOP In this Adobe Photoshop tutorial, we re going to look at one of the most essential features in all of Photoshop - layer masks. We ll cover exactly what layer masks
Computer Graphics and Image Editing Software
 ELCHK Lutheran Secondary School Form Two Computer Literacy Computer Graphics and Image Editing Software Name : Class : ( ) 0 Content Chapter 1 Bitmap image and vector graphic 2 Chapter 2 Photoshop basic
METAL TEXT EFFECT. Step 1: Create A New Document. Step 2: Fill The Background With Black
 METAL TEXT EFFECT In this text effects tutorial, we ll learn how to easily create metal text, a popular effect widely used in video games and movie posters! It may seem like there s a lot of steps involved,
Create a Candy Cane. Create a new canvas with the size 8x10 inches at 300 pixel/inch. See image below Ctrl + N
 Create a Candy Cane The Basic Candy Cane Canvas and Shape 1. Create a new folder, name it Candy Cane your name. Create a new canvas with the size 8x10 inches at 300 pixel/inch. See image below Ctrl + N
How to blur a background in Photoshop CS3, Elements 9 or later By Steve Zimic
 This is a technique I developed which allows blurring of the background without any bleeding of the main subject into the background. This technique does require a working knowledge of the various selection
GIMP Layers. Creating a Blank Image
 GIMP Layers One of the most powerful features of modern imaging software is the ability to work with layers. If an image is made of layers, we can work on the part that is in one layer without affecting
Adobe Photoshop Notes. Adobe Photoshop CS3
 Adobe Photoshop Notes Adobe Photoshop CS3 Page 2 Introduction These notes have been put together for basic and advanced methods, features and language. I have also created notes on other Adobe products.
Using Adobe Photoshop
 Using Adobe Photoshop 8 In the last section we looked at adjusting colours to improve your image. In this section we ll look at various ways of touching up your images to fix problems with the images or
Challenge Image: Blur the Background
 Challenge Image: Blur the Background Challenge Image: Blur the Background In this lesson, we re going to work on a challenge image that was submitted by a Masters Academy member. The image features a little
Compositing. Compositing is the art of combining two or more distinct elements to create a sense of seamlessness or a feeling of belonging.
 Compositing Compositing is the art of combining two or more distinct elements to create a sense of seamlessness or a feeling of belonging. Selection Tools In the simplest terms, selections help us to cut