The Paper-Faced Foam Board Family. Fabrication Manual. 3A Composites. 1 of 28
|
|
|
- Arnold McCormick
- 5 years ago
- Views:
Transcription


1 The Paper-Faced Foam Board Family Fabrication Manual 1 of 28 3A Composites May 2018
2 Foreword Thank you for choosing a 3A Composites product for your graphic display applications. We have compiled this Fabrication Manual based on our Fabrication Guide, which is divided into the following sections: Mounting Repositioning Vinyl Direct Digital Printing Direct Screen Printing Painting Knife Cutting Saw Cutting Routing Die Cutting/ Punching Embossing Forming Curves Appendix I: MSDS (Material Data Safety Sheet) Appendix II: Specifications This Fabrication Guide was created to incorporate the most common fabrication methods that are used with 3A Composites line of graphics display products. Not all fabrication methods are compatible with each product, but this format was kept for consistency purposes. The term the substrate is used throughout this guide and is meant to apply to all members of the substrate family unless noted otherwise. Those fabrication methods that do not apply to a certain product are stated with a short explanation and a recommendation for an alternative product that fits that application method. This manual also contains Appendix I which provides a Material Safety Data Sheet section. Appendix II includes an adhesives, fastening and storage guidelines section. Any unique product information will be contained in Appendix II. See Table of Contents. An Appendix III section lists products that can be used in conjunction with 3A Compositesproducts. 3A Composites is not responsible for the performance of any of these products when used independently or with any 3A Composites product. The date of the last revision is shown on the bottom right hand corner of each page. Please make sure you have the most current version by going to and selecting the document library. If you have any further questions about our product or about how to use this manual, please feel free to contact us at PLEASE NOTE: TRIALING IS RECOMMENDED TO ENSURE SUITABILITY FOR THE PROPOSED APPLICATION AND FABRICATION BEFORE FULL-SCALE COMMERCIALIZATION. 2 of 28
3 Table Of Contents Introduction 5 Introduction to Fome-Cor... 5 Why Choose Fome-Cor?... 6 Applications & Fabrication Guides... 7 Section I: Mounting 8 General Notes... 8 Archival Mounting (Conversation Framing)... 8 Methods for Mounting... 8 Surface Preparation... 8 Other Considerations... 8 Hot Mounting General Notes... 9 Fome-Cor Heat-Activated... 9 Cold Mounting General Notes Cold Mounting Procedures Section II: Repositioning Vinyl 13 General Notes Section III: Direct Digital Printing 14 General Notes Surface Preparation Suitable Inks Section IV: Direct Screen Printing 15 General Notes Surface Preparation Suitable Inks Ink Curing Section V: Painting 16 General Notes Surface Preparation Suitable Paints Application Drying Section VI: Cutting 17 General Notes Knife Cutting Shearing Saw Cutting Routing Die Cutting / Punching of 28
4 Table Of Contents Section VII: Embossing 22 General Notes Scoring Bars Embossing Dies Embossing Fome-Cor in 1/8, 3/16 and 3/ Section VIII: Forming Curves 24 General Notes Appendix I: MSDS 25 Material Safety Data Sheet Appendix II: Specifications 26 Adhesives Fastening Storage Guidelines Physical Product Specifications Chart Conclusion of 28


5 Introduction to Fome-Cor The original paper-faced foam-centered graphic display boards that set the industry standard. More graphic arts ideas have appeared on legendary Fome-Cor products than any other graphic arts board. Fome-Cor, the original foam core graphic arts board, has been supporting your creative vision for more than 40+ years; and it s still the one you ask for by name. Fome-Cor Products consist of extruded polystyrene foam bonded between various high-quality papers. It s available in a wide variety of sheet sizes and thicknesses as described below for just about any graphic display application. You can choose from white, black, or natural liners; white or black foam for various looks; recovery foam or embossable; and two types of adhesive surfaces on clay-coated liners. Fome-Cor Graphic Display Products consists of two products lines Fome-Cor Board and Fome-Cor Specialty Products, which consist of: FOME-COR : FOME-COR Board FOAM-X ValuBoard FOME-COR Jetmount FOME-COR Specialty Products: FOME-COR Acid-Free FOME-COR Self-Adhesive (Low Tack & High Tack) FOME-COR Heat Activated FOME-COR Canvas Board The Fome-Cor board set of products feature a lightweight, rigid, smooth, flat and uniform surface. These characteristics make Fome-Cor board suitable for a wide variety of application and fabrication methods. It can be mounted on or direct printed. It can be easily cut with knife like tools or dramatic die cutting. Die-cutting features of an open edge can be accomplished with Foam-X and closed edges and 3-D embossing with Fome-Cor Board. Fome-Cor board products are available as thin as 1/8, progressing to 3/16, 1/4 and finally 3/8. Consult the 3A Composites website for the most current products and sizes at. The Fome-Cor board Specialty Products provide two methods for adhering artwork with either a peel and stick self-adhesive in a repositional low-tack or quick set high-tack, or a heat-activated. For those conservation framing jobs we provide an acid-free board. FOAM-X ValuBoard Jetmount FOME-COR Acid Free Self-Adhesive Heat Activated Canvas Board 5 of 28
6 Why Choose Fome-Cor? The Paper-Faced Foam Board Family FOME-COR Board is the industry s leading paper-faced foam board for more than 40 years. It is comprised of extruded polystyrene foam with clay-coated white or black paper facers. The original graphic arts foam boards with a great reputation for performance Perfect for die cutting with a compressed edge that stays closed Quick service on cut-to-size orders including large sheets up to 8 x10 Uniquely embossable for 3-D effect displays Cuts easily and cleanly, even by hand Extremely lightweight Well-suited for screen or direct digital printing applications FOAM-X Recovery is comprised of memory retaining polystyrene foam with clay-coated paper facers. Memory core resists denting Edges remain open when die cut Economical alternative to competitive foam boards FOME-COR ValuBoard TM is comprised of extruded polystyrene foam with natural kraft facers. A cost-effective alternative to corrugated cardboard Provides a smooth surface for mounting with no flute marks FOME-COR JetMount is comprised of denser extruded polystyrene foam with clay-coated paper facers. The denser foam core provides increased rigidity and warp resistance Great for more demanding mounting jobs for display, signage and framing FOME-COR Acid-Free is comprised of extruded polystyrene foam with acid-free paper facers that meet Library of Congress standards for conservation framing. Perfect for the archival preservation of valuable art and photographs No additional backing is required, saving time and framing materials FOME-COR Self-Adhesive is comprised of extruded polystyrene foam with clay-coated paper facers, one of which is covered with pressure sensitive adhesive. Simply peel back the release facer as you position the graphic on the sticky surface. Eliminates the use of pressure-sensitive adhesive stock Available in repositionable Low-Tack (LT) or immediate bonding High-Tack (HT) HT identified by red release facer and LT identified by blue release facer FOME-COR Heat Activated is comprised of extruded polystyrene foam with clay-coated paper facers, one of which is covered with heat-activated adhesive. Eliminates the use of hot melt tissue stock The adhesive is activated with low temperature settings for a quick, damage-free mount Can be used on a heated mechanical or vacuum dry mount press, or with a heated roller laminator FOME-COR Canvas Board is comprised of polystyrene foam with an embossed canvas like clay-coated paper facer on both sides. Deep embossed texture that creates a more artistic look Prints and cuts the same as traditional FOME-COR products Economical alternative to competitive canvas-like products 6 of 28
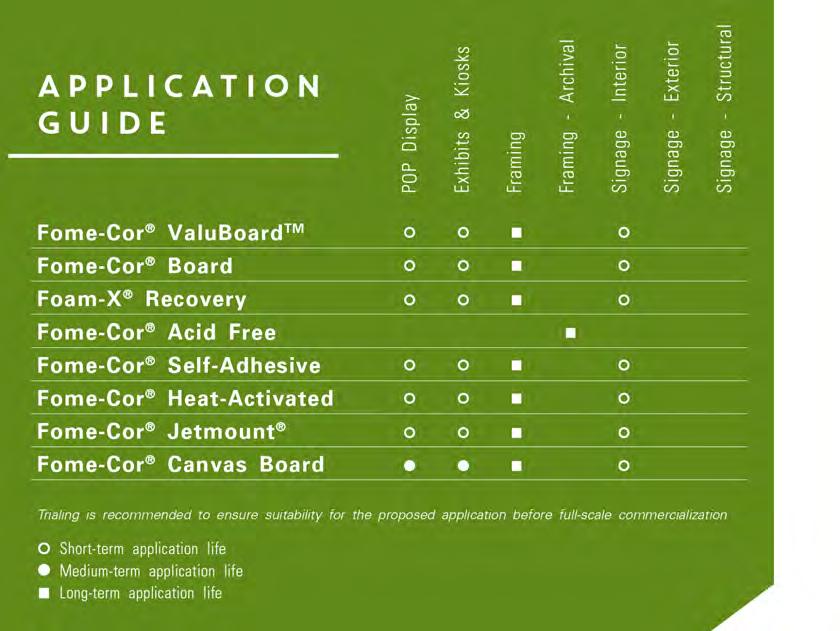


7 Application & Fabrication Guides 7 of 28
8 Section I: Mounting General Notes Mounting, laminating and bonding are terms that are often times interchanged. For this document, mounting is defined as the attachment of the graphic to the substrate. Lamination is the application of a covering (film or liquid) over the mounted item to either protect the graphic or provide a certain appearance i.e. matte or glossy finish. Bonding also conveys affixing one thing to another. This can involve a graphic to a substrate or one substrate to another. This document uses the term mounting to convey affixing as opposed to bonding. A paper, foil, plastic or fabric graphic can be mounted to the substrate. With regard to adhesive, mounting consideration should follow the adhesive manufacturer s instructions. In general, determine the minimum amount of adhesive lay down to attain the desired adhesion level. It is advisable to leave the boards for a period of time to setup. Consult the adhesive manufacturer s instructions to see what specific times are recommended. Please refer to Appendix I for additional adhesive information. Archival Mounting (Conservation Framing) Only Fome-Cor Acid Free is suitable for Archival Mounting. Conservation or archival mounting requires the selection of materials that are ph neutral to use in conjunction with the substrate and the artwork. This includes matting material, hinges, and adhesives. Matboards, particularly those in contact with the art, should meet the Library of Congress specifications. Art must never be mounted in contact with the glass. If long-term preservation is the goal, only UV protection glass should be used. Finally, it is a good practice to seal the back of the frame with a dust cover or barrier paper. Methods for Mounting There are a variety of methods (adhesive, pressure, etc.) for mounting a graphic to a substrate. For this document, mounting will be broken into two groupings; hot or cold mounting, with discussion on the various methods of applying pressure. Hot mounting provides a heat source to activate the adhesive. Typically, this is accomplished with a heat source associated with either a vacuum press or a roller press. Cold mounting typically utilizes a spray or pressure-sensitive film or coating in combination with a roller press. Printed papers, foils, and fabrics can all be mounted to the substrate provided that the proper types of adhesives are selected. Mounting can be accomplished on most standard equipment capable of applying adhesive and laminating sheets or roll stock to rigid boards. Surface Preparation Surface should be cleaned and free of any surface contaminates (i.e. oils, dust particles, etc.) prior to commencing. Other Considerations Care should be taken when using laminate films on only one side of the mounted graphic. Moisture pickup will be sealed on one side while the other side in not protected from moisture pickup. Bowing may occur because of moisture imbalance. Additionally, care should be taken when mounting only one side with spray adhesives. As the mount cures out, tensile forces within the adhesive may cause the substrate to bow. It may be necessary to apply a counter-mount of comparable strength on the backside. Finally, one must use the minimum amount of tension when mounting with film or pressure sensitive adhesives as too much tension will cause the substrate to bow; too little will cause the graphic to wrinkle. 8 of 28
9 Section I: Mounting Hot Mounting - General Notes The substrate can be hot mounted utilizing dry mount tissues or Fome-Cor Heat-Activated can be used. The following settings are recommendations; trialing is necessary before commercialization: Maximum temperature not to exceed 190 F. Maximum time not to exceed two-to-three minutes Panels in excess of 3/16 should be placed in the press and pre-heated prior to mounting Be sure to follow the adhesive supplier s recommendations. Fome-Cor Heat Activated Fome-Cor Heat Activated has a low activation temperature that is designed to protect the artwork/ graphic from heat damage, so one does not need to increase heat to achieve proper adhesion. With this material, the heat and dwell times should remain at the recommended levels to get the best results. Too often, operators increase heat and boil out the adhesive. Increasing the temperature can damage the graphic, the laminate or Fome-Cor board. Conditions can vary depending on: the thickness of the graphic, the type of graphic (paper, vinyl, cloth, etc.) to be mounted and the use of a laminate film over the graphic. Trialing Fome-Cor Heat-Activated with various types and thicknesses of graphic material and laminating film is recommended. TYPE OF DRY MOUNT EQUIPMENT TEMPERATURE & TIME DURATION* Vacuum Press 165 o to 170 o F 2 to 21/2 minutes Roll Laminator Roller Temperature 225 o to 230 o F Roll Speed 2-3 feet/minute *Trialing graphic material and any laminating film is recommended for best results. Temperatures and speeds may vary depending on equipment. Six Steps for Mounting with Fome-Cor Heat-Activated 1. Preheat equipment keep your equipment calibrated to ensure proper temperature control. 2. Align the graphic to the Heat-Activated substrate. The adhesive faces the underside of the graphic. 3. Protect the graphic and press with the provided release liner. The release liner may be used more than once. 4. Set the temperature and determine dwell time before running the project. (Trialing the graphic material and any laminating film is recommended for best results.) 5. Run the mount. 6. For best results, allow the mounted graphic to cool approximately 30 seconds to enhance the bond. Place weight on the mounted panel during the cooling period to ensure the panel will lie flat as it 9 of 28
10 Section I: Mounting Cold Mounting - General Notes Getting Good Adhesion To cold mount pressure-sensitive adhesives, you need sufficient pressure. You also must make sure that proper spacers are used. Because effective mounting depends on equal force exerted across the entire width of the substrate being mounted, the top roll must move down evenly left and right. Even contact between the top and the bottom mounting rolls is essential. It is recommended that the clearance of the mounting rolls be adjusted so that the substrate is compressed slightly ( ) to assure a good bond. Adequate pressure helps squeeze out air from between the adhesive, the substrate and the print. The mount obtained after 3 hours will generally allow for processing. Maximum mount is usually obtained within 24 hours after mounting. To test adhesion, flex the finished mount. It should not come loose in the center. Moisture can become trapped between layers of porous material (such as paper) and cause blisters. The level of moisture in the atmosphere should be reduced before press work. Prints may even have to be pre-dried. When tacking prints to the substrate, some shops will hang a number of tacked pieces in an upside-down position until they are ready to pass them through. As a precaution, it is advisable not to hold them any longer than 10 minutes or the prints may absorb moisture, change in dimension and cause bubbles and wrinkles. Please contact the film manufacturer for recommendations concerning the use of their respective laminating material in conjunction with the substrate as film choice is the most important consideration. It is advisable to use a film with a high green tack strength. When using pressure sensitive films, the substrate should be at room temperature to achieve optimal results. Demounting Bad Mounts Pressure-sensitive adhesives may be demounted if done within 5 minutes after mounting. The print will probably be ruined, but the substrate may be reused. Beyond 5 minutes, the adhesive has set and other methods will have to be used, such as a hot air gun or a hair dryer to peel off the laminate. The remaining adhesive may be taken off with isopropyl alcohol or mineral spirits. Avoiding Wrinkles & Surface Blemishes Wrinkles can be caused by misalignment of adhesive roll, too much pressure, or unparallel rolls. Small bumps, particularly visible with Cibachrome or glossy prints, are caused by trapped dirt or hardened adhesive. Good housekeeping and an ionizing static eliminator on the press are important to minimize dirt pick-up. During mounting, the back of the print should be checked and wiped down before it is processed. If bumps are caused by hardened adhesive (cut open to check), use a fresh roll or sheet of transfer adhesive. To prevent strikethrough, one might also consider using a print made with thicker paper (.007+). Pressure roller applicators can compress the leading edge of the mounting substrate. In order to keep the leading edge from rounding as it goes through the roller, use a plastic lead or guide of the same thickness of the mounted substrate. Clear Overlays Clear high-gloss overlays enhance color and protect against fading indoors and outdoors. To avoid blistering, do not use overlays, clear coatings, or sprays which contain solvents. 10 of 28
11 Section I: Mounting Cold Mounting Procedures There are several techniques for cold mounting to the substrate: Cold Mounting by Hand Using Transfer Adhesive Take a sheet of transfer adhesive (both sides covered by release paper) and fold back release paper on one side approximately 1/2 from one edge. Tack on edge of print to exposed adhesive. Lift the print slightly, remove the rest of the release paper and use a roller or squeegee to smooth the print onto the adhesive. The back of the print is now coated with an adhesive which is protected by release paper. Before mounting to the substrate, remove excess air between print and adhesive. This is done by turning the print over so that the release paper is up and smoothing out from the center with a squeegee. Now peel off approximately 1/2 1 of release paper from upper edge and fold back. Tack on to the substrate, lining up edges. Using a hand roller or squeegee, closely follow the removal of the liner to eliminate bubbles caused by air entrapment. Work with a small surface at a time (approximately 12 ). Continue this step until the mounting is complete. Cold Mounting by Hand or Press Using Spray Adhesive Select a spray mounting adhesive that is safe to use with polystyrene and the artwork to be mounted; solvent based adhesives should be used with caution. Spray adhesive on the back of the piece to be mounted. Spray 6 8 away from the surface. A double coat is best, with the second coat applied in a cross direction to the first coat. For mounting most art materials, adhesive need only be applied to one surface, preferably the print. Avoid using excessive bonding adhesive Before mounting, allow adhesive to dry to the touch; the adhesive must be aggressively tacky. If there are blisters due to trapped solvent, allow slightly longer than 4 minutes of drying time. Carefully position piece on the substrate and smooth out if possible to eliminate any wrinkles and trapped solvent. If using a press, simply turn on the press to complete the mount. If mounting is done by hand, place a clean sheet of the substrate over the laminated piece and weigh down for 15 minutes to obtain the maximum bond. Depending upon the type of adhesive, allow 24 hours for maximum cure out before exposing the laminate to sudden temperature or humidity changes. Cold Mounting by Roller Laminator With an Adhesive-backed Graphic Adjust the rollers to slightly compress the substrate. Peel off a 1/2 1 section of release paper from the upper edge of the preprinted adhesive backed paper. Tack on to the substrate, lining up edges. Feed tacked edge into nip of rollers keeping printed piece bent away from the substrate. As it passes through the rollers, strip away the release paper. (Make sure there are no wrinkles or trapped dirt.) 11 of 28
12 Section I: Mounting Cold Mounting Procedures Cold Mounting Non-Porous Graphics For non-porous material such as PVC, other plastics or metal, the following types of contact adhesive with solvent may be used. Neoprene, nitrile, polyurethane or other synthetic rubber types. Adhesive must be applied to both faces. Parallel beads of adhesive are often preferred because it allows evaporation of solvent providing faster cure. For mounting the substrate to flexible PVC sheets, only plasticizer-resistant types of adhesives should be used. Cold Mounting Porous Graphics For porous materials such as paper, textiles, fabrics or wood, the following adhesives may be used. Contact adhesive with solvent: Same systems as for non-porous materials. Construction mastic, structural silicone adhesives. Considerations such as expected temperature ranges (expansion/contraction), porous material, and size of substrate should be taken into careful consideration when deciding on a method of attachment. Cold Mounting With Pressure Sensitive Tapes Pressure sensitive tapes can be used for: Less demanding applications that are stress-free. Adhering parts during installation work. Holding parts while the primary adhesive is curing. It is recommended to trial pressure sensitive tapes prior to use. 12 of 28
13 Section II: Repositioning Vinyl General Notes The substrate is not recommended for this fabrication method. Please see the fabrication guide on page 7 for choosing the best recommended product. 13 of 28
14 Section III: Direct Digital Printing General Notes Large format digital printing on flatbed printers has excellent application for the substrate. Although the substrate is available in a wide range of colors that all demonstrate excellent ink adhesion, the predominant substrate color is white when direct digital printing. However, colored variations of the substrate may provide vibrant color contrasts depending upon the availability of a white print head on the printer. Surface Preparation Surface should be cleaned and free of any surface contaminates (i.e. oils, dust particles, etc.) prior to commencing. Suitable Inks Actual ink type depends upon the printer make and model. Consult the printer owner s manual for recommendations. Trialing for ink compatibility is always recommended. The substrate readily accepts all types of inks including: Aqueous Solvent-Based UV-curable 14 of 28
15 Section IV: Direct Screen Printing General Notes Fome-Cor Acid Free, Fome-Cor Self Adhesive, and Fome-Cor Heat Activated are not recommended for this fabrication method. Please see the fabrication guide on page 7 for choosing the best recommended product. Large format screen printing has excellent application for the substrate. The substrate is available in a wide range of colors that all demonstrate excellent ink adhesion. Surface Preparation Surface should be cleaned and free of any surface contaminates (i.e. oils, dust particles, etc.) prior to commencing. Suitable Inks When screen printing with the substrate, the following inks may be suitable: Solvent-Based Vinyl/Acrylic UV-curable Screen Printing inks should be tested in a manner which duplicates your printing process before initiating production. It is advised that you contact the equipment and ink supplier to provide you with specific recommendations to achieve maximum results. It is strongly recommended to consult the appropriate ink manufacturer regarding any required ink additives such as catalyst for proper adhesion and exterior use. Ink Curing The ink, once applied, must be given proper time and treatment to completely adhere and cure. Oven temperature must be controlled to a maximum of 180 F to prevent deterioration of the foam and possible warping. 15 of 28
16 Section V: Painting General Notes Painting is a suitable fabrication option for the substrate, whether for artistic expression or more commercial applications. On some projects that involve the substrate, a small quantity of custom color may be required that is often not practical to obtain from the factory and post painting is a viable option. Surface Preparation Surface should be cleaned and free of any surface contaminates (i.e. oils, dust particles, etc.) prior to commencing. Suitable Paints The substrate readily accepts the following: Poster colors Acrylic paints Tempera India ink Latex-based pigments Lacquers Vinyls Some water-based paints may also be suitable, depending upon the application. Lacquers, shellacs, and solvent-based paints should be used only when not allowed to penetrate the liner or contact the foam edge. The types of paints are likely to attack and deteriorate the polystyrene foam. When coating the majority of one side of the substrate, the backside should also be coated to maintain more perfect long-term flatness. Place weights at the edges when allowing the substrate to dry. Heavy paint coating will warp the substrate; therefore, it is advisable to trial the paint coating to determine the proper coat thickness before proceeding to production. Application Paints can usually be applied with a brush or roller, although conventional air spray equipment will provide a more consistent appearance. Consult paint manufacturer s literature for recommended application technique and thinning requirements. Drying For drying and cure times, consult paint manufacturer s literature. Due to the wide variety of paint products on the market, testing is recommended for the initial use of any coating system before commercialization. 16 of 28
17 Section VI: Cutting General Notes There are many different methods in which cutting can be accomplished. This guide focuses on five primary cutting methods: Knife Cutting Shearing Saw Cutting Routing Die Cutting/Punching When necessary, laying out a pattern on the surface of the substrate is best achieved with a soft pencil. Knife Cutting The substrate can be cut by hand with mat knives, utility knives, and razor blades. Mat cutters make smooth, excellent cuts, either right-angled or beveled. Cardboard and glass cutters also work well. The key to getting a smooth, clean cut is to use a very sharp thin blade held at as low an angle as possible to the board, which reduces friction and allows the foam to slice rather than tear. If a straight edge is being used as a guide, it may be practical to make the cut in more than one pass which also helps eliminate any foam tearing. Shearing Large-scale straight-line cutting of the substrate can be done in several ways, including automated razor blade cutters or power shearing with guillotine cutters. Though not generally recommended because they can compress and fray the edges of the board, a guillotine cutter can be used to cut one or more sheets at a time. Caution must be observed to prevent the foot-clamp from indenting the board s edge. A stop block placed on each side of the foot-clamp may be necessary. A sheet of cardboard on top of the substrate may reduce compression. The blade must be maintained sharp and cut with a scissor-like motion. Saw Cutting Saw cutting is generally not recommended for paper-faced foam board cutting. However, some custom saw blades can be utilized. General Saw Company makes a blade for this use. Other manufacturers make thin-rimmed, high-speed carbide- tipped plastic cutting blades ( degree alternating teeth on a 10 blade) acceptable for cutting the substrate. Band Saws Band saws with a similar tooth design and a linear speed approximating 9000 ft/min can be used. Trialing this type of cutting is a must to ensure the cut meets the desired customer result. Intricate Shapes Cutting intricate curves and shapes can be accomplished with a Cutawl model K-11 power tool. Cutawl 21D or 23D blades are available for cutting the substrate. Routing The substrate is not recommended for this fabrication method. Please see the fabrication guide on page 7 for choosing the best recommended product. 17 of 28
18 Section VI: Cutting Die Cutting / Punching Die cutting and/or Punching is a method for the rapid production of flat shapes or cutouts. Typical applications would include the die cutting of: Letters & shapes Openings in a sheet used as part of an assembly Puzzle pieces 3D assemblies - die cutting part-way through to form hinges. Hinges can be reinforced by Mylar Tape. The flat die-cut piece can be folded into a three-dimensional shape such as a picture frame or display. Die cutting and punching processes are similar in that they both can provide a curved shape by cutting through a substrate. Die cutting, however, uses one steel rule die that comes in contact with a flat platen, whereas, a punch has two designed shapes, a male and a female that cut the shape when pressed together. Die cutting is typically used with lighter weight paper or foam type materials, where punches are used for heavier materials. The die cut process can utilize one of the unique features of the substrate; edge pillowing (not including Fome-X Recovery). Prior to die cutting, the substrate can be painted or screen printed. A Note on Punching The substrate does not require punching tools, as die cutting works very well; please refer to the previous section on die cutting. Steel Rule Die Cutting Process The key elements to consider when die cutting are: the substrate, the press, the steel rules, and the ejection rubber. Each of these elements must be selected properly to yield satisfactory results. Although various methods such as using punches and high-dies are applicable to die cutting the substrate, cutting with steel rule dies (SRD) is the most common. SRD work basically the same way as a cookie cutter. They are made of a 1 -wide strip steel with one pre-sharpened edge. The cut strips are called rules. The strip steel is typically made in a thick ness range of The strips are bent to the shape of the design s trim line and held in place in a block called a die body. In order to facilitate ejection of the part, strips of a compressible material such as neoprene are glued along the perimeter and protrude above the cutting edge of the rule. The strips can also be glued to the top or bottom platen to hold the substrate in position. During die cutting, the SRD assembly is fixed under the top platen, and the substrate is placed on a steel bottom platen. Pressure is applied to force the rules of the SRD through the substrate. The platens are then opened and the parts removed. In some cases, additional work such as finishing the cut edge might be required. Substrate Considerations The substrate consists of top and bottom linerboard layers and a polystyrene core. This laminated structure results in some unique considerations for die cutting, as each layer of the substrate is sequentially cut. The paper is the critical part of the laminate, which creates challenges while die cutting. Linerboard is a rigid product, and as such, is not flexible or ductile. Linerboard does not tend to stretch easily, and as a result, the top liner can tend to crack if improperly die cut. 18 of 28
19 Section VI: Cutting Die Cutting / Punching Substrate Considerations (cont d.) All machine-produced papers have a grain. The grain runs along the length on the paper as it is manufactured. The grain direction is often referred to as the machine direction. The opposite direction is referred to as the cross machine direction. The properties of the paper are different in the machine direction vs. the cross machine direction. Paper is more rigid and will stretch less in the machine direction. Paper cuts more easily along the grain rather than across the grain. The polystyrene foam core can compress during die cutting (not including Foam-X Recovery board). The substrate has the unique property that the crushed foam will remain crushed. The foam does not tend to assume its original thickness. This results in the die cut edges remaining closed (about 40 to 60 mil residual foam thickness). This provides an asymmetrically pleasing rounded effect at the die cut edges, called pillowing. This process can also be utilized to produce alternating raised and lowered areas (embossed or debossed). Press Considerations The substrate is typically die cut on flat bed presses, which can be either a moving platen type or a clam shell type. Either type may be utilized without affecting the quality of the die cut. The key press consideration is proper make ready, or preparing the press bed (anvil) to assure that the steel rule cuts evenly through the substrate without dulling the steel rules. Typically, the substrate is cut on a hard anvil. Make ready for this type of die cutting utilizes carbon paper. The press is lowered to the point where the steel rule just touches the anvil. The places where the rule fails to touch the anvil are built up with one-mil thick shim-tape. This process is repeated until a complete imprint of the steel rule is apparent. Make ready is very important because the platen of the press does not necessarily close evenly. This can be caused by misalignment, uneven cutting loads or by deflection of the platen. As a rule of thumb, a four-post press will deflect one mil per foot. Steel rules that have been dulled by improper make ready will cut poorly, have increased cutting loads and can contribute to cracking problems. Back-Up Plate One problem with steel plates is that the die might not completely penetrate the substrate which can result in fracturing at the base of the cut. An alternative to a steel plate would be to use additional substrate or chipboard as a back-up. This would allow the die to penetrate beyond the thickness of the substrate so that a cleaner cut could be obtained. 19 of 28
20 Section VI: Cutting Die Cutting / Punching Steel Rule Considerations Steel rules are flat strips of steel with a very uniform height. One edge of the steel rule is honed to yield a cutting surface. The key properties of cutting rules are hardness, flexibility, bevel type, thickness, uniformity of height and edge preparation. 1. STEEL RULES THAT APPLY TO THIS SUBSTRATE ARE LISTED BELOW: Cutting Rules Cutting rules are the most common when die cutting the substrate. These rules are used to cut and pillow the edge. Cutting rules are either center bevel or side bevel, which indicates where the cutting edge is located. Center bevel rules result in equal forces being placed on both sides of the piece to be cut and are used when both the inside and the outside of a cut needs to be saved, e.g., as in a puzzle. This distribution of forces can be important when attempting to minimize cracking Side bevel rules have one side that is essentially flat and the opposite side is sloped or beveled. The flat side should be placed toward the substrate that will be kept, with the bevel facing the scrap piece. This results in additional compressive force being placed on the scrap side. Cracking tends to be directed in this direction. Scoring or Creasing Rules Scoring or creasing rules are used to create a fold line in paper-faced substrates. Scoring rules are shorter than standard rules. These rules cut through the top liner, but leave the bottom liner intact. This technique is also referred to as slit scoring or short knifing. This method is often used when additional materials are laminated to the substrate. Unique to the substrate, because of its foam structure, is the ability to crease cleanly. Creasing rules create a crease line on the top of the liner. Creasing rules should have curved edges and be shorter than cutting rules. The substrate is generally creased without the use of a matrix. Wider creasing rules make folding the substrate easier. Creasing rules can be used to emboss patterns in the substrate (see Section VII: Embossing). Serrated & Perforating Rules Serrated and Perforating rules have teeth, much like saw. The points of the teeth puncture the substrate, where as the lower points of the teeth do not. This leaves a perforated edge in the substrate that can easily be torn by hand. 2. THE EDGE OF THE STEEL RULE CAN BE PREPARED IN EITHER TWO METHODS: Grinding Ground edge rules have micro-scratches on the cutting edge. This can result in a blade that has a reduced cutting force. The disadvantage of this type of rule is that it is difficult to maintain the uniform blade height. Drawn Edges Drawn edge blades are made by drawing the blade through a die. This produces a uniform blade height and a smooth blade surface. Although the knife has been hardened to RC (Rockwell), after numerous die cuts, the cutting edge will become dull and may result in rough and/or incomplete cuts. Generally, it is not a good idea to resharpen the knives. Resharpening will often result in an uneven knife length. This in turn can cause uneven penetration or no penetration when the cut is made. 20 of 28
21 Section VI: Cutting Die Cutting / Punching Steel Rule Considerations (cont d.) 3. LENGTH OF BEVEL: A long bevel will result in less deformation as the substrate is sheared. The length of the bevel is defined as the distance from the tip to the point where the honed (beveled) portion ends. The bevel should be 3/16 1/4 in length. Strippers / Ejectors Ejection & Stripping Rubber Ejection and stripping rubber is essential when cutting the substrate. It serves two purposes. The first purpose is to eject the part from the die after the press opens. The second purpose is to assist edge pillowing and to prevent cracking. Liner cracking problems need to be considered whenever coated products are die cut. When designing the figure to be die cut into Fome-Cor, it is best to avoid sharp corners and narrow spaces. A minimum distance of 1 inch is recommended between pieces. When sharp corners cannot be avoided, additional, very soft, foam rubber should be added on top of the ejection rubber to avoid localized cracking. 21 of 28
22 Section VII: Embossing General Notes The substrate (excluding Foam-X Recovery board) can be embossed to create attractive 3-dimensional effects. Embossing is done by using an embossing die on a flat bed die cutting press such as a clam shell, clicker or a fixed platen press. Sections of the substrate that are raised or higher than the rest of the surface are referred to as embossed ; compressed or lowered sections are referred to as debossed. However, for this document, embossing is defined as any designed deformation of the substrate achieved through the use of scoring bars or embossing dies. Embossing utilizes the same substrate characteristics that allow edges to be closed or pillowed when die cutting. When compressed beyond a certain critical point, the substrate will retain the pattern of the compression, resulting in displays that are both unique and eye-catching. The effect is amplified for highly reflective finishes such as: foil laminates, glossy lithographs or high gloss screen prints. Posters and displays that have been laminated or screen printed can indeed utilize embossing as the next step in the fabrication process. The embossing can be done as part of the die cutting step or if desired, as a separate operation. The decision to separate the operations may depend on the capability of the press to provide the required cutting power. If the press cannot provide sufficient power, the bottom edges of the substrate may not be cut through completely. This problem would require die cutting and embossing in separate operations. Scoring Bars Small, straight line areas can be embossed by using a scoring bar mounted in a standard dieboard. Simple line shapes can also be produced by bending the scoring bars. The score bars will produce pillowed sections in the center of the board. It is best to use score bars with rounded edges to avoid liner cracking. The score bar should also be lined with soft ejection rubber if cracking is an issue. Straight score lines are easier to emboss in the grain direction than across the grain when this is an option. Score bars located less than 3/4 inches apart will compress the substrate area between the score bars slightly. Score bars should be at least 3/4 from the edge of the board. Score bars should extend to the die cut, pillowed edge if possible. If this is not possible, the score bars should gradually taper off (less depth of compression) to avoid a sharp edge that would puncture the liner. Embossing Dies Embossing or compressing of large areas can be done by utilizing an embossing die. The embossing die is a plate, attached to die board that will compress additional areas of the substrate. The pattern of the embossing die is often matched to the screen print or lithograph. The depth of embossing can be varied; though, a typical embossing die would compress to a residual thickness of at least mils. The force required would be about 100 lbs. per square inch compressed. The embossing depth can be less if desired. The embossing force will vary depending on the configuration of the piece and the depth of compression. The embossing die should be designed to avoid puncturing the top liner. To accomplish this, it is necessary to follow the same basic rules as die cutting. Sharp points or angles should be avoided and spacing should be adequate to avoid excessive liner stretch. The embossing die should be fabricated with smooth rounded edges. The angle of the edge should be no sharper than about 30 degrees. Embossing dies can be made from various materials including metal (copper, brass, etc), rigid plastics, hard rubber or pressed board. The construction material of the die is usually selected based on: available fabrication techniques, complexity of the design and intended life. 22 of 28
23 Section VII: Embossing Embossing Fome-Cor in 1/8, 3/16, and 3/8 All substrate thicknesses may be embossed including 1/8, though 3/16 produces the best embossed effects. Thicknesses of 3/8 require special considerations for embossing (see next section for recommendations). Fome-Cor 3/16 can be compressed to a residual thickness of mils, but will bounce back slightly from its maximum compression. The force to accomplish this maximum compression with a scoring bar is about lbs. per linear inch. This force varies depending on the embossing geometry. 23 of 28
24 Section VIII: Forming Curves General Notes The substrate is not recommended for this fabrication method. Please see the fabrication guide on page 7 for choosing the best recommended product. 24 of 28
25 Appendix I: MSDS MATERIAL SAFETY DATA SHEET Fome-Cor is an article and no MSDS is required for compliance with the OSHA Hazard Communication Standard (29 CFR 1019, 1200). The standard applies to chemicals but it does not apply to any substance, which is an article. The term article is defined in the OSHA warning rule, as a manufactured item: which is formed to a specific design during manufacture, which has end use function(s) dependent in whole or in part upon its shape or design use during end use, and which does not release, or otherwise result in exposure to hazardous chemical under normal conditions of use. 25 of 28
26 Appendix II: Specifications Adhesives Adhesives suitable for bonding wood-fiber will adhere to Fome-Cor. Adhesives with high solids such as dextrin-based or resin-based should work well. Solvent based adhesives should not come in contact with the foam core of Fome-Cor. It is always advisable to trial your potential adhesives prior to production use. Fastening Information is being developed. Storage Guidelines Fome-Cor is to be stored inside in a dry and clean area. Material must be stored flat. 26 of 28
27 Appendix II: Specifications Physical Product Specifications Chart FOME-COR PRODUCT SPECIFICATIONS Product Specifications 1/8 3/16 1/4 3/8 Target Thickness Gauge (+ or -) Sheet Size Tolerances Width < 66 Length >96 +/ / / / / / / / /4 +/ / /4 Diagonal max 1/4 max 1/4 max 1/4 max 1/4 Squareness (Straight Edges) N/A N/A N/A N/A Warpage / Bow Max 1/8 per foot Max 1/8 per foot Max 1/8 per foot Max 1/8 per foot Surface Energy (Dyne) N/A N/A N/A N/A Color ( E) N/A N/A N/A Opacity N/A N/A N/A N/A N/A DEFINITIONS Target Thickness: The gauge that is to be focused on as optimum. The Gauge Range is then used to define the limits of the thickness that can be considered in spec. Gauge Range: The upper and lower limits in thickness that a product can be manufactured making it in spec. Example: Target of 250mils with a range of + or - 25 mils would be 225 mils to 275 mils. Sheet Tolerances: We measure width, length and diagonal. Width is typically cross machine, length is typically machine direction and diagonal is the difference in the diagonals. Squareness: The difference in the lengths of the machine direction sides. Warpage/Bow: This is the measured by laying the sheet flat on a surface and measuring the amount of smile or frown in the center of the board in either the length or width. Should we have a problem described as potato chip this is a two direction warp, which is automatically not in spec. Surface Energy: This is measured using standard dyne solution pens. Color (E): This is measured using a standard color meter. Opacity: This is measured using a standard opacity meter. 27 of 28
28 Conclusion This Fabrication Manual has been developed to assist fabricators to work with the substrate in the most efficient and effective manner. The tips and suggestions contained in this manual are the result of many years of combined experience by fabricators in the U.S., Canada, South America, Asia and Europe. These fabrication suggestions and product specifications are based on information which is, in our opinion, reliable. However, since skill, judgment, and quality of equipment and tools are involved, and since conditions and methods of using the substrate are beyond our control, the suggestions contained in this manual are provided without guarantee. We recommend that prospective users determine the suitability of both the material and suggestions before adopting them on a commercial scale. 3A COMPOSITES USA, INC., DOES NOT MAKE ANY WARRANTIES, EXPRESS OR IMPLIED, INCLUDING MERCHANTABILITY AND FITNESS FOR PURPOSE, WITH RESPECT TO ANY SAID SUGGESTIONS AND PRODUCT DATA. In no event shall 3A Composites USA, Inc., have any liability in any way related to or arising out of said suggestions and product data for direct, special, consequential or any other damages of any kind regardless of whether such liability is based on breach of contract, negligence or other tort, or breach of any warranty, express or implied. Also, normal safety and health precautions practiced in any fabricating environment should be used when fabricating the substrate. 3A Composites USA, Inc registered trademark of 3A Composites USA TM - trademark of 3A Composites USA - 3A Composites USA of 28
The Paper-Faced Foam Board Family. Fabrication Manual. 3A Composites. 1 of 26
 The Paper-Faced Foam Board Family Fabrication Manual 1 of 26 3A Composites Foreword Thank you for choosing a 3A Composites product for your graphic display applications. We have compiled this Fabrication
The Heavy-Duty Foam Board Family. Fabrication Manual. 3A Composites. 1 of 22
 The Heavy-Duty Foam Board Family Fabrication Manual 3A Composites 1 of 22 Foreword Thank you for choosing a 3A Composites product for your graphic display applications. We have compiled this Fabrication
GatorfoamUSA.com. The Heavy-Duty Foam Board Family. Fabrication Manual. 1 of 26
 The Heavy-Duty Foam Board Family Fabrication Manual 1 of 26 January 2010 Foreword Thank you for choosing an Alcan Composites product for your graphic display applications. We have compiled this Fabrication
The Foamed PVC Family. Fabrication Manual. 3A Composites. 1 of 45
 The Foamed PVC Family Fabrication Manual 1 of 45 3A Composites September 2016 Foreword Thank you for choosing a 3A Composites product for your graphic display applications. We have compiled this Fabrication
UltraBoard Classic Application Guide
 1900 East Central Ave., Bentonville, AR 72712 p. 479-273-2924 f. 479-273-5186 e. info@ultraboard.com w. www.ultraboard.com UltraBoard Classic Application Guide Cutting Circular Saw UltraBoard Classic may
UltraBoard Plus Application Guide
 1900 East Central Ave., Bentonville, AR 72712 p. 479-273-2924 f. 479-273-5186 e. info@ultraboard.com w. www.ultraboard.com UltraBoard Plus Application Guide Cutting Circular Saws UltraBoard Plus may be
Application Notes! RIGID MATERIALS. Rigid material standards. Printing on Rigid Materials with the Gerber Solara ion & Gerber CAT UV
 Printing on Rigid Materials with the Gerber Solara ion & Gerber CAT UV This document instructs on the proper use of rigid materials when printing on the flat bed of the Gerber Solara ion & Gerber CAT UV.
VIEWpanel Technical Manual
 VIEWpanel Technical Manual VIEWpanel is a prefabricated panel comprising 0.21 aluminium skin (1100 alloy) both sides, apart from our lite grade, which is 0.12 aluminium skin both sides and a polyethylene
PASTE. Get the skinny on papercrafting tips, techniques, terms and more! Papercrafting 101 free
 CUT PASTE PLAY Get the skinny on papercrafting tips, techniques, terms and more! Papercrafting 101 {CREATIVE INSPIRATIONS free FROM HOBBY LOBBY } BASIC PAPERCRAFTING TERMS New to the scrapbook page? Start
Application of 3M Pressure Sensitive Films to 3M Panagraphics Substrates
 Instruction Bulletin 5.30 Release B, Effective October 2006 See bulletin change summary on last page Application of 3M Pressure Sensitive Films to 3M Panagraphics Substrates Preparation Points to Consider
PALBOARD Multilayered PVC Sheet. Fabrication Guide
 PALBOARD Multilayered PVC Sheet Fabrication Guide Contents Introduction to PALBOARD 1 Main Benefits 1 Cutting 1 Drilling 2 Milling/Routing 2 V-Groove 2 Thermal Expansion / Contraction 3 Screwing and Nailing
September 10, 2009 Page 1 PRODUCT DESCRIPTION PRODUCT FEATURES
 September 10, 2009 Page 1 PRODUCT FEATURES BASIC USES/RELATED USES Interior decorative tile. Architectural tile for decorative wall surfaces, backsplashes and other applications. Custom architectural and
Installing 3M DI-NOC Architectural Finishes on Doors
 Installation Guide Revision C, September 2017 Introduction The purpose of this installation guide is to establish a 3M-recommended procedure for installing 3M DI-NOC Architectural Finishes (the Product
APPLICATION OF JAC FILMS
 1. Important points For reliable results, JAC films are best applied to smooth, dry and clean surfaces (metal, glass, paintwork, plastic etc.). It is essential to ensure that the surface is free from dirt
FoamBoard Technical Guide
 FoamBoard Technical Guide The diverse types of EnCore Foam Boards are applicable to a wide range of end uses. This guide was compiled based on our experience and is designed to give you advice on fabricating
Adhesive Application & Laminating System
 U S E R S G U I D E Adhesive Application & Laminating System The XM2500 is an economical and easy to use document finishing system. This versatile and non-electric system has been designed to laminate
Extruded sheet (FF) #3 Other Methods of Cutting. Technical information. This brief gives advice for:
 #3 Other Methods of Cutting. Technical information. This brief gives advice for:") Technical information Extruded sheet (FF) WARNING: This product can expose you to chemicals including Ethyl acrylate, CAS 140-88-5, which are known to the State of California to cause cancer. For more
Technical information Extruded sheet (FF) WARNING: This product can expose you to chemicals including Ethyl acrylate, CAS 140-88-5, which are known to the State of California to cause cancer. For more
Xyron Professional 2500 Laminating System
 Xyron Professional 2500 Laminating System Instruction Manual Provided By http://www.mybinding.com http://www.mybindingblog.com U S E R S G U I D E 2500 Adhesive Application & Laminating System The XM2500
Practical Information ORALITE Reflective Films of Class RA2, Grade B for Road Safety
 Page 1 of 5 1.Processing instructions for ORALITE reflective films of reflection class RA2, B These processing instructions apply to the following ORALITE reflective films of reflection class RA2, grade
Contents. pages 20-24: Installing Edge sinks into. custom laminate countertops page 8: Installing Edge sinks into postform laminate countertops
 Contents pages 2-8: Installing Edge sinks into custom laminate countertops page 8: Installing Edge sinks into postform laminate countertops pages 9-14: Installing Acrylic sinks into custom laminate countertops
3M Impact Protection Profile Installation System Instructions
 3M Impact Protection Profile Installation System Instructions IMPORTANT: READ INSTRUCTIONS FOR USE BEFORE OPERATING Intended Use: The 3M Impact Protection Profile Installation System is for installing
Controltac Graphic Film
 Controltac Graphic Film 162-10 and 162-114 Product Bulletin 162 Release L, December 2008 See Bulletin Change Summary on last page. For Screen Printing and Offset Printing Only Product Description Recommended
Making Thermal Ink Jet Graphics 3M Scotchcal Opaque Imaging Media 8522CP 3M Scotchcal Instant Dry Translucent Imaging Media 8544CP
 Instruction Bulletin 4.23 Release D-EU, Effective February, 2001 Making Thermal Ink Jet Graphics 3M Scotchcal Opaque Imaging Media 8522CP 3M Scotchcal Instant Dry Translucent Imaging Media Compatible Products
lb. Coated Inkjet Bond
 746 36 lb. Coated Inkjet Bond 746 is a high-quality base paper with a waterresistant inkjet coating to produce a strong, smooth printing surface ideally suited for many types of high-volume CAD and graphic
EASY APPLICATION. Furniture Linoleum
 EASY APPLICATION Furniture Linoleum can be applied easily on all common materials such as MDF, chipboard and Plywood as well as steel or composite materials. Furniture Linoleum has a special matte appearance
Practical Information ORALITE Reflective Films of Class RA3B, Grade C for Road Safety
 Page 1 of 6 1. Processing instructions for ORALITE reflective films of reflection class RA3B, grade C These processing instructions apply to the following ORALITE reflective films of reflection class RA3B,
Vinyl Installation Guide and Tips
 Vinyl Installation Guide and Tips Tools Needed: Squeegee; Grease Pencil (white or blue only!); 2" & 1/4" Masking Tape Prepare your surface and vinyl as outlined on back cover prior to employing this technique
Technical Tips. Using Bundle Breaker (rotary corrugated applications) In General, bundle breaker rule is determined based on the following criteria:
 In General, bundle breaker rule is determined based on the following criteria:") Technical Tips 080215_BBarticle Using Bundle Breaker (rotary corrugated applications) Bundle Breaker: a mechanical device designed specifically to separate ganged, multiout sheets after they have been
Technical Tips 080215_BBarticle Using Bundle Breaker (rotary corrugated applications) Bundle Breaker: a mechanical device designed specifically to separate ganged, multiout sheets after they have been
ORAFLEX Cushion. for Flexible Packaging. Flexographic Mounting Tapes - Bringing life to your prints. Cushion Mounting Tapes
 Flexographic Mounting Tapes - Bringing life to your prints Cushion Cushion Mounting Tapes for Flexible Packaging Engineered to Perform Better ORAFOL Europe GmbH - Experience and Expertise ORAFOL Europe
The Aluminum Composite Material (ACM) Family. Fabrication Manual. 3A Composites. 1 of 43
 Family. Fabrication Manual. 3A Composites. 1 of 43") The Aluminum Composite Material (ACM) Family Fabrication Manual 1 of 43 3A Composites May 2018 Foreword Thank you for choosing a 3A Composites product for your graphic display applications. We have compiled
The Aluminum Composite Material (ACM) Family Fabrication Manual 1 of 43 3A Composites May 2018 Foreword Thank you for choosing a 3A Composites product for your graphic display applications. We have compiled
Application guidance for Printed Vinyl decals
 Paint Masks - Dry Rub Decals - Waterslides - Printed media Telephone: Website: email: +44(0)7872 181119 (mobile) http://www.flightlinegraphics.com sales@flightlinegraphics.com Application guidance for
M A N U A L 6 June 2017
 M A N U A L 6 June 2017 What are Protection Films? These films are meant to protect the vulnerable parts of cars, bicycles, motorbikes, etc... They are transparent glossy, so the underlying colour remains
Processing Instructions Protection and Mounting Films
 Processing Instructions Protection and Mounting Films Definition of terms Enhancing Laminating Hot sealing Mounting general term for the processing of self-adhesive and hot-sealing films the processing
B. Embossing. 1. Description. a. Embossing
 B. Embossing 1. Description a. Embossing Often used in combination with foil stamping, embossing is a process that applies pressure to the backside of a material to alter the surface, giving it a three
Installation Guide. Pionite Decorative Surfaces One Pionite Road, Auburn, Maine PIONITE ( )
") Installation Guide A Subsidiary of Panolam Surface Systems SMPBRO00-012 6/14 Pionite decorative laminates are designed for finished interior surfaces which require high impact, wear and stain resistance
Installation Guide A Subsidiary of Panolam Surface Systems SMPBRO00-012 6/14 Pionite decorative laminates are designed for finished interior surfaces which require high impact, wear and stain resistance
3M Wrap Film Series 1080 Preparation of Substrates, Application, Maintenance and Removal
 Instruction Bulletin 1080 3M Europe, Effective August 2015 3M Wrap Film Series 1080 Preparation of Substrates, Application, Maintenance and Removal Instruction Bulletin Recommended Types of Graphics and
Double Coated Tapes with Adhesive 300MP B 9690F LE
 3 Double Coated Tapes with Adhesive 300MP Technical Data October, 2002 Product Description These 3M Double Coated Tapes feature a thin polyester film for dimensional stability and improved handling with
Controltac Plus. Graphic Film RG Product Bulletin RG Description. Compatible Products. For Piezo Ink Jet Printing Only
 Controltac Plus Graphic Film RG162-10 Product Bulletin RG162-10 Release UKB, Effective Aug06 See Bulletin Change Summary on last page Description 3M Controltac Plus Graphic Film RG162-10 is a 4 -mil positionable
Installation Instructions
 www.marlite.com Effective Date 03/01/2018 ARTIZAN FRP, SYMMETRIX FRP, ENVUE FRP, STANDARD FRP Installation Instructions Statements expressed in this technical bulletin are recommendations for the application
Engineered for flawless performance, EnCore foam boards are
 FOAMBOARD Call or Click 1-800-873-4868 www.encoreproducts.com With the creation of Design Boards, EnCore Products continues to expand designer, picture framer, printer and fabricator capabilities with
Makrolon Solid Polycarbonate Sheets
 1. General remarks Tools sheets can be machined using the standard tools commonly used for metal and woodworking. We recommend carbide-tipped tools. Above all, it is important to use sharp cutting tools
Dicing Through Hard and Brittle Materials in the Micro Electronic Industry By Gideon Levinson, Dicing Tools Product Manager
 Dicing Through Hard and Brittle Materials in the Micro Electronic Industry By Gideon Levinson, Dicing Tools Product Manager A high percentage of micro electronics dicing applications require dicing completely
Repairs. Chapter 10 Repairs 10. 1
 10 Repairs Chapter 10 Repairs 10. 1 Repairs As an installer, you will probably be called upon to repair damage to a resilient floor. Here are some of the most common problems and the recommended repairs
Operating Instructions Guide to Paper
 Operating Instructions Guide to Paper For safe and correct use, be sure to read the Safety Information in Read This First before using the machine. TABLE OF CONTENTS Introduction... 3 1. Characteristics
Cardboard Model Buildings
 Cardboard Model Buildings Get more model kits from http://www.modelbuildings.org PRINTING & ASSEMBLY TIPS: These OO designs can easily be resized by reducing the print percentage as follows: OO scale is
Technical Data Sheet August 2017
 Technical Data Sheet August 2017 Consumer Solutions Products Description Consumer Solutions Products are designed for use on safety garments and in athletic and casual wear. When properly used, Scotchlite
Industrial and Transportation Business DISTRIBUTOR PRODUCT LINE
 Industrial and Transportation Business DISTRIBUTOR PRODUCT LINE 3900 DUCT TAPE 3900 DUCT TAPE MRO (Maintenance and Repair) Construction Trade Shows and Conventions General Industrial Electrical Aerospace
COMPOSITES LAB MANUAL
 COMPOSITES LAB MANUAL Version 1 Lab 3: Surface Preparation, Wet Layup, and Vacuum Bagging The original version of this manual was a one student senior design project written by Katherine White, the Composite
Loose Lay Luxury Vinyl Plank
 Loose Lay Luxury Vinyl Plank FLEX COLLECTION Installation & maintenance * PLEASE READ CAREFULLY * Installation, maintenance & warranty guideline for loose lay luxury vinyl products. Adherence to This guideline
Processing and design Solid Textile Board
 Processing and design Solid Textile Board List of contents Introduction Kerfing Joints and assembly Increasing thickness and stiffness Edges Cutting Milling and drilling Three-dimensional pressing Surface
Processing Guidelines ORAFOL Films for Aircraft Applications
 Page 1 of 11 Description This document describes the application and removal procedures for ORAFOL films for aircraft applications, in particular ORAJET 3967AC and ORACAL 970AC ORAFOL offers a wide range
Digital Magnetics Support document
 Digital Magnetics Support document Digital Magnetics Change your graphics quickly. 01 / 02 Introduction DM 03 / 04 Support Ferro & Magnetic Base About DM 05 / 06 Support Flexible Ferrous films Digital
Table saws are not recommended for cutting sheets larger than 4'X4' I size.
 Aluminum Composite Panel (Fabrication) Considerable care should be taken in the layout and handling of Aluminum Composite Panel. The use if coolants or lubricants are not required when sawing. A. Sawing
Crackle Paste is a water-based product formulated with styrene-acrylic copolymer emulsions, and may have a tendency to yellow.
 PRODUCT DESCRIPTION Crackle Paste is a water-based product formulated with styrene-acrylic copolymer emulsions, and may have a tendency to yellow. This product has white, low-density solids that replace
Conversion, Application and Maintenance of the Avery Dennison Floor Marking System Instructional Bulletin #6.30
 Conversion, Application and Maintenance of the Avery Dennison Floor Marking System #6.30 (Revision 16) Dated: 12/31/14 1.0 Scope Due to the unique nature of the Floor Marking System, particular attention
MICRO1L / MICRO2 / MICRO6 / MICRO140UV / MICROM0
 Application Guide MICROperforated Films APPLICATION AND REMOVAL Microperforated Films MICRO1L / MICRO2 / MICRO6 / MICRO140UV / MICROM0 REQUIRED ACCESSORIES QA squeegee (refer to our catalogue) QRigid for
FABRICATION MANUAL CCM Copper Composite You discover why ALPOLIC Copper composite material (CCM) is the building material of the future as soon as
 is the building material of the future as soon as") FABRICATION MANUAL CCM Copper Composite You discover why ALPOLIC Copper composite material (CCM) is the building material of the future as soon as you fabricate it. Our CCM is as easy to fabricate as wood:
FABRICATION MANUAL CCM Copper Composite You discover why ALPOLIC Copper composite material (CCM) is the building material of the future as soon as you fabricate it. Our CCM is as easy to fabricate as wood:
FOLDING DOOR - FOR FACTORY ASSEMBLED JAMBS WITH APPLIED SILL
 FOLDING DOOR - FOR FACTORY ASSEMBLED JAMBS WITH APPLIED SILL READ SPECIFIC INSTALLATION INSTRUCTIONS COMPLETELY BEFORE STARTING ANY INSTALLATION Failure to install and maintain our product according to
HOWICK CAMERA CLUB HOWICK TUTOR GROUP MOUNTING PRINTS FOR COMPETITION AND DISPLAY.
 HOWICK CAMERA CLUB 1 HOWICK TUTOR GROUP MOUNTING PRINTS FOR COMPETITION AND DISPLAY. The printing of your Picture (photograph) is not the last process that must be done! In order to take part in Competitions
INSTALLATION MANUAL STORAGE
 IMVersion 1.1 INSTALLATION MANUAL GENERAL GUIDE: The information in this IM is intended to serve as a general guide to proper installation with no warranties intended or implied. Prime Panels assumes no
Masking: Each mirrored sheet is well protected by a durable paint backing and
 STORAGE Horizontal storage: If mirror sheets are stored flat, care must be taken to avoid warping, slipping and scratching. If different sizes are stored together the largest panels should at the bottom
Lamination Techniques for Converters
 3 Lamination Techniques for Converters Technical Bulletin April, 2017 Lamination Process Basic Requirements for Good Results 1. Clean substrates. 2. Selection of best adhesive for the job. 3. Proper equipment
Scotchcal Series 7725 SE
 Scotchcal Series 7725 SE Special Effects Film Product Bulletin 7725 SE (UK) Release UK-J, Effective July 2004 Description Applications and Uses 3M Scotchcal Special Effects Film Series 7725 SE is intended
KODAK Matchprint M150DP KODAK Matchprint M120DP
 TECHNICAL DATA / WIDE-FORMAT INKJET MEDIA March 2009 719-01167A-A KODAK Matchprint M150DP KODAK Matchprint M120DP GENERAL DESCRIPTION Lightweight (6 and 7mil), easy-to-fold bond paper with matte finish
Curium 19H Installation Instructions & Parts List
 Curium 19H Installation Instructions & Parts List Illustration Curium 19H Right Hand Page 1 of 15 01/07/2016 Revision 2.1 IMPORTANT This shower screen / enclosure must be installed by suitably qualified
Piece Of Mind The last time you will see your product is when it leaves the factory floor
 Piece Of Mind The last time you will see your product is when it leaves the factory floor Teal Tape & Plastics We are located half-way between Nashville and Chattanooga, Tennessee in the Coffee County
3M Scotchmate Reclosable Fasteners
 3 Scotchmate Reclosable Fasteners Technical Data March, 2008 Product Description 3M Scotchmate Reclosable Fasteners offer advanced closure alternatives to zippers, screws, snaps, hooks, bolts and more.
Peel Adhesion of Pressure Sensitive Tape
 Harmonized International Standard Peel Adhesion of Pressure Sensitive Tape Call Letters Date of Issuance Revised Revised Revised PSTC 101 10/00 10/03 05/07 11/13 1. SCOPE 1.1 These methods cover the measurement
SIMPLEX ELITE MAT CUTTER
 INSTRUCTION MANUAL MODEL 750-1 / 760-1 SIMPLEX ELITE MAT CUTTER INSTRUCTIONS AND OPERATION MANUAL 40 in (101 cm) mat cutting system with bevel & straight cutters, production stops, 27 in (68 cm) squaring
Installation Materials Required: Tools Required: 6" self-adhesive flashing. Shims. 3-foot level 6-foot level Tape measure 1/8" drill bit
 installation instructions for CUSTOM WOOD & FIBERGLASS EXTERIOR FOLDING DOOR SYSTEMs (JII101) Thank you for selecting JELD-WEN products. Attached are JELD-WEN s recommended installation instructions for
DASH KIT INSTALLATION
 ÿÿÿÿÿ ÿÿÿÿÿÿÿÿÿÿÿÿ ÿÿÿ ÿÿÿÿÿ ÿÿ ÿÿÿ ÿÿÿÿÿÿÿÿÿÿÿÿÿÿ ÿÿÿÿÿÿÿÿÿÿ ÿÿÿÿ ÿÿÿÿ ÿÿ ÿÿÿÿÿ ÿÿÿÿÿÿÿÿ PROUDLY MADE IN THE USA DASH KIT INSTALLATION These instructions are aimed at the do-it-yourself installer. Read
FoamBoard Technical Guide
 FoamBoard Technical Guide The diverse types of EnCore Foam Boards are applicable to a wide range of end uses. This guide was compiled based on our experience and is designed to give you advice on fabricating
ColorCore Laminate: Fabrication
 ColorCore Laminate: Fabrication Formica ColorCore is a high quality surfacing material. Most of the conventional tools, machines and methods used in the fabrication of normal laminates apply, but some
Installation Guide. for E-Series/Eagle Clad Hinged Inswing French Door
 Installation Guide for E-Series/Eagle Clad Hinged Inswing French Door Thank you for choosing Andersen. Instructions are for typical, new wood-framed wall construction with weather protection in place.
Adhesive Selection. 1/32 x 1/16 x 1/32 U-notch 4 Gallon 880-1,040 SF 40.0 P u u u. 1/32 x 1/16 x 1/32 U-notch 4 Gallon 1,200-1,400 SF 40.
 Sheet Flooring Installation Guide TOLI MATURE SELECT & TAKIRON WELS SHEET CBC Flooring Please refer to the CBC Flooring website www.cbcflooring.com for the most current guidance about product application
The following media characteristics affect print quality and reliability. Consider these characteristics when evaluating new media stock.
 Media specifications Paper and specialty media guidelines Media guidelines Media characteristics The following media characteristics affect print quality and reliability. Consider these characteristics
Mold Release, Break-In, Maintenance and Storage. Linda Bergstrom
 Mold Release, Break-In, Maintenance and Storage Linda Bergstrom Mold Release Requirements Form a barrier between the mold and molded part Provide a lubricating film which allows the molded part to be easily
Module 3 Selection of Manufacturing Processes
 Module 3 Selection of Manufacturing Processes Lecture 4 Design for Sheet Metal Forming Processes Instructional objectives By the end of this lecture, the student will learn the principles of several sheet
Technical Data April Product Facestock Adhesive Liner. 3M Sheet Label.002 in. Bright Silver 350 Acrylic 90# Polyctd.
 3 Sheet Label Material 7903 7905 7908 7909T 7903FL 7908FL Technical Data April 2017 Product Description 3M Sheet Label Materials are durable, high performance materials that offer excellent thermal stability,
CONREMA cold vulcanizing materials for repairing textile conveyor belts. Conveyor Belt Group
 CONREMA cold vulcanizing materials for repairing textile conveyor belts Conveyor Belt Group ContiTech Conveyor Belt Group Contents 3 Introduction 4 General Instructions 6 CONREMA Repair Materials 7 Repairing
Océ Arizona 250 GT. Revision A Issued by: ODGS S & S, Vancouver June 12, Recommendations for Printing on Various Media. Card Stock...
 Océ Arizona 250 GT Media Notes Revision A Issued by: ODGS S & S, Vancouver June 12, 2007 Recommendations for Printing on Various Media Card Stock...2 Clear Acrylic or Polycarbonate...2 Plastic Coated Aluminum
Read guide from beginning to end before starting installation. Read all warnings and cautions during unit installation.
 Installation Guide for E-Series/Eagle High-Performance Mullion Windows with LVL Reinforcement and Installed Using Type B Clips Thank you for choosing Andersen. Instructions are for typical, new wood-framed
Vinyl Windows and Doors
 Vinyl Windows and Doors Part Number: V983571 2011 Pella Corporation INSTALLATION INSTRUCTION - INSTRUCCIONES DE INSTALACION 350 SERIES WINDOW INTO EXISTING WOOD FRAME WINDOW Lea las instrucciones en español
Scotchcal Graphic Film VS3966
 Scotchcal Graphic Film VS3966 Hockey Dasher Board Film Product Specification VS3966 Release A, Effective July 2008 For Screen Printing Only Product Description Film VS3966 is a removable 4 mil, screen
Curium 19.4H Installation Instructions & Parts List
 Curium 19.4H Installation Instructions & Parts List Illustration Curium 19.4H Right Hand Page 1 of 21 30/06/2016 Revision 1.0 IMPORTANT This shower screen / enclosure must be installed by suitably qualified
SUPER BLUE INSTRUCTIONS FOR INSTALLING
 Featuring STRIPENET REV. 09/01 PAGE 1 Super Blue, Super Blue 2 and StripeNet are registered trademarks of PRI. All other company and product names mentioned in this document are trademarks of their respective
Printing and Graphics Product Guide Making print come alive
 Printing and Graphics Product Guide Making print come alive Scapa - Your experienced printing partner Scapa Group Scapa is a market-leading developer and manufacturer of bonding materials and solutions.
Tools Required: Steps to completion:
 SEAMING Introduction This bulletin addresses seaming Corian Solid Surface. Overview High quality seams are essential to maximize the appearance and performance of Corian Solid Surface installations. Tight
Sheet Metal Forming. Part 1
 Sheet Metal Forming Part 1 Sheet Metal Forming For products with versatile shapes and lightweight Dates to 5000 B.C. Products include metal desks, file cabinets, appliances, car bodies, beverage cans Common
REVISION LIST CHAPTER 25: AFT WINDOWS. The following list of revisions will allow you to update the Legacy construction manual chapter listed above.
 REVISION LIST CHAPTER 25: The following list of revisions will allow you to update the Legacy construction manual chapter listed above. Under the Action column, R&R directs you to remove and replace the
ODiSI Fiber Optic Sensor Installation Guide
 Application Note May 30, 2017 ODiSI Fiber Optic Sensor Installation Guide Contents 1. Introduction... 1 2. Contents of Fiber Optic Sensor Installation Kit... 2 3. Mounting the Strain Sensor... 2 3.1. Planning
SPACER APPLICATION: KEY POİNTS FOR HİGH QUALİTY İG UNİTS
 SPACER APPLICATION: KEY POİNTS FOR HİGH QUALİTY İG UNİTS Application of spacer should be in clean and indoor area. Glass washing machine, hot press machine and spacer application table should be in the
LuxCore Installation Instructions
 LuxCore Installation Instructions ATTENTION: LuxCore PANELS MUST BE ACCLIMATIZED FOR 24 HOURS BEFORE INSTALLATION PLEASE READ ALL INSTRUCTIONS PRIOR TO INSTALLATION The guidelines provided herein have
There are three primary units to this box: two three-sided trays (one made to fit over the other) and one case that wraps around the trays.
 and one case that wraps around the trays.") Instructions for Basic Drop-Spine Box by Sandra Liddell Reese There are three primary units to this box: two three-sided trays (one made to fit over the other) and one case that wraps around the trays.
Instructions for Basic Drop-Spine Box by Sandra Liddell Reese There are three primary units to this box: two three-sided trays (one made to fit over the other) and one case that wraps around the trays.
Radon 07 Installation Instructions & Parts List
 Radon 07 Installation Instructions & Parts List Illustration Radon 07, H1 Handle Right Hand: Open Out 14/06/2016 Revision 1.1 Page 1 of 21 IMPORTANT This shower screen / enclosure must be installed by
The use of retaining pins is not required when using Armaflex 520 Adhesive.
 INSTALLATION INSTRUCTIONS AP Armaflex & AP Armaflex FS Black Duct Liner (non-self adhesive) 2/18/11 Installation Instructions for Rectangular Duct Using Armaflex 520 Adhesive Temperature The temperature
Specifications & Instructions for the HP1000 & HD5000
 Specifications & Instructions for the HP1000 & HD5000 PVC Film Specifications DESCRIPTION. CET metallized vinyl films are exceptionally suited for general purpose applications, such as packaging, labels,
Media specifications. Media guidelines. Paper. Paper characteristics. Media specifications
 3 Media specifications Media is paper, card stock, transparencies, labels, and envelopes. The last four are sometimes referred to as specialty media. The printer provides high quality printing on a variety
Roll Out Vinyl Installation Guide
 Sub-floor Requirements The contractor performing the installation of the performance vinyl flooring must ensure the proper quality of the sub-floor. The sub-floor must be clean, smooth, permanently dry,
3 Scotchmate TM. Polyester Reclosable Fasteners. Product Selection Guide April, M Scotchmate Polyester Reclosable Fastener.
 3 Product Selection Guide April, 2003 Products 3M Scotchmate Polyester Reclosable Fastener Plainbacked Products Loop Hook SJ3477 SJ3476 SJ3487FR SJ3486FR Pressure Sensitive Adhesive Products Loop Hook