Animated Snowman. Image size: 11 w x 17 h 300 dpi
|
|
|
- Clarissa Garrett
- 5 years ago
- Views:
Transcription

1 Animated Snowman Image size: 11 w x 17 h 300 dpi Step 1 First of all, you ll need the texture on my website. Now open a new document. I usually work on really big documents because I can work on the details better and you can always decrease the image size later. So, as you can see in the picture below, the background is blue and the color code is #89defd. Fill the layer with this color. SAVE - Name it CUTE SNOWMAN - Your Name. Step 2 Create a new layer. Name it BODY. Select the Ellipse Marque tool (NOT THE SHAPE TOOL) and create a big circle and fill it with white #ffffff. Create a new layer, name it HEAD and make a new circle, only smaller this time. Fill it with white. Put the small circle on top of the big one. (see below) SAVE! MAKE SURE IT IS A.TIF FILE.
 This will be the head s shadow.")

2 Step 3 Duplicate the HEAD layer and name it SHADOW. Cmd click the thumbnail of the SHADOW layer and fill the new circle with #CCCCCC (light gray) This will be the head s shadow. Move the SHADOW layer with the gray circle under the HEAD layer and make the gray circle larger, like shown below. Go to the BODT layer, press Command + Click on the thumbnail to select the large circle, then go to Select, Inverse. Click on the SHADOW layer and click the delete key. This should leave the sliver of gray for the shadow. Cmd +D to deselect. Select the SHADOW layer and go to Filter > Blur > Gaussian Blur and add some blur (3-4%). Now you have the shadow of the head. SAVE!

, Scattering (372%, 1%, 0% ), Transfer (100%, 0% ). Make a new layer and name it TEXTURE.")
3 Step 4 Duplicate the BODY layer. Name it BODY 2. While on the BODY 2 layer, use the Gradient Tool (radial gradient) and drag from the center of the circle outward. Your image should look like the example on the right. Now set the Opacity to about 20%. Now your image should look like in the large picture. Do the same steps for the HEAD layer. SAVE! Step 5 The next step is to create a texture for the snowman. For this select a round brush with hard edges and make the following presets: Shape Dynamics (all to 0% ), Scattering (372%, 1%, 0% ), Transfer (100%, 0% ). Make a new layer and name it TEXTURE. CMD + click the thumbnail of the BODY 2 layer (make sure you are painting on the TEXTURE layer) and paint inside the selection with a small brush, add more points to the edges and fewer in the middle. ( scroll down to see the example) Next you have to set the blending mode to MULTIPLY and the Opacity to about 35-40%. Repeat the same steps for the HEAD.


4 Step 6 Make a new layer and name it EYES. Use a small brush tool with hard edges, without the previous presets and draw two black eyes. Go to the layer style and make the following presets:
, right click and")
 on the right part of")
5 Step 7 Make a new layer and name it NOSE. With the Pen Tool, create a path that looks like a carrot (SEE BELOW), right click and choose MAKE SELECTION and fill it with orange # e37b19. Now let s make some light using the Dodge Tool (looks like a sucker) on the right part of the nose and use the burn tool to create some shadows on the left side of the carrot nose.


6 Step 8 In this step we re going to create a shadow of the nose. Make a new layer and name it NOSE SHADOW. CMD + CLICK on the thumbnail of the HEAD layer. Fill the selection with black #0000. Move the black circle as shown below. Duplicate the NOSE SHADOW layer. Name it NOSE SHADOW 2. CMD + CLICK the thumbnail of the NOSE SHADOW layer and fill the selection with yellow. Select the move tool and move the yellow circle over and up so you can see a black shape as seen below. CMD + CLICK the thumbnail of the NOSE SHADOW 2 layer, Click on the NOSE SHADOW layer to make it active and press the delete key. Now close the eye on the NOSE SHADOW 2 layer. It should look like a black sliver. Click on the NOSE SHADOW layer and CMD + Click on the thumbnail of the HEAD layer, choose SELECT, INVERSE and press the delete key. Lower the layer opacity so it appears like the example below. Step 9 Create a new layer and name it MOUTH. Use the PEN TOOL and make three points (like a large, wide V. Use the CONVERT PEN TOOL to curve the path into a smile shape. Set up your paint brush so it is thin and hard. Make sure the color is set to BLACK. Select the pen tool, right click, choose stroke path, MAKE SURE THE BOX FOR PEN PRESSURE IS SELECTED.

7 Use the paintbrush to create small vertical lines to complete the smile. SAVE!


8 Step 10 Make a new layer, name it FUR. With the Pen Tool make a shape like you see in the image. This shape should look like fur on a hat. Fill it with white. Step 10 Make a new layer and name it HAT. Use the pen tool and create the shape of the hat. Use the CONVERT PEN tool to round it out. Right click and choose MAKE SELECTION. Fill the selection with red #a CMD + D to de-select. Open the TEXTURE file and and drag it on top of the hat. Name the new layer TEXTURE. While on the TEXTURE layer, CMD + Click the thumbnail of the HAT layer, Choose SELECT, INVERSE and press the DELETE key. Set the blending mode of the TEXTURE layer to Luminosity and the Opacity to about 20-25%. SAVE!
 Step 13 Let s make the buttons.")

9 Step 12 Give it some depth with the Burn Tool for the shadows and Dodge Tool for the light. (See below) Step 13 Let s make the buttons. Create a new layer and name it BUTTONS. USE the same technique as we used to make the eyes. Select the round brush tool with a hard edge and make a few buttons. Make the following layer styles:


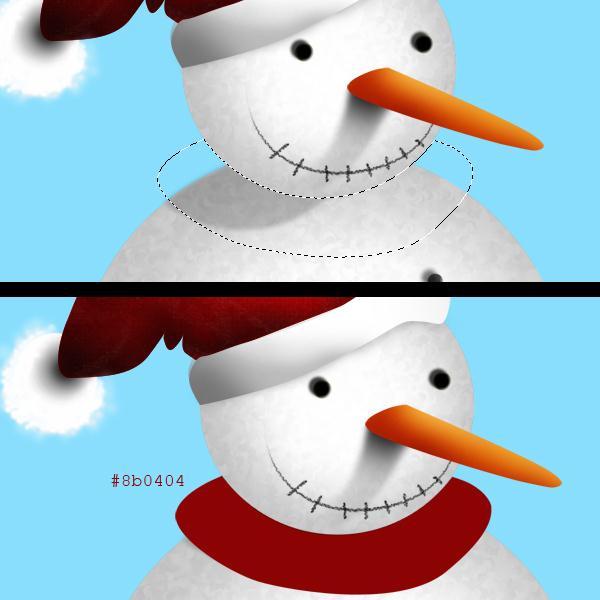
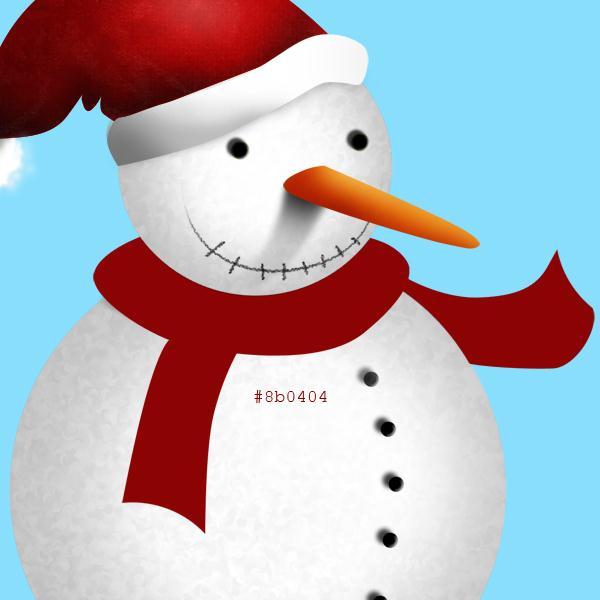
10 Step 14 Make a new layer and name it BALL. Select the Ellipse tool and create a small circle, fill it with white and move the BALL layer under the HAT layer. Use the burn tool and create a light shadow on the BALL layer. Now select the basic brush with the presets that we did for the snowman s texture ( the spots) and paint some fur with white. Step 15 Create a new layer and name it SCARF. Using the PEN tool, Create a shape, like in this image below, round it out with the CONVERT PEN tool, right click and MAKE SELECTION and fill it with red (#8b0404). Continue creating the remaining parts of the scarf in the same way. (See below)
11


12 Create a new layer and name it STRIPES. With the pen tool make some shapes as shown in the image below and fill them with green #0b6a16. Use the Burn and Dodge Tool for the light and shadows as needed. Click on the SCARF layer and create a layer style (double click) for a drop shadow. SAVE!


13 Step 16 Create a new layer and name it SNOW. Use a round, soft brush and paint some snow. you like with a simple brush. Step 17 Make sure everything is perfect and you are happy with your snowman. SAVE. MAKE SURE IT IS A.TIF FILE. NOW, DO A SAVE AS AND NAME IT CUTE SNOWMAN 2-YOUR NAME this will still be a TIF FILE. Now you should be working on the CUTE SNOWMAN 2 - YOUR NAME file. Select all the layers EXCEPT the background layer, right click and choose merge layers. Name the new combined layer SNOWMAN. Now we will add some adjustment layers so the snowman won t look like a desktop icon.


14 Select LAYERS from the menu bar and choose NEW ADJUSTMENT LAYER/ CURVES. Choose the setting below. You may have to make some adjustments if it doesn't look quite right. Step 18 Duplicate the SNOWMAN layer, name it SNOWMAN2 and move it to the top of the layers. Next, go to Filter > Filter Gallery > Watercolor and make the settings like in the image. Set the opacity to about to around 50% or whatever looks right for you. Step 19 Choose LAYER > NEW ADJUSTMENT LAYER > Photo Filter > Warming Filter 50%.

15 If everything looks perfect, SAVE and then do a SAVE AS and save it as a.jpg file. Make sure to post the completed image to the gallery.
Create a new image: 10 IN height and 16 IN width, 300 dpi.
 The images needed for this project are on my website. Create a new image: 10 IN height and 16 IN width, 300 dpi. Create a new layer and fill the layer with white.. Create a radial gradient by using following
TV Aquarium. Create a new document. 8.5 x 11, 300 dpi. Save as TV Aquarium Your Name. Create TV shape. Use Pen
 Create a new document. 8.5 x 11, 300 dpi. Save as TV Aquarium Your Name. Create TV shape. Use Pen Tool, Convert Point Tool and Direct Selection Tool. We need side shapes to create patches of light and
HOW TO CREATE A SUPER SHINY PENCIL ICON
 HOW TO CREATE A SUPER SHINY PENCIL ICON Tutorial from http://psd.tutsplus.com/ Compiled by INTRODUCTION The Pencil is one of the visual metaphors most used to express creativity. In this tutorial,
Design a Halloween Pumpkin Wallpaper in Photoshop
 Design a Halloween Pumpkin Wallpaper in Photoshop By: Alvaro Guzman Halloween is near! So let's take a pumpkin image, carve it up, and light it for this coming holiday. You'll learn how to get this nice
Converse Chuck Taylor Shoes Photoshop Tutorial
 20 Converse Chuck Taylor Shoes Photoshop Tutorial Step 1 Create A New Document Create a New Document. The size of my canvas is 600px x 700px with a 72dpi resolution. Save as Chuck Taylor - Your Name. Step
Exploring Photoshop Tutorial
 Exploring Photoshop Tutorial Objective: In this tutorial we will create a poster composed of three distinct elements: a Bokeh, an image and title text. The Bokeh is an effect which is sometimes seen in
This tutorial will show you how to use artistic grunge overlays to transform your photos into works of art.
 ARTISTIC GRUNGE OVERLAYS For all photo editing software that supports PNG files If you have any questions, please feel free to contact me at kim@photosbykimhill.com. This tutorial will show you how to
Painting Special Effects on Photographs
 TUTORIAL 7 Painting Special Effects on Photographs In this tutorial you will learn how to transform a photo into a striking color composition with paintbrushes, masks, blending modes, color, and paper
Create a Candy Cane. Create a new canvas with the size 8x10 inches at 300 pixel/inch. See image below Ctrl + N
 Create a Candy Cane The Basic Candy Cane Canvas and Shape 1. Create a new folder, name it Candy Cane your name. Create a new canvas with the size 8x10 inches at 300 pixel/inch. See image below Ctrl + N
Photoshop & Illustrator
 Week 6 Lesson 6 : Utilize Filters Effect Applying filters Creating and editing Smart Filters Hiding, copying, and deleting Smart Filters Working with the Smart Filter mask More filter techniques Photoshop
Drawing the Red Christmas Bell
 Vector 3D Christmas Bells Thinking of drawing some Christmas bells for this Christmas? Read this illustrator tutorial to learn how to draw 5 different styles of vector Christmas bells using the 3D Revolve
A quick note: We hope that you will find something from the Tips and Tricks that will add a little pizazz to your yearbook pages!
 A quick note: The following pages are tips and tricks for Basic Photoshop users. You may notice that some instructions indicate that non-awpc fonts were used, and that some colors were created using the
Create a Multicolored Splashed Text Effect in Adobe Illustrator
 Create a Multicolored Splashed Text Effect in Adobe Illustrator by Diana Toma17 Nov 2014 What You'll Be Creating In this tutorial you will learn how to create a multicolored splashed text effect in Adobe
Introduction to Photoshop
 Introduction to Photoshop Instructional Services at KU Libraries A Division of Information Services www.lib.ku.edu/instruction Abstract: This course covers the basics of Photoshop, including common tools
How to Create Fake Shadows
 TIP SHEET #8 How to Create Fake Shadows As well as the colour, it s the shadows in a picture that help to give it mood and atmosphere so in this tutorial I want to show you how you can add in extra shadows.
PHOTOSHOP & ILLUSTRATOR BOOTCAMP
 FALL 2014 - ELIZABETH LIN PHOTOSHOP & ILLUSTRATOR BOOTCAMP ILLUSTRATOR ALIGNMENT To access the alignment panel, go to Window -> Align. You should see a panel like the one below. This panel allows you to
Module All You Ever Need to Know About The Displace Filter
 Module 02-05 All You Ever Need to Know About The Displace Filter 02-05 All You Ever Need to Know About The Displace Filter [00:00:00] In this video, we're going to talk about the Displace Filter in Photoshop.
Photoshop 1. click Create.
 Photoshop 1 Step 1: Create a new file Open Adobe Photoshop. Create a new file: File->New On the right side, create a new file of size 600x600 pixels at a resolution of 300 pixels per inch. Name the file
Web Graphics Chapter 7 Review
 Web Graphics Chapter 7 Review Name Date 1. The Add Layer Mask button is located on/in the. a. Toolbox b. Layers palette c. Mask palette d. History palette 2. How many color adjustments commands are available
Cute Gooey Blob Photoshop Tutorial
 Download the PSD Cute 3D Character.zip 22.11 MB Download from Website (http://photoshoptutorials.ws/downloads/psd/cute 3D Character.zip) Cute Gooey Blob Photoshop Tutorial Step 1 Create a new document
ITEC185 INTRODUCTION TO DIGITAL MEDIA
 1 ITEC185 INTRODUCTION TO DIGITAL MEDIA ADOBE PHOTOSHOP ITEC185 - Introduction to Digital Media ITEC185 - Introduction to Digital Media 2 What is Adobe Photoshop? Photoshop is the leading professional
PHOTOSHOP TUTORIAL: DIGITAL DARKROOM TECHNIQUES
 PHOTOSHOP TUTORIAL: DIGITAL DARKROOM TECHNIQUES STEP BY STEP TRAINING Learn by doing step by step exercises. Includes downloadable class files that work on Mac & PC. EDITION 1 Copyright Info Published
Create A Briefcase Icon
 Create A Briefcase Icon In this tutorial, I will show you how to create a briefcase icon with rectangles, ellipses, and gradients. This briefcase icon is great for web designs and user interfaces. Moreover,
prepared by Allison Hwang for T. Purdy 2011
 There are many ways to create material textures in Photoshop. In addition to using primarily the blending tool, you can also use filters to create textures. In this tutorial, the objective is to create
Adobe Illustrator. Mountain Sunset
 Adobe Illustrator Mountain Sunset Adobe Illustrator Mountain Sunset Introduction Today we re going to be doing a very simple yet very appealing mountain sunset tutorial. You can see the finished product
Extreme Makeovers: Photoshop Retouching Techniques
 Extreme Makeovers: Table of Contents About the Workshop... 1 Workshop Objectives... 1 Getting Started... 1 Photoshop Workspace... 1 Retouching Tools... 2 General Steps... 2 Resolution and image size...
Tablet overrides: overrides current settings for opacity and size based on pen pressure.
 Photoshop 1 Painting Eye Dropper Tool Samples a color from an image source and makes it the foreground color. Brush Tool Paints brush strokes with anti-aliased (smooth) edges. Brush Presets Quickly access
Here is a 100% zoom close up. Name in Popsicles
 Here is a 100% zoom close up Name in Popsicles Step 1 Let s start by creating a new Photoshop document. Mine is 2560 1440 pixels. Fill the background with a color of your choice (it s not important at
Undress a Giraffe in Photoshop
 Undress a Giraffe in Photoshop By: Alexandra Fomicheva Have you ever wanted to know what a Giraffe looks like without its spots? If so, this tutorial is for you, you pervert! Today, we will demonstrate
RETRO User guide RETRO. Photoshop actions. For PS CC, CS6, CS5, CS4. User Guide
 RETRO Photoshop actions For PS CC, CS6, CS5, CS4 User Guide CONTENTS 1. THE BASICS... 1 1.1. About the effects... 1 1.2. How the actions are organized... 1 1.3. Installing the actions in Photoshop... 2
Digital Image Manipulation 2014
 Week 4 Advanced Type Techniques- create special effect type Step 1 Create a new 1024 x 768 px document. Set the document background color to light pink or follow my colour (#f8cece) Create the text using
Compiled by <<coldbing>> FIRE EFFECTS
 FIRE EFFECTS Compiled by Step 1 - New Document Make a new document. Fill it with black. Then make a new layer, and type out (or whatever) you want to set on fire in white. Step 2 - Windy Go
Creating a Watercolor Painting From a Photo. Open the photo you want to appear to be a watercolor painting. I am using the photo below:
 Creating a Watercolor Painting From a Photo Open the photo you want to appear to be a watercolor painting. I am using the photo below: Make any adjustments as needed like cropping the photo before preceding
Using the Shoe Advertisement tutorial, create a shoe ad that is specifically designed to appeal to your assigned consumer.
 Lesson Instructions: Using the Shoe Advertisement tutorial, create a shoe ad that is specifically designed to appeal to your assigned consumer. Consider the specifications in the tutorial as the requests
Winter Card.
 Winter Card Used images: http://www.cgtextures.com/texview.php?id=24321&phpsessid=95e8e8290894cc5194898 e16d1dddb4c http://www.cgtextures.com/texview.php?id=14285&phpsessid=95e8e8290894cc5194898 e16d1dddb4c
Advanced Photography. Topic 3 - Photoshop Filters. Learning Outcomes
 Topic 3 - Photoshop Filters Learning Outcomes In this lesson, we're going to take a look at some techniques that make use of some of the more practical filters. We are also going to learn how to convert
Create an Amazing Surreal-Style Treehouse in Photoshop Photoshop Tutorials
 Download the PSD Surreal Treehouse.zip 23.59 MB Download from Website Surreal Treehouse Photoshop Tutorial Tutorial Resources Tree Houses Thanks archetype, Deviantart Bonsai Tree Thanks fabemiko, Deviantart
Create a Cute Furry Vector Monster in Illustrator
 Create a Cute Furry Vector Monster in Illustrator Other labs from this author can be found at http://www.blog.spoongraphics.co.uk/tutorials/create-a-cute-furry-vector-monster-inillustrator Follow these
PHOTOSHOP DESIGN EFFECTS FOR INTERMEDIATE TO ADVANCED USERS
 PHOTOSHOP DESIGN EFFECTS FOR INTERMEDIATE TO ADVANCED USERS Copyright 2012, National Seminars Training Introduction This class is all about design effects in Adobe Photoshop. For example, let s say that
LET S GET STARTED! Title: SANTA HEAD. Software: Serif DrawPlus X8. Author: TeejayJoyce. Website: Tutorials by Teejay. Skill Level: Intermediate
 Title: SANTA HEAD Software: Serif DrawPlus X8 Author: TeejayJoyce Website: Tutorials by Teejay Skill Level: Intermediate Supplies: None Description: This tutorial uses simple Quick shapes and Filter Effects
u Selections, Channels, Masks, and Paths
 6 u Selections, Channels, Masks, and Paths No matter what type of Photoshop work you do, you will most likely have to make selections. Spot color corrections require selections. Compositing requires selections.
CREATE A BASIC VEXEL IMAGE
 CREATE A BASIC VEXEL IMAGE Tutorial from http://psd.tutsplus.com/ Compiled by INTRODUCTION This time we'll create a simple vexel image from a picture. Also, we'll use some pattern effects
I have an image of a flower that is entirely in focus. I would like to blur the background to make the flower stand out.
 Using Gaussian Blur to blur background Request I have an image of a flower that is entirely in focus. I would like to blur the background to make the flower stand out. Response A portion of the image can
INTRO TO LAYERS (PART 2)
") Adobe Photoshop Elements INTRO TO LAYERS (PART 2) By Dave Cross In Part 1, we talked about the main concept behind layers and why they re so important. Now we ll take it a step further and show how to
Adobe Photoshop Elements INTRO TO LAYERS (PART 2) By Dave Cross In Part 1, we talked about the main concept behind layers and why they re so important. Now we ll take it a step further and show how to
IMAGE CORRECTION. You can find this and more information with video tutorials at
 IMAGE CORRECTION You can find this and more information with video tutorials at http://www.adobe.com/support/photoshop/ P H O T O S H O P T O O L S CLONE STAMP TOOL The Clone Stamp tool paints one part
DAZ Productions - 3D Models, 3D Content, and 3D Software
 Página 1 de 26 Postwork made Easy Author: mizgriz Step 1: Preparing the image. Step 2: Get your glow on. Step 3: And now for something completely (not) different... Step 4: Hue and Saturate Step 5: About
Photoshop. Make a Spooky Halloween Pumpkin Text Effect in Photoshop - Photoshop tutorial PSDDude
 Photoshop October 4th,2017 1 2 Image size: 7 in wide x 3 in high 300 dpi Start with a simple black gradient background layer. Radial Gradiant, black to gray. Install the CREEPSVILLE font. Center and Type
Chapter 8. Working with Transparency, Effects, and Graphic Styles and Recoloring Artwork Delmar, Cengage Learning
 Chapter 8 Working with Transparency, Effects, and Graphic Styles and Recoloring Artwork 2011 Delmar, Cengage Learning Objectives Use the Transparency panel and the Color Picker Recolor artwork Apply effects
Learning Adobe Photoshop CS6
 Module 1 Contents Chapter 1: Introduction to Photoshop Loading Photoshop...1-1 The Tools Panel...1-2 Using the Tools...1-3 The Panel Group...1-5 Layers...1-6 Loading a Sample File...1-6 Looking at the
PHOTOSHOP PUZZLE EFFECT
 PHOTOSHOP PUZZLE EFFECT In this Photoshop tutorial, we re going to look at how to easily create a puzzle effect, allowing us to turn any photo into a jigsaw puzzle! Or at least, we ll be creating the illusion
Using Adobe Photoshop
 Using Adobe Photoshop 6 One of the most useful features of applications like Photoshop is the ability to work with layers. allow you to have several pieces of images in the same file, which can be arranged
Transparency and blending modes
 Transparency and blending modes About transparency Transparency is such an integral part of Illustrator that it s possible to add transparency to your artwork without realizing it. You can add transparency
GIMP (GNU Image Manipulation Program) MANUAL
 MANUAL") Selection Tools Icon Tool Name Function Select Rectangle Select Ellipse Select Hand-drawn area (lasso tool) Select Contiguous Region (magic wand) Selects a rectangular area, drawn from upper left (or lower
Selection Tools Icon Tool Name Function Select Rectangle Select Ellipse Select Hand-drawn area (lasso tool) Select Contiguous Region (magic wand) Selects a rectangular area, drawn from upper left (or lower
Dark & Surreal Poster
 Step 1 Dark & Surreal Poster Start off with the creation of your document and, in this case 1200 1600. If you want to print this you might want to work in CMYK mode, a higher resolution and also 300DPI.
Compositing. Compositing is the art of combining two or more distinct elements to create a sense of seamlessness or a feeling of belonging.
 Compositing Compositing is the art of combining two or more distinct elements to create a sense of seamlessness or a feeling of belonging. Selection Tools In the simplest terms, selections help us to cut
ADDING A RAINBOW TO A PHOTOGRAPH
 ADDING A RAINBOW TO A PHOTOGRAPH This assignment will cover how to add a simple rainbow (or if you want to go crazy, a double rainbow) to any photograph. This will give us some great work with gradients,
SAVING, LOADING AND REUSING LAYER STYLES
 SAVING, LOADING AND REUSING LAYER STYLES In this Photoshop tutorial, we re going to learn how to save, load and reuse layer styles! Layer styles are a great way to create fun and interesting photo effects
Basic Digital Dark Room
 Basic Digital Dark Room When I took a good photograph I almost always trying to improve it using Photoshop: exposure, depth of field, black and white, duotones, blur and sharpness or even replace washed
Adobe PhotoShop Elements
 Adobe PhotoShop Elements North Lake College DCCCD 2006 1 When you open Adobe PhotoShop Elements, you will see this welcome screen. You can open any of the specialized areas. We will talk about 4 of them:
Realistic Skin Smoothing
 TIP SHEET #7 Realistic Skin Smoothing I think it s fair to say when it comes to retouching techniques, the number of different ways to smooth skin is seemingly endless. From blurring techniques through
How to Create a Landscape Wallpaper for your Desktop
 How to Create a Landscape Wallpaper for your Desktop Why not create a vector landscape wallpaper? In this simple tutorial, you will learn how to create an eye-appealing wallpaper quickly and effectively.
Contents: Bibliography:
 ( 2 ) Contents: Sizing an Image...4 RAW File Conversion...4 Selection Tools...5 Colour Range...5 Quick Mask...6 Extract Tool...7 Adding a Layer Style...7 Adjustment Layer...8 Adding a gradient to an Adjustment
The original image. Let s get started! The final rainbow effect. The photo sits on the Background layer in the Layers panel.
 Add A Realistic Rainbow To A Photo In this Photoshop photo effects tutorial, we ll learn how to easily add a rainbow, and even a double rainbow, to a photo! As we ll see, Photoshop ships with a ready-made
HOW TO CREATE A DARK SURREAL ILLUSTRATION IN PHOTOSHOP
 HOW TO CREATE A DARK SURREAL ILLUSTRATION IN PHOTOSHOP Tutorial from http://psd.tutsplus.com/ Compiled by INTRODUCTION In this tutorial we are going to create a dark surreal illustration using
Create a Happy Sun Character. Below is the final illustration we will be working towards.
 Create a Happy Sun Character Below is the final illustration we will be working towards. 1 Step 1 Create a new document and with the Ellipse tool (L), create an ellipse. 2 Step 2 Fill the ellipse with
Note: Adjustment layers are available only in Photo Explosion Deluxe.
 164 PHOTO EXPLOSION USER MANUAL Understanding Layers Layers keep different regions of an image separate from one another, such as separating text from the background, and shapes from text. Use the Layers
Photoshop Project 1: Create Vector Art
 Photoshop Project 1: Create Vector Art Duplicate and name layers Create new layers Show and hide layers Apply the desaturate adjustment Work with the Pen tool Work with shape layers Zoom in and out of
How to Create a Curious Owl in Illustrator
 How to Create a Curious Owl in Illustrator Tutorial Details Program: Adobe Illustrator Difficulty: Intermediate Estimated Completion Time: 1.5 hours Take a look at what we're aiming for, an inquisitive
Adobe Photoshop CS5 Layers and Masks
 Adobe Photoshop CS5 Layers and Masks Email: training@health.ufl.edu Web Page: http://training.health.ufl.edu Adobe Photoshop CS5: Layers and Masks 2.0 Hours The workshop will cover creating and manipulating
Sports Jersey Mania, Part 2 By Joel Day
 Sports Jersey Mania, Part 2 By Joel Day jersey. We ll continue with all the finer details to create our basketball jersey template and at the end we ll show you a Home and Away STEP THIRTEEN: In this step,
Filters. Learning Objectives. Introduction
 6 Painting Tools and Filters Learning Objectives After completing this chapter, you will be able to: Apply paint to an image using the Brush Tool. Select and modify brush styles using the Brush Preset
How to Draw a Realistic iphone 4 with
 Home Freebies Submit Your Work Contact Us How to Draw a Realistic iphone 4 with Photoshop Jan 3 2011 By Mohammad Jeprie 34 Comments In this tutorial, we will draw a realistic-looking iphone 4 using Photoshop.
photoshop filters kelly ludwig assistant professor
 photoshop filters kelly ludwig assistant professor sharpening images reducing noise correcting distortions in images practical filters There are over 100 filters that ship with Photoshop and they're all
11 Advanced Layer Techniques
 11 Advanced Layer Techniques After you ve learned basic layer techniques, you can create more complex effects in your artwork using layer masks, path groups, filters, adjustment layers, and more style
Practice: Using Layer Masks
 DIGITAL IMAGING I UNIT 4 1 Practice: Using Layer Masks INTRODUCTION: Layer Masks are a way to hide elements on a layer without erasing them. In that manner, the hidden elements can be re-exposed without
AGENDA :: MULTI- MEDIA TOOLS :: CLASS NOTES. :: Homework Critiques Best and Worst Websites. :: Photoshop Lesson 2 Things aren t what they seem
 CLASS :: 02 02.02 2018 AGENDA :: Homework Critiques Best and Worst Websites :: Photoshop Lesson 2 Things aren t what they seem I. PHOTO RETOUCHING: Before There Were Computers (Web Post) http://jmcolberg.com/weblog/2010/01/photoshop_before_there_were_computers_the_art_of_retouching_and_improving_negatives_and_prints/
In this Adobe Photoshop tutorial, we re going to look at a way to give a photo a more ghostly appearance.
 GHOSTING AN IMAGE In this Adobe Photoshop tutorial, we re going to look at a way to give a photo a more ghostly appearance. I m a fan of horror films, but I admit I m a bit shallow in that I usually just
Out of Bounds - Dolphins
 Out of Bounds - Dolphins Let's start by making a copy of our original image layer - This is not essential but it's easier to rectify mistakes. From the menus, select Layer > Duplicate Layer or drag the
HOW TO BREAK SUNLIGHT THROUGH THE CLOUDS
 HOW TO BREAK SUNLIGHT THROUGH THE CLOUDS Tutorial from http://psd.tutsplus.com/ Compiled by INTRODUCTION In this tutorial I will show you how to turn an overcast day into a stunningly dramatic
Creating Pastel Images and other effects in Photoshop
 Creating Pastel Images and other effects in Photoshop Martin Addison 2015 Creating pastel images Page 1 Martin Addison FRPS Using White Layers in Photoshop 1. Create a new empty Layer 2. Edit> Fill 3.
Transforming Your Photographs with Photoshop
 Transforming Your Photographs with Photoshop Jesús Ramirez PhotoshopTrainingChannel.com Contents Introduction 2 About the Instructor 2 Lab Project Files 2 Lab Objectives 2 Lab Description 2 Removing Distracting
Reflection Project. Please start by resetting all tools in Photoshop.
 Reflection Project You will be creating a floor and wall for your advertisement. Before you begin on the Reflection Project, create a new composition. File New: Width 720 Pixels / Height 486 Pixels. Resolution
Tutorial Resources. Combine a Crocodile with a Car to Create an Exotic Crocomobile Photoshop Tutorials
 Tutorial Resources Crocodile1 SXC Crocodile2 charadestock Crocodile3 frostdragon64 Old car achatinastock Background SXC Bird rml-stock sign1 discordia-stock Sign2 ecathe Step 1 Open the background image
Pacific New Media David Ulrich
 Pacific New Media David Ulrich pacimage@maui.net www.creativeguide.com 808.721.2862 Digital Imaging Workflow in Adobe Photoshop All color and tonal correction editing should be done in a non-destructive
> color scheme painting
 > color scheme painting > objective(s): Students will create a highly accurate brush overlay painting of a closely cropped image of their eye using only colors within a specific selected color scheme,
10 Creating Special Effects
 10 Creating Special Effects The huge assortment of filters available for Adobe Photoshop lets you transform ordinary images into extraordinary digital artwork. You can select filters that simulate a traditional
Perspective Shadow Text Effect In Photoshop
 Perspective Shadow Text Effect In Photoshop Written by Steve Patterson. In this Photoshop text effects tutorial, we ll learn how to create a popular, classic effect by giving text a perspective shadow
Create a Creepy Face Photo Manipulation in Photoshop
 i TUTORIALS Create a Creepy Face Photo Manipulation in Photoshop by Alan Klim Advertisement In this tutorial we ll show you an easy way to create a nice creepy face effect using Photoshop. We strongly
Darkroom Effects. Solarization. Bleach Bypass
 Darkroom Effects Solarization A popular technique with surrealists like May Ray, solarization is achieved in the darkroom by exposing a developing image to a flash of light. Darkroom solarization is difficult
TEXT PERSPECTIVE SHADOW EFFECT
 TEXT PERSPECTIVE SHADOW EFFECT In this Photoshop text effects tutorial, we ll learn how to create a popular, classic effect by giving text a perspective shadow as if a light source behind the text was
Make Watercolor and Marker Style Portraits with Illustrator
 Make Watercolor and Marker Style Portraits with Illustrator Save Preview Resources Portrait by Lillian Bertram (Creative Commons Share Alike used here with permission) Step 1: Set up your Illustrator document
ADD A REALISTIC WATER REFLECTION
 ADD A REALISTIC WATER REFLECTION In this Photoshop photo effects tutorial, we re going to learn how to easily add a realistic water reflection to any photo. It s a very easy effect to create and you can
Oil Painting look with the Smudge tool in Photoshop CS3.
 Oil Painting look with the Smudge tool in Photoshop CS3. This tutorial is mostly free to experiment and you don't have to follow every little thing to the letter. I never had, so why force you to. I do
Car Ad Photoshop Tutorial Miss Van Lenten Tools: Paint brush, Eraser, Quick Selection/Magic Wand, Quick Mask, Layer Mask
 Car Ad Photoshop Tutorial Miss Van Lenten Tools: Paint brush, Eraser, Quick Selection/Magic Wand, Quick Mask, Layer Mask Part One: Google image search for a car of your choosing. Make sure you go to tools
WORN, TORN PHOTO EDGES EFFECT
 Photo Effects: CC - Worn, Torn Photo Edges Effect WORN, TORN PHOTO EDGES EFFECT In this Photoshop tutorial, we ll learn how to take the normally sharp, straight edges of an image and make them look all
Create a Street Art Style Illustration By CorelDRAW Master Stefan Lindblad
 Create a Street Art Style Illustration By CorelDRAW Master Stefan Lindblad Start with an original drawing on paper. With Corel PHOTO-PAINT and CorelDRAW, creating street art images, and later printing
The Little Fish Transcript
 The Little Fish Transcript welcome back everybody we are going to do this nice little scare to fish so if you've been following on to our shark tutorial you might notice this little guy in the thumbnail
USING BRUSHES TO CREATE A POSTER
 11 USING BRUSHES TO CREATE A POSTER Lesson overview In this lesson, you ll learn how to do the following: Use four brush types: Calligraphic, Art, Bristle, and Pattern. Apply brushes to paths. Paint and
Content Exchange File > New Corel CONNECT > Content Exchange > Photos > Animals Object Manager Docker Combine Icon Paint Tool (P)
") Working with Double Exposure and Collage techniques and in this case Double Exposure effects can be very inspiring and make a strong visual impression. The cool thing about Collage, (apart from Pablo Picasso
Working with Double Exposure and Collage techniques and in this case Double Exposure effects can be very inspiring and make a strong visual impression. The cool thing about Collage, (apart from Pablo Picasso
How To Create a Stylish Skull Based Vector Illustration
 How To Create a Stylish Skull Based Vector Illustration The skull and crossed pistons mark is a popular adaption of the tradition skull and crossbones symbol and is commonly seen in motorcycle culture,