Create A Briefcase Icon
|
|
|
- Heather Hampton
- 6 years ago
- Views:
Transcription


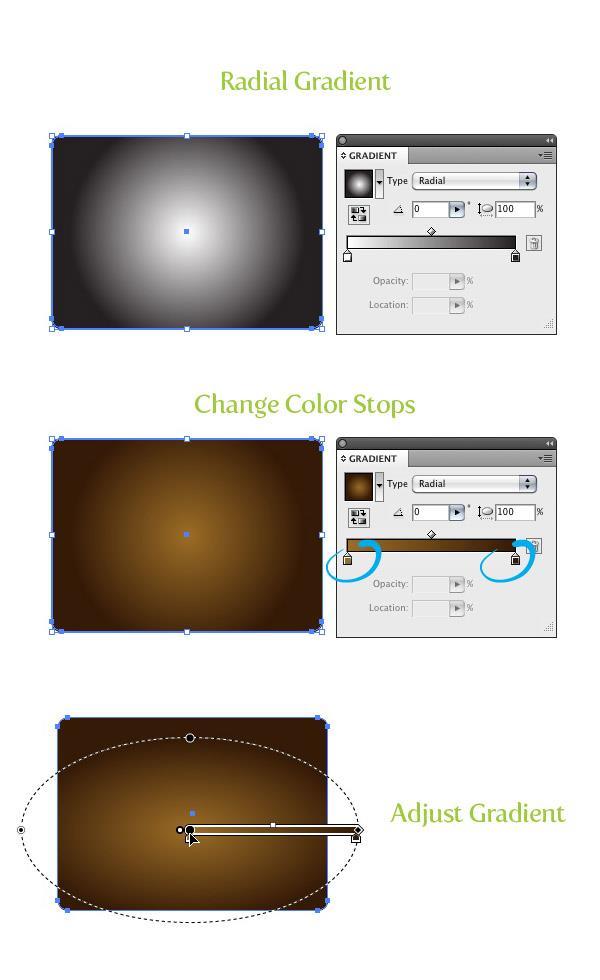
1 Create A Briefcase Icon In this tutorial, I will show you how to create a briefcase icon with rectangles, ellipses, and gradients. This briefcase icon is great for web designs and user interfaces. Moreover, you can easily apply these techniques to other icons, logos, and illustrations. Final Image Below is the final icon we will be working towards. Tutorial Details Program: Adobe Illustrator CS4 Difficulty: Intermediate Topics Covered: Shape tools, Gradient panel, Effects Estimated Completion Time: minutes Step 1
2 Create a new document and with the Rectangle tool (M), create a rectangle for the main body shape of the briefcase. Step 2 With the rectangle selected, go Effect > Stylize > Round Corners. In the Round Corners dialog, change the Radius to 10 px. This value might be different depending on the size of your main rectangle. Next, go Object > Expand Appearance.
3 Step 3 Fill the shape with a radial gradient form the Gradient panel. Change the first color stop in the gradient to a light brown color and the second color stop to a dark brown color. With the Gradient tool (G), scale the circumference of radial gradient vertically, expand the gradient past the left and right borders of the shape, and move it slightly towards the bottom of the shape.
4

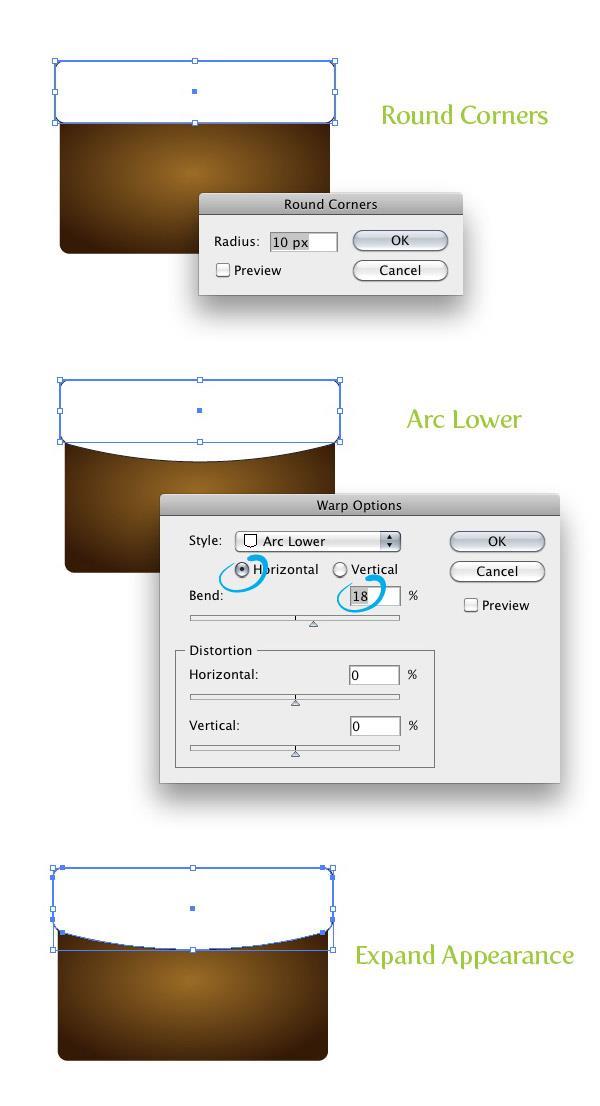
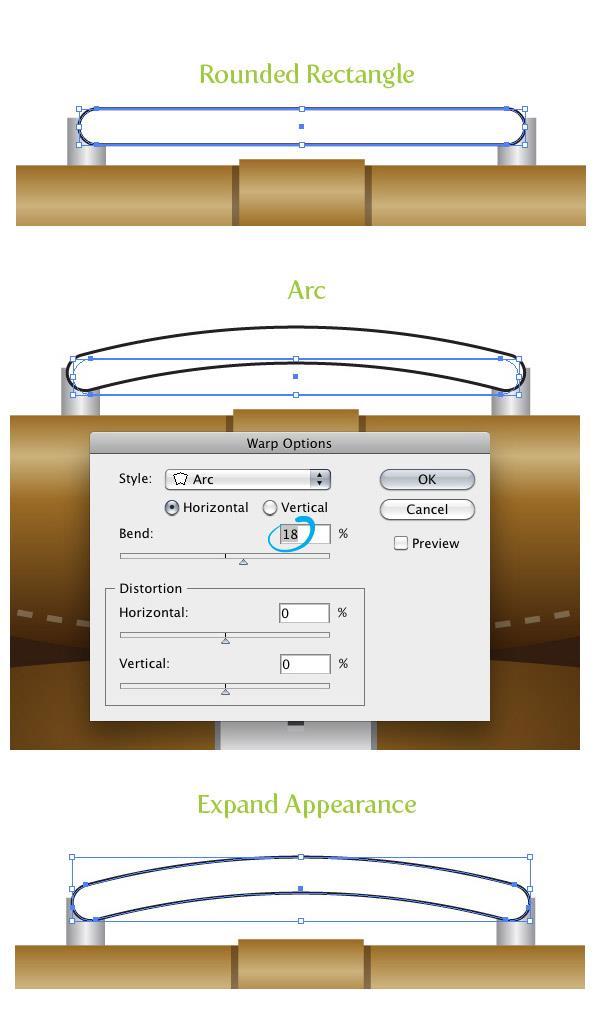
5 Step 4 With the Rectangle tool (M), create a rectangle about a third tall and slightly wider than the size of the main shape. Place the new rectangle over the top part of the main body shape. This will be our flap. Step 5 With the flap shape selected, go Effect > Stylize > Round Corners and change the Radius in the Round Corners dialog to 10 px. Next go, Effect > Warp > Arc Lower. In the Warp Options dialog make sure Horizontal is selected and change the Bend to 18. Now go Object > Expand Appearance.
6
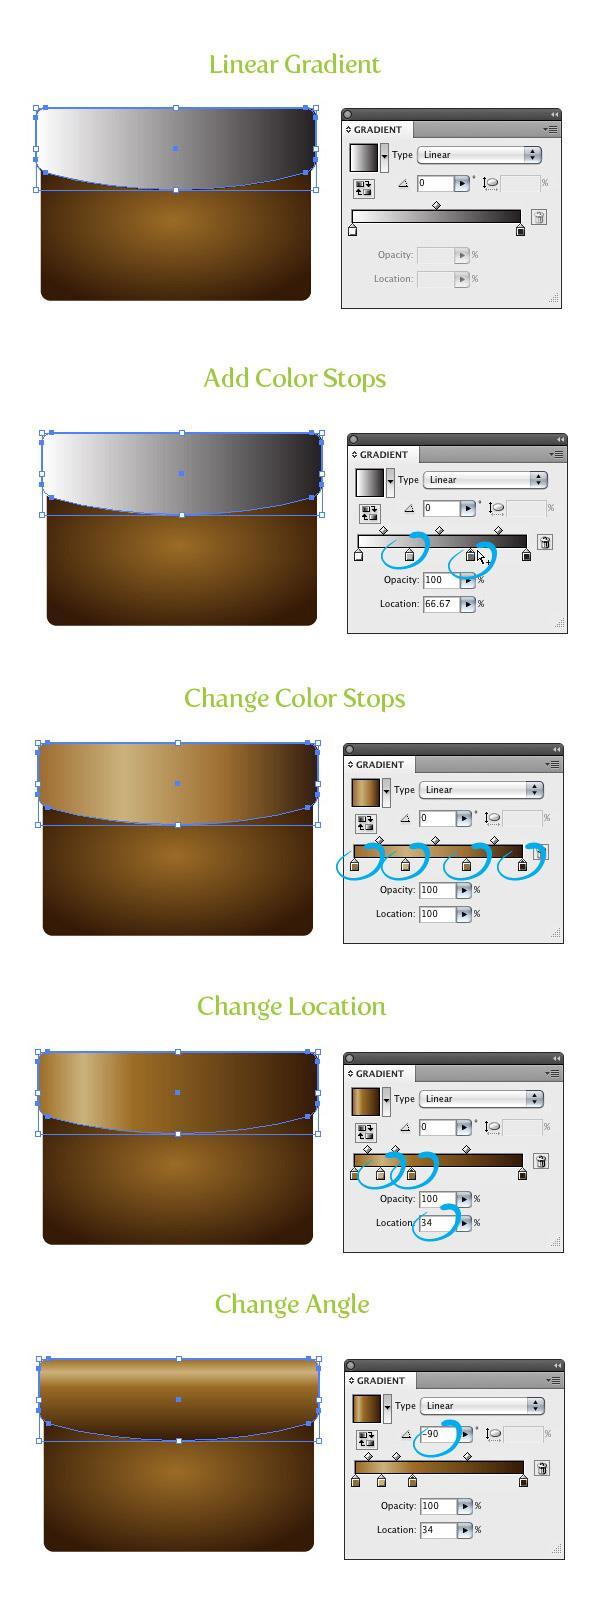
7 Step 6 Fill the flap shape with a linear gradient from the Gradient panel. For this gradient we are going to add two color stop giving us a total of four color stops in the gradient. To add the color stops, simply click just below the Gradient Slider in the Gradient panel twice. Change the first color to a brown color, the second to a light brown color, the third the same brown color as the first color stop, and the last one to a dark brown color. Select the second color stop and change the Location from the Gradient panel to 16 and change the Location of the third color stop to 34. Next, change the Angle of the gradient to -90.
8
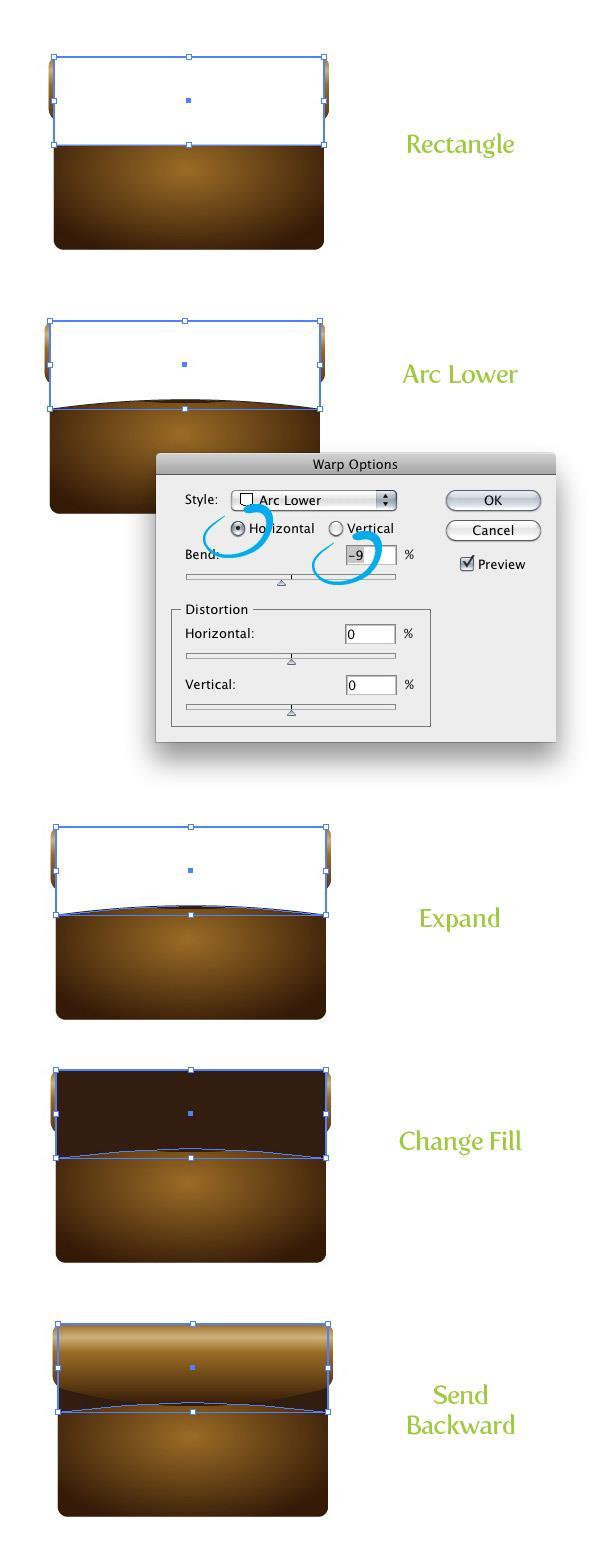
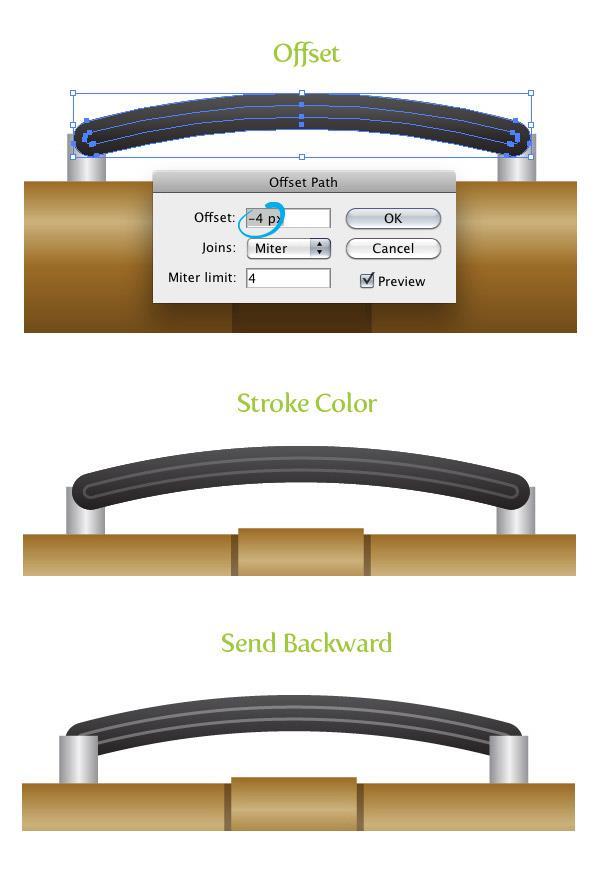
9 Step 7 With the Rectangle tool (M), create a rectangle half the height and same width as the main shape. Go Effect > Warp > Arc Lower. In the Warp Options dialog, make sure Horizontal is select and change the Bend to -9. Expand the Appearance, fill the shape with your dark brown, and go Object > Arrange > Send Backward (Command + [ ).
10
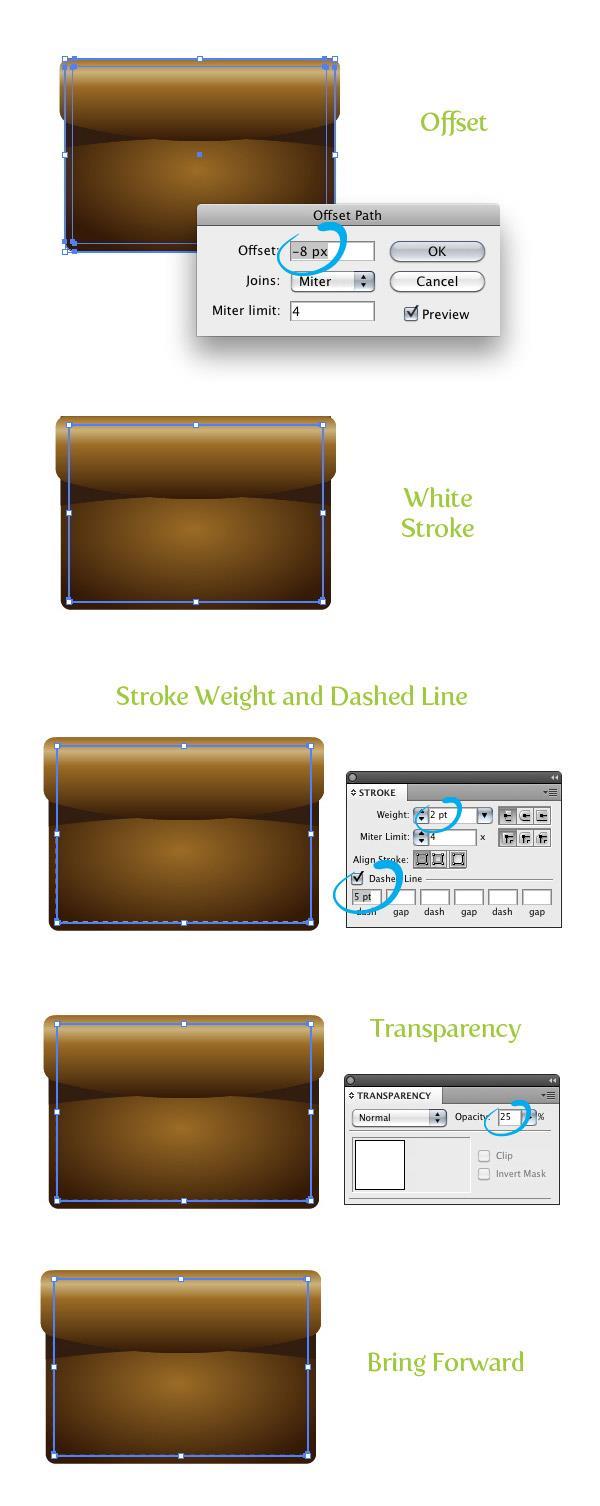
11 Step 8 Select the main shape and go Object > Path > Offset. In the dialog, change the Offset to -8 px. Take off any fill and change the stroke color to white. From the Stroke panel, change the Weight to 2 pt and select a 5 pt Dashed Line. From the Transparency panel, change the Opacity to 25. Next, go Object > Arrange > Bring Forward (Command + ] ).
12
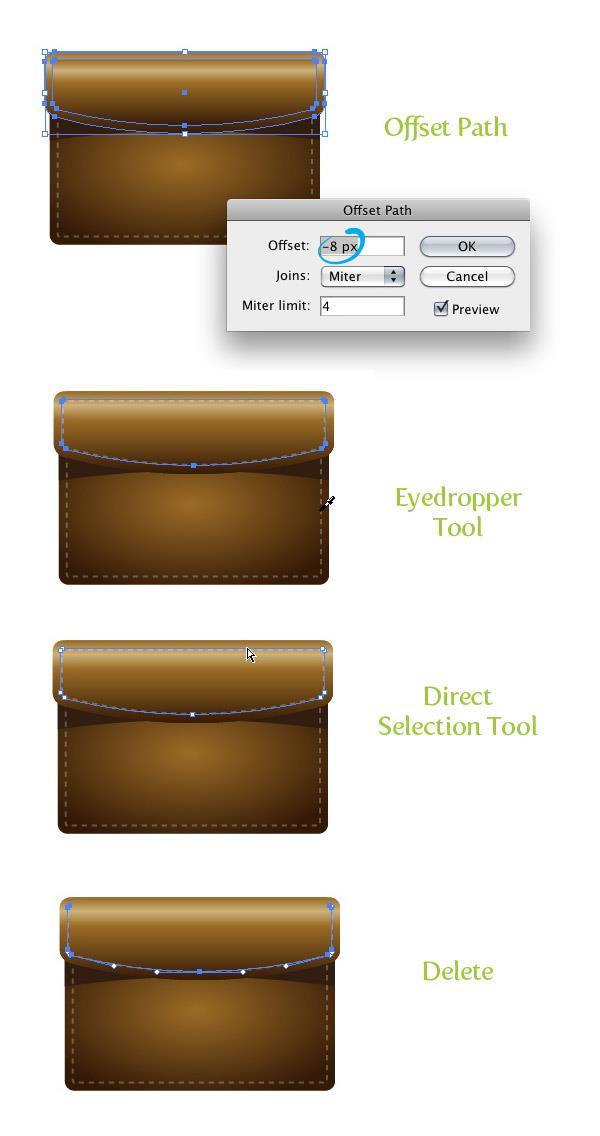
13 Step 9 Select the flap shape and go Object > Path > Offset and change the Offset to -8 px. With the new offset still selected use the Eyedropper tool (I) and sample the dashed line you created in the first step. Next, with the Direct Selection tool (A), select the top line in the new dashed line and delete it by pressing the Delete button.
14
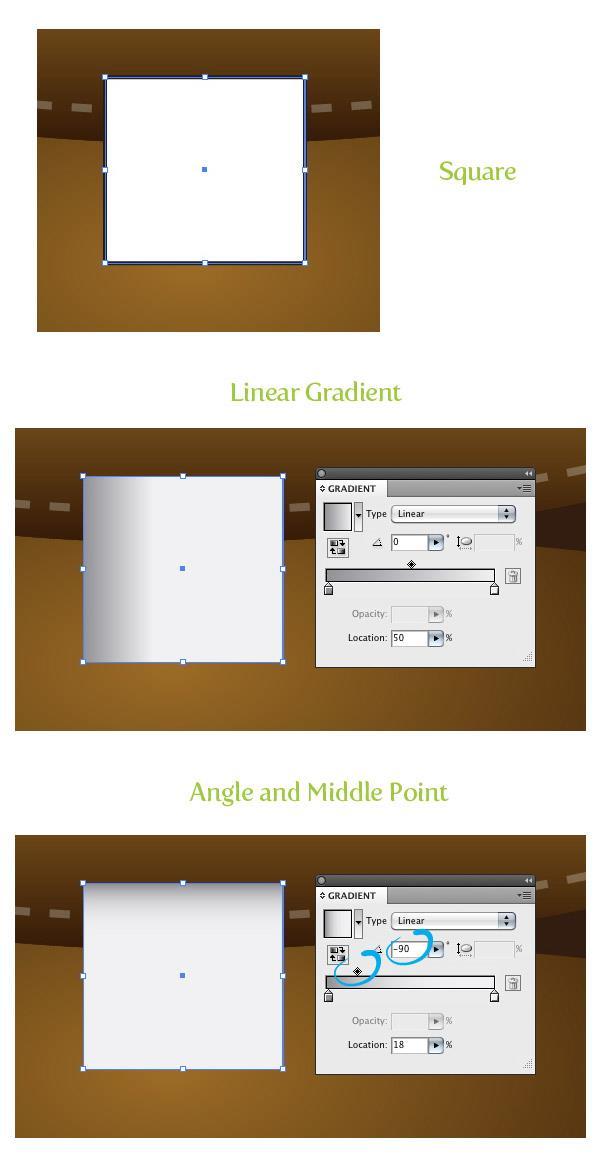
15 Step 10 Create a small square with the Rectangle tool (M) and place it where the bottom of the flap shape arc. Fill the square with a linear gradient with the first color stop a gray color and the second color stop white. In the Gradient panel, change the Middle Point of the gradient to 18 and the Angle to -90.
16

17 Step 11 Offset to square by 2 px and press the Reverse Gradient button from the Gradient panel. Step 12
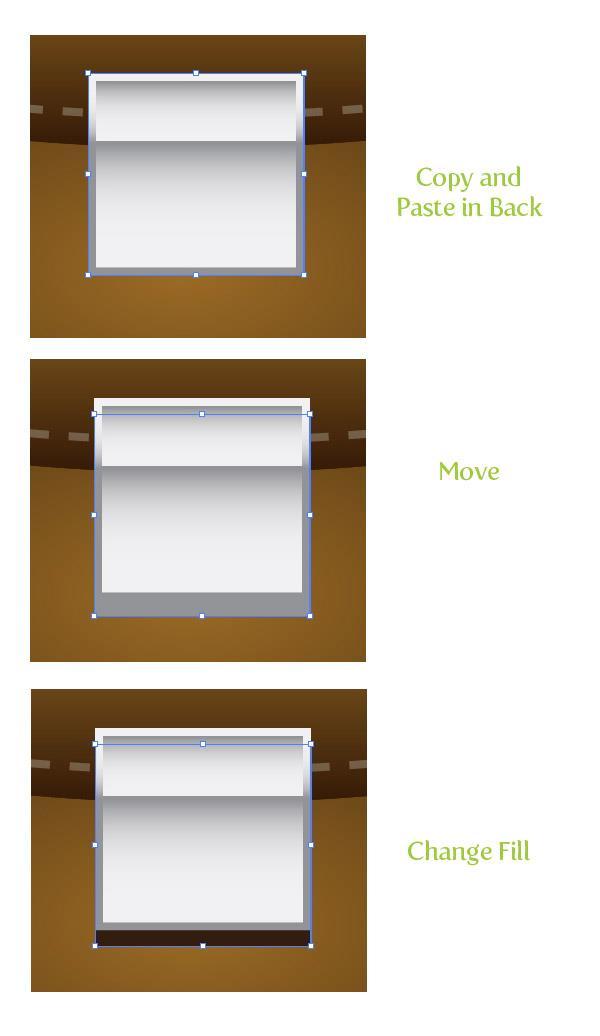
, select the top of the square and scale it vertically down to about two thirds of its original size.")
18 Select the original square, Copy (Command + C), and Paste in Front (Command + F). With the Selection tool (V), select the top of the square and scale it vertically down to about two thirds of its original size. Step 13 Select the offset square, Copy (Command + C), Paste in Back (Command + B), and move down slightly with the Selection tool (V). Next, change the fill to your dark brown color.
19
20 Step 14 Draw a small ellipse in the bottom half of the square shapes and draw a thin rectangle coming out of the bottom of the circle. Select both shapes and press the Unite button in the Pathfinder panel.
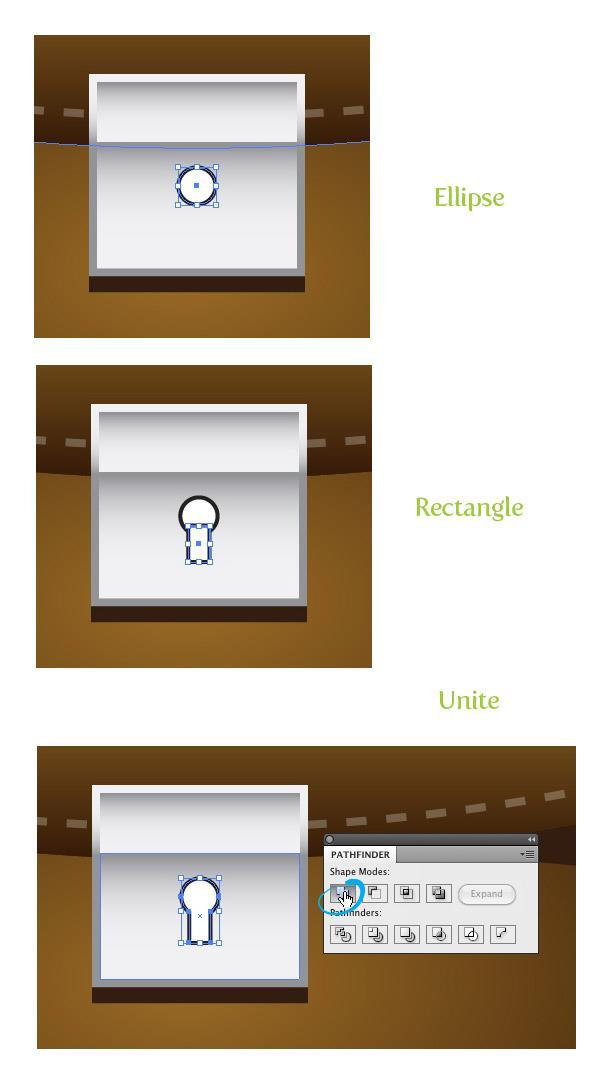
21
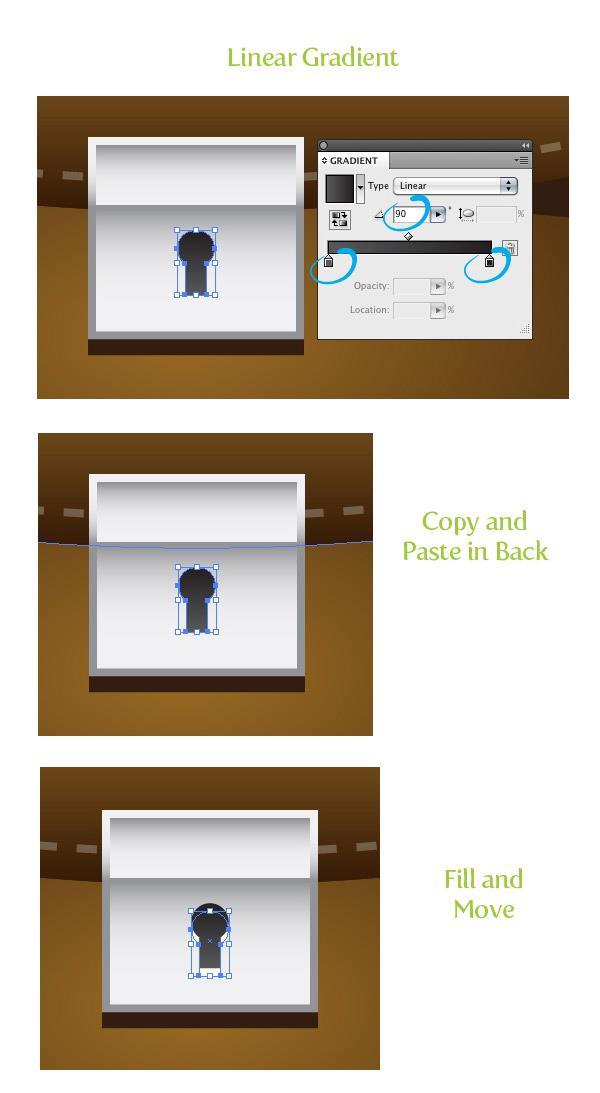
22 Step 15 Fill the new shape with a linear gradient, change the first color stop a dark gray color, the second an even darker gray color, and change the Angle to 90. With the shape still selected, Copy (Command + C), Paste in Back (Command + B), move down slightly, and change the fill to white.
23
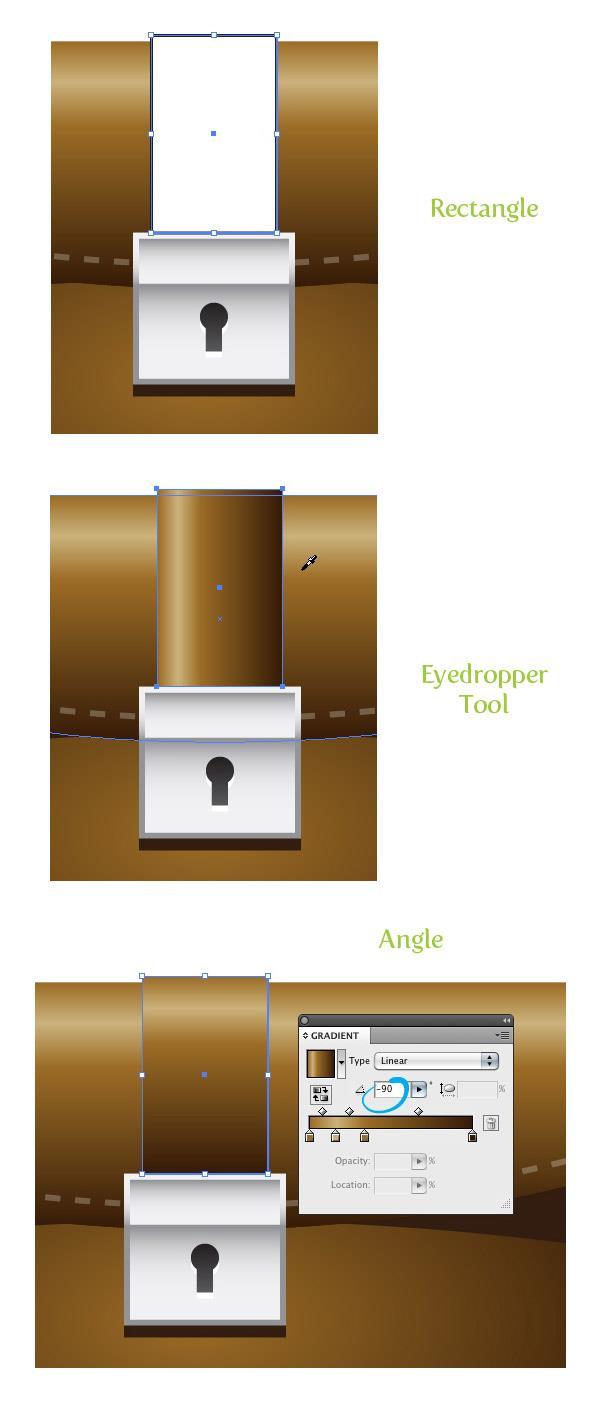
24 Step 16 Create a rectangle from the top of the buckle shapes to slightly above the flap shape. Use the Eyedropper tool (I) and sample to flap linear gradient and change the Angle to -90.
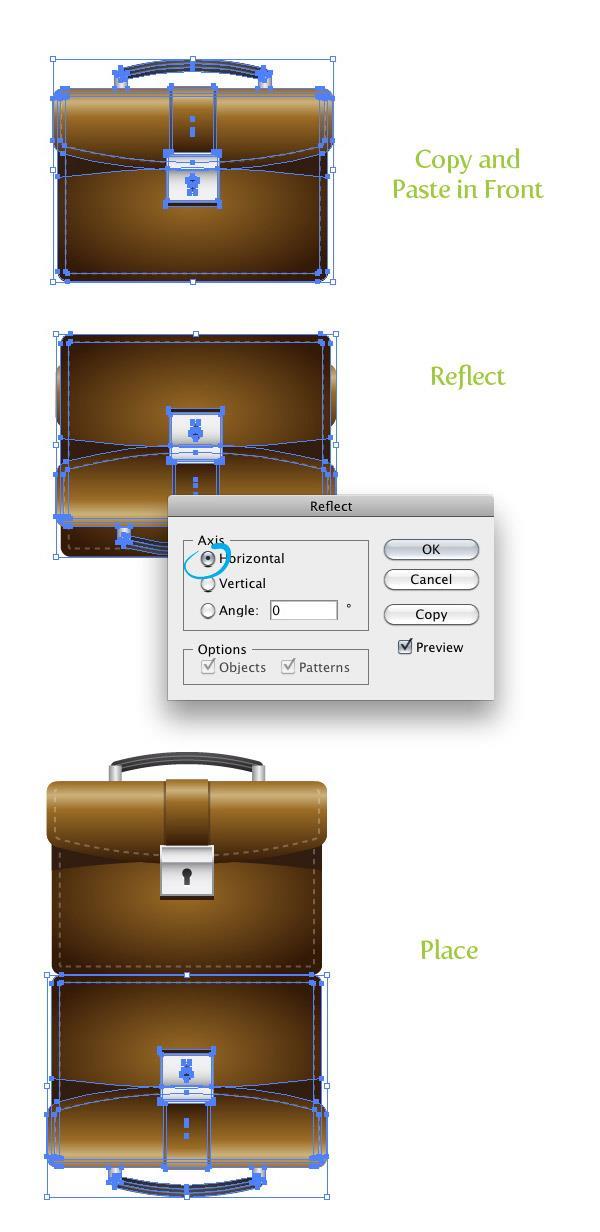
25
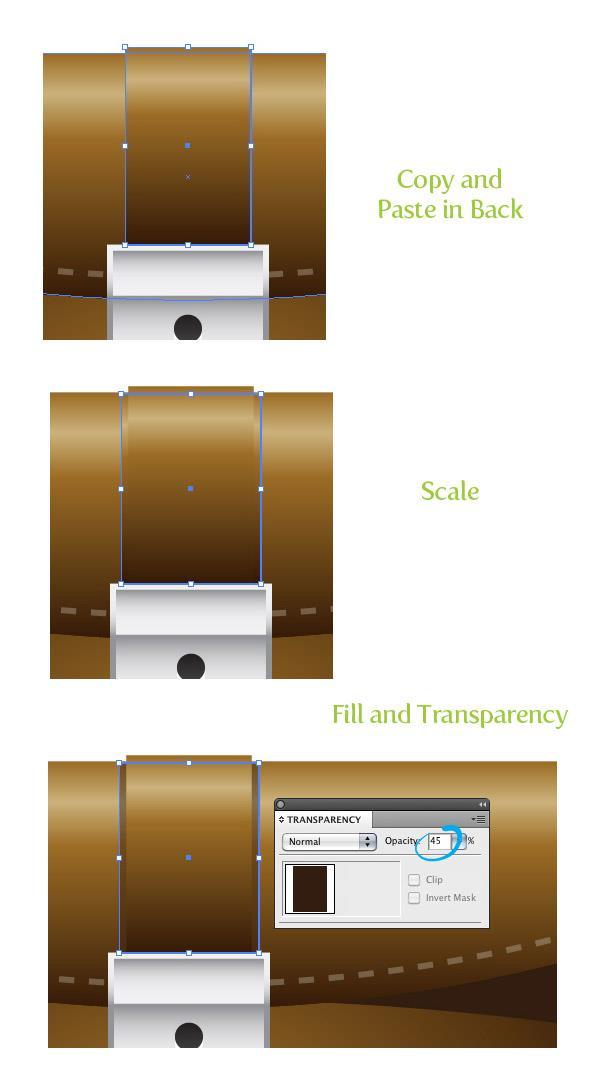
26 Step 17 Select the new rectangle, Copy (Command + C), and Paste in Back (Command + B). With the Selection tool (V), widen the shape slightly and make the top of the copy line up with the top of the flap. Change the copy to your dark brown color and set the Opacity to 45 from the Transparency panel.
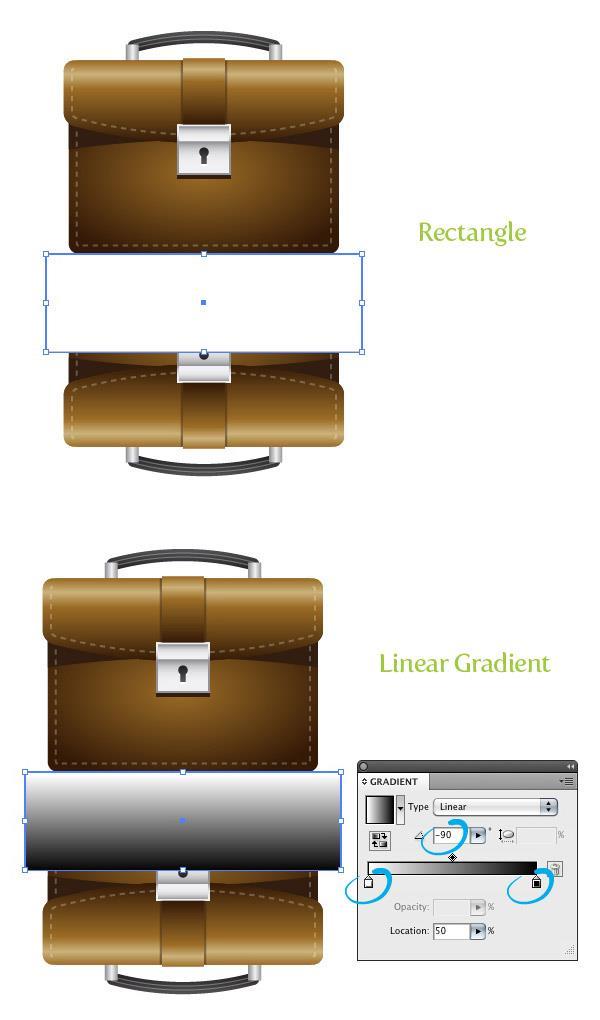
27

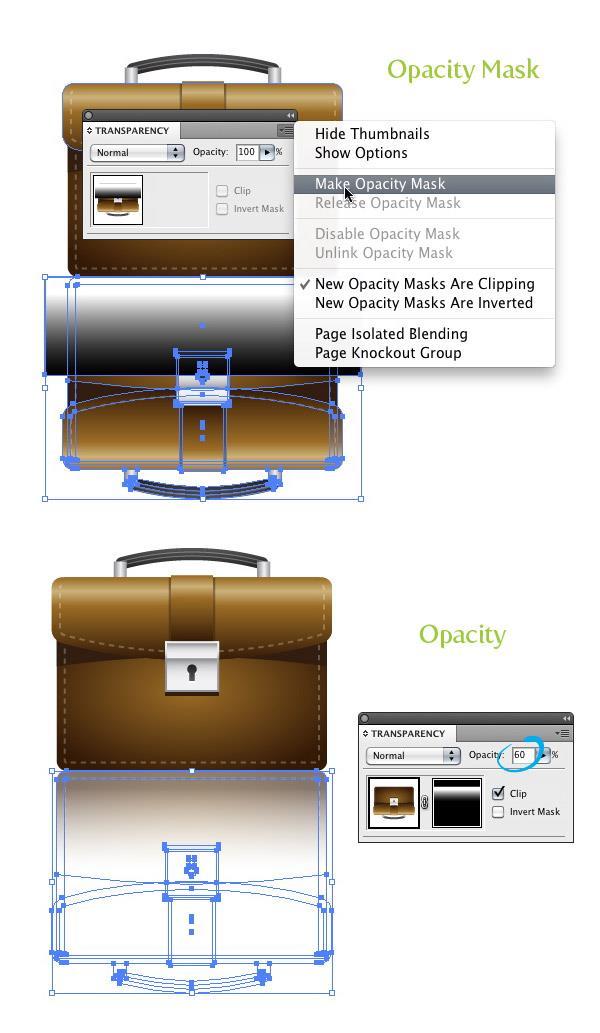
28 Step 18 Create a small rectangle on top of the flap shape. Fill the rectangle with a three color stop gradient. Change the first color stop to a gray color, the second white, and the third to a gray color. Step 19 Use the Selection tool (V), Hold down Alt/ Option, hold down Shift, and drag a copy of the rectangle to the opposite side of the top flap.

29 Step 20 Use the Rounded Rectangle tool and create a thin rounded rectangle connecting the two small rectangles. With the rounded rectangle selected, go Effect > Warp > Arc, make sure Horizontal is selected, and change the Bend to 18. Next, go Object > Expand Appearance.
30

31 Step 21 Fill the arc shape with a linear gradient, change the first color stop to a dark gray color, the second color stop to black, and change the Angle to -90. Step 22 Offset the arc shape by -4 px and change the stroke color to a gray color. Select both arc shapes and send them behind the smaller square shapes.
32 Step 23
33 Select all the artwork we have created so far, Copy (Command + C), and Paste in Front (Command + F). With the copies still selected, go Object > Transform > Reflect. In the Reflect dialog change the Axis to Horizontal. Next, move the reflected copies right under the original artwork.
34
35 Step 24 Create a rectangle over top half of the reflection. Fill the rectangle with a linear gradient, change the first color stop to white, the second color stop to a rich black and change the Angle to -90.
36
37 Step 25 Select the reflection and gradient and choose Make Opacity Mask from the pop-up menu of the Transparency panel. Next, change the opacity of the mask to 60.
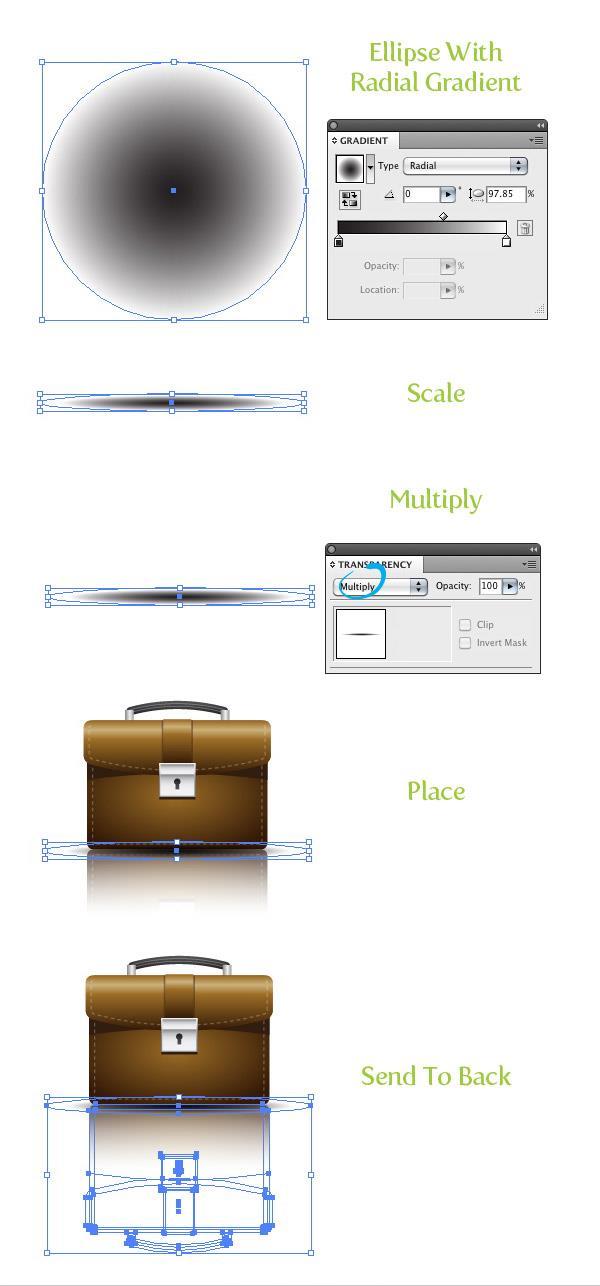
38
39 Step 26 Create an ellipse bigger than the main briefcase artwork and fill it with a radial gradient. Scale the ellipse down vertically to about an eight of its original size. Set the Blending Mode to Multiply from the Transparency panel and place the ellipse over the bottom part of the briefcase. Select the ellipse and opacity mask and send them behind all other artwork. All done! You can also place your icon on different color backgrounds. In my example I placed the icon on a dark gray radial gradient background.
40
41 Final Image Below is the final image again.
Create a Simple Storefront Icon
 Create a Simple Storefront Icon In this tutorial I will show you how to create a simple storefront icon using some rectangles, Illustrator Effects, and gradients. This icon is great for use in e-commerce
Create a Stylized GPS Icon
 Home About Resources Contact Shop Tutorials Tips and Tricks Interviews Inspiration Create a Stylized GPS Icon Tutorials July 9th, 2009 Location based software and peripherals are very popular these days.
Step 1. Blue Bird Tutorial
 Blue Bird Tutorial Using some basic shapes, effects, and gradients I will show you how to create a Twitter mascot for your blog or website. Twitter is a popular free web service for social networking and
Create a Happy Sun Character. Below is the final illustration we will be working towards.
 Create a Happy Sun Character Below is the final illustration we will be working towards. 1 Step 1 Create a new document and with the Ellipse tool (L), create an ellipse. 2 Step 2 Fill the ellipse with
Create a Twitter Style Bird Mascot - Vectortuts+
 Create a Twitter Style Bird Mascot Aug 4th in Illustration by Rype Using some basic shapes, effects, and gradients I will show you how to create a Twitter mascot for your blog or website. Twitter is a
ADOBE ILLUSTRATOR. Step 1. Dificultad: Intermedio Tiempo: 30 minutos 1 hora. Create a new document and with the Ellipse tool (L), create an ellipse.
, create an ellipse.") Dificultad: Intermedio Tiempo: 30 minutos 1 hora Step 1 Create a new document and with the Ellipse tool (L), create an ellipse. Lic. José Luis Solórzano Vera Página 1 Step 2 Fill the ellipse with a radial
Dificultad: Intermedio Tiempo: 30 minutos 1 hora Step 1 Create a new document and with the Ellipse tool (L), create an ellipse. Lic. José Luis Solórzano Vera Página 1 Step 2 Fill the ellipse with a radial
Adobe Illustrator. Mountain Sunset
 Adobe Illustrator Mountain Sunset Adobe Illustrator Mountain Sunset Introduction Today we re going to be doing a very simple yet very appealing mountain sunset tutorial. You can see the finished product
HOW TO CREATE A SUPER SHINY PENCIL ICON
 HOW TO CREATE A SUPER SHINY PENCIL ICON Tutorial from http://psd.tutsplus.com/ Compiled by INTRODUCTION The Pencil is one of the visual metaphors most used to express creativity. In this tutorial,
How to Create a Curious Owl in Illustrator
 How to Create a Curious Owl in Illustrator Tutorial Details Program: Adobe Illustrator Difficulty: Intermediate Estimated Completion Time: 1.5 hours Take a look at what we're aiming for, an inquisitive
Drawing the Red Christmas Bell
 Vector 3D Christmas Bells Thinking of drawing some Christmas bells for this Christmas? Read this illustrator tutorial to learn how to draw 5 different styles of vector Christmas bells using the 3D Revolve
How to Create Animated Vector Icons in Adobe Illustrator and Photoshop
 How to Create Animated Vector Icons in Adobe Illustrator and Photoshop by Mary Winkler (Illustrator CC) What You'll Be Creating Animating vector icons and designs is made easy with Adobe Illustrator and
Part 1- Fundamental Functions
 Part 1- Fundamental Functions Note: Alt+Tab will allow you to move between programs in the docker. Shift+Tab removes right pallets Tab removes all pallets Ctrl+1= centers art board Ctrl + 0= fill window
Create a Cute Furry Vector Monster in Illustrator
 Create a Cute Furry Vector Monster in Illustrator Other labs from this author can be found at http://www.blog.spoongraphics.co.uk/tutorials/create-a-cute-furry-vector-monster-inillustrator Follow these
How to Create a Landscape Wallpaper for your Desktop
 How to Create a Landscape Wallpaper for your Desktop Why not create a vector landscape wallpaper? In this simple tutorial, you will learn how to create an eye-appealing wallpaper quickly and effectively.
Adobe Photoshop CS5 Tutorial
 Adobe Photoshop CS5 Tutorial GETTING STARTED Adobe Photoshop CS5 is a popular image editing software that provides a work environment consistent with Adobe Illustrator, Adobe InDesign, Adobe Photoshop
TURN A PHOTO INTO A PATTERN OF COLORED DOTS (CS6)
") TURN A PHOTO INTO A PATTERN OF COLORED DOTS (CS6) In this photo effects tutorial, we ll learn how to turn a photo into a pattern of solid-colored dots! As we ll see, all it takes to create the effect is
TURN A PHOTO INTO A PATTERN OF COLORED DOTS (CS6) In this photo effects tutorial, we ll learn how to turn a photo into a pattern of solid-colored dots! As we ll see, all it takes to create the effect is
Step 1. Facebook Twitter Google+ Find us on Facebook. Vectortuts+ How to Create a Curious Owl in Illustrator CS4 Vectortuts+
 Joomla developers needed - Long term potential in India Copywriter Email Campaigns Wordpress Creative design Social media in UK More Freelance Jobs... Facebook Twitter Google+ Find us on Facebook Step
Undress a Giraffe in Photoshop
 Undress a Giraffe in Photoshop By: Alexandra Fomicheva Have you ever wanted to know what a Giraffe looks like without its spots? If so, this tutorial is for you, you pervert! Today, we will demonstrate
Creating Digital Illustrations for Your Research Workshop IV Illustration Demo Part II
 Creating Digital Illustrations for Your Research Workshop IV Illustration Demo Part II Final Figure Workshop IV Components Topics & Techniques covered How to randomly transform a group of individual shapes.
The original image. Let s get started! The final rainbow effect. The photo sits on the Background layer in the Layers panel.
 Add A Realistic Rainbow To A Photo In this Photoshop photo effects tutorial, we ll learn how to easily add a rainbow, and even a double rainbow, to a photo! As we ll see, Photoshop ships with a ready-made
Adobe Photoshop CC 2018 Tutorial
 Adobe Photoshop CC 2018 Tutorial GETTING STARTED Adobe Photoshop CC 2018 is a popular image editing software that provides a work environment consistent with Adobe Illustrator, Adobe InDesign, Adobe Photoshop,
ADOBE PHOTOSHOP CS TUTORIAL
 ADOBE PHOTOSHOP CS TUTORIAL A D O B E P H O T O S H O P C S Adobe Photoshop CS is a popular image editing software that provides a work environment consistent with Adobe Illustrator, Adobe InDesign, Adobe
TEXT PERSPECTIVE SHADOW EFFECT
 TEXT PERSPECTIVE SHADOW EFFECT In this Photoshop text effects tutorial, we ll learn how to create a popular, classic effect by giving text a perspective shadow as if a light source behind the text was
11 Advanced Layer Techniques
 11 Advanced Layer Techniques After you ve learned basic layer techniques, you can create more complex effects in your artwork using layer masks, path groups, filters, adjustment layers, and more style
Chapter 8. Working with Transparency, Effects, and Graphic Styles and Recoloring Artwork Delmar, Cengage Learning
 Chapter 8 Working with Transparency, Effects, and Graphic Styles and Recoloring Artwork 2011 Delmar, Cengage Learning Objectives Use the Transparency panel and the Color Picker Recolor artwork Apply effects
A Classic Icon. Overview: Finding different ways to construct the same iconic image.
 A Classic Icon Five Ways to Re-create Simple Shapes Overview: Finding different ways to construct the same iconic image. You can construct even the simplest of iconic images in many ways. Patricia McShane
Perspective Shadow Text Effect In Photoshop
 Perspective Shadow Text Effect In Photoshop Written by Steve Patterson. In this Photoshop text effects tutorial, we ll learn how to create a popular, classic effect by giving text a perspective shadow
How to Create Website Banners
 How to Create Website Banners In the following instructions you will be creating banners in Adobe Photoshop Elements 6.0, using different images and fonts. The instructions will consist of finding images,
Create a new image: 10 IN height and 16 IN width, 300 dpi.
 The images needed for this project are on my website. Create a new image: 10 IN height and 16 IN width, 300 dpi. Create a new layer and fill the layer with white.. Create a radial gradient by using following
By Washan Najat Nawi
 By Washan Najat Nawi how to get started how to use the interface how to modify images with basic editing skills Adobe Photoshop: is a popular image-editing software. Two general usage of Photoshop Creating
METAL TEXT EFFECT. Step 1: Create A New Document. Step 2: Fill The Background With Black
 METAL TEXT EFFECT In this text effects tutorial, we ll learn how to easily create metal text, a popular effect widely used in video games and movie posters! It may seem like there s a lot of steps involved,
Introduction to Photoshop
 Introduction to Photoshop Photoshop Creative Cloud (CC) Start -> All Programs -> Classes -> Web Expressions -> Tutorials Google Photoshop CC tutorial Color Replacement Image -> Adjustments -> Replace
How to Draw a Realistic iphone 4 with
 Home Freebies Submit Your Work Contact Us How to Draw a Realistic iphone 4 with Photoshop Jan 3 2011 By Mohammad Jeprie 34 Comments In this tutorial, we will draw a realistic-looking iphone 4 using Photoshop.
CREATE A BURNT EDGE EFFECT
 CREATE A BURNT EDGE EFFECT One of the all-time classic effects in Photoshop is the burnt edge, and there s lots of different ways to create it, but in this Adobe Photoshop tutorial, we re going to look
Create a Multicolored Splashed Text Effect in Adobe Illustrator
 Create a Multicolored Splashed Text Effect in Adobe Illustrator by Diana Toma17 Nov 2014 What You'll Be Creating In this tutorial you will learn how to create a multicolored splashed text effect in Adobe
Adobe Illustrator Craft a Dramatic Vector Landscape Environment
 Adobe Illustrator Craft a Dramatic Vector Landscape Environment This tutorial will show the intermediate Adobe Illustrator artist how to make a dramatic landscape environment. You should have a basic understanding
A quick note: We hope that you will find something from the Tips and Tricks that will add a little pizazz to your yearbook pages!
 A quick note: The following pages are tips and tricks for Basic Photoshop users. You may notice that some instructions indicate that non-awpc fonts were used, and that some colors were created using the
Using layer masks to remove backgrounds with Photoshop CS5 and CS6
 Using layer masks to remove backgrounds with Photoshop CS5 and CS6 Use layer masks to combine these pictures into this You will learn: 1. Layers and layer masks 2. Brushes 3. Layer styles 4. Type tool
Exploring Photoshop Tutorial
 Exploring Photoshop Tutorial Objective: In this tutorial we will create a poster composed of three distinct elements: a Bokeh, an image and title text. The Bokeh is an effect which is sometimes seen in
Tutorial: Gradient Noise Reduction
 Introduction This photoshop tutorial will show how to use a linear gradient to selectively apply noise reduction to an image. This tutorial assumes that you have the photoshop plug-in version of Noise
Lab for Working with Adobe Photoshop
 Lab for Working with Adobe Photoshop Try the tasks listed with one of the sample images supplied (You will find them in the Course Materials section of Blackboard as the file sample_images.zip. You will
Color and More. Color basics
 Color and More In this lesson, you'll evaluate an image in terms of its overall tonal range (lightness, darkness, and contrast), its overall balance of color, and its overall appearance for areas that
GETTING STARTED. 0 P a g e B a s i c s o f A d o b e P h o t o s h o p A g a P r i v a t e I n s t i t u t e f o r c o m p u t e r s c i e n c e
 GETTING STARTED 0 P a g e B a s i c s o f A d o b e P h o t o s h o p Adobe Photoshop: is a popular image editing software that provides a work environment consistent with Adobe Illustrator, Adobe InDesign,
How To Create a Stylish Skull Based Vector Illustration
 How To Create a Stylish Skull Based Vector Illustration The skull and crossed pistons mark is a popular adaption of the tradition skull and crossbones symbol and is commonly seen in motorcycle culture,
SAVING, LOADING AND REUSING LAYER STYLES
 SAVING, LOADING AND REUSING LAYER STYLES In this Photoshop tutorial, we re going to learn how to save, load and reuse layer styles! Layer styles are a great way to create fun and interesting photo effects
PhotoFiltre DEPARTMENT OF EDUCATION
 DEPARTMENT OF EDUCATION PhotoFiltre Updated on 20 February 2010 This resource is part of the resource collection available through the ecentre for teachers. www.ecentre.education.tas.gov.au PhotoFiltre
TV Aquarium. Create a new document. 8.5 x 11, 300 dpi. Save as TV Aquarium Your Name. Create TV shape. Use Pen
 Create a new document. 8.5 x 11, 300 dpi. Save as TV Aquarium Your Name. Create TV shape. Use Pen Tool, Convert Point Tool and Direct Selection Tool. We need side shapes to create patches of light and
Photo Within A Photo - Photoshop
 Photo Within A Photo - Photoshop Here s the image I ll be starting with: The original image. And here s what the final "photo within a photo" effect will look like: The final result. Let s get started!
Downloaded From : Working with Photoshop 7.0
 Adobe Photoshop 1. Introduction What is Adobe Photoshop? Adobe Photoshop is a web designing software used for giving effects and filters to an image to make it more appealing and attractive. Brought out
All Creative Suite Design documents are saved in the same way. Click the Save or Save As (if saving for the first time) command on the File menu to
 command on the File menu to") 1 The Application bar is new in the CS4 applications. It combines the menu bar with control buttons that allow you to perform tasks such as arranging multiple documents or changing the workspace view.
1 The Application bar is new in the CS4 applications. It combines the menu bar with control buttons that allow you to perform tasks such as arranging multiple documents or changing the workspace view.
PHOTOSHOP & ILLUSTRATOR BOOTCAMP
 FALL 2014 - ELIZABETH LIN PHOTOSHOP & ILLUSTRATOR BOOTCAMP ILLUSTRATOR ALIGNMENT To access the alignment panel, go to Window -> Align. You should see a panel like the one below. This panel allows you to
BORDERS AND FRAMES - DROP SHADOW
 BORDERS AND FRAMES - DROP SHADOW In this tutorial in our series on creating photo borders and frames in Photoshop, we ll learn how to quickly add canvas space and a drop shadow to an image to create a
Using Adobe Photoshop
 Using Adobe Photoshop 4 Colour is important in most art forms. For example, a painter needs to know how to select and mix colours to produce the right tones in a picture. A Photographer needs to understand
Chapter 4: Draw with the Pencil and Brush
 Page 1 of 15 Chapter 4: Draw with the Pencil and Brush Tools In Illustrator, you create and edit drawings by defining anchor points and the paths between them. Before you start drawing lines and curves,
WORN, TORN PHOTO EDGES EFFECT
 Photo Effects: CC - Worn, Torn Photo Edges Effect WORN, TORN PHOTO EDGES EFFECT In this Photoshop tutorial, we ll learn how to take the normally sharp, straight edges of an image and make them look all
Animated Snowman. Image size: 11 w x 17 h 300 dpi
 Animated Snowman Image size: 11 w x 17 h 300 dpi Step 1 First of all, you ll need the texture on my website. Now open a new document. I usually work on really big documents because I can work on the details
Everything you ever wanted to know about Layer Styles with Adobe Photoshop CS3 - CS5
 Everything you ever wanted to know about Layer Styles with Adobe Photoshop CS3 - CS5 A layer style is one or more effects applied to a layer or layer group. You can apply one of the preset styles provided
Reveal the mystery of the mask
 Reveal the mystery of the mask Imagine you're participating in a group brainstorming session to generate new ideas for the design phase of a new project. The facilitator starts the brainstorming session
How to blend, feather, and smooth
 How to blend, feather, and smooth Quite often, you need to select part of an image to modify it. When you select uniform geometric areas squares, circles, ovals, rectangles you don t need to worry too
FLAMING HOT FIRE TEXT
 FLAMING HOT FIRE TEXT In this Photoshop text effects tutorial, we re going to learn how to create a fire text effect, engulfing our letters in burning hot flames. We ll be using Photoshop s powerful Liquify
INTRO TO LAYERS (PART 2)
") Adobe Photoshop Elements INTRO TO LAYERS (PART 2) By Dave Cross In Part 1, we talked about the main concept behind layers and why they re so important. Now we ll take it a step further and show how to
Adobe Photoshop Elements INTRO TO LAYERS (PART 2) By Dave Cross In Part 1, we talked about the main concept behind layers and why they re so important. Now we ll take it a step further and show how to
CREATE A 60 S PSYCHEDELIC STYLE CONCERT POSTER
 CREATE A 60 S PSYCHEDELIC STYLE CONCERT POSTER Tutorial from http://psd.tutsplus.com/ Compiled by INTRODUCTION In this tutorial, we will go through the steps to create a retro 1960s psychedelic
Silhouette Connect Layout... 4 The Preview Window... 5 Undo/Redo... 5 Navigational Zoom Tools... 5 Cut Options... 6
 user s manual Table of Contents Introduction... 3 Sending Designs to Silhouette Connect... 3 Sending a Design to Silhouette Connect from Adobe Illustrator... 3 Sending a Design to Silhouette Connect from
Clipping Masks And Type Placing An Image In Text With Photoshop
 Clipping Masks And Type Placing An Image In Text With Photoshop Written by Steve Patterson. In a previous tutorial, we learned the basics and essentials of using clipping masks in Photoshop to hide unwanted
Using Adobe Photoshop
 Using Adobe Photoshop 6 One of the most useful features of applications like Photoshop is the ability to work with layers. allow you to have several pieces of images in the same file, which can be arranged
66 Photoshop 7 Image Effects
 Project 7: Engraving Collage STEP 1. Opening the Source Photos Choose File, Open (CtrI/Command+O) and open the Book\Sources\picO1.jpg, Book\Sources\pic_O2.jpg, and Book\Sources\picO3.jpg CD-ROM. files
Welcome to Corel DESIGNER, a comprehensive vector-based package for technical graphic users and technical illustrators.
 Workspace tour Welcome to Corel DESIGNER, a comprehensive vector-based package for technical graphic users and technical illustrators. This tutorial will help you become familiar with the terminology and
This section will take you through the process of drawing a fixture base. Your entire part, in all views, should look like Figure 1.
 Fixture Base Preface This section will take you through the process of drawing a fixture base. Your entire part, in all views, should look like Figure 1. Figure 1 92 / Scripted 3D Drawings: Fixture Base
Figure 9.10 This shows the File Scripts menu, where there is now a new script item called Delete All Empty layers.
 Layers Layers play an essential role in all aspects of Photoshop work. Whether you are designing a Web page layout or editing a photograph, working with layers lets you keep the various elements in a design
Functions added in CLIP STUDIO PAINT Ver are marked with an *.
 Preface > Changes in Ver.1.7.1 Preface Changes in Ver.1.7.1 The functions added/changed in CLIP STUDIO PAINT Ver.1.7.1 are as follows. Functions added in CLIP STUDIO PAINT Ver.1.7.1 are marked with an
PHOTOSHOP DESIGN EFFECTS FOR INTERMEDIATE TO ADVANCED USERS
 PHOTOSHOP DESIGN EFFECTS FOR INTERMEDIATE TO ADVANCED USERS Copyright 2012, National Seminars Training Introduction This class is all about design effects in Adobe Photoshop. For example, let s say that
Panoramas and the Info Palette By: Martin Kesselman 5/25/09
 Panoramas and the Info Palette By: Martin Kesselman 5/25/09 Any time you have a color you would like to copy exactly, use the info palette. When cropping to achieve a particular size, it is useful to use
EXTREME CONTRAST PHOTO EFFECT
 EXTREME CONTRAST PHOTO EFFECT In this Photoshop tutorial, we re going to learn how to use layers, layer blend modes, some noise, a little sharpening, and a simple adjustment layer to easily give a photo
ADD A REALISTIC WATER REFLECTION
 ADD A REALISTIC WATER REFLECTION In this Photoshop photo effects tutorial, we re going to learn how to easily add a realistic water reflection to any photo. It s a very easy effect to create and you can
Learning Adobe Illustrator CS5
 Module 1 Contents Chapter 1: Introduction to Adobe Illustrator The Adobe Illustrator Screen...1-1 The Tools Panel...1-3 Drawing Lines...1-3 Tearing off a Panel... 1-3 Drawing Different Line Types... 1-4
Photoshop CS2. Step by Step Instructions Using Layers. Adobe. About Layers:
 About Layers: Layers allow you to work on one element of an image without disturbing the others. Think of layers as sheets of acetate stacked one on top of the other. You can see through transparent areas
Project 25 Page 1 ` JAZZ POSTCARD
 Project 25 Page 1 ` JAZZ POSTCARD Reset all tools! Create the Background 1. Create a new RGB document, 4.25 in. wide by 5.75 in. high at 100 dpi with a white background. 2. Click the foreground color swatch
12. Creating a Product Mockup in Perspective
 12. Creating a Product Mockup in Perspective Lesson overview In this lesson, you ll learn how to do the following: Understand perspective drawing. Use grid presets. Adjust the perspective grid. Draw and
How to Make Instagram Filters in Photoshop: Earlybird
 How to Make Instagram Filters in Photoshop: Earlybird JANUARY 9, 2013 BY MELANIE MAYNE Cell phone cameras and apps like Instagram have made it possible for anyone to practice and enjoy the art of Photography.
PanosFX CARTOONS User guide PANOSFX CARTOONS. Photoshop actions - for PS CC, CS6, CS5, CS4, CS3. User Guide
 PANOSFX CARTOONS Photoshop actions - for PS CC, CS6, CS5, CS4, CS3 User Guide CONTENTS 1. THE BASICS... 1 1.1. About the effects... 1 1.2. How the actions are organized... 1 1.3. Installing the actions
Adobe Photoshop Chapter 5 Study Questions /50 Total Points
 Name: Class: Date: Adobe Photoshop Chapter 5 Study Questions /50 Total Points True/False Indicate whether the statement is true or false. 1. Bitmapped images are resolution-independent, maintaining their
Working with Live Paint
 Adobe Illustrator Working with Live Paint In Illustrator CS2, Adobe introduced the Live Paint feature, which revolutionized how a designer artist could add color to a drawing. The Live Paint feature allows
XXXX - MAKING A FLYER BOOKLET COVER 1 N/08/08
 INTRODUCTION TO GRAPHICS Making a flyer booklet cover Information Sheet No. XXXX Create a new document with these settings. Note that you will be using 300 dpi because this will be made for print. Keepit
A Basic Guide to Photoshop CS Adjustment Layers
 A Basic Guide to Photoshop CS Adjustment Layers Alvaro Guzman Photoshop CS4 has a new Panel named Adjustments, based on the Adjustment Layers of previous versions. These adjustments can be used for non-destructive
c) Save the document as taller3p1_tunombre
 Save the document as taller3p1_tunombre") WORKSHOP# 3 DRAW WITH INKSCAPE Preparing the page 1. Enter Inkscape and from the File menu, go to Document Properties. 2. Prepare a page with the following characteristics: a) Format A4 (millimeters as
WORKSHOP# 3 DRAW WITH INKSCAPE Preparing the page 1. Enter Inkscape and from the File menu, go to Document Properties. 2. Prepare a page with the following characteristics: a) Format A4 (millimeters as
New functions to CLIP STUDIO PAINT Ver are marked with a * in the text.
 Preface > Changes in Ver.1.8.0 Preface Changes in Ver.1.8.0 The following features have been added or changed in CLIP STUDIO PAINT Ver.1.8.0. New functions to CLIP STUDIO PAINT Ver.1.8.0 are marked with
Winter Card.
 Winter Card Used images: http://www.cgtextures.com/texview.php?id=24321&phpsessid=95e8e8290894cc5194898 e16d1dddb4c http://www.cgtextures.com/texview.php?id=14285&phpsessid=95e8e8290894cc5194898 e16d1dddb4c
Compositing. Compositing is the art of combining two or more distinct elements to create a sense of seamlessness or a feeling of belonging.
 Compositing Compositing is the art of combining two or more distinct elements to create a sense of seamlessness or a feeling of belonging. Selection Tools In the simplest terms, selections help us to cut
The original image. The final rainbow effect.
 ADD A realistic rainbow to a photo In this Photoshop photo effects tutorial, we re going to learn how to easily add a rainbow, even a double rainbow, to a photo. Of course, as with most photo effects,
Create a Vector Glass With Layered Reflections to Create Depth
 Create a Vector Glass With Layered Reflections to Create Depth 1) Draw a rectangle at approx 3:2 ratio. Next, use the ellipse tool and hold Ctrl to create a perfect circle. Position the circle at the bottom
This Photoshop Tutorial 2012 Steve Patterson, Photoshop Essentials.com. Not To Be Reproduced Or Redistributed Without Permission.
 How To Replace The Sky In A Photo In this Photoshop tutorial, we ll learn how to easily replace the sky in a photo! We ll use a basic selection tool and a layer mask to separate the sky from the area below
Digital Image Manipulation 2014
 Week 4 Advanced Type Techniques- create special effect type Step 1 Create a new 1024 x 768 px document. Set the document background color to light pink or follow my colour (#f8cece) Create the text using
A Basic Guide to Photoshop Adjustment Layers
 A Basic Guide to Photoshop Adjustment Layers Photoshop has a Panel named Adjustments, based on the Adjustment Layers of previous versions. These adjustments can be used for non-destructive editing, can
This section will take you through the process of drawing an oblique block. Your entire part, in all views, should look like Figure 1.
 Oblique Block Preface This section will take you through the process of drawing an oblique block. Your entire part, in all views, should look like Figure 1. Figure 1 68 / 3D Scripted Drawings: Oblique
How to use advanced color techniques
 Adobe Photoshop CS5 Extended Project 6 guide How to use advanced color techniques In Adobe Photoshop CS5, you can adjust an image s colors in a variety of ways. Using the techniques described in this guide,
XXXX - ILLUSTRATING FROM SKETCHES IN PHOTOSHOP 1 N/08/08
 INTRODUCTION TO GRAPHICS Illustrating from sketches in Photoshop Information Sheet No. XXXX Creating illustrations from existing photography is an excellent method to create bold and sharp works of art
Movie Merchandising. Movie Poster. Open the Poster Background.psd file. Open the Cloud.jpg file.
 Movie Poster Open the Poster Background.psd file. Open the Cloud.jpg file. Movie Merchandising Choose Image>Adjustments>Desaturate to make it a grayscale image. Select the Move tool in the Toolbar and
Reflection Project. Please start by resetting all tools in Photoshop.
 Reflection Project You will be creating a floor and wall for your advertisement. Before you begin on the Reflection Project, create a new composition. File New: Width 720 Pixels / Height 486 Pixels. Resolution
Chapter 5 Sectional Views
 Chapter 5 Sectional Views There are a number of different types of sectional views that can be drawn. A few of the more common ones are: full sections, half sections, broken sections, rotated or revolved
Basic Digital Dark Room
 Basic Digital Dark Room When I took a good photograph I almost always trying to improve it using Photoshop: exposure, depth of field, black and white, duotones, blur and sharpness or even replace washed