Crewel Embroidery Instructions Design: Motley Mums (Version 1, 2, 3, & 4)
|
|
|
- Ferdinand Hudson
- 6 years ago
- Views:
Transcription
, No.")
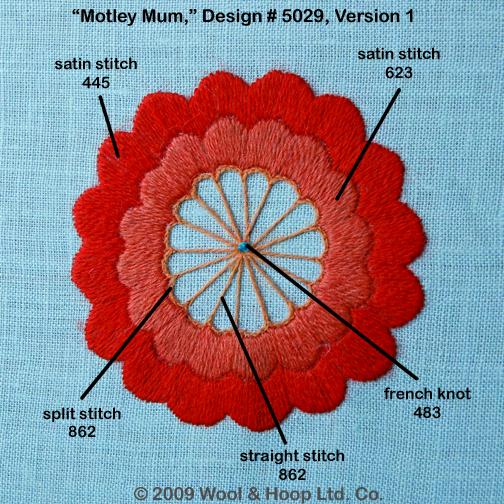
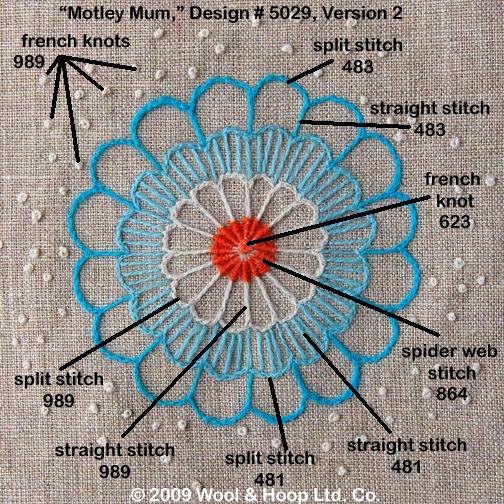
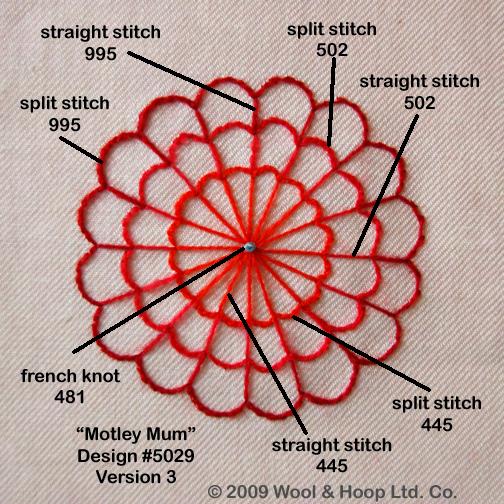
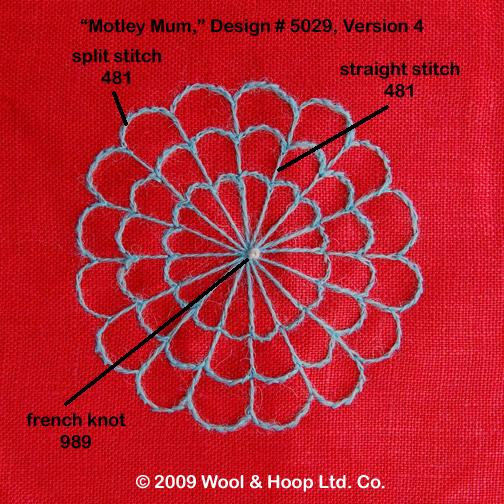
1 Crewel Embroidery Instructions Design: Motley Mums (Version,,, & 4) What you ll need: 9" x 9" Linen (Version : Sky Blue plain weave; Version : Natural plain weave; Version : Oyster White twill, Version 4: Red plain weave), No. 4 Chenille Needle, Scissors, Pencil, 6" Embroidery Hoop, Appleton Crewel Wool (Version : 445, 48, 6, 86 - skein each; Version : 48, 48, 6, 864, skein each; Version : 445, 48, 50, skein each, Version 4: 48, skein each) Instructions: Tracing Tape the design onto a light table or a window with sunlight coming through. Center and tape your linen fabric over the design and with a pencil trace the design onto the fabric. Hooping (Fig. ) Lay the inner hoop on a flat surface. Center your fabric on top of inner hoop with design facing up. With the outer hoop adjusted so that it is just bigger than the inner hoop, place it over the fabric and press down around the inner hoop until the fabric is evenly caught between the two hoops. Adjust fabric as necessary and tighten the screw on the outer hoop until the fabric is taut like a drum. You will want to stop and retighten your fabric occasionally, because it will naturally loosen as you work. Threading (Fig. ) Take the thread in your dominant hand while holding the needle in your other hand. Make a one-inch loop at one end of the thread. Lasso it around the needle and tug thread away from the needle to make a crease. Slide the needle out and pinch thread between your thumb and forefinger about /8 inch from the fold. Guide the folded tip of the thread through the eye of the needle. Stitching Make a small knot at the end of the thread. Use one of the four Color & Stitch Diagrams to find the matching colors and stitches for you re the design. Refer to the list of Embroidery Stitches below for instructions on how to make each stitch. Ending (Fig. ) To end a thread, do not knot it. Instead, pull it through several existing stitches on the underside of your work, without going through to the front. Do this two or three times. Trim the excess and begin with a new thread in the same way you just ended by pulling it through several existing stitches on the underside of your work. The linen fabric is much sturdier than the wool thread, so if your thread wears too thin or starts to break, end it and begin again with a fresh one. Once you have created enough stitches, use this ending technique in place of the knotting technique outlined above. Fig. Fig. Fig Wool & Hoop Ltd. Co.
 First, make a single Straight Stitch. Then, come up through the middle of your Straight Stitch at A.")
2 Crewel Embroidery Stitches: Straight Stitch (Fig. 4) The simplest of stitches. Drive the threaded needle from the back through the front of your fabric at A. Then insert the needle into the fabric front at B and push through. Easy! Split Stitch (Fig. 5) First, make a single Straight Stitch. Then, come up through the middle of your Straight Stitch at A. Next, go down at B and come up at C, again splitting the stitch. Go down at D and so on. Take care to make shorter stitches around tight corners. Satin Stitch (Fig. 6) Satin Stitch is a combination of the Straight Stitch and the Split Stitch. First, outline the area to be Satin Stitched using Split Stitch. Second, beginning at the widest part of the shape you are to fill, make Straight Stitches one after the other, very close together. This is a classic embroidery stitch that requires practice to master. French Knot (Fig. 7) Drive your thread through to the front of your fabric. Wrap the thread around the needle twice. Insert the needle very near to where it came up. While pulling the thread taut with your opposite hand, SLOWLY push the needle down through the fabric. A knot will form on the surface. Presto! You are finished. Fig. 4 Fig. 5 Fig. 6 Fig. 7 A B A C B D Circular Spider s Web Stitch (Fig. 8) Starting from the center and working out, use Straight Stitch to make "spokes" that will form the structure of the web. Then slide the needle under two of the spokes (A & B) near the center of the web. Pull your thread taut. Again slide the needle under two more spokes (B & C). Pull your thread taut and toward the center of the web. Continue by sliding the needle under C & D and then under D & E, and so on, filling the web from the center out. Your web is finished when the spokes 4 are no longer visible. Fig. 8 Finishing: Stretching & Pressing (Fig. 9) Lay your finished crewelwork on an ironing board face down. Mist lightly with water from a spray bottle. Cover with a thin piece of fabric. Using a warm iron, firmly press down on your embroidery pulling the fabric at the corners as needed to keep it square. Work quickly so as not to scorch your work. Flip the fabric and press firmly on the underside. Fig. 9 A B thin cloth on top E D C pull corners of embroidery to keep it square embroidery underneath Wool & Hoop Ltd. Co. It's a crewel world For more crewel kits, crewel ideas and crewel supplies, visit

3
4
5
6
7
DOG ROSE PROJECT Level Beginner
 DOG ROSE PROJECT Level Beginner Introduction This project is aimed at the beginner. It is recommended that you get detailed instructions on the technique from either the DVD The Long & The Short Of It
SWEET PEA PROJECT Level Beginner
 SWEET PEA PROJECT Level Beginner Introduction This project is aimed at the beginner. It is recommended that you get detailed instructions on the technique from either the DVD The Long & The Short Of It
Pink Butterflies - Kit by Radda Pty Ltd 2005 Radda Pty Ltd
 Pink Butterflies - Kit by Radda Pty Ltd 2005 Radda Pty Ltd This kit was designed and created on StitchCraft software http://www.stitchcraft.info INSTRUCTIONS FOR CROSS STITCH 1. Always begin stitching
Cross Stitch. Created by Becky Stern
 Cross Stitch Created by Becky Stern Guide Contents Guide Contents Overview Instructions Buy Ohm Sweet Ohm Kit 2 3 4 20 Adafruit Industries http://learn.adafruit.com/cross-stitch Page 2 of 20 Overview So
T U T O R I A L. Learn To Do Embroidery Cactus Flowers TRISH BURR EMBROIDERY
 T U T O R I A L Learn To Do Embroidery Cactus Flowers TRISH BURR EMBROIDERY Cactus flower Level All Size approx 9 Includes 2 projects: Project One: Cactus Flower Project Two: Pair of cactus flowers. Digital
Scottish Diaspora Tapestry
 Prestoungrange Arts Festival The Prestoungrange Gothenburg 227-229 High Street Prestonpans EH32 9BE Dear Stitcher Scottish Diaspora Tapestry Thank you for helping us create this lasting legacy, Scotland
A. Preparing the fabric (not shown):
:") INSERTING ZIPPERS - CENTER INSERTION The zipper can be snapped on to the right or to the left side of the needle so that you can sew close to the zipper. When sewing on the right side of the zipper, attach
INSERTING ZIPPERS - CENTER INSERTION The zipper can be snapped on to the right or to the left side of the needle so that you can sew close to the zipper. When sewing on the right side of the zipper, attach
Diamond Tile Cyber Class - Lesson 1
 1 P a g e Diamond Tile Cyber Class - Lesson 1 By Alison Cole Embroidery All embroidery is worked with a waxed length of Gutermann thread in a #10 crewel needle. After waxing the Gutermann, make sure to
Maritime Knots. Materials: Directions: Red jute twine Scissors
 Maritime Knots Red jute twine 1. Measure twine to gift box size (with a little extra). 2. Cut 6 equal lengths. 3. Separate into two sets of 3 strands. 4. Form each into a loop. 5. Arrange side-by-side.
Organza Shadowbox Ornament
 Organza Shadowbox Ornament Illuminate your holiday decor with this unique shadowbox ornament! Two layers of sheer embroidered organza create a beautiful scene with depth and dimension. When lights shine
AMermaid s. Basic technique. Raising the surface. Jennifer Rochester creates simply folded containers encrusted with stitch
 Jennifer Rochester creates simply folded containers encrusted with stitch PHOTO BY ALAN BENNINGTON For centuries, nomadic tribes have used folded squares of fabric to create soft containers. These folded
rozenboek - Kit Dit borduurpakket wordt u gratis aangeboden door Wilma Karels Patchwork & Quilten
 rozenboek - Kit Dit borduurpakket wordt u gratis aangeboden door Wilma Karels Patchwork & Quilten www.wilmakarels.nl INSTRUCTIONS FOR CROSS STITCH 1. Always begin stitching from the centre of your design
NOTES 1. Please wash, dry & iron your fabric before beginning. 2. Use a 1/4 seam allowance throughout. 3. All seams are sewn Right Sides together.
 OTHER TOOLS & SUPPLIES - fiber stuffing or fabric scraps - paper printer - 24 contrasting embroidery floss & an embroidery hoop, for eyes - 2 yds of ribbon, for hanging (optional) - basic sewing supplies:
Design, pattern, text and images are 2017 Anna Maria Horner and are intended for personal use.
 Introducing the Snuggle & Play Dress inspired by my feisty, littlest girl, Mary Anna, who loves being able to get dressed by herself every morning. The ease and comfort of the stretch knit top of the dress
Orchids - Kit by T Gillespie Crafted Software
 Orchids - Kit by T Gillespie Crafted Software This kit was designed and created on StitchCraft software http://www.stitchcraft.info INSTRUCTIONS FOR CROSS STITCH 1. Always begin stitching from the Centre
Triangle Earrings. Another important step is to use split or jump rings on the hooks. They help the earrings dangle more freely.
 Triangle Earrings Description: The Triangle Earrings are based on the Celtic Triangle knot, which is an artistic design called the Triquetra. This Celtic symbol represents the Trinity as well as Body,
blauwkwa - Kit Dit borduurpakket wordt u gratis aangeboden door Wilma Karels Patchwork & Quilten
 blauwkwa - Kit Dit borduurpakket wordt u gratis aangeboden door Wilma Karels Patchwork & Quilten www.wilmakarels.nl INSTRUCTIONS FOR CROSS STITCH 1. Always begin stitching from the centre of your design
Kim Christopherson Materials Needed:
 The Kristine Zipper Pouch: Small & Medium These in-the-hoop zipper pouches are PERFECT for organizing all those small items! This would also make the perfect gift for that hard to buy for person on your
INSTRUCTIONS BFC716 QIH LEOPARD BAG
 INSTRUCTIONS BFC716 QIH LEOPARD BAG This bag can be done in many ways! You can stitch it as I did the medium size bag shown at the end of this document (with the Orange trim). For this bag I embroidered
Merry Mailbox. Store all of your holiday cards in this Merry Mailbox!
 Merry Mailbox Store all of your holiday cards in this Merry Mailbox! A great addition to any Christmas decor, this mailbox is a fun and festive way to display all your holiday greetings. Read below for
Capri Pant Conversion
 Capri Pant Conversion Get ready for spring and summer by converting fulllength pants into sassy Capri pants! Adding embroidery and raising the hemline on an old pair of pants will be the start of a whole
Little Stitching Bear
 Little Stitching Bear A hand embroidery tutorial January brings some of the coldest weather of the year when, after a brisk and chilly walk with the Newfies (who simply adore these winter days), it s lovely
Basic Sewing Portfolio. Name
 Basic Sewing Portfolio Name Back stitching Whip stitch Starting in the corner of a sample begin stitching diagonally. 3-4 stitches Hold up the back stitching lever and backstitch to the beginning. Release
Creative Stitchery Embroidery
 Prior to Presenting: Creative Stitchery Embroidery Facilitator Script and Notes Note to facilitator: Presentation: Using a laser pointer with this lesson is helpful when showing how each stitch is made.
Thread Painting Pumpkin Patch
 Thread Painting Pumpkin Patch Supply List 1. Background fabric (1) 9 x9 piece of tone-on-tone fabric 2. Stabilizer (1) 9 x9 piece of clear water soluble stabilizer film such as 4X by Superior 3. (2) 9
The Three Witches. A 24" x 24" mini quilt and 16" pillow by Shelly Pagliai. The Three Witches. by Shelly Pagliai of Prairie Moon Quilts
 The Three Witches A 24" x 24" mini quilt and 16" pillow by Shelly Pagliai The Three Witches by Shelly Pagliai of Prairie Moon Quilts Riley Blake has a new Halloween-themed fabric line out, and it is the
Camo Carryall. Project Needs & Notes
 Camo Carryall Carry your gear in style with this sturdy carryall! Perfect for travel, camping, sporting, laundry, and more, this all-terrain bag is a terrific way to tote your belongings. Project Needs
Christmas Bow-tique Stocking
 Christmas Bow-tique Stocking Add a stunning bow to your Christmas stockings for a lovely, elegant look. The bold bow is a fabulous way to customize a stocking for your loved ones. Use red and green for
Stretchy Headbands: Pleated & Turban Styles
 Published on Sew4Home Stretchy Headbands: Pleated & Turban Styles Editor: Liz Johnson Tuesday, 15 March 2016 1:00 You've seen these awesome headbands everywhere. They're a go-to solution for yoga class,
Knitting 101 Pamela Girard
 Knitting 101 Pamela Girard http://www.illuminatedspaces.com/ithreads/ More information for Beginners: The All New Teach Yourself to Knit by Evie Rosen Leisure Arts Boye needles and information http://www.simplicity.com/t-boye.aspx
Made for Each Other Pillows
 Two embroidered pillows create the shape of a heart when displayed together. Use to decorate your home, or give as a wedding gift! Project Needs & Notes: - 18" pillow forms - 1 1/2 yards print cotton fabric
Mini 4-H SEWING PROJECT
 Mini 4-H SEWING PROJECT Each Mini 4-H'er can take only one of the projects offered. All Mini 4-H Projects are entered on the Wednesday before the fair. Mini 4-H is open to 4-H'ers who are currently in
A Button Owl Sewing Pattern.
 A Button Owl Sewing Pattern HELLO! Are you ready to start sewing? At the end of this fun project, you will not only have a cute BUTTON OWL, you will also be able to tell your friends that you know how
Thread Painting. First Flowers
 Thread Painting First Flowers Supply List 1. Background fabric (1) 8 x10 piece of blue batik or tone-on-tone 2. Stabilizer (2) 8 x8 pieces of clear water soluble stabilizer film such as 4X by Superior
squid amigurumi free crochet pattern
 squid amigurumi free crochet pattern - squid amigurumi - 2 - introduction - squid amigurumi This angry little squid is ready to rage! The fun conical shape is adorned with two triangular fins and 8 cute
BEAD KNITTING. Shimmery. knit necklace. An easy-to-knit crystal necklace hides a magnetic clasp. designed by Ea Eden. 1 Bead&Button online project
 BEAD KNITTING Shimmery knit necklace An easy-to-knit crystal necklace hides a magnetic clasp designed by Ea Eden 1 Bead&Button online project MATERIALS necklace 15 in. (38 cm) 864 Swarovski 4 mm round
Fryer's Trebuchet Paper Kits
 Fryer's Trebuchet Paper Kits Things you will need 7 sheets of card approx. 0.3 mm or 0.01 inches thick 1 sheet of paper to print out to download. 2 x 6-7 mm dowel or pencils 1 paper clip String 6 cms (2.5
Elara NanoEdge Fixed Frame Screen User Guide
 Elara NanoEdge Fixed Frame Screen User Guide INTRODUCTION INTRODUCTION WARNING This product may contain sharp edges, please handle with care. Protective gloves are recommended. A minimum of two people
EMBROIDERY STITCH GUIDE
 EMROIDERY STITCH GUIDE Published by Trish urr. COPYRIGHT & DISCLIMER by Trish urr Embroidery 2018 ll rights reserved. No part of this publication my be reproduced, distributed, sold or transmitted in any
Bound and Determined:
 Think You Don t Have Time to Create Beautiful Quilts? From quick-quilt adaptations of classic patterns to fun, fresh novelty designs, McCall s Quick Quilts provides you with a treasury of time- and effort-saving
In The Hoop Wallet. Materials: Press Stud Fastener
 In The Hoop Wallet This easy to create wallet is done in two hoopings and is created entirely in the hoop. The only bit of stitching to do is to close the opening which is used to turn the wallet right
Note: Yardage and supplies listed are for all three bags.
 Stash Pouches Finished sizes: Large 10" (25.4 cm) wide x 81/2" (21.6 cm) tall x 31/2" (8.9 cm) deep Medium 9" (22.9 cm) wide x 7" (17.8 cm) tall x 3" (7.6 cm) deep Small 8" (20.3 cm) wide x 6" (15.2 cm)
Animals on the Edge Hats
 Animals on the Edge Hats Animals on the Edge designs are cuter than ever, smiling from a fleece hat! Choose your little one's favorite critter and create a hat sure to keep them cozy and warm this winter.
Sew Sweet Bunny Basket
 Sew Sweet Bunny Basket Crafter level: Intermediate to Advanced Time needed: 2½ hours What you'll need Printouts of templates ¾ yd. linen fabric for basket ¾ yd. cotton print fabric for lining Pins Sharp
The Allie An in-the-hoop project
 The Allie An in-the-hoop project A wallet/coin purse for the 5x7 hoop. The Allie has 3 credit card slots in the front section which features a large flap with a snap closure. You can carry coins or other
How to Set Up Your Rick s Bead Loom (TL2862)
") How to Set Up Your Rick s Bead Loom (TL2862) The first step to looming your first pattern is assembling the loom, and then adding the warp, which is the set of thread that runs the length of the design
How to Set Up Your Rick s Bead Loom (TL2862) The first step to looming your first pattern is assembling the loom, and then adding the warp, which is the set of thread that runs the length of the design
Margaret Moorehead s. Virtual Sewing Guild Video Series
 Margaret Moorehead s Virtual Sewing Guild Video Series Contents What You ll Learn... 2 Supplies You ll Need... 2 Equipment You ll Need... 2 Fabric Preparation... 3 Section 1 Machine Embroidery... 4 Section
Chatelaine. Read on for project instructions to create a beautiful and useful chatelaine! Chatelaine
 Chatelaine Chatelaines have a long history, dating back to the 18th century. A chatelaine is a decorative belt hook or clasp worn at the waist with a series of chains (or cords, in this project) suspended
Stained Glass Spring Wall Hanging
 Stained Glass Spring Wall Hanging Embroidery designs inspired by classic stained glass come together to create a work-ofart wall hanging that's as fresh as spring. Stitching this gorgeous spring scene
Bee #2 - Tea Cozy. ** All seam allowances are ¼. ** To avoid dull or broken needles, always remove pins while sewing.
 How do you keep your last cup of tea as piping hot as the first? Follow these instructions to make a decorative and practical tea cozy. This Bee includes all of the instructions, supply list and 4 beautiful
PRACTICAL STITCHES. Threading. Thread knotting
 Threading PRACTICAL STITCHES As sewing is based on needlework, the first lesson should be in threading and handling the needle. Thread dark thread into the needle against a light background and light thread
Faux Cabled Headband. ...craftable... by Stephanie White of You Can Knit!
 ...craftable... Faux Cabled Headband by Stephanie White of You Can Knit! INSTRUCTIONS Stephanie White, 2015 PHOTOGRAPHY F+W, a Content + ecommerce Company, Inc. 2015 All rights reserved. materials 1 skein
Pajama Sock Monkey 2009 Cutest Creations
 Materials needed: Pajama Sock Monkey 2009 Cutest Creations 1 pair of size Large Brown Red-Heel socks can be purchased from my online store www.ohboyorgirl.com Black embroidery thread Other color embroidery
c r a f t m e i s t e r. m c u n i v e r s e. c o m Page 0
 c r a f t m e i s t e r. m c u n i v e r s e. c o m Page 0 TABLE OF CONTENTS Table of Contents... 1 Learn How to Make Your Own Tablet Cover... 2 Instructions For Making Your Own Tablet Cover Template...
Embroidered Scrap Bag Carol A. Brown
 Embroidered Scrap Bag Carol A. Brown Materials: 1. Outer fabric (sturdy fabric such as poplin): at least 12 1/2 wide by 22 high. 2. Medium weight fusible interfacing: same size as for fabric. 3. Lining
jellyfish amigurumi free crochet pattern
 jellyfish amigurumi free crochet pattern - jellyfish amigurumi - 2 - introduction - jellyfish amigurumi This cute little jellyfish is a sweet and simple plush, with a round body and several swirly tentacles.
Quilted Wine Bag. Project Needs & Notes
 Quilted Wine Bag Gift a bottle of wine or sparkling cider in style with a festive quilted wine bag. A handy opening at the top lets you carry it with ease, while a quilted cotton lining keeps the glass
Mini 4-H SEWING PROJECT
 Mini 4-H SEWING PROJECT Mini 4-H is open to youth who are currently in Kindergarten, first, or second grade at the time of their enrollment on 4HOnline. Enroll in Mini 4-H through the 4HOnline website
Make Trousers (beginners)
") Make Trousers (beginners) This tutorial will help you to make your first pair of trousers. If you have already made some in the past and are just looking for a recap, you probably want the refresher tutorial.
Make Trousers (beginners) This tutorial will help you to make your first pair of trousers. If you have already made some in the past and are just looking for a recap, you probably want the refresher tutorial.
assembly instructions
 THE LILLI LOOM assembly instructions Find out more at schachtspindle.com Schacht Spindle Company 6101 Ben Place Boulder, CO 80301 p. 303.442.3212 800.228.2553 f. 303.447.9273 2017 Schacht Spindle Company,
Brother PQ- Series Accessories
 Brother PQ- Series Accessories The PQ-series of high-speed straight stitch machines (1300, 1500 and 1500S) are designed to sew quickly and accurately with a wide variety of fabrics, even combinations of
WRAP DRESS. A DIY pattern for use with Alabama Stitch Book, Alabama Studio Style, Alabama Studio Sewing + Design, and Alabama Studio Sewing Patterns
 WRAP DRESS A DIY pattern for use with Alabama Stitch Book, Alabama Studio Style, Alabama Studio Sewing + Design, and Alabama Studio Sewing Patterns theschoolofmaking.alabamachanin.com Alabama Chanin 2017
Learn to weave. on the Knitters Loom
 Learn to weave on the Knitters Loom Welcome to the wonderful world of weaving... YOUR FIRST PROJECT A SCARF You will need: A pair of sharp scissors A measuring tape Cardboard strips 20cm (8ins) wide Two
Practicing Basic Machine Operation Sample #1
 Practicing Basic Machine Operation Sample #1 Listed below are various tasks required in basic sewing machine operation. Demonstrate your ability to perform each task by creating a sample. The samples that
Hoop-It-Up Organizer
 Hoop-It-Up Organizer This helpful catchall organizer is perfect for the craft room or the laundry room! Add an embroidery design, and it becomes a nice addition to the room's decor as well. The embroidery
Mirror and Pouch STEP: 2
 Mirror and Pouch This in-the-hoop project is an ingenious process that is really a lot of fun to do. The basic tutorial was provided by Linda Berg. STEP: 1 STEP: 2 Decide on the color of thread you want
FIORI 23 - Kit by STEFY.PALMA StitchCraft Home Edition
 FIORI 23 - Kit by STEFY.PALMA StitchCraft Home Edition This kit was designed and created on StitchCraft software http://www.stitchcraft.info INSTRUCTIONS FOR CROSS STITCH 1. Always begin stitching from
I always run my thread or floss over a piece of beeswax to strengthen it. [In a pinch, a piece of beeswax candle works just fine.]
![I always run my thread or floss over a piece of beeswax to strengthen it. [In a pinch, a piece of beeswax candle works just fine.]](/thumbs/75/72453046.jpg "I always run my thread or floss over a piece of beeswax to strengthen it. [In a pinch, a piece of beeswax candle works just fine.]") Sewing the Binding to the Back of a Quilt a tutorial written and photographed by Dora Scheer for the Victory Quilt Ministry at Mountainside United Methodist Church Cedar Crest, New Mexico, USA This tutorial
Sewing the Binding to the Back of a Quilt a tutorial written and photographed by Dora Scheer for the Victory Quilt Ministry at Mountainside United Methodist Church Cedar Crest, New Mexico, USA This tutorial
FIORI 24 - Kit by STEFY.PALMA StitchCraft Home Edition
 FIORI 24 - Kit by STEFY.PALMA StitchCraft Home Edition This kit was designed and created on StitchCraft software http://www.stitchcraft.info INSTRUCTIONS FOR CROSS STITCH 1. Always begin stitching from
Dancing Rain Dolls. Knot Doll. Created By. Amy Prentice
 Dancing Rain Dolls Knot Doll Created By Amy Prentice Copyright 2007 1 Dear Friends, This pattern is the easiest of all dolls to make. This doll will take about 2 hours to complete and is the perfect doll
Create a room outdoors with gorgeous garden-inspired table linens. Entertain to soft breezes and candle glow with a table fit for finery.
 Garden Party By Stephanie Corina Goddard Create a room outdoors with gorgeous garden-inspired table linens. Entertain to soft breezes and candle glow with a table fit for finery. Supplies Decorator fabric.
Supply List. Tracing the design onto the clear stabilizer
 Solitary Tree Supply List 1. Background fabric (1) 9 x12 piece of landscape batik 2. Moon Scrap of yellow batik 3. Stabilizer (1) 9 x12 piece of clear water soluble stabilizer film such as 4X by Superior
FLIP RIGID HEDDLE LOOM
 FLIP RIGID HEDDLE LOOM SL2013, SL2014 SL2015, SL2016 Warping and Weaving Instructions Flip Loom shown with optional accessories Trestle Floor Stand and Flip Trap Find out more at schachtspindle.com Schacht
Embroidered Scrap Bag and Bed Caddy Carol A. Brown
 Embroidered Scrap Bag and Bed Caddy Carol A. Brown Materials: 1. Outer fabric for Scrap Bag (sturdy fabric such as poplin): at least 12-1/2 wide by 22 high. 2. Outer fabric for Bed Caddy (sturdy fabric
Lesson 2 CREATING THE SKIRT: LACE SHAPING
 1 Extension 1 Extension Lesson 2 CREATING THE SKIRT: LACE SHAPING For this lesson we will be working with the skirt pieces one skirt front and two skirt backs and your lace insertion. Are you ready to
FIORI 19 - Kit by STEFY.PALMA StitchCraft Home Edition
 FIORI 19 - Kit by STEFY.PALMA StitchCraft Home Edition This kit was designed and created on StitchCraft software http://www.stitchcraft.info INSTRUCTIONS FOR CROSS STITCH 1. Always begin stitching from
Arno Haft's Vogeldrachen (Bird Kite)
") Arno Haft's Vogeldrachen (Bird Kite) Bob and Charmayne Umbowers 31 March 2007 www.2kiters.com The Arno Haft Bird Kite Arno Haft's bird kite is from the 1950's. The original kite was made from cotton canvas
Arno Haft's Vogeldrachen (Bird Kite) Bob and Charmayne Umbowers 31 March 2007 www.2kiters.com The Arno Haft Bird Kite Arno Haft's bird kite is from the 1950's. The original kite was made from cotton canvas
FIORI 4 - Kit by STEFY.PALMA StitchCraft Home Edition
 FIORI 4 - Kit by STEFY.PALMA StitchCraft Home Edition This kit was designed and created on StitchCraft software http://www.stitchcraft.info INSTRUCTIONS FOR CROSS STITCH 1. Always begin stitching from
FIORI 18 - Kit by STEFY.PALMA StitchCraft Home Edition
 FIORI 18 - Kit by STEFY.PALMA StitchCraft Home Edition This kit was designed and created on StitchCraft software http://www.stitchcraft.info INSTRUCTIONS FOR CROSS STITCH 1. Always begin stitching from
Zipperless Pillow Sham
 Zipperless Pillow Sham This fantastic Pillow Sham is not only zipperless, it's reversible, too! Button-up your home decor projects with a pillow that can change from holiday to everyday in mere seconds.
shiba cube puppy plush a sewing pattern by
 shiba cube puppy plush a sewing pattern by If you ve ever sewn a cube before, this pattern takes it to the next level! The classic geometric shape forms a chubby little puppy body complete with four stubby
3D Lace & Fabric Santa
 3D Lace & Fabric Santa Santa Claus is coming to town... and to your home! Organza and quilters cotton combine beautifully with freestanding lace to make this magnificent Santa Claus, perfect for a Christmas
Lace Edged Organza Star STEP: 2 STEP: 1
 Lace Edged Organza Star This elegant freestanding lace star incorporates areas of sheer organza fabric. Because each star is made from repetitions of one embroidery file, you can make a very large star
Weaving Your 1st Scarf
 Weaving Your 1st Scarf My First Woven Scarf See part 1 How to Warp the Kromski Harp Forte to get started. Supplies: Kromski Harp Forte Loom at least 8 wide 155 yards size 3 Crochet Thread or 8/2 Weaving
Hot Pads with Ribbon & Decorative Stitch Accents
 Published on Sew4Home Hot Pads with Ribbon & Decorative Stitch Accents Editor: Liz Johnson Friday, 01 September 2017 1:00 Hot pads provide a great small surface to experiment with some embellishment. Obviously,
 Supplies WARM AND NATURAL COTTON BATTING FIBER FILL STUFFING COTTON PRINT FABRIC FOR DRESS OLD LIGHT WEIGHT SWEATER TO CUT UP SMALL PIECE OF MUSLIN FOR CANDY RABBIT PLAID-APPLE BARREL NUTMEG BROWN CRAFT
Battenburg Lace Pillow
 Battenburg Lace Pillow Home decor fabric is the perfect backdrop for the lovely Battenburg lace embellishments in this pillow project. The fabric is cut into graceful, arcing shapes to mimic the shape
Cozy Crock Pot Carrier
 Cozy Crock Pot Carrier At our recent visit to the Heathers embroidery group near our Minnesota home, several of the members said they'd love to see us create a crock pot carrier project. Kenny thought
Crafty Pin Cushion Organizer
 Crafty Pin Cushion Organizer An embroidered pin cushion organizer keeps sewing essentials in reach, and brightens any room's decor. Fill it with all your most used notions to keep them handy. Pencils,
Beaded Clutch. Other Supplies 7 zipper
 Beaded Clutch Other Supplies 7 zipper Preparation 1. Print out the templates found on the last three pages of this tutorial at 100% of actual size and trace them onto folded double layers of your fabric
To adjust the length of the track
 DELUXE ROTARY CHAIN ROMAN BLIND KITS The standard kit has a 1:1 chain drive suitable for blinds up to 3kgs in weight. For heavier blinds up to 6Kg use a 1:4 chain drive, see instructions on page 2. There
Insulated Water Bottle Carrier
 Insulated Water Bottle Carrier Keep your drink cool with this stylish insulated water bottle carrier. The unique hands-free design is ideal for walking and hiking. Personalize yours with your favorite
Hand Em!oidered Bracelet
 T U T O R I A L Hand Em!oidered Bracelet Amy Barickman Indygo Junction by Amy Barickman of Indygo Junction Supplies TWO apx. 1" x 12" - 14" strips of recycled denim; instructions are shown below to determine
INSTRUCTIONS FOR KNITTING
 INSTRUCTIONS FOR KNITTING CASTING ON The first step in knitting is to cast the yarn onto the needle. This provides the first row of stitches which is usually the bottom edge or selvedge of the piece you
shaver to get rid of pills. If the item doesn t contain a pipe cleaner or glue, you could even run it through the washing machine.
 shaver to get rid of pills. If the item doesn t contain a pipe cleaner or glue, you could even run it through the washing machine. Wool felt will wear better and last longer. If you re creating something
Table of Contents. Pom-Pom Bookmark Yarn covered Pencil Holder Yarn Hangers... Yarn Hair Bows
 1 Table of Contents Pom-Pom Bookmark... 3-5 Yarn covered Pencil Holder... 6-8 Yarn Hangers... 9-11 Yarn Hair Bows... 12-14 Tassel Necklace or Gift Wrapping... 15-17 No Knit Infinity Scarf... 18-20 Braided
Finishing a Kite Ornament
 Finishing a Kite Ornament These instructions have been written to aid in finishing the kite ornament shown in Needlepoint Now, September/October 2017, Volume XIX, No..5 Materials Stitched kite ornament
EC How to Make Braided Rugs
 University of Nebraska - Lincoln DigitalCommons@University of Nebraska - Lincoln Historical Materials from University of Nebraska- Lincoln Extension Extension 1962 EC62-1156 How to Make Braided Rugs Magdalene
Shamrock Apron. Shamrocks upon shamrocks! This apron is bursting with the good luck symbol of Ireland.
 Shamrock Apron Shamrocks upon shamrocks! This apron is bursting with the good luck symbol of Ireland. Ruffles around the top shamrock and along the bottom hem make this apron as charming as can be. Combine
LED Thin Frame Fixed Frame Screen User Guide
 LED Thin Frame Fixed Frame Screen User Guide INTRODUCTION INTRODUCTION WARNING - Sharp Edges This product may contain sharp edges, please handle with care. Protective gloves are recommended. WARNING -