(a) Work gloves may be cloth, leather palm, or all leather; (b) Welding gloves are gauntlet-type gloves with high
|
|
|
- Sandra Hubbard
- 6 years ago
- Views:
Transcription


1 Figure 16-1 cuffs (a) Work gloves may be cloth, leather palm, or all leather; (b) Welding gloves are gauntlet-type gloves with high


2 Figure 16-2 Welding boots should have smooth toes to prevent sparks from being trapped.
 The B acetylene tank holds 40")
3 Figure 16-3 (a) The MC acetylene tank holds 10 ft 3 ; (b) The B acetylene tank holds 40 ft 3

4 Figure 16-4 Diagram of a cutaway section of a B acetylene tank showing the porous absorbent section


5 Figure 16-5 Acetylene regulator with gauges


6 Figure 16-6 (a) 22 ft 3 oxygen cylinder; (b) 55 ft 3 oxygen cylinder


7 Figure 16-7 Support the cylinder with one hand when turning on the acetylene or oxygen valves

8 Figure 16-8 Nonadjustable acetylene wrench
 Improper position for striker, directly in front of the torch tip")
9 Figure 16-9 (a) Correct position for striker, off to the side of the torch tip; (b) Improper position for striker, directly in front of the torch tip

10 Figure (a) Correct appearance of oxyacetylene flame for brazing; (b) Flame with too much acetylene brings heat too close to tip, and can damage it
 Excessive oxygen causes the flame to become purple and the inner cone becomes very small")
11 Figure (a) When first lit, low pressure acetylene has smoke; (b) Increase acetylene pressure until smoke disappears; (c) Turn on oxygen and slowly increase flow; (d) Increase oxygen until the outer feather forms into a very smooth uniform cone; (e) Excessive oxygen causes the flame to become purple and the inner cone becomes very small


12 Figure Turn off the acetylene gas valve first; for clarity, this procedure is shown with bare hands, but welding gloves should always be used


13 Figure Tip cleaning set


14 Figure File the tip flat if it has been damaged

15 Figure Use the round tip cleaner to ream the tip orifice


16 Figure Air acetylene torch kit


17 Figure Portable oxyacetylene welding and cutting rig (Courtesy Victor Equipment Company)
18 Figure Copper oxide formed by excessively heating copper pipes and fittings
 Be sure to clean all the way around the")
19 Figure (a) Use aluminum oxide sand cloth to clean copper before brazing and soldering; (b) Be sure to clean all the way around the fitting


20 Figure Round tubing brushes can be used to clean the inside of pipe and fittings
 Copper")

21 Figure (a) Copper pipe before cleaning; (b) Copper pipe after cleaning; (c) Clean at least 1/2 in beyond the fitting


22 Figure (a) Insert the copper pipe into the fitting; (b) Twisting the copper pipe against the stop helps seat the fitting
")

23 Figure (a) Begin heating the pipe near the fitting; (b) Once the pipe is hot, move the flame onto the fitting and continue heating

24 Figure Once brazing temperatures have been reached, use a slight downward pressure on the filler rod at the braze joint and follow the joint around the fitting


25 Figure Add the filler metal straight into the joint gap


26 Figure Add a small amount of braze to the joint so that there is a smooth uniform fillet to ensure a good joint seal


27 Figure This horizontal refrigerant line is 1 in above the ground, making access to the bottom of the joint difficult


28 Figure Use the flame to heat and bend the brazing rod approximately 2 in from the end to make reaching the bottom of the horizontal joint easier
29 Figure When the fitting is completely heated, filler metal can be added from the bottom first; then follow the joint around with the tip of the filler metal ending at the top of the joint
30 Figure Inward pressure of the filler metal helps in filling the joint gap completely with brazes in the vertical up position


31 Figure The first step in braze joint testing is to cut the fitting just beyond where the pipe is seated


32 Figure Use a hacksaw to make two cuts through the entire length of the fitting
 Flatten each section using a ball peen hammer")
33 Figure (a) Use a pair of pliers to bend each quarter section out; (b) Flatten each section using a ball peen hammer and anvil

34 Figure (a) A thin layer of brazed metal can be seen between the pipe and fitting; (b) Area not filled with brazed metal will allow the pipe and fitting to slip, slightly revealing a very small shelf between the pipe and fitting; this area was not properly filled with brazing metal


35 Figure Electric resistance soldering gun


36 Figure Cleaning soldering gun tip

37 Figure Fluxing soldering gun tip in preparation for tinning

38 Figure Tinning soldering gun tip


39 Figure Loop wire through terminal lug to make a mechanical connection


40 Figure Hold the soldering gun against one side of the wire and lug as the solder is introduced to the opposite side
41 Figure Clip the ends of the wire as necessary to complete the job; when connecting multiple wires, have the insulation always on the inside so there is less chance of an electrical short


42 Figure Air Mapp and air propane flames wrap around the pipe for more uniform heating than oxyacetylene


43 Figure A variety of sanding cloths are available


44 Figure Apply the flux up to approximately 1/8 in from the end of the copper pipe


45 Figure Preheat the pipe before moving the flame over the fitting


46 Figure Add a small amount of additional solder to create a fillet around the joint

47 Figure Add a small amount of additional solder to create a fillet around the joint
 Rock the hacksaw as the cut is")
48 Figure (a) Begin the hacksaw cut flat across the fitting; (b) Rock the hacksaw as the cut is made


49 Figure The finished cut should completely cut through only the outer fitting. A small cut into a portion of the inner fitting is OK


50 Figure Place a flat head screwdriver in the hacksaw kerf and twist to begin opening up the joint; use pliers to finish the job


51 Figure An acceptable solder joint is one that will have a minimum of small bubbles and flux inclusions


52 Figure Excessive bubbles formed by overheating and boiling solder


53 Figure From the outside, this joint looks very good; solder flowed completely across the outside face of the joint indicating that the fitting was at the proper soldering temperature


54 Figure The inside of the joint from Figure 16-53; solder did not flow through the joint because the pipe had not reached the soldering temperature due to improper heating techniques

55 Figure Resistance spot welding


56 Figure Resistance spot welding, tip cleanup

57 Figure Pedestal spot welder


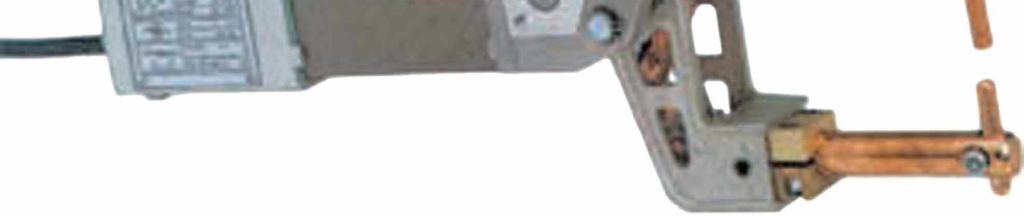
58 Figure Portable spot welder
INTRODUCTION. Tube and fitting
 Service Application Manual SAM Chapter 630-41A Section 21 SOLDERING & BRAZING COPPER TUBE The Copper Development Association Inc. INTRODUCTION The material that follows is adapted from publications first
METAL FABRICATION MECHANICAL
 METAL FABRICATION MECHANICAL Machine Screws Machine screws have a parallel thread and need a threaded hole to screw into. They come in a wide variety of materials and sizes and are used for semi-permanent
Applying Fuel Gas Welding (FGW) Processes and Techniques
 Processes and Techniques") Applying Fuel Gas Welding (FGW) Processes and Techniques Interest Approach Here is an arc welder and fuel gas welder exhibited side by side. What is the difference between them? The differences are not
Applying Fuel Gas Welding (FGW) Processes and Techniques Interest Approach Here is an arc welder and fuel gas welder exhibited side by side. What is the difference between them? The differences are not
unit 3: GENErAL ElectriCAL SySTEM DiAGNOSiS
 Electrical/Electronic Systems unit 3: GENErAL ElectriCAL SySTEM DiAGNOSiS lesson 4: wire and connector repairs I. Connector repairs A. Connector repairs involve fixing damaged wires. Wires are marred due
SUPPLIED BY DELTA FLUID PRODUCTS LTD DELTA ROAD ST. HELENS WA9 2ED UK TEL: FAX:
 BRAZOWELD TECHNIICAL LIITERATURE SUPPLIED BY DELTA FLUID PRODUCTS LTD DELTA ROAD ST. HELENS WA9 2ED UK TEL: 01744 611 811 FAX: 01744 453 975 BRAZING COPPER TUBE TO BROWNALL BRAZOWELD FITTINGS 1) Preparation:
SE5a Instrument Board part 2 - rev 1.1
 SE5a Instrument Board part 2 - rev 1.1 Fuel (Petrol) Valve This valve uses two circular name plates, eight brass screws, one black plastic base, copper wire and two black plastic risers. You can pick any
INSTALLATION STANDARD FOR WELDED COPPER AND COPPER ALLOY WATER TUBE IAPMO IS
 INSTALLATION STANDARD FOR WELDED COPPER AND COPPER ALLOY WATER TUBE IAPMO IS 21-2006 1.0 Scope. This standard shall govern the installation of welded copper and copper alloy water tube in potable hot and
Plans & Materials List for Handwashing Station
 Plans & Materials List for Handwashing Station Required Tools Arc Welder (mig or stick) Chop or metal band saw Grinder (bench and/or handheld) 3/8" Drill 1/8", 1/4", 5/16" Drill Bits Copper Pipe Cutter
Union coupling, copper x female thread. Cone joint
 Union coupling, copper x female thread. Cone joint N69F Union coupling Size Pattern No. Pack 1 Qty Pack 2 Qty Code Barcode Price ( ) ex VAT test 15mm x 1/2" N69F 10 100 84842D 5022050269638 3589.48 22mm
PLK CJ PRODUCT INSTRUCTION PI002 REV Page 1
 PLK One Shot Crucible Weld Kit PLK Kit Components CJ One Shot Crucible PLK CJ PRODUCT INSTRUCTION PI002 REV 3 270807 Page 1 PLK The Complete Welding Process The All New Railtech PLK-CJ welding process
SMAW LESSON #1: Initiating and maintaining an arc using the scratch start method
 SMAW LESSON #1: Initiating and maintaining an arc using the scratch start method OBJECTIVE: Upon completion of this lesson the learner will be able to strike and maintain an arc using SMAW on steel plate
Welding-Oxy Fuel Metals Joining
 Western Technical College 31442301 Welding-Oxy Fuel Metals Joining Course Outcome Summary Course Information Description Career Cluster Instructional Level Total Credits 1.00 Total Hours 36.00 Introduction
Page 1. Wide Gap 68 CJ Acetylene Product Instruction PI014 Rev
 Wide Gap One Shot Crucible Weld Kit Wide Gap Kit Components CJ One Shot Crucible Page 1 T h e Al l N ew Railtech W i d e G a p w e l d i n g pr o c e s s d e s i g n e d f or Au s t r a l i a n c o n d
Welding 12 & Soldering
 12 Welding & Soldering Electric Soldering Soldering Iron 2 Watt K&W Burn Proof Silicone Lead P733 $20.0 $18.0 Replacement Tip to Suit K&W 2 Watt Soldering Iron P7 $.13 $3.72 Weller WES1D Soldering Station
Ford Ranger / Bronco II Set Part # Rev B 5-04
 Ford Ranger / Bronco II Set Part # 21008 Rev B 5-04 Step 1: Prior to Installation: A) Fit: Verify the fit of the flares to vehicle. (Some filing, sanding, or cutting may be necessary to ensure proper fit).
BRAZING PROCEDURE SPECIFICATION NO
 NATIONAL CERTIFIED PIPE WELDING BUREAU BRAZING PROCEDURE SPECIFICATION NO. 107-1 FOR TORCH BRAZING OF ALLOYS 102, 120, 122, 142, 192 OF TUBE, VALVES, FITTING AND FLANGES USING BcuP-3 THROUGH-7 FILLER METALS
Operation Manual K
 Operation Manual K104-0009 Please read these instructions completely before using this tool. By reading all the instructions you will get the maximum benefit and the best solder/welded joints. The K104-0009
Terminating D /-0289 Subminiature SolderTact Contacts to Twisted-Pair Cable
 Print 12-Jun-03 1 of 11 Terminating D-602-0288/-0289 Subminiature SolderTact Contacts to Twisted-Pair Cable 1. Purpose and Scope This engineering standard contains the termination procedures, inspection
Pacific Antenna 20 and 40M Lightweight Dipole Kit
 Pacific Antenna 20 and 40M Lightweight Dipole Kit Antenna diagram showing configuration and lengths when assembled 7 8 16 9 16 9 Description The Pacific Antenna lightweight dual band dipole kit provides
SEMPEO SQA Unit Code FP38 04 Preparing and using manual flame brazing and braze welding equipment
 Preparing and using manual flame brazing and braze welding Overview This standard covers a broad range of basic manual flame brazing and braze welding competences that will prepare you for entry into the
FG-02: Apply Hard Surface
 FG-02: Apply Hard Surface Page 1 of 9 SAFETY FIRST Follow all Caterpillar facility safety standards when performing this task. An explosive hazard exists if acetylene or oxygen leaks when working in a
Welder Training Program. Practical Competencies
 Welder Training Program Level C P2: Oxy-Fuel Gas Cutting (OFC) Practical Competencies Acknowledgements & Copyright Permission The Industry Training Authority of British Columbia would like to acknowledge
Make a Safe. Description. Lesson Objectives. Assumptions. Terminology
 Youth Explore Trades Skills Make a Safe Description Welding is a vast area in the metalworking field and a widely used joining process for metal. In this activity plan students will learn how to MIG weld
Making a basic hook tool By Alan Lacer
 Making a basic hook tool By Alan Lacer The hook tool is essentially a right-angle gouge that enables the woodturner doing inside end-grain hollowing to achieve two goals: work with the grain and use a
PAC-12 Kit Contents. Tools Needed Soldering iron Phillips screwdriver Wire stripper Wrenches, 7/16 and 1/2 Terminal crimp tool Pliers Solder
 PAC-2 Kit Contents Part Quantity Screws: 8/32 x 3/8 Screws: 8-32 x 5/6 Screw: 8-32 x /4 #8 internal tooth washers #8 solder lug ring terminals Bolt: Aluminum, /4-20 x.5 /4 internal tooth washer Nut: Aluminum
A Practical Update on Advanced Copper Alloys and On-Site Joining Methods for HVACR Systems. Educate Promote Defend Support Inspire
 A Practical Update on Advanced Copper Alloys and On-Site Joining Methods for HVACR Systems A Practical Update on Advanced Copper Alloys and On-site Joining Methods for HVACR Systems Presented by: John
LocoGear. Technical Bulletin - 14 November 28, 2003 Copyright 2003 by LocoGear LIVE STEAM CASTINGS. Tech Bulletin - 14
 LIVE STEAM CASTINGS LocoGear Tech Bulletin - 14 John D.L. Johnson 3879 Woods Walk Blvd Lake Worth, FL 33467-2359 jjohnson@locogear.com www.locogear.com Technical Bulletin - 14 November 28, 2003 Copyright
Water Line and Water Line Assembly Gasket
 1 Preparation for Repair 1) Remove tip from scaler 2) Remove scaler from air supply 3) Remove gasket from back end of scaler. Examine gasket for obvious wear or disfigurement. Replace if necessary. 2 Remove
BC WELDER TRAINING PROGRAM
 BC WELDER TRAINING PROGRAM FOUNDATION AND APPRENTICESHIP LEVELS 1 AND 2 P2 (Line B): Oxy-Fuel Gas Cutting (OFC) Practical Competencies Acknowledgements & Copyright Permission The Industry Training Authority
Induction Heater Coil Kit Compact low voltage, high current induction coil
 Induction Heater Coil Kit Compact low voltage, high current induction coil Model: CT-400-KIT Features and Specifications High power water cool-able copper coil PCB Layout designed to reduce eddy losses
HBS-AP ASSEMBLING INSTRUCTIONS
 ALUMINIUM PIPEWORK - ALUMINIUM PIPEWORK - ALUMINIUM PIPEWORK 97 HBS-AP ASSEMBLING INSTRUCTIONS 1. INTRODUCTION 1.1. This manual is very easy to consult and we recommend reading it before starting work,
Photo-Etch Demonstration Notes. Presented at the AMPS Central SC August 11, 2011 Meeting
 The basic steps in using PE up-date sets: Photo-Etch Demonstration Notes Presented at the AMPS Central SC August 11, 2011 Meeting 1. Plan Use 2. Cut Part from Fret / Clean up Burrs 3. Bend / Form Part
stringer bead tack welds tee joint trailing electrode angle weave pattern
 Chapter 9 Shielded Metal Arc Welding Plate OBJECTIVES After completing this chapter, the student should be able to: Demonstrate the safe way to set up a welding station. Explain the differences among F2,
Materials Needed. Tube Size O.D.
 Materials Needed Eaton FF9075 silver braze rings or 1/16- inch diameter 45% silver alloy braze wire Water soluble flux Brazing outfit capable of +1200ºF (propane or mapp gas) Small files - rattail and
Dubnium 11 Installation Instructions & Parts List
 Dubnium 11 Installation Instructions & Parts List Illustration Dubnium, H1 Handle Right Hand: Open Out Page 1 of 25 IMPORTANT This shower screen / enclosure must be installed by suitably qualified individuals.
INSTRUCTION MANUAL. Force Transducer Output Tube Repair Kit
 INSTRUCTION MANUAL Model 400-TR Force Transducer Output Tube Repair Kit June 4, 2004, Revision 5 Copyright 2004 Aurora Scientific Inc. Aurora Scientific Inc. 360 Industrial Pkwy. S., Unit 4 Aurora, Ontario,
Ruby 0-4-0T Kit Assembly Instructions
 Ruby 0-4-0T Kit Assembly Instructions Ruby Parts List PART NO.& NAME QTY PART NO.& NAME QTY SHEET 1 1 Frame 2 2 Bracket 4 3 M2 x 4 Hex Head Screw 25 4 Wheelset (without eccentrics) 1 5 Wheelset (with eccentrics)
C-L-X ARMOR REMOVAL PROCEDURES
 C-L-X ARMOR REMOVAL PROCEDURES USING THE KETT MODEL #KS-226 CABLE SAW The procedure listed below details Okonite s recommended method for removing C-L-X armor from large and small diameter cables. These
Architecture and Construction Plumbing and Pipefitting Revised 8/30/2012 Item Number Price Per Piece Total
 Architecture and Construction Plumbing and Pipefitting Revised 8/30/2012 Item Number Price Per Piece Total 2ft. Level 3 $7.00 $21.00 4ft. Level 2 $14.00 $28.00 Pipe Rack 2 $300.00 $600.00 Adjustable Pipe
Avoiding Common Problems in Saw Preparation
 Avoiding Common Problems in Saw Preparation Bruce Lehmann, P.Eng, Ph.D. This talk draws on the expertise of experienced sawfilers, and some research results to show practical techniques and possible problems
SECTION 7. SAFETYING
 9/8/98 AC 43.13-1B SECTION 7. SAFETYING 7-122. GENERAL. The word safetying is a term universally used in the aircraft industry. Briefly, safetying is defined as: Securing by various means any nut, bolt,
UPC-LL Power Connection Kit
 Installation Instructions UPC-LL Power Connection Kit for Series Long Line Heating Cables 1 PJ951 161-562681-020 July 2015 UPC-LL End Termination Kit Kit Contents Item Qty Description Item Qty Description
Explorer Wiring Kit (assembled)
") Explorer Wiring Kit (assembled) For Vintage, Firestorm & Standard Series Please Read All Instructions Before Beginning. Tools you will need: Soldering Iron (35 watt preferably) Solder Wet Sponge Wire Clippers
Explorer Wiring Kit (assembled) For Vintage, Firestorm & Standard Series Please Read All Instructions Before Beginning. Tools you will need: Soldering Iron (35 watt preferably) Solder Wet Sponge Wire Clippers
SOLDERING & BRAZING SOLDERING & BRAZING
 SOLDERING & BRAZING SOLDERING & BRAZING Soldering Cleaning pads 198 Electric soldering pliers 198 Electric soldering unit 199 Turbo soldering torches 200 Solder wire and solder paste 201 REMS Cu-Vlies
Manual Version July 2007
 Manual Version 1.2 - July 2007 Page 1 Table of Contents Section1: M3 Phono Board Build...3 Phono Board Parts List...3 Preparation...4 Fitting the Valve Bases...6 Installing the Resistors...7 Starting the
F-F-Fiddle Assembly Instructions
 F-F-Fiddle Assembly Instructions Bout Bridge Neck Machine Heads/Tuners Truss Rod Strings An open-source FFF 3d-printable electric violin. 1. Assemble materials 5 3 8 1 9,10, 11 7 4 2 6 PARTS 1. Bout part
1104. Clean up the door striker plates with a hand grinder using a wire brush and WD-40.
 Chapter 31 - Misc. Putting VW Back Together (Video Clip 31) 1104. Clean up the door striker plates with a hand grinder using a wire brush and WD-40. 1105. Install both door striker plates on the VW body
FCT-MW _ Kalmbach Publishing Co. This material may not be reproduced in any form without permission from the publisher. facetjewelry.
 FCT-MW-082216_04 2007 Kalmbach Publishing Co. This material may not be reproduced in any form without permission from the publisher. facetjewelry.com intermediate metal Chain Reaction Forge sterling silver
joining materials - wood
 UNIT D E S I G N A N D M A N U F A C T U R E : C O U R S E M A T E R I A L Wood joints joining materials - wood The majority of joints used in woodcraft have been designed specifically to attain the maximum
Curium 19H Installation Instructions & Parts List
 Curium 19H Installation Instructions & Parts List Illustration Curium 19H Right Hand Page 1 of 15 01/07/2016 Revision 2.1 IMPORTANT This shower screen / enclosure must be installed by suitably qualified
Solder is a metallic glue that holds the parts together and forms a connection that allows electrical current to flow.
 Proper Soldering & Desoldering High Performance Ultrasonic Range Finders Techniques of a MaxBotix Sensor Materials Needed for Soldering Goggles Hands-free clamp Wire stripper Soldering iron with stand
Introduction to Soldering
 Introduction to Soldering The Soldering Iron American Standard Wire Gage (AWG) Solder The Soldering Process Stripping & Tinning Wire Connecting/Soldering Wire Component Soldering De-Soldering Lab Exercise
Written by Frank Garcia Ver. 2
 Written by Frank Garcia frankg670@gmail.com 3-18-2017 Ver. 2 Preparing Copper Or Brass inlay wire. The Copper or Brass wire which is used with this inlay technique is flat. The wire can be purchased from
Curium 19.4H Installation Instructions & Parts List
 Curium 19.4H Installation Instructions & Parts List Illustration Curium 19.4H Right Hand Page 1 of 21 30/06/2016 Revision 1.0 IMPORTANT This shower screen / enclosure must be installed by suitably qualified
Spiderbeam Balun Construction Guide
 BALUN CONSTRUCTION GUIDE Ver. 1.0 1 The components of the Balun Kit are in a plastic bag. Most of the components are inside the plastic case of the balun. The aluminum U-profile and the RG-142 Teflon Coax
PRE-PRINT. IaPMo Is InstallatIon standard For CoPPEr PlUMBInG tube, PIPE, and FIttInGs
 InstallatIon standard For CoPPEr PlUMBInG tube, PIPE, and FIttInGs IaPMo Is 3-2006 1.0 scope 1.1 Installation and material of copper tube, pipe and fittings in drainage, vent, and water systems shall comply
Jeep. Flat Style Fender Flares Front Pair. Included in Hardware Kit:
 Jeep Flat Style Fender Flares Front Pair STEP 1 PRIOR TO INSTALLATION A) Bushwacker only approves installing the fl ares according to these written instructions with the hardware provided. WARNING: Failure
Welding & Soldering. Hakko FA-400 Soldering Fume Absorber Ultimate in Bench-Top Extraction Kit includes 2 Filters (Replacement Filters Available)
") 12 Section 12 Welding & Soldering Electric Soldering Part No Soldering Iron 20 Watt Micron Burn Proof Rubber Lead 1.6mm Replacement tip to suit Micron 20 Watt Soldering Iron Soldering Iron Stand Heavy
12 Section 12 Welding & Soldering Electric Soldering Part No Soldering Iron 20 Watt Micron Burn Proof Rubber Lead 1.6mm Replacement tip to suit Micron 20 Watt Soldering Iron Soldering Iron Stand Heavy
Series 1500 Aluminum Door Canopy
 Series 500 Aluminum Door Canopy with Sidewings It is our recommendation that you read instructions carefully prior to assembly and installation. Series 500 with Sidewings mounting bar (A) top trim (B)
Stained Glass Mission-Style Frame A stained glass project
 Stained Glass Mission-Style Frame A stained glass project Stained Glass Mission-Style Frame A Stained Glass Project PROJECT TITLE: Stained Glass Mission-Style Frame SKILL LEVEL: (Adult 1-5: 1 being the
Gallium 03 Installation Instructions & Parts List
 Gallium 03 Installation Instructions & Parts List Illustration Gallium 03, H1 Handle Left Hand: Open Out 04/05/2016 Revision 1.1 Page 1 of 19 IMPORTANT This shower screen / enclosure must be installed
Electronics Merit Badge Class 4. 12/30/2010 Electronics Merit Badge Class 4 1
 Electronics Merit Badge Class 4 12/30/2010 Electronics Merit Badge Class 4 1 Soldering Safety Note: A Soldering Iron gets hotter than 374 F. Do not touch the soldering iron s metal parts or you will receive
ascading Create the tiered appearance of chandelier crystals in this elegant set by Jennifer Jordan Park
 intermediate wire ascading carnelian Create the tiered appearance of chandelier crystals in this elegant set by Jennifer Jordan Park Jewelry designers are especially receptive to color, shape, and texture.
RACER TECH COMMANDER HD TIE ROD INSTALLATION
 RACER TECH COMMANDER HD TIE ROD INSTALLATION NOTE: These instructions are a universal explanation of how to install our HD Tie Rods. All kits are identical for all inner joints and nearly identical for
Series 1100 Aluminum Door Canopy
 Series 00 Aluminum Door Canopy with Support Arms It is our recommendation that you read instructions carefully prior to assembly and installation. Series 00 with Support Arms MOUNTING BAR (A) TOP TRIM
Pacific Antenna 20 and 40M Lightweight Dipole Kit
 Pacific Antenna 20 and 40M Lightweight Dipole Kit Diagram showing configuration and approximate lengths 8 6 16 9 16 9 8 6 Description The Pacific Antenna lightweight dual band, trap dipole kit provides
ELECTRICAL CONNECTIONS
 ELECTRICAL CONNECTIONS Lesson 13 EET 150 Electrical Connections Learning Objectives In this lesson you will: see different methods of making electrical connections. learn a procedure for making soldered
Xenon 05 Installation Instructions & Parts List
 Xenon 05 Installation Instructions & Parts List Illustration Xenon 05, H1 Handle Left Hand: Open Out 26/05/2016 Revision 2.1 Page 1 of 19 IMPORTANT This shower screen / enclosure must be installed by suitably
UNCONTROLLED 3 STANDARD PROCEDURES FOR PREPARING 33KV CABLES
 3 STANDARD PROCEDURES FOR PREPARING 33KV CABLES 3.1 Single-Core Copper Wire Screened Polymeric Cables 3.1.1 Removing the Outer Sheath Clean and abrade the outer sheath with an approved abrasive paper for
Pacific Antenna 20 and 40M Lightweight Dipole Kit
 Pacific Antenna 20 and 40M Lightweight Dipole Kit Diagram showing configuration and approximate lengths 8 3 16 9 16 9 8 3 Description The Pacific Antenna lightweight dual band, trap dipole kit provides
SOLDERING MANUAL A simple, yet easy to follow manual for your basic soldering needs. Copyright 2017 TortugaPro. All Rights Reserved
 A simple, yet easy to follow manual for your basic soldering needs Copyright 2017 TortugaPro. All Rights Reserved Purpose Soldering is not limited to electrical and electronics work. It is a skill that
Lumber Smith. Assembly Manual. If you are having problems assembling the saw and need assistance, please contact us at:
 Lumber Smith Assembly Manual If you are having problems assembling the saw and need assistance, please contact us at: 804-577-7398 info@lumbersmith.com 1 Step 1 Safety Carefully read the Owners Manual.
PRODUCT INSTRUCTION ONE-SHOT ALUMINOTHERMIC RAIL WELDING PROCESS MRS 86 CRANE RAIL
 PRODUCT INSTRUCTION ONE-SHOT ALUMINOTHERMIC RAIL WELDING PROCESS MRS 86 CRANE RAIL MRS 86 CRANE RAIL OXYGEN AND PROPANE PREHEAT ONE-SHOT CRUCIBLE STEMMING PASTE Railtech Australia Limited Po Box 6211 Acacia
PO Box 1879, 515 Tucker Ave. Friday Harbor, WA Phone: (360) Fax: (360)
 Fax: (360)") Thermocouple Replacement The thermocouple in your RADAK furnace has been made, installed, and inspected with great care. The junction, which is formed by spot-welding, is subject to failure due to mechanical
Thermocouple Replacement The thermocouple in your RADAK furnace has been made, installed, and inspected with great care. The junction, which is formed by spot-welding, is subject to failure due to mechanical
Welding & Fabrication Tools FT-Flat Electrode Welding
 Welding & Fabrication Tools FT-Flat Electrode Welding Instruction Manual The Next Step in Belting Welding & Fabrication FT-Flat Electrode Welding Table of Contents Page How to Use this Manual 3 Symbols
(Build Instructions)
") (Build Instructions) Specifications * Wingspan: 58cm * Length: 50cm * Flying Weight: 59 grams * Channels: 3 (Rudder Elevator Throttle) * Suggested Receiver: 4Ch Micro * Motor: 8mm GearDrive * Prop: GWS
(Build Instructions) Specifications * Wingspan: 58cm * Length: 50cm * Flying Weight: 59 grams * Channels: 3 (Rudder Elevator Throttle) * Suggested Receiver: 4Ch Micro * Motor: 8mm GearDrive * Prop: GWS
Aluminum Clad Wood Window 1/2 Reinforced Field Mulling and Stacking Supplement
 Aluminum Clad Wood Window 1/2 Reinforced Field Mulling and Stacking Supplement 1 Aluminum Clad Wood Window 1/2 Reinforced Field Mulling and Stacking Supplement The following instructions are a supplement
Sheet Metal Tools. by:prem Mahendranathan
 Sheet Metal Tools by: SHEET METAL TOOL KIT SHEET METAL TOOLS Rivet Gun 3/32, 1/8, 5/32, 3/16",Cupped Set Mini Bucking Bar Footed Heel-Toe Bucking Bar Air Tool Oil Mechanics Tool Bag High-Speed Air Drill
Application Note. Athearn RTR AC4400CW Tsunami Digital Sound Decoder Installation Notes
 Application Note Overview This application note describes how to install a TSU-AT1000 Digital Sound Decoder into an HO Athearn Ready To Roll AC4400CW. Skill Level 2: The entire installation can be completed
Maintenance Information
 16601023 Edition 2 January 2014 Air Impact Wrench 2705P1 Maintenance Information Save These Instructions Product Safety Information WARNING Failure to observe the following warnings, and to avoid these
Radon 07 Installation Instructions & Parts List
 Radon 07 Installation Instructions & Parts List Illustration Radon 07, H1 Handle Right Hand: Open Out 14/06/2016 Revision 1.1 Page 1 of 21 IMPORTANT This shower screen / enclosure must be installed by
Plastic Welding Experiences
 Plastic Welding Experiences In the past I have advocated plastic solvent welding with ABS solvent to rejoin ABS plastic parts without repainting. Solvent is inexpensive but it does takes considerable time
NABTEB Past Questions and Answers - Uploaded online PAST QUESTIONS AND ANSWERS GENERAL METAL WORK (191-1) MAY/JUNE 2005
 MAY/JUNE 2005") PAST QUESTIONS AND ANSWERS GENERAL METAL WORK (191-1) MAY/JUNE 2005 1a. Define Drilling Drilling is defined as the process or method of creating or originating hole in any of the engineering materials,
PAST QUESTIONS AND ANSWERS GENERAL METAL WORK (191-1) MAY/JUNE 2005 1a. Define Drilling Drilling is defined as the process or method of creating or originating hole in any of the engineering materials,
Heat, Color, Set & Fire
 LARK JEWELRY & BEADING Heat, Color, Set & Fire Surface Effects for Metal Jewelry MARY HETTMANSPERGER Liquid Enamel Necklace Liquid enamel applied over a copper wire coil creates a pendant with great texture.
Forming and assembling pipework systems
 Unit 007 Forming and assembling pipework systems Level: 2 Credit value: 14 NDAQ number: 500/9514/6 Unit aim This unit covers the skills and knowledge needed to prove the competences required to cover a
Powerpole General Assembly Instructions
 Powerpole General Assembly Instructions The contacts go in the housings in only one way. Insert the contacts with their sharp edge down against the flat spring that is in the housing. They should slide
This article shows a step by step process of restoring your G503 WWII Jeep Radiator - By Lew Ladwig
 This article shows a step by step process of restoring your G503 WWII Jeep Radiator - By Lew Ladwig 1. I found a good GPW radiator. Most of the thin fins are bent over but the tubes look to be OK. It has
A SRF/SERF A SRF/SERF
 A1100-055SRF/SERF A1100-056SRF/SERF Remote Fill Assembly INSTALLATION INSTRUCTIONS **CRITICAL - MUST READ** This unit can only be used for new installations or tank level retrofits that allow access to
REEL BLADE / BED KNIFE ADJUSTING & SHARPENING
 Here s a QR code image that can be used to access this document on a portable device. Reel Mower Cutting Fundamentals The reel mower s cutting ability is the result of the corner edges of the reel blade
General Array Layout Sketch
 General Array Layout Sketch Cold TO Panels Hot FROM Panels OR Cold TO Panels Hot FROM Panels 1 Introduction This document describes how to install EZ series panels. The EZ series panels are designed to
EMO. Service Instruction. created by Frank Weithöner. Table of contents: Special Tools Assembling Mixing Chamber
 EMO Service Instruction created by Frank Weithöner Table of contents: - Special Tools Disassembling Mixing Chamber Assembling Mixing Chamber Adjustment Rotor / Level Indicator Unit Temperature Compensating
Assembly Instructions for the 1.5 Watt Amplifier Kit
 Assembly Instructions for the 1.5 Watt Amplifier Kit 1.) All of the small parts are attached to a sheet of paper indicating both their value and id. 2.) Leave the parts affixed to the paper until you are
ADVANCED ROCKETRY. Page 01. What you will need to build the Quest MEAN GREEN. Parts and exploded view of the Quest MEAN GREEN. Prod No.
 ADANCED Prod No. 5013 * What you will need to build the Quest MEAN GREEN Hobby Knife * Pencil Straight Edge Aliphatic Resin Wood Sanding Sealer & Brush Spray Paint Parts and exploded view of the Quest
SUPPORTS FOR SPRINKLER RISER PIPES
 ( (" r SUPPORTS FOR SPRINKLER RISER PIPES ROBERT E. STROHMAN LAWRENCE W. LARSON SUPPORTS FOR SPRINKLER RISER PIPES ROBERT E. STROHMAN LAWRENCE W. LARSON Photographs by WILLIAM T. KIRSCHBAUM Circular 46
Learn how to make decorative rivets while working with this uncommon alloy. by Addie Kidd
 PROJECT INTERMEDIATE METAL Shibuichi Cuff: Learn how to make decorative rivets while working with this uncommon alloy. by Addie Kidd To take full advantage of shibuichi, you ve got to use patinas. One
IX. FLARED JOINTS IX. FLARED JOINTS
 IX. FLARED JOINTS IX. FLARED JOINTS While copper tube is usually joined by soldering or brazing, there are times when a mechanical joint may be required or preferred. Flared fittings (Figures 28 and 29)
BRAZE INSTRUCTION VIDEO
 BRAZE INSTRUCTION VIDEO 1 Purpose: The purpose of this video is to provide instructions, guidelines and examples as to the proper techniques involved in the brazing of diamond cutters into matrix or steel
Hand Torch or Flame Brazing Principles
 Hand Torch or Flame Brazing Principles Introduction Hand-torch brazing is inexpensive and flexible, making it ideally suited to small production batches or production runs involving differing components.
CODE OF PRACTICE. SKV- Elite Single-Use Crucible Systems FOR THE THERMIT QUICK WELDING PROCEDURES THRMIT AUSTRALIA PTY LTD SAFETY FIRST
 THRMIT AUSTRALIA PTY LTD CODE OF PRACTICE FOR THE THERMIT QUICK WELDING PROCEDURES SKV- Elite Single-Use Crucible Systems SAFETY FIRST Before any welding operations are undertaken it is mandatory that
MUDGUN Drywall Finishing System
 Watch the demonstration video online at hydetools.com MUDGUN Drywall Finishing System Quick Start Guide Hyde Tools, Inc. / A Hyde Group Company / 800-872-4933 / custrelations@hydetools.com / hydetools.com