Instructions for using the CRR10: Creality 3D - Our Trustworthy 3D printer
|
|
|
- Vincent Barker
- 5 years ago
- Views:
Transcription


1 Instructions for using the CRR10: Creality 3D - Our Trustworthy 3D printer FABLAB BRIGHTON 2018 Installing Curamaker software The first step is to download the software for this machine. The one we ve been using is called Curamaker, by Ultimaker, and download it from this site: Machine settings Here are the machine settings required for Cura, specifically for our machine which is like the CR10...we ve called it the CR10 mini because the bed size is slightly smaller. We need to change the bed size as shown below:
2 And then the main thing to change in the Custom print setup is the bed temperature...for this machine THIS MUST BE 70 deg C. The other big consideration is whether you want support material or not. Here are the basic settings we used to start with:

3 Loading your file into the software File > Open Files...then search for your CAD model (typically in.stl format) and then hit OPEN. You can then re-orient, scale, mirror, position etc your model on the bed. It will be then ready to prepare the model by slicing it up and this will be turned into G-Code by hitting the SLICE button (bottom right). Here s how it will look: Once this is generated, Cura has a really nice feature, where if you plug in your USB stick, it will ask you if you want to save the G-Code directly to your USB device (button on bottom right again). Note that you can ONLY use the special FLUORESCENT GREEN USB stick. This has a small SD card embedded within it that can then be plugged directly into the 3D printer.
, which is where you press the dial, scroll down to PRINT FROM SD CARD, then find your G-Code file and then press the dial again to start the")
4 The fluoro green USB stick and 3D printer setup can be seen below. You can also see the LCD on the interface (left), which is where you press the dial, scroll down to PRINT FROM SD CARD, then find your G-Code file and then press the dial again to start the printing. Note that it will take a few minutes to warm up the printer bed before the actual printing will start. And here it is in action.

5 Here s a short video showing the process (double click on the image below to play the video).


 Gaps tended to be smaller than drawn (mean decrease 0.")
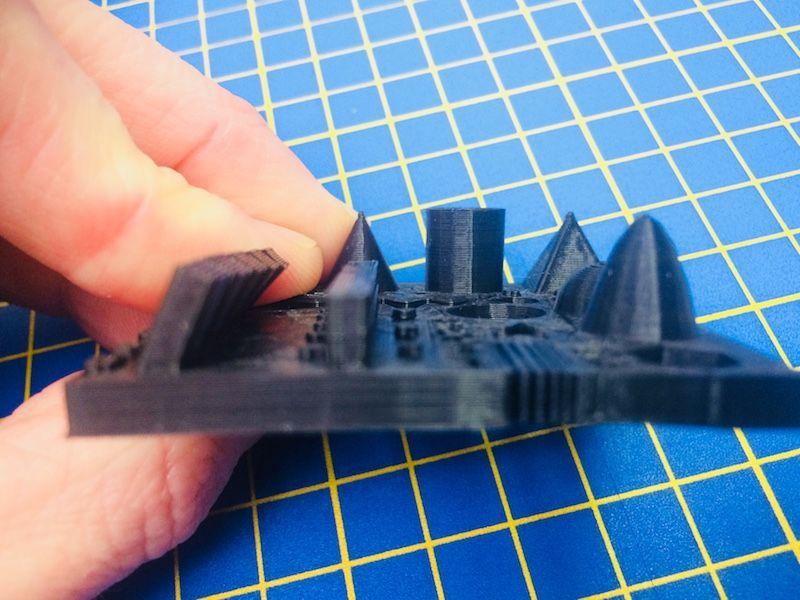
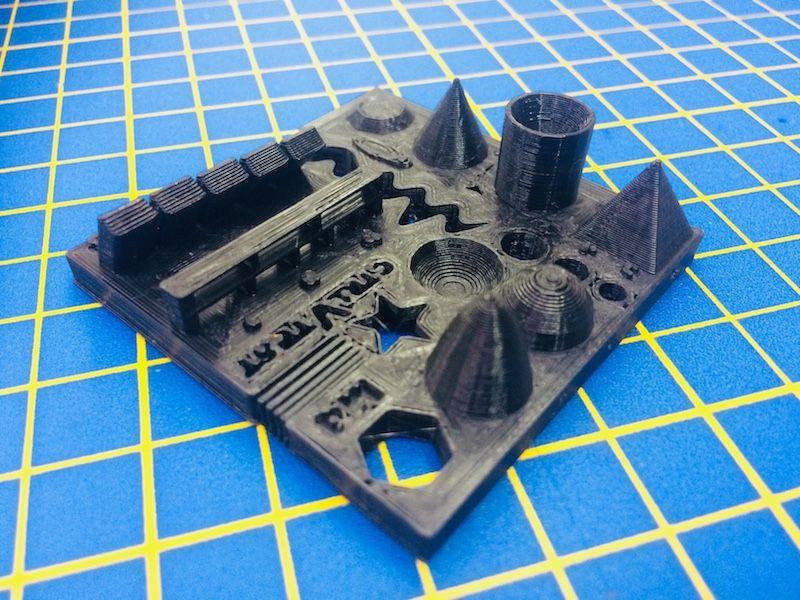
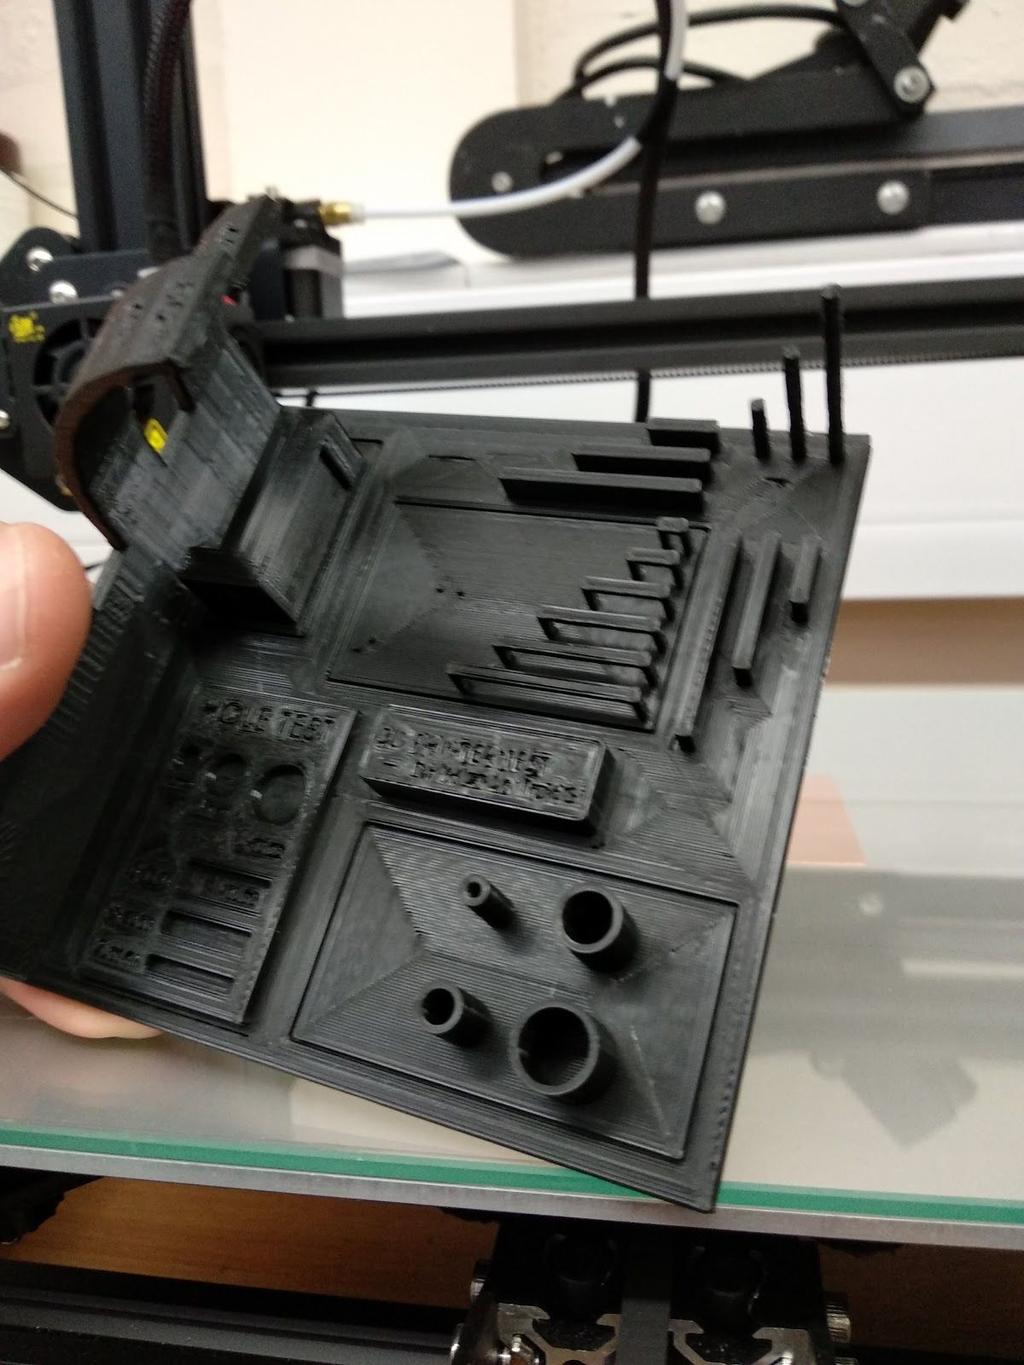
6 Printing calibration test models We then printed a series of test models to check the capabilities, design rules and limitations of this machine. And what a machine! We were very impressed by this little beauty. So easy to use, so impressive with reliability and repeatability (so far), and all for only about 300. Here are the three models we adapted from thingiverse. In particular these were good at testing: overhangs at various angles, unsupported beams, wall thicknesses, slot/gap thicknesses, text debossing, etc. To summarise key outcomes: We could only print standalone walls down to 0.6 mm wall thickness. 0.4 mm and 0.2 mm did not print at all. Note we didn t try 0.5 mm, but I suspect this would work. Walls tended to be larger than drawn (mean increase 0.03 mm) Gaps tended to be smaller than drawn (mean decrease 0.19 mm) Overhangs were limited to XX degrees from the vertical. And here are a few images of the parts themselves:

7


8

9 Gap and wall measurement data We then measured the actual gap and wall dimensions with our trusty calipers. Here is the data.
10 Table 1: Measurements of wall thicknesses for various sizes, including mean +- standard deviation. Table 1: Measurements of gap thicknesses for various sizes, including mean +- standard deviation. Note: 1.84 (0.8 measurement), should read 0.84 instead.
11 Makerbot Replicator 2X We also have makerbots available to print work in the Advanced Engineering Centre. Here are the instructions and design guides which we hope are useful. Designing Parts to be Printed on the MakerBot Replicator 2X Saving Please save your file, as your name, what the part is called and the approximate size, colour and material i.e. Joe_bloggs_castle_50x50x40_blue_abs.stl Save your files as STL using (fine setting) in Solidworks, Rhino or equivelent and reload the STL file to check the curves are smooth enough. Save each item as a separate STL file Size The maximum size is 220mm long x 140mm deep x 140mm high Bigger is not always better, only make it as big as it needs to be The extruders are typically 0.4mm wide. 0.4mm will give a single wall, will give 2 walls that are merged is good for 3 merged walls. 1.5mm for 4 walls Things to Avoid Do not print out pieces that could be easily be made by hand or with another machine e.g. laser cutter Very thin or small items will not print Long flat strips are hard to make as they tend to warp. Avoid unnecessary protrusions, especially on the base of the part. Avoid overhangs that will need support material. The Makerbots can handle up to 68 degrees from the vertical without support (normally). Tips Cutting models up and adding locating holes can eliminate a lot, if not all support material. Make wall thickness as small as possible that the design will allow, but no less than 1mm. When designing your part think in what orientation it will be printed and the supports that it will need. Where supports are, think if you can include it in the model, then there will be less post processing removing supports, giving a better looking model. Layers There is a weakness between layers Holes Model holes bigger than they need to be to allow for shrinkage. Holes smaller than 10mm diameter should be have a clearance of 0.4mm e.g. for an 8mm hole make it 8.4mm For holes larger than 10mm, increase the clearance 1mm clearance for 50mm holes i.e. 51mm 2mm clearance for 130mm holes i.e. 132mm
12 Roughly scale the clearance for diameters between 10mm and 130mm e.g. 90mm would be modelled as 91.5mm Vertical holes are generally less geometrically accurate. Parts that fit together Where a fit is required make smaller test pieces first Where two parts must fit together exactly, locating holes should be made each side and use rods to fit together. The rods could be made by cutting a small piece of the 3D printing plastic, which has a diameter of 1.75mm. To allow for shrinkage, model the holes as 2.2mm Alternatively, use welding rods, tin copper wire or enamel coated wire, but check availability of rod sizes first. Where two parts fit together with a lip, leave a 0.2mm gap on each side. When using snap fits make sure the print is in the correct orientation to avoid x,y plane weakness. Here's some free software ( I think there's a plugin for Solidworks) to help slice up a model into several printable parts! Solids If access to the interior of the model is not required make it solid. If it needs to be more solid we can stipulate an infill normally 5 50% to make it heavier and stronger. Checklist : Have you saved the files as separate STLs called your name, what the part is called and the approximate size, colour and material? Is the size no more than 220mm long x 140mm deep x 140mm high? Have you made allowances for holes to shrink? Would your design be more suitable to be made on a laser cutter? How to get things printed at the University of Brighton Step 1 - Prepare your CAD using the tips in the 'Designing Parts to be Printed on the MakerBots' section below Step 2 - Save as an STL file/s Step 3 - Complete the Checklist (on the left) Step 4 - Bring the STL file/s on a USB stick and talk to Trevor or final year students or other students working on the printers. They will look at your CAD with you to check that it s ready and discuss how you would like it printed, such as the size and colour. If your CAD is not ready to print, they will make suggestions if possible Step 5 - Your file/s will be transferred to the 3D printing computer from your USB stick and your details will be added to the 3D printing queue. Step 6 - When your model is about to be printed it, the file/s will be transferred to one of the 3D printers using an SD card. Your model will then be printed.
13 Please note: each printer has a dedicated SD card, so you do not need to provide one. Your model may not be printed on the day it's added to the queue, depending on availability, so please allow extra time. You do not need to be present for Step 6, although you may want to watch your model being printed. Step 7 - Once your model is printed it can be collected from outside room 101 in the Advanced Engineering Centre.
Using Cura for the first time
 Cura User manual Using Cura for the first time Initial startup When you start Cura you will be greeted by the following wizard: This wizard will guide you through your initial checkup and calibration of
Ultimaker 2+ / 3. Guide for. General Information. Self-service 3d printing at the AOC. Ultimaker 2+ UItimaker 3
 Guide for Ultimaker 2+ / 3 Self-service 3d printing at the AOC General Information Location:, 1232 Sullivan (see page 9 for full list of Ultimakers on campus) Access: You can walk-in or reserve the Ultimakers
Rapid Prototyping Introduction ENGR 1182
 Rapid Prototyping Introduction ENGR 1182 Objectives What is Rapid Prototyping? How a 3D printer works 3D Printing in EED Laser Cutting in EED Design your own part option What is Rapid Prototyping? Rapid
Design Guidelines for FDM technology
 Design Guidelines for FDM technology This guideline is supposed to be used by people who already have knowledge in 3D design, CAD/CAM, etc. and it s goal is to show the key points when designing a model
LAB 1A: Intro to SolidWorks: 2D -> 3D Brackets
 LAB 1A: Intro to SolidWorks: 2D -> 3D Brackets Set units Create Sketch Add relations Linear patterns Mirror Fillet Extrude Extrude cut First, set units. click Option on top of main menu Open Document Properties
3D Printing with Ultimaker2, User Guide
 February 25, 2015 3D Printing with Ultimaker2, User Guide University of Victoria, (BDSL) Biomedical Systems Design Laboratory 1 Cleaning and Leveling the Build- Plate Step 1: Use screwdriver to remove
Table of Contents CONTENTS
 Table of Contents CONTENTS Introduction... 2 Contact TKI... 2 Printer Features & Definitions... 3 Software Parameter Setup... 8 Setting Up A Printer Profile in Cura... 8 Printing Settings... 13 Printing
CAD tutorial for the drinking straw support
 CAD tutorial for the drinking straw support Having tried a number of different designs, this one worked best on the greatest variety of glasses straight sided glass, angled glass and even a champagne flute.
Welcome to the a Department of Engineering Education! ENGR 1182 Introduction to Engineering II Graphics 01
 Welcome to the a Department of Engineering Education! ENGR 1182 Introduction to Engineering II Graphics 01 Today s Objectives Teaching Team Introduction Course Structure & Expectations Course Syllabus
Quick Start Guide. Simplify3D. Zeemanlaan MV IJsselstein The Netherlands
 Quick Start Guide Simplify3D www.felixprinters.com/support support@felixprinters.com Zeemanlaan 15 3401 MV IJsselstein The Netherlands 1 Introduction Introduction Simplify3D is software to control your
CURA WANHAO EDITION USER MANUEL
 CURA WANHAO EDITION USER MANUEL 1.1 Cura Overview We recommend that new users start with Cura as it includes a slicing engine. Host software we recommend to use Repitator. There is separate introduction
Straw support Fusion 360
 Straw support Fusion 360 Before using these instructions, watch the video screencast of the CAD drawing actually being done in the software. Click this link for video tutorial This design works on a variety
3D Printing Instructions MANTIS CHENG
 3D Printing Instructions MANTIS CHENG CHAPTER 1 How to Print on Thing-O-Matic Our Makerbot Thing-O-Matic (TOM) 3D printer is now several years old. It is not running the latest firmware. It doesn t work
CURA WANHAO EDITION USER MANUEL
 CURA WANHAO EDITION USER MANUEL 1.1 Cura Overview We recommend that new users start with Cura as it includes a slicing engine. Host software we recommend to use Repitator. There is separate introduction
Cube in a cube Fusion 360 tutorial
 Cube in a cube Fusion 360 tutorial n Before using these instructions, it is helpful to watch this video screencast of the CAD drawing actually being done in the software. Click to link to the video tutorial.
1. Change units to inches: Tools > Options > Document Properties > Units and then select: IPS (inch, pound, second)
") Steps to Draw Pump Impeller: The steps below show one way to draw the impeller. You should make sure that your impeller is not larger than the one shown or it may not fit in the pump housing. 1. Change
Steps to Draw Pump Impeller: The steps below show one way to draw the impeller. You should make sure that your impeller is not larger than the one shown or it may not fit in the pump housing. 1. Change
TL4100 Top 5 Build Tips
 TL4100 Top 5 Build Tips 1: Top Plate When assembling the top plate, align the top of the top plate brackets with the top of the rods. This can be done by placing a hard flat object (such as a ruler) on
Introduction to SolidWorks Introduction to SolidWorks
 Introduction to SolidWorks Introduction to SolidWorks SolidWorks is a powerful 3D modeling program. The models it produces can be used in a number of ways to simulate the behaviour of a real part or assembly
Dremel 3D Printer Digital Fabrication Lab College of Design, Iowa State University
 Dremel 3D Printer Digital Fabrication Lab College of Design, Iowa State University 3D Printing - The following steps will guide the user on how to transfer digital work from a design software to setting
PrintrBot NinjaFlex Extruder Upgrade
 PrintrBot NinjaFlex Extruder Upgrade Created by Ruiz Brothers Last updated on 2015-11-08 06:00:17 PM EST Guide Contents Guide Contents Overview Get the Gear Head Extruder 3D Printing 3D Printing with NinjaFlex
Front View Side View Top View
 Instructions: Below is a detailed instructional guide to producing a functioning Brace assembly from the provided CAD files. Sizing guide Measurements for brace sizing are best taken using a flexible measuring
What is an STL file.
 What is an STL file To get your model printed you will need to send us an stl file, (we can also accept stp files). The stl file is a format created to take the complexity out of a CAD model & allow easy
Notes on printing Addison Library students things
 Notes on printing Addison Library students things 5/9/14 jw Printing the objects we didn t have time to print at the Library was an interesting task, and I learned a lot while doing it. I was also able
User Manual for Mini 3D Printer
 User Manual for Mini 3D Printer Copyright@iNSTONE 3D Content Content... 1 Technical Parameters...2 Packing List... 3 Installation... 4 Instructions...5 I.Printing... 5 II. Taking down the finished printing
SolidWorks Design & Technology
 SolidWorks Design & Technology Training Course at PHSG Ex 5. Lego man Working with part files 8mm At first glance the Lego man looks complicated but I hope you will see that if you approach a project one
Diane Burton, STEM Outreach.
 123D Design Tutorial: LED decoration Before using these instructions, it is very helpful to watch this video screencast of the CAD drawing actually being done in the software. Click this link for the video
User Manual Creatr HS
 1 Leapfrog BV Dear customer, Congratulations with the purchase of your very own Leapfrog Creatr HS! We would like to help you get started so you can make your first 3D print on the Creatr HS and many more.
Mechanical Design. Mark Jennings and Meera Wakim
 Mechanical Design Mark Jennings and Meera Wakim Download, install, and log in to the UT Virtual desktop (for engineering students): http://www.engr.utexas.edu/itg/facilities/virtualdesktop Mark Jennings
Lulzbot Taz Workflow Computation + Construction Lab Iowa State University
 Lulzbot Taz Workflow Computation + Construction Lab Iowa State University 3D Printing on the Lulzbot Taz - Guidelines - The following steps that will guide the user on how to 3D print using the Lulzbot
Stock Materials Interior Fillets... 10
 Rapid Machining Overview... 3 Capabilities... 4 Certifications & Registrations... 4 Stock Materials... 5 Design Guidelines Tolerances... 6 Wall Thickness... 7 Outside Corners... 8 Hole Depth... 9 Interior
Wood Case for Raspberry Pi 3
 Wood Case for Raspberry Pi 3 Created by Ruiz Brothers Last updated on 2018-08-22 04:00:10 PM UTC Guide Contents Guide Contents Overview CNC Milling Enclosures CAD to CAM Parts & Tools List Design Designing
3D Printing with the Lulzbot 4 Alyssa Schwartz on 7/2/2018
 3D Printing with the Lulzbot 4 Alyssa Schwartz on 7/2/2018 1. Find or Design your Object. This can come from almost any source, but needs to be in a.stl file format. a. Thingiverse.com b. https://3dprint.nih.gov/
USER MANUAL TABLE OF CONTENT
 USER MANUAL TABLE OF CONTENT A Precautions 2 B Check List 3 C Component Diagram 4 D LCD control Menu and its Function 5 E Technical Specifications 6 F Hardware Installation on Printer 7 G Software installation
F-F-Fiddle Assembly Instructions
 F-F-Fiddle Assembly Instructions Bout Bridge Neck Machine Heads/Tuners Truss Rod Strings An open-source FFF 3d-printable electric violin. 1. Assemble materials 5 3 8 1 9,10, 11 7 4 2 6 PARTS 1. Bout part
Slicer"CURA" User Instructions for Olivetti S2 3D Printer
 Slicer"CURA" User Instructions for Olivetti S2 3D Printer 1 Cura Install - 1 Click Next 2 Cura Install - 2 Check all components. Then click Install 3 Cura Install - 3 Click Next 4 Cura Install - 4 The
Daan Speth, October Slic3r settings
 Slic3r settings Daan Speth, October 2016 Slic3r is slicing software that can turn a 3D model saved as STL file into a gcode file, containing instructions for the 3D printer. After starting slic3r a startup
For rapid-prototyping and production of low volume, low cost plastic objects.
 3D Printer Standard Operating Procedure Jonathan M. Cabot 10 January 2016 For rapid-prototyping and production of low volume, low cost plastic objects. 1.0 Material Requirements 1.1 Equipment needed for
Printing with the Ultimaker 2
 Printing with the Ultimaker 2 Introduction Ultimaker 2 uses a Fused deposition modeling (FDM) technology that was developed and implemented at first time by Scott Crump, Stratasys Ltd. founder, in 1980s.
ENSC 470/894 Lab 3 Version 6.0 (Nov. 19, 2015)
") ENSC 470/894 Lab 3 Version 6.0 (Nov. 19, 2015) Purpose The purpose of the lab is (i) To measure the spot size and profile of the He-Ne laser beam and a laser pointer laser beam. (ii) To create a beam expander
ENSC 470/894 Lab 3 Version 6.0 (Nov. 19, 2015) Purpose The purpose of the lab is (i) To measure the spot size and profile of the He-Ne laser beam and a laser pointer laser beam. (ii) To create a beam expander
Introduction to 3D Printing. Activity 1: Design a keychain using computer-aided design software
 Introduction to 3D Printing Activity 1: Design a keychain using computer-aided design software 1 In this activity we ll design a keychain name tag and learn the fundamentals of computer-aided design, the
Ladybird Project - Vacuum Mould
 - Vacuum Mould Prerequisite Mould drawn and saved as an STL file in SolidWorks Focus of the Lesson On completion of this exercise you will have: Opened an STL file Set Machining Constraints Set up Tools
Dyson Centre For Engineering Design. User manual for Ultimaker 2 Extended 3D printer
 Dyson Centre For Engineering Design User manual for Ultimaker 2 Extended 3D printer Created/edited by Version Date Diana Thomas McEwen V1 12/09/2017 Table of Contents 1.0 Machine Familiarisation... 2 1.1
ideamaker Manual
 ideamaker Manual Using ideamaker... 2 1 Basic information... 2 1.1 What is ideamaker?... 2 1.2 Where to download ideamaker?... 2 2 Install ideamaker... 3 3 Let s Print!... 6 4 How to use ideamaker?...
Instructions for making our TinyFABISB using ROLAND MODELA (MDX-50) milling machine
 milling machine") Instructions for making our TinyFABISB using ROLAND MODELA (MDX-50) milling machine FABLAB BRIGHTON 2018 1. Circuit design - creating RML files 2 2. Setting up MDX-50 Machine 5 Fix board 5 Setup machine
Instructions for making our TinyFABISB using ROLAND MODELA (MDX-50) milling machine FABLAB BRIGHTON 2018 1. Circuit design - creating RML files 2 2. Setting up MDX-50 Machine 5 Fix board 5 Setup machine
Design Analysis Process
 Prototype Design Analysis Process Rapid Prototyping What is rapid prototyping? A process that generates physical objects directly from geometric data without traditional tools Rapid Prototyping What is
SolidWorks & Tinkerine 3D Printing Tutorial ELEC391
 SolidWorks & Tinkerine 3D Printing Tutorial ELEC391 Engineering Services, Dept. of Electrical and Computer Engineering University of British Columbia, Faculty of Applied Science Table of Contents Installing
1. Assemble in your groups. 2. Using SolidWorks create a spinning coin, suited for FDM UprintPlus/ Robo 3D R1. Import the Coin_Pattern.
 MEEN 3349 Fundamentals of Manufacturing Lab 3D Printing Lab (2 week lab) 1. Assemble in your groups. 2. Using SolidWorks create a spinning coin, suited for FDM UprintPlus/ Robo 3D R1. Import the Coin_Pattern.igs
How to 3D Print molds for custom
 How to 3D Print molds for custom Stamps @ustreasury Created by phillip torrone Last updated on 2017-10-04 01:23:10 AM UTC Guide Contents Guide Contents Overview Parts Two part mold putty Ultimaker 2+ 3D
1. ASSEMBLING THE PCB 2. FLASH THE ZIP LEDs 3. BUILDING THE WHEELS
 V1.0 :MOVE The Kitronik :MOVE mini for the BBC micro:bit provides an introduction to robotics. The :MOVE mini is a 2 wheeled robot, suitable for both remote control and autonomous operation. A range of
CNC INTRO WALKTHROUGH GSAPP FABRICATION LAB, FALL 2017
 CNC INTRO WALKTHROUGH GSAPP FABRICATION LAB, FALL 2017 this is a student guide to the procedure of gaining access to the CNC router digital fabrication equipment in the Fabrication Lab at GSAPP. The guide
TABLE OF CONTENTS. About Ultimaker. Fused Filament Fabrication. Capabilities. Considerations
 Ultimaker Tutorial TABLE OF CONTENTS About Ultimaker... 1 Prepare Your File for Printing... 2 Logging the Print... 8 Preparing the Machine... 9 Paying for Your Part... 11 Printing Your Part... 12 Removing
Empire Dresser Plans
 1 Empire Dresser Plans Materials 1 sheet 3/4" plywood (cabinet grade 4' x 8') 1 sheet 5 mm (3/16") underlayment plywood 4'x 8', buy another 1/2 sheet if you want to put a back on the dresser. 1-2" x 4"
Assembly Guide for Printrbot - Simple Maker s Edition 1405
 Assembly Guide for Printrbot - Simple Maker s Edition 1405 Last update: March 2016 Please Note: be careful on the steps that are underlined 1 Contents Tools Needed:... 3 First step: Check components and
Digital Media Tutorial Written By John Eberhart
 MadCAM MadCAM 5.0: Large 4.1: Large & Medium CNC Tool CNC Path Tool Path Generator Generator Digital Media Tutorial Written By John Eberhart MadCAM is a tool path generator that works inside Rhino. It
AM8 Printer A metal frame for your Anet A8 By Pheneeny v1.0 April 20, 2017
 AM8 Printer A metal frame for your Anet A8 By Pheneeny v1.0 April 20, 2017 Please read this entire document before printing parts or building this frame Disclaimer: This guide is for informational purposes
(Assembling Guide supplied by imakr ) with the support of MyMiniFactory.com
 with the support of MyMiniFactory.com") (Assembling Guide supplied by imakr ) with the support of MyMiniFactory.com Summary Congratulations on beginning on your journey into 3D printing with the STARTT 3D printer. In this guide, you will have
(Assembling Guide supplied by imakr ) with the support of MyMiniFactory.com Summary Congratulations on beginning on your journey into 3D printing with the STARTT 3D printer. In this guide, you will have
Introduction to 3D CAD with SolidWorks. Jianan Li
 Introduction to 3D CAD with SolidWorks Jianan Li Create a New Part The first time you launch SolidWorks, it asks you to set the default units and dimension standard. Make sure you have IPS and ANSI selected,
Content. 1. Unpacking Component Description Hardware Installation Software Application...5. (1) Software Installation.
 Software Installation.") WWW.BIQU.EQUIPMENT Content 1. Unpacking 1 2. Component Description.2 3. Hardware Installation...3 4. Software Application...5 (1) Software Installation.5 (2) Slicing Operation...7 Appendix...... 8 5. Automatic
WWW.BIQU.EQUIPMENT Content 1. Unpacking 1 2. Component Description.2 3. Hardware Installation...3 4. Software Application...5 (1) Software Installation.5 (2) Slicing Operation...7 Appendix...... 8 5. Automatic
WOOD TOY NEWS SANDING DRUMS & JIGS ISSUE
 WOOD TOY NEWS SANDING DRUMS & JIGS ISSUE toymakingplans.com June 11, 2014 Wednesday How to Make a Sanding Drum Jig for Smarter Toymaking. By Imants Udris Udie Our discussion begins based on the 5 piece
Slicer"CURA" User Instructions for Olivetti 3D DESK
 Slicer"CURA" User Instructions for Olivetti 3D DESK 1 Cura Install - 1 Click Next 2 Cura Install - 2 Check all components. Then click Install 3 Cura Install - 3 Click Next 4 Cura Install - 4 The Wizard
Advanced CO2 car Import CAM Procedures
 Advanced CO2 car Import CAM Procedures While the standard CO2 car tutorial within Quick CAM has a part that is sized to fit the billet as custom designed cars are produced this will not be the case. Before
6625 WEST WILSHIRE BLVD. OKLAHOMA CITY, OK (405) FAX (405)
 FAX (405)") INSTALLATION INSTRUCTIONS FOR BEDSIDE INNER REPAIR PANELS 67-72 GM FLEETSIDES This instruction illustrates the removal and replacement of the often rusted and damaged lower inner flanges on the 1967-1972
INSTALLATION INSTRUCTIONS FOR BEDSIDE INNER REPAIR PANELS 67-72 GM FLEETSIDES This instruction illustrates the removal and replacement of the often rusted and damaged lower inner flanges on the 1967-1972
Buildings Space City from Fireball XL5 December 2018 By Gary Reighn
 Buildings Space City from Fireball XL5 December 2018 By Gary Reighn General 3D Printing and Assembly Instructions Introduction: The models described below are 3D renderings of the rotating control tower
Part 2: Earpiece. Insert Protrusion (Internal Sketch) Hole Patterns Getting Started with Pro/ENGINEER Wildfire. Round extrusion.
 Hole Patterns Getting Started with Pro/ENGINEER Wildfire. Round extrusion.") Part 2: Earpiece 4 Round extrusion Radial pattern Chamfered edge To create this part, you'll use some of the same extrusion techniques you used in the lens part. The only difference in this part is that
Part 2: Earpiece 4 Round extrusion Radial pattern Chamfered edge To create this part, you'll use some of the same extrusion techniques you used in the lens part. The only difference in this part is that
Design Guide: CNC Machining VERSION 3.4
 Design Guide: CNC Machining VERSION 3.4 CNC GUIDE V3.4 Table of Contents Overview...3 Tolerances...4 General Tolerances...4 Part Tolerances...5 Size Limitations...6 Milling...6 Lathe...6 Material Selection...7
BEST PRACTICES COURSE WEEK 21 Creating and Customizing Library Parts PART 7 - Custom Doors and Windows
 BEST PRACTICES COURSE WEEK 21 Creating and Customizing Library Parts PART 7 - Custom Doors and Windows Hello, this is Eric Bobrow. In this lesson, we'll take a look at how you can create your own custom
Printing Guide. Revision 1.3. Kudo3D Titan 1 Printing Guide Ver of 11
 Printing Guide Revision 1.3 1 of 11 Copyright 2015 by Kudo3D. This material may be distributed only subject to the terms and conditions set forth in the Creative Commons Attribution-NonCommercial-NoDerivatives
Content. Before You Start. Assemble the 3D Printer. Use the 3D Printer. Load Filament Level the Heated Bed Start Printing Support
 Quick Start Guide Content A Before You Start B Assemble the 3D Printer C Use the 3D Printer Load Filament Level the Heated Bed Start Printing Support 2 Before You Start Get the Screwdriver Ready The screwdriver
FABRICATION SHOP Bernard and Anne Spitzer School of Architecture. City College of New York City University of New York DIGITAL FABRICATION SERVICES
 FABRICATION SHOP Bernard and Anne Spitzer School of Architecture City College of New York City University of New York DIGITAL FABRICATION SERVICES 1 F ABRICATION SHOP SSA DIGITAL FABRICATION SERVICES Updated
Slicing Jig For Pen Inlays
 Slicing Jig For Pen Inlays By Randall Smith (randyrls) May 2008 This article has been downloaded from the library of the International Association of Penturners. www.penturners.org You are welcome to reproduce
Prototyping a. Playable Ukulele. Rabea Baroudi
 Prototyping a Playable Ukulele Rabea Baroudi Contents 1 Scenario 2 Goals & Motivators 3 Research & Planning 4 Implementation 5 Evaluation 6 Analysis 2 1 Scenario Design Challenge The UX Prototyping (HCDE
Porcelite is ideal for objects requiring high resolution details. It s capable of printing at 25 micron layer thickness.
 fa is a UV-curable porcelain resin suitable for 3D printers that utilize SLA, DLP or CLIP technologies with UV wavelengths between 350-405 nm. Porcelite is ideal for objects requiring high resolution details.
A LAMP STORY... from Form Finding to Assembly ANNE-MARIE DESMEULES YU-CHANG GRACE LIN REENA MISTRY DAN GUENTER JESSICA SIN RICO LAW THE PORTFOLIO
 THE PORTFOLIO ANNE-MARIE DESMEULES YU-CHANG GRACE LIN REENA MISTRY DAN GUENTER JESSICA SIN RICO LAW A LAMP STORY... from Form Finding to Assembly A) Form-Finding 1.The initial form was based on a broad,
An Introduction to Lasercut 5.3 Preparing the Artwork
 An Introduction to Lasercut 5.3 Preparing the Artwork Version 0.1, December 8th 2015 Precautions Introduction Importing from.dxf Setting up the layers Checking the Operations Tips, Mistakes and Problems
Engineering Metrology and Instrumentation
 Engineering Metrology and Instrumentation Machine-Tool Slideway Figure 35.1 Cross-section of a machine-tool slideway. The width, depth. Angles, and other dimensions all must be produced and measured accurately
LINK: thingiverse.com/thing: for access to handouts, videos and other materials associated with this project.
 PROJECT NINE ARCHIMEDES SCREW BONANZA PAGE 1 LINK: thingiverse.com/thing:1769714 for access to handouts, videos and other materials associated with this project. PROJECT INFO AUTHOR MakerBot Learning @makerbotlearning
FABRICATION INSTRUCTIONS OF THE PRINTED COMPONENTS OF THE PLECO
 FABRICATION INSTRUCTIONS OF THE PRINTED COMPONENTS OF THE PLECO BEFORE STARTING Some components of the Pleco are fabricated using 3D printing techniques: the nozzle, the cover, the piston head and the
Gouge Jig SVD-186 (SVD-186)
") Gouge Jig SVD-186 (SVD-186) TURNING TOOLS Bowl gouges Spindle gouges Turning cutters CARVING TOOLS Curved gouges Spoon-shaped gouges Back bent gouges Down bent gouges Curved V-tools Max tool width 36 mm
Gouge Jig SVD-186 (SVD-186) TURNING TOOLS Bowl gouges Spindle gouges Turning cutters CARVING TOOLS Curved gouges Spoon-shaped gouges Back bent gouges Down bent gouges Curved V-tools Max tool width 36 mm
PLEASE WEAR GLOVES. NEVER TOUCH THE RESIN (EVEN WITH GLOVED HANDS). BE CAREFUL: RESIN GETS EVERYWHERE.
. BE CAREFUL: RESIN GETS EVERYWHERE.") FORM 2 TUTORIAL PLEASE KEEP THE FORM 2 AREA CLEAN. PLEASE WEAR GLOVES. NEVER TOUCH THE RESIN (EVEN WITH GLOVED HANDS). BE CAREFUL: RESIN GETS EVERYWHERE. TABLE OF CONTENTS STEP 1: HAVE YOUR.STL or.obj
FORM 2 TUTORIAL PLEASE KEEP THE FORM 2 AREA CLEAN. PLEASE WEAR GLOVES. NEVER TOUCH THE RESIN (EVEN WITH GLOVED HANDS). BE CAREFUL: RESIN GETS EVERYWHERE. TABLE OF CONTENTS STEP 1: HAVE YOUR.STL or.obj
Fabrication. Production Options Available. By fabrication speed: By ease of access:
 Fabrication Production Options Available By ease of access: easy fast hard By fabrication speed: hand tools / Hebb42 laser cutter waterjet cutter 3D printer student machine shop slow hand tools / Hebb42
Part 8: The Front Cover
 Part 8: The Front Cover 4 Earpiece cuts and housing Lens cut and housing Microphone cut and housing The front cover is similar to the back cover in that it is a shelled protrusion with screw posts extruding
UNIT 11: Revolved and Extruded Shapes
 UNIT 11: Revolved and Extruded Shapes In addition to basic geometric shapes and importing of three-dimensional STL files, SOLIDCast allows you to create three-dimensional shapes that are formed by revolving
2016/02 Hideo Nakano STRAW KITE
 2016/02 Hideo Nakano nh1886@yahoo.co.jp STRAW KITE Introduction We can build up an improvised airplane, which has a plastic straw skeleton, a rubbish bag sheet wing and a rubber band powered toy propeller.
fun and adaptable pie shooting catapult!
 fun and adaptable pie shooting catapult! (made with 3D printing) a project by Maya & Noah the MyPie Catapult project: The MyPie Catapult is designed by Maya and Noah. Maya is the brains behind the design.
The image above is intended to give you an idea of what the dovecote will look like when finished.
 Thank you for buying my book, I hope it is useful and enjoyable in your quest to building your own dovecote. This book will give you step-by step instructions on how to build your own dovecote also included
Drawing and Assembling
 Youth Explore Trades Skills Description In this activity the six sides of a die will be drawn and then assembled together. The intent is to understand how constraints are used to lock individual parts
Design for Manufacturability Guide
 Design for Manufacturability Guide WHO WE ARE Short-to-medium run metal stamping manufacturer Annual volume of 250 to 300,000 per part number We serve a very diversified mix of customers & markets Our
Print then Cut Calibration
 Calibration The feature of Cricut Design Space for PC and Mac allows you to print your images from your home printer and then cut them out with high precision on your Cricut machine. Print then Cut calibration
Know Which Cricut Blade to Use?
 How Do I Know Which Cricut Blade to Use? Ever wondered which blades and housings are compatible with your Cricut machine? See the chart below for a quick-reference guide on blades. Machine Premium Fine
Rendering a perspective drawing using Adobe Photoshop
 Rendering a perspective drawing using Adobe Photoshop This hand-out will take you through the steps to render a perspective line drawing using Adobe Photoshop. The first important element in this process
whatever s in your mind, make it real.
 in partnership with whatever s in your mind, make it real. Cooksongold Direct Metal Laser Sintering Design Guidelines. 2559 DMLS design guidelines 203x290_English_AW.indd 1 The Direct Metal Laser Sintering
F400 QUICK-START GUIDE
 F400 QUICK-START GUIDE PLEASE READ THIS DOCUMENT BEFORE OPERATING YOUR PRINTER Revision 10-1/31/18 Page 1 Table of Contents 1. Introduction... 3 2. What s in the Box... 3 3. Unboxing Your F400... 4 4.
Desk Tidy Project. Design Brief. Design Specification. The products. Researching Materials. Essential Desirable Additional
 Function and Performance - The desk tidy should fulfill it main purpose and function of holding a range of stationary securely and in a tidy way. It should be easy to put th stationary tidy and not be
Activity 1 Modeling a Plastic Part
 Activity 1 Modeling a Plastic Part In this activity, you will model a plastic part. When completed, your plastic part should look like the following two illustrations. While building this model, take time
Roll-to-Roll Printing Gerber Solara ion & Gerber CAT UV
 Title: Product: Document Number: Roll-to-Roll Printing with the Gerber Solara ion & Gerber CAT UV Gerber Solara ion & Gerber CAT UV ANote 2010-ion & CAT UV-012 Last Modified: August 30, 2010 Summary: This
3M Custom Formed Reflectors Design Guide Considerations
 3M Custom Formed Reflectors Design Guide Considerations 3M Custom Formed Reflectors increase the optical efficiency of a light fixture by using precise reflection optics to raise the lumen output. Each
Objectives: Learn what an Arduino is and what it can do Learn what an LED is and how to use it Be able to wire and program an LED to blink
 Objectives: Learn what an Arduino is and what it can do Learn what an LED is and how to use it Be able to wire and program an LED to blink By the end of this session: You will know how to use an Arduino
CAMWorks How To Create CNC G-Code for CO2 Dragsters
 Creating the Left Side Smooth Finish Tool Path. This chapter will focus on the steps for creating the left side smooth finish tool path. The objective of this chapter is to create to an accurate and highly
DESIGN GUIDE >> CNC MACHINING. Quotes in Hours. Parts in Days. rapidmanufacturing.com
 Quotes in Hours. Parts in Days. rapidmanufacturing.com Contents 03 Overview 03 Capabilities 03 Certifications & Registrations 04 Stock Materials DESIGN GUIDELINES 04 Tolerances FINISHING 12 Threads 13
HOW TO ASSEMBLE THE NANOCADE KIT
 KIT HOW TO ASSEMBLE THE NANOCADE KIT v 1.1 10 STEPS Second Edition 1.10 Work in progress COPYRIGHT NANOCADE.COM 2011 1 INDEX The Nanocade KIT parts... 3 SPECIFICATION AND INFORMATION... 4 IMPORTANT INFORMATION...