Brook sectional corner. assembly instructions
|
|
|
- Sabina Flynn
- 5 years ago
- Views:
Transcription

1 Brook sectional corner assembly instructions

2 Smooth & Wrinkle-Free Fabric Covers: In addition to these printed instructions, you may want to watch our beauty tips videos on the customer service page of our website. The videos show demonstrations on how to apply the fabric covers and make them smooth and wrinkle free. Renewability: Individual foam and fabric parts are available. You no longer have to worry that something will happen and you ll just have to live with it. From pet attacks to paint spills, it s easy to recover from a furniture accident. Foam: The seat cushions will feel firm at first. That s intentional, since firmer foam lasts longer. You can shorten the break-in period by putting the cushions on the floor and walking on them for a few minutes.

3 Tools needed: Phillips Screwdriver or powered drill with a Phillips screwdriver bit. A sanding pad is included in case you wish to smooth over any of the surfaces or edges after the frame is assembled. It is not necessary to sand any of the frame parts during assembly. No glue will be used during assembly. Item will be ready for use immediately.
4 Frame Assembly Open the box and set aside the foam and fabrics for later. Then take the wood parts out of the box. The parts are not packed in the order of assembly so don t worry about getting them mixed up. They are all numbered for easy reference. Open the parts bag and insert the black plastic T connectors into the parts shown here. Through-out these instructions it is okay to use a hammer to tap the T-connectors and wood parts into position.
5 Attach black floor glides to the parts shown. Connect parts 1 and 2 together. Repeat for parts 3 and 4, 5 and 6, 7 and 8.
6 Slide part 6 into part 2 and secure with a screw. Place part 4 onto part 2 and secure with two screws.
7 Spread parts 4 and 6 apart far enough to slide part 9 into the slots on 2, 4 and 6. Slide Part 10 into the slots on parts 4 and 6. Top View Slide part 8 into the slots on parts 4 and 6. Secure with a screw through part 4.
8 Place part 11 onto parts 4 and 6 and secure with three screws. Place part 12 onto parts 2, 8 and 11 and secure with five screws.
9 Place part 13 onto parts 3 and 5 and secure with two screws. Place part 14 onto parts 1, 7 and 13 as shown and secure with three screws.

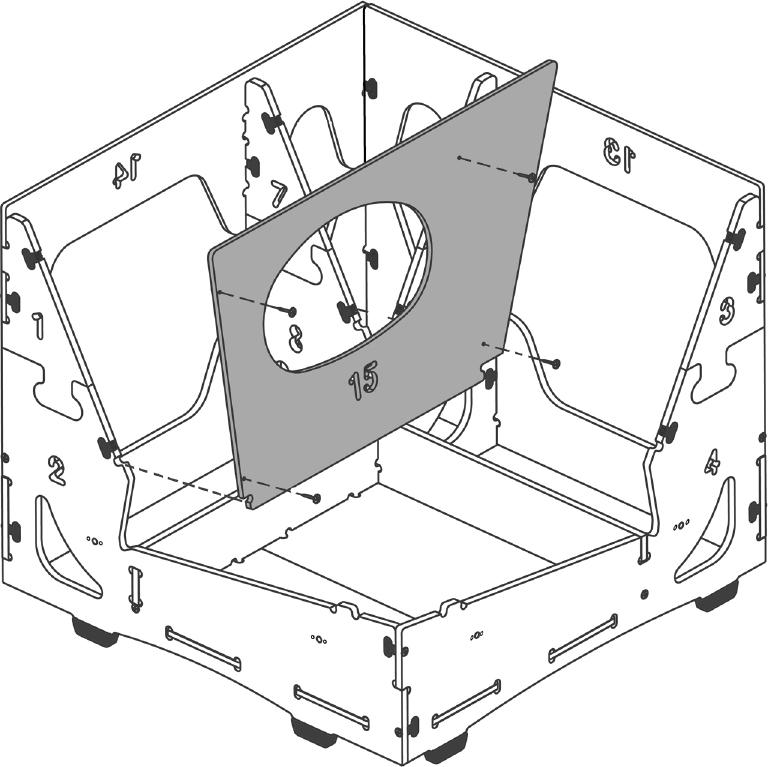
10 Place part 15 onto parts 1, 7, 2 and 8 as shown and secure with four screws. Place part 16 onto parts 3, 5, 4 and 6 as shown and secure with four screws.
11 Slide part 17 into position in the storage compartment. It fits at an angle. Top View Place part 18 into postion as shown.
12 Place part 19 into postion as shown. Frame assembly now complete. Now that you know how part 18 & 19 go into position, remove them and set them aside. [In fabric assembly we ll be tilting the frame and we don t want 18 & 19 to fall off.]
.")


13 Fabric & Foam Assembly Most of the fabric covers come inside out (It is the way they are sewn and protects the fabric surface in shipping). Unfold them all in preparation for assembly. To unfold a piece with a zipper, just pull the zipper apart as shown on the right. You can snip off any hanging threads from the covers. They are left long during automatic trimming in the sewing process. Snipping them won t affect the strength of the seams. Beauty tips: In addition to these printed instructions, you may want to watch our beauty tips videos on the customer service page of the website. The videos show demonstrations on how to apply the fabric covers and make them smooth and wrinkle free. Fabrics Seat Cushion Cover (1) Frame Cover (1) Elite Fabric (2) Back Cushion Covers (2) Foam Seat Cushion (1) Top Rail Foam Pieces (2) Back Cushions (2)


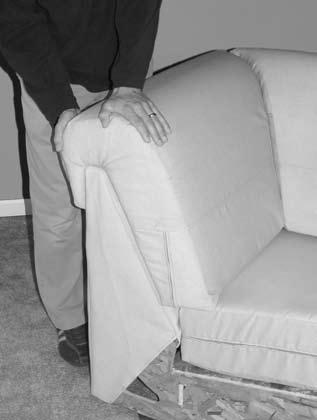
14 Take the Top Rail Foam Pieces and place them on the top of the frame. Push them down firmly between the front and back wood pieces. Take the Frame Cover (the largest fabric piece) and place it over the back of your frame as shown. Follow the sequence in the photos. Start at one end. Slide the cover over the top. Pull it down... and tuck corner under the frame. Move to the middle. Position the cover at the top... Back Corner...and tuck the fabric around and under the back corner of the frame. Move to the other end. Slide cover down and tuck the corner under the frame.


15 Tilt the frame so that you can access the bottom. Reach up under the edge of the fabric, pull out the two little elastic......bands and stretch them around the black floor glides. These keep the cover tight along the bottom of the frame. Turn the frame upright and place parts 18 and 19 back onto the storage compartments. Take the Seat Cushion Cover and the seat cushion foam and start the cover on the corner of the foam that is marked Top Front (see below). Zip the cover around the cushion. Cover the back cushions with the elite fabric. The elite is a white silky material that will help you slide the cover over the foam in step #5. Without the elite the cover sticks to the foam and is hard to get into position. Start by laying the elite over the wedge shaped area of the back cushion. Leave enough overlap so that you can wrap it up under the wedge.


16 Now bring it over the top of the foam stretch it out wide and lay it down the front of the foam. Position the elite across the bottom and then bring it back up the foam so that you finish under the wedge shaped area. Smooth the sides and make sure all the foam is covered. In this next step, you ll be putting the covers on the back cushions. Be sure to match up the side of the foam that has a 45 degree angle, with the side of the cover that has the corresponding 45 degree angle. Take the back cushion cover and place it over the side of the elite covered back cushion foam. Start at the top corner. Fill in the wedge shaped area and the top of the cover. You can work the materials with your hands and also reach up under the cover to smooth and straighten.


17 Turn the cushion over, smash down the foam and as you release it, guide the foam so that it pops back up into the wedge shaped area and the top of the cover. Straighten as necessary. Work the fabric down along the sides wrap the cover around the corners of the foam and start zipping the cover closed. Zip the bottom and up the other side. Once the zipper is closed, you can work the cover with your hands to make it all fit evenly. Wide sweeping motions work better than small movements. Make sure the cover is pressed all the way up into the wedge area. Complete steps 4 & 5 for both back cushions.


18 The back cushions are now ready to be placed on the frame. Congratulations, assembly is now complete!


19 Joining Your Sectional Group Together Once you have all the individual pieces of your sectional group assembled, arrange them in the room according to your design plan. Then, starting at one end of the sectional arrangement, follow these instructions to secure all the units tightly together. The frames will be joined together with the connector bolts from the parts bags. A cut away showing how these connector bolts will be used is shown to the right of this paragraph. There are holes for the connector bolts at the front and back of the frames as indicated by the arrows in the diagram below. Remove the storage lids to access these holes. Align the frames and slide the connectors into the holes. Tighten the wingnuts to draw the frames together. Bolt Prongs in guide holes Connector Bolt Washer Wingnut seat depth adjustment The furniture is designed to allow for seat depth adjustments. The normal setting for the cushions to protrude is 1½ out in front of the frame. Slide the seat cushion in or out to adjust to your own seat depth preference. REMEMBER You can snip off any hanging threads from the covers. They are left long during automatic trimming in the sewing process. Snipping them won t affect the strength of the seams.
20 Home Reserve products are made in the USA under patents: #6,267,446 #6,568,058 #6,981,747 #7,044,557 #7,523,989 Copyright Home Reserve, L.L.C. All Rights Reserved Worldwide. 08/2010
Armless. tightback loveseat. assembly instructions
 Armless tightback loveseat assembly instructions Smooth & Wrinkle-Free Fabric Covers: In addition to these printed instructions, you may want to watch our beauty tips videos on the customer service page
Sectional armless. assembly instructions
 Sectional armless assembly instructions Smooth & Wrinkle-Free Fabric Covers: In addition to these printed instructions, you may want to watch our beauty tips videos on the customer service page of our
Laney chair. assembly instructions
 Laney chair assembly instructions Smooth & Wrinkle-Free Fabric Covers: In addition to these printed instructions, you may want to watch our beauty tips videos on the customer service page of our website.
Ray chair & half. assembly instructions
 Ray chair & half assembly instructions Smooth & Wrinkle-Free Fabric Covers: In addition to these printed instructions, you may want to watch our beauty tips videos on the customer service page of our website.
Laney loveseat. assembly instructions
 Laney loveseat assembly instructions Smooth & Wrinkle-Free Fabric Covers: In addition to these printed instructions, you may want to watch our beauty tips videos on the customer service page of our website.
Tux chair & half. assembly instructions
 Tux chair & half assembly instructions Smooth & Wrinkle-Free Fabric Covers: In addition to these printed instructions, you may want to watch our beauty tips videos on the customer service page of our website.
Armless. looseback sofa. assembly instructions
 Armless looseback sofa assembly instructions Smooth & Wrinkle-Free Fabric Covers: In addition to these printed instructions, you may want to watch our beauty tips videos on the customer service page of
Tux sofa. assembly instructions
 Tux sofa assembly instructions Smooth & Wrinkle-Free Fabric Covers: In addition to these printed instructions, you may want to watch our beauty tips videos on the customer service page of our website.
Modular ottoman. assembly instructions
 Modular ottoman assembly instructions Smooth & Wrinkle-Free Fabric Covers: In addition to these printed instructions, you may want to watch our beauty tips videos on the customer service page of our website.
Monroe loveseat. assembly instructions
 Monroe loveseat assembly instructions Smooth & Wrinkle-Free Fabric Covers: In addition to these printed instructions, you may want to watch our beauty tips videos on the customer service page of our website.
Ali sectional right. assembly instructions
 Ali sectional right assembly instructions Smooth & Wrinkle-Free Fabric Covers: In addition to these printed instructions, you may want to watch our beauty tips videos on the customer service page of our
Monroe sofa. assembly instructions
 Monroe sofa assembly instructions Smooth & Wrinkle-Free Fabric Covers: In addition to these printed instructions, you may want to watch our beauty tips videos on the customer service page of our website.
EmagiKit. Privacy Pod Plus. Quiet. Easy. Affordable. INSTRUCTIONS ASSEMBLY
 EmagiKit Privacy Pod Plus Quiet. Easy. Affordable. INSTRUCTIONS ASSEMBLY DIMENSIONS AND COMPONENTS 47 47 Ceiling Unit 2-B 2-L 2-R Glass Door Corner Trim Door Handle 90 Adjustable Height Work Surface 1-B
RAMPAGE P R O D U C T S. INSTALLATION INSTRUCTIONS BRONCO ZIPPER FASTRACK TOP PART #984xx BRONCO TOOLS REQUIRED
 RAMPAGE P R O D U C T S 84 (+/- 1/4 ) INSTALLATION INSTRUCTIONS BRONCO ZIPPER FASTRACK TOP PART #984xx BRONCO 1966-1977 TOOLS REQUIRED 3/8 WRENCH 7/16 WRENCH ½ WRENCH #2 PHILLIPS SCREWDRIVER 1/8 DRILL
PROFILE Flat Panel Console System Installation Manual
 PROFILE Flat Panel Console System Installation Manual Table of Contents Page Introduction... 2 Important Safety Information...3, 4 Installation Overview... 4, 5, 6 Single Sided/Single Unit... 7 Double
Steele TV Stand Stock # BH
 LOT NUMBER: DATE PURCHASED: / / Steele TV Stand Stock # BH46-084-899-02 ADULT ASSEMBLY REQUIRED If you have any questions regarding assembly or if parts are missing, DO NOT return this item to the store
The Phoenix. Professional Quilting Frame. Copyright January 1, 2016 Jim M. Bagley, GraceWood, Inc (Reproduction Prohibited) Version 2.
 Version 2.") The Phoenix Professional Quilting Frame Copyright January 1, 2016 Jim M. Bagley, GraceWood, Inc (Reproduction Prohibited) Version 2.1 1 The Phoenix Professional Quilting Frame Parts List Box 1...3 Box
The Phoenix Professional Quilting Frame Copyright January 1, 2016 Jim M. Bagley, GraceWood, Inc (Reproduction Prohibited) Version 2.1 1 The Phoenix Professional Quilting Frame Parts List Box 1...3 Box
INSTALLATION GUIDE 2009-CURRENT HUMMER H3T PRODUCT CODE:
 INSTALLATION GUIDE 2009-CURRENT HUMMER H3T PRODUCT CODE: 268 June 22, 2010 TOOLS NEEDED COMPONENTS INCLUDED P2 Tip 3/8" Drill Rubber Gasket(s) x 2 Bracket(s) x 2 1/2" Drill Bit Bulkhead Flange #2 Phillips
The Festival Assembly Instructions
 The Festival Assembly Instructions Toll Free: 866.768.8465 Hours: 9-5 Monday-Friday EST www.homeplacestructures.com Package ships as shown CONTACT INFORMATION: HomePlace Structures 301 Commerce Drive New
Treviso POCKET BILLIARD TABLE INSTALLATION MANUAL. SERVICE DEPARTMENT P.O. BOX 68 BRISTOL, WI 53104
 Treviso TM POCKET BILLIARD TABLE INSTALLATION MANUAL www.brunswickbilliards.com SERVICE DEPARTMENT P.O. BOX 68 BRISTOL, WI 53104 51-905881-000 NOVEMBER 2008 NOTE: Please use the instructions in this manual
Installation Instructions
 Installation Instructions Optima LED 8 Double-Sided StretchLite Perimeter Lit Graphic Display Line Voltage Connector Optima LED DS5 (Double-sided StretchLite Graphic Display) with Graphics Corner Bracket
Small Flush Wood Flue Adapter Installation Instructions (SKU )
") Warning Regarding Draft Use of any offset adapter may degrade draft performance of the insert. To minimize the adverse effects, set the adapter to the minimum offset possible. Any leaks in the adapter
Warning Regarding Draft Use of any offset adapter may degrade draft performance of the insert. To minimize the adverse effects, set the adapter to the minimum offset possible. Any leaks in the adapter
Depending on the size you ordered you will have either 5 Foot sections which will build the 10 Foot frame or 6 Foot sections which will build the 12
 XL Quilting Frame 1 Depending on the size you ordered you will have either 5 Foot sections which will build the 10 Foot frame or 6 Foot sections which will build the 12 Foot frame Printed 2 June 2014 Updated
Desk/Wall-Mount Rack
 Desk/Wall-Mount Rack Patent(s) Pending Installation Instructions Post P/N: 119-1752 119-1781 119-1782 119-4014 Frame P/N: 119-1591 119-1754 119-1755 Kit Contents (2) Frames (4) Posts Assembly Hardware
General Features. Low Profile. The SMART BOXX stands only 1.5 off of the bed of your truck so cargo space is maximized
 General Features Low Profile. The SMART BOXX stands only 1.5 off of the bed of your truck so cargo space is maximized Two Sizes Short Box :74 L X 47 W X 7 T and Long Box 92 L X 47 W X 7 T All Aluminium
Mount to the Wall INSTALLATION MANUAL
 Mount to the Wall 15 Locate the Wooden Studs This step applies to wooden stud wall installation only. Determine and mark the exact locations of two stud centers on the wall. Wooden studs should be spaced
Octagon Vinyl Gazebo Assembly Instructions For 10 & 12 Models
 Octagon Vinyl Gazebo Assembly Instructions For 10 & 12 Models Toll Free: 866.768.8465 Hours: 9-5 Monday-Friday EST www.homeplacestructures.com Package ships as shown revised 04/29/09 Vinyl Gazebo Assembly
Germ City Storage Box Inventory
 Germ City Storage Box Inventory 4 Wide connector bars 11 Thin connector bars (4 with Velcro on one side) 12 Channel parts (6 with extensions) 1 Black fabric exhibit cover 2 Black decorated burlap panels
Joiner Kit Joiner bracket (x1) Biscuit aligners (x2) Trim Flange
 Biscuit aligners (x2) Trim Flange") - Trim System Overview These instructions review how to install TruGroove Perimeter fixtures. Modules can be installed as individual standalone units, or they can be joined together to create continuous
- Trim System Overview These instructions review how to install TruGroove Perimeter fixtures. Modules can be installed as individual standalone units, or they can be joined together to create continuous
Assembly Instructions
 10' and 12' Octagon Cedar Gazebo Assembly Instructions Toll Free: 866.768.8465 Hours: 9-5 Monday-Friday EST www.homeplacestructures.com Package ships as shown revised 06/20/09 Cedar Gazebo Assembly Instructions
Footprint Mobile Assembly Instructions
 Footprint Mobile Assembly Instructions 1998754 Revision -1 Complete Series Master Packet If you have any questions concerning these instructions, please call Kimball Office Customer Service. 20 Kimball
Display-Top Apothecary Cabinet. Assembly Instructions. Page 1
 Display-Top Apothecary Cabinet Assembly Instructions Page 1 Display-Top Apothecary Cabinet Parts List Please check packaging for all parts and hardware before discarding. Unpack and lay parts on clean,
Bushwacker Jeep Flat Style Fender Flares Front Pair
 Bushwacker Jeep Flat Style Fender Flares Front Pair Note: These instructions involve cutting parts of your vehicle. Please read all instructions prior to starting. Installation Time: 3-4 Hours Tools Required:
Design, Build and Upholster a Custom Chair
 Rowley How-To Guide Design, Build and Upholster a Custom Chair Sometimes the perfect furniture piece to complete a room may not exist. In this case, why not design, build and upholster to your own specifications,
FREE CLIMBER 4400 ASSEMBLY INSTRUCTIONS 27694B
 FREE CLIMBER 4400 ASSEMBLY INSTRUCTIONS 27694B 1 TOOLS REQUIRED: CLAW HAMMER KNIFE 1/2 WRENCH OR SOCKET 1. USE KNIFE TO REMOVE ALL PLASTIC STRAPS FROM AROUND PALLET AND CARTON. STRAP 2. USE CLAW HAMMER
MACHINE QUILTING FRAME
 MACHINE QUILTING FRAME YOU WILL NEED TO PURCHASE: 5 pieces of 1-1/4 thin wall metal conduit (EMT) cut to your preferred length for the rollers. (Maximum 120 ) DETERMINING YOUR ROLLER LENGTH: Determine
BABY WOLF LOOM. Assembly Instructions for Knocked-Down Looms
 BABY WOLF LOOM Assembly Instructions for Knocked-Down Looms BEFORE YOU BEGIN Please read through the directions before beginning to assemble your loom. Unpack the loom parts carefully. Do not throw away
Balishutters. INSTALLATION guide FOR L-FRAME MOUNT INSTALL OPTIONS B OR C
 Balishutters INSTALLATION guide FOR L-FRAME MOUNT INSTALL OPTIONS B OR C Tools needed for installation Drill Phillips bit 1/8" drill bit 4. Hammer (preferably hard plastic) 5. Level 6. Phillips-head screwdriver
Office Partitions WARNING. Assembly Instructions. Customer Service A S S E M B LY HARDWARE H1 H2 H3 H4 H5 H8 H9 H10 H11 H12
 Customer Service 1-800-645-2986 Assembly Instructions WARNING In order to prevent structural failure, instability, t i p - o v e r, and/or serious injury, please follow i n s t ructions care f u l l y.
Octagon Vinyl Gazebo Assembly Instructions
 Octagon Vinyl Gazebo Assembly Instructions For 10 & 12 Models Toll Free: 866.768.8465 Hours: 9-5 Monday-Friday EST www.homeplacestructures.com Package ships as shown revised 04/29/09 Vinyl Gazebo Assembly
BOOKCASE WARNING. Illustration 1
 Illustration 1 Lower Back Panel Upper Back Panel Cam Connector Illustration 2 Left end Illustration 3 Cam Bolt Adjustable Shelf Left end Left End Panel Bottom/ Center Shelf Connector Cover Right End Panel
Machine Quilting Frame assembly, and instruction manual
 Machine Quilting Frame assembly, and instruction manual Table of Contents Parts List................. Pg. 2 Step 1 - Legs............... Pg. 4 Step 2 - Lower Leg Brace....... Pg. 5 Step 3 - Frame Ends..........
Braxton 7-pc Dining Set (Chair) Model # BRA7PD-E
 Model # BRA7PD-E") LOT NUMBER: DATE PURCHASED: / / Braxton 7-pc Dining Set (Chair) ADULT ASSEMBLY REQUIRED If you have any questions regarding assembly or if parts are missing, DO NOT return this item to the store where
LOT NUMBER: DATE PURCHASED: / / Braxton 7-pc Dining Set (Chair) ADULT ASSEMBLY REQUIRED If you have any questions regarding assembly or if parts are missing, DO NOT return this item to the store where
FACTORY STRETCH INSTALLATION INSTRUCTIONS
 !! Important!! Make sure all power is disconnected prior to installation. Wiring to be done according to Local and National Electric Codes by a qualified electrician. Make sure the building and/or structure
Continuum Frame Assembly Instructions
 Continuum Frame Assembly Instructions Copyright January 1, 2017 Jim M. Bagley, GraceWood, Inc (Reproduction Prohibited) Version 2.2 Table of Contents Continuum Frame Table of Contents... i Warranty...ii
3/8-16 x 3/4 cap screw. 3/8-16 hex nut for above screws. 1/4-20 x 3/4 socket cap screw. 3/16 short arm hex key (not to scale)
") Super Slab Roller 24, 30 and 36 models Worktable Assembly Directions P.O. Box 89 Cheney, WA 99004 USA 509.235.9200/800.23.7896 Fax: 509.235.9203 www.northstarequipment.com Revised September, 2006. All
Super Slab Roller 24, 30 and 36 models Worktable Assembly Directions P.O. Box 89 Cheney, WA 99004 USA 509.235.9200/800.23.7896 Fax: 509.235.9203 www.northstarequipment.com Revised September, 2006. All
Escape Mini Bags Finished size: 8" x 10" x 2" Makes 2 Bags
 TM Escape Mini Bags Finished size: 8" x 10" x 2" Makes 2 Bags SUPPLIES NEEDED 2-1 Yard Cottons (Escape Brown Floral and ) 2 - ¼ Yard Cottons (Escape Green Floral) 3 8 yd. Pellon 987F Fusible Fleece 1 ½
TASK: Replace Control Mechanism/Drive End for G71 Supervue/Everglide Vertical headrail
 1. Locate the clear plastic louver stems where louvers are attached. 2. Rotate louvers open. Slide a hard plastic card between the louver and the long side of the louver stem. Push the card and louver
COCKPIT CORNER UNIT WARNING. Illustration 1. Read all instructions and review illustrations before installing. Tools required for assembly:
 Illustration 1 Illustration 2 Right side of Illustration 3 Right brace Right brace Read all instructions and review illustrations before installing. Tools required for assembly: Phillips screwdriver Rubber
User Guide. 7ft x 10ft JumpPOD Oval
 User Guide 7ft x 10ft JumpPOD Oval Got a Problem building your trampoline? Call us on 0344 800 4060 and we can help Patent no: DE602006006495D1, EP1721640B1 and US7628731 WARNING: Read these assembly instructions
The Queen Quilter Professional Quilters Kit Frame
 The Queen Quilter Professional Quilters Kit Frame Assembly Instructions Table of Contents: Before you begin......................... Pg. 2 Wood parts............................. Pg. 3 Hardware..............................
Oakland II POCKET BILLIARD TABLE INSTALLATION MANUAL
 TM Oakland II POCKET BILLIARD TABLE INSTALLATION MANUAL www.brunswickbilliards.com SERVICE DEPARTMENT P.O. BOX 68 BRISTOL, WI 53104 EMAIL: BRUNSWICKSERVICE@BRUNSWICKBILLIADS.COM 51-906253-000 OCTOBER 2016
THE GRACE EZ3 FABRI-FAST QUILTING FRAME
 THE GRACE EZ3 FABRI-FAST QUILTING FRAME TABLE OF CONTENTS CARE, FINISHING AND STORAGE..................................................... 2 WARRANTY..........................................................................
Artisan Vinyl Pergola
 Artisan Vinyl Pergola Assembly Manual Thank you for your purchase of this Pergola. Beefy Vinyl Pergola Assembly Manual This manual is designed to simplify the assembly process, however we recommend having
The Bowflex Revolution XP Home Gym Assembly Instructions. P/N: Rev ( /0 )
") P/N: 001-7057 Rev ( /0 ) The Bowflex Revolution XP Home Gym Assembly Instructions 2 Table of Contents Before You Start... 2 Tools You Will Need / Hardware Contents... 3 Box Contents... 6 Assembling Your
P/N: 001-7057 Rev ( /0 ) The Bowflex Revolution XP Home Gym Assembly Instructions 2 Table of Contents Before You Start... 2 Tools You Will Need / Hardware Contents... 3 Box Contents... 6 Assembling Your
SINCE 1922 P UBLICATION N O
 SINCE 1922 GARED SPORTS MICRO-Z SET-UP INSTRUCTIONS VERY IMPORTANT! READ INSTRUCTIONS CAREFULLY AND FOLLOW STEP BY STEP SET-UP PROCEDURE P UBLICATION N O. 5 5 1 7 5 2 9 1 6 Recommended tools and accessories.
HOMECREST STYLE SLING 3J300 Installation Instructions
 1 HOMECREST STYLE SLING 3J300 Installation Instructions Before beginning, take careful note of how the chaise is assembled, particularly the adjustment hardware. An additional set of hands to help during
TOYOTA MOTOR EUROPE CA Products Division Tel : Fax :
 TOYOTA MOTOR EUROPE CA Products Division Tel : + 32 2 745 26 77 Fax : + 33 2 745 26 99 Ordering part numbers Comments Part Numbers Wooden floor one hatch PZ449-D3C42-11 one hatch with carpet PZ449-D3C42-01
compile system INSTALLATION GUIDE Updated January 2019
 INSTALLATION GUIDE Updated January 09 compile system Table of Contents Panels 0 Quick Connect Clips 0 Lock Clips 0 Panel Trims 0 Privacy Glass 0 Post Base Covers 04 Electrical 04 Power Distribution Harness
MH60/MH72 DESK HUTCH IMPORTANT!
 MH60/M2 DESK HUTCH IMPORTANT! Assembly may require the assistance of another person. Before you begin assembly: READ THE DIRECTIONS all the way through one time. This will speed up the process and help
POP PLUS / SPIDER SET-UP INSTRUCTIONS
 POP PLUS / SPIDER SET-UP INSTRUCTIONS 1 Place system frame on floor with screws indicating top. Expand upwards & outwards and secure frame connectors. Pop-Up display systems are made to be set-up and taken
Before beginning refer to page 4 to assure that all parts are included in your kit. Refer to diagrams for help when installing top and hardware.
 INSTALLATION INSTRUCTIONS BRONCO 1980-1994 PART #98501 RAMPAGE P R O D U C T S Thank you for purchasing Rampage Products Top for your Bronco. Please read and follow, precisely, all installation instructions
Important Loading Information. Tools Required. Meridian Lateral Files Instructions
 Y Meridian Lateral Files Instructions! WARNING Failure to observe stated capacities below will result in unsafe usage conditions, causing possible product damage or personal injury. Important Loading Information
INSTALL/REMOVAL INSTRUCTIONS: WINDOW REGULATOR
 REMOVAL/INSTALL OF WINDOW REGULATOR (741-584) Ford Focus 2000-2007 General Tech Tips: Use painter s tape rather than duct tape to secure window. It will not damage paint or leave sticky residue. A plastic
Playground Assembly Instructions
 Before You Begin Playground Assembly Instructions Locate the playground set on firm, level ground. Assemble the playground on or close to its permanent location Two people are recommended to assemble the
Sliding Glass Door Assembly and Installation Guide
 Sliding Glass Door Assembly and Installation Guide Index Door System Components and Hardware The following components are needed to complete the installation of your Sliding Patio Door unit. Check all
Half Door Installation Instructions
 Half Door Installation Instructions For: CJ5 (1955-1975), CJ6 (All), M38-A1 (1955-1971) Part Number: 53025 WARNING This product is designed primarily to enhance the appearance of the vehicle and to shield
Congratulations! Your dog is going to love you!
 DIY INSTRUCTIONS Congratulations! Your dog is going to love you! Thank you for ordering your non-electric dog fence kit from Pet Playgrounds. In less than a day you will have your very own personal dog
Sewing Roll. Base Fabric. Base Fabric. Third Fabric. Second Fabric (Bottom Pockets) Pockets)
 Pockets)") You will need Brother Creative Sewing Pack (Free Motion Foot, Braiding Foot, Narrow Hem Foot, Piping Foot and Concealed Zipper Foot) Base fabric 1 x fat ¼ (50cm square) cut in half Second fabric 50cm x
You will need Brother Creative Sewing Pack (Free Motion Foot, Braiding Foot, Narrow Hem Foot, Piping Foot and Concealed Zipper Foot) Base fabric 1 x fat ¼ (50cm square) cut in half Second fabric 50cm x
Triplex Instructions for Packing and Unpacking
 2-8-8-2 Triplex Instructions for Packing and Unpacking It is recommended that you review all these instructions before removing the engine or tender from the poly foam container. www.mthtrains.com Table
Sentinel Series Cigar Humidor End Tables
 Sentinel Series Cigar Humidor End Tables Assembly Instructions Models: Sentinel 500, 1000 and 1500 Style: Traditional SENTINEL ASSEMBLY INSTRUCTIONS Congratulations! You have purchased a superior cigar
2.0 INSTALLATION PROCEDURE. 2.1 Open the Speaker Post. 2.2 Install the Speaker and Microphone Grills. Figure 2. SPP2 rear view
 Figure 2. SPP2 rear view 2.0 INSTALLATION PROCEDURE Figure 3. SPP2 rear view with rear panel removed For ease of assembly, locate a clean area where the speaker post can be laid down to be worked on without
re3d Assembling Gigabot: "Flatpack"
 re3d Assembling Gigabot: "Flatpack" Your Gigabot was assembled, calibrated, tested, and taken apart for shipping purposes. All you need to do is reassemble it, and you're ready to go! Written By: Chris
MKPLAY VAULT MINI TRAMPOLINE SERIES
 MKPLAY VAULT MINI TRAMPOLINE SERIES 55 INCH (4.5FT) TRAMPOLINE WITH SAFETY NET ENCLOSURE Weight Limit 100lbs (45kg) Person Limit 1 Persons Age Limit 3-6 years 1 TABLE OF CONTENTS Parts List Trampoline
Door Installation. Bulletin Install Read and understand these instructions before proceeding! It saves frustration!
 Door Installation Door Series: 3300 Bulletin 1 Preparation Preliminary Examination Inspect the packaging. If the package was damaged when it arrived, contact the shipping carrier first, then notify Woodfold.
LCD LIFT Flat Panel Display System Installation Manual. Table of Contents
 LCD LIFT Flat Panel Display System Installation Manual Table of Contents Page Installation Overview... 2 Trim Ring Installation... 3 LCD Lift Installation....4 Actuator Switch Installation.5 Top Plate
Exterra Installation Guide
 Exterra Installation Guide Installing the foam padding Please review this installation guide before you begin installing the floor. If you have any questions, please call us at 800-428-5306 any time Monday
HOW TO MAKE A SLIPCOVER INSTRUCTIONS Instructions are for slipcovering a wing-back chair. The principle is the same for an arm chair or sofa.
 HOW TO MAKE A SLIPCOVER INSTRUCTIONS Instructions are for slipcovering a wing-back chair. The principle is the same for an arm chair or sofa. YOU WILL NEED: Slipcover fabric Piping cord Zipper Thread Ruler
INSTALLATION AND CARE INSTRUCTIONS
 INSTALLATION AND CARE INSTRUCTIONS Skylight Manually Operated Honeycomb Shades 20 C8-10-1806 2/15 1 INTRODUCTION Thank you for purchasing our product. Your new shade has been custom built for you from
Assembly Instructions COMO Double Bed
 Assembly Instructions COMO Double Bed VER 1.2 WARNING NG FAILURE TO FOLLOW THESE BASIC STEPS CAN LEAD TO DAMAGE THAT IS NOT COVERED BY YOUR WARRANTY 2 Read Instructions carefully. Check no parts are missing.
Deck Mount Installation with Bench
 Deck Mount Installation with Bench 1. Mark track with square. 2. Cut tracks with saw. 3. Drill ¼ hole (if needed.) 4. Countersink track. 5. Countersink all track 6. File all track ends. ends. 7. Lay out
Assembly Instructions 10 X 10 Aluminum Frame Building
 Assembly Instructions 10 X 10 Aluminum Frame Building 27 97 9 8 47 36 74 52 10 10 X 10 Square Building W/ Dome Includes: The Steel Entry Door with a Dead Bolt Lock assembly and Aluminum Door Frame. Metal
SAVE THESE INSTRUCTIONS
 SAVE THESE INSTRUCTIONS DEALER/INSTALLER: GIVE TO HOMEOWNER OCEAN BLUE GRAND ENTRANCE POOL STEPS ASSEMBLY AND INSTALLATION MANUAL ABOVE GROUND FOUR TREAD MODEL Part No. 400700 IN GROUND THREE TREAD MODEL
Zenterra TM Installation Guide
 Zenterra TM Installation Guide Installing the foam padding Please review this installation guide before you begin installing the floor. If you have any questions, please call us at 800-428-5306 any time
BLADE N BULLET BLIND Cabela s Item Number:
 BLADE N BULLET BLIND Cabela s Item Number: 466353 Visit cabelas.com or call 1-800-237-4444 for assistance. TABLE OF CONTENTS 2 3 4-13 Table of Contents Package Contents Instructions for Use Visit cabelas.com
Half Door Installation Instructions
 Half Door Installation Instructions For: CJ5 (1955-1975), CJ6 (All), M38-A1 (1955-1971) Part Number: 53025 Congratulations on your purchasing decision. Bestop designed these Doors to give you years of
Base Cabinet. Assembly Guide. Give Us A Call at ext 2. Or You Can Watch The Assembly Videos Here
 Base Cabinet Assembly Guide 1 Hey there! Assembling our cabinets is really simple, but in case you re a little nervous, this guide should help. Simply follow this quick guide and you ll be a cabinet assembly
https://www.wallbedsbywilding.com/wallbed-installation-studio-series/
 For Wallbed models: KING SIZE INSTRUCTION BOOKLET #C1 Watch step by step installation instructions at: https://www.wallbedsbywilding.com/wallbed-installation-studio-series/ WARNING! ALL MURPHY/WALLBED
ROMAN AND. Roller Lift System Continuous Cord Loop GETTING STARTED BRACKET INFORMATION INSIDE MOUNT. A few simple tools are required:
 ROMAN AND WOVEN WOOD SHADES Roller Lift System Continuous Cord Loop GETTING STARTED BRACKET INFORMATION A few simple tools are required: The brackets you received with your product are REQUIRED for proper
TOOLS REQUIRED FOR ASSEMBLY. Rubber Mallet or Plastic Tip Hammer PARTS REQUIRED FOR ASSEMBLY OF SINGLE ENTRY STARTER.
 TOOLS REQUIRED FOR ASSEMBLY Rubber Mallet or Plastic Tip Hammer Top Cover Support PARTS REQUIRED FOR ASSEMBLY OF SINGLE ENTRY STARTER Back Stop Divider Closed 'L' Upright Slotted Reinforcement Support
TIP FOR GETTING STARTED
 Tip for getting started TIP FOR GETTING STARTED Be careful not to drill into any electrical wires, ductwork, plumbing or other damagable components. If you have any questions on the locations of these
Baby Grande or Grande Crank Shade with Cables and Housing Installation Instructions
 Baby Grande or Grande Crank Shade with Cables and Housing Installation Instructions Tools Needed Drill 3/8 Metal Drill Bit Screwdriver (Flat & Phillips) Measuring Tape Pencil 4 Level Plumb Line ¼ Masonry
Installing your new Bevella Top. L Shaped Countertop with Joints No Finished Ends (Fits Between Four Walls)
") Installing your new Bevella Top L Shaped Countertop with Joints No Finished Ends (Fits Between Four Walls) Bevella RTI Countertops are engineered and manufactured to the highest quality standards, built
Installing your new Bevella Top L Shaped Countertop with Joints No Finished Ends (Fits Between Four Walls) Bevella RTI Countertops are engineered and manufactured to the highest quality standards, built
WK2 Rear Tie Downs. Install Instructions. Begin Trim Removal IMPORTANT
 Page REF QTY DESCRIPTION REF QTY DESCRIPTION A B C D E 4 4 Tie-Down Bracket Tie-Down Fixture M6 x 0mm.9 Bolts (Zinc) M6 x 30mm.9 Bolts (Zinc) M6 Wedge-Lock Washer F - - Flanged Nut 4g Anti-Seize Pouch
TV Console Model # AVCBEC60-SMB
 LOT NUMER: DATE PURCHASED: / / TV Console ADULT ASSEMLY REQUIRED If you have any questions regarding assembly or if parts are missing, DO NOT return this item to the store where it was purchased. Please
For a flat or four-sided reticule:
 Page 1 of 8 DRAWSTRINGS When purchasing, one fabric store meter is the minimum to make two drawstrings of a nice length for one reticule in most designs. If you like longer drawstrings, increase the length.
 For Wallbed models: KING SIZE INSTRUCTION BOOKLET #C1 Watch step by step installation instructions at: https://www.wallbedsbywilding.com/wallbed-installation-studio-series/ WARNING! ALL MURPHY/WALLBED
INSTALL INSTRUCTIONS WELCOME TO THE NEWAGE PERFORMANCE CABINETRY SERIES NEWAGE STEEL WELDED CABINETRY
 NEWAGE STEEL WELDED CABINETRY WELCOME TO THE NEWAGE PERFORMANCE CABINETRY SERIES ALL CABINETS MUST BE MOUNTED TO STUDS ON A SECURE WALL, AS PER THESE INSTRUCTIONS. FAILURE TO DO SO MAY RESULT IN SERIOUS
Sailcloth Fabric Replacement Top and Doors with Tinted Side and Rear Curtains Installation Instructions
 Sailcloth Fabric Replacement Top and Doors with Tinted Side and Rear Curtains Installation Instructions TM For: Wrangler / TJ 2003 - Current Part Number: 79129 Inc. This product is only designed for the
Ping Pong Ball Launcher. Version 3.0 New Matter, 2016 Part number: 11069
 Ping Pong Ball Launcher Version 3.0 New Matter, 2016 Part number: 11069 Hardware needed to complete this project: Size Length Used Label Screw, Type 25, Phillips Pan head, Thread Cutting #4 0.375 29 A