How to Apply a Halftone Effect as a Photo Background Using CorelDRAW
|
|
|
- Joel Richard
- 5 years ago
- Views:
Transcription

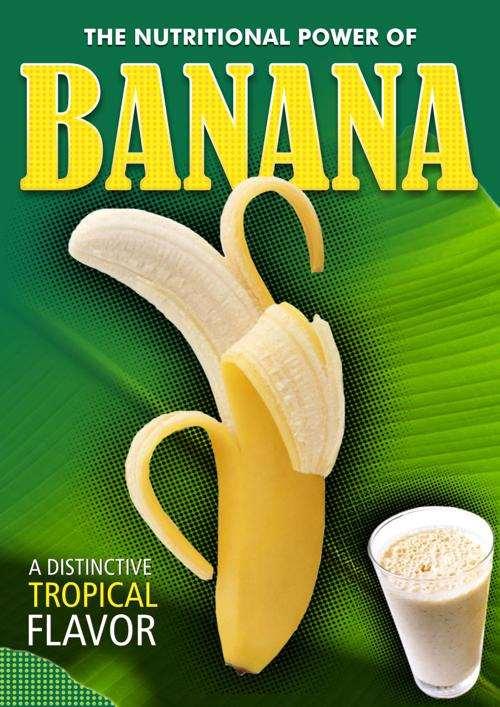
1 How to Apply a Halftone Effect as a Photo Background Using CorelDRAW by Silvio Gomes CorelDRAW offers great tools for applying interesting effects that can really highlight the look of your art work. One of these features is the halftone effect which can be used as an image background to emphasize the main figure. In this example we will create a fake poster that, in addition to halftone effect, will also have drop shadows applied, a gradient effect to outlined text, and the PowerClip feature that allows us to place decorative elements inside fonts and/or objects. This example will be done using the A4 format (210x 297mm) with 3 photos: a half-peeled banana, a banana leaf and a vitamin cup. The fonts used in our project are: Futura MD BT Bernard MT Condensed Humnst 777 Cn BT Step by step in assembly order 1. Open a new file (File > New... or CTRL+N), go to Layout > Page Setup and click on Add Page Frame (A page frame can also be added by double-clicking on the Rectangle tool in the Toolbox). 2. Select the page frame and fill with a dark green color (in this case, C100 M30 Y100 K25). To edit the fill color, double-click the Fill color swatch in the Status bar and edit the color value). 3. Next, import the photo of the Banana Leaf: File > Import or CTRL+I. (Make sure that any backgrounds have been removed from the image before importing). 1/9

2 4. Resize the photo in order to fit the A4 format (Bitmaps > Resample), or crop to size by using the Crop tool from the Toolbox and adjusting the size of the cropping area in the Property Bar to fit A4. Then select the resized photo and hit the P key to center the image on the page. 5. Select the banana leaf photo and click on the Transparency tool icon in the Toolbox. Place the mouse cursor in the center of the photo. Hold down the left mouse button and drag upwards until you get a satisfactory transparency. 6. Type the various text objects and resize them (Toolbox > Text tool or F8). We will start by filling the text objects with a white color, just to have a better view contrast. 7. Select the text "The Nutritional Power..." and click on the Drop Shadow tool (Toolbox > Drop Shadow). Drag the mouse from the text to create the shadow and adjust the shadow parameters in the Property Bar. 2/9
.")
. This will break apart the text and the drop shadow. b. Deselect and select the text object only.")
3 8. Select the next text object (Banana), and using the Text Properties in the Object Properties docker, fill with a yellow color and apply a white outline (thickness: 1.5 mm). 9. Repeat Step 07 to add a Drop Shadow to the text. Set the shadow parameters in the Property Bar as needed. 10. By default, outlines will not accept a Fountain fill effect (only solid colors). To solve this, we first need to convert the outline to an object. Proceed as follows: a. First right-click a text object and choose Break Drop Shadow Object Apart from the context menu (or click Ctrl+K). This will break apart the text and the drop shadow. b. Deselect and select the text object only. Click on Object > Convert outline to object (or Ctrl+Shift+Q). 11. Once the outline has been converted we can apply new colors - in this case a Fountain Fill. Select the new object that was created and press F11 to edit the fill. Click on the Fountain Fill icon and adjust the fill colors. 3/9

, 2.")

4 The 'Outline' object will now display a gradient fill as shown in the red circles in the image below. 12. Adding a Blend Effect: Draw two small circles with the Ellipse tool (Toolbox > Ellipse or F7), 2.0 mm in diameter, and place them horizontally with a distance slightly exceeding the width of word "Banana". Fill circles with an orange color and right-click the 'no color' swatch in the color palette to remove the outline. 4/9
. e.")

5 a. Click on the Blend tool (Toolbox > Drop Shadow flyout menu > Blend tool), and drag the mouse from one circle to another. b. Open Blend Docker and set to 50 steps. c. Press Ctrl+K to Break Group Blend Apart. d. Select circles and ungroup all (Ctrl+U). e. With all circles selected click on the Weld icon in the Property Bar. f. Hit the + key on the numerical number pad to create a new object, hold down the Ctrl key, and dragging the mouse down, position the new set of circles aligned with the upper set. Make sure that the distance exceeds the height of the word "Banana" slightly. 5/9


6 13. Blend two set of circles as shown on item (see Step 12 a), but apply only 20 steps vertically. Repeat the steps c), d) and e) to Break Group Blend Apart and Weld them all again. 14. Select the set of circles, go to Object > PowerClip > Place Inside Frame. The mouse cursor will change to an arrow shape. Click on the "Banana" text to insert the circles. Finally, on the PowerClip tool bar, click on the EditPowerClip icon. 15. Applying the HALFTONE EFFECT to a background of photos: 6/9
.")

7 a. Import the photo of banana (make sure the image has a transparent background). Duplicate the photo (CTRL+D), and drag the copy off of the page. b. Convert the copy to a bitmap: Bitmap > Color Mode > Greyscale (8-bit). Make sure that the option "Transparent background" is checked. c. Go to: Effects > Adjust > Contrast/Brightness/Intensity (CTRL+B). Accentuate the contrast to make the image as dark as possible. Set Brightness and Intensity to a minimum. d. Now go to: Bitmap > Blur > Gaussian Blur. Adjust intensity of the Radius to about 40 pixels. e. Go to: Bitmap > Color Transform > Halftone. Adjust the Max dot/black parameters. (Here I have set the Max. dot to 4 and the Black settings to 112). 7/9

8 16. Select the halftone image and the original photo by selecting both and press C on the keyboard to center them. Bring the original photo above the halftone image by selecting it and pressing CTRL + PageUp. 17. Photo of Vitamin Cup: repeat same main steps used to transform the picture of the Banana to halftone (steps 15 and 16). 18. Now edit the text "A distinctive tropical flavor" (all capitals). Use the Full Justify alignment setting on the Property Bar so that each line has the same width. Fill the word "Tropical" with a different color. 19. To apply the dots effects shown at the bottom left corner of the poster, repeat the same steps used for creating the Blend effects (step 12) of course using fewer points, just enough to fill that area. 8/9
9 9/9
How to Create Website Banners
 How to Create Website Banners In the following instructions you will be creating banners in Adobe Photoshop Elements 6.0, using different images and fonts. The instructions will consist of finding images,
Exploring Photoshop Tutorial
 Exploring Photoshop Tutorial Objective: In this tutorial we will create a poster composed of three distinct elements: a Bokeh, an image and title text. The Bokeh is an effect which is sometimes seen in
Welcome to Corel DESIGNER, a comprehensive vector-based package for technical graphic users and technical illustrators.
 Workspace tour Welcome to Corel DESIGNER, a comprehensive vector-based package for technical graphic users and technical illustrators. This tutorial will help you become familiar with the terminology and
Drawing with precision
 Drawing with precision Welcome to Corel DESIGNER, a comprehensive vector-based drawing application for creating technical graphics. Precision is essential in creating technical graphics. This tutorial
Corel PHOTO-PAINT BERNINA Page 1 DL
 Corel PHOTO-PAINT 2018 BERNINA Page 1 Corel PHOTO-PAINT Corel PHOTO-PAINT is part of BERNINA Embroidery Software and gives users many tools for editing photos or bitmap artwork. Corel PHOTO- PAINT can
HOW TO CREATE A SUPER SHINY PENCIL ICON
 HOW TO CREATE A SUPER SHINY PENCIL ICON Tutorial from http://psd.tutsplus.com/ Compiled by INTRODUCTION The Pencil is one of the visual metaphors most used to express creativity. In this tutorial,
A quick note: We hope that you will find something from the Tips and Tricks that will add a little pizazz to your yearbook pages!
 A quick note: The following pages are tips and tricks for Basic Photoshop users. You may notice that some instructions indicate that non-awpc fonts were used, and that some colors were created using the
By Washan Najat Nawi
 By Washan Najat Nawi how to get started how to use the interface how to modify images with basic editing skills Adobe Photoshop: is a popular image-editing software. Two general usage of Photoshop Creating
Creating a Mascot Design
 Creating a Mascot Design From time to time, I'm hired to design a mascot for a sports team. These tend to be some of my favorite projects, but also some of the more challenging projects as well. I tend
Adobe Photoshop CC 2018 Tutorial
 Adobe Photoshop CC 2018 Tutorial GETTING STARTED Adobe Photoshop CC 2018 is a popular image editing software that provides a work environment consistent with Adobe Illustrator, Adobe InDesign, Adobe Photoshop,
Adobe Photoshop CS5 Tutorial
 Adobe Photoshop CS5 Tutorial GETTING STARTED Adobe Photoshop CS5 is a popular image editing software that provides a work environment consistent with Adobe Illustrator, Adobe InDesign, Adobe Photoshop
Tinker Tuesday Project - Drinking Glasses
 Tinker Tuesday Project - Drinking Glasses 1. Open CorelDRAW and create a new document. Near the top left corner of the screen, click File, and then click Import on the resulting menu. Select an image from
Duplicate Layer 1 by dragging it and dropping it on top of the New Layer icon in the Layer s Palette. You should now have two layers rename the top la
 50 Face Project For this project, you are going to put your face on a coin. The object is to make it look as real as possible. Though you will probably be able to tell your project was computer generated,
MEASUREMENT CAMERA USER GUIDE
 How to use your Aven camera s imaging and measurement tools Part 1 of this guide identifies software icons for on-screen functions, camera settings and measurement tools. Part 2 provides step-by-step operating
Creating Digital Illustrations for Your Research Workshop IV Illustration Demo Part II
 Creating Digital Illustrations for Your Research Workshop IV Illustration Demo Part II Final Figure Workshop IV Components Topics & Techniques covered How to randomly transform a group of individual shapes.
PosterArtist Quick Guide
 PosterArtist Quick Guide Create posters in four easy steps STEP STEP STEP STEP Use Auto Design to Create Posters Simply select a poster type and a design image to automatically create high-quality posters.
FLAMING HOT FIRE TEXT
 FLAMING HOT FIRE TEXT In this Photoshop text effects tutorial, we re going to learn how to create a fire text effect, engulfing our letters in burning hot flames. We ll be using Photoshop s powerful Liquify
Create a Vector Glass With Layered Reflections to Create Depth
 Create a Vector Glass With Layered Reflections to Create Depth 1) Draw a rectangle at approx 3:2 ratio. Next, use the ellipse tool and hold Ctrl to create a perfect circle. Position the circle at the bottom
Preparing Photos for Laser Engraving
 Preparing Photos for Laser Engraving Epilog Laser 16371 Table Mountain Parkway Golden, CO 80403 303-277-1188 -voice 303-277-9669 - fax www.epiloglaser.com Tips for Laser Engraving Photographs There is
Project 8: Nice Close-Up
 ps7ie_p08_b.qxd 11/18/02 3:25 PM Page 74 ps7ie_p08_b.qxd 11/18/02 3:25 PM Page 75 Photoshop 7 Image Effects In this project, work with a picture that was taken at an angle for effect. Correct and crop
ADOBE PHOTOSHOP CS TUTORIAL
 ADOBE PHOTOSHOP CS TUTORIAL A D O B E P H O T O S H O P C S Adobe Photoshop CS is a popular image editing software that provides a work environment consistent with Adobe Illustrator, Adobe InDesign, Adobe
Photoshop: Manipulating Photos
 Photoshop: Manipulating Photos All Labs must be uploaded to the University s web server and permissions set properly. In this lab we will be manipulating photos using a very small subset of all of Photoshop
Digital Photography 1
 Digital Photography 1 Photoshop Lesson 3 Resizing and transforming images Name Date Create a new image 1. Choose File > New. 2. In the New dialog box, type a name for the image. 3. Choose document size
GETTING STARTED. 0 P a g e B a s i c s o f A d o b e P h o t o s h o p A g a P r i v a t e I n s t i t u t e f o r c o m p u t e r s c i e n c e
 GETTING STARTED 0 P a g e B a s i c s o f A d o b e P h o t o s h o p Adobe Photoshop: is a popular image editing software that provides a work environment consistent with Adobe Illustrator, Adobe InDesign,
c) Save the document as taller3p1_tunombre
 Save the document as taller3p1_tunombre") WORKSHOP# 3 DRAW WITH INKSCAPE Preparing the page 1. Enter Inkscape and from the File menu, go to Document Properties. 2. Prepare a page with the following characteristics: a) Format A4 (millimeters as
WORKSHOP# 3 DRAW WITH INKSCAPE Preparing the page 1. Enter Inkscape and from the File menu, go to Document Properties. 2. Prepare a page with the following characteristics: a) Format A4 (millimeters as
Part 1- Fundamental Functions
 Part 1- Fundamental Functions Note: Alt+Tab will allow you to move between programs in the docker. Shift+Tab removes right pallets Tab removes all pallets Ctrl+1= centers art board Ctrl + 0= fill window
Tinker Tuesday Project - Fabric Engraving
 Tinker Tuesday Project - Fabric Engraving 1. Open CorelDRAW and create a new document. On the toolbar on the left side of the screen, select the Basic Shapes tool icon. This will allow you to create simple
Key Terms. Where is it Located Start > All Programs > Adobe Design Premium CS5> Adobe Photoshop CS5. Description
 Adobe Adobe Creative Suite (CS) is collection of video editing, graphic design, and web developing applications made by Adobe Systems. It includes Photoshop, InDesign, and Acrobat among other programs.
Photoshop CC 2018 Essential Skills
 Photoshop CC 2018 Essential Skills Adobe Photoshop Creative Cloud 2018 University Information Technology Services Learning Technology, Training, Audiovisual and Outreach Copyright 2018 KSU Division of
ADD TRANSPARENT TYPE TO AN IMAGE
 ADD TRANSPARENT TYPE TO AN IMAGE In this Photoshop tutorial, we re going to learn how to add transparent type to an image. There s lots of different ways to make type transparent in Photoshop, and in this
12. Creating a Product Mockup in Perspective
 12. Creating a Product Mockup in Perspective Lesson overview In this lesson, you ll learn how to do the following: Understand perspective drawing. Use grid presets. Adjust the perspective grid. Draw and
Add Transparent Type To An Image With Photoshop
 Add Transparent Type To An Image With Photoshop Written by Steve Patterson. In this Photoshop Effects tutorial, we re going to learn how to add transparent type to an image. There s lots of different ways
Create a Street Art Style Illustration By CorelDRAW Master Stefan Lindblad
 Create a Street Art Style Illustration By CorelDRAW Master Stefan Lindblad Start with an original drawing on paper. With Corel PHOTO-PAINT and CorelDRAW, creating street art images, and later printing
Photoshop 1. click Create.
 Photoshop 1 Step 1: Create a new file Open Adobe Photoshop. Create a new file: File->New On the right side, create a new file of size 600x600 pixels at a resolution of 300 pixels per inch. Name the file
Tinker Tuesday Project - Stainless Steel Tumblers
 Tinker Tuesday Project - Stainless Steel Tumblers 1. Open CorelDRAW and create a new document. Near the top left corner of the screen, click File, and then click Import on the resulting menu. Select an
Recitation 2 Introduction to Photoshop
 Recitation 2 Introduction to Photoshop What is Adobe Photoshop? Adobe Photoshop is a tool for creating digital graphics either by starting with a scanned photograph or artwork or by creating the graphics
LESSON 02: GET STRONGER FOR PS USERS COMPANION BOOK. Digital Scrapbook Academy. February 2018: Lesson 02 Get Stronger for Photoshop Users
 Digital Scrapbook Academy February 2018: Lesson 02 LESSON 02: GET STRONGER FOR PS USERS COMPANION BOOK Page 1 of 19 Table of Contents Table of Contents 2 Welcome to Lesson 02 for Photoshop Users 4 1: Add
The final wrap text in 3D result.
 WRAPPING TEXT IN 3D In this Photoshop tutorial, we re going to learn how to easily wrap text around a 3D object in Photoshop, without the need for any 3D software. We re going to be wrapping our text around
METAL TEXT EFFECT. Step 1: Create A New Document. Step 2: Fill The Background With Black
 METAL TEXT EFFECT In this text effects tutorial, we ll learn how to easily create metal text, a popular effect widely used in video games and movie posters! It may seem like there s a lot of steps involved,
Drawing a Plan of a Paper Airplane. Open a Plan of a Paper Airplane
 Inventor 2014 Paper Airplane Drawing a Plan of a Paper Airplane In this activity, you ll create a 2D layout of a paper airplane. Please follow these directions carefully. When you have a question, reread
Appliqué with CutWork
 Appliqué with CutWork Method 1: Creating Appliqué from a Placement Line Open BERNINA Embroidery Software. Click on File> Open. Select the Appliqué Flowers, provided with the lesson. Click on Open. Select
Rendering a perspective drawing using Adobe Photoshop
 Rendering a perspective drawing using Adobe Photoshop This hand-out will take you through the steps to render a perspective line drawing using Adobe Photoshop. The first important element in this process
WORD ART - CHANGING LETTERING SPACING
 CHANGING LETTERING SIZE Enter single letters or words and use the icon to rescale the motif. When the Maintaining Proportions (lock) icon is outlined in white, the design will be resized proportionately.
Photoshop: Manipulating Photos
 Photoshop: Manipulating Photos All Labs must be uploaded to the University s web server and permissions set properly. In this lab we will be manipulating photos using a very small subset of all of Photoshop
Photoshop CC Editing Images
 Photoshop CC Editing Images Rotate a Canvas A canvas can be rotated 90 degrees Clockwise, 90 degrees Counter Clockwise, or rotated 180 degrees. Navigate to the Image Menu, select Image Rotation and then
J. La Favre Fusion 360 Lesson 4 April 21, 2017
 In this lesson, you will create an I-beam like the one in the image to the left. As you become more experienced in using CAD software, you will learn that there is usually more than one way to make a 3-D
Chapter 11. Preparing a Document for Prepress and Printing Delmar, Cengage Learning
 Chapter 11 Preparing a Document for Prepress and Printing 2011 Delmar, Cengage Learning Objectives Explore color theory and resolution issues Work in CMYK mode Specify spot colors Create crop marks Create
This tutorial will show you how to change your images into a cool dirty grunge design, which could be used for posters, prints, CD covers, etc.
 This tutorial will show you how to change your images into a cool dirty grunge design, which could be used for posters, prints, CD covers, etc.today We ll be making this: STEP 1: Open a new document in
Create a Twitter Style Bird Mascot - Vectortuts+
 Create a Twitter Style Bird Mascot Aug 4th in Illustration by Rype Using some basic shapes, effects, and gradients I will show you how to create a Twitter mascot for your blog or website. Twitter is a
PHOTOSHOP. Introduction to Adobe Photoshop
 PHOTOSHOP You will; 1. Learn about some of Photoshop s Tools. 2. Learn how Layers work. 3. Learn how the Auto Adjustments in Photoshop work. 4. Learn how to adjust Colours. 5. Learn how to measure Colours.
Sashiko-Style Sampler
 Sashiko-Style Sampler Created by Debbi Lashbrook Sashiko, traditionally a Japanese hand embroidery technique, can be imitated using BERNINA Embroidery Software 7 and your embroidery machine. The simple,
GIMP (GNU Image Manipulation Program) MANUAL
 MANUAL") Selection Tools Icon Tool Name Function Select Rectangle Select Ellipse Select Hand-drawn area (lasso tool) Select Contiguous Region (magic wand) Selects a rectangular area, drawn from upper left (or lower
Selection Tools Icon Tool Name Function Select Rectangle Select Ellipse Select Hand-drawn area (lasso tool) Select Contiguous Region (magic wand) Selects a rectangular area, drawn from upper left (or lower
Step 1. Blue Bird Tutorial
 Blue Bird Tutorial Using some basic shapes, effects, and gradients I will show you how to create a Twitter mascot for your blog or website. Twitter is a popular free web service for social networking and
Toothbrush Holder. A drawing of the sheet metal part will also be created.
 Prerequisite Knowledge Previous knowledge of the following commands is required to complete this lesson; Sketch (Line, Centerline, Circle, Add Relations, Smart Dimension,), Extrude Boss/Base, and Edit
ADDING RAIN TO A PHOTO
 ADDING RAIN TO A PHOTO Most of us would prefer to avoid being caught in the rain if possible, especially if we have our cameras with us. But what if you re one of a large number of people who enjoy taking
Using Adobe Photoshop
 Using Adobe Photoshop 4 Colour is important in most art forms. For example, a painter needs to know how to select and mix colours to produce the right tones in a picture. A Photographer needs to understand
The original image. As I said, we ll be looking at a few different variations on the effect. Here s the first one we ll be working towards:
 DIGITAL PIXEL EFFECT In this Photoshop tutorial, we re going to look at how to create a digital pixel effect, which is often used in ads that sell anything to do with digital. We re going to first pixelate
Create A Briefcase Icon
 Create A Briefcase Icon In this tutorial, I will show you how to create a briefcase icon with rectangles, ellipses, and gradients. This briefcase icon is great for web designs and user interfaces. Moreover,
CSCI Lab 6. Part I: Simple Image Editing with Paint. Introduction to Personal Computing University of Georgia. Multimedia/Image Processing
 CSCI-1100 Introduction to Personal Computing University of Georgia Lab 6 Multimedia/Image Processing Purpose: The purpose of this lab is for you to gain experience performing image processing using some
Blend Photos Like a Hollywood Movie Poster
 Blend Photos Like a Hollywood Movie Poster Written By Steve Patterson In this Photoshop tutorial, we're going to learn how to blend photos together like a Hollywood movie poster. Blending photos is easy
Adobe Photoshop The program: The Menus: Computer Graphics I- Final Review
 Computer Graphics I- Final Review The written portion of your final exam will be 25 multiple choice questions and one free response. Some parts of the exam will be related to examples, images and pictures.
Personalize Your Napkins
 Dress up a table with embroidered napkins. These napkins are great for gifts, but don t forget to make some for yourself. In this project, we ll be working with text, adding a decorative outline to it,
Using Adobe Photoshop to enhance the image quality. Assistant course web site:
 Using Adobe Photoshop to enhance the image quality Assistant course web site: http://www.arches.uga.edu/~skwang/edit6170/course.htm Content Introduction 2 Unit1: Scan images 3 Lesson 1-1: Preparations
Using Adobe Photoshop
 Using Adobe Photoshop 6 One of the most useful features of applications like Photoshop is the ability to work with layers. allow you to have several pieces of images in the same file, which can be arranged
Creating a Single Page Flyer in PowerPoint
 Creating a Single Page Flyer in PowerPoint Digital Media Commons Fondren Basement B42 (713) 348-3635 dmc-info@rice.edu 1 Creating a Single Page Flyer in PowerPoint Jane Zhao janezhao@rice.edu Director,
Create a Cute Furry Vector Monster in Illustrator
 Create a Cute Furry Vector Monster in Illustrator Other labs from this author can be found at http://www.blog.spoongraphics.co.uk/tutorials/create-a-cute-furry-vector-monster-inillustrator Follow these
Quick Mask Setting Up your Work Environment Setting Up the Quickmask Parameters
 Quick Mask Quickmask gets its name from the fact that as you create your selection area, Photoshop masks that area off, tinting it with a colored mask to show what has been selected. When you're finished
Mullingar Camera Club Basic introduction to Digital Printing using Photoshop CC.
 Mullingar Camera Club Basic introduction to Digital Printing using Photoshop CC. Table of Contents Course aims: 1 Course presentation notes: 1 Introducing Photoshop: 1 Adjusting the Brightness or Contrast
Introduction to Layers
 Introduction to Layers By Anna Castano A layer is an image or text that is piled on top of another. There are many things you can do with layer and it is easy to understand how it works. Through the introduction
Superhero. Here s the image I ll be using for this Photoshop tutorial:
 Superhero Here s the image I ll be using for this Photoshop tutorial: The original image. Obviously, this little guy sees himself as a mighty super hero, so let s help him out by projecting a super hero
Extreme Makeovers: Photoshop Retouching Techniques
 Extreme Makeovers: Table of Contents About the Workshop... 1 Workshop Objectives... 1 Getting Started... 1 Photoshop Workspace... 1 Retouching Tools... 2 General Steps... 2 Resolution and image size...
SHAPE CLUSTER PHOTO DISPLAY
 SHAPE CLUSTER PHOTO DISPLAY In this Photoshop tutorial, we ll learn how to display a single photo as a cluster of shapes, similar to larger wall cluster displays where several photos, usually in different
Modeling Basic Mechanical Components #1 Tie-Wrap Clip
 Modeling Basic Mechanical Components #1 Tie-Wrap Clip This tutorial is about modeling simple and basic mechanical components with 3D Mechanical CAD programs, specifically one called Alibre Xpress, a freely
Patterned Paper Christmas Tree (Photoshop)
") Patterned Paper Christmas Tree (Photoshop) Tip of the Week by Sara Horton on November 30, 2009 Did you put up your Christmas tree over the weekend? It s a tradition in our family to decorate the tree while
Patterned Paper Christmas Tree (Photoshop) Tip of the Week by Sara Horton on November 30, 2009 Did you put up your Christmas tree over the weekend? It s a tradition in our family to decorate the tree while
How to Create Fake Shadows
 TIP SHEET #8 How to Create Fake Shadows As well as the colour, it s the shadows in a picture that help to give it mood and atmosphere so in this tutorial I want to show you how you can add in extra shadows.
Create a Simple Storefront Icon
 Create a Simple Storefront Icon In this tutorial I will show you how to create a simple storefront icon using some rectangles, Illustrator Effects, and gradients. This icon is great for use in e-commerce
Love is a Puzzle. Created by Sylvain Bergeron BERNINA of America Page 1 of 7
 Love is a Puzzle Created by Sylvain Bergeron This monogram features PaintWork and CutWork. It combines layers of PaintWork to a CutWork base (CutWork puzzle design). The result is a monogram with assembly
ARCHICAD Introduction Tutorial
 Starting a New Project ARCHICAD Introduction Tutorial 1. Double-click the Archicad Icon from the desktop 2. Click on the Grey Warning/Information box when it appears on the screen. 3. Click on the Create
Adobe Photoshop CS5 ACE
 Adobe Photoshop CS5 ACE Number: A9A0-150 Passing Score: 800 Time Limit: 120 min File Version: 1.0 Sections 1. Selection Tools Exam A QUESTION 1 John creates a circular selection with Elliptical Marquee
Introduction to Photoshop
 Introduction to Photoshop Instructional Services at KU Libraries A Division of Information Services www.lib.ku.edu/instruction Abstract: This course covers the basics of Photoshop, including common tools
Step 1: Open A Photo To Place Inside Your Text
 Place A Photo Or Image In Text In Photoshop In this Photoshop tutorial, we re going to learn how to place a photo or image inside text, a very popular thing to do in Photoshop, and also a very easy thing
11 Advanced Layer Techniques
 11 Advanced Layer Techniques After you ve learned basic layer techniques, you can create more complex effects in your artwork using layer masks, path groups, filters, adjustment layers, and more style
Photoshop: a Beginner s course. by: Charina Ong Centre for Development of Teaching and Learning National University of Singapore
 Photoshop: a Beginner s course by: Charina Ong Centre for Development of Teaching and Learning National University of Singapore Table of Contents About the Workshop... 1 Prerequisites... 1 Workshop Objectives...
::: Update: June 1st, :46 :::
 ::: Update: June 1st, 2009 17:46 ::: This lesson has been written by Ann on May 18th 2009 using the Dutch version of PSP X2 Copyright 2009 - website: tdstudio - tubegroup: TubesBellisimo - guestbook :::
Impress Guide. Chapter 4 Adding and Formatting Pictures
 Impress Guide Chapter 4 Adding and Formatting Pictures Copyright This document is Copyright 2005 2012 by its contributors as listed below. You may distribute it and/or modify it under the terms of either
CHAPTER 5: MICROSOFT OFFICE: POWERPOINT 2010
 CHAPTER 5: MICROSOFT OFFICE: POWERPOINT 2010 Quick Summary Microsoft PowerPoint 2010 is software that can be used to effectively present information to an audience. The following objects are parts of the
PhotoFiltre DEPARTMENT OF EDUCATION
 DEPARTMENT OF EDUCATION PhotoFiltre Updated on 20 February 2010 This resource is part of the resource collection available through the ecentre for teachers. www.ecentre.education.tas.gov.au PhotoFiltre
ADD A REALISTIC WATER REFLECTION
 ADD A REALISTIC WATER REFLECTION In this Photoshop photo effects tutorial, we re going to learn how to easily add a realistic water reflection to any photo. It s a very easy effect to create and you can
Drawing the Red Christmas Bell
 Vector 3D Christmas Bells Thinking of drawing some Christmas bells for this Christmas? Read this illustrator tutorial to learn how to draw 5 different styles of vector Christmas bells using the 3D Revolve
Mid_Term_Review_PhotoShop_Design Test B Name
 Mid_Term_Review_PhotoShop_Design Test B Name Multiple Choice Identify the choice that best completes the statement or answers the question. 1. Photoshop uses a mathematical process called when it changes
Appendix B: Autocad Booklet YR 9 REFERENCE BOOKLET ORTHOGRAPHIC PROJECTION
 Appendix B: Autocad Booklet YR 9 REFERENCE BOOKLET ORTHOGRAPHIC PROJECTION To load Autocad: AUTOCAD 2000 S DRAWING SCREEN Click the start button Click on Programs Click on technology Click Autocad 2000
Tinker Tuesday Project - Wood Book Covers
 Tinker Tuesday Project - Wood Book Covers 1. On the laser engraver computer, click on the folder icon on the task bar. Then, select Thaw Space and open the document titled Living Hinge Template. 2. Measure
Alibre Design Exercise Manual Introduction to Sheet Metal Design
 Alibre Design Exercise Manual Introduction to Sheet Metal Design Copyrights Information in this document is subject to change without notice. The software described in this documents is furnished under
g. Click once on the left vertical line of the rectangle.
 This drawing will require you to a model of a truck as a Solidworks Part. Please be sure to read the directions carefully before constructing the truck in Solidworks. Before submitting you will be required
Managing images with NewZapp
 Managing images with NewZapp This guide is for anyone using the NewZapp Fixed editor as opposed to the Drag and Drop editor. The Image Manager is where images are uploaded and stored in your NewZapp account
Photo Within A Photo - Photoshop
 Photo Within A Photo - Photoshop Here s the image I ll be starting with: The original image. And here s what the final "photo within a photo" effect will look like: The final result. Let s get started!
GO! with Microsoft PowerPoint 2016 Comprehensive
 GO! with Microsoft PowerPoint 2016 Comprehensive First Edition Chapter 2 Formatting PowerPoint Presentations Learning Objectives Format Numbered and Bulleted Lists Insert Online Pictures Insert Text Boxes
How to make Lithophanes for the LED Holiday Litho-Lantern
 How to make Lithophanes for the LED Holiday Litho-Lantern Bob Eaton (Festus440) Creating the lithophanes for the lantern is quite easy. You need to have some limited photo editing skill but if you're new
Basics Pictures Media Bar
 Basics 1 The right pictures can make your publication stand out from the crowd. In this tutorial, we ll show you how to: Add and replace pictures. Use the Media Bar. Pan, zoom, and crop pictures. Apply
Adobe Illustrator. Mountain Sunset
 Adobe Illustrator Mountain Sunset Adobe Illustrator Mountain Sunset Introduction Today we re going to be doing a very simple yet very appealing mountain sunset tutorial. You can see the finished product