PANACHE FLOORING. Engineered Hardwood Flooring Installation Instructions. For Tongue and Groove Engineered Hardwood Flooring
|
|
|
- Thomasine Barton
- 5 years ago
- Views:
Transcription
1 PANACHE FLOORING Engineered Hardwood Flooring Installation Instructions For Tongue and Groove Engineered Hardwood Flooring Tongue and Groove Engineered Hardwood Flooring can be installed over most pr operly prepared subfloors and are engineered to be dimensionally st able, making them suit able for installation on all grade levels where moisture conditions do not exist. We continuously make technological advancements that improve product performance or installation techniques or methods. To confirm you have the most recent installation instructions, please contact Supplier. Caution: Wood Dust Cutting, sanding or m achining wood products produces wood dust. Wh ile wood products are not hazardous under the OSHA Hazard Communication Standard (29 CFR ), the International Agency for Research on Cancer (IARC) and the State of California have classified wood dust as a human carcinogen. PROPOSITION 65 WARNING: This product produces wood dust when cut, sanded or m achined. Wood dust is considered a carcinogen by the State of California. Precautionary Measures: Airborne wood dust can cause respiratory, skin and eye irritation. Power tools should be equipped with a dust collector. Use an appropriate NIOSHdesignated dust mask. Avoid dust contact with skin and eyes. First Aid Measures in case of irritations: In case of irritation flush eyes with water. If needed seek medical attention. If dermatitis occurs, seek medical attention. To request a Material Safety Data Sheet, call Supplier WARNING I DO NOT MECHANICALLY CHIP OR PULVERIZE EXISTING RESILIENT FLOORING, BACKING, LINING FELT, ASPHALTIC CUTBACK ADHESIVES OR OTHER ADHESIVES. Previously instalied resilient floor covering products and the asphaltic or cutback adhesives used to install them may contain either asbestos fibers and/or crystall inesilica. The products in this carton DO NOT contain asbestos or crystalline silica. Avoid creating dust. Inhalation of asbestos or crystalline dust is a cancer and respiratory tract hazard. Smoking by individuals exposed to asbestos fibers greatly increases the ri sk of serious bodily harm. Unless positively certain that the product is a nonasbestos containing material, you must presume it contains asbestos. Regulations may require that the material be tested to determine asbestos content and may govern the removal and disposal of material. See current edition of the Resilient Floor Covering Institute (RFCI) publication Recommended Work Practices for Removal of Resilient Floor Coverings for detailed information and instructions on removing aii resilient covering structures. INSTALLER / OWNER RESPONSIBILITY: It is the responsibility of the installer and owner to ensure that job site environmental, sub-floor and subsurface conditions involved meet or exceed all requirements as outlined in installation instructions prior to installation. Manufacturer declines all responsibility for product performance or installation failure due to sub-floor, substrate or environ mental deficiencies or jobsite conditions. All work involving water or moisture (plumbing, masonry, painting, plastering) must be completed prior to flooring being delivered. Building envelope must be complete and exterior doors and windows installed. Exterior grading and gutter downspouts should be completed and permanent HVAC systems in operation for 14 days prior to flooring being delivered to job site. Measures should be taken to protect floors from other trade work. Do not cover floors with plastic, red rosin, felt or wax paper or previously used cardboard. Instead use a breathable material such as clean, dry, plain uncoated cardboard or Kraft paper. Inks from printed cardboard could damage the hardwood floor The floor should be thoroughly cleaned before covering to remove grit and debris that would damage the finish. the floor must be completely covered to eliminate uneven ambering from exposure to UV light. Manufacturer requires Engineered Hardwood products acclimate for 48 hours prior to installation. Acclimation allows flooring to achieve equilibrium moisture c ontent (EMC) with t he installation environment. All wood continually expands and contracts until it reaches moisture equilibrium with the environment in which its installed. As with all wood flooring, expansion and contraction will be minimized if climate control is consistently maintained year round. This is especially important with tropi cal species, because denser woods experience more significant shrinkage in low moisture / low humidity environments. Room temperature should be F, with relative humidity between 45-55%. These environmental conditions are specified as pre-installation requirements and must be maintained for the life of the product. Building interiors are affected by two distinct humidity seasons. Heating and Non- Heating. Care should be taken to maintain humidity levels between 45-55% year round. Manufacturer warranties do not cover natural expansion and contraction which results in separation between planks, or damage caused by excessively low or high humidity. Seasonal gapping is not considered a manufacturing defect. Heating season, Low Humidity, Dry. All heating methods create dry, low humidity conditions. Humidifiers are recommended to prevent excessive shrinkage or gapping in wood floors due to seasonal periods of low humidity. Non Heating Season and Coastal or Waterfront Areas High Humidity, Wet During the non heating season proper humidity levels should be maintained by using an air conditioner, dehumidifier or by turning on your heating system periodically during the summer months. Do not install in full bathrooms or powder rooms. Examine flooring for color, finish and qua lity prior to insta llation. If material is unacceptable, contact the seller imm ediately. W ood is a natural product and contains characteristics such as variations in color, tone and graining. Flooring is manufactured in accordance with industry standards, which allows manufacturing and natural defect tolerances up to 5% of the total installation. Installer should work from several cartons at the same time to ensure good color and shade blend. Installer should not install undesirable pieces. Flooring warranties DO NOT cover materials with visible defects once they are installed. Installer and Owner are responsible for final inspection of flooring manufacture, grade and finish. Purchase an additional 5% of flooring to allow for cuts and an additional 10% if installing diagonally. WARRANTY NOTE: Installer should provide owner with one carton end label from product installed for warranty purposes. Owner should retain carton end label and copy of invoice with product style name and style number for their records. Excess flooring should be retained and stored for future repairs in the event planks are ever damaged. The use of stain, filler or putty for correction is considered a normal practice and a routine part of installation. Page 1
2
3


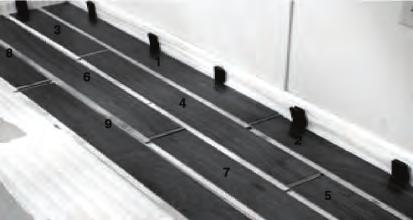
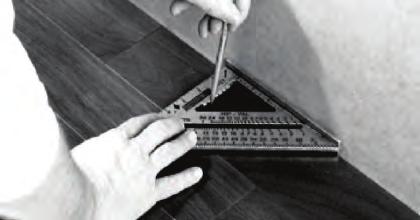
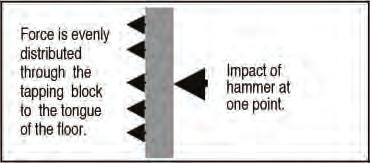
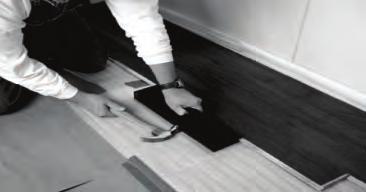
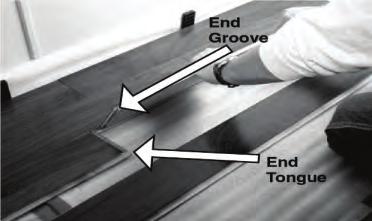
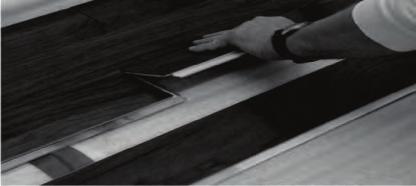
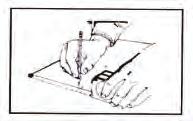
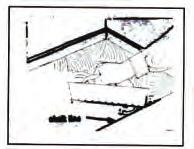
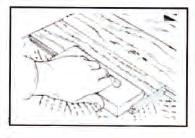
4 Note: When radiant heat is installed in concrete, mortar beds, or gypsum cement, it is very important to operate the radiant heat system until these are completely dry before you install your hardwood flooring on top. This may take several weeks. Also operate the HVAC system to allow humidity levels in the area to stabilize (35-55% RH) for the area in which the hardwood floor will be installed. Allow hardwood to acclimate to this humidity level before installation. This will minimize dimensional changes due to moisture. Before installing over a radiant heat floor turn off heat and wait until the floor has reached room temperature (70-75f). After installing the floor, gradually return the heat in 5 degree increments. CAUTION: The floor surface must never exceed 85f. Multi Width Installation Installing planks of multiple widths requires special consideration. Multi Width products arrive in the same carton so measure material needs as you normally would. Always start installation with the widest plank width and install in descending widths (example 7"-5" -3", 7"- 5"-3"). Do not try to "mix" widths within a row. Before You Start Plan your layout and determine the direction of the installation in the room. Planks installed parallel to windows accent the hardwood best. Blending of Cartons: To achieve a uniform installation appearance, preselect and set aside hardwood planks that blend best with all trims and moldings. Install these planks next to best blended moldings. Remove all wall mounted moldings such as base and quarter round. Floor should be installed blending planks from several cartons at the same time to ensure good color and shade mixture throughout the installation. Be attentive to staggering the ends of the boards at least 4" - 15 cm) when possible, in adjacent rows. The floating floor underlayment already has double-sided tape for ease of taping the precut overlapping seams. If a non-adhesive underlayment is used, tape all seams. Do not install in areas of high moisture such as bathrooms and powder rooms. PREPARATION: Undercut Door Casings: Undercut all door casings 1/16" higher than the thickness of the flooring materials being installed. To do this, use a scrap piece of flooring as a guide. Lay it on the substrate and cut the casing with a handsaw or use a power jamb saw set at the correct height. Remove all moldings and wall-base, and undercut all door casings. FLOATING INSTALLATION NOTE: Only Engineered Hardwood Flooring with 4" or more width are approved for floating installations. Underlayment: Use Performance Accessory Underlayments or equivalent underlayment with equal or better specifications. Underlayment requirements are very critical to a floating installation. Excessive pad compression or compaction is a common cause of seam failure. Lay the underlayment on the floor with the moisture barrier facing up. The direction of the underlayment should be parallel to the direction of the floor. For the first row of flooring the underlayment should be placed so that approximately 1 inch overlaps onto all perpendicular walls. Place the following row next to the first row on top of the lower moisture barrier overlap. Remove the adhesive strip and fold back the upper overlap on the second row. Make sure the underlayment fits together tightly (don't leave gaps). On the last row, place the underlayment 1 inch up the wall. To join rolls on the short side of the underlayment, use a moisture resistant tape to connect the 2 pieces so water cannot penetrate the underlayment. Expansion Space: An expansion space of at least ½ inch must be maintained around the perimeter of the room, all pipes, counters, cabinets, fireplace hearths, doorframes and any other fixed vertical objects in the room. Doorway or archways 4 feet or less and rooms larger than a 26 X 33 are required to have a T-Molding. Glue and Glue Placement: The recommended glue for floating installation is Dritac Tongue & Groove Rated Floating Floor Glue. The glue must be placed along the topside of the groove the full length of the grooved side and end. This can be accomplished by inverting the plank and applying a bead of glue (3/32") to the topside of the groove (side of the groove nearest the face of the plank), when the plank is turned back over the glue will flow down the back of the groove allowing total coverage. Apply only a 3/32-inch bead of glue; if the groove is filled with glue it will be difficult to close the seam not allowing a tight fit. Getting Started: The installation begins with three rows of flooring glued together and held in place with 3M blue painters tape (#2080) with the groove side facing the wall. Spacers must be used to establish the minimum ½" expansion space from the walls. These three rows must be straight, square and in rack because they establish the alignment of the rest of the floor. After putting these three rows together allow the glue to set (15 to 45 minutes) before proceeding with the installation. With the tongue facing out the planks can be tapped together with a tapping block on the tongue to make a snug fit. After installing 8 or 10 rows of flooring, stand back and check for crowning or heaving due to tension strapping or any damage caused by improper taping. CLEAN AS YOU GO: If any glue squeezes out of the seam between the planks allow it to dry for 10 to 15 minutes and then lightly scrape it away with a plastic scraper or putty knife, any glue left may be cleaned with a damp cloth. Do not allow the glue to dry on the face of the flooring; it will be very difficult to clean off. Starting Off - The First Three Rows Row One: Plank 1 should begin in the left hand corner of the room. Spacing around the wall perimeter of 11.2" can be maintained by using wood wedges. The planks are laid with the groove side facing the wall. The first row starts with a full length board; working from left to right will be required when installing engineered hardwood flooring. Slide the end groove of the board being installed into the end tongue of the board you previously installed. Place each plank firmly against the wood wedges. After setting the first row and making sure you are against a firm starting point, lay out three to four rows before starting to install. (Figure 3) Plank 2 end tongue is connected to the end groove of Plank 1. Lay the rest, plank after plank, in this manner until you have completed the first row. Cut the last plank accordingly. Please ensure that this first row is straight using the wedges to maintain proper V.Z"expansion space from the wall. Page4
5

6


7
8 Clean Up Use clean white terry cloth towels to clean as you go along with mineral spirits. It is easy and convenient to use. Adhesive that has cured on the surface of the flooring can be difficult to remove. Light foot traffic is allowed after 12 hours but wait 24 hours after installation to remove the 3M blue masking tape. Once the tape is removed clean any adhesive residue left from the tape using mineral spirits on a clean white terry towel. Final Touches Install the proper trim molding at the doorways to achieve the transition and along the walls to cover the edges of any gaps along the wall due to irregularity. Complete the job by using the wood filler that coordinates with the installed engineered flooring for minor corrections or areas where brad nails were used in the trim or the flooring. Clean the finished floor with Hardwood & Laminate Floor cleaners. Trim excess underlayment (floating installation only) and install or reinstall any transition pieces, reducer strips, T-moldings, thresholds, bases and/or quarter round moldings. Trims and moldings should be nailed into the wall, not the floor. To prevent surface damage, avoid rolling heavy furniture and appliances on the floor. Use plywood, hardboard or appliance lifts if necessary. Use protective castors/castor cups or felt pads on the legs of furniture to prevent damage to the flooring. Clean Up Use clean white terry cloth towels to clean as you go along with mineral spirits. It is easy and convenient to use. Adhesive that has cured on the surface of the flooring can be difficult to remove. Measures should be taken to protect floors from other trade work. If the floor is to be covered, the floor should be thoroughly cleaned prior to covering to prevent grit damage to the finish. Do not cover with plastic, red rosin, felt or wax paper or previously used cardboard. Instead use a breathable material such as clean, dry, plain uncoated cardboard or Kraft paper. Inks from printed cardboard could damage the hardwood floor. A common reinforced builder's paper is a good choice. Any covering should be taped, using a low-adhesion tape, to base or shoe moldings. Avoid taping to finished flooring. When taping paper or sheets together, tape them to each other, not to the floor. The floor must be completely covered to eliminate uneven ambering from exposure to UV light. MAINTENANCE Engineered Hardwood Floors are very easily maintained. No wax, no mess. Simply use Hardwood Floor cleaners and a terry cloth flooring mop. STEP ONE: Sweep your floor to remove any particles that could scratch your floor. Warning: Vacuums with a beater bar or power rotary brush head can damage a wood floor and should never be used. STEP TWO: Apply the approved Hardwood Flooring cleaners directly to the terry cloth flooring mop, not to the floor! STEP THREE: Use a back and forth motion with the mop. When the terry cloth cover becomes soiled, simply replace it with a clean one. Cleaning the floor with a soiled cover could cause streaking. The covers are re-usable so simply throw the cover in the wash and dry it as you would any towel. DO NOT USE FABRIC SOFTENER when washing terry cloth covers. Tips & Warnings: Sweep regularly, with a soft bristle broom. Remove spills promptly and use Hardwood Floor cleaners and a clean white cloth. Use felt protectors under heavy pieces of furniture and chairs. Use protective mats at all exterior entrances. Do not use mats or area rug cushions constructed of rubber or PVC. Instead use urethane backed products. Spiked heels or shoes in need of repair can severely damage your floor. Replace hard plastic, metal casters or wheels on furniture with soft rubber casters or by using a protective mat under the casters. Never wet or damp mop your wood floors. Water can cause damage to wood flooring. Never use oil soaps, wax, liquid or other household products to clean your floor. The sun's UV rays can change the color of your floor. Keep animal nails trimmed. Protect your floor when using a dolly for moving furniture or appliances. Never slide or roll heavy furniture or appliances across the floor. Never use steam cleaners on your wood floors. This will force moisture into the wood and cause damage to your flooring. Use protective window coverings to protect hardwood floors from excessive heat during periods of direct sunlight. Exterior and interior walk off mats should be used at all exterior entrance to avoid exposure to moisture from tracking during periods of inclement weather. Walk off mats should be routinely maintained to avoid becoming a soil source. Do not use mats or under mat cushions constructed of rubber or PVC. Instead use urethane backed products. Hardwoods react to sunlight Hardwood contains certain types of acids in their cellular structure. With exposure to sunlight these acids begin to amber. The color change is referred to as patina. The wood will reach its own natural warmth and patina level and stop ambering. The amount of patina is directly related to the species, amount of acids and the level of sunlight. The entire floor will reach the same patina level over time. This is often noticed after a rug is removed and the floor is noticeably different in color underneath. If you remove the rug and expose the entire floor to the same amount of light, it will even out over time and become uniform in color. Hardwood flooring will scratch and dent With today's active lifestyles it is important to note that hardwood flooring can, and will, scratch and dent. See Tips & Warnings for protecting your hardwood floor. In order to prevent excessive abuse the use of strategically placed mats and area rugs as well as floor protectors on chair and table legs are a must. Pre-installation Subfloor Moisture Testing: Installer should use this section to record moisture content readings and provide to the owner for their records Moisture Content: Wood Subfloor % Moisture Content of Subfloor % Moisture Content of Hardwood % Difference between subfloor & flooring Concrete Subfloor Test Calcium Chloride (ASTM F1869) Method -- RH (ASTM F )1869 Used: Electronic Meter (Tramex or equivalent) Moisture Readings: Page 8
¾ Solid Hardwood Flooring Installation Information
 ¾ Solid Hardwood Flooring Installation Information! ATTN: INSTALLERS Caution: Wood Dust Sawing, sanding and machining wood products can produce wood dust. Airborne wood dust can cause respiratory, skin
Installation Instructions FOR INTERLOCKING ENGINEERED HARDWOOD (P.1)
") Installation Instructions FOR INTERLOCKING ENGINEERED HARDWOOD (P.1) Glue or Floating Installation: INTERLOCKING ENGINEERED WOODS can be installed over most sub-fl oors, and are engineered to be very dimensionally
Installation Instructions FOR INTERLOCKING ENGINEERED HARDWOOD (P.1) Glue or Floating Installation: INTERLOCKING ENGINEERED WOODS can be installed over most sub-fl oors, and are engineered to be very dimensionally
INSTALLATION INSTRUCTIONS FOR ENGINEERED WOOD
 INSTALLATION INSTRUCTIONS FOR ENGINEERED WOOD Glue, Staple/Nail Down, or Floating Installation: ENGINEERED WOODS can be installed over most sub floors, and are engineered to be very dimensionally stable,
TORLYS LEATHER PLANK INSTALLATION INSTRUCTIONS
 ENGLISH INSTRUCTIONS TORLYS LEATHER PLANK INSTALLATION INSTRUCTIONS Dear Customer, You have chosen a high quality TORLYS Leather floor, well suited for all residential application except bathrooms and
Engineered Hardwood Flooring Installation Instructions
 Engineered Hardwood Flooring Installation Instructions 1 Important Information before You Begin 1.1 Installer/Owner Responsibility Carefully inspect all materials before installation. Materials installed
AquaGuard - Water Resistant Flooring Installation guidelines
 AquaGuard - Water Resistant Flooring Installation guidelines Before You Start: Please read all the instructions before you begin the installation. Improper installation will void the warranty. Important
Wood Molding Installation Guide
 Wood Molding Installation Guide 1 P age Estimating the Quantity of Molding Required for the Job. Calculate the following: 1. Total lineal feet of Wall Base required for the job: Lineal feet 2. Total lineal
Prior to installation, the installer assumes all responsibility for final inspection and quality of the product
 Mae Terra Hardwood Installation Instructions ¾ Solid Nail Down Protect your investment. Review and adhere to the flooring installation instructions. Please note that these are instructions for the experienced
SOLID STRAND BAMBOO INSTALLATION GUIDE. Tips for a successful installation
 SOLID STRAND BAMBOO INSTALLATION GUIDE Please keep in mind that all hardwood flooring will scratch, dent, and change color over time. Therefore, you will need to decide if hardwood is suitable for your
INSTALLATION INSTRUCTIONS
 VESDURA VINYL PLANKS 3MM PVC GLUE DOWN - OAK COLLECTION Safety First CAUTION Asbestos Warning in existing floor. Do not sand, dry scrape, bead blast or mechanically pulverize existing resilient flooring.
TRIVERSA TRIVERSA ID. Triversa Triversa ID Installation Instructions. Remove the wall base and doorway trim. Always undercut wood door casings
 INSTALL ON ALL GRADE LEVELS Above Grade On Grade Below Grade by CONGOLEUM TRIVERSA TRIVERSA ID Triversa Triversa ID Installation Instructions GENERAL INFORMATION ATTENTION! READ BEFORE INSTALLING! Handle
LUXURY VINYL FLOORING INSTALL INSTRUCTIONS
 PLEASE READ ALL INSTRUCTIONS CAREFULLY BEFORE YOU BEGIN INSTALLATION. IMPROPER INSTALLATION WILL VOID WARRANTY. Installation Preparation: The information on this sheet provides general guidelines. All
¾ Solid Installation Instructions
 ¾ Solid Installation Instructions Thank you for choosing STRAVAGANZA products! Hardwood flooring is a natural product; therefore defects in the flooring can occur in the manufacturing process or naturally
Manufacturer 12mm Laminate Flooring Installation Guidelines
 Manufacturer 12mm Laminate Flooring Installation Guidelines IMPORTANT Do not open immediately. Before opening, acclimatize planks for 48 hours by laying each box horizontally and individually in the center
MOHAWK LAMINATE INSTALLATION INSTRUCTIONS
 MOHAWK LAMINATE INSTALLATION INSTRUCTIONS General Mohawk flooring panels us Uniclic technology, a revolutionary system for installing laminate floors without using glue. The panels can be clicked together
Staple/Nail-DOWN APPLICATIONS INSTALLATION INSTRUCTIONS
 Staple/Nail-DOWN APPLICATIONS INSTALLATION INSTRUCTIONS GENERAL NOTES: Inspect all materials carefully before installation. Warranties do not cover materials with visible defects once they are installed.
ENGINEERED WOOD INSTALLATION GUIDE: The Cardinal Collection
 ENGINEERED WOOD INSTALLATION GUIDE: The Cardinal Collection READ BEFORE INSTALLATION OF OILED FINISHED FLOORING DO S 1. Do mix wood from several boxes of flooring during installation. 2. Do make your best
For ANGLE-DROP Styles
 For ANGLE-DROP Styles BEFORE INSTALLATION: 1. READ THESE DETAILED INSTALLATION INSTRUCTIONS. 2. Material and tool requirements: - Estimate square footage and add 10%. - Select underlayment (over concrete
INSTALLATION. GlUElEss CliCK BamBoo installation GUidE. Introduction. Tips for a successful installation
 GlUElEss CliCK BamBoo installation GUidE Introduction Thank you for purchasing a Yanchi Bamboo Floor! Our flooring combines superior technology and the highest quality materials available so that your
INSTALLATION INSTRUCTIONS
 FLOATING-FLOOR APPLICATION INSTRUCTIONS Thank you for choosing Vanier Hardwood Flooring. Protect your investment. Review and adhere to the flooring installation instructions. Please note that these are
Loose Lay Luxury Vinyl Plank
 Loose Lay Luxury Vinyl Plank FLEX COLLECTION Installation & maintenance * PLEASE READ CAREFULLY * Installation, maintenance & warranty guideline for loose lay luxury vinyl products. Adherence to This guideline
INSTALLATION INSTRUCTIONS ECOfusion 1/2 & 3/8 Engineered Hardwood Flooring
 INSTALLATION INSTRUCTIONS ECOfusion 1/2 & 3/8 Engineered Hardwood Flooring PLEASE READ THOROUGHLY BEFORE BEGINNING INSTALLATION. THESE INSTALLATION INSTRUCTIONS ARE SPECIFICALLY INTENDED FOR USE WITH ECOFUSION
INSTALLER / OWNER RESPONSIBILITY:
 Pergo Multi-Layered Core Engineered Hardwood Flooring T&G Installation Instructions Glue Down, Staple Down, or Floating Installation Multi-Layered Core Engineered Hardwood Flooring can be installed over
DuChâteau Vinyl DeLuxe Grand Collection LuxCor Click Installation Instructions
 DuChâteau Vinyl DeLuxe Grand Collection LuxCor Click Installation Instructions General Information Intended for indoor residential and commercial use only, DuChâteau Vinyl DeLuxe Grand Collection - Luxcor
Nail-Down Installation Instructions Prefinished 3/4 and 5/8 solid
 Nail-Down Installation Instructions Prefinished 3/4 and 5/8 solid Thank you for choosing 3 4 or 5 8 Exotic Hardwood Flooring. Protect your investment; review and adhere to the flooring installation instructions.
Laminate Floor Installation Guide
 Laminate Floor Installation Guide Introduction This guide will take you through the necessary steps to install your Bel-Air Laminate Flooring. Make sure to carefully read through this guide so that you
Engineered Installation Instructions
 Engineered Installation Instructions Thank you for choosing STRAVAGANZA products! Hardwood flooring is a natural product; therefore defects in the flooring can occur in the manufacturing process or naturally
Engineered Hardwood Flooring Installation Instructions
 Engineered Hardwood Flooring Installation Instructions Glue: All profiles Nail: 3/8", 1/2", 3/4" Staple: 3/8", 1/2" Float: 1/2" Engineered Planks and Strips can be installed over most subfloors, and are
INSTALLATION INSTRUCTIONS of Chevron and Herringbone Engineered Hardwood Flooring
 INSTALLATION INSTRUCTIONS of Chevron and Herringbone Engineered Hardwood Flooring www.tomson-floors.com TABLE OF CONTENTS 3 USING THE PRODUCT 3 YOUR RESPONSIBILITIES 4 PRE-INSTALLATION INSPECTION 5 BASIC
ARTISTIC FINISHES. The Artistic Touch TM. Installation and Maintenance Guide. Copyright 1999 Artistic Finishes, Inc. All rights reserved.
 ARTISTIC FINISHES The Artistic Touch TM Installation and Maintenance Guide Estimating the quantity of molding required for the job Calculate the following: 1. Total lineal feet of Wall Base required for
Kraus Engineered Luxury Vinyl Plank 5G Insta-Loc Click Installation Instructions
 Kraus Engineered Luxury Vinyl Plank 5G Insta-Loc Click Installation Instructions GENERAL GUIDELINES All instructions and recommendations are based on the most recent information available. They should
TONGUE & GROOVE NAIL-DOWN INSTALLATION INSTRUCTIONS
 FEBRUARY 2017 TONGUE & GROOVE NAIL-DOWN INSTALLATION INSTRUCTIONS Applicable to: Kahrs Supreme 20mm 3/4 Grande Collection Only PROTECT YOUR INVESTMENT! Maintain your warranty: Only use Kährs branded underlayments,
English Professional Installation Guidelines
 Professional Installation Guidelines General Installation Instructions NOTE: After proper acclimation, open cartons just prior to installation. NOTE: Mannington Laminate Flooring is intended to be installed
Engineered Strand Uniclic Floating Installation
 Engineered Strand Uniclic Floating Installation Introduction Thank you for choosing our Engineered Strand Bamboo Flooring! You have selected one of the highest quality engineered floors available. Our
Installation Instructions Floating-Floor Application Thank you for choosing Indusparquet Hardwood Flooring (IP)
") Installation Instructions Floating-Floor Application Thank you for choosing Indusparquet Hardwood Flooring (IP) Protect your investment. Review and adhere to the flooring installation instructions. Please
Installation Instructions Floating-Floor Application Thank you for choosing Indusparquet Hardwood Flooring (IP) Protect your investment. Review and adhere to the flooring installation instructions. Please
1. Read all instructions/warranty first: Get all your questions answered before you start installing the floor by calling
 STRAND WOVEN BAMBOO INSTALLATION GUIDE Please keep in mind that all hardwood flooring will scratch, dent, and change color over time. Therefore, you will need to decide if hardwood is suitable for your
Engineered Hardwood Installation
 Engineered Hardwood Installation Installer / Owner Responsibility Carefully inspect all materials before installation. Materials installed with visible defects are not covered under the warranty. Do not
WATER AND WOOD DON T MIX KEEPING YOUR TRIÂNGULO HARDWOOD FLOOR BEAUTIFUL SCRATCHES, INDENTATIONS AND GOUGES
 WATER AND WOOD DON T MIX Using any of the following items to maintain your wood floor will void all manufacturer warranties! Water Oil Soap Vinegar, Ammonia Household Detergent Wax Furniture Polish Dust
SINCE 1995 HYBRID / LOFT / MANOR LINE INSTALLATION GUIDE
 HYBRID / LOFT / MANOR LINE INSTALLATION GUIDE We strive to offer our customers the highest quality bamboo flooring. Please carefully read this installation guide to ensure satisfactory results from your
READ PRIOR TO BEGINNING INSTALLATION
 READ PRIOR TO BEGINNING INSTALLATION Bella Cera La Palazzina Engineered Hardwood Flooring Installation Instructions Check for Proper Color Selection Prior to Installation 1 Important Information before
INSTALLATION INSTRUCTIONS
 Part I INSTALLATION AND CARE: Product Description: Engineered T&G hardwood flooring planks ore designed for use in multiple locations. Acceptable location includes basements, ground floors or high-rise
Royal Collection. Installation Guidelines
 Royal Collection Installation Guidelines Congratulation! Thank you for purchasing TEKA pre-finished engineered hardwood flooring. You made the right choice for the right product. Manufacture only real
Engineered Hardwood Installation
 Engineered Hardwood Installation Installer / Owner Responsibility Carefully inspect all materials before installation. Materials installed with visible defects are not covered under the warranty. Do not
Installation Guide. When purchasing Aboeda flooring, add 5%-15% to actual square footage needed for cutting allowance.
 Installer/Owner Responsibility Aboeda strives to offer its customers high quality hardwood flooring. Please carefully read this installation guide to ensure satisfactory results from your floor. Carefully
INSTALLATION. Installer / Owner Responsibility. Basic Tools and Equipment. Putty and Filler Use. Recommended Installation Methods
 Installer / Owner Responsibility Carefully inspect all materials before installation. Materials installed with visible defects are not covered under the warranty. Do not install if you are not satisfied
BOIS CHAMOIS VINTAGE HARDWOOD FLOORING
 Professional Installation Recommended Nail-Down Installation Instructions Solid 3/4 x 7 x Random Length (6 10 ) Thank you for choosing Bois Chamois Vintage Hardwood Flooring. Protect your investment; thoroughly
INSTALLATION LAMTON INSTALLATION INSTRUCTIONS. Lamton Laminate Flooring with Underlay Attached Glueless Installation. Tools and Accessories
 Lamton quality laminate flooring is manufactured to exacting standards for long life and lasting beauty. Following these simple procedures for installation and it will ensure many years of pride and satisfaction.
INSTALLATION INSTRUCTIONS
 GLUE DOWN APPLICATION INSTRUCTIONS Thank you for choosing Vanier Hardwood Flooring. Protect your investment. Review and adhere to the flooring installation instructions. Please note that these are instructions
IMPORTANT NOTES ABOUT YOUR FLOORING PLEASE READ BEFORE INSTALLING INSTALLATION & MAINTENANCE FOR ENGINNERED HERRINGBONE
 IMPORTANT NOTES ABOUT YOUR FLOORING PLEASE READ BEFORE INSTALLING INSTALLATION & MAINTENANCE FOR ENGINNERED HERRINGBONE ACCLIMATIZATION AND STORAGE Your new flooring has to be acclimatized before installation,
Landscape Collection
 Landscape Collection Installation Guidelines READ BEFORE INSTALLATION OF OILED FINISHED FLOORING We are providing a brief explanation of the Do s and Do Not s during and shortly after installation. DO
INSTALLATION. Installation Guide. Installing Bamboo Flooring on Top of a Wood Subfloor
 READ COMPLETELY BEFORE STARTING INSTALLATION. Congratulations on choosing Yanchi bamboo flooring. Please take time to read the following procedures before you begin installation. With the correct installation
Installation Information
 Add for glue-down: Recommended Boardbrokers adhesive. Add for staple or nail-down: 1 1/2 staples or cleats (minimum), power nail model # 45 or compressor, in-line regulator, nylon/plastic tapping block,
INSTALLATION GUIDE; ENGINEERED & HARDWOOD FLOORING (COMMERCIAL & RECLAIMED)
") INSTALLATION GUIDE; ENGINEERED & HARDWOOD FLOORING (COMMERCIAL & RECLAIMED) ATTENTION! INSTALLER/OWNER RESPONSIBILITIES Beautiful hardwood floors are a product of nature and, therefore, they will show
INSTALLATION GUIDE; ENGINEERED & HARDWOOD FLOORING (COMMERCIAL & RECLAIMED) ATTENTION! INSTALLER/OWNER RESPONSIBILITIES Beautiful hardwood floors are a product of nature and, therefore, they will show
Multi-Layered Core Engineered Hardwood Flooring T&G Installation Instructions Glue Down, Staple Down, or Floating Installation
 Multi-Layered Core Engineered Hardwood Flooring T&G Installation Instructions Glue Down, Staple Down, or Floating Installation Multi-Layered Core Engineered Hardwood Flooring can be installed over most
INSTALLATION GUIDE FOR MAZAMA MULBERRYWOOD HARDWOOD FLOORING
 INSTALLATION GUIDE FOR MAZAMA MULBERRYWOOD HARDWOOD FLOORING READ COMPLETELY BEFORE STARTING INSTALLATION. Congratulations on choosing Mulberrywood flooring. Please take time to read the following procedures
For more information, call PERGO
 SILICONE CAULK SILICONE CAULK SYSTEM SYSTEM MADE IN THE USA SPECIALLY DEVELOPED FOR LAMINATE FLOORING 1 FL OZ (33.5ml) 0 1 0 2 50 100 ON Non Destructive Moisture 3 150 Concrete Encounter Plus 4 200 250
Lifestyle Laminates Uniclic Floating Floor
 Lifestyle Laminates Uniclic Floating Floor Thank you for choosing Wellmade Laminate Flooring, featuring the glue-less Uniclic floating installation system. You have selected one of the highest quality
STOP BEFORE YOU START
 STOP Please inspect product for color, finish, quality and style BEFORE installing any material. SLCC Enterprise, Inc. warranty DOES NOT cover materials with visible defects once they have been installed.
FOR BOURBON BEHS-BOU5 AND SUEDE BEHS-SUE5 1
 Timeless Designs Engineered Flooring Products can be installed over most sub-floors, and are engineered to be dimensionally stable, making them suitable for installation over all grade levels. See all
Multi-Layered Core Engineered Hardwood Flooring T&G Installation Instructions Glue Down, Staple Down, or Floating Installation
 Multi-Layered Core Engineered Hardwood Flooring T&G Installation Instructions Glue Down, Staple Down, or Floating Installation Multi-Layered Core Engineered Hardwood Flooring can be installed over most
INSTALLER / OWNER RESPONSIBILITIES
 www.mainetraditionsflooring.com TM HARDWOOD FLOORING Crafted by Kennebec Lumber Company INSTALLER / OWNER RESPONSIBILITIES Common Facts / Issues Hardwood floors are made from beautiful trees that each
ENGINEERED TONGUE & GROOVE INSTALLATION INSTRUCTIONS 3/8, 7/16, 1/2, 9/16, 5/8, 3/4 Float-In / Glue-Down / Nail Down
 ENGINEERED TONGUE & GROOVE INSTALLATION INSTRUCTIONS 3/8, 7/16, 1/2, 9/16, 5/8, 3/4 Float-In / Glue-Down / Nail Down Important / Read First Please read and review installation instructions completely before
FITTING INSTRUCTIONS FOR OFD SOLID OAK FLOORING
 FITTING INSTRUCTIONS FOR OFD SOLID OAK FLOORING SECTION 1 Installers Responsibility Pre-Installation SECTION 2 Glue Down (Solid & Engineered Flooring) SECTION 3 Secret Nailing (Solid & Engineered Flooring)
Glueless Laminate Installation Instructions
 2nd FLOOR 1st FLOOR BASEMENT Glueless Laminate Installation Instructions! CAUTION: WOOD DUST ing, sanding, and/or machining of wood products can produce wood dust that can cause respiratory, eye, and skin
Installation Instructions Glue-Down Application Thank you for choosing Indusparquet Hardwood Flooring (IP)
") Installation Instructions Glue-Down Application Thank you for choosing Indusparquet Hardwood Flooring (IP) Protect your investment. Review and adhere to the flooring installation instructions. Please note
Installation Instructions Glue-Down Application Thank you for choosing Indusparquet Hardwood Flooring (IP) Protect your investment. Review and adhere to the flooring installation instructions. Please note
Pompeii Birch & Hickory Engineered Hardwood Flooring Installation Instructions
 Pompeii Birch & Hickory Engineered Hardwood Flooring Installation Instructions Tip: Check for proper color selection and style prior to Installation. No claims will be accepted after installation. 1 Important
Installation Manual. Installation for Solid OAK Flooring: Before Installation
 Installation Manual Installation for Solid OAK Flooring: OAK flooring, when properly installed, is a beautiful durable floor-covering material. OAK flooring is manufactured with a moisture content range
Columbia Laminate Installation Instructions
 Columbia Laminate Installation Instructions 1. General Uniclic is a revolutionary system for installing laminated flooring without using glue. Uniclic uses an ingenious form of tongue and groove to click
WOODLOC STAPLE DOWN INSTALLATION INSTRUCTIONS
 FEBRUARY 2017 WOODLOC STAPLE DOWN INSTALLATION INSTRUCTIONS Applicable to: Kährs Spirit 10mm 3/8 Kährs Avanti 12 & 13mm 1/2 Kährs Original 15mm 5/8 Kahrs Supreme 15mm 5/8 PROTECT YOUR INVESTMENT! Maintain
Glue-Down and Floating Installation IndusParquet 5/16 Engineered
 Glue-Down and Floating Installation IndusParquet 5/16 Engineered Thank you for choosing IndusParquet 5/16 Engineered Hardwood Flooring. Protect your investment; review and adhere to the flooring installation
General Installation Instructions
 General Installation Instructions Good web sites to check out that may assist you are: For gluing engineered boards over timber chipboard/particle board/ yellow tongue: https://www.youtube.com/watch?v=bpyfr373tl8
GLUE-DOWN APPLICATIONS INSTALLATION INSTRUCTIONS
 GLUE-DOWN APPLICATIONS INSTALLATION INSTRUCTIONS GENERAL NOTES: Inspect all materials carefully before installation. Warranties do not cover materials with visible defects once they are installed. It is
Please read and review installation instructions completely before proceeding with the actual installation.
 INSTALLATION INSTRUCTIONS Important / Read First Please read and review installation instructions completely before proceeding with the actual installation. Owner / Installer responsibility The installer
Please Read All Instructions, Carefully, Before You Begin Installation. Improper Installation Will Void Warranty
 1. Read enclosed detailed installation instructions before beginning install. 2. A flat subfloor is a must! 3. Proper moisture testing is a must! 4. Proper expansion around all permanent structures is
Engineered Strand Bamboo Flooring
 Engineered Strand Bamboo Flooring Introduction Thank you for choosing Wellmade Engineered Strand Bamboo! You have selected one of the highest quality engineered floors available. Our engineered flooring
Installation Instructions for Viking Hearth Engineered Wood Flooring
 Installation Instructions for Viking Hearth Engineered Wood Flooring 4.16.15 PLEASE READ THESE INSTRUCTIONS IN THEIR ENTIERTY BEFORE BEGINNING THE INSTALLATION. Installer s / Owners Responsibility As a
Glueless Laminate Installation Instructions Wood Designs
 OptiCore Installation Grade Glueless Laminate Installation Instructions Wood Designs! CAUTION: WOOD DUST The International Agency for Research on Cancer has classified wood dust as a nasal carcinogen.
Staple-Down, Glue-Down and Floating Installation IndusParquet 1/2 Engineered
 Staple-Down, Glue-Down and Floating Installation IndusParquet 1/2 Engineered Thank you for choosing IndusParquet ½ Engineered Hardwood Flooring. Protect your investment; review and adhere to the flooring
Install your floor between 18 and 30 C.
 GOLDEN RULES 8-0 C Install your floor between 8 and 0 C. Quick-Step Livyn must be acclimatized in the room of installation between 8-0 C for a period of at least 8 hours before installation. This floor
BOIS CHAMOIS VINTAGE HARDWOOD FLOORING
 Professional Installation Recommended Glue Down Installation Instructions Solid or Engineered 5/8 or 3/4 Thank you for choosing Bois Chamois Vintage Hardwood Flooring. Protect your investment; thoroughly
CFS Engineered Flooring Floating Installation Instructions
 CFS Engineered Flooring Floating Installation Instructions CFS s stable engineered hardwood floors are natural products and as a result are not perfect. All of the floors CFS manufactures are in accordance
Installation Instructions for Engineered Wood Flooring
 Installation Instructions for Engineered Wood Flooring PLEASE READ THESE INSTRUCTIONS IN THEIR ENTIERTY BEFORE BEGINNING THE INSTALLATION. Installer s / Owners Responsibility As a natural product, hardwood
INSTALLATION INSTRUCTIONS FOR QUICK-STEP LAMINATE WITH HYDROSEAL TECHNOLOGY.
 . PREPARATION. INSTALLATION. FINISHING. MAINTENANCE INSTALLATION INSTRUCTIONS FOR QUICK-STEP LAMINATE WITH HYDROSEAL TECHNOLOGY. IN ORDER TO OBTAIN A GOOD RESULT, WE ADVISE TO FOLLOW ALL GIVEN INSTRUCTIONS
installation Prefinished 3/4 solid (including various widths such as 3 1/4, 3 5/8, 4 3/4, 5 ) naildown installation instructions
 naildown installation instructions") Prefinished 3/4 solid (including various widths such as 3 1/4, 3 5/8, 4 3/4, 5 ) naildown installation instructions Thank you for choosing Jasper Floors Exotic Hardwood Flooring. Jasper Floors feature
Prefinished 3/4 solid (including various widths such as 3 1/4, 3 5/8, 4 3/4, 5 ) naildown installation instructions Thank you for choosing Jasper Floors Exotic Hardwood Flooring. Jasper Floors feature
WoodWORKS Channeled Plank
 CEILING&WALL SYSTEMS Between us, ideas become reality WoodWORKS Channeled Plank Assembly and Installation Instructions 1. General 1.1 Product Description WoodWorks Channeled acoustical ceiling and wall
Trendwood Flooring Installation Instructions
 Trendwood Flooring Installation Instructions READ ALL OF THESE INSTRUCTIONS THOROUGHLY BEFORE BEGINNING INSTALLATION. Flooring Installation Instructions PRIOR TO INSTALLATION It is the installer's responsibility
Wall Installations. Chapter 16 Wall Installations 16. 1
 16 Wall Installations Chapter 16 Wall Installations 16. 1 Alterna Premium Groutable Tile Create decorative backsplashes, accent walls, or other focal points with any size Alterna 16" x 16", 8" x 16", 8"
Carmel Bay & Touch of Euro Engineered Floors - Installation Instructions
 Carmel Bay & Touch of Euro Engineered Floors - Installation Instructions OWNER/INSTALLATION TECHNICIAN RESPONSIBILITIES: Order Quantity: When the flooring is ordered, a minimum of 5% (recommended 7% -
Quest ¾ and 5/8 Solid Installation Instructions
 Quest ¾ and 5/8 Solid Installation Instructions ATTENTION INSTALLER Please read carefully before installing the product. Make sure to follow our installation instructions and acclimatization recommendations
Installation Instructions Solid Bamboo Flooring Visit homelegend.com for latest version of installation instructions.
 Installation Instructions Solid Bamboo Flooring Visit homelegend.com for latest version of installation instructions. Products Included Approved Grade Levels Approved Installation Methods 5/8, 9/16, 1/2,
Galaxy SPC RIGID-CORE UNICLIC HYBRID PLANK. Installation Guidelines
 Galaxy SPC RIGID-CORE UNICLIC HYBRID PLANK Installation Guidelines ** Read all instructions carefully before installing. Incorrect installation will invalidate and void warranty. ** The planks you are
INSTALLATION INSTRUCTIONS FOR ELKALAMINATE. IN ORDER TO OBTAIN A GOOD RESULT, WE ADVISE TO FOLLOW ALL GIVEN INSTRUCTIONS CAREFULLY.
 INSTALLATION INSTRUCTIONS FOR ELKALAMINATE. IN ORDER TO OBTAIN A GOOD RESULT, WE ADVISE TO FOLLOW ALL GIVEN INSTRUCTIONS CAREFULLY. PREPARATION Let the planks acclimatize for 48 hours in the unopened packaging
For best results, it is essential that you follow the installation instructions exactly.
 For best results, it is essential that you follow the installation instructions exactly. PREPRTION Let the planks acclimatize for 48 hours in the unopened packaging at the normal room temperature, in the
Installation Instructions Engineered Bamboo Plywood Flooring Visit homelegend.com for latest version of installation instructions.
 Installation Instructions Engineered Bamboo Plywood Flooring Visit homelegend.com for latest version of installation instructions. Products Included Approved Grade Levels Approved Installation Methods
BAMBOO FLOORING PRE-FINISHED SOLID BAMBOO INSTALLATION GUIDE
 BAMBOO FLOORING PRE-FINISHED SOLID BAMBOO INSTALLATION GUIDE PLEASE READ AND REVIEW THE ENTIRE INSTALLATION GUIDE BEFORE PROCEEDING WITH THE ACTUAL INSTALLATION IMPORTANT NOTICE: HOME LEGEND strongly recommends
ENGINEERED TONGUE & GROOVE
 ENGINEERED TONGUE & GROOVE Multi-layer & OSB core INSTALLATION INSTRUCTIONS 7/16, 1/2, 9/16, 5/8 Float-in / Glue-Down / Nail or Staple IMPORTANT INFORMATION BEFORE YOU BEGIN Please read and review installation
General Installation Instructions. Laminate Drop & Lock installation - 2G
 General Installation Instructions Laminate Drop & Lock installation - 2G A. INTRODUCTION Laminates and other wooden material acts after the surrounding climate, the main factor is the relative humidity
Exterra Installation Guide
 Exterra Installation Guide Installing the foam padding Please review this installation guide before you begin installing the floor. If you have any questions, please call us at 800-428-5306 any time Monday
LifeScapes ¾ and 5/8 Solid Installation Instructions
 LifeScapes ¾ and 5/8 Solid Installation Instructions ATTENTION INSTALLER Please read carefully before installing the product. Make sure to follow our installation instructions and acclimatization recommendations
Engineered Prefinished & Unfinished Flooring
 AACER FLOORING INSTALLATION INSTRUCTIONS Engineered Prefinished & Unfinished Flooring 877-582-1181 aacerflooring.com AACER FLOORING INSTALLATION INSTRUCTIONS Engineered Prefinished & Unfinished Flooring