INSTALLATION INSTRUCTIONS
|
|
|
- Martina Shana Jones
- 5 years ago
- Views:
Transcription

1 Part I INSTALLATION AND CARE: Product Description: Engineered T&G hardwood flooring planks ore designed for use in multiple locations. Acceptable location includes basements, ground floors or high-rise buildings. Engineered T&G hardwood flooring can be floating on, directly nailed or glued to a wooden or concrete sub-floor. Professional advice should be sought for the type of glue and method of glue-down installation to ensure trouble free installation. Engineered T&G hardwood flooring is made of a wear layer of solid wood lamella mounted under high pressure to produce premium quality flooring. These products are pre-finished under ideal conditions that meet or exceed industry standards. Where to install and Method to install: Site Specific - depending on the degree of levelness, firmness and soundness of the sub-floor. Sub-floor should be sound, level and free of debris. The following is as defined by NWFA Hardwood Flooring Installation Guidelines - Section V for moisture testing: Concrete moisture readings ore not to exceed 4.5% on Tromex Concrete Moisture Encounter meter. Calcium Chloride Test is not to exceed 3 lbs. per 1000 square feet in 24 hours. Plywood must be COX-rated at least 3/4 thick. OSB must be 3/4, PS2 rated, and sealed side face down. Specific installation with Radiant Heating: Engineered T&G hardwood flooring planks is suitable for multiple radiant heat system as long as the radian heated subfloor surface do not exceed 85 F (29.5 C). Page 1
2 IMPORTANT: Examine each plank carefully, Contact the dealer immediately if the material is not acceptable. Materials installed with visible defects are not covered under warranty. Manufacturer will not assume any responsibility for any materials that have already been installed. The manufacturer will not assume any liability for product damage caused by the use of unsuitable tools or the improper use of materials. Crucial Points to Remember: 1. Plan your project by making an installation sketch. Determine the installation starting point. Consider if it is one regular-shaped room; a number of rooms with landings; or rooms on one floor, including a hall or main room. Think about how to get the most out of your budget. If in doubt, ask your dealer for advice. 2. Choose the floor plank direction. It is strongly recommended that you install boards at a 45 or 900 angle to the joist direction. This is NOT applicable for installation on concrete. 3. Take precautions at all times not to damage the finish. For example, place tools on a protective mat during installation. Vacuum or sweep floor frequently to eliminate sawdust and abrasives. Do not use vacuums with beater bars or hard plastic attachments. 4. Before starting installation, cut the bottom moldings around door frames to insert the floor planks underneath. Leaving an expansion joint is necessary. This allows the wood to react to changes in ambient humidity. The expansion joint will be hidden by wood flooring moldings such as T-molding, quarter round, etc. Moldings will be nailed to the walls and not the floor. 5. Clean your floor with Bona Hardwood Floor Polish after installation, this will remove any hair-like scratch you may have cause during the installation or due to transportation. Jobsite Preparation: Laying the floor should be the last step of your installation. Prior to the delivery of your flooring, make sure that: The jobsite is properly enclosed, with all doors and windows installed Installation site are climate controlled at all time with relative humidity (RH) at 35 to 60% and temperature between 65 to 85 F ( 18.3 to 29 _5oq Concrete, plaster, paint and the sub-floor are completely dry (Always measure!) Any depressions in the sub-floor should not exceed l /8 (3.17 mm) and the floor must be level not to exceed l /8 over a 6 length ( 1860 mm) Flooring planks has been at the jobsite for at least 3 days The surface must be clean and free of all debris. Remove any glue residue and/or staples and drive in any protruding nails. Install your floor under good lighting conditions Wood Sub-floor: The sub-floor (plywood or OSB) moisture content should not exceed 12%. The difference in moisture between the sub-floor and floor planks should not be greater than 4%. Do not carry out the installation when condition not met. Wooden sub-floors must be securely screwed down to joists to prevent any movement or squeaking. Inspect the existing subfloor and replace any subfloor that exhibits signs of water damage or structural weakness. The floor of the crawl space (if there is one) is completely covered by 6-8 mil black polyethylene film and has had adequate cross ventilation Page 2
3 Concrete Sub-floor: Moisture readings must not exceed 4.5% with a moisture meter for concrete (Tramex Moisture Encounter) as defined by NWFA (National Wood Flooring Association). In the presence of moisture, perform a calcium chloride test. The moisture level measured using the calcium chloride test must not exceed 3 lb/1,000 sq. ft. /24 hours. If the reading exceeds 3 lb. but is below 7 lb., install a waterproof membrane such as Bostik MVP or equivalent. IMPORT ANT: When it comes to floor installation, moisture is an important element that should be emphasized. The installer and the homeowner are jointly responsible for checking the sub-floor moisture content. If the moisture content is too high, installation of flooring must be postponed. Never install a hardwood floor on a wooden sub-floor if a moisture test reading exceeds 12%. Any responsibility for failures or deficiencies related to job site quality is declined by the manufacturer. Installation Work: Once you are ready to install your floor planks, open a case to check that product species, grade, color, size and quality are correct. If everything is in order, then open several cartons of flooring at the same time for installation. This will allow you to balance plank length, color and variations in the grain of the wood. This will ensure that planks can be arranged to reflect a homogenous floor covering. Please advise your dealer immediately if any problems occur. Our in-house installation team could be contracted to take over the installation if required. IMPORTANT: Prior to installing the floor, the installer and the homeowner must ensure that the installation site and sub-floor meet the conditions in this document. The installer and the homeowner are responsible for inspecting floor planks prior to installing them. Depending on the type of installation, you may also need special moldings for your floor such as nosing and reducer strips. Installer is responsible to ensure the proper selection and installation of molding pieces. NAIL DOWN INSTALLATION Nail installation is only used with PS-2 rated oriented strand board (OSB) or plywood sub-floors. Manufacturer recommends using 3/4 (18 mm) OSB or plywood on joists spaced no more than 19.2 (450 mm) apart, center-to center. OSB or plywood must be structurally sound. Recommended tools 1. Moisture Meter 2. Hardwood Flooring Cleat-Nailer with ½ adapter plate (L-cleats only) 3. Chalk reel, Tape measure, Speed Square 4. Hammer, Pull bar, Knocking block 5. Electric Drill and 3/32 bit, Floor Screw 6. Finishing spiral nails, and nail set 7. Use non-tarred felt paper on sub-floor surface to reduce normal mechanical friction, and a 6 mil. Poly sheeting, if additional moisture protection is required. 8. Electric saw or Hand saw Page 3
 over a distance of 6 (1830 mm). Eliminate small surface irregularities with a sander or floor leveler.")
4 Preparing and leveling the sub-floor: The sub-floor must be firmly fixed to the joists to avoid any panel movement that could cause creaking. Use flooring screws if necessary to prevent creaking. The sub-floor surface must be level. The difference in level must not exceed 3/16 (5 mm) over a distance of 6 (1830 mm). Eliminate small surface irregularities with a sander or floor leveler. The surface must be clean. Remove glue residue and staples, and drive in protruding nails. Remove debris and dust with a broom or vacuum. It is recommended that you use non-tarred felt paper on the sub-floor surface to reduce normal mechanical friction between materials and facilitate installation. Lay the felt paper in the direction of the boards using staples, overlapping the ends by 3 to 4. Drive in staples. Using the nailer: Practice using the floor nailer on a scrap plank. Follow the safety tips and instructions of the nailer manufacturer. Clean the nail base plate regularly to ensure it does not damage the finish. If you are using a pneumatic nailer, adjust the compressor air pressure for the hardness of the species and to insure proper nail placement in tongue (about psi). Follow the safety tips and instructions of the nailer manufacturer. Nail Down Installation Steps: Page 4
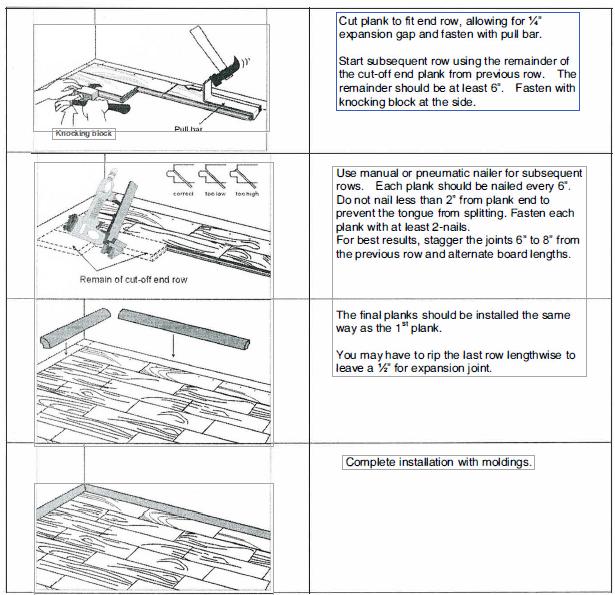
5 Page 5
6 Glue Down Installation Engineered T&G hardwood flooring can be glued directly to a concrete sub-floor, wood sub-floor, or terrazzo on the ground floor and second floor. Must not be installed over any type of vinyl; vinyl must be removed. Subfloor must be free of wax, paint, oil and debris. Terrazzo floors must be cleaned and stripped of all polishes. Recommended tools 1. Moisture Meter 2. Bostik BEST or equivalent moisture-cured urethane adhesive 3. Bostik MVP moisture barrier (if required) 4. Notched Trowel--follow Glue Manufacturer s guidelines for recommended size 5. Bostik Ultimate Adhesive remover or wipes 6. Guide Strip, Chalk reel, Tape measure, Speed square 7. Hammer, Pull bar, Knocking block 8. Flooring straps lb Roller 10. Electric saw or Hand saw IMPORT ANT: Do not apply any tape to the surface of your floor at any time during installation, or thereafter. This includes special tapes that say they are made for wood flooring. Preparing and leveling the sub-floor: The sub-floor should be free of any surface defect. If it is not, fill gaps with a Portland-based leveling cement (for concrete floors only) or sand down uneven areas. The sub-floor must be level, i.e., a slope of no more than 3/16 (5 mm) over 10 (3048 mm). The surface must be clean and free of debris and contaminants such as wax, paint, grease, dust, oil, nails, staples, etc For concrete installation, ensure that the concrete is not low-density (below 3000 psi) or friable. Page 6

7 Glue Down Installation Steps: Page 7

8 Page 8

9 IMPORTANT: During Installation, immediately wipe any adhesive from the floor surface using Bostik s Ultimate solvent and/or wipes. Floating Installation Engineered T&G hardwood floor is suitable for floating installation at any grade level, be it above grade, on grade or even below grade onto a concrete sub-floor, wood sub-floor, ceramic tiling, or linoleum with proper site preparation. Recommended tools 1. Moisture Meter 2. 6 mil. Polyfilm and Foam underlayment OR 2-in-1 foam underlayment 3. Poly or Duct tape 4. Titebond Tongue & Groove wood glue 5. Flooring straps, Expansion Spacers, Chalk reel, Tape measure, Speed Square 6. Hammer, Pull bar, Tapping block 7. Electric saw or Hand saw Preparing and leveling the sub-floor: The sub-floor must be level, i.e., a slope of no more than 3/16 (5 mm) over 10 (3048 mm). The surface should be clean and free of particles. If below grade, lay a 6-mil Polyfilm with seams overlapping 8 {200 mm). Fasten seams every 18 to 24 (450 to 600 mm) with duct tape or poly tape. Run 4 {100 mm) of poly-film up against the perimeter of wall. Lay foam underlayment by butting edges and duct tape the full length of the seam. Floating Installation Steps: Page 9
10 Page 10

11 IMPORT ANT: During Installation, immediately wipe any adhesive from the floor surface. Part II MAINTENANCE & CARE Finishing & Maintenance: You can hide the small holes left by finishing nails with wood putty. 1. Fill the hole. 2. Wipe excess wood putty immediately with a clean cloth and cleaner. 3. Apply a thin coat of urethane to the clean surface of the putty. 4. Let it dry for about 1 hour. Regular Maintenance: Clean your wood floors with a damp cloth or terrycloth mop/applicator. Wipe in the direction of the grain (length of the boards). Waxing is NOT recommended. Dust mop or vacuum your wood floor as needed. Never wet-mop or flood your floor with water. Never use cleaners that contain oil soaps or surfactants. Set up precautions and a regular maintenance program depending on your specific traffic conditions. Preventive Maintenance: Install floor protectors on all furniture legs, especially if the piece has the potential of moving on the wood. Make sure you use the correct size and pad thickness for the weight and size of the furniture. Cleon one replace felt pods yearly or sooner if they ore thinning out or damaged. Gritty sand and dirt are abrasive to wood floors. Use protective mots at doorways. Use rugs (non-rubber-back) in high traffic areas such as at all exterior doors, in front of refrigerators, dishwashers and sinks. Keep floors clean and free of dirt & sand. Dust mop and/or vacuum os needed. Do not use a vacuum that hos a beater bar, metal wheels, and/or metal or hard plastic attachments. It is best to use felt or fine brush attachments. Make sure plastic wheels are free of dirt Page 11
12 . prior to vacuuming. Wipe up spills immediately. NEVER clean your floor with water or cleaners that mix with water. NEVER clean clean your floors with excessive water. NEVER use furniture duster sprays on wood floors. NEVER use cleaners that contain oil soaps or surfactants. NEVER use a Sharp Steamer or any other type of steam cleaning machine on wood floors. Some types of high heel shoes may cause indentations in wood floors. High-heels worn by an c:veroge wcman con exert 8,000 pounds per square inch! All dogs, especially large dogs, will cause scratches and dents in o wood floor. Page 12
Engineered Hardwood Flooring Installation Instructions
 Engineered Hardwood Flooring Installation Instructions 1 Important Information before You Begin 1.1 Installer/Owner Responsibility Carefully inspect all materials before installation. Materials installed
Installation Instructions for Viking Hearth Engineered Wood Flooring
 Installation Instructions for Viking Hearth Engineered Wood Flooring 4.16.15 PLEASE READ THESE INSTRUCTIONS IN THEIR ENTIERTY BEFORE BEGINNING THE INSTALLATION. Installer s / Owners Responsibility As a
Installation Instructions for Engineered Wood Flooring
 Installation Instructions for Engineered Wood Flooring PLEASE READ THESE INSTRUCTIONS IN THEIR ENTIERTY BEFORE BEGINNING THE INSTALLATION. Installer s / Owners Responsibility As a natural product, hardwood
READ PRIOR TO BEGINNING INSTALLATION
 READ PRIOR TO BEGINNING INSTALLATION Bella Cera La Palazzina Engineered Hardwood Flooring Installation Instructions Check for Proper Color Selection Prior to Installation 1 Important Information before
INSTALLATION. Installer / Owner Responsibility. Basic Tools and Equipment. Putty and Filler Use. Recommended Installation Methods
 Installer / Owner Responsibility Carefully inspect all materials before installation. Materials installed with visible defects are not covered under the warranty. Do not install if you are not satisfied
Engineered Hardwood Installation
 Engineered Hardwood Installation Installer / Owner Responsibility Carefully inspect all materials before installation. Materials installed with visible defects are not covered under the warranty. Do not
INSTALLATION. GlUElEss CliCK BamBoo installation GUidE. Introduction. Tips for a successful installation
 GlUElEss CliCK BamBoo installation GUidE Introduction Thank you for purchasing a Yanchi Bamboo Floor! Our flooring combines superior technology and the highest quality materials available so that your
Engineered Hardwood Installation
 Engineered Hardwood Installation Installer / Owner Responsibility Carefully inspect all materials before installation. Materials installed with visible defects are not covered under the warranty. Do not
SINCE 1995 HYBRID / LOFT / MANOR LINE INSTALLATION GUIDE
 HYBRID / LOFT / MANOR LINE INSTALLATION GUIDE We strive to offer our customers the highest quality bamboo flooring. Please carefully read this installation guide to ensure satisfactory results from your
INSTALLATION GUIDE FOR MAZAMA MULBERRYWOOD HARDWOOD FLOORING
 INSTALLATION GUIDE FOR MAZAMA MULBERRYWOOD HARDWOOD FLOORING READ COMPLETELY BEFORE STARTING INSTALLATION. Congratulations on choosing Mulberrywood flooring. Please take time to read the following procedures
INSTALLATION INSTRUCTIONS FOR ENGINEERED WOOD
 INSTALLATION INSTRUCTIONS FOR ENGINEERED WOOD Glue, Staple/Nail Down, or Floating Installation: ENGINEERED WOODS can be installed over most sub floors, and are engineered to be very dimensionally stable,
INSTALLATION. Installation Guide. Installing Bamboo Flooring on Top of a Wood Subfloor
 READ COMPLETELY BEFORE STARTING INSTALLATION. Congratulations on choosing Yanchi bamboo flooring. Please take time to read the following procedures before you begin installation. With the correct installation
TORLYS LEATHER PLANK INSTALLATION INSTRUCTIONS
 ENGLISH INSTRUCTIONS TORLYS LEATHER PLANK INSTALLATION INSTRUCTIONS Dear Customer, You have chosen a high quality TORLYS Leather floor, well suited for all residential application except bathrooms and
Engineered Strand Uniclic Floating Installation
 Engineered Strand Uniclic Floating Installation Introduction Thank you for choosing our Engineered Strand Bamboo Flooring! You have selected one of the highest quality engineered floors available. Our
Pompeii Birch & Hickory Engineered Hardwood Flooring Installation Instructions
 Pompeii Birch & Hickory Engineered Hardwood Flooring Installation Instructions Tip: Check for proper color selection and style prior to Installation. No claims will be accepted after installation. 1 Important
Nail-Down Installation Instructions Prefinished 3/4 and 5/8 solid
 Nail-Down Installation Instructions Prefinished 3/4 and 5/8 solid Thank you for choosing 3 4 or 5 8 Exotic Hardwood Flooring. Protect your investment; review and adhere to the flooring installation instructions.
BOIS CHAMOIS VINTAGE HARDWOOD FLOORING
 Professional Installation Recommended Nail-Down Installation Instructions Solid 3/4 x 7 x Random Length (6 10 ) Thank you for choosing Bois Chamois Vintage Hardwood Flooring. Protect your investment; thoroughly
Columbia Laminate Installation Instructions
 Columbia Laminate Installation Instructions 1. General Uniclic is a revolutionary system for installing laminated flooring without using glue. Uniclic uses an ingenious form of tongue and groove to click
Loose Lay Luxury Vinyl Plank
 Loose Lay Luxury Vinyl Plank FLEX COLLECTION Installation & maintenance * PLEASE READ CAREFULLY * Installation, maintenance & warranty guideline for loose lay luxury vinyl products. Adherence to This guideline
Installation Guide. When purchasing Aboeda flooring, add 5%-15% to actual square footage needed for cutting allowance.
 Installer/Owner Responsibility Aboeda strives to offer its customers high quality hardwood flooring. Please carefully read this installation guide to ensure satisfactory results from your floor. Carefully
Engineered Installation Instructions
 Engineered Installation Instructions Thank you for choosing STRAVAGANZA products! Hardwood flooring is a natural product; therefore defects in the flooring can occur in the manufacturing process or naturally
TONGUE & GROOVE NAIL-DOWN INSTALLATION INSTRUCTIONS
 FEBRUARY 2017 TONGUE & GROOVE NAIL-DOWN INSTALLATION INSTRUCTIONS Applicable to: Kahrs Supreme 20mm 3/4 Grande Collection Only PROTECT YOUR INVESTMENT! Maintain your warranty: Only use Kährs branded underlayments,
Installation Instructions FOR INTERLOCKING ENGINEERED HARDWOOD (P.1)
") Installation Instructions FOR INTERLOCKING ENGINEERED HARDWOOD (P.1) Glue or Floating Installation: INTERLOCKING ENGINEERED WOODS can be installed over most sub-fl oors, and are engineered to be very dimensionally
Installation Instructions FOR INTERLOCKING ENGINEERED HARDWOOD (P.1) Glue or Floating Installation: INTERLOCKING ENGINEERED WOODS can be installed over most sub-fl oors, and are engineered to be very dimensionally
FITTING INSTRUCTIONS FOR OFD SOLID OAK FLOORING
 FITTING INSTRUCTIONS FOR OFD SOLID OAK FLOORING SECTION 1 Installers Responsibility Pre-Installation SECTION 2 Glue Down (Solid & Engineered Flooring) SECTION 3 Secret Nailing (Solid & Engineered Flooring)
Prior to installation, the installer assumes all responsibility for final inspection and quality of the product
 Mae Terra Hardwood Installation Instructions ¾ Solid Nail Down Protect your investment. Review and adhere to the flooring installation instructions. Please note that these are instructions for the experienced
INSTALLATION INSTRUCTIONS ECOfusion 1/2 & 3/8 Engineered Hardwood Flooring
 INSTALLATION INSTRUCTIONS ECOfusion 1/2 & 3/8 Engineered Hardwood Flooring PLEASE READ THOROUGHLY BEFORE BEGINNING INSTALLATION. THESE INSTALLATION INSTRUCTIONS ARE SPECIFICALLY INTENDED FOR USE WITH ECOFUSION
INSTALLATION INSTRUCTIONS
 FLOATING-FLOOR APPLICATION INSTRUCTIONS Thank you for choosing Vanier Hardwood Flooring. Protect your investment. Review and adhere to the flooring installation instructions. Please note that these are
Installation Information
 Add for glue-down: Recommended Boardbrokers adhesive. Add for staple or nail-down: 1 1/2 staples or cleats (minimum), power nail model # 45 or compressor, in-line regulator, nylon/plastic tapping block,
Lifestyle Laminates Uniclic Floating Floor
 Lifestyle Laminates Uniclic Floating Floor Thank you for choosing Wellmade Laminate Flooring, featuring the glue-less Uniclic floating installation system. You have selected one of the highest quality
Trendwood Flooring Installation Instructions
 Trendwood Flooring Installation Instructions READ ALL OF THESE INSTRUCTIONS THOROUGHLY BEFORE BEGINNING INSTALLATION. Flooring Installation Instructions PRIOR TO INSTALLATION It is the installer's responsibility
SOLID STRAND BAMBOO INSTALLATION GUIDE. Tips for a successful installation
 SOLID STRAND BAMBOO INSTALLATION GUIDE Please keep in mind that all hardwood flooring will scratch, dent, and change color over time. Therefore, you will need to decide if hardwood is suitable for your
¾ Solid Installation Instructions
 ¾ Solid Installation Instructions Thank you for choosing STRAVAGANZA products! Hardwood flooring is a natural product; therefore defects in the flooring can occur in the manufacturing process or naturally
Engineered Strand Bamboo Flooring
 Engineered Strand Bamboo Flooring Introduction Thank you for choosing Wellmade Engineered Strand Bamboo! You have selected one of the highest quality engineered floors available. Our engineered flooring
TRIVERSA TRIVERSA ID. Triversa Triversa ID Installation Instructions. Remove the wall base and doorway trim. Always undercut wood door casings
 INSTALL ON ALL GRADE LEVELS Above Grade On Grade Below Grade by CONGOLEUM TRIVERSA TRIVERSA ID Triversa Triversa ID Installation Instructions GENERAL INFORMATION ATTENTION! READ BEFORE INSTALLING! Handle
BOIS CHAMOIS VINTAGE HARDWOOD FLOORING
 Professional Installation Recommended Glue Down Installation Instructions Solid or Engineered 5/8 or 3/4 Thank you for choosing Bois Chamois Vintage Hardwood Flooring. Protect your investment; thoroughly
For ANGLE-DROP Styles
 For ANGLE-DROP Styles BEFORE INSTALLATION: 1. READ THESE DETAILED INSTALLATION INSTRUCTIONS. 2. Material and tool requirements: - Estimate square footage and add 10%. - Select underlayment (over concrete
Installation, Care, Maintenance Windsor Park
 Installation, Care, Maintenance Windsor Park Windsor Park Engineered Hardwood Flooring Installation Instructions Tip: Check for proper color selection and style prior to Installation. No claims will be
WATER AND WOOD DON T MIX KEEPING YOUR TRIÂNGULO HARDWOOD FLOOR BEAUTIFUL SCRATCHES, INDENTATIONS AND GOUGES
 WATER AND WOOD DON T MIX Using any of the following items to maintain your wood floor will void all manufacturer warranties! Water Oil Soap Vinegar, Ammonia Household Detergent Wax Furniture Polish Dust
Wood Molding Installation Guide
 Wood Molding Installation Guide 1 P age Estimating the Quantity of Molding Required for the Job. Calculate the following: 1. Total lineal feet of Wall Base required for the job: Lineal feet 2. Total lineal
DuChâteau Vinyl DeLuxe Grand Collection LuxCor Click Installation Instructions
 DuChâteau Vinyl DeLuxe Grand Collection LuxCor Click Installation Instructions General Information Intended for indoor residential and commercial use only, DuChâteau Vinyl DeLuxe Grand Collection - Luxcor
Solid Installation Guidelines Elegance Plyquet
 Solid Installation Guidelines Elegance Plyquet Structure and Finish Warranty: Elegance Plyquet makes exceptionally high quality prefinished exotic and domestic solid hardwood floors. We are proud to warranty
installation Prefinished 3/4 solid (including various widths such as 3 1/4, 3 5/8, 4 3/4, 5 ) naildown installation instructions
 naildown installation instructions") Prefinished 3/4 solid (including various widths such as 3 1/4, 3 5/8, 4 3/4, 5 ) naildown installation instructions Thank you for choosing Jasper Floors Exotic Hardwood Flooring. Jasper Floors feature
Prefinished 3/4 solid (including various widths such as 3 1/4, 3 5/8, 4 3/4, 5 ) naildown installation instructions Thank you for choosing Jasper Floors Exotic Hardwood Flooring. Jasper Floors feature
General Installation Instructions
 General Installation Instructions Good web sites to check out that may assist you are: For gluing engineered boards over timber chipboard/particle board/ yellow tongue: https://www.youtube.com/watch?v=bpyfr373tl8
INSTALLATION GUIDE; ENGINEERED & HARDWOOD FLOORING (COMMERCIAL & RECLAIMED)
") INSTALLATION GUIDE; ENGINEERED & HARDWOOD FLOORING (COMMERCIAL & RECLAIMED) ATTENTION! INSTALLER/OWNER RESPONSIBILITIES Beautiful hardwood floors are a product of nature and, therefore, they will show
INSTALLATION GUIDE; ENGINEERED & HARDWOOD FLOORING (COMMERCIAL & RECLAIMED) ATTENTION! INSTALLER/OWNER RESPONSIBILITIES Beautiful hardwood floors are a product of nature and, therefore, they will show
INSTALLATION INSTRUCTIONS
 GLUE DOWN APPLICATION INSTRUCTIONS Thank you for choosing Vanier Hardwood Flooring. Protect your investment. Review and adhere to the flooring installation instructions. Please note that these are instructions
ENGINEERED WOOD INSTALLATION GUIDE: The Cardinal Collection
 ENGINEERED WOOD INSTALLATION GUIDE: The Cardinal Collection READ BEFORE INSTALLATION OF OILED FINISHED FLOORING DO S 1. Do mix wood from several boxes of flooring during installation. 2. Do make your best
Royal Collection. Installation Guidelines
 Royal Collection Installation Guidelines Congratulation! Thank you for purchasing TEKA pre-finished engineered hardwood flooring. You made the right choice for the right product. Manufacture only real
Installation Instructions Floating-Floor Application Thank you for choosing Indusparquet Hardwood Flooring (IP)
") Installation Instructions Floating-Floor Application Thank you for choosing Indusparquet Hardwood Flooring (IP) Protect your investment. Review and adhere to the flooring installation instructions. Please
Installation Instructions Floating-Floor Application Thank you for choosing Indusparquet Hardwood Flooring (IP) Protect your investment. Review and adhere to the flooring installation instructions. Please
installation PreFinished 3/8, 1/2 and 9/16 engineered staple, glue-down and Floating installation instructions
 PreFinished 3/8, 1/2 and 9/16 engineered staple, glue-down and Floating instructions Thank you for choosing Vanier Floors! Our line features exotic species that bring a world of distinctive beauty and
ENGINEERED TONGUE & GROOVE INSTALLATION INSTRUCTIONS 3/8, 7/16, 1/2, 9/16, 5/8, 3/4 Float-In / Glue-Down / Nail Down
 ENGINEERED TONGUE & GROOVE INSTALLATION INSTRUCTIONS 3/8, 7/16, 1/2, 9/16, 5/8, 3/4 Float-In / Glue-Down / Nail Down Important / Read First Please read and review installation instructions completely before
Staple-Down, Glue-Down and Floating Installation IndusParquet 1/2 Engineered
 Staple-Down, Glue-Down and Floating Installation IndusParquet 1/2 Engineered Thank you for choosing IndusParquet ½ Engineered Hardwood Flooring. Protect your investment; review and adhere to the flooring
Glue-Down and Floating Installation IndusParquet 5/16 Engineered
 Glue-Down and Floating Installation IndusParquet 5/16 Engineered Thank you for choosing IndusParquet 5/16 Engineered Hardwood Flooring. Protect your investment; review and adhere to the flooring installation
1. Read all instructions/warranty first: Get all your questions answered before you start installing the floor by calling
 STRAND WOVEN BAMBOO INSTALLATION GUIDE Please keep in mind that all hardwood flooring will scratch, dent, and change color over time. Therefore, you will need to decide if hardwood is suitable for your
Kraus Engineered Luxury Vinyl Plank 5G Insta-Loc Click Installation Instructions
 Kraus Engineered Luxury Vinyl Plank 5G Insta-Loc Click Installation Instructions GENERAL GUIDELINES All instructions and recommendations are based on the most recent information available. They should
WOOD INSTALLATION GUIDE
 WOOD INSTALLATION GUIDE WOOD INSTALLATION DEFINITION FLOOR PREPARATION UNDERLAYMENT INSTALLATION MOULDINGS TOOLS NEEDED WHAT IS WOOD FLOORING? WOOD COMES IN A VARIETY OF SIZES, COLORS, SHADES AND INSTALLATION
Quest ¾ and 5/8 Solid Installation Instructions
 Quest ¾ and 5/8 Solid Installation Instructions ATTENTION INSTALLER Please read carefully before installing the product. Make sure to follow our installation instructions and acclimatization recommendations
CFS Engineered Flooring Floating Installation Instructions
 CFS Engineered Flooring Floating Installation Instructions CFS s stable engineered hardwood floors are natural products and as a result are not perfect. All of the floors CFS manufactures are in accordance
B e l l e F l o o r INSTALLATION GUIDE INSTALLER/OWNER RESPONSIBILITY
 B e l l e F l o o r INSTALLATION GUIDE INSTALLER/OWNER RESPONSIBILITY BELLEFLOOR Engineered Hardwood Floors are manufactured by WoodWalk International Co., Ltd. to meet the highest standard for quality
BAMBOO FLOORING PRE-FINISHED SOLID BAMBOO INSTALLATION GUIDE
 BAMBOO FLOORING PRE-FINISHED SOLID BAMBOO INSTALLATION GUIDE PLEASE READ AND REVIEW THE ENTIRE INSTALLATION GUIDE BEFORE PROCEEDING WITH THE ACTUAL INSTALLATION IMPORTANT NOTICE: HOME LEGEND strongly recommends
INSTALLATION INSTRUCTIONS FOR ELKALAMINATE. IN ORDER TO OBTAIN A GOOD RESULT, WE ADVISE TO FOLLOW ALL GIVEN INSTRUCTIONS CAREFULLY.
 INSTALLATION INSTRUCTIONS FOR ELKALAMINATE. IN ORDER TO OBTAIN A GOOD RESULT, WE ADVISE TO FOLLOW ALL GIVEN INSTRUCTIONS CAREFULLY. PREPARATION Let the planks acclimatize for 48 hours in the unopened packaging
Laminate Floor Installation Guide
 Laminate Floor Installation Guide Introduction This guide will take you through the necessary steps to install your Bel-Air Laminate Flooring. Make sure to carefully read through this guide so that you
Installation Instructions Glue-Down Application Thank you for choosing Indusparquet Hardwood Flooring (IP)
") Installation Instructions Glue-Down Application Thank you for choosing Indusparquet Hardwood Flooring (IP) Protect your investment. Review and adhere to the flooring installation instructions. Please note
Installation Instructions Glue-Down Application Thank you for choosing Indusparquet Hardwood Flooring (IP) Protect your investment. Review and adhere to the flooring installation instructions. Please note
INSTALLATION INSTRUCTIONS FOR QUICK-STEP LAMINATE WITH HYDROSEAL TECHNOLOGY.
 . PREPARATION. INSTALLATION. FINISHING. MAINTENANCE INSTALLATION INSTRUCTIONS FOR QUICK-STEP LAMINATE WITH HYDROSEAL TECHNOLOGY. IN ORDER TO OBTAIN A GOOD RESULT, WE ADVISE TO FOLLOW ALL GIVEN INSTRUCTIONS
INSTALLATION GUIDE.
 INSTALLATION GUIDE Hardwood floors are a product of nature and therefore not entirely free of typical timber features such as grain variation and knots. Every piece of wood has different grain, colour
DL HARDWOOD FLOOR INSTALLATION INSTRUCTIONS CARE AND MAINTENANCE:
 CARE AND MAINTENANCE: DL HARDWOOD FLOOR INSTALLATION INSTRUCTIONS REGULAR CARE AND MAINTENANCE: Regular cleaning and sweeping of sand and dirt will be required to maintain your new DiamondLiving flooring
Please read and review installation instructions completely before proceeding with the actual installation.
 INSTALLATION INSTRUCTIONS Important / Read First Please read and review installation instructions completely before proceeding with the actual installation. Owner / Installer responsibility The installer
AquaGuard - Water Resistant Flooring Installation guidelines
 AquaGuard - Water Resistant Flooring Installation guidelines Before You Start: Please read all the instructions before you begin the installation. Improper installation will void the warranty. Important
Landscape Collection
 Landscape Collection Installation Guidelines READ BEFORE INSTALLATION OF OILED FINISHED FLOORING We are providing a brief explanation of the Do s and Do Not s during and shortly after installation. DO
3/9 HANDLING AND STORING LOCATION TOOLS AND MATERIAL REQUIRED ABOUT INSTALLATION
 HANDLING AND STORING Hardwood is a natural living material, which reacts to changes of relative humidity. It absorbs and releases moisture before and after it is installed, depending on the variations
INSTALLATION INSTRUCTIONS
 INSTALLATION UV-OILED STRUCTURED FLOORING Please read all of these instructions thoroughly before beginning installation. In addition to these instructions, we recommend that the installer follow all installation
INSTALLATION INSTRUCTIONS of Chevron and Herringbone Engineered Hardwood Flooring
 INSTALLATION INSTRUCTIONS of Chevron and Herringbone Engineered Hardwood Flooring www.tomson-floors.com TABLE OF CONTENTS 3 USING THE PRODUCT 3 YOUR RESPONSIBILITIES 4 PRE-INSTALLATION INSPECTION 5 BASIC
Strand Woven Bamboo Flooring
 Bamboo Warehouse Product Guide Series: Strand Woven Bamboo Flooring Bamboo Warehouse s Strand Woven Bamboo Flooring is:» Eco-friendly» Water resistant» Scratch resistant» Cost effective» Hypo-allergenic»
Engineered Prefinished & Unfinished Flooring
 AACER FLOORING INSTALLATION INSTRUCTIONS Engineered Prefinished & Unfinished Flooring 877-582-1181 aacerflooring.com AACER FLOORING INSTALLATION INSTRUCTIONS Engineered Prefinished & Unfinished Flooring
DESIGNER EDITION L EXINGTON
 DESIGNER EDITION L EXINGTON U.S. GREEN BUILDING COUNCIL R COMMERCIAL GRADE FINISH High performance finish is ideally suited for high traffic commercial areas, thanks to the abrasion resistant and anti-microbial
Glueless Laminate Installation Instructions
 2nd FLOOR 1st FLOOR BASEMENT Glueless Laminate Installation Instructions! CAUTION: WOOD DUST ing, sanding, and/or machining of wood products can produce wood dust that can cause respiratory, eye, and skin
TOOLS AND/OR ACCESSORIES NEEDED: NAIL/STAPLE-DOWN INSTALLATION
 http://www.simplefloors.com Artisan : 3/4 Exotic Imports Passport Collection 2 Hardwood Installation Instructions Beautiful, exotic hardwood floors are natural products and as a result are not perfect.
INSTALLER / OWNER RESPONSIBILITIES
 www.mainetraditionsflooring.com TM HARDWOOD FLOORING Crafted by Kennebec Lumber Company INSTALLER / OWNER RESPONSIBILITIES Common Facts / Issues Hardwood floors are made from beautiful trees that each
Lifetime Floors Engineered Flooring Installation Instructions
 READ ALL OF THESE INSTRUCTIONS THOROUGHLY BEFORE BEGINNING INSTALLATION. IN ADDITION TO THESE INSTRUCTIONS, WE RECOMMEND THAT THE INSTALLER FOLLOW ALL INSTALLATION GUIDELINES SET FORTH BY THE NATIONAL
¾ Solid Hardwood Flooring Installation Information
 ¾ Solid Hardwood Flooring Installation Information! ATTN: INSTALLERS Caution: Wood Dust Sawing, sanding and machining wood products can produce wood dust. Airborne wood dust can cause respiratory, skin
installation guide TASMANIAN HARDWOOD OVERLAY FLOORING
 TASMANIAN HARDWOOD OVERLAY FLOORING installation guide These instructions apply to quality Tasmanian strip flooring used as an overlay on a structural substrate in residential applications. nail glue SHEET
English Professional Installation Guidelines
 Professional Installation Guidelines General Installation Instructions NOTE: After proper acclimation, open cartons just prior to installation. NOTE: Mannington Laminate Flooring is intended to be installed
STOP BEFORE YOU START
 STOP Please inspect product for color, finish, quality and style BEFORE installing any material. SLCC Enterprise, Inc. warranty DOES NOT cover materials with visible defects once they have been installed.
Artisan World Imports Terre Verte 1/2 Engineered Hardwood Installation Instructions
 http://www.simplefloors. com/ Artisan World Imports Terre Verte 1/2 Engineered Hardwood Installation Instructions Beautiful, exotic hardwood floors are natural products and as a result are not perfect.
IMPORTANT NOTES ABOUT YOUR FLOORING PLEASE READ BEFORE INSTALLING INSTALLATION & MAINTENANCE FOR ENGINNERED HERRINGBONE
 IMPORTANT NOTES ABOUT YOUR FLOORING PLEASE READ BEFORE INSTALLING INSTALLATION & MAINTENANCE FOR ENGINNERED HERRINGBONE ACCLIMATIZATION AND STORAGE Your new flooring has to be acclimatized before installation,
Manufacturer 12mm Laminate Flooring Installation Guidelines
 Manufacturer 12mm Laminate Flooring Installation Guidelines IMPORTANT Do not open immediately. Before opening, acclimatize planks for 48 hours by laying each box horizontally and individually in the center
V3 Engineered Flooring- Installation Instructions
 V3 Engineered Flooring- Installation Instructions Installation Options V3 Engineered Flooring is designed to be installed several ways. 1. Straight Nail down 2. Straight Glue down 3. Glue and Nail down
Engineered Wood Flooring Installation Guidelines
 Engineered Wood Flooring Installation Guidelines READ ENTIRE INSTALLATION GUIDELINES BEFORE PROCEEDING WITH THIS INSTALLATION. ALL WORK SHOULD BE PERFORMED IN ACCORDANCE WITH NWFA (National Wood Flooring
For best results, it is essential that you follow the installation instructions exactly.
 For best results, it is essential that you follow the installation instructions exactly. PREPRTION Let the planks acclimatize for 48 hours in the unopened packaging at the normal room temperature, in the
INSTALLATION GUIDE. Preparation
 INSTALLATION GUIDE The investment that flooring represents in the home is an important one and customers want their flooring to last. In light of this fact, the importance of product quality and the quality
INSTALLATION INSTRUCTIONS FOR QUICK-STEP LAMINATE.
 . PREPARATION. INSTALLATION. FINISHING. MAINTENANCE INSTALLATION INSTRUCTIONS FOR QUICK-STEP LAMINATE. IN ORDER TO OBTAIN A GOOD RESULT, WE ADVISE TO FOLLOW ALL GIVEN INSTRUCTIONS CAREFULLY. - 0-% RH 8h
PLEASE READ THESE INSTRUCTIONS COMPLETELY BEFORE BEGINNING THE INSTALLATION.
 PLEASE READ THESE INSTRUCTIONS COMPLETELY BEFORE BEGINNING THE INSTALLATION. PurParket fl oors must be installed in accordance with the following instructions. Failure to do so may void the product warranty.
Install your floor between 18 and 30 C.
 GOLDEN RULES 8-0 C Install your floor between 8 and 0 C. Quick-Step Livyn must be acclimatized in the room of installation between 8-0 C for a period of at least 8 hours before installation. This floor
ARTISTIC FINISHES. The Artistic Touch TM. Installation and Maintenance Guide. Copyright 1999 Artistic Finishes, Inc. All rights reserved.
 ARTISTIC FINISHES The Artistic Touch TM Installation and Maintenance Guide Estimating the quantity of molding required for the job Calculate the following: 1. Total lineal feet of Wall Base required for
INSTALLATION GUIDE SOLID HARDWOOD FLOORING
 Laurentian Hardwood Canadian Heritage Series INSTALLATION GUIDE SOLID HARDWOOD FLOORING The investment that flooring represents in the home is an important one. Customers want their flooring to last. In
Installation Manual. Installation for Solid OAK Flooring: Before Installation
 Installation Manual Installation for Solid OAK Flooring: OAK flooring, when properly installed, is a beautiful durable floor-covering material. OAK flooring is manufactured with a moisture content range
Carmel Bay & Touch of Euro Engineered Floors - Installation Instructions
 Carmel Bay & Touch of Euro Engineered Floors - Installation Instructions OWNER/INSTALLATION TECHNICIAN RESPONSIBILITIES: Order Quantity: When the flooring is ordered, a minimum of 5% (recommended 7% -
ENGINEERED TONGUE & GROOVE
 ENGINEERED TONGUE & GROOVE Multi-layer & OSB core INSTALLATION INSTRUCTIONS 7/16, 1/2, 9/16, 5/8 Float-in / Glue-Down / Nail or Staple IMPORTANT INFORMATION BEFORE YOU BEGIN Please read and review installation
L ARTISTE INSTALLATION GUIDELINES
 B. PRE INSTALLATION/JOBSITE REQUIREMENTS ACCLIMATION IS CRITICAL Allow floors to acclimate to the appropriate jobsite conditions. Proper acclimation is particularly important in extremely dry climates
Please Read All Instructions, Carefully, Before You Begin Installation. Improper Installation Will Void Warranty
 1. Read enclosed detailed installation instructions before beginning install. 2. A flat subfloor is a must! 3. Proper moisture testing is a must! 4. Proper expansion around all permanent structures is
INSTALLATION GUIDE. Preparation The environment
 INSTALLATION GUIDE PG-MODEL HARDWOOD FLOORING The investment that ing represents in the home is an important one and customers want their ing to last. In light of this fact, the importance of product quality