Columbia Laminate Installation Instructions
|
|
|
- Bruce Montgomery
- 6 years ago
- Views:
Transcription

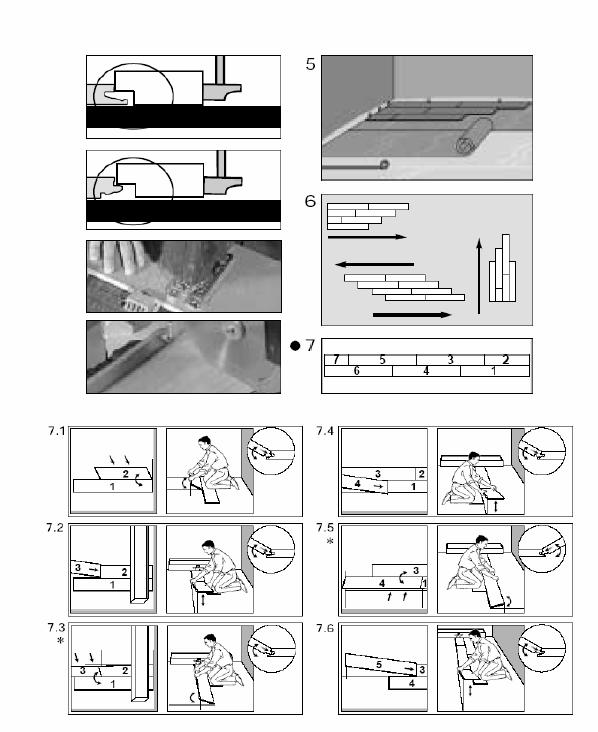
1 Columbia Laminate Installation Instructions 1. General Uniclic is a revolutionary system for installing laminated flooring without using glue. Uniclic uses an ingenious form of tongue and groove to click the panels together. The Uniclic system enables you to work 50% faster than with traditional, glued laminated flooring. Because there is no glue, Uniclic is much easier and cleaner to work with. You can join together the panels of the Uniclic system in 2 different ways: A The panels can be rotated to fit into one another, with either the tongue into the groove, or the groove on to the tongue. The easiest way, though, is to fit the tongue into the groove. (The installation instructions are based on using the last technique as much as possible. Fitting the groove on to the tongue is only required in a few specific situations). Position the panel to be installed at an angle of to the panel already installed. Move the panel to be fitted slightly up and down at the same time as exerting forward pressure. The panels will then click into place together. B In some cases, the panels cannot be rotated into one another, for example under a door frame. In this case, the panels can also be fitted installing flat. IMPORTANT! To do this, you need a hammer and the special Columbia Laminate tapping block. DO NOT USE ANY OTHER TAPPING BLOCK - otherwise you may damage the panels to be fitted. You should not attempt to knock the Uniclic joint into place with one hit. For the short edge, use a number of smaller taps until the panels click together completely. For the long edge, you should tap them together gradually: begin tapping lightly at the corner of a panel until the panels are fully engaged being careful not to over tap and damage edges. Then repeat the process some 30 cm (12 ) along until the entire long edge of the panel has clicked in with the other. For the best results, it is absolutely vital to follow the installation instructions to the letter and TO USE Columbia Laminate ACCESSORIES ONLY, i.e. Columbia Laminate is not suitable for use in damp areas such as bathrooms and saunas. Check the panels from all packs before and during installation. Defective panels should not be installed.
2 2. Tools for installing the floor In addition to the traditional tools for installing laminated flooring, such as hammer, saw, crowbar or pinch bar with protruding edge (to be tapped on with a hammer), and spacer blocks, it is absolutely vital to use the Columbia Laminate TAPPING BLOCK when installing the floor. With any other type of block, you are certain to damage the panels. When sawing pieces off the panels, use a fine-toothed hand saw, jigsaw or cross-cut saw. To achieve a clean cut, saw with the pattern side down with a jigsaw and up with a hand saw or cross-cut saw. 3. The best preparation The floor should preferably be installed parallel to the way the light falls. The ideal environment has a temperature of C (59-68 F) and relative humidity of 50-60%. Allow the laminated flooring to acclimatize for 48 hours, in its original packing, in the area where it is to be installed. Put the packs in the middle of the room, NEVER against a wall or place in a corner. CHECK THAT: - the doors can still open and close after installing the floor with the underlayment (minimum + 1 cm (3/8 )) - the door frames may need to be adapted to install the floor under them - the old skirting boards can be removed. 4. The base floor The base floor must be thoroughly clean and flat before Uniclic is installed on it. Flatten any unevenness of more than 2 mm/m (3/16 inch in 10 feet). Depending on the situation, the following cases may present themselves : CONCRETE New construction : The moisture content of the concrete may not exceed 3 pounds per 1000 square feet per 24 hours using the calcium chloride test method. A freshly poured coating must dry out for at least 1 week per cm (3/8 ) thickness up to 4 cm (1-1/2 ), and 2 weeks per cm (3/8 ) thickness above 4 cm (1-1/2 ), with sufficient ventilation. (6 cm (2-1/2 ) concrete must therefore dry out for a minimum of 8 weeks). In case of floor heating, the moisture content may not exceed 1.5% (CM method). In this case, some specific installing instructions are applicable. Please consult your dealer for more information. Renovated construction : In the case of damp-proof flooring (PVC, linoleum etc.), Columbia Laminate may be installed on the existing floor covering. In the case of damp-open flooring (carpet, needle felt floor etc.), first remove the existing floor covering.
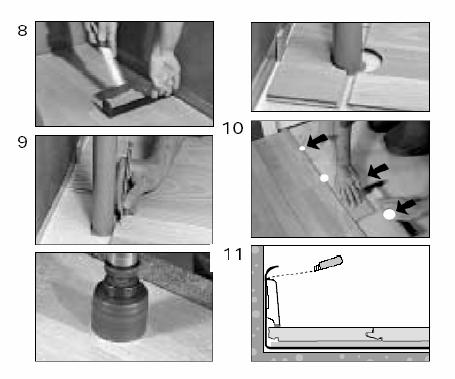
3 WOODEN FLOOR First remove any existing floor covering. The wooden floor must be sufficiently stable. Any loose parts must be nailed down and, if necessary, a leveling underfloor must be installed. The moisture content of the wood may not exceed 10%. It is essential that the crawl space under the wooden floor be sufficiently ventilated: remove any obstacles and provide sufficient ventilation (minimum 4 cm² (0.6 sq. inch) total ventilation opening per m2 (10.76 sq.ft) of floor). Install the new panels across the planks. 5. The Columbia Laminate Underlayment System It is absolutely vital to use a leveling underfloor in order to level out any unevenness in the base floor. USE only the Columbia Laminate UNDERLAYMENT SYSTEM and follow the installation instructions that come with the underlayment. 6. Correct installation Wood is the primary constituent of Columbia Laminate. Because the humidity of the room can vary, due to differences between the seasons for example, the floor must be able to expand in all directions. This expansion can amount to 2 mm per meter (1/12 per 3.28 ft), so the greater the surface area, the greater the room for expansion required. The floor must be able to expand or contract an ALL sides. To facilitate this, an expansion gap is provided at all walls of 8-10 mm (1/3-3/8 ). A gap must also be provided around pipes or at thresholds. With large surface areas, a wider gap must be provided, for example under a double wall. Lengths of more than 12 meters (39 ft 4 inches) must be interrupted with an expansion gap. Take account of the fact that the floor may move in one direction. Where possible, provide expansions gaps, for example under doors. These gaps are covered by a profile that is not fixed to the laminated floor but to the base floor. Install the panels preferably in the same direction as the longest wall and the way the light falls (visually more attractive). Start installing the floor at one corner or in the middle of the area. You can also work from left to right, or right to left. Always remember that the easiest way of installing the floor is using the tongue into the groove. 7. The first three rows see drawings (point 7) 8. The final row There should also be a 10 mm (3/8 ) expansion joint between the final row and the wall. In doing this, remember you have to saw off the long edges of the final row of panels. Place these panels one by one next to the panels of the penultimate row and tap the long edges together using the crowbar and hammer. The short edges can be knocked together using the Columbia Laminate tapping block.
4 9. Through pipes Make sure that in the row where there is a through pipe this pipe comes exactly at the cross joint of two panels. Take a drill bit with a diameter similar to the diameter of the pipe + 20 mm (3/4 ) for expansion. Click the panels together on the short edge and drill the hole with its center on the join between the two panels. Now install the panels as part of the floor. 10. Under door-frames Saw the panels or undercut door frames so that after installation there is a minimum 10 mm (3/8 ) expansion joint. If you cannot rotate this panel, use the pullbar or Columbia Laminate tapping block and hammer to knock the panels together. 11. Finish After installing your floor, you can immediately walk on it and begin the finishing process. This is one of the major benefits of the Uniclic system. Remove all spacer blocks Fix the skirting boards to the plastic membrane sticking up from the floor. Never fix the skirting boards to the floor itself, but allow the floor to expand and contract underneath the skirting board. Finish the gaps around the pipes with rosettes or flexible caulking. In places where no profiles or skirting boards can be placed, the expansion gap must be filled with flexible caulking. 12. Precautions Protect furniture and chair feet by means of felt or plastic caps. Avoid bringing dirt, water and sand from outside by using a doormat. Use wheel chairs with soft rollers suitable for laminated flooring. Make sure there is a minimum humidity of 50% in the room. If necessary, use a humidifier. 13. Maintenance With its smooth surface, Columbia Laminate cannot retain dust or dirt. NEVER use a wax or varnish coating on the floor. For dry maintenance, use a duster or vacuum cleaner (CAUTION: never use vacuum with a beater bar attachment). For damp maintenance: wipe over with clean water or with a cleaner recommended by the manufacturer for laminate flooring. (Never use other cleaning products or detergents!) This product cleans the floor very well and leaves a satin shine. Only use a WELL WRUNG OUT CLOTH. ALWAYS WIPE DRY IMMEDIATELY AFTER until no moisture is visible on the floor. If you do not wipe it dry, the recommended cleaning product has virtually no effect. WET MAINTENANCE IS ENTIRELY FORBIDDEN! Never wet mop or use wet or steam cleaners on your floor. Remove stubborn stains carefully with a little acetone. Never use any scouring products! Columbia Laminate is based on pre-treated, watertight glued HDF board. Despite Columbia Laminate s relative moisture-resistance, remove any excess water immediately.

5 Enjoy your floor!
6
7
8
INSTALLING YOUR UNICLIC FLOOR - Small planks / 3 sizes
 INSTALLING YOUR UNICLIC FLOOR - Small planks / 3 sizes 1) General The panels must be rotated on both short and long edges to fit into one another. This can be performed by inserting either the tongue into
INSTALLATION INSTRUCTIONS FOR ELKALAMINATE. IN ORDER TO OBTAIN A GOOD RESULT, WE ADVISE TO FOLLOW ALL GIVEN INSTRUCTIONS CAREFULLY.
 INSTALLATION INSTRUCTIONS FOR ELKALAMINATE. IN ORDER TO OBTAIN A GOOD RESULT, WE ADVISE TO FOLLOW ALL GIVEN INSTRUCTIONS CAREFULLY. PREPARATION Let the planks acclimatize for 48 hours in the unopened packaging
For best results, it is essential that you follow the installation instructions exactly.
 For best results, it is essential that you follow the installation instructions exactly. PREPRTION Let the planks acclimatize for 48 hours in the unopened packaging at the normal room temperature, in the
INSTALLATION INSTRUCTIONS FOR QUICK-STEP LAMINATE.
 . PREPARATION. INSTALLATION. FINISHING. MAINTENANCE INSTALLATION INSTRUCTIONS FOR QUICK-STEP LAMINATE. IN ORDER TO OBTAIN A GOOD RESULT, WE ADVISE TO FOLLOW ALL GIVEN INSTRUCTIONS CAREFULLY. - 0-% RH 8h
INSTALLATION INSTRUCTIONS FOR QUICK-STEP LAMINATE WITH HYDROSEAL TECHNOLOGY.
 . PREPARATION. INSTALLATION. FINISHING. MAINTENANCE INSTALLATION INSTRUCTIONS FOR QUICK-STEP LAMINATE WITH HYDROSEAL TECHNOLOGY. IN ORDER TO OBTAIN A GOOD RESULT, WE ADVISE TO FOLLOW ALL GIVEN INSTRUCTIONS
TORLYS LEATHER PLANK INSTALLATION INSTRUCTIONS
 ENGLISH INSTRUCTIONS TORLYS LEATHER PLANK INSTALLATION INSTRUCTIONS Dear Customer, You have chosen a high quality TORLYS Leather floor, well suited for all residential application except bathrooms and
INSTALLATION INSTRUCTIONS FOR QUICK-STEP LAMINATE WITH HYDROSEAL TECHNOLOGY.
 . PREPARATION. INSTALLATION. FINISHING. MAINTENANCE INSTALLATION INSTRUCTIONS FOR QUICK-STEP LAMINATE WITH HYDROSEAL TECHNOLOGY. IN ORDER TO OBTAIN A GOOD RESULT, WE ADVISE TO FOLLOW ALL GIVEN INSTRUCTIONS
MOHAWK LAMINATE INSTALLATION INSTRUCTIONS
 MOHAWK LAMINATE INSTALLATION INSTRUCTIONS General Mohawk flooring panels us Uniclic technology, a revolutionary system for installing laminate floors without using glue. The panels can be clicked together
Install your floor between 18 and 30 C.
 GOLDEN RULES 8-0 C Install your floor between 8 and 0 C. Quick-Step Livyn must be acclimatized in the room of installation between 8-0 C for a period of at least 8 hours before installation. This floor
INSTALLATION INSTRUCTIONS
 INSTALLATION INSTRUCTIONS 1/5 Dear customer, We thank you for purchasing our Par-ky floor. Before starting the installation, it is essential to read these instructions carefully. If these instructions
Installation instructions
 1/5 Installation instructions Dear customer, We thank you for purchasing our Par-ky floor. Before starting the installation, it is essential to read these instructions carefully. INSTALLATION MATERIALS
For ANGLE-DROP Styles
 For ANGLE-DROP Styles BEFORE INSTALLATION: 1. READ THESE DETAILED INSTALLATION INSTRUCTIONS. 2. Material and tool requirements: - Estimate square footage and add 10%. - Select underlayment (over concrete
General Installation Instructions. Laminate Drop & Lock installation - 2G
 General Installation Instructions Laminate Drop & Lock installation - 2G A. INTRODUCTION Laminates and other wooden material acts after the surrounding climate, the main factor is the relative humidity
English Professional Installation Guidelines
 Professional Installation Guidelines General Installation Instructions NOTE: After proper acclimation, open cartons just prior to installation. NOTE: Mannington Laminate Flooring is intended to be installed
IMPORTANT NOTES ABOUT YOUR FLOORING PLEASE READ BEFORE INSTALLING INSTALLATION & MAINTENANCE FOR ENGINNERED HERRINGBONE
 IMPORTANT NOTES ABOUT YOUR FLOORING PLEASE READ BEFORE INSTALLING INSTALLATION & MAINTENANCE FOR ENGINNERED HERRINGBONE ACCLIMATIZATION AND STORAGE Your new flooring has to be acclimatized before installation,
Installation Instructions
 Information You will find all illustrations and instructions on the backside of the box and on the inserted instruction folder in the package. General The floor should be a floating installation i.e. not
Engineered Strand Uniclic Floating Installation
 Engineered Strand Uniclic Floating Installation Introduction Thank you for choosing our Engineered Strand Bamboo Flooring! You have selected one of the highest quality engineered floors available. Our
Laying instructions Installation of multilayer Herringbone / Basket-weave with tongue and groove joint.
 Laying instructions Installation of multilayer Herringbone / Basket-weave with tongue and groove joint. Preparation Store the boards in their packaging and open them as you need them. Read the instructions
INSTALLATION LAMTON INSTALLATION INSTRUCTIONS. Lamton Laminate Flooring with Underlay Attached Glueless Installation. Tools and Accessories
 Lamton quality laminate flooring is manufactured to exacting standards for long life and lasting beauty. Following these simple procedures for installation and it will ensure many years of pride and satisfaction.
Lifestyle Laminates Uniclic Floating Floor
 Lifestyle Laminates Uniclic Floating Floor Thank you for choosing Wellmade Laminate Flooring, featuring the glue-less Uniclic floating installation system. You have selected one of the highest quality
INSTALLATION. GlUElEss CliCK BamBoo installation GUidE. Introduction. Tips for a successful installation
 GlUElEss CliCK BamBoo installation GUidE Introduction Thank you for purchasing a Yanchi Bamboo Floor! Our flooring combines superior technology and the highest quality materials available so that your
TONGUE & GROOVE NAIL-DOWN INSTALLATION INSTRUCTIONS
 FEBRUARY 2017 TONGUE & GROOVE NAIL-DOWN INSTALLATION INSTRUCTIONS Applicable to: Kahrs Supreme 20mm 3/4 Grande Collection Only PROTECT YOUR INVESTMENT! Maintain your warranty: Only use Kährs branded underlayments,
DuChâteau Vinyl DeLuxe Grand Collection LuxCor Click Installation Instructions
 DuChâteau Vinyl DeLuxe Grand Collection LuxCor Click Installation Instructions General Information Intended for indoor residential and commercial use only, DuChâteau Vinyl DeLuxe Grand Collection - Luxcor
FITTING INSTRUCTIONS FOR OFD SOLID OAK FLOORING
 FITTING INSTRUCTIONS FOR OFD SOLID OAK FLOORING SECTION 1 Installers Responsibility Pre-Installation SECTION 2 Glue Down (Solid & Engineered Flooring) SECTION 3 Secret Nailing (Solid & Engineered Flooring)
Laminate Flooring Alternative to Hardwood Flooring
 Laminate Flooring Alternative to Hardwood Flooring Laminate flooring is moderately expensive, with a cost generally between that of vinyl and hardwood flooring. It's easier to install than hardwood and
INSTALLATION INSTRUCTIONS
 Part I INSTALLATION AND CARE: Product Description: Engineered T&G hardwood flooring planks ore designed for use in multiple locations. Acceptable location includes basements, ground floors or high-rise
Manufacturer 12mm Laminate Flooring Installation Guidelines
 Manufacturer 12mm Laminate Flooring Installation Guidelines IMPORTANT Do not open immediately. Before opening, acclimatize planks for 48 hours by laying each box horizontally and individually in the center
AquaGuard - Water Resistant Flooring Installation guidelines
 AquaGuard - Water Resistant Flooring Installation guidelines Before You Start: Please read all the instructions before you begin the installation. Improper installation will void the warranty. Important
Loose Lay Luxury Vinyl Plank
 Loose Lay Luxury Vinyl Plank FLEX COLLECTION Installation & maintenance * PLEASE READ CAREFULLY * Installation, maintenance & warranty guideline for loose lay luxury vinyl products. Adherence to This guideline
INSTALLATION INSTRUCTIONS of Chevron and Herringbone Engineered Hardwood Flooring
 INSTALLATION INSTRUCTIONS of Chevron and Herringbone Engineered Hardwood Flooring www.tomson-floors.com TABLE OF CONTENTS 3 USING THE PRODUCT 3 YOUR RESPONSIBILITIES 4 PRE-INSTALLATION INSPECTION 5 BASIC
General Installation Instructions
 General Installation Instructions Good web sites to check out that may assist you are: For gluing engineered boards over timber chipboard/particle board/ yellow tongue: https://www.youtube.com/watch?v=bpyfr373tl8
Galaxy SPC RIGID-CORE UNICLIC HYBRID PLANK. Installation Guidelines
 Galaxy SPC RIGID-CORE UNICLIC HYBRID PLANK Installation Guidelines ** Read all instructions carefully before installing. Incorrect installation will invalidate and void warranty. ** The planks you are
Engineered Hardwood Flooring Installation Instructions
 Engineered Hardwood Flooring Installation Instructions 1 Important Information before You Begin 1.1 Installer/Owner Responsibility Carefully inspect all materials before installation. Materials installed
TRIVERSA TRIVERSA ID. Triversa Triversa ID Installation Instructions. Remove the wall base and doorway trim. Always undercut wood door casings
 INSTALL ON ALL GRADE LEVELS Above Grade On Grade Below Grade by CONGOLEUM TRIVERSA TRIVERSA ID Triversa Triversa ID Installation Instructions GENERAL INFORMATION ATTENTION! READ BEFORE INSTALLING! Handle
PLEASE READ THIS FIRST
 UNICLIC INSTRUCTION Groove Tongue PLEASE READ THIS FIRST It is wise to spend some time on planning before you start installing your new flooring. Read all of these instructions and if anything is unclear,
INSTALLATION GUIDE FOR MAZAMA MULBERRYWOOD HARDWOOD FLOORING
 INSTALLATION GUIDE FOR MAZAMA MULBERRYWOOD HARDWOOD FLOORING READ COMPLETELY BEFORE STARTING INSTALLATION. Congratulations on choosing Mulberrywood flooring. Please take time to read the following procedures
ENGINEERED WOOD INSTALLATION GUIDE: The Cardinal Collection
 ENGINEERED WOOD INSTALLATION GUIDE: The Cardinal Collection READ BEFORE INSTALLATION OF OILED FINISHED FLOORING DO S 1. Do mix wood from several boxes of flooring during installation. 2. Do make your best
Laminate Floor Installation Guide
 Laminate Floor Installation Guide Introduction This guide will take you through the necessary steps to install your Bel-Air Laminate Flooring. Make sure to carefully read through this guide so that you
Installation Instructions for Viking Hearth Engineered Wood Flooring
 Installation Instructions for Viking Hearth Engineered Wood Flooring 4.16.15 PLEASE READ THESE INSTRUCTIONS IN THEIR ENTIERTY BEFORE BEGINNING THE INSTALLATION. Installer s / Owners Responsibility As a
mm. 48h 25-85% RH. Leginstructies Parquet_FLOATING_multifit_A4_2017_ENG.indd 1 22/02/ :21:18 75% 50% x = 8 mm x = 10 mm x = 12 mm
 Quick-Step wood fl ooring materials are delivered with instructions in the form of illustrations. The text below is covering a fl oating illustration in regards of a fl oating installation, and is divided
mm. 48h 25-85% RH. Leginstructies Parquet_GLUED_uniclic_A4_2017.indd 1 22/02/ :21:36 75% 50% x = 8 mm x = 10 mm x = 12 mm
 Quick-Step wood fl ooring materials are delivered with instructions in the form of illustrations. The text below is covering a fl oating illustration in regards of a fl oating installation, and is divided
Plantation Compressed Bamboo Flooring Installation instructions
 Plantation Compressed Bamboo Flooring Installation instructions thinking of our FUTURE Pre-installation FOR BOTH DIRECT STICK & FLOATING FLOORS Prior to installation of any floor, the installer must ensure
INSTALLATION INSTRUCTIONS
 VESDURA VINYL PLANKS 3MM PVC GLUE DOWN - OAK COLLECTION Safety First CAUTION Asbestos Warning in existing floor. Do not sand, dry scrape, bead blast or mechanically pulverize existing resilient flooring.
WOOD INSTALLATION GUIDE
 WOOD INSTALLATION GUIDE WOOD INSTALLATION DEFINITION FLOOR PREPARATION UNDERLAYMENT INSTALLATION MOULDINGS TOOLS NEEDED WHAT IS WOOD FLOORING? WOOD COMES IN A VARIETY OF SIZES, COLORS, SHADES AND INSTALLATION
INSTALLATION. Installation Guide. Installing Bamboo Flooring on Top of a Wood Subfloor
 READ COMPLETELY BEFORE STARTING INSTALLATION. Congratulations on choosing Yanchi bamboo flooring. Please take time to read the following procedures before you begin installation. With the correct installation
15mm Solid European Droploc Oak Fitting Guide & Warranty Information
 15mm Solid European Droploc Oak & Warranty Information Introduction Congratulations on your purchase of your brand new Timba Floor 15mm European Solid Oak Flooring. Prior to installation please examine
Installation Instructions for Engineered Wood Flooring
 Installation Instructions for Engineered Wood Flooring PLEASE READ THESE INSTRUCTIONS IN THEIR ENTIERTY BEFORE BEGINNING THE INSTALLATION. Installer s / Owners Responsibility As a natural product, hardwood
SOLID STRAND BAMBOO INSTALLATION GUIDE. Tips for a successful installation
 SOLID STRAND BAMBOO INSTALLATION GUIDE Please keep in mind that all hardwood flooring will scratch, dent, and change color over time. Therefore, you will need to decide if hardwood is suitable for your
Exterra Installation Guide
 Exterra Installation Guide Installing the foam padding Please review this installation guide before you begin installing the floor. If you have any questions, please call us at 800-428-5306 any time Monday
[320] LAYING PRINCIPLE: CREATION 30 CLIC
![[320] LAYING PRINCIPLE: CREATION 30 CLIC](/thumbs/95/122609531.jpg "[320] LAYING PRINCIPLE: CREATION 30 CLIC") All floor and wall coverings should be examined prior to installation for any visible defects. If there are any visible defects, please notify GERFLOR and do not begin installation without its prior approval.
All floor and wall coverings should be examined prior to installation for any visible defects. If there are any visible defects, please notify GERFLOR and do not begin installation without its prior approval.
Alterna Grouting Tiles & Planks
 Alterna Grouting Tiles & Planks Grouting Alterna Tiles and Planks Armstrong S-693 Premixed Sanded Acrylic Grout Soft rubber float Soft rubber Margin float White 3M pad Tile spacers Gloves Two- 5 Gallon
Installation Instructions
 www.marlite.com Effective Date 03/01/2018 ARTIZAN FRP, SYMMETRIX FRP, ENVUE FRP, STANDARD FRP Installation Instructions Statements expressed in this technical bulletin are recommendations for the application
INSTALLATION INSTRUCTION
 INSTALLATION INSTRUCTION BJOORN PARQUET ANGLE/SNAP LOCKING SYSTEM SQUARE PATTERN PRODUCT INFORMATION A European parquet strip with a core of high-end plywood approx. 3.6 mm wear layer, pre sanded to 120
Unit5EustonStreet FreemensCommon Leicester LE27ST T: F:
 Unit5EustonStreet FreemensCommon Leicester LE27ST T:01162741050 F:01162741046 SECTION 1: INSTALLERS RESPONSIBILITY It is the installers responsibility to carry out the final inspection of the floor to
Landscape Collection
 Landscape Collection Installation Guidelines READ BEFORE INSTALLATION OF OILED FINISHED FLOORING We are providing a brief explanation of the Do s and Do Not s during and shortly after installation. DO
1INSTALLATION GUIDE: ENGINEERED WOOD FLOORING
 1INSTALLATION GUIDE: ENGINEERED WOOD FLOORING INSTALLATION GUIDELINES FOR ENGINEERED WOOD FLOORING These guidelines are designed to complement the current South African Flooring Standards. Engineered wood
Glueless Laminate Installation Instructions
 2nd FLOOR 1st FLOOR BASEMENT Glueless Laminate Installation Instructions! CAUTION: WOOD DUST ing, sanding, and/or machining of wood products can produce wood dust that can cause respiratory, eye, and skin
Prior to installation, the installer assumes all responsibility for final inspection and quality of the product
 Mae Terra Hardwood Installation Instructions ¾ Solid Nail Down Protect your investment. Review and adhere to the flooring installation instructions. Please note that these are instructions for the experienced
WOOD. Floating. Installation Instructions
 WOOD Floating Installation Instructions Conditions Floating installation means that the wood floor is not attached (i.e. with nails or adhesive) to the subfloor. The subfloor must be level, sound, dry
Installation instructions for Egger Laminate and Comfort flooring with UNI fit! installation system
 Installation instructions for Egger Laminate and Comfort flooring with UNI fit! installation system Obligatory testing and exercise of due care / Sub-floors 1. Obligatory testing and exercise of due care
WOODLOC STAPLE DOWN INSTALLATION INSTRUCTIONS
 FEBRUARY 2017 WOODLOC STAPLE DOWN INSTALLATION INSTRUCTIONS Applicable to: Kährs Spirit 10mm 3/8 Kährs Avanti 12 & 13mm 1/2 Kährs Original 15mm 5/8 Kahrs Supreme 15mm 5/8 PROTECT YOUR INVESTMENT! Maintain
installation guide TASMANIAN HARDWOOD OVERLAY FLOORING
 TASMANIAN HARDWOOD OVERLAY FLOORING installation guide These instructions apply to quality Tasmanian strip flooring used as an overlay on a structural substrate in residential applications. nail glue SHEET
For more information, call PERGO
 SILICONE CAULK SILICONE CAULK SYSTEM SYSTEM MADE IN THE USA SPECIALLY DEVELOPED FOR LAMINATE FLOORING 1 FL OZ (33.5ml) 0 1 0 2 50 100 ON Non Destructive Moisture 3 150 Concrete Encounter Plus 4 200 250
¾ Solid Installation Instructions
 ¾ Solid Installation Instructions Thank you for choosing STRAVAGANZA products! Hardwood flooring is a natural product; therefore defects in the flooring can occur in the manufacturing process or naturally
Wall Installations. Chapter 16 Wall Installations 16. 1
 16 Wall Installations Chapter 16 Wall Installations 16. 1 Alterna Premium Groutable Tile Create decorative backsplashes, accent walls, or other focal points with any size Alterna 16" x 16", 8" x 16", 8"
HeatBoard Joisted Floor System
 Design HeatBoard Joisted Floor System The Floor Heating Warehouse Underfloor Heating using Heatboard Slotted and Turning Boards is intended for installation on standard wood joist floors of a max. 600mm
Installation Instruction
 Installation Instruction WOOD Glue Down Installation Conditions Gluing to the subfloor reduces the movement of the wood floor, and is recommended for laying patterns, covering large areas, etc. The subfloor
BOIS CHAMOIS VINTAGE HARDWOOD FLOORING
 Professional Installation Recommended Nail-Down Installation Instructions Solid 3/4 x 7 x Random Length (6 10 ) Thank you for choosing Bois Chamois Vintage Hardwood Flooring. Protect your investment; thoroughly
READ PRIOR TO BEGINNING INSTALLATION
 READ PRIOR TO BEGINNING INSTALLATION Bella Cera La Palazzina Engineered Hardwood Flooring Installation Instructions Check for Proper Color Selection Prior to Installation 1 Important Information before
Robert Bosch GmbH. Minimalist washstand
 Minimalist washstand Neat and tidy Minimalist washstand Minimalist design in the bathroom is in fashion. And rightly so, as this washstand proves: because less is more! 1 Introduction Here s an idea to
Please read and review installation instructions completely before proceeding with the actual installation.
 INSTALLATION INSTRUCTIONS Important / Read First Please read and review installation instructions completely before proceeding with the actual installation. Owner / Installer responsibility The installer
Royal Collection. Installation Guidelines
 Royal Collection Installation Guidelines Congratulation! Thank you for purchasing TEKA pre-finished engineered hardwood flooring. You made the right choice for the right product. Manufacture only real
Engineered Strand Bamboo Flooring
 Engineered Strand Bamboo Flooring Introduction Thank you for choosing Wellmade Engineered Strand Bamboo! You have selected one of the highest quality engineered floors available. Our engineered flooring
WET AREA PANELLING. Designer Walls. Fast
 WET AREA PANELLING Designer Walls. Fast AU/a5 WallART Brochure_ART BUNNINGS.qxp_Layout 1 7/6/18 10:16 am Page 3 LINEAR SERIES WET AREA PANELLING Add a touch of class to your SHEET COLOURS home or workplace
Laminate Installation Guide
 Laminate Installation Guide Wilsonart Tap- N- LockTM Glueless Technology Installation System Featuring Wilsonart ClassicTM, Wilsonart Estate Plus, Wilsonart DuoLink Flooring, and Wilsonart Red Label Woods
INSTALLATION. Installer / Owner Responsibility. Basic Tools and Equipment. Putty and Filler Use. Recommended Installation Methods
 Installer / Owner Responsibility Carefully inspect all materials before installation. Materials installed with visible defects are not covered under the warranty. Do not install if you are not satisfied
Engineered Installation Instructions
 Engineered Installation Instructions Thank you for choosing STRAVAGANZA products! Hardwood flooring is a natural product; therefore defects in the flooring can occur in the manufacturing process or naturally
3 Simple Steps to a Beautiful Tile Surface. Tec Skill Set How-To Project Guide Floor Tile 1. PREPARE THE SURFACE 2. SET THE TILE. Reverso en español
 Reverso en español Tec Skill Set How-To Project Guide Floor Tile 3 Simple Steps to a Beautiful Tile Surface 1. PREPARE THE SURFACE 2. SET THE TILE 3. Grout AND CAULK H.B. Fuller Construction Products Inc.
Installation Guide. Pionite Decorative Surfaces One Pionite Road, Auburn, Maine PIONITE ( )
") Installation Guide A Subsidiary of Panolam Surface Systems SMPBRO00-012 6/14 Pionite decorative laminates are designed for finished interior surfaces which require high impact, wear and stain resistance
Installation Guide A Subsidiary of Panolam Surface Systems SMPBRO00-012 6/14 Pionite decorative laminates are designed for finished interior surfaces which require high impact, wear and stain resistance
Glueless Laminate Installation Instructions Wood Designs
 OptiCore Installation Grade Glueless Laminate Installation Instructions Wood Designs! CAUTION: WOOD DUST The International Agency for Research on Cancer has classified wood dust as a nasal carcinogen.
INSTALLATION GUIDE. Preparation. Subfloor Preparation. Installation of Vapour Barrier Paper (asphalt-free) Model repair and maintenance kit
 Model repair and maintenance kit") INSTALLATION GUIDE pg and model solid ing The investment that ing represents in the home is an important one and customers want their ing to last. In light of this fact, the importance of product quality
INSTALLATION GUIDE pg and model solid ing The investment that ing represents in the home is an important one and customers want their ing to last. In light of this fact, the importance of product quality
JUNCKERS HEXPARKET LAYING INSTRUCTIONS
 JUNKERS HEXPRKET LYING INSTRUTIONS ONTENT JUNKERS SYSTEM SOLUTIONS GENERL INFORMTION INSTLLTION SURFE TRETMENT OF WOOD TILE FLOOR 2 3 4 8 JUNKERS SYSTEM SOLUTIONS FOR HEXPRKET In order to make it simple
Wet Area Panelling. Linear Series
 Wet Area Panelling Linear Series LINEAR SERIES WET AREA Add a touch of class to your home or workplace with the Linear Series, WallART s line of wet area panelling. With a striking range of colours and
PREPARATION PREPARATION BEFORE DELIVERY INSPECTION MOISTURE TESTING PREPARING THE SUBFLOOR LAYING THE FLOOR HEATING AND AIR CONDITIONING
 PREPARATION PREPARATION acclimatised should be as close as possible to the typical living conditions BEFORE DELIVERY The conditions must be ideal before any flooring is fitted. Wet trades like screeds,
Engineered Hardwood Installation
 Engineered Hardwood Installation Installer / Owner Responsibility Carefully inspect all materials before installation. Materials installed with visible defects are not covered under the warranty. Do not
Kraus Engineered Luxury Vinyl Plank 5G Insta-Loc Click Installation Instructions
 Kraus Engineered Luxury Vinyl Plank 5G Insta-Loc Click Installation Instructions GENERAL GUIDELINES All instructions and recommendations are based on the most recent information available. They should
MATERIALS FORMAT CODE NOTES
 FLOORS IN BUILDINGS [421] LAYING FLOOR COVERINGS WITH ELECTRICAL PROPERTIES, Before laying the flooring, it is a good idea to inspect it and to identify any problems with the appearance. If there are visible
Zenterra TM Installation Guide
 Zenterra TM Installation Guide Installing the foam padding Please review this installation guide before you begin installing the floor. If you have any questions, please call us at 800-428-5306 any time
SINCE 1995 HYBRID / LOFT / MANOR LINE INSTALLATION GUIDE
 HYBRID / LOFT / MANOR LINE INSTALLATION GUIDE We strive to offer our customers the highest quality bamboo flooring. Please carefully read this installation guide to ensure satisfactory results from your
Flooring. Technical specifications plus acclimatisation, laying preparations and after-care instructions
 Flooring Technical specifications plus acclimatisation, laying preparations and after-care instructions Whippletree flooring is a natural product that, from one season to the next, will display a marginal
Engineered Hardwood Installation
 Engineered Hardwood Installation Installer / Owner Responsibility Carefully inspect all materials before installation. Materials installed with visible defects are not covered under the warranty. Do not
BAMBOO FLOORING PRE-FINISHED SOLID BAMBOO INSTALLATION GUIDE
 BAMBOO FLOORING PRE-FINISHED SOLID BAMBOO INSTALLATION GUIDE PLEASE READ AND REVIEW THE ENTIRE INSTALLATION GUIDE BEFORE PROCEEDING WITH THE ACTUAL INSTALLATION IMPORTANT NOTICE: HOME LEGEND strongly recommends
Nail-Down Installation Instructions Prefinished 3/4 and 5/8 solid
 Nail-Down Installation Instructions Prefinished 3/4 and 5/8 solid Thank you for choosing 3 4 or 5 8 Exotic Hardwood Flooring. Protect your investment; review and adhere to the flooring installation instructions.
DO NOT HESITATE TO CONTACT US TO BE GUIDE DURING THE INSTALLATION OF SQUAREDECKO PRODUCTS
 Table of contents Product specifications Step 1 : Surface preparation Installation guide Step 2-3-4 : Method of installation Step 5 : Layout of tiles Step 6 : Installation of tiles on the side of the structure
Please read these instructions before use and keep for future reference
 Wardrobe Assembly Guide Allen Key Provided (if required) Philips Screwdriver Required Hammer Required Please read these instructions before use and keep for future reference Caution! Two Person Assembly
INSTALLATION MANUAL STORAGE
 IMVersion 1.1 INSTALLATION MANUAL GENERAL GUIDE: The information in this IM is intended to serve as a general guide to proper installation with no warranties intended or implied. Prime Panels assumes no
Installation Instructions Meister Catega Flex
 Installation Instructions Version 1.0 June 2016 Installation Instructions QUALITY STARTS WITH THE INSTALLATION Meister quality is not just about the durability of your floor. It can also be seen during
SPEKVA. Installation Instructions. Solid wood. August
 Installation Instructions Solid wood August 2013 www.spekva.com Table of contents Page Before installation - warranty coverage... 3 Receipt and storage... 4 Location... 4 Jointing worktops... 5 Attachment...
INSTALLATION GUIDE SOLID HARDWOOD FLOORING
 Laurentian Hardwood Canadian Heritage Series INSTALLATION GUIDE SOLID HARDWOOD FLOORING The investment that flooring represents in the home is an important one. Customers want their flooring to last. In
INSTALLATION GUIDE.
 INSTALLATION GUIDE Hardwood floors are a product of nature and therefore not entirely free of typical timber features such as grain variation and knots. Every piece of wood has different grain, colour