Home Theater Fixed Frame Curved Projection Screen Lunette Series
|
|
|
- Tracy Webb
- 5 years ago
- Views:
Transcription


1 Home Theater Fixed Frame Curved Projection Screen Lunette Series 1
2 Important Safety & Warning Precautions Please follow these instructions carefully to ensure proper maintenance and safety with your screen. 1. Please make sure that no other objects such as power switches, outlets, furniture, ladders, windows, etc. occupy the space designated to hang the screen. 2. Regardless if the screen is installed inside or on the wall, make sure that the proper mounting anchors are used and that the weight is supported appropriately by a strong and structurally sound surface just as any large and heavy picture frame should. (Please consult a home improvement specialist for the best advice on installation.) 3. Frame parts are made of high quality velour surfaced aluminum and should be handled with care. 4. When not in use, cover the screen with a furniture sheet to protect from dirt, grime, paint or any other impurities. 5. When cleaning, use a damp soft cloth with warm water to remove any marks on the frame or screen surface. 6. Never attempt to use any solutions, chemicals or abrasive cleaners on the screen surface. 7. To avoid damaging the screen, do not touch the material directly with your fingers, tools or any other abrasive or sharp objects. 8. Spare parts should be placed out of reach for small children in accordance with household safety guidelines. Caution: The projection screen frame is made of high quality aluminum alloy and should be handled with care. Use a soft cloth with warm water to remove any spots on the screen surface. To avoid damaging the screen material, never attempt to use any solutions, chemicals or abrasive cleaners on the screen, and avoid touching the material with your fingers or sharp/abrasive objects. 2


3 Parts List for the Lunette Series Please make sure all parts listed below are included before proceeding with the installation. A. Dry wall anchor B L Bracket C. 4 L Bracket D. Y Bracket E. M5 Screw F. Wood Screw G. Fix Plate H. Center Support Bar I. Support Joiner J. Elbow Joint K. Butterfly Screw L. Tension Rods M. Vertical Upright Frame N. Horizontal Curved Frame O. Screen Material 3
. Minimal gap is normal here 3.")
4 Installation Instructions Assembly 1. Insert both Elbow Joints (J) into each Horizontal Curved Frame (N) and join all four frame parts together as shown below. 2. After making sure that all four corners join at right angles to form a perfect rectangle and fasten together with the M5 screws (E). Minimal gap is normal here 3. Lay out the Screen Material (O) and Tension Rods (L) on a clean and dry surface and gently roll out the screen material on the back of the frame. Vertical Upright Frame Horizontal Curved Frame Black Backing of the screen material 4

5 4. Insert the screen Tension Rods (L) through the sleeves according to their corresponding length on each edge of the screen. 5. Slip the tension rods into the grooves running along each side on the back of the frame. Clip on the Fix Plates (F) to the back of the frame to secure the rods into place forming a tight and flat surface. Tension Rod Fix Plate Viewing Surface 5
6 Black Backing g for AccousticP Pro Mode els This proceedure only ap pplies to Acou usticpro models, disrregard if yourr curved frame us now an AcousticP Pro 1080 variaant. The blackk backing counters the effeects of light penetration p th hat would otherwisee light up all ittems behind the screen an nd spoil the picture. p The black backing b goes behind b the pro ojection surfacce and is held into position by b Velcro faced d fix plates. Black backing Fix plate securees AcousticPro and the backing. A AcousticPro1080 Screen Material Cover by Blackk backing. Fiix Plate Blackk backing T Tension Rod (Stretches the AccousticPro1080 material) After the material m has be een installed, the backing will lie over the back b of the whiite (AcousticPrro1080) materiial and then be heeld into place by b the fix plates as they re ad dded (Fig.1 3). Interval markin ngs reveal the suggested points of attachmen nt (Fig.1). The prongs p on the fix f plates (Fig.2 2) straddle a lip p on the back of o the frame crreating friction n to hold the material m in place e (Fig.3 4). Fig.1 Fig.2 b to the back of the AccousticPro material is to o utilize the Vellcro *An alternate way to attaach the black backing tabs locateed on the outer surface of the fix plates (Figg. 3 4). Fig.3 Fig.4 6 Rev A AS

7 ATTACH THE FIX PLATES 1. Make sure that the material and frame are lying face down on a clean, dry and non abrasive surface. 2. Center the material inside the frame. Note: The material will be noticeably smaller because stretching the material is required to create a sufficient amount of tension for perfect material flatness. 3. Start attaching the Fix Plates in the center of the Horizontal Curved Frame s edge and (1) then alternate with the center short sides (2). Note: Follow these instructions to make sure the material is properly fixed in the center position of the frame. After attaching the Fix Plates in sequence #2 (the center of the short sides), please remove the fix plates in sequence #1 (the center of the long horizontal edge) and reattach them again, and also remove the fix plates on sequence# (2) and reattach them again. 4. Then continue to follow our recommended order numbers 3 8 to properly distribute tension to the screen material. 7
8 CENTER SUPPORT BAR 1. Insert the Support Joiner (I) into each side of the Center Support Bar (H) to complete assembly. Support joiner Center support bar 2. Insert the Center Support Bar (H) into the upper top groove on the back of the frame (not the one where the fix plate inserts) with the bottom end near the approximate center point of the frame and place it in at an angle so that both ends of the bar are in alignment with the groove. 3. Slide the top end of the end bar into the top center point location as shown below to complete the center support bar installation. This will provide added stability to your frame and add tension to the material. 8
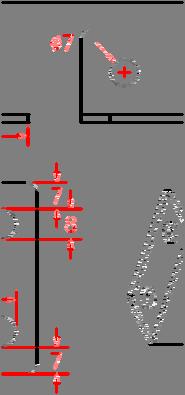
9 INSTALLATION Wall Horizontal Curved Frame Mid Point (Y Bracket) L Point (L Bracket) R Point (L Bracket) 9
10 1. Locate your desired installation height, draw the Datum Line and mark the drill hole area of the Mid Point. Note: The center of the hole must align with the Datum Line. 2. Mark the drill hole area of the L Point and the R Point. The top of the bracket must align with the Datum Line. 3. Drill a hole with the proper bit size according to the included Wood Screws (F). 4. Line up the brackets with the drilled holes on the installation location and screw then in using a Phillips screwdriver. 5. Position the fixed frame screen onto the Y Bracket (D) and push down at the center of the bottom frame to secure the insertion of the frame into the Y Bracket. 6. Combine the 1.77 L Bracket (B) with the installed mounted 4 L Bracket (C) using the Butterfly Screws (K) and then position frame onto the bracket. Note: Step 6 only refers to models 125w and above. Models 85w 115w use four 1.77 L Brackets (B). 7. The brackets provide flexibility by allowing the fixed frame screen to slide to the slides. This is an important feature as it allows your screen to be properly centered. 10
11 Model Numbers Parts List Curve235- Model Number 85w 96w 103w 115w 125w 138w 147w 158w Part Name Horizontal Curved Frame Upright Vertical Frame Elbow Joint M5*15 Assembly Screw Screen Material Top/Bottom Tension Rod Side Tension Rod Center Support Bar Support Joiner Fix Plate Dry wall anchor M5*45 Wood Screw " L Bracket " L Bracket Y Bracket Butterfly Screw Dimensions of Diagram on page 9 View View Overall Overall Frame Model Distance Distance Width Height Width Height Height Number (D) (E) (A1) (A2) (B1) (B2) (C) 85w (1986) (845) (2166) (1025) (86) (1050) (1050) 96w (2244) (954) (2424) (1134) (98) (1150) (1150) 103w (2407) (1024) (2587) (1204) (106) (1200) (1200) 115w (2688) (1143) (2868) (1323) (122) (1300) (1300) 125w (2921) (1242) (3101) (1422) (136) (1500) (1500) 138w (3225) (1371) (3405) (1511) (158) (1600) (1600) 147w (3435) (1461) (3615) (1641) (173) (1700) (1700) 158w (3693) (1570) (3873) (1750) (192) (1750) (1750) Measurement dimensions are intended as a reference only and subject to change without notice. Note: Data Error may be ±1" Unit: (mm) 11


 Height (B) Height")


 96\"(2.")
 125\"(2..35:1) 138\"(2.")
 Diagonal 2166 2423")


 85.")


12 Lunette Series Dimension Table1 Unit:mm Diagonal Overall Viewing Frame Overall Viewing Frame Model Size/Aspect Ratio Width (A) Width (A1) Width (A2) Height (B) Height (B1) B2 C Depth (D) Curve235-85W Curve235-96W Curve W Curve W Curve W Curve W Curve W Unit: Inches 85"(2.35:1) 96"(2.35:1) 103"(2..35:1) 115"(2..35:1) 125"(2..35:1) 138"(2..35:1) 158"(2..35:1) Diagonal Overall Viewing Frame Overall Viewing Frame Model Size/Aspect Ratio Width (A) Width (A1) Width (A2) Height (B) Height (B1) B2 C Depth (D) Curve235-85W Curve235-96W Curve W Curve W Curve W Curve W Curve W 85"(2.35:1) 96"(2.35:1) 103"(2..35:1) 115"(2..35:1) 125"(2..35:1) 138"(2..35:1) 158"(2..35:1) Measurements are intended as a reference only and are subject to change without notice. Note: Data Error may be ±1" E E Unit: mm 12
13 Warranty Policy Two (2) Year parts and labor warranty from defects in workmanship from purchase date as follows (except for refurbished units as specified below). Three (3) Year parts and labor warranty from defects in workmanship for GEMR (Government, Educational, Military, & Religious) purchases of new product only. Refurbished Units carry a DAY parts and labor warranty. Each party will be responsible for one way shipping during the warranty period. A RMA (Return Merchandise Authorization) number must be issued in order to process a replacement or to authorize a return for warranty repair. Elite Screens will, at its sole option replace or repair the defective unit with a replacement *(see exceptions below) after the defective unit or parts have been received. Once the product is received, Elite Screens will send out a replacement *unit to the customer by ground service (subject to inventory availability). Do Not Return Any Unauthorized Items to Elite Screens, as they will be refused and returned at your expense. The RMA Number must be included on the outside label of your shipping box. Our warehouse is not authorized to accept returns without an RMA number on the shipping label. RMA Numbers are valid for 45 days from the date issued. Missing Parts must be reported within 7 days of receipt. If reported after 7 days, the customer will be responsible for shipping and handling fees. If reported after 30 days of receipt, the customer will be responsible for cost of parts and shipping & handling fees. *A New or refurbished replacement will be send out to the customer depending on the type of purchase (new or refurbished) and based on stock availability. North America only U.S. and Canada For Warranty and Service requests, please submit an RMA/Service Form at: /warrantysupportform Please visit this link for full Warranty information: /warranty For Customer Service and Technical questions, please contact Elite Screens at: Telephone: (877) service@elitescreens.com Fax: (562) techsupport@elitescreens.com REMEMBER TO REGISTER YOUR PRODUCT AT: 13
14 Contact Info US & Canada Tech Support & Warranty Claim Please contact us at or call #3 or fax Europe Tech Support & Warranty Claim Please contact us at or call +49 (0) Asia Tech Support & Warranty Claim Please contact us at or call +86 (0) Taiwan Tech Support & Warranty Claim Please contact us at or call America: Europe: Elite Screens Inc Elite Screens Europe Manning Way Lübecker Straße 1 Cerritos, CA 703 USA Hamburg, Germany Tel: Tel: Fax: Fax: info@elitescreens.eu Asia: Elite Screens France S.A.S Elite Screens China Corp. 11, Allée William Penn Longxi Duimianling Industry Zone Surenes, France Longcheng Longgang District, Tel: ShenZhen GuangDong, China Fax: Tel: +86 (0) info.fr@elitescreens.com Fax: +86 (0) /fr.cn.cn Japan: Taiwan: Elite Screens Japan Corp. Elite Screens Taiwan Corp Tsuruma, Machida shi, 4F., No Wuguan Rd. Wugu Township Taipei Tokyo, Japan County 248, Taiwan (Wugu Industrial Park) Tel: Taiwan (R.O.C) Fax: + 81(0) Tel: info@elitescreens.jp Fax: Latin America Contact: Info.la@elitescreens.com East Asia Contact: Info.ea@elitescreens.com India Contact: Info.ea@elitescreens.com 14
WhiteBoardScreen Universal Series
 Whiteboard Projection Screen WhiteBoardScreen Universal Series User s Guide Rev. 111110-JA www.elitescreens.com info@elitescreens.com Parts List for WhiteBoardScreen Universal Please make sure all parts
Lunette Series. Home Theater Curved Fixed Frame Projection Screen. User s Guide. Important Safety and Warning Precautions
 Lunette Series Home Theater Curved Fixed Frame Projection Screen User s Guide Important Safety and Warning Precautions Please follow these instructions carefully to ensure proper maintenance and safety
Lunette 2 Series. Curved Fixed Frame Projection Screen. User s Guide
 Lunette 2 Series Curved Fixed Frame Projection Screen User s Guide Important Safety and Warning Precautions Please follow these instructions carefully to ensure proper maintenance and safety with your
Lunette Series. Home Theater Curved Fixed Frame Projection Screen. User s Guide. Important Safety and Warning Precautions
 Lunette Series Home Theater Curved Fixed Frame Projection Screen User s Guide Important Safety and Warning Precautions Please follow these instructions carefully to ensure proper maintenance and safety
Ambient Light Rejecting Fixed Frame Screen. (3.9 width frame) User s Guide
 User s Guide") Ambient Light Rejecting Fixed Frame Screen (3.9 width frame) User s Guide Attention: The DarkStar 9 is composed of high quality sensitive multi-layer projection material. Please follow the precautions
Ambient Light Rejecting Fixed Frame Screen (3.9 width frame) User s Guide Attention: The DarkStar 9 is composed of high quality sensitive multi-layer projection material. Please follow the precautions
Sable Frame Series. Fixed Frame Projection Screen. Featuring CineGrey 3D Ambient Light Rejecting Material. User s Guide
 Sable Frame Series Fixed Frame Projection Screen Featuring CineGrey 3D Ambient Light Rejecting Material User s Guide Congratulations on your new Sable Frame purchase! The screen material included is our
Sable Frame CineGrey 3D
 Sable Frame CineGrey 3D Ambient Light Rejecting Fixed Frame USER S GUIDE (spring type) Congratulations on your new Sable Frame purchase! The screen material included is our ISF Certified CineGrey 3D which
PAPER. dry erase. 1.2 How The WhiteBoard. glare. Available. 1.3 Sizes
 WhiteBoardScreen Universal SERIES Section 1: Screen Design 1.1 What is it for? WhiteBoardScreen Universal is a revolutionary projection screen with the dry erase capabilities. This 2 in 1 product eliminates
ezframe CineGrey 5D Ambient Light Rejecting Fixed Frame Screen
 1 ezframe CineGrey 5D Ambient Light Rejecting Fixed Frame USER S GUIDE Congratulations on your new ezframe purchase! The screen material included is our award winning CineGrey 5D which is a front projection
INSTA-RP 2 SCREEN SERIES
 Section 1: Screen Design 1.1 What is it for? INSTA-RP 2 SCREEN SERIES The Insta-RP 2 Screen is a self-adhesive optical rear projection screen film material suitable for commercial applications such as
WHITEBOARDSCREEN SERIES
 Section 1: Screen Design 1.1 What is it for? WHITEBOARDSCREEN SERIES The revolutionary whiteboard marker erasable front projection screen is well designed for bright environments. Multiscreen combines
Aeon AcousticPro UHD Series
 Aeon AcousticPro UHD Series EDGE FREE Fixed Frame Sound Transparent Projection Screen User s Guide Product Description: The Aeon AcousticPro UHD Series is a fixed frame projection screen that uses Elite
Aeon ALR Series. EDGE FREE Ambient Light Rejecting Fixed Frame Screen USER S GUIDE
 Aeon ALR Series EDGE FREE Ambient Light Rejecting Fixed Frame Screen USER S GUIDE Product Description: The Aeon ALR Series is a fixed frame projection screen with an EDGE FREE design The EDGE FREE design
Aeon CineGrey 3D Series
 Aeon CineGrey 3D Series EDGE FREE Ceiling/Ambient Light Rejecting Fixed Frame Screen USER S GUIDE Version 2 (Spring type) Product Description: The Aeon Series is a fixed frame projection screen that uses
Aeon CLR Series EDGE FREE CLR Fixed Frame Screen w/ StarBright CLR (Ceiling Light Rejecting ) Front Projection Material
 Front Projection Material") Aeon CLR Series EDGE FREE CLR Fixed Frame Screen w/ StarBright CLR (Ceiling Light Rejecting ) Front Projection Material User s Guide Product Description: The Aeon CLR Series is an ultra-short throw fixed
Aeon CLR Series EDGE FREE CLR Fixed Frame Screen w/ StarBright CLR (Ceiling Light Rejecting ) Front Projection Material User s Guide Product Description: The Aeon CLR Series is an ultra-short throw fixed
Manual Pull-Down Screen. Elite Manual Series USER S GUIDE MATTE WHITE. Rev. 1.3
 Manual Pull-Down Screen Elite Manual Series USER S GUIDE MATTE WHITE Pre-installation 1. Carefully unpack the screen 2. Always handle the screen on a clean and level surface. a: Vertical hooks suspend
Elara NanoEdge Fixed Frame Screen User Guide
 Elara NanoEdge Fixed Frame Screen User Guide INTRODUCTION INTRODUCTION WARNING This product may contain sharp edges, please handle with care. Protective gloves are recommended. A minimum of two people
Mount to the Wall INSTALLATION MANUAL
 Mount to the Wall 15 Locate the Wooden Studs This step applies to wooden stud wall installation only. Determine and mark the exact locations of two stud centers on the wall. Wooden studs should be spaced
OWNER'S MANUAL. Bunk Bed NOTE: THIS INSTRUCTION BOOKLET CONTAINS IMPORTANT SAFETY INFORMATION PLEASE READ AND KEEP FOR FUTURE REFERENCE.
 OWNER'S MANUAL Bunk Bed Model No.: DASE3618P- PINE DASE3618W- WALNUT NOTE: THIS INSTRUCTION BOOKLET CONTAINS IMPORTANT SAFETY INFORMATION PLEASE READ AND KEEP FOR FUTURE REFERENCE. RECEIPT OF PURCHASE:
LED Thin Frame Fixed Frame Screen User Guide
 LED Thin Frame Fixed Frame Screen User Guide INTRODUCTION INTRODUCTION WARNING - Sharp Edges This product may contain sharp edges, please handle with care. Protective gloves are recommended. WARNING -
Installation And Care Instructions. Vertical Honeycomb Shades
 Installation And Care Instructions Vertical Honeycomb Shades Rev 5/2013 Table Of Contents Getting Started... 3 Parts Overview... 4 Materials Required... 5 Tools Required... 6 Outside Mount Installation...
INSTALLATION AND CARE INSTRUCTIONS
 INSTALLATION AND CARE INSTRUCTIONS Vertical Applications Honeycomb Shades 52 C8-10-3401 Rev 2/14 CONTENTS Introduction...2 Before You Begin...3 Vertical Application Parts Overview...4 Materials Required...5
INSTRUCTION BOOK FOR. Parallax 0.8 Screen
 INSTRUCTION BOOK FOR Parallax 0.8 Screen Included Hardware Large Wall Bracket (47" Long) Installation screws not included Quantities vary by screen size: Screens 80" and smaller viewing width = 1 Screens
QWALL 5.2 (2 Back Panels)
") QWALL 5. ( Back Panels) SHOWER ACRYLIC WALL INSTALLATION INSTRUCTIONS IMPORTANT DreamLine TM reserves the right to alter, modify or redesign products at any time without prior notice. For the latest up-to-date
QWALL 5. ( Back Panels) SHOWER ACRYLIC WALL INSTALLATION INSTRUCTIONS IMPORTANT DreamLine TM reserves the right to alter, modify or redesign products at any time without prior notice. For the latest up-to-date
Basic Spring Motor Roller Shades
 Basic Spring Motor Roller Shades ATTENTION!!! READ CAREFULLY! This shade has a reliable long-lasting Spring Motor. The Spring Motor must have proper tension in order to function as intended. Handling in
Vertical Honeycomb Shades
 Step by Step Installation Instructions Vertical Honeycomb Shades Customer Service 800.248.8888 or visit us online at smithandnoble.com Thank you for purchasing from Smith+Noble. Your new shades have been
Aeon Series. EDGE FREE Fixed Frame Projection Screen. User s Guide
 Applies to all available screen materials: Aeon Series EDGE FREE Fixed Frame Projection Screen User s Guide CineGrey 3D, CineGrey and CineWhite Product Description: The Aeon Series is a fixed frame projection
QWALL 4 ACRYLIC SHOWER WALL INSTALLATION INSTRUCTIONS
 QWALL 4 ACRYLIC SHOWER WALL INSTALLATION INSTRUCTIONS IMPORTANT DreamLine TM reserves the right to alter, modify or redesign products at any time without prior notice. For the latest up-to-date technical
PORTROD WALL MOUNTED HEIGHT ROD
 PORTROD WALL MOUNTED HEIGHT ROD USER INSTRUCTIONS P/N UMPORTROD Rev 1-052112 1 PORTROD Thank you for your purchase of this Health o meter Professional product. Please read this manual carefully, and keep
FENCE INSTALLATION GUIDE 8 HIGH WALLS
 FENCE INSTALLATION GUIDE 8 HIGH WALLS 1.866.648.9336 www.simtekfence.com INSTALLATION GUIDE These instructions are designed to assist both professional installers and do-it-yourselfers of SimTek decorative
OWNER'S MANUAL TWIN OVER FULL BUNK BED DATE OF PURCHASE: MODEL #: TG-BTC01E ESPRESSO TG-BTC01W WHITE
 OWNER'S MANUAL TWIN OVER FULL BUNK BED MODEL #: TG-BTC01E ESPRESSO TG-BTC01W WHITE NOTE: THIS INSTRUCTION BOOKLET CONTAINS IMPORTANT SAFETY INFORMATION. PLEASE READ AND KEEP FOR FUTURE REFERENCE. DATE
Dual Purpose Projection Screen
 Dual Purpose Screen WhiteBoardScreen Series User s Guide Thank you for choosing the WhiteboardScreen Series dry-erase whiteboard projection screen! Please read through this user guide before utilizing
FENCE INSTALLATION GUIDE 6 HIGH FENCE
 FENCE INSTALLATION GUIDE 6 HIGH FENCE 1.866.648.9336 www.simtekfence.com INSTALLATION GUIDE These instructions are designed to assist both professional installers and do-it-yourselfers of SimTek decorative
Models 2230 and 2240
 Models 2230 and 2240 Overview... 2 Tools Needed... 2 Hardware...3 Assembly... 4-13 Installation... 14 Drawer Removal... 15 Operation... 15 Maintenance... 15 Accessories... 16 Limited Warranty... 16 Perform
Horizontal Shadings. Installation & Operating Instructions
 Horizontal Shadings Installation & Operating Instructions TABLE OF CONTENTS Getting Started: Mounting Types...3 Installation Components...3 Tools and Fasteners Needed...4 Product View...5 Installation:
Steele TV Stand Stock # BH
 LOT NUMBER: DATE PURCHASED: / / Steele TV Stand Stock # BH46-084-899-02 ADULT ASSEMBLY REQUIRED If you have any questions regarding assembly or if parts are missing, DO NOT return this item to the store
LOGAN HUTCH WITH SHELVES 36
 LOGAN HUTCH WITH SHELVES 36 Date: 12-May-15 www. potterybarn.com Page 1 of 9 Important Safety Instructions: Please read all instructions carefully before assembling. For your safety, assembly by two or
BLYTHE BUNK BED TWIN OVER TWIN
 pottery barn kids BLYTHE BUNK BED TWIN OVER TWIN www.potterybarnkids.com Date: 2014-Sept.-25 Page 1 of 11 WARNING:. Failure to follow these warnings and assembly instructions could result in serious injury
Gared Pro-S Portable Backstop
 Models: 9616 & 9618 Installation, Operation and Maintenance Instructions Please read all instructions before attempting installation or operation of these units SAVE THESE INSTRUCTIONS FOR FUTURE USE PUBLICATION
DO NOT RETURN PRODUCT TO THE STORE
 Model Number: UPC Code: Color: DL7519E 0-65857-17348-2 Espresso DL7519W 0-65857-17349-9 White Congratulations on your latest furniture purchase! Dorel Living furniture has been developed with quality,
1200 SERIES 2 PANEL DOOR rev.1 DETAILED INSTALLATION INTRUCTIONS
 1200 SERIES 2 PANEL DOOR 10.2013 rev.1 DETAILED INSTALLATION INTRUCTIONS GENERAL: Door elevations shown in these instructions are as viewed from the outside. X denotes the active or moving panel(s). O
INSTALLATION AND CARE INSTRUCTIONS
 INSTALLATION AND CARE INSTRUCTIONS Skylight Manually Operated Honeycomb Shades 20 C8-10-1806 2/15 1 INTRODUCTION Thank you for purchasing our product. Your new shade has been custom built for you from
Installation Manual for Metal Emperor Lockers
 P a g e 1 Table of Contents Page General Notes and Tools Required 2-3 Assemble Shelves with Coat Hooks/Coat Rods 4 Fastening Chart 5 Knock Down Locker Assembly (Banks of Three) 6-12 Appendix A: Dress End
INSTALLATION INSTRUCTIONS
 CREATING POSITIVE CUSTOMER EXPERIENCES INSTALLATION INSTRUCTIONS Universal Low Profile Tilt Mount for 42 to 63 Flat Panels NORTH AMERICA 3130 East Miraloma Avenue Anaheim, CA 92806 USA USA and Canada Phone:
Stuff-Your-Stuff Platform Bed (Twin and Full)
") Stuff-Your-Stuff Platform Bed (Twin and Full) Pre-Assembly: Please read all instructions before beginning assembly. Assembly by two people is a must. Save all packing materials until assembly is complete
Stuff-Your-Stuff Platform Bed (Twin and Full) Pre-Assembly: Please read all instructions before beginning assembly. Assembly by two people is a must. Save all packing materials until assembly is complete
INSTALLATION AND CARE INSTRUCTIONS
 INSTALLATION AND CARE INSTRUCTIONS Vertical Applications Honeycomb Shades CONTENTS Introduction...2 Before You Begin...3 Vertical Application Parts Overview...4 Materials Required...5 Tools Required...6
Model No.: UPC CODE: Color
 DOREL ASIA BUNK BED Model No.: UPC CODE: Color WM3911-13 0-65857-15752-9 PINE WM3921-13 0-65857-15700-0 LIGHT CHERRY WM3921E2 0-65857-16529-6 MOCHA WM3921B-DC 0-65857-16887-7 BLACK WM3921W-DC-13 0-65857-16277-6
Models 2130 and 2140
 Models 2130 and 2140 Overview... 2 Tools Needed... 2 Hardware... 2 Assembly... 3-10 Installation...11 Operation... 11 Maintenance... 12 Accessories...12 Limited Warranty... 12 Printed in USA 2007 Perform
Please Do Not Return This Product To The Store!
 MODEL NOS. T8512 TOURNAMENT SERIES 3 TABLE TENNIS TABLE OWNER'S MANUAL 1. Read this manual carefully before starting assembly. Read each step completely before beginning each step. 2. Some smaller parts
Models 2130 and 2140
 Models 2130 and 2140 Overview... 2 Tools Needed... 2 Hardware... 2 Assembly... 3-10 Installation...11 Operation... 11 Maintenance... 12 Accessories...12 Limited Warranty... 12 Perform the following sequence
TITAN INDUSTRIAL RACK 6-FOOT TALL / 4-SHELF
 TITAN INDUSTRIAL RACK 6-FOOT TALL / 4-SHELF DXST10000 IMPORTANT: Please read this manual carefully before assembling this storage rack and save it for reference INSTRUCTION MANUAL 3 TABLE OF CONTENTS
INSTALLATION GUIDE Hisense Laser TV Display Screen
 INSTLLTION GUIDE Hisense Laser TV Display Screen efore you install this product, read this guide completely and make sure you understand all of the content. ES-G835M8 ENGLISH Product Description The Hisense
CATALINA STEP BED ASSEMBLY INSTRUCTIONS
 pottery barn kids CATALINA STEP BED ASSEMBLY INSTRUCTIONS www.potterybarnkids.com Date: 2013-Apr-26 Page 1 of 8 WARNING: Failure to follow these warnings and assembly instructions could result in serious
INSTRUCTION MANUAL TWIN WOODEN DAYBED MODEL NO: UPC CODE: NOTE: Lot number: Date of purchase: / / WM6394E ESPRESSO WM6394W WHITE WM6394B BLACK
 INSTRUCTION MANUAL TWIN WOODEN DAYBED MODEL NO: WM6394E ESPRESSO WM6394W WHITE WM6394B BLACK UPC CODE: 0-65857-16370-4 ESPRESSO 0-65857-16371-1 WHITE 0-65857-16890-7 BLACK NOTE: THIS INSTRUCTION BOOKLET
INSTALLATION GUIDE Hisense Laser TV Display Screen
 INSTALLATION GUIDE Hisense Laser TV Display Screen Before you install this product, read this guide completely and make sure you understand all of the content. ES-G1811M2-1 ENGLISH Product Description
! WARNING: FALL HAZARD - To prevent death or serious injury from
 pottery barn kids ARMOIRE CHANGING TABLE! WARNING: FALL HAZARD - To prevent death or serious injury from falls, always keep child within arm s reach. Read all instructions before use of the changing table.
ASSEMBLY INSTRUCTIONS
 ASSEMBLY INSTRUCTIONS UltraHD Storage Cabinet (Model No. 16238) 48in. W X 24in. D X 72in. H (1.21 m x 60.9 cm x 1.83 m) Reference page 12 for special care and maintenance of stainless steel TR170619 (pg
Installation Instructions. Tools Needed. Tape measure. Level. Shovel or Post hole digger. Concrete. Drill. Stakes. Mallet or hammer.
 Installation Guide EcoStone Fence 1330 West 400 North Orem, UT 84057 Toll Free 1.866.648.9336 Tel. 1.801.655.5236 Fax 1.801.655.5240 www.ecostonefence.com Installation Instructions Introduction. These
PATRIOT DOCKS ASSEMBLY INSTRUCTIONS
 6/1/2008 PATRIOT DOCKS ASSEMBLY INSTRUCTIONS Congratulations on your new Patriot Dock purchase. This manual contains instructions to assemble basic dock configurations for use at typical shoreline application.
ProLine PL60 - PL70 - PL80 RETURN PANEL SUPPLEMENT
 INSTALLATION INSTRUCTIONS ProLine PL60 - PL70 - PL80 RETURN PANEL SUPPLEMENT Copyright Alumax Bath Enclosures 2013. All rights reserved. G03000000 7-1-13 Three-Year Limited Residential Warranty Alumax
INSTALLATION MANUAL CTM-VESA
 INSTALLATION MANUAL CTM-VESA Premier Mounts 3130 E. Miraloma Avenue Anaheim, CA 92806 Phone: (800) 368-9700 Fax: (800) 832-4888 mounts@mounts.com www.mounts.com IN-CTMVESA.R1 PBL-110 Projector Mount Page
WARNING: Failure to follow these warnings and assembly instructions could
 OXFORD BUNK BED TWIN OVER TWIN & FULL OVER FULL For Bunk Bed Twin Over Twin WARNING: Failure to follow these warnings and assembly instructions could result in serious injury or death. To help prevent
Installation Instructions
 Installation Instructions To ensure that your installation proceeds smoothly--please read these instructions carefully before you begin. P r o d u c t s Luxury Faucets and Accessories Jean Nouvel Product
Installation Operation Care
 Installation Operation Care Designer Roller and Designer Screen Shades Standard and Cassette Cordless Lifting System CONTENTS Getting Started: Product Views... 1 Tools and Fasteners Needed... 3 Installation
DOREL ASIA COUNTER HEIGHT DESK NEED HELP! Model No: WM3514 UPC CODE:
 DOREL ASIA COUNTER HEIGHT DESK Model No: UPC CODE: 0-65857-15762-8 NOTE: THIS INSTRUCTION BOOKLET CONTAINS IMPORTANT SAFETY INFORMATION. PLEASE READ AND KEEP FOR FUTURE REFERENCE. Lot number: (TAKEN FROM
Tauten Tab Tension Screen User Manual
 Tauten Tab Tension Screen User Manual Thank you for choosing a Tauten Series Tab Tension screen by Cirrus Screens. Please read through this user manual and understand all instructions before installing
ATTENTION USE THIS MANUAL TO ASSEMBLE THE TWIN BUNK BED TWIN BUNKBED
 TWIN BUNKBED Model Number: UPC Code: Color: DL891-1 0-6585-196-1 Mocha Customer satisfaction is important to us at Dorel Asia. Our agents are available Monday to Friday 8am to 5pm (EST) to answer any question
DOREL ASIA KITCHEN CART
 DOREL ASIA Model No: WM6545N (Natural) WM6545W (White) UPC CODE: 0-65857-16525-8 (Natural) 0-65857-16526-5 (White) NOTE: THIS INSTRUCTION BOOKLET CONTAINS IMPORTANT SAFETY INFORMATION. PLEASE READ AND
CABANA / PAVILION ASSEMBLY ALUMINUM FRAME MODELS
 Assembled cabanas are large & heavy. Assemble at place of use. CABANA / PAVILION ASSEMBLY ALUMINUM FRAME MODELS Step 1 CAUTION: To avoid damage to the finish of your Cabana frame, prepare a smooth, non-scratch
E N G L I S H GARDEN SHED. Assembly Instructions. Suitable for Models WITH VARYING DEPTHS
 GARDEN SHED Assembly Instructions Suitable for Models 6' Wide 8' Wide 0' Wide WITH VARYING DEPTHS GI0003 November 0 INSTALLATION ADVICE It's Not That Difficult! The construction of your shed isn't as complicated
Mercer Crib (M6801)- Assembly and Operation Manual
- Assembly and Operation Manual") Mercer Crib (M6801)- Assembly and Operation Manual Congratulations on purchasing this product. This crib will provide many years of service if you adhere to the following guidelines for assembly, maintenance,
Mercer Crib (M6801)- Assembly and Operation Manual Congratulations on purchasing this product. This crib will provide many years of service if you adhere to the following guidelines for assembly, maintenance,
ATTENTION USE THIS MANUAL TO ASSEMBLE THE TRIPLE BUNK BED TRIPLE BUNKBED
 TRIPLE BUNKBED Model Number: UPC Code: Color: DL891TBB 0-6585-182-2 Mocha Customer satisfaction is important to us at Dorel Asia. Our agents are available Monday to Friday 8am to 5pm (EST) to answer any
Northcote Wardrobe with Toy Box Base & Shelf L2988
 Thank you for shopping with GLTC, we hope you enjoy having this product in your home. www.gltc.co.uk Northcote Wardrobe with Toy Box Base & Shelf L2988 We know assembling furniture, toys or accessories
OWNER S MANUAL Table Tennis Table Patent Pending
 OWNER S MANUAL Table Tennis Table Patent Pending Be sure to write your model number and serial number here for future reference. You can find these numbers printed on the bottom of the table. MODEL # T8266
DOREL ASIA DESK, HUTCH & CHAIR. Lot number: Date of purchase: / /
 DOREL ASIA DESK, HUTCH & CHAIR Model No. : WMP-DC (White) WMP-DC (White) WMEP-DC (Espresso) WMEP-DC (Espresso) UPC CODE: 0-6585-50-8 (White) 0-6585-50-5 (White) 0-6585-565- (Espresso) 0-6585-565-9 (Espresso)
Please read and understand the OnBoard Timpani Cart Owner s Manual before using the Timpani Cart.
 Assembly and Owner s Manual OnBoard Timpani Cart Performance Position Towing Position CONTENTS Important User Information...........................2 General......................................2 Manufacturer.................................2
TITAN INDUSTRIAL RACK 4-FOOT TALL / 3-SHELF
 TITAN INDUSTRIAL RACK 4-FOOT TALL / 3-SHELF DXST4500 IMPORTANT: Please read this manual carefully before assembling this storage rack and save it for reference INSTRUCTION MANUAL 3 TABLE OF CONTENTS TECHNICAL
VALENCIA CORNER DOOR WITH RETURN
 VALENCIA CORNER DOOR WITH RETURN INSTALLATION GUIDE SEALANT REQUIRED TO COMPLETE THIS INSTALLATION: ( not supplied) Sika Silaflex NG To seal the WHITE shower door and returns to the shower tray. Usage:
DASHLEY COLLECTION GAZEBO
 DASHLEY COLLECTION GAZEBO MODEL NO. 088-1760-6 INSTRUCTIONS Toll-free: 1-888-670-6684 IMPORTANT: Please read this manual carefully before beginning assembly of this product. Keep this manual for future
Models 2030 and 2040
 Models 2030 and 2040 Overview... 2 Tools Needed... 2 Hardware... 2 Assembly... 3-8 Installation... 9 Operation... 9 Maintenance... 10 Accessories... 10 Limited Warranty... 10 Document # 101290 0607 Printed
NOVA-EXT Versatile Projector Mount Model: NOVA-EXT
 INSTALLATION MANUAL NOVA-EXT Versatile Projector Mount Model: NOVA-EXT NORTH AMERICA 3130 East Miraloma Avenue Anaheim, CA 92806 USA USA and Canada Phone: 800-368-9700 Fax: 800-832-4888 Other Locations
Dry-Erase Ambient Light Rejecting Projection Screen
 WhiteBoardScreen Series Dry-Erase Ambient Light Rejecting Projection Screen User s Guide Thank you for choosing the WhiteBoardScreen Series dry-erase whiteboard projection screen! Please read through this
OPERATION MANUAL MODEL T SUPPLIER CODE: BJ T
 OPERATION MANUAL MODEL 60-5800T SUPPLIER CODE: BJ-60-5800T COMMODORE II BIG & TALL LEATHER EXECUTIVE CHAIR CUSTOMER SERVICE For fastest service, please visit our website at www.comfortproducts.net/support
ClearSpan Hydroponic Table Kit
 ClearSpan Hydroponic Table Kit Hydroponic Table Kit (The 109314 (4' x 16') model is shown.) Designed to grow healthy plants without soil using mineral-nutrient solutions. 2009 ClearSpan All Rights Reserved.
Loading Dock Safety Gate
 Installation Instructions/Operation and Maintenance Manual Models LDSG-120-PCY LDSG-144-PCY Table of Contents Product Information...2 Parts List...3 Installation Instructions...5 Operation...13 Inspection
Instructions for Catalina Round/Square Extension Tables
 Unpack the table onto a soft level surface and identify the listed items. Instructions for Catalina Round/Square Extension Tables Hardware included: ¼ - #20 x 35mm s (4) ¼ - #20 x 50mm s (8) Cross nuts
APPLICATION. General Instructions. Maintenance and Cleaning. Removal. Shelf Life, Storage and Shipping. 2 Product Bulletin ixc
 APPLICATION Note: For graphics larger than poster size, we recommend contacting a professional graphics installer for assistance. General Instructions Please review the General Instructions and Method:
MM340 Installation Instructions IMPORTANT SAFETY INSTRUCTIONS - SAVE THESE INSTRUCTIONS
 MM30 Installation Instructions IMPORTANT SAFETY INSTRUCTIONS - SAVE THESE INSTRUCTIONS Please read this entire manual before you begin. Do not unpack any contents until you verify all requirements on PAGE.
LOGAN BASE WITH DOORS 36
 (NOTE : This product comes with only 1 shelf that is adjustable please refer to Assembly Instruction) LOGAN BASE WITH DOORS 36 Date: 2 Apr 15 www. potterybarn.com Page 1 of 7 Important Safety Instructions:
400A 40113V, 401A 40120V, & 401AL 40120VL ALUMINUM VERTICAL 4000 LB LIFT INCLUDES SCREW LEG ASSEMBLY INSTRUCTIONS
 12/11/07 PAGE 1 OF 12 400A 40113V, 401A 40120V, & 401AL 40120VL ALUMINUM VERTICAL 4000 LB LIFT INCLUDES SCREW LEG ASSEMBLY INSTRUCTIONS Thank you for purchasing our product! *Please read these instructions
PART #MSP-DCCPPWS Plasma Wall Swing-Out (PWS) Wall Mount
 Wall Mount") I N S T R U C T I O N M A N U A L PART # Plasma Wall Swing-Out (PWS) Wall Mount The wall mount is a rugged, versatile, and installer-friendly solution to unique display mounting requirements. With the
I N S T R U C T I O N M A N U A L PART # Plasma Wall Swing-Out (PWS) Wall Mount The wall mount is a rugged, versatile, and installer-friendly solution to unique display mounting requirements. With the
AVA REGENCY BUNK BED TWIN OVER FULL
 pottery barn kids AVA REGENCY BUNK BED TWIN OVER FULL www.potterybarnkids.com Date: 2016-Feb.-18 Page 1 of 14 WARNING: Failure to follow these warnings and assembly instructions could result in serious
Constable Oak Extension Dining Table
 Constable Oak Extension Dining Table Assembly Instructions - Please keep for future reference 176/0325 Dimensions Width - 160/ 200cm Depth - 90cm Height - 75cm Important - Please read these instructions
BOUNCE TABLE TENNIS TABLE & ACCESSORIES ASSEMBLY INSTRUCTIONS
 BOUNCE TABLE TENNIS TABLE & ACCESSORIES ASSEMBLY INSTRUCTIONS NG2325 THANK YOU! Thank you for your purchase of our product. We work around the clock and around the globe to ensure that our products maintain
Installation Operation Care. Duette Honeycomb Shades EasyRise Lifting System
 Installation Operation Care Duette Honeycomb Shades EasyRise Lifting System CONTENTS Getting Started: Product View... 1 Tools and Fasteners Needed... 2 Installation: Installation Overview... 3 Mount the
Full Motion Gas Spring TV Wall Mount - 24" to 55" Installation Instructions
 Full Motion Gas Spring TV Wall Mount - 24" to 55" Installation Instructions 04-1102A Caution Prior to installation of this product, the installation instructions should be read and completely understood.
tile redi redi DOOR Redi Redi Swing Slide g TM TM...Opening Doors to Stunning Showers! TM TM SERIES: CONFIGURATION: MOUNTING PACKAGE:
 redi DOOR INSTALLATION INSTRUCTIONS tile redi Redi Redi Swing Slide g TM TM...Opening Doors to Stunning Showers! TM TM SERIES: CONFIGURATION: MOUNTING PACKAGE: 3000 Door-Door Header, sliding doors RDQCI5301
OWNER'S MANUAL. Please Do Not Return This Product To The Store!
 MODEL NO. T8190SA TABLE TENNIS TABLE OWNER'S MANUAL 1. Read this manual carefully before starting assembly. Read each step completely before beginning each step.. Some smaller parts may be shipped inside
MM540 Installation Instructions IMPORTANT SAFETY INSTRUCTIONS - SAVE THESE INSTRUCTIONS
 MM50 Installation Instructions IMPORTANT SAFETY INSTRUCTIONS - SAVE THESE INSTRUCTIONS Please read this entire manual before you begin. Do not unpack any contents until you verify all requirements on PAGE.