Instruction Manual. 250mm BENCH SAW. Model SROM Our tool range has you covered for DIY. Whatever the job, make light work of it with MAKO tools.
|
|
|
- Crystal Gordon
- 5 years ago
- Views:
Transcription


1 Instruction Manual 250mm BENCH SAW Model SROM 1197 Our tool range has you covered for DIY. Whatever the job, make light work of it with MAKO tools.
2 Dear Valued Customer, Thank you for purchasing this Mako Power Tool. We are dedicated to providing quality Mako Power Tools at competitive prices. Whether you are serious about DIY or just a casual user, our range of power tools are perfect for any job. Mako 2 Year DIY Warranty: All Mako Power Tools are backed by a comprehensive 2 year DIY warranty. If for any reason you experience a fault with this power tool, please contact the retailer that it was purchased from, and present the receipt for a full refund or replacement. The warranty is void if damage is not attributable to normal wear and tear, if the tool is used commercially, the motor is overloaded or is tampered with, is damaged by accident or if it is bought second hand. Continued use after partial failure, or use with the incorrect accessories will void the warranty. This warranty excludes all Mako accessories, which are covered by their own appropriate warranties. MAKO TOOLS ARE FOR DIY USE ONLY. THEY ARE NOT DESIGNED OR APPROVED FOR INDUSTRIAL OR COMMERCIAL USE.
3
4

5
6
7
8


9 CONTENTS: 1. Safety Instructions and Warnings 2. Components 3. Proper Usage 4. General Safety Instructions 5. Specific Safety Instructions 6. Before Starting the Saw 7. Assembly 8. Using the Saw 9. Operation 10. Replacing the Power Cable 11. Maintenance & Cleaning 12. Technical Data 13. Storage 14. Disposal and Recycling DESCRIPTION OF SYMBOLS: Please read all of the safety and operating instructions carefully before using this bench saw. Please pay particular attention to all sections of this User Guide that carry warning symbols and notices. Observe caution and safety notes! Caution - electric shock! Danger to life! Wear hearing protection, dust protection mask, protective glasses and protective gloves. Keep children away from electrical power tools! Protect electrical power tools from moisture! Check that the device, mains lead and plug are in good condition! Safety classⅡ Dispose of packaging and appliance in an environmentally friendly way! Caution! Risk of injury! Do not reach into the running saw blade.
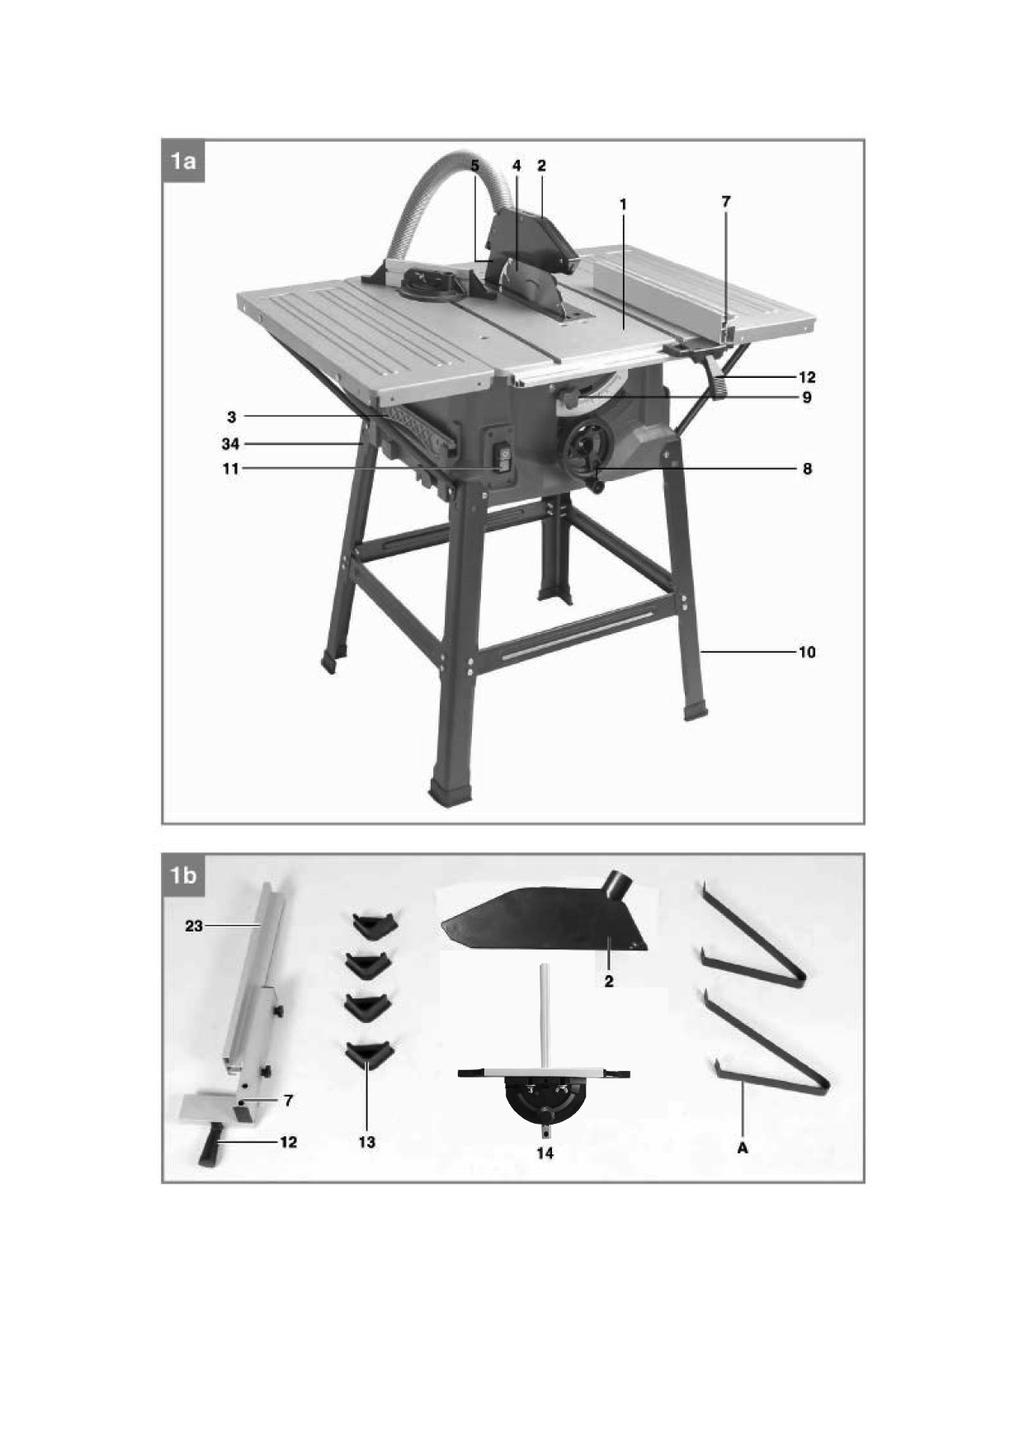
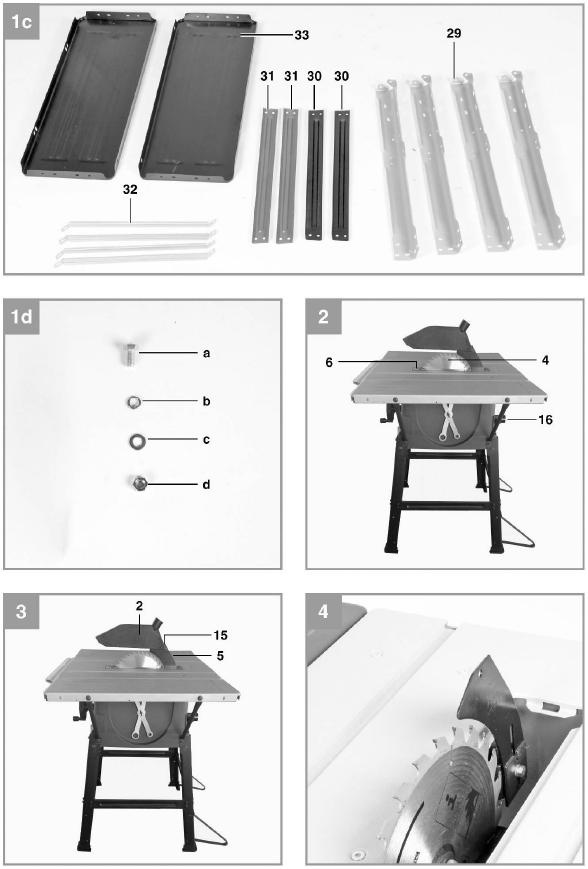
10 1. SAFETY INSTRUCTIONS AND WARNINGS: The equipment complies with the safety regulations required for electrical equipment. Read through the instructions for use before starting up the equipment. Improper use can lead to personal Injury and properly damage. Persons who are not familiar with the instructions may not operate the equipment. Keep the instructions for use in safe custody. Children and youths are not permitted to operate the equipment 2. COMPONENTS: 1. Saw Table 2. Saw Blade Guard 3. Push Stick 4. Saw Blade 5. Riving Knife 6. Table Insert 7. Rip Fence 8. Hand Wheel 9. Adjusting and Locking Nut 10. Base Frame 11. On/Off Switch 12. Rip Fence Clamp 13. Rubber Foot x4 14. Cross Slide 15. Pivot Screw 16. Extractor Adapter 17. Countersunk Screw 18. Hole (riving knife) 19. Fastening Bolt 20. Pivot Clamp/Handle 21. Table Groove 22. Scale 23. Fence Rail 24. Fence Bracket 25. Slot in Fence 26. Screw and Nut x2 27. Slot in Fence 28. Guide Rail 29. Leg x4 30. Cross Rail x2 31. Side Rail x Side Table Braces x4 33. Table Width Extension x2 34. Tool Hook A. Leg Brace a. Hex Screw b. Spring Washer c. Flat Washer d. Nut Items supplied Please check that all parts are included as specified above. If parts are missing, please contact the sales outlet where you made your purchase at the latest within 5 working days after purchasing the product and upon presentation of a valid receipt. Open the packaging and take out the equipment with care. Remove the packaging material and any packaging and/or transportation braces (if used). Check to see if all items are supplied. Inspect the equipment and accessories for transport damage. If possible, please keep the packaging until the end of the guarantee period. Danger! The equipment and packaging material are not toys. Do not let children play with plastic bags, foils or small parts. There is a danger of swallowing or suffocating!
11 3. PROPER USE: This machine is designed for ripping and crosscutting wood and plastic in sizes corresponding to the machine size. It is not suitable for cutting firewood or round-wood. Use only saw blades which are suitable for the machine. Do not use cutting discs. The manufacturer assumes no liability whatsoever for improper use, or if the machine has been tampered with. Give equal attention to the safety instructions, assembly and operating instructions, as well as all prevailing accident prevention regulations. Even when the equipment is used as prescribed it is still impossible to eliminate certain residual risk factors. The following hazards may arise in connection with the machine s construction and design: Contact with the saw blade in the uncovered saw zone. Reaching into the running saw blade (cut injuries). Kick-back of workpieces and parts of workpieces. Saw blade fracturing. Catapulting of faulty carbide tips from the saw blade. Damage to hearing if essential ear-muffs are not used. Harmful emissions of wood dust when used in closed rooms. 4. GENERAL SAFETY INSTRUCTIONS: This appliance is not intended for use by persons (including children) with reduced physical, sensory or mental capabilities, or lack of experience and knowledge, unless they have been given supervision or instruction concerning use of the appliance by a person responsible for their safety. Children should be supervised to ensure that they do not play with the appliance. Keep your work area clean and well lit to prevent accidents. Don t use electric devices close to flammable liquids or gases, or in wet or damp environments. If you fail to observe this, there is danger of fire or explosion. Never leave the device running unattended. Never use the device when you are tired or lack concentration or if your reactions are impaired due to consumption of alcohol or medication. Lack of attention can lead to serious injury. Keep the tools clean and in good working order in order to be able to work better and safer. Don t wear bulky clothing or jewellery. Make sure you can stand stably and have shoes that won t slip. Use a head cover if you have long hair. Loose clothing, jewellery, and long hair can become entangled in moving parts. Always wear safety goggles. Wear a dust mask when working with materials that produce dust. Wear ear protection if a lot of noise is produced. Persons using the machines must not be distracted. This could cause one to lose control over the tool. Don t use any device that has a faulty on/off switch. An electric tool that can no longer be switched on or off is dangerous and must be repaired. Always switch the device on before coming into contact with the material. Remove keys and adjusting tools before switching on the device.
12 Never overload the machine. If the speed drops, unload the machine or switch it off. You will work safer and better with the appropriate electric tool in a specific area of application. Stop the workpiece from turning, for example with a clamping device or a vice. Don t work on any workpiece that is too small to clamp in place. If you hold the workpiece with your hand, then you can t operate the tool safely. Keep electric tools out of the reach of children. Only use accessories recommended by the manufacturer. The mains voltage must correspond to the information on the machine s type plate. Avoid body contact to grounded elements, e.g. pipes, radiators, stoves, and refrigerators to prevent an electric shock Never carry the device by the cable. Only pull the cable from the receptacle with the plug. Protect the cable from oil, heat, and sharp edges. Damaged cables can cause an electric shock. Check the device and power cable for damage before starting work. When plugging in the tool, make sure that the operating switch is not in the ON position. Only use approved extension cables when using the device outside. When using a cable drum, unwind it entirely in order to prevent the cable from heating up. The minimum suitable wire gauge is 1.5 mm 2. When working outside it is recommended that the tool always be supplied via a residual current device with a rated current of 30mA or less. Pull out the plug when you are not using the device, or are making adjustments. Always guide the cable away from the back of the tool. Ensure that the socket outlet that the tool is connected to is always accessible during use. If the supply cord is damaged, it must be replaced by a special cord or assembly available from the manufacturer or its service agent. 5. SPECIFIC SAFETY INSTRUCTIONS FOR TABLE SAWS: 1. Safety Precautions: Warning! Do not use damaged, cracked or deformed saw blades. Replace worn table inserts. Only use saw blades recommended by the manufacturer, which conform to EN Warning! Ensure, when changing the saw blade, that the cutting width and main body thickness of the replacement blade is not smaller than the thickness of the riving knife! Make sure that a suitable saw blade for the material to be cut is selected. Wear suitable personal protective equipment. This includes: Hearing protection to avoid the risk of becoming hearing impaired, Respiratory protection to avoid the risk of inhaling harmful dust, Wear gloves when handling saw blades and rough materials. Carry saw blades in a container whenever practical. Wear goggles. Sparks generated during work or splinters, chippings and dust coming from the device can lead to loss of eyesight. Connect a dust collecting device to the electric tool when sawing wood. The emission of dust is influenced, among other things, by the type of material to be processed, the significance of local separation (collection or source) and the correct setting of the hood/guide plates/guides. Do not use saw blades made of high-speed alloy steel (HSS steel).
13 Wear hearing protection. The generation of noise is influenced by various factors, including the characteristics of saw blades, condition of saw blade and electric tool. Use saw blades which were designed for reduced noise development, insofar as possible. In times of non-use keep the push stick or the push block with the electrical power tool in its holder at all times. 2. Maintenance and Repair: Pull out the mains plug for any adjustment or repair tasks. Maintain the electric tool and tool attachments regularly and if necessary, initiate repairs in order to reduce noise. Report faults on the electric tool, protective devices or the tool attachment to the person responsible for safety as soon as they are discovered. 3. Safe Work Use the push stick or cross-slide, to pass the workpiece securely through the saw blade. Make sure that the riving knife is always used, and set up is correct. Use the upper blade guard and set it to the correct position. Only use saw blades for which the maximum permissible speed is not lower than the maximum spindle speed of the table saw and which are suitable for the material to be cut. Do not cut rebates or grooves without fitting a suitable guard, e.g. a tunnel-type guard, over the saw table. Circular saws must not be used for slotting jobs (cutting grooves which end in the workpiece). When transporting the electric tool, only use specified carry points. Never use the protective devices for handling or transport. Make sure that the upper part of the saw blade is covered during transport, e.g. by the guard. Be sure to only use spacers and spindle rings specified by the manufacturer as suitable for the intended purpose. The floor around the machine must be level, clean and free of loose particles, such as chips and cutting residues. Always stand to the side of the saw blade when working with the saw. Do not remove any cutting residues or other parts of workpieces from the cutting zone while the machine is running and the saw unit is not at rest. Make sure that the machine is always secured on a workbench or a table if at all possible. Support long workpieces (e.g. with a roller table) to prevent them sagging at the end of a cut. Attention! Never remove loose splinters, chips or jammed pieces of wood while the saw blade is running. Switch off the machine to troubleshoot or remove jammed pieces of wood. Disconnect the main power plug - Refitting, including adjusting and measuring works, and cleaning must be carried out only when the motor is switched off. Before switching on again, ensure that keys and adjustment tools have been removed. Warning! This electric tool generates an electromagnetic field during operation. This field can impair active or passive medical implants under certain conditions. In order to prevent the risk of serious or deadly injuries, we recommend that persons with medical implants consult with their physician and the manufacturer of the medical implant prior to operating the electric tool. 4. Safety Instructions for Handling of Saw Blades Only use multi-piece blades or cutter heads if you have mastered their use.
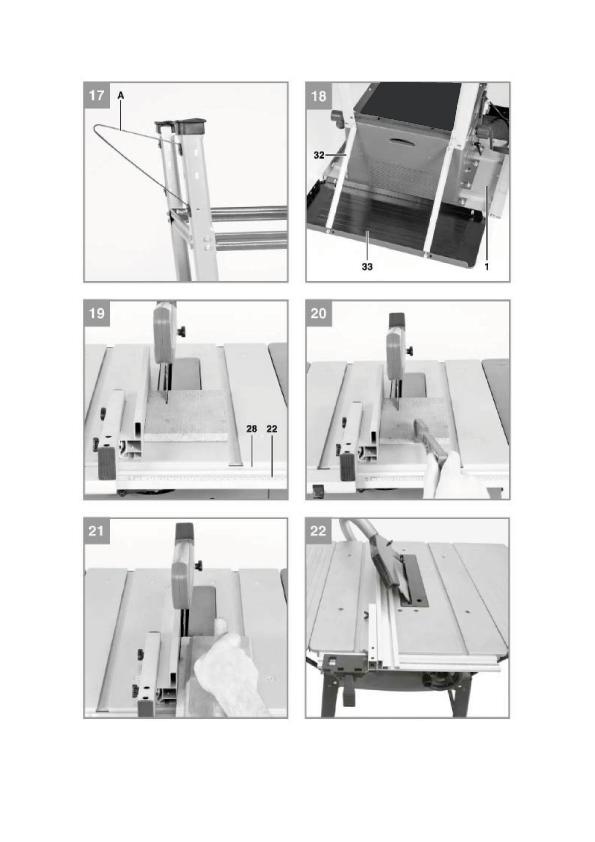
14 Observe the maximum speed. The maximum speed specified on the multi-piece blade or cutter head may not be exceeded. If specified, observe the speed range. Confirm the motor/saw blade direction of rotation. Do not use any multi-piece blades or cutter heads with cracks. Discard them. Repairs are not permitted. Clean grease, oil and water off the clamping surfaces. Do not use any loose reducing rings or bushes for the reducing of holes on saw blades. Make sure that fixed reducer rings for securing multi-piece blades or cutter heads have the same diameter and have at least 1/3 of the cutting diameter. Make sure that fixed reducer rings are parallel to each other. Handle multi-piece blades or cutter heads with caution. They are ideally stored in the original package or special containers. Wear protective gloves in order to improve grip and to further reduce the risk of injury. Prior to the use of multi-piece blades or cutter heads, make sure that all protective devices are properly fastened. Prior to use, make sure that the multi-piece blade or cutter head meets the technical requirements of this electric tool and is properly fastened. Only use the supplied saw blade for sawing operations in wood, materials similar to wood, plastics and non-ferrous metals (This tool is NOT suitable for magnesium and alloys containing magnesium). 6. BEFORE STARTING: Assemble the machine in a stable position, in other words on a workbench, a sub-frame or the like. Secure it if you wish to use the machine on a stationary basis. Before starting the machine, check that all covers and safety equipment are correctly fitted. The saw blade must be able to run freely. Check all the moving parts to ensure that they move easily. Before you connect the machine, check the information on the rating plate against the mains data. Warning! Always pull the power plug before making adjustments to the equipment. 7. ASSEMBLY: Warning! Always pull the power plug before making adjustments to the equipment. 7.1 Assembling the Base Frame - Fig.15,16,17 Turn the saw body upside down and place it on the floor. Use the Washers (c) and the Hex Screws (a) to fasten the four Legs (29) loosely to the saw body. Now use the Hex Screws (a), the Washers (c) and the Nuts (d) to fasten the Side Rails (31) and the Cross Rails (30) loosely to the legs (29). Please note: The Side Rails are longer than the Cross Rails. Finally, tighten all screws and nuts on the base frame. Screw the Leg Braces (A) to the rear legs (29) so that they point towards the rear of the machine - Fig. 17. Plug the Rubber Feet (13) onto the Legs (29).
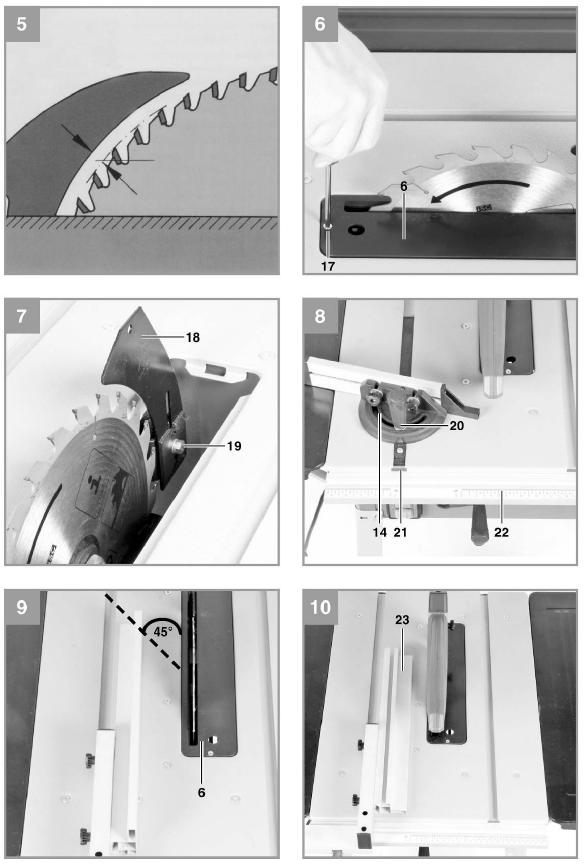
15 7.2 Fitting & removing the Saw Blade Guard Fig 3 Mount the Saw Blade Guard (2) on the Riving Knife (5) so that the screw fits through the hole (18) in the Riving Knife. Do not tighten the screw (15) too far the Saw Blade Guard must be able to move freely. To remove the Saw Blade Guard, proceed in reverse order. Warning! The Guard (2) must always be lowered over the workpiece before you begin to cut Setting the splitter - Fig. 3,5,6 & 7 Danger! Pull out the power plug before making adjustments to the equipment. Set the Saw Blade (4) to maximum cutting depth, move to 0 position and lock in place. Remove the Saw Blade Guard - see 6.2. Take out the Table Insert (6) - see 6.4. Slacken the Fastening Bolt (19) Setting for maximum cuts - Fig. 5,6 & 7 Push up the splitter (5) until the gap between the saw table (1) and the upper edge of the splitter (5) equals approx. 10 cm. The distance between the blade (4) and the splitter (5) should be 3-5 mm. Retighten the screw (19) and mount the table insert (6) (Fig. 6). 7.4 Changing the table insert - Fig. 6 To prevent increased likelihood of injury the table insert should be changed whenever it is worn or damaged. Remove the saw blade guard (2). Remove the 2 countersunk head screws (17). Take out the worn table insert (6). To fit the replacement table insert, proceed in reverse order. 7.5 Fitting & replacing the Saw Blade - Fig. 4 Important! Pull out the power plug first. Remove the Table Insert by undoing the two Countersunk Screws - see 6.4. Undo the nut with a 24mm wrench on the nut itself and a second 10mm wrench on the motor shaft to apply counter-pressure. Important! Turn the nut in the direction of rotation of the Saw Blade. Take off the outer flange and pull the old Saw Blade off the inner flange by dropping the blade at an angle. Clean the blade flange thoroughly before fitting the new Saw Blade. Mount and fasten the new Saw Blade in reverse order. Important! Note the running direction. The cutting angle of the teeth must point in the running direction, i.e. forwards (see the arrow on the Saw Blade Guard). Refit and set the Riving Knife (5) and the Saw Blade Guard (2) - see 6.2, 6.3. Check to make sure that all safety devices are properly mounted and in good working condition before you begin working with the saw again. 7.6 Assembling the Table Width Extensions - Fig. 18 Use the Screws (a), Nuts (d) and Washers (c) to fasten the Table Width Extensions (33) loosely to the Saw Table (1). Screw the Side Table Braces (32) loosely onto the Base Frame (10) and onto the Table Width Extensions (33).
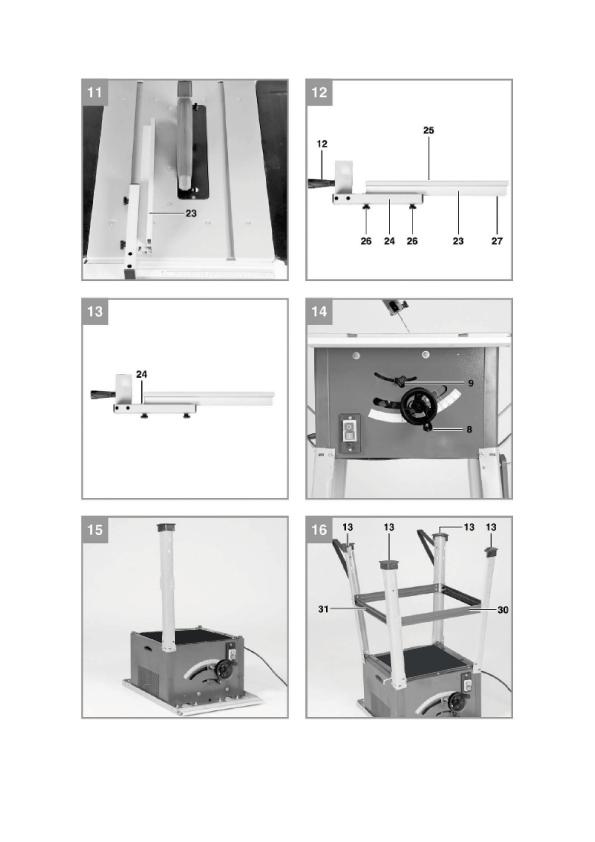
16 Align the Table Width Extensions (33) level with the Saw Table. Finally, tighten all Screws (a). Connect the supplied dust collection hose to the top of the Saw Guard and to the side branch of the Tee fitting at the lower rear of the saw body. 8. USING THE SAW 8.1 ON/OFF switch - Fig. 1 To turn the saw on, press the green button I. Wait for the blade to reach its maximum speed of rotation before beginning the cut. To turn the machine off again, press the red button O. 8.2 Cutting depth - Fig. 1 Turn the Hand Crank (8) to set the blade (4) to the required cutting depth. Turn anti-clockwise: larger cutting depth Turn clockwise: smaller cutting depth 8.3 Rip Fence Fence Height - Fig. 9 & 13 The Rip Fence (7) supplied with the saw has two different guide faces. For thick material you must use the Fence Rail (23) as shown in Fig. 11; for thin material you must use the Fence Rail as shown in Fig.10. To change over the Fence Rail (23) to the Fence Bracket (24), you have to slacken the two Screws and Nuts (26) in order to disconnect the Fence Rail (23) from the Fence Bracket (24). Remove the two knurled Screws (26) from one slot (27) in the Fence Rail (23) and insert in the other slot (25). Remount the Fence Rail (23) on the Fence Bracket (24). The procedure for changing over to the high Fence Rail is similar Cutting Width: The Rip Fence (7) has to be used when making longitudinal cuts in wooden workpieces. The Rip Fence can be mounted on either side of the saw table (1). The Rip Fence (7) has to be mounted in the Guide Rail (28) of the Saw Table (1). The Rip Fence (7) can be set to the required dimension with the help of the Scale (22) on the Guide Rail (1). Note check settings with a ruler before cutting. You can clamp the Rip Fence in the required position by pressing the Rip Fence Clamp (12) Setting the Fence Rail position - Fig. 9 The Fence Rail (23) can be moved in backwards and forwards in order to prevent the workpiece from becoming jammed. Rule of Thumb: The rear end of the Fence Rail comes up against an imaginary line that begins roughly at the center of the blade and runs at an angle of 45 to the rear. Set the required cutting width. Slacken the knurled Screws (26) and pull the Fence Rail (23) forward until the rear touches that imaginary 45 line. Retighten the knurled Screws (26). Important! Do not push the Fence Rail (23) too far toward the Saw Blade. The distance between the Fence Rail (23) and the Saw Blade (4) should be approx. 2 cm. 8.4 Cross Slide Fig. 8 Slide the Cross Slide (14) into the Table Groove (21). Slacken the Pivot Clamp/Handle (20).
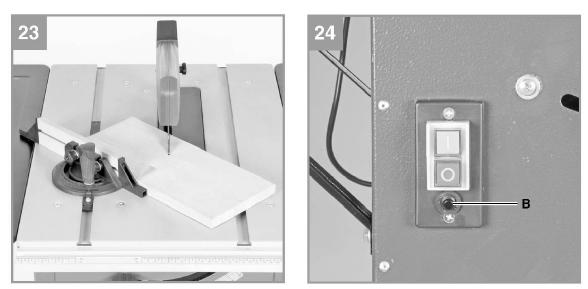
17 Turn the Cross Slide (14) until the arrow points to the angle required. Retighten the Pivot Clamp/Handle (20). 8.5 Setting the Saw Blade angle - Fig. 14 Undo the Adjusting and Locking Nut (9). Turn the Hand Wheel to set the desired angle on the scale. Lock the Adjusting and Locking Nut again in the required angle position. 9. OPERATION Warning! After every new adjustment we recommend you to make a trial cut in order to check the new settings. After switching on the saw, wait for the blade to reach its maximum speed of rotation before commencing with the cut. Take extra care when starting the cut! Never use the equipment without the suction function. Regularly check and clean the dust extraction ducts. A Vacuum Cleaner hose can be connected to the dust extraction Tee at the rear of the saw for safe collection of dust produced in cutting Making longitudinal cuts Fig. 19 Longitudinal cutting (also known as ripping) is when you use the saw to cut along the grain of the wood. Press one edge of the workpiece against the Rip Fence (7) while the flat side lies on the Saw Table (1). The Blade Guard (2) must always be lowered over the workpiece. When you make a longitudinal cut, never adopt a working position that is in line with the cutting direction. Set the Rip Fence (7) in accordance with the workpiece height and the desired width. (See 8.3.) Switch on the saw. Place your hands (with fingers closed) flat on the workpiece and push the workpiece along the Rip Fence (7) and into the Saw Blade (4). Guide at the side with your left or right hand (depending on the position of the Rip Fence) only as far as the front edge of the Blade Guard. Always push the workpiece through to the end of the Riving Knife (5). Do not remove the offcut until the Saw Blade (4) has completely stopped. Secure long workpieces against falling off at the end of the cut with a roller stand or similar Cutting narrow workpieces - Fig. 20 Be sure to use the Push Stick (3) when making longitudinal cuts in workpieces smaller than 120mm in width. A push stick is supplied with the saw! Replace a worn or damaged push stick immediately. Be sure to use a push block when making longitudinal cuts in very narrow workpieces with a width of 30 mm and less. The low guide face of the parallel stop is best used in this case. There is no push block supplied with the saw! Replace the push block without delay when it becomes worn.
18 9.1.3 Making bevel cuts - Fig. 14 & 22 Bevel cuts must always be used using the Rip Fence (7). Set the Saw Blade (4) to the desired angle. (See 8.5.) Set the Rip Fence (7) according to the workpiece width and height (see 8.3.1) Carry out the cut according to the work-piece width (see 8.1.1, and ) Making cross cuts - Fig. 23 Slide the Cross Slide (21) into one of the Table Grooves (21) and adjust to the required angle. (See 8.4.) If you also want to tilt the Saw Blade (4), use the Table Groove (21) which prevents your hand and the Cross Slide from making contact with the Blade Guard. Hold the workpiece firmly against the Cross Slide (14). Switch on the saw. Push the Cross Slide (14) and the workpiece toward the Saw Blade in order to make the cut. Warning! Always hold the guided part of the workpiece. Never hold the part which is to be cut off. Push the Cross Slide (14) forward until the workpiece is cut all the way through. Switch off the saw again. Do not remove the offcut until the blade has stopped rotating. 10. REPLACING THE POWER CABLE Danger! If the power cable for this equipment is damaged, it must be replaced by the manufacturer or its after-sales service or similarly trained personnel to avoid danger. 11. CLEANING, MAINTENANCE AND ORDERING OF SPARE PARTS Danger! Always pull out the mains power plug before starting any cleaning work Cleaning Keep all safety devices, air vents and the motor housing free of dirt and dust as far as possible. Wipe the equipment with a clean cloth or blow it with compressed air at low pressure. We recommend that you clean the tool immediately each time you have finished using it. Clean the equipment regularly with a moist cloth and some soft soap. Do not use cleaning agents or solvents; these could attack the plastic parts of the equipment. Ensure that no water can seep into the device. The ingress of water into an electric tool increases the risk of an electric shock Carbon brushes In case of excessive sparking, have the carbon brushes checked only by a qualified electrician. Danger! The carbon brushes should not be replaced by anyone but a qualified electrician Maintenance There are no parts inside the equipment which require additional maintenance.

19 12. TECHNICAL DATA This machine is double insulated. Voltage V, 50Hz Rating: 1800W No Load Speed: 3000rpm Saw blade: 250mm x 30 x 3.2 mm, 48T Angle or mitre bench: - -45º/0 /+45 0ºx0º: 310mm x 70mm cutting size 0 x45 : 310mm x 42mm 45x0º: 205mm x 70mm 45x 45º: 205mm x 42mm 13. STORAGE Store the equipment and accessories in a cool, dry place. Store the electric tool in its original packaging where possible. 14. DISPOSAL The equipment is supplied in packaging to prevent it from being damaged in transit. The raw materials in this packaging can be reused or recycled. The equipment and its accessories are made of various types of material, such as metal and plastic. Never place defective equipment in your household refuse. The equipment should be taken to a suitable collection center for proper disposal. If you do not know the whereabouts of such a collection point, you should ask in your local council offices.
ANGLE GRINDER STAND USER GUIDE AFTER SALES SUPPORT
 ANGLE GRINDER STAND USER GUIDE Important: retain for future reference - please read carefully. Now you have purchased a WORKZONE product you can rest assured in the knowledge that as well as your 1 year
SAFETY AND OPERATING MANUAL
 SAFETY AND OPERATING MANUAL BladeRunner X2 WX572 9 10 8 11 5 7 12 6 20 1 2 4 3 14 13 15 A2 A1 17 18 B2 B1 1 2 1 2 19 B3 3 4 2 C 1 D1 D1 C 2 1 E1 D2 1 2 E2 1 2 F G1 G1 F OFF ON G2 G3 H1 H2 I1 I2 I1 I2 J
GENERAL OPERATIONAL PRECAUTIONS PRECAUTIONS ON USING DISC GRINDER
 GENERAL OPERATIONAL PRECAUTIONS WARNING! When using electric tools, basic safety precautions should always be followed to reduce the risk of fire, electric shock and personal injury, including the following.
ATBG280/6 Bench Grinder Bench Grinder ATBG280/6 230V-50Hz 280 Watt 150mm x 25mm Wheel size
 Bench Grinder ATBG280/6 230V-50Hz 280 Watt 150mm x 25mm Wheel size SPECIFICATIONS Model Number : ATBG280/6 Nominal Voltage Power Consumption No load speed Wheel size Weight 230Volt 50Hz 280 Watts 2880
Circular Saw MODEL MT581. WARNING: For your personal safety, READ and UNDERSTAND before using. SAVE THESE INSTRUCTIONS FOR FUTURE REFERENCE.
 ENGLISH Circular Saw MODEL MT58 005337 DOUBLE INSULATION I N S T R U C T I O N M A N U A L WARNING: For your personal safety, READ and UNDERSTAND before using. SAVE THESE INSTRUCTIONS FOR FUTURE REFERENCE.
Finger Jointer. Operating and Safety Instructions FJA300
 Finger Jointer FJA300 Operating and Safety Instructions www.tritontools.com Thank you for purchasing this Triton tool. These instructions contain information necessary for safe and effective operation
Cut-Off Machine Model CC 14SE
 Cut-Off Machine Model CC 14SE Handling instructions NOTE: Before using this Electric Power Tool, carefully read through these HANDLING INSTRUCTIONS to ensure efficient, safe operation. It is recommended
Instruction Manual 13MM DRILL PRESS. Model SROM1199. Our tool range has you covered for DIY. Whatever the job, make light work of it with MAKO tools.
 Instruction Manual 13MM DRILL PRESS Model SROM1199 Our tool range has you covered for DIY. Whatever the job, make light work of it with MAKO tools. PRODUCT FEATURES: 1. Pulley Cover 9. Feed Handle 2. Motor
INSTRUCTION BOOKLET AND WARRANTY INFORMATION 6 BENCH GRINDER
 INSTRUCTION BOOKLET AND WARRANTY INFORMATION 6 BENCH GRINDER Part No.: SW1250 PLEASE READ CARE AND SAFETY INSTRUCTIONS BEFORE USE SPECIFICATIONS Part No.: SW1250 Input Voltage: 240V Frequency: 50Hz Rated
Angle Grinder MODEL 9553B MODEL 9555B
 ENGLISH Angle Grinder MODEL 9553B MODEL 9555B 006649 DOUBLE INSULATION I N S T R U C T I O N M A N U A L WARNING: For your personal safety, READ and UNDERSTAND before using. SAVE THESE INSTRUCTIONS FOR
 GENERAL OPERATIONAL PRECAUTIONS WARNING! When using electric tools, basic safety precautions should always be followed to reduce the risk of fire, electric shock and personal injury, including the following.
Tile Cutting Saw 600W. OZTCS600WA. To view the full range visit: Instruction Manual 3 Year Replacement Warranty
 Tile Cutting Saw 600W Instruction Manual 3 Year Replacement Warranty OZTCS600WA! WARNING! Read all safety warnings and all instructions. Failure to follow the warnings and instructions may result in electric
GENERAL OPERATIONAL PRECAUTIONS
 GENERAL OPERATIONAL PRECAUTIONS WARNING! When using electric tools, basic safety precautions should always be followed to reduce the risk of fire, electric shock and personal injury, including the following.
GENERAL OPERATIONAL PRECAUTIONS PRECAUTIONS ON USING CUT-OFF MACHINE
 GENERAL OPERATIONAL PRECAUTIONS WARNING! When using electric tools, basic safety precautions should always be followed to reduce the risk of fire, electric shock and personal injury, including the following.
Instruction Manual DETAIL SANDER. Model SROM Our tool range has you covered for DIY. Whatever the job, make light work of it with MAKO tools.
 Instruction Manual DETAIL SANDER Model SROM 1187 Our tool range has you covered for DIY. Whatever the job, make light work of it with MAKO tools. Product Features: 1. On/Off Switch 2. Base Pad 3. Dust
BB Inch Double Cut Saw Assembly & Operating Instructions READ ALL INSTRUCTIONS AND WARNINGS BEFORE USING THIS PRODUCT.
 BB07552 5 Inch Double Cut Saw Assembly & Operating Instructions READ ALL INSTRUCTIONS AND WARNINGS BEFORE USING THIS PRODUCT. This manual provides important information on proper operation & maintenance.
12mm (Max) 6mm (Max) 82mm (Max) 12mm (Max) 6mm (Max)
 6mm (Max) 82mm (Max) 12mm (Max) 6mm (Max)") 1 1 2 2 3 3 82mm (Max) 12mm (Max) 12mm (Max) 6mm (Max) 4 4 5 6 8 6mm (Max) 0.5 0mm 1 5 6 7 7 8 9 9 A = B 10 11 12 D B 1 13 14 15 0 C A D E 16 17 18 F G D B N H J G I K 19 A 20 G L 21 C K 1mm L M 1mm 22
1 1 2 2 3 3 82mm (Max) 12mm (Max) 12mm (Max) 6mm (Max) 4 4 5 6 8 6mm (Max) 0.5 0mm 1 5 6 7 7 8 9 9 A = B 10 11 12 D B 1 13 14 15 0 C A D E 16 17 18 F G D B N H J G I K 19 A 20 G L 21 C K 1mm L M 1mm 22
GENERAL OPERATIONAL PRECAUTIONS
 GENERAL OPERATIONAL PRECAUTIONS WARNING! When using electric tools, basic safety precautions should always be followed to reduce the risk of fire, electric shock and personal injury, including the following.
Operating Manual 6 Industrial Bench Grinder ATBG280/
 Operating Manual 6 Industrial Bench Grinder ATBG280/6 804531 40 Year Australian Heritage The reputable name in bench grinders for 40 years Protect yourself and others by observing all safety information,
Impact Wrench. 19 mm (3/4 ) MODEL 6906
 MODEL 6906") Impact Wrench 9 mm (3/4 ) MODEL 6906 002290 DOUBLE INSULATION I N S T R U C T I O N M A N U A L WARNING: For your personal safety, READ and UNDERSTAND before using. SAVE THESE INSTRUCTIONS FOR FUTURE REFERENCE.
Impact Wrench 9 mm (3/4 ) MODEL 6906 002290 DOUBLE INSULATION I N S T R U C T I O N M A N U A L WARNING: For your personal safety, READ and UNDERSTAND before using. SAVE THESE INSTRUCTIONS FOR FUTURE REFERENCE.
45º 30º 25º 15º 20º 22.5º 0º 5º 10º WARRANTY WARNING
 0º 5º 10º 22.5º WHAT S IN THE BOX TABLE SAW 2000W 250mm INSTRUCTION MANUAL 15º 20º 25º 30º 45º Sliding Mitre Gauge Rip Fence Base Frame Legs x 4, Cross Struts x 4, Feet x 4 SPECIFICATIONS Motor: 2000W
Tapping Screw (W/Flange) 46 Cord Armor 47 Tube (D) 48 Cord. 45 Cord Clip. Tapping Screw (W/Flange) 10 Gear Cover Ass'y. 12 Socket (B) Ass'y
 46 Cord Armor 47 Tube (D) 48 Cord. 45 Cord Clip. Tapping Screw (W/Flange) 10 Gear Cover Ass'y. 12 Socket (B) Ass'y") W8VB The exploded assembly drawing should be used only for authoized service center. W8VB Item No. Part time 1 Magnetic Hex. Socket 2 Sub Stopper 3 O-Ring (S-16) 4 Locator (A) 5 Lock Sleeve (A) 6 O-Ring
W8VB The exploded assembly drawing should be used only for authoized service center. W8VB Item No. Part time 1 Magnetic Hex. Socket 2 Sub Stopper 3 O-Ring (S-16) 4 Locator (A) 5 Lock Sleeve (A) 6 O-Ring
Jigsaw Kit. Operating and Safety Instructions AJA300
 Jigsaw Kit AJA300 Operating and Safety Instructions www.tritontools.com Thank you for purchasing this Triton tool. These instructions contain information necessary for safe and effective operation of this
ROTARY HAMMER OWNER'S MANUAL
 ROTARY HAMMER OWNER'S MANUAL WARNING: Read carefully and understand all INSTRUCTIONS before operating. Failure to follow the safety rules and other basic safety precautions may result in serious personal
SAFETY AND OPERATING MANUAL
 SAFETY AND OPERATING MANUAL 2 General Power Tool Safety Warnings WARNING: Read all safety warnings and all instructions. Failure to follow the warnings and instructions may result in electric shock, fire
ENGLISH (Original instructions) INSTRUCTION MANUAL. Drill DS4012 DOUBLE INSULATION. IMPORTANT: Read Before Using.
 INSTRUCTION MANUAL. Drill DS4012 DOUBLE INSULATION. IMPORTANT: Read Before Using.") ENGLISH (Original instructions) INSTRUCTION MANUAL Drill DS402 05402 DOUBLE INSULATION IMPORTANT: Read Before Using. ENGLISH (Original instructions) SPECIFICATIONS Model DS402 Capacities Steel 3 mm Wood
ENGLISH (Original instructions) INSTRUCTION MANUAL Drill DS402 05402 DOUBLE INSULATION IMPORTANT: Read Before Using. ENGLISH (Original instructions) SPECIFICATIONS Model DS402 Capacities Steel 3 mm Wood
Impact Wrench MODEL TW1000. WARNING: For your personal safety, READ and UNDERSTAND before using. SAVE THESE INSTRUCTIONS FOR FUTURE REFERENCE.
 ENGLISH Impact Wrench MODEL TW000 00605 DOUBLE INSULATION I N S T R U C T I O N M A N U A L WARNING: For your personal safety, READ and UNDERSTAND before using. SAVE THESE INSTRUCTIONS FOR FUTURE REFERENCE.
MULTI FUNCTION SHARPENER
 WHAT S IN THE BOX MULTI FUNCTION SHARPENER 65W INSTRUCTION MANUAL SPECIFICATIONS Motor: 65W No Load Speed: 6,700/min Wheel Diameter: 49mm (2 ) Sharpening Capacity Drill bit: 3-10mm Blade: 6-51mm Weight:
COJSAWBX Electric Jig Saw Assembly & Operating Instructions
 COJSAWBX Electric Jig Saw Assembly & Operating Instructions READ ALL INSTRUCTIONS AND WARNINGS BEFORE USING THIS PRODUCT. This manual provides important information on proper operation and maintenance.
Handling instructions
 Hand Shear Model CE 16SA Handling instructions Note: Before using this Electric Power Tool, carefully read through these HANDLING INSTRUCTIONS to ensure efficient, safe operation. It is recommended that
INSTRUCTION MANUAL P W 355mm CUT OFF SAW. Black Cyan. Magenta Yellow. Code: P3059 Date: Edition: 07 Op: MJF
 INSTRUCTION MANUAL P3059 2400W 355mm CUT OFF SAW Black Cyan Magenta Yellow Code: P3059 Date: 110328 Edition: 07 Op: MJF CONTENTS Warranty 2 Introduction 3 Environmental protection 3 Description of symbols
45º 30º 25º 15º 20º 22.5º 0º 5º 10º WARRANTY WARNING
 0º 5º 10º 22.5º WHAT S IN THE BOX TABLE SAW 2000W 250mm INSTRUCTION MANUAL 15º 20º 25º 30º 45º Sliding Mitre Gauge Rip Fence Base Frame Legs x 4, Cross Struts x 4, Feet x 4 SPECIFICATIONS Motor: 2000W
Planer 82mm Watt
 Planer 82mm - 650 Watt Operation Manual 3 Year Replacement Warranty OZPL650A To view the full range visit: www.ozito.com.au 0209 SPECIFICATIONS MODEL NO. OZPL650A Motor size: Input: No load speed: Planing
MULTI-PURPOSE SAW MODEL NO. OZMPS500A OPERATING INSTRUCTIONS
 MULTI-PURPOSE SAW 500watt MODEL NO. OZMPS500A OPERATING INSTRUCTIONS To view our entire range visit www.ozito.com.au SPECIFICATIONS - MODEL NO. OZMPS500A Motor: Input: No load speed: Length of stroke:
Dust Collector. Model No: DC2200 (FM300S)
") Dust Collector Model No: DC2200 (FM300S) GENERAL SAFETY INSTRUCTIONS Before attempting to operate this machine, it is important that you read, understand and follow these instructions very carefully. They
Dust Collector Model No: DC2200 (FM300S) GENERAL SAFETY INSTRUCTIONS Before attempting to operate this machine, it is important that you read, understand and follow these instructions very carefully. They
Power Planer 1900B/N1900B/1902
 Power Planer 1900B N1900B 1902 SPECIFICATIONS Model 1900B/N1900B/1902 Planing width... 82 mm Planing depth... 1 mm Shiplapping depth... 9 mm No load speed (min -1 )...16,000 Overall length... 290 mm Net
TILE CUTTING SAW. 500W 115mm INSTRUCTION MANUAL SPECIFICATIONS. ozito.com.au TCS-115 WHAT S IN THE BOX. Tile Cutting Saw.
 WHAT S IN THE BOX TILE CUTTING SAW 500W 115mm INSTRUCTION MANUAL SPECIFICATIONS Motor: 500W Input: 230 240V~50Hz No Load Speed: 5,200min 1 Blade: Ø115 x Ø22.2mm Max. Depth Of Cut: 24mm Table Size: 330
planer/thicknesser 200 x 120mm
 instructions for planer/thicknesser 200 x 120mm model no: sm1311 Thank you for purchasing a Sealey product. Manufactured to a high standard, this product will, if used according to these instructions,
MINI RECIPROCATING SAW MODEL NO: CRS350M
 CRS350M - Mini Reciprocating saw.fm Page 1 Thursday, November 22, 2012 9:41 AM MINI RECIPROCATING SAW MODEL NO: CRS350M PART NO: 6462550 OPERATION & MAINTENANCE INSTRUCTIONS LS1112 CRS350M - Mini Reciprocating
ENGLISH (Original instructions) INSTRUCTION MANUAL. Shear Wrench 6922NB DOUBLE INSULATION. IMPORTANT: Read Before Using.
 INSTRUCTION MANUAL. Shear Wrench 6922NB DOUBLE INSULATION. IMPORTANT: Read Before Using.") ENGLISH (Original instructions) INSTRUCTION MANUAL Shear Wrench 69NB 00498 DOUBLE INSULATION IMPORTANT: Read Before Using. ENGLISH (Original instructions) SPECIFICATIONS Model 69NB Bolt size M6, M0, M
ENGLISH (Original instructions) INSTRUCTION MANUAL Shear Wrench 69NB 00498 DOUBLE INSULATION IMPORTANT: Read Before Using. ENGLISH (Original instructions) SPECIFICATIONS Model 69NB Bolt size M6, M0, M
Tube Facing Tool.
 www.swagelok.com Tube Facing Tool This manual contains important information for the safe and effective operation of the Swagelok TF72 series tube facing tool. Users should read and understand its contents
Instructions for Stone Cutting Machine
 Technical data Kg. Instructions for Stone Cutting Machine SCM600 3HP 2800rpm IP55 SCM800 3HP 2800rpm IP55 SCM1000 2800rpm IP55 SCM1200 2800rpm IP55 L=600 B=85(165) L=800 B=85(175) 500x510 0 or 45 600lt/h
ASSEMBLY AND OPERATING INSTRUCTIONS 10" TABLE SAW. FOX Model F36-527
 ASSEMBLY AND OPERATING INSTRUCTIONS 10" TABLE SAW FOX Model F36-527 1 10" Table Saw FOX MODEL F36-527 TABLE OF CONTENTS Safety instructions Page 3 Specific safety instructions for saws. Page 5 Specifications
UK Subject to change PAG-125/1020 Angle Grinder
 Subject to change www.servotool.nl 0511-09 USERS MANUAL Art.nr.AGM6010 PAG-125/1020 Angle Grinder 3 6 5 2 4 1 Fig. A 8 7 12 2 6 Fig. B Fig. D Fig. C Fig. E 2 Powercraft EXPLODED VIEW Powercraft 15 SPARE
HOLE CUTTER SHARPENER ASSEMBLY & SERVICE MANUAL
 HOLE CUTTER SHARPENER ASSEMBLY & SERVICE MANUAL WARNING You must thoroughly read and understand this manual before operating the equipment, paying particular attention to the Warning & Safety instructions.
ENGLISH (Original instructions) INSTRUCTION MANUAL. Curved Planer 1002BA DOUBLE INSULATION. IMPORTANT: Read Before Using.
 INSTRUCTION MANUAL. Curved Planer 1002BA DOUBLE INSULATION. IMPORTANT: Read Before Using.") ENGLISH (Original instructions) INSTRUCTION MANUAL Curved Planer 00BA 0059 DOUBLE INSULATION IMPORTANT: Read Before Using. ENGLISH (Original instructions) SPECIFICATIONS Model 00BA Planing width 0 mm Planing
ENGLISH (Original instructions) INSTRUCTION MANUAL Curved Planer 00BA 0059 DOUBLE INSULATION IMPORTANT: Read Before Using. ENGLISH (Original instructions) SPECIFICATIONS Model 00BA Planing width 0 mm Planing
10 SLIDING MITRE SAW MODEL NO: CMS10S2
 10 SLIDING MITRE SAW MODEL NO: CMS10S2 PART NO: 6461514 OPERATION & MAINTENANCE INSTRUCTIONS LS0312 INTRODUCTION Thank you for purchasing this CLARKE 10 Sliding Mitre Saw. Before attempting to use this
MICRO Shaper MT 300 Manual
 70 0 ProxxonTools.com MICRO Shaper Manual 0 0 70 U = V~ 70 0 0 0 U = V~ 70 U = V~ U = V~ U = V~ n = 6.000/min Messerwelle Breite = mm max U = V~ 4 7 9 3 3 6 4 5 Fig. Fig. Fig 8 4 3 Fig. Fig. 3a Fig. 3b
SAFETY AND OPERATING MANUAL. Hedge Trimmer WG205E WG206E WG207E WG208E
 SAFETY AND OPERATING MANUAL 2 PRODUCT SAFETY GENERAL Power Tool Safety Warnings WARNING: Read all instructions. Failure to follow all instructions listed below may result in electric shock, fire and/or
Cut-Off Machine CC 14SF. Read through carefully and understand these instructions before use. Handling instructions
 Cut-Off Machine CC 14SF Read through carefully and understand these instructions before use. Handling instructions GENERAL OPERATIONAL PRES WARNING! When using electric tools, basic safety precautions
PLATE JOINER 4 INCH. ASSEMBLY and OPERATING INSTRUCTIONS. Distributed Exclusively by Harbor Freight Tools
 PLATE JOINER 4 INCH 38437 ASSEMBLY and OPERATING INSTRUCTIONS Distributed Exclusively by Harbor Freight Tools 3491 Mission Oaks Blvd., Camarillo, CA 93011 Copyright 1998 by Harbor Freight Tools. All rights
Impact Wrench MODEL 6905B MODEL 6906
 ENGLISH Impact Wrench MODEL 6905B MODEL 6906 005305 DOUBLE INSULATION I N S T R U C T I O N M A N U A L WARNING: For your personal safety, READ and UNDERSTAND before using. SAVE THESE INSTRUCTIONS FOR
SAFETY AND OPERATING MANUAL. 750W/13mm IMPACT DRILL JM750ID
 SAFETY AND OPERATING MANUAL 750W/13mm IMPACT DRILL JM750ID GENERAL POWER TOOL SAFETY WARNINGS WARNING! Read all safety warnings and all instructions. Failure to follow the warnings and instructions may
Artikel-Nr.:
 CXMT 135; EX; UK Grinding and Engraving Tool Artikel-Nr.: 4419179 Ident-Nr.: 01018 Komponenten / Ersatzteile Position Artikel-Nr. Beschreibung 1 441917001006 nut 2 441917001008 fix pin 5 441917001011 screw
ENGLISH (Original instructions) INSTRUCTION MANUAL. Drill DOUBLE INSULATION. IMPORTANT: Read Before Using.
 INSTRUCTION MANUAL. Drill DOUBLE INSULATION. IMPORTANT: Read Before Using.") ENGLISH (Original instructions) INSTRUCTION MANUAL Drill 64 642 643 007894 DOUBLE INSULATION IMPORTANT: Read Before Using. ENGLISH (Original instructions) SPECIFICATIONS Model 64 642 643 Capacities Steel
ENGLISH (Original instructions) INSTRUCTION MANUAL Drill 64 642 643 007894 DOUBLE INSULATION IMPORTANT: Read Before Using. ENGLISH (Original instructions) SPECIFICATIONS Model 64 642 643 Capacities Steel
1/4in. SHEET PALM SANDER
 1/4in. SHEET PALM SANDER OPERATING INSTRUCTIONS SPECIFICATIONS ITEM# 151608 Voltage: Max. output: No load speed: Cord: 120V ~ 60Hz 180W 14000 RPM 6 feet (2m) Dust-Sealed On/off Switch Dust Extraction Adaptor
PLEASE READ CARE AND SAFETY INSTRUCTIONS BEFORE USE
 INSTRUCTION BOOKLET 305mm Double Bevel Sliding Compound Mitre Saw Part No. SW1045 PLEASE READ CARE AND SAFETY INSTRUCTIONS BEFORE USE WARRANTY The product is warranted to be free from defects in materials
Drill INSTRUCTION MANUAL. WARNING: For your personal safety, READ and UNDERSTAND before using. SAVE THESE INSTRUCTIONS FOR FUTURE 1 REFERENCE.
 ENGLISH (Original instructions) INSTRUCTION MANUAL Drill 6411 6412 6413 007894 DOUBLE INSULATION WARNING: For your personal safety, READ and UNDERSTAND before using. SAVE THESE INSTRUCTIONS FOR FUTURE
ARROW SAW PRECISE CUT 8000 RPM WITH DUST COLLECTING ATTACHMENT INSTRUCTION BOOK MODEL NO
 ATTENTION If any components of this unit are broken or the unit does not operate properly, please contact Cabela s Customer Service. Retail Store Purchases: 1-800-905-2731 (U.S. & Canada) Catalog and Internet
18V CORDLESS STAPLER/NAILER
 18V CORDLESS STAPLER/NAILER MODEL NO: CONSN18LIC PART NO: 6487058 OPERATION & MAINTENANCE INSTRUCTIONS ORIGINAL INSTRUCTIONS LS0717 ISS2 2 INTRODUCTION Thank you for purchasing this CLARKE product. Before
TABLE SAW. 2000W 254mm WARRANTY INSTRUCTION MANUAL SPECIFICATIONS. ozito.com.au TBS-2000 WHAT S IN THE BOX
 WHAT S IN THE BOX TABLE SAW 2000W 254mm INSTRUCTION MANUAL SPECIFICATIONS Motor: 2000W (S6 40%) 1800W (S1) Input: 230-240V ~ 50Hz No Load Speed: 4,250/min Blade: Ø254mm x Ø30 x 2.8mm Blade Teeth: 24 TCT
10" Wet Tile Cutting Saw
 8035735 10" Wet Tile Cutting Saw Owner s Manual Read and understand all instructions before operation. Keep this manual for future reference pg. 2 SPECIFICATIONS ITEM DESCRIPTION Overall Dimensions (saw
ENGLISH (Original instructions) INSTRUCTION MANUAL. Drill MT600 MT601 DOUBLE INSULATION. IMPORTANT: Read Before Using.
 INSTRUCTION MANUAL. Drill MT600 MT601 DOUBLE INSULATION. IMPORTANT: Read Before Using.") ENGLISH (Original instructions) INSTRUCTION MANUAL Drill MT600 MT60 003635 DOUBLE INSULATION IMPORTANT: Read Before Using. ENGLISH (Original instructions) SPECIFICATIONS Model MT600 MT60 Capacities Steel
ENGLISH (Original instructions) INSTRUCTION MANUAL Drill MT600 MT60 003635 DOUBLE INSULATION IMPORTANT: Read Before Using. ENGLISH (Original instructions) SPECIFICATIONS Model MT600 MT60 Capacities Steel
COMPOUND MITRE SAW. 210mm (8¼ ) WARRANTY INSTRUCTION MANUAL SPECIFICATIONS. ozito.com.au CMS-1621S WHAT S IN THE BOX
 WARRANTY INSTRUCTION MANUAL SPECIFICATIONS. ozito.com.au CMS-1621S WHAT S IN THE BOX") WHAT S IN THE BOX COMPOUND MITRE SAW 210mm (8¼ ) INSTRUCTION MANUAL SPECIFICATIONS Motor: 1600W (S6 40%), 1400W (S1) No Load Speed: 5,000/min Blade: Ø210mm x Ø16 x 48T Mitre Angle: 0-45 left & right Bevel
WHAT S IN THE BOX COMPOUND MITRE SAW 210mm (8¼ ) INSTRUCTION MANUAL SPECIFICATIONS Motor: 1600W (S6 40%), 1400W (S1) No Load Speed: 5,000/min Blade: Ø210mm x Ø16 x 48T Mitre Angle: 0-45 left & right Bevel
SAFETY AND OPERATING MANUAL
 SAFETY AND OPERATING MANUAL 8 TABLE SAW SF08N5 Congratulations on your purchase of a power tool from Screwfix Direct Ltd. We want you to continue getting the best performance from it so this handbook includes
MULTI FUNCTION SHARPENER
 WHAT S IN THE BOX MULTI FUNCTION SHARPENER 65W INSTRUCTION MANUAL SPECIFICATIONS Motor: 65W No Load Speed: 6,7/min Wheel Diameter: 49mm (2 ) Sharpening Capacity Drill bit: 3-1mm Blade: 6-51mm Weight: 1.32kg
18 GAUGE ELECTRIC METAL SHEAR
 241-9895 18 GAUGE ELECTRIC METAL SHEAR Operator s Manual SAVE THIS MANUAL You will need this manual for safety instructions, operating procedures and warranty. Put it and the original sales receipt in
Hedge Trimmer. 450 Watt. HT-501. To view the full range visit: Operation Manual 2 Year Replacement Warranty
 Hedge Trimmer 450 Watt Operation Manual 2 Year Replacement Warranty HT-501 To view the full range visit: www.ozito.com.au 0109 SPECIFICATIONS - MODEL NO. HT-501 Motor size: Input: No load speed: Blade
OPERATION & MAINTENANCE
 DOUBLE HEADED METAL NIBBLER MODEL NO: DHC-2 PART NO: 6500233 OPERATION & MAINTENANCE INSTRUCTIONS LS0609 INTRODUCTION Thank you for purchasing this CLARKE Double Headed Metal Nibbler. Before attempting
ATD AMP Variable Speed Reciprocating Saw Owner s Manual
 ATD-10535 7 AMP Variable Speed Reciprocating Saw Owner s Manual Manufactured in China To ATD Tools, Inc. Specifications TECHNICAL SPECIFICATIONS Voltage: 120V Frequency: 60Hz Power input: 7 Amps No load
ECS23235RG CIRCULAR SAW OWNER S OPERATING MANUAL
 ECS23235RG CIRCULAR SAW OWNER S OPERATING MANUAL 6 DESCRIPTION DESCRIPTION Components list 1. Dust extraction outlet 2. Rear bevel adjustment knob 3. Blade retracting lever 4. Lower guard 5. Front bevel
TABLE SAW. 2000W 254mm ASSEMBLY MANUAL ASSEMBLING THE DIAL TBS-254 ONLINE MANUAL PARTS FASTENERS
 ASSEMBLING THE DIAL TABLE SAW 2000W 254mm ASSEMBLY MANUAL WARNING! BEFORE ASSEMBLING YOUR TABLE SAW OR REPLACING BLADES, MAKE SURE THAT THE MOTOR IS OFF AND THE TOOL IS DISCONNECTED FROM THE POWER SUPPLY
8-Ton Manual Splitter OWNER S MANUAL
 8-Ton Manual Splitter OWNER S MANUAL WARNING: Read carefully and understand all ASSEMBLY AND OPERATION INSTRUCTIONS before operating. Failure to follow the safety rules and other basic safety precautions
Impact Wrench WR 22SA HANDLING INSTRUCTIONS. Read through carefully and understand these instructions before use.
 Impact Wrench WR 22SA HANDLING INSTRUCTIONS Read through carefully and understand these instructions before use. 1 1 2 2 3 4 5 3 6 7 8 9 5 3 4 kg-m 80 N m 800 M22 70 (F 10T) 0 C 70 700 60 50 600 500 40
PS /8 Inch Electric Drill Assembly & Operating Instructions
 PS07216 3/8 Inch Electric Drill Assembly & Operating Instructions READ ALL INSTRUCTIONS AND WARNINGS BEFORE USING THIS PRODUCT. This manual provides important information on proper operation & maintenance.
Subject to change. USERS MANUAL Art.nr. PRM6006 PBF-1050N
 UK Subject to change UK USERS MANUAL Art.nr. PRM6006 PBF-1050N 0406-14 EXPLODED VIEW Fig. D Fig. A Fig. E Fig. B Fig. F Fig. C Fig. G 2 Powercraft Powercraft 11 SPARE PARTS LIST PBF-1050N REF NR DESCRIPTION
PLANER 750W INSTRUCTION MANUAL SPECIFICATIONS. ozito.com.au PLR-5000 WHAT S IN THE BOX. Planer. Parallel Guide. Rebate Guide.
 WHAT S IN THE BOX PLANER 750W INSTRUCTION MANUAL SPECIFICATIONS Voltage: Input Power: No Load Speed: Planing Width: Blade Type: Planing Depth: Rebate Depth: Weight: ozito.com.au 230-240V ~ 50Hz 750W 14,000/min
VARIABLE SPEED WOOD LATHE
 MODEL MC1100B VARIABLE SPEED WOOD LATHE INSTRUCTION MANUAL Please read and fully understand the instructions in this manual before operation. Keep this manual safe for future reference. Version: 2015.02.02
L A M I N AT E F L O O R C U T T E R OWNER S MANUAL
 L A M I N AT E F L O O R C U T T E R OWNER S MANUAL WARNING: Read carefully and understand all INSTRUCTIONS before operating. Failure to follow the safety rules and other basic safety precautions may result
2-Speed Hammer Drill HP2000 HP2020
 2-Speed Hammer Drill HP2000 HP2020 SPECIFICATIONS Model HP2000 HP2020 Speed High Low High Low Capacities Concrete 20 mm 20 mm Steel 6.5 mm 13 mm 6.5 mm 13 mm No load speed (min 1 ) 0 2,300 0 900 2,300
154570/220 5/17/02 1:41 PM Page 3. Instruction Manual Variable Speed Orbital Action Jig Saw
 154570/220 5/17/02 1:41 PM Page 3 Instruction Manual 3157-220 Variable Speed Orbital Action Jig Saw 154570/220 5/17/02 1:41 PM Page 4 Getting the most out of your tool. Please take time to read this manual
10 TABLE SAW WITH LASER & STAND MODEL NO: CTS13L
 10 TABLE SAW WITH LASER & STAND MODEL NO: CTS13L PART NO: 6500820 OPERATION & MAINTENANCE INSTRUCTIONS LS0913 INTRODUCTION Thank you for purchasing this CLARKE product. The table saw has been designed
20V CORDLESS RECIPROCATING SAW MODEL NO: CRS20Li
 20V CORDLESS RECIPROCATING SAW MODEL NO: CRS20Li PART NO: 6487020 OPERATION & MAINTENANCE INSTRUCTIONS LS1013 INTRODUCTION Thank you for purchasing this CLARKE 20V Cordless Reciprocating Saw. Before attempting
Nibbler MODEL JN1601. WARNING: For your personal safety, READ and UNDERSTAND before using. SAVE THESE INSTRUCTIONS FOR FUTURE REFERENCE.
 ENGLISH Nibbler MODEL JN60 00477 DOUBLE INSULATION I N S T R U C T I O N M A N U A L WARNING: For your personal safety, READ and UNDERSTAND before using. SAVE THESE INSTRUCTIONS FOR FUTURE REFERENCE. SPECIFICATIONS
TABLE SAW. 200mm 800W WARRANTY INSTRUCTION MANUAL SPECIFICATIONS. ozito.com.au TSB-0808 WHAT S IN THE BOX
 WHAT S IN THE BOX TABLE SAW 200mm 800W INSTRUCTION MANUAL SPECIFICATIONS Motor: 800W (S2 10min) Input: 230-240V ~ 50Hz No Load Speed: 2,950/min Blade: Ø200mm x Ø16 x 2.4mm Blade Teeth 24TCT Depth of Cut:
Angle Grinder 230mm Watt
 AGG-051K manual.qxd 9/24/09 9:48 AM Page 1 Angle Grinder 230mm - 2200 Watt Operation Manual 3 Year Replacement Warranty AGG-051K To view the full range visit: www.ozito.com.au 0909 AGG-051K manual.qxd
PALM PLANER OPERATING INSTRUCTIONS. To view our full range visit MODEL NO. OZPPL280WA
 PALM PLANER 280W MODEL NO. OZPPL280WA OPERATING INSTRUCTIONS To view our full range visit w w w. o z i t o. c o m. a u SPECIFICATIONS MODEL NO. OZPPL280WA Motor size: Input: No load speed: Planing width:
SAFETY AND OPERATING MANUAL
 SAFETY AND OPERATING MANUAL Impact drill WX317 WX318 1 3 2 8 7 6 5 4 A1 A2 B C1 2 1 3 3 1 D C2 5 4 E F 2 E F 1 G 4 2 H 1. Keyless Chuck 2. Depth gauge 3. Drill/hammer drill function selector 4. Switch
Grinding drill machine OPERATION MANUAL - 1 -
 Grinding drill machine OPERATION MANUAL - 1 - Index: I. Safety Notification P.4 II. Machine Devices Introduction P.9 III. Machine Installation Instruction P.11 IV. Standard Operational Steps P.13 V. Replacement
Handling instructions
 Nibbler Model CN 16SA Handling instructions Note: Before using this Electric Power Tool, carefully read through these HANDLING INSTRUCTIONS to ensure efficient, safe operation. It is recommended that these
Cordless Circular Saw with Dust Collection
 ENGLISH Cordless Circular Saw with Dust Collection MODEL 506D MODEL 5036D MODEL 5046D 003 I N S T R U C T I O N M A N U A L WARNING: For your personal safety, READ and UNDERSTAND before using. SAVE THESE
K2 15 #10 # cm cm
 DW682K 3 4 2 6 11 1 5 10 9 8 7 A 2 9 4 6 1 B C1 11 8 C2 D 6 7 E F 12 G H 10 J K1 13 5 14 5 K2 15 #0 L 15-25 cm 5-7.5 cm #10 M #20 N1 N2 N3 N4 P 5-7.5 cm 15-25 cm 15-25 cm Q1 Q2 R1 R2 R3 S1 S2 T U1 U2 U3
PAG-230/2100K Angle Grinder
 UK Subject to change UK USERS MANUAL Art.nr. AGM6011 PAG-230/2100K Angle Grinder Servotool Lingenstraat 6 8028 PM Zwolle NL www.ferm.com UK-0507-05 3 5 6 EXPLODED VIEW 4 2 8 1 Fig.1 7 12 11 + 4 10 9 8
Instruction Manual. 115mm ANGLE GRINDER. Model SROM 1183
 Instruction Manual 115mm ANGLE GRINDER Model SROM 1183 Our tool range has you covered for DIY. Whatever the job, make light work of it with MAKO tools. PRODUCT FEATURES: 1. Spindle Lock 2. On/Off Switch
KR703-XE KR704-XE KR705-XE KR753-XE KR754-XE KR755-XE Australia New Zealand
 6 5 4 www.blackanddecker.com.au 3 7 2 1 8 KR703-XE KR704-XE KR705-XE KR753-XE KR754-XE KR755-XE Australia New Zealand 7 8 A 12 13 10 9 10 B C 11 7 8 D E 2 Intended use Your Black & Decker hammer drill
8 TONNE LOG SPLITTER
 8 TONNE LOG SPLITTER MODEL NO: LOGBUSTER 9 PART NO: 3402043 OPERATION & MAINTENANCE INSTRUCTIONS LS03/16 INTRODUCTION Thank you for purchasing this CLARKE 8 Tonne Log Splitter. Before attempting to use
BELT/DISC SANDER MODEL NO: CBS1-5 OPERATION & MAINTENANCE INSTRUCTIONS PART NO: GC0414
 BELT/DISC SANDER MODEL NO: CBS1-5 PART NO: 6500403 OPERATION & MAINTENANCE INSTRUCTIONS GC0414 INTRODUCTION Thank you for purchasing this CLARKE Belt and Disc Sander, which is designed for hobby, DIY and
SAFETY AND OPERATING MANUAL 135W PALM SANDER JM135PS
 SAFETY AND OPERATING MANUAL 135W PALM SANDER JM135PS GENERAL POWER TOOL SAFETY WARNINGS WARNING! Read all safety warnings and all instructions. Failure to follow the warnings and instructions may result
BENCH GRINDER OWNER S MANUAL
 BENCH GRINDER OWNER S MANUAL WARNING: Read carefully and understand all ASSEMBLY AND OPERATION INSTRUCTIONS before operating. Failure to follow the safety rules and other basic safety precautions may result
BENCH GRINDER & FLEXIBLE DRIVE
 WHAT S IN THE BOX BENCH GRINDER & FLEXIBLE DRIVE 120W 75mm INSTRUCTION MANUAL SPECIFICATIONS Voltage: Input Power: No Load Speed: Wheel: Wheel Bore: Wheel Max. Speed: Weight: 230-240V ~ 50Hz 120W 0 9,900/min