OWNER S MANUAL. Pro Dunk Gold Basketball System WELCOME TO THE FAMILY OF PRO DUNK OWNERS
|
|
|
- Owen Sparks
- 5 years ago
- Views:
Transcription
1 OWNER S MANUAL Warning! Do not slide, climb, or play on pole.! Keep organic material away from pole base. Grass, litter, etc. could cause corrosion and /or deterioration.! Check pole system twice a year for signs of corrosion (rust, pitting, and chipping). Remove rust and/or loose paint completely and repaint with exterior enamel paint. If rust has penetrated through the steel anywhere, replace pole immediately.! Check unit before each use for loose hardware, excessive wear, and signs of corrosion and repair before using.! During play, use extreme caution to keep players face away from the backboard, rim, and net.! Wear a mouth guard when playing to avoid dental injuries.! When adjusting height, keep hands and fingers away from moving parts.! During play, do not wear jewelry (rings, watches, necklaces, etc.). Objects may entangle in net. Pro Dunk Gold Basketball System MODEL NUMBER PD-G-G or PD-G-A WELCOME TO THE FAMILY OF PRO DUNK OWNERS Thank you for purchasing our basketball system. We try hard to ensure that our products are of high quality and free of manufacturing defects and of missing parts. However, if you have any problems with your basketball pole, such as a manufacturing defect or a missing part please contact us at the following: Toll Free: Web: FAX: (281) Hoops Incorporated Lutheran Church Rd. Tomball, TX Please provide model number, serial number, and/or part number of the product and/or part when you call, write or . These numbers can be found on the product, packaging, or in this owner's manual. Read this manual all the way through before starting to put up your pole. Then read each step completely before beginning that step. 1
2 Bill of Materials Ref. Qty. Description A 1 Vertical Post B 1 Main Extension Arm C 2 Parallel Linkages D 1 H-Frame Backboard Mount E 1 Spring-Assist Cartridge F 1 Crank Adjustment Cylinder G 2 14mm X 13cm Hex Bolt H 2 14mm Lock Nuts I 4 16mm X 31cm Hex Bolts J 2 16mm X 28cm Hex Bolts K 6 16mm Lock Nuts L 4 16mm Anchor J-Bolts M 12 16mm J-Bolt Hex Nuts N 1 Anchor Footing Template O 4 Anchor Footing Rebars P 8 8mm X 2.5cm Machine Screws Q 8 8mm Flatwashers R 8 8mm Lockwashers S 8 8mm Hex Nuts T 1 Rim Height Sticker U 1 Rim Height Indicator V 4 Plastic and Steel Spacers 2
3 Installation Instructions In order to have the safest, fun and longest use of your Pro Dunk system, please note and heed the following: 1. Prior to goal assembly, call utility services for location of underground utility lines before you dig. 2. NOTE: Immediately unpack all components and cross check against bill of materials. Report any shortages to Hoops Inc. customer service at Assembly is a two part process. Day 1. Day 2. Day 3 Day 4. PART 1 PART 2 Complete Anchor System Day 5. Complete Pro Dunk Installation Instructions. (Below) assembly instructions. Allow concrete to cure. Allow concrete to cure. Allow concrete to cure. 4. For safety measures, have at least 3 capable persons to assist you in assembly of your Pro Dunk Goal. 3

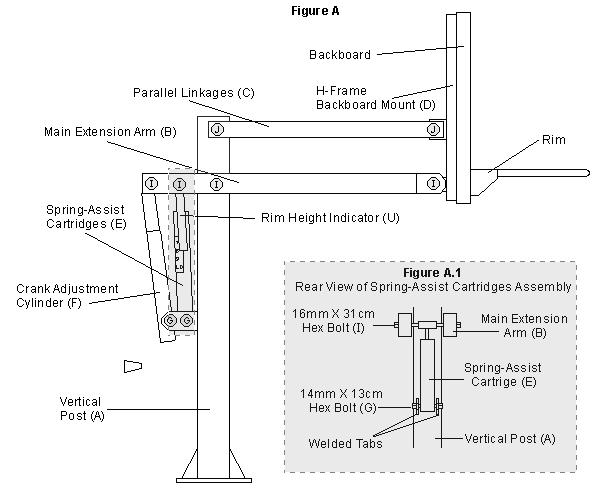
4 ANCHOR SYSTEM INSTALLATION INSTRUCTIONS (Day 1) 1. Choose the proper location to dig for the concrete footing. Use the distance chart in figure C to help you make your decision. When choosing the exact position to dig, make sure to maximize the amount of playing surface while minimizing possible driveway obstruction. Rim Height Distance from the face of the backboard to the front of the Vertical Post (A) Dig hole 36" deep and 20" square. Be sure to bell out the bottom 12 of the hole to give added stability to the footing. NOTE: If you live in an area where the frost line is below 36" it is advisable to dig to normal frost line. Do not cheat on the hole size, it is imperative that the hole be a minimum of 36" deep and 20" square! 3. Assemble the anchor kit as shown in figure B. First thread a 16mm J-Bolt Hex Nut (M) 2 ½ of the way on to each 16mm Anchor J-Bolt (L). Place the threaded end of each 16mm Anchor J-Bolt (L) through the 4 holes located in the Anchor Footing Template (N). Then thread a second 16mm J-Bolt Hex Nut (M) on to each 16mm Anchor J-Bolt (L) until tight against the Anchor Footing Template (N), making sure to keep the 16mm Anchor J-Bolt (L) hooks pointing in toward the center of the Anchor Footing Template (N). 4. For this step you will need: level, broomstick and tape measure. The 36" x 20" anchor footing will require a little over a 1/3 yard of 3000 psi concrete ( pound sacks of premix concrete). More will be needed if you dig a larger hole. NOTE: Make certain that you have enough concrete to finish the job. Allowing a portion to dry while you purchase more concrete will weaken the footing. 4
5 5. Mix the concrete according to the instructions on the bag. Fill the hole full to ground level with as little time between batches as possible. NOTE: It is better to mix it slightly wet than too dry. 6. Insert the broomstick in 3 or 4 different places and vibrate up and down to settle the concrete. Submerge the four Anchor Footing Rebar (O) pieces into the center of the hole spaced evenly. Next set the anchor system into the wet concrete, vibrate it as it goes in to make sure the concrete fills in around the 16mm Anchor J-Bolts (L) hooks. Make sure the Anchor Footing Template (N) is pressed firmly against the top of the wet concrete. Use the level to ensure that it is level in all directions. Additionally, the center line of the 16mm Anchor J-Bolts (L) must be parallel with the edge of the playing surface (See figure C). NOTE: The four 16mm J-Bolt Hex Nuts (M) on the bottom of the Anchor Footing Template (N) will be sacrificed into the concrete. STOP HERE! Allow footing to cure for 3-7 days before proceeding. 5
6 PRO DUNK ASSEMBLY INSTRUCTIONS (~Day 5) 7. Loosen the top four 16mm J-Bolt Hex Nuts (M) from the 16mm Anchor J- Bolts (L). Leave Anchor Footing Template (N) in place. 8. Place the Vertical Post (A) down over the footing making sure not to damage the 16mm Anchor J-Bolts (K) threads. Using the final four 16mm J-Bolt Hex Nuts (M), bolt down Vertical Post (A) finger tight with two metal ears to the rear. 9. Level the Vertical Post (A) by adjusting the 16mm J-Bolt Hex Nuts (M) located underneath the flanged base plate of the Vertical Post (A). Then tighten top 16mm J-Bolt Hex Nuts (M) against the top side of the flanged base plate of the Vertical Post (A). 10. Slide the Main Extension Arm (B) over the top of the Vertical Post (A) and attach to the lower pivot tube with a 16mm X 31cm Hex Bolt (I) and a 16mm Lock Nut (K). 11. Slide the hole located in the Rim Height Indicator (U) over one of the second set of welded tubes on the Main Extension Arm (B). Attach the Spring-Assist Cartridge (E) to the second set of attachment holes on both the Main Extension Arm (B) and Vertical Post (A) welded tabs utilizing a 16mm X 31cm Hex Bolt (I) and a 14mm X 13cm Hex Bolt (G) as shown in figure A.1. Tighten each with a 14mm Lock Nut (H). The Rim Height Indicator (U) should now hang freely along side the Spring-Assist Cartridge (E). 12. Next attach the Crank Adjustment Cylinder (F) using a 16mm X 31cm Hex Bolt (I) at the top and a 14mm X 13cm Hex Bolt (G) at the bottom. Tighten each with a 16mm Lock Nut (K) and 14mm Lock Nut (H). Next, remove and discard the blue plastic spreader tube from Spring-Assist Cartridge (E). 13. Attach Parallel Linkages (C) to Vertical Post (A) with a 16mm X 28cm Hex Bolt (J) and a 16mm Lock Nut (K). NOTE: It does not matter which end of the parallel link you attach to the vertical post. CAUTION: Injury may occur if linkages are allowed to fall off main arm during assembly. 14. Next, lay the H-Frame Backboard Mount (D) down into backboard aligning the four top and bottom holes in the H-Frame Backboard Mount (D) with the four holes in the top and bottom of the backboard (see figure D). Check to make sure the rim hole pattern in the H-Frame Backboard Mount (D) lines up with the rim hole pattern in the backboard, adjust as needed. When you are satisfied with alignment, attach backboard to H-Frame Backboard Mount (D) at all points along the top and bottom of the board 6
7 using the 8mm X 2.5cm Machine Screws (P), 8mm Flatwashers (Q), 8mm Lockwashers (R) and 8mm Hex Nuts (S) as shown in figure D. Tighten all 8mm hardware. 15. Mount the H-Frame Backboard Mount (D) and Backboard assembly lower pivot tube first to the Main Extension Arm (B) using one 16mm X 31cm Hex Bolt (I) and one 16mm Lock Nut (K). Next, attach the upper H-Frame Backboard Mount (D) pivot tube to the Parallel Linkages (C) using one 16mm X 28cm Hex Bolt (J) and one 16mm Lock Nut (K). 16. Check face of backboard to see if it is level forward and back. If it is not level, correct it by adjusting the 16mm J-Bolt Hex Nuts (M) located underneath the Vertical Post (A) flanged base plate. 17. Prior to installing the rim, locate four Plastic and Steel Spacers (V). Insert them into four rim holes in the backboard. This is very important to prevent backboard breakage. CAUTION: Do not proceed with rim installation without these spacers! 18. Mount the rim to the H-Frame Backboard Mount (D) and Backboard assembly using the hardware supplied in the rim box. NOTE: Use a level to make sure rim is level side to side before tightening nuts 19. After everything is square, make sure all nuts on the system have been tightened. NOTE: Do not over tighten. If unit is excessively difficult to crank up and down the 16mm Lock Nut (K) that secures the Main Extension Arm (B) and Vertical Post (A) is probably too tight. 20. To apply the Rim Height Sticker (T), first use a tape measure to crank rim up to exactly 10' from the playing surface. Use a pencil to make a mark on the Spring-Assist Cartridge (E) where the bottom of the Rim Height Indicator (U) stops. Then, peel and apply Rim Height Sticker (T) to outside of Spring-Assist Cartridge (E) lining up the pencil mark with the 10' mark on the Rim Height Sticker (T). See figure A for a diagram of a completed height indicator assembly. NOTE: It is advisable to wait up to two weeks to allow the anchor footing to fully cure before aggressive play. 7
8 Installation Figures 8
9 9
10 Pro Dunk Care Information Items needed to clean backboard: 100% cotton soft cloth, (only) Mild dish washing liquid for soap Luke warm water BACKBOARD Cleaning Directions Rinse backboard with lukewarm water. Wash gently with a 100% Cotton soft cloth, lukewarm water and mild soap. Do not scrub. Rinse backboard with lukewarm water again. Dry with 100% cotton soft cloth. To minimize scratches and minor abrasions to your backboard Rim The goal should not be cranked under 5 or over 10'. Adjustments of the goal should be done under adult supervision. When attempting slam dunk activity you should always wear a mouth guard to avoid dental injury. 10
11 Hoops Inc. Pro Dunk Limited Lifetime Warranty Hoops Pro Dunk basketball structural components are warranted to the original purchaser to be free from defects in material or workmanship for the duration of ownership by the original retail purchaser. The word defects is defined as imperfections that impair the use of the product. Warranty Fulfillment Merchandise must be shipped prepaid with a copy of proof of purchase to Hoops Inc. for examination to see whether it needs to be repaired or replaced. Any labor costs, travel expenses and any other changes involved in the removal, installation or replacement of the defective/repaired parts from/to your Hoops Pro Dunk system will be your (the purchaser's) responsibility. Shipping charges for replaced or warranted merchandise being sent back to the customer must be prepaid by the customer in advance. If not, the replacement shipment will be sent out collect. Hoops Inc. reserves the right to examine photographs or physical evidence of merchandise claimed to be defective, and to recover said merchandise, prior to authorization of warranty claims. What is not covered by this warranty This warranty does not cover defects or damage due to improper installation, shipping, handling, alteration, accidents, vandalism, weather conditions (rusting), exposure to corrosives, negligence, misuse (anything other than a type of basketball activity or related contact with the unit), scratching, scuffing or any event beyond the control of the Hoops Inc.. Liability Hoops Inc. shall not be liable for indirect, special, or consequential damages arising out of or in connection with the use or performance of the products or other damages with respect to any economical loss, loss of property, loss of enjoyment of use, costs of removal, installation or other consequential damages for breach of any expressed or implied warranty on these products. Guidelines Keep your proof of purchase (original retail purchaser). Without it, we will not be able to proceed with any warranty service. Call / Warranty Dept. Write Hoops Inc. Attn: Warranty Dept Lutheran Church Rd. Tomball TX support@hoopsincorporated.com Toll Free: Web: FAX: (281) Hoops Incorporated Lutheran Church Rd. Tomball, TX
OWNER S MANUAL. Hercules Diamond Basketball System WELCOME TO THE FAMILY OF HERCULES OWNERS
 OWNER S MANUAL Warning! Do not slide, climb, or play on pole.! Keep organic material away from pole base. Grass, litter, etc. could cause corrosion and /or deterioration.! Check pole system twice a year
Titan Series Assembly Instructions
 Titan Series Assembly Instructions Bill of Materials A(1) Vertical Post J(4) 5/8" Anchor Bolt B(1) Main Extension Arm K(4) Anchor Footing Rebar C(2) Parallel Linkage L(1) Anchor Footing Template D(1) H-Frame
To make assembly of your basketball pole easier, use the Hardware Identifier on page 2 to identify and sort all fasteners.
 OWNER'S MANUAL AL WARNING FAILURE TO FOLLOW THESE WARNINGS MAY RESULT IN SERIOUS INJURY AND/OR PROPERTY DAMAGE. Owner must ensure that all players know and follow these rules for safe operation of the
OWNER S MANUAL. Heavyweight WELCOME TO THE FAMILY OF HEAVYWEIGHT OWNERS. Warning. Basketball System
 OWNER S MANUAL Warning! Do not slide, climb, or play on pole.! Keep organic material away from pole base. Grass, litter, etc. could cause corrosion and /or deterioration.! Check pole system twice a year
OWNER S MANUAL. Pro Dunk Silver WELCOME TO THE FAMILY OF PRO DUNK OWNERS. Warning. Basketball System
 OWNER S MANUAL Warning! Do not slide, climb, or play on pole.! Keep organic material away from pole base. Grass, litter, etc. could cause corrosion and /or deterioration.! Check pole system twice a year
OWNER S MANUAL. Hercules Platinum/Gold WELCOME TO THE FAMILY OF HERCULES OWNERS. Warning. Basketball System
 OWNER S MANUAL Warning! Do not slide, climb, or play on pole.! Keep organic material away from pole base. Grass, litter, etc. could cause corrosion and /or deterioration.! Check pole system twice a year
Please Do Not Return This Product to the Store!
 MODEL NO. B2314 14W Goalrilla II BASKETBALL SYSTEM OWNER'S MANUAL 1. Read this manual carefully before starting assembly. Read each step completely before beginning each step. 2. Some smaller parts may
Please Do Not Return This Product To The Store!
 MODEL NO. B2214 214 Goaliath 48 BASKETBALL SYSTEM OWNER'S MANUAL 1. Read this manual carefully before starting assembly. Read each step completely before beginning each step. 2. Some smaller parts may
High End Residential In-Ground Basketball System Owners Manual
 High End Residential In-Ground Basketball System Owners Manual Customer Service Center N53 W24700 South Corporate Circle Sussex, WI 53089 U.S.A. Write Model Number From Box Here: READ AND UNDERSTAND OPERATOR'S
DRIVEWAY SERIES D554 D560
 DRIVEWAY SERIES D554 D560 Version ' Keep this instruction manual in case you have to contact the manufacturer for replacement parts. 2 FAILURE TO FOLLOW THESE WARNINGS MAY RESULT IN SERIOUS INJURY AND/OR
Please Do Not Return This Product To The Store!
 MODEL NO. B330 Goalrilla E BASKETBALL SYSTEM OWNER'S MANUAL. Read this manual carefully before starting assembly. Read each step completely before beginning each step.. Some smaller parts may be shipped
O W N E R ' S M A N U A L
 MODEL NO. B5402W B5402F SB60 BASKETBALL SYSTEM O W N E R ' S M A N U A L 1. Read this manual carefully before starting assembly. Read each step completely before beginning each step. 2. Some smaller parts
Please Do Not Return This Product to the Store!
 MODEL NO. B400W GS60 BASKETBALL SYSTEM O W N E R ' S M A N U A L 1. Read this manual carefully before starting assembly. Read each step completely before beginning each step.. Some smaller parts may be
Please Do Not Return This Product To The Store! SB60 BASKETBALL SYSTEM. Please visit our World Wide Web site at:
 MODEL NO. B5402 SB60 BASKETBALL SYSTEM O W N E R ' S M A N U A L 1. Read this manual carefully before starting assembly. Read each step completely before beginning each step. 2. Some smaller parts may
HEAVY-DUTY BASKETBALL BACKSTOPS
 INSTALLATION, OPERATION &MAINTENANCE MANUAL HEAVY-DUTY BASKETBALL BACKSTOPS No. 00195-580 Single Extension No. 00195-582 Double Extension No. 00195-582 5'-0" 5'-0" 5'-0" No. 00195-580 THE OWNER OF THIS
215W Goaliath BASKETBALL SYSTEM
 MODEL NO. B2215W 215W Goaliath BASKETBALL SYSTEM OWNER'S MANUAL 1. Read this manual carefully before starting assembly. Read each step completely before beginning each step. 2. Some smaller parts may be
Please Do Not Return This Product To The Store!
 O W N E R ' S MODEL NO. M A N U A L B00F B00W GS60av BASKETBALL SYSTEM. Read this manual carefully before starting assembly. Read each step completely before beginning each step.. Some smaller parts may
C872 Series ADJUSTABLE HEIGHT. Version 3
 C872 Series ADJUSTABLE HEIGHT GOAL SYSTEM Version 3 Thank you and congratulations for purchasing a Ryval Hoops Goal - the finest basketball goal system on the market today! You will discover that Ryval
ADJUSTABLE BASKETBALL SYSTEM ASSEMBLY INSTRUCTIONS AND OWNER'S MANUAL
 IRONCLAD SPORTS, INC GAME CHANGER ADJUSTABLE BASKETBALL SYSTEM ASSEMBLY INSTRUCTIONS AND OWNER'S MANUAL MODEL: GC55-MD (1 piece pole)!! WARNING FAILURE TO COMPLY WITH ANY OF THE WARNINGS IN THESE INSTRUCTIONS
A 1 Vertical Pole I 1 BA47/47A/47P Backboard (2 req d on Model BA872)
") Instruction Manual BA871, BA872 Ultimate Playground Basketball System Instructions Customer Service (800) 247-7668 P A R T S L I S T Item Qty Description Item Qty Description A 1 Vertical Pole I 1 BA47/47A/47P
Instruction Manual BA871, BA872 Ultimate Playground Basketball System Instructions Customer Service (800) 247-7668 P A R T S L I S T Item Qty Description Item Qty Description A 1 Vertical Pole I 1 BA47/47A/47P
ADJUSTABLE BASKETBALL SYSTEM ASSEMBLY INSTRUCTIONS AND OWNER'S MANUAL
 DJUSTBL BSKTBLL SYSTM SSMBLY INSTRUCTIONS ND OWNR'S MNUL!! WRNING FILUR TO COMPLY WITH NY OF TH WRNINGS IN THS INSTRUCTIONS MY RSULT IN SRIOUS PRSONL INJURY. FILUR TO COMPLY MY LSO RSULT IN PROPRTY DMG.
A Huffy Sports Company In-Ground Basketball System Owners Manual. Customer Service Center N53 W24700 South Corporate Circle Sussex, WI U.S.A.
 A Huffy Sports Company In-Ground Basketball System Owners Manual Customer Service Center N53 W2400 South Corporate Circle Sussex, WI 53089 U.S.A. Write Model Number From Box Here: WARNING! REQUIRED TOOLS
RoofMaster Assembly Instructions
 RoofMaster Assembly Instructions Bill of Materials A (2)Roof/Wall Strut B (2)Perforated Tube C (1) I-Rod D (1) Main Sup. Channel E (1) Ext. Arm Support F (2) Upper Ext. Arm G (2) Lower Ext. Arm H (1) H-Frame
First Team Sports, Inc RoofMaster
 First Team Sports, Inc RoofMaster Bill of Materials A (2)Roof/Wall Strut L (1) Rim Height Stickers W (4) "x 1 " Hex Bolt B (2)Perforated Tube M (1) 3/8"x13" Hex Bolt X (1) "x 8" Hex Bolt C (1) I-Rod N
ADJUSTABLE BASKETBALL SYSTEM ASSEMBLY INSTRUCTIONS AND OWNER'S MANUAL
 IRONCLAD SPORTS, INC HIGHLIGHT HOOPS ADJUSTALE ASKETALL SYSTEM ASSEMLY INSTRUCTIONS AND OWNER'S MANUAL MODEL: HIL885!! WARNING FAILURE TO COMPLY WITH ANY OF THE WARNINGS IN THESE INSTRUCTIONS MAY RESULT
First Team, Inc. WallMonster Series. Installation Instructions
 First Team, Inc. WallMonster Series Installation Instructions Bill of Materials A (1) Wall Bracket B (2) Upper Extension Arms C (1) Lower Extension Arm Assembly D (1) H-Frame Backboard Mount E (1) 5/8
First Team Sports, Inc FoldaMount46, 68, 82
 First Team Sports, Inc FoldaMount46, 68, 82 Bill of Materials A (4) Extension Frame B (4) Telescoping Extension C (4) Perforated Attachment Tube D (3) 2 x8 x84 Wall Board E (2) Eye Bracket F (2) 3/16 Proof
BASKETBALL SET. Assembly & Installation Instructions. inter-fab.com 3050 S. ALVERNON WAY TUCSON, AZ FAX
 SET Assembly & Installation Instructions 3050 S. ALVERNON WAY TUCSON, AZ 85713 520.790.7040 800.737.5386 FAX 520.790.7127 inter-fab.com TABLE OF CONTENTS: Intended Use Instructions...1 In Deck/In Ground
ADJUSTABLE BASKETBALL SYSTEM ASSEMBLY INSTRUCTIONS AND OWNER'S MANUAL
 IRONCLD SPORTS, INC M CHNR DJUSTBL BSKTBLL SYSTM SSMBLY INSTRUCTIONS ND OWNR'S MNUL MODL: C55-L ( piece pole)!! WRNIN FILUR TO COMPLY WITH NY OF TH WRNINS IN THS INSTRUCTIONS MY RSULT IN SRIOUS PRSONL
C872 Series ADJUSTABLE HEIGHT
 C87 Series DJUSTBLE HEIGHT GOL SYSTEM Thank you and congratulations for purchasing a Ryval Hoops Goal - the finest basketball goal system on the market today! You will discover that Ryval Hoops is unsurpassed
PORTABLE ADJUSTABLE BASKETBALL SYSTEM
 Instruction Manual PORTABLE ADJUSTABLE BASKETBALL SYSTEM P A R T S L I S T 5 1/2 and 8 safe play clearance Item Qty Description Item Qty Description A 1 Portable Base Assembly M 4 1/2 Lock Nut B 2 Front
Please Do Not Return This Product To The Store!
 MODEL NO. T8176 QUICK SERVE 3000 TABLE TENNIS TABLE OWNER'S MANUAL 1. Read this manual carefully before starting assembly. Read each step completely before beginning each step. 2. Some smaller parts may
MERRY GO ROUND ITEM NO: 8030
 MERRY GO ROUND ITEM NO: 8030 OWNER S MANUAL CAUTION: This unit is designed to be used safely by up to 4 children between the ages of 3 years to 8 years old with a maximum weight of 00 pounds (45.4 kgs)
SuperMount Series Installation instructions for SuperMount 46, 68 & 80 wall structures Bill Of Materials
 SuperMount Series Installation instructions for SuperMount 46, 68 & 80 wall structures Bill Of Materials A (4) Extension Frame B (4) Telescoping Extension C (4) Cross Brace D (3) 2"x8"x84" Wall Board E
Please Do Not Return This Product To The Store!
 MODEL NOS. T8512 TOURNAMENT SERIES 3 TABLE TENNIS TABLE OWNER'S MANUAL 1. Read this manual carefully before starting assembly. Read each step completely before beginning each step. 2. Some smaller parts
OWNER S MANUAL Table Tennis Table Patent Pending
 OWNER S MANUAL Table Tennis Table Patent Pending Be sure to write your model number and serial number here for future reference. You can find these numbers printed on the bottom of the table. MODEL # T8266
Please Do Not Return This Product To The Store!
 MODEL NOS. T81 TABLE TENNIS TABLE OWNER'S MANUAL 1. Read this manual carefully before starting assembly. Read each step completely before beginning each step.. Some smaller parts may be shipped inside
TENBROOK SLING ACTION CHAIRS (SET OF 6)
") ITEM #0355057 TENBROOK SLING ACTION CHAIRS (SET OF 6) Allen + Roth is a registered trademark of LF, LLC. All Rights Reserved. MODEL #ADC09400 Français p. 07 Español p. 13 ATTACH YOUR RECEIPT HERE Serial
ITEM #0355057 TENBROOK SLING ACTION CHAIRS (SET OF 6) Allen + Roth is a registered trademark of LF, LLC. All Rights Reserved. MODEL #ADC09400 Français p. 07 Español p. 13 ATTACH YOUR RECEIPT HERE Serial
Super Shot Adjustable Basketball System
 Model: GP5A48 Installation, Operation and Maintenance Instructions Please read all instructions before attempting installation or operation of these units SAVE THESE INSTRUCTIONS FOR FUTURE USE PUBLICATION
Please Do Not Return This Product To The Store!
 THE TOUGHEST TRAINING SYSTEM ON THE PLANET. MODEL NO. TR2000W TR2000F MULTI SPORTS TRAINER OWNER S MANUAL 1. Read this manual carefully before starting assembly. Read each step completely before beginning
TP4463. ASSeMBly INSTruCTIONS FLAT PANEL TV MOUNTING SYSTEM OPTION 1 OPTION 2 OPTION 3
 TP63 FLAT PANEL TV MOUNTING SYSTEM OPTION 1 OPTION 2 OPTION 3 Flat Panel TV Stand Stand with TV Mounting System Stand with Wall Mount ASSeMBly INSTruCTIONS for your safety, please follow these precautions:!
ADJUSTABLE BASKETBALL SYSTEM ASSEMBLY INSTRUCTIONS AND OWNER'S MANUAL
 DJUSTBLE BSKETBLL SYSTEM SSEMBLY INSTRUCTIONS ND OWNER'S MNUL!! WRNIN ILURE TO COMPLY WITH NY O THE WRNINS IN THESE INSTRUCTIONS MY RESULT IN SERIOUS PERSONL INJURY. ILURE TO COMPLY MY LSO RESULT IN PROPERTY
Planishing hammer stand For use with SKU Planishing hammer
 Planishing hammer stand For use with SKU 94847 Planishing hammer Model 96300 Assembly And Operation Instructions Please Note: Planishing Hammer not included with Stand. Due to continuing improvements,
OWNER S MANUAL with Assembly Instructions
 OWNER S MANUAL with Assembly Instructions VISIT E LIFETIME WEB SITE: WWW.LIFETIME.COM ** Do Not Contact the Store ** For Assistance, including missing or broken parts, Call Customer Service at: 1 (800)
340 & 350 SERIES BATH ENCLOSURES
 INSTALLATION INSTRUCTIONS 340 & 350 SERIES BATH ENCLOSURES 800-643-1514 www.alumaxbath.com Copyright Alumax Bath Enclosures 2010. All rights reserved. LIMITED WARRANTY AND REMEDY ALUMAX BATH ENCLOSURES
INSTALLATION INSTRUCTIONS
 CREATING POSITIVE CUSTOMER EXPERIENCES INSTALLATION INSTRUCTIONS Universal Low Profile Tilt Mount for 42 to 63 Flat Panels NORTH AMERICA 3130 East Miraloma Avenue Anaheim, CA 92806 USA USA and Canada Phone:
OWNER'S MANUAL. Please Do Not Return This Product To The Store!
 MODEL NO. T8190SA TABLE TENNIS TABLE OWNER'S MANUAL 1. Read this manual carefully before starting assembly. Read each step completely before beginning each step.. Some smaller parts may be shipped inside
Installation Instructions TrekStep Side Mount
 Installation Instructions TrekStep Side Mount Vehicle Application Chevrolet Silverado / GMC Sierra All Bed Sizes 1999 Current Part Number: 75400-15 www.bestop.com - We re here to help! Visit our web site
ADJUSTABLE MOUNTING POST
 C Part Number 069 B EACH CARTON CONTAINS D Floor Mounting Kit A. Bottom Post Assembly B. Top Post Assembly C. Flange Head Bolts (x2) D. Floor Mounting Kit. 5/8 Wx/6 Hx0 L framing channels (x2) 2. /8-6x4
BBULTRA Basketball Tower Installation
 Ph: 1300 500 314 Basketball Tower Installation Thank you for your purchase of the Ultra adjustable Basketball system. To ensure that our equipment will provide years of use to you, we are including this
340 & 350 SERIES DELUXE FRAMELESS BYPASS
 BATH ENCLOSURES An Alcoa Company Tel: 800-643-1514 Fax: 870-234-3181 www.alumaxbath.com INSTALLATION INSTRUCTIONS 340 & 350 SERIES DELUXE FRAMELESS BYPASS BATH ENCLOSURES Copyright Alumax Bath Enclosures
Installation Instructions TrekStep Side Mount
 Installation Instructions TrekStep Side Mount Vehicle Application Ford F150 Regular Cab and Super Cab 2009 Current Part Number: 75402-15 Fits both Driver s and Passenger Side www.bestop.com - We re here
Item # L-DN1856SST-E-SFLS SKU# Loveseat:
 Stoneridge Loveseat & Sofa Assembly Instruction Item # L-DN1856SST-E-SFLS SKU# 810330969 Loveseat: Sofa: CAUTION: Chair is for setting purpose only. Standing on or misuse of sofa and loveseat may result
INSTALLATION MANUAL SONANCE SOUNDBARS SB46 M AND SB46 L. Introduction. Box Contents. Wall Mount Installations
 INSTALLATION MANUAL SONANCE SOUNDBARS SB46 M AND SB46 L Introduction Thank you for purchasing the Sonance Soundbar SB46 M or SB46 L. When properly installed your new Soundbar will give you years of entertainment
Owner s Manual GS2010 Garden Seeder/Fertilizer. Caution: Carefully read all Rules and Instructions for Safe Operation.
 Manufacture s Limited Warranty for The limited warranty set forth below is given by Precision Products, Incorporated with respect to new merchandise purchased and used in the United States, its possessions
VAN STORAGE SOLUTIONS FOR THE WAY YOU WORK
 WWW.WEATHERGUARD.COM VAN STORAGE SOLUTIONS FOR THE WAY YOU WORK Weather Guard / KNAACK 420 E. Terra Cotta Ave. Crystal Lake, IL 60014 USA 800-456-7865 (Toll Free) 800-334-2981 (Fax) Knaack.OrderEntry@wernerco,.com
IMPORTANT, RETAIN FOR FUTURE REFERENCE: READ CAREFULLY For Outdoor Use Only
 ITEM#: FG-SNP4272TBL17 San Paulo 42 x72 Oval Dining Table IMPORTANT, RETAIN FOR FUTURE REFERENCE: READ CAREFULLY For Outdoor Use Only Customer Service E-Mail : customerservice@foremostgroups.com 8:30a.m.
SawStop. Contractor Fence Assembly OWNER S MANUAL. Model CNS-SFA
 Contractor Fence Assembly OWNER S MANUAL Model CNS-SFA Warranty warrants to the original retail purchaser of the Contractor Fence Assembly accompanying this manual that the fence assembly will be free
Assembly Instructions and Parts Manual JPSF-1 Fence and JPSR Rail Set
 Assembly Instructions and Parts Manual JPSF-1 Fence and JPSR Rail Set WALTER MEIER (Manufacturing) Inc. 427 New Sanford Road LaVergne, Tennessee 37086 Part No. M-708482 Ph.: 800-274-6848 Revision C2 02/2013
P4263TP. Installation Guide. Low-Profile Tilting Portrait Mount for Flat-Panels
 Low-Profile Tilting Portrait Mount for Flat-Panels 1321 S. State College Blvd., Fullerton, CA 92831 USA Weight Limit Maximum Flat Panel Weight: 175 lbs. Warning Statements THE WALL STRUCTURE MUST BE CAPABLE
Hoops Installation Instructions for Adjustable Basketball Goals
 WARNING! Before beginning any excavation, call your local Underground Service Locator company to make sure there are NO electrical power, natural gas, telephone, cable television, irrigation systems or
4" Oval Nerf Bar. Part No. A1007S/B. PARTS LIST: Qty Part Description Qty Part Description
 4" Oval Nerf Bar Part No. A1007S/B Fits: 2009 - Current Dodge Ram 1500 Crew Cab 2001 - Current Dodge Ram 2500/3500 Crew Cab REMOVE CONTENTS FROM BOX. VERIFY ALL PARTS ARE PRESENT. 60-180 min Cutting Not
FIRST TEAM SPORTS, INC.
 FIRST TEAM SPORTS, INC. INVADER EZ-CRANK PORTABLE BASKETBALL GOAL ASSEMBLY INSTRUCTIONS Revised - 08/04/10 BILL OF MATERIALS (1) BASE TANK (1) BACKBOARD MOUNT (2) 5/16 X ¾ HEX BOLT (1) LOWER POST (2) SPRING
Portable System Owners Manual Customer Service Center N53 W24700 South Corporate Circle Sussex, WI U.S.A.
 Portable System Owners Manual Customer Service Center N53 W24700 South Corporate Circle Sussex, WI 53089 U.S.A. Adult Assembly Required. This manual, accompanied by sales receipt, should be saved and kept
Models 2230 and 2240
 Models 2230 and 2240 Overview... 2 Tools Needed... 2 Hardware...3 Assembly... 4-13 Installation... 14 Drawer Removal... 15 Operation... 15 Maintenance... 15 Accessories... 16 Limited Warranty... 16 Perform
15 Planer Stand. Model Due to continuing improvements, actual product may differ slightly from the product described herein.
 15 Planer Stand Model 96316 Assembly And Operation Instructions Due to continuing improvements, actual product may differ slightly from the product described herein. 3491 Mission Oaks Blvd., Camarillo,
No No No
 INSTALLATION, ASSEMBLY & MAINTENANCE MANUAL BASEBALL BACKSTOP No. 331025 No. 331036 No. 331039 No. 331025 No. 331036 No. 331039 INSTALLER NOTE: Upon completion of the installation/assembly of this baseball
All Purpose Hardware
 Backs and Support OWNER MANUAL All Purpose Hardware TFB Hardware All Purpose (Knob) Owner s Manual Customer Satisfaction 1.0 Stealth Products strives for 100% customer satisfaction. Your complete satisfaction
Stop! Read This Important Information.
 Stop! Read This Important Information. Stop, Do Not Proceed, Read This This door replacement kit is designed for the replacement of doors on a Supertop ONLY! This door will not work on any other style
Use and Care Guide Moore Haven 7pc Dining Set Neutral Color Product Code D71 M20331 KSN 0 08752118 3 UPC Code 0 5087452514 7 Date of Purchase
 Use and Care Guide Thank you for your purchase Thank you for your purchase! We are pleased that you have chosen Sears for your outdoor furniture purchase. We hope that you enjoy the unmatched quality,
Tilting & Swiveling Plasma/LCD Flat Panel Wall Mount Installation Guide Model: A380SM
 Tilting & Swiveling Plasma/LCD Flat Panel Wall Mount Installation Guide Model: A380SM Easy installation Built-in level for easy positioning Corrective leveling adjustments after installation Forward /
Half Door Installation Instructions
 Half Door Installation Instructions For: CJ5 (1955-1975), CJ6 (All), M38-A1 (1955-1971) Part Number: 53025 Congratulations on your purchasing decision. Bestop designed these Doors to give you years of
Models 2030 and 2040
 Models 2030 and 2040 Overview... 2 Tools Needed... 2 Hardware... 2 Assembly... 3-8 Installation... 9 Operation... 9 Maintenance... 10 Accessories... 10 Limited Warranty... 10 Document # 101290 0607 Printed
Owner s Manual LSP38 38 Lawn Sweeper
 Owner s Manual LSP38 38 Lawn Sweeper Manual Contents Safety Instructions Assembly Operation Maintenance Parts Warranty 2 4-13 2 11 14-15 16 Your Lawn Sweeper Congratulations on your purchase of a new Precision
Owner s Manual and Assembly Instruction
 Owner s Manual and Assembly Instruction Model #: 22-PS120 Model Name: Verona III Swing Set Manual Date: September, 2007 Important: Keep this owner s manual; do not discard in case you need to contact Pacific
INSTALLATION INSTRUCTIONS
 INSTALLATION INSTRUCTIONS P4263F Universal Low Profi le Flat Mount for 42 to 63 Flat Panels NORTH AMERICA 3130 East Miraloma Avenue Anaheim, CA 92806 USA USA and Canada Phone: 1.800.368.9700 Fax: 1.800.832.4888
Installation Instructions Lower Cargo Rack Bracket
 Installation Instructions Lower Cargo Rack Application: Jeep Wrangler 2003 Current Part Number: 41437 US Patent 6799706 www.bestop.com - We re here to help! Visit our web site and click on Ask a Question.
Portable System Owners Manual
 Portable System Owners Manual Customer Service Center N53 W24700 South Corporate Circle Sussex, WI 53089 U.S.A. Adult Assembly Required. This manual, accompanied by sales receipt, should be saved and kept
Installation Instructions:
 NOTE: Carefully read entire instructions thoroughly before attempting to install this part. (SB76904) Parts Included Qty 94-241CA001 Front Upright: Drvr 1 94-241CA002 Front Upright: Pass 1 94-241CA003
INSTALLATION INSTRUCTIONS CJ-5 M38A PART # With Doors
 INSTALLATION INSTRUCTIONS CJ-5 M38A1 1955-1975 PART #109-011 With Doors Thank you for purchasing Specialty s Convertible Top for your Jeep vehicle. It has been designed for great fit and long wear. Please
BISON GOOSENECK FOOTBALL 1 PAIR OF GOAL POSTS
 Instruction Manual BISON GOOSENECK FOOTBALL 1 PAIR OF GOAL POSTS Customer Service (800) 247-7668 P A R T S L I S T Item Qty Description Item Qty Description A 2 GOOSENECK POLE I 4 UPRIGHTS B 2 BAND CLAMP
ITEM#:DNSW5102J PK IMPORTANT, RETAIN FOR FUTURE REFERENCE: READ CAREFULLY. St. Thomas Swivel Rocking Dining Chair
 ITEM#:DNSW5102J-48019-2PK IMPORTANT, RETAIN FOR FUTURE REFERENCE: READ CAREFULLY St. Thomas Swivel Rocking Dining Chair Customer Service E-Mail : customerservice@foremostgroups.com 8:30a.m. 5:00p.m. EST,
MM540 Installation Instructions IMPORTANT SAFETY INSTRUCTIONS - SAVE THESE INSTRUCTIONS
 MM50 Installation Instructions IMPORTANT SAFETY INSTRUCTIONS - SAVE THESE INSTRUCTIONS Please read this entire manual before you begin. Do not unpack any contents until you verify all requirements on PAGE.
FSM / FULL SWING WALL MOUNT. For Flat Panel Screens. User Manual
 FSM- 3760 / FULL SWING WALL MOUNT For 37-60 Flat Panel Screens User Manual Thank you for choosing Gabor. Thank you for choosing Gabor s full swing flat panel screen wall mount. This heavy-duty wall mount
Specifications. Important Safety Information
 Specifications Tire Rim Capacity 4 to 12 Rim Height 16 (2) Bead Breaker Handles 21 Long Includes Aluminum Centering Cone (2) Nylon Spacers Important Safety Information 1. Do not exceed max. tire capacity.
ATTENTION: PLEASE READ AND UNDERSTAND ALL INSTRUCTIONS AND WARNINGS BEFORE ASSEMBLING, INSTALLING OR USING THIS PRODUCT.
 INSTALLATION MANUAL Models 96111-3-02 & 96511-3-02 Bulkheads for 2014 and Later Ford Transit Connect Vans ATTENTION: PLEASE READ AND UNDERSTAND ALL INSTRUCTIONS AND WARNINGS BEFORE ASSEMBLING, INSTALLING
CAUTION: WEIGHT ON THIS PRODUCT SHOULD NOT EXCEED 136KG / 300LBS.
 OWNER S MANUAL Thank you for choosing the Sit N Cycle. We take great pride in producing this quality product and hope it will provide many hours of quality exercise to make you feel better, look better
Trouble Free Hardware
 Backs and Support OWNER MANUAL Trouble Free Hardware TFB Hardware Trouble Free Owner s Manual Customer Satisfaction 1.0 Stealth Products strives for 100% customer satisfaction. Your complete satisfaction
Tilting, Swiveling & Rotating Flat Panel Wall Mount
 Tilting, Swiveling & Rotating Flat Panel Wall Mount Model: VXA980TC +5 to -5 +5 to -5 Supports most 0-80 Flat Panel TVs Maximum Weight Capacity: 32 lbs. Supports VESA Sizes up to 600x500 For technical
M ACS Instructions
 APPLICABLE MODELS: Nissan Frontier 2005 and up short bed with Utili-Trak mounting rails PACKAGE CONTENTS 00-0060-M-01-1205 ACS Instructions Leitner Designs 25675 Taladro Circle Unit E Mission Viejo, CA
Installation Instructions Kit, Base Rail Bracket Part # 31413
 Installation Instructions Kit, Base Rail Bracket Part # 31413 Dealer / Installer: End User: Provide a copy of these Instructions to the end user of this product. These Instructions provide important operating
Single Arm Pole Mount. Installation Manual Edition v1.01. For models: UNI-SA/14 UNI-SA/21.5 UNI-SA/26 UNI-SA01-MAN
 Pole Mount Installation Manual 2016 Edition v1.01 For models: UNI-SA/14 UNI-SA/21.5 UNI-SA/26 UNI-SA01-MAN Table of Contents 1 1 2 3 4 5 5 Introduction Customer Support Project Essentials Assembly: Steps
KIDS ROCKER SEESAW MODEL# 9306RS PRODUCT MANUAL - VERSION
 KIDS ROCKER SEESAW PRODUCT MANUAL - VERSION 03.16.02 FOR AGES: 4-10 WEIGHT LIMIT: 150 Lbs 68 Kgs ADULT(S) NEEDED: TOOLS NEEDED: WARNING/ADVERTENCIA CUSTOMER SERVICE Please read all the instructions before
9 QUICK RELEASE WOODWORKING VISE
 9 QUICK RELEASE WOODWORKING VISE 94386 OPERATING INSTRUCTIONS Due to continuing improvements, actual product may differ slightly from the product described herein. 349 Mission Oaks Blvd., Camarillo, CA
Model Assembly & Operating Instructions
 30 SHEAR BRAKE ROLL Model 05907 Assembly & Operating Instructions Diagrams within this manual may not be drawn proportionally. Due to continuing improvements, actual product may differ slightly from the
Owner s Manual & Safety Instructions
 Owner s Manual & Safety Instructions Save This Manual Keep this manual for the safety warnings and precautions, assembly, operating, inspection, maintenance and cleaning procedures. Write the product s
738 SERIES PIVOT SHOWER DOOR
 INSTALLATION INSTRUCTIONS 738 SERIES PIVOT SHOWER DOOR Copyright Alumax Bath Enclosures 1997. All rights reserved. Page 1 of 8 LIMITED WARRANTY AND REMEDY Alumax Bath Enclosures warrants to its dealers,
Quick Release Hardware
 Backs and Support OWNER MANUAL Quick Release Hardware TFB Hardware Quick Release Owner s Manual Customer Satisfaction 1.0 Stealth Products strives for 100% customer satisfaction. Your complete satisfaction
00108/00110 INSTRUCTION MANUAL
 00108/00110 INSTRUCTION MANUAL Removable and Adjustable Mudflap System IMPORTANT! Please Read this Instruction Booklet prior to assembly of your Rock Tamer Kit. IMPORTANT! Exhaust Systems Note: Any modifications
INSTRUCTION MANUAL TAPER ATTACHMENT MODEL M1022. Phone: (360) On-Line Technical Support: FOR USE WITH MODEL M1019
 On-Line Technical Support: FOR USE WITH MODEL M1019") MODEL M1022 TAPER ATTACHMENT FOR USE WITH MODEL M1019 INSTRUCTION MANUAL Phone: (360) 734-3482 On-Line Technical Support: tech-support@shopfox.biz #6809BL COPYRIGHT DECEMBER, 2004 BY WOODSTOCK INTERNATIONAL,
MODEL M1022 TAPER ATTACHMENT FOR USE WITH MODEL M1019 INSTRUCTION MANUAL Phone: (360) 734-3482 On-Line Technical Support: tech-support@shopfox.biz #6809BL COPYRIGHT DECEMBER, 2004 BY WOODSTOCK INTERNATIONAL,