GSN Professional RK DK. Robert Bosch GmbH Power Tools Division Leinfelden-Echterdingen Germany.
|
|
|
- Barrie Atkins
- 6 years ago
- Views:
Transcription
 PS / 352 UNI GSN Professional 90-21 RK 90-34 DK de Originalbetriebsanleitung en Original instructions fr Notice originale es Manual original pt Manual original it Istruzioni originali nl")

1 OBJ_BUCH book Page 1 Tuesday, December 8, :15 PM Robert Bosch GmbH Power Tools Division Leinfelden-Echterdingen Germany U15 ( ) PS / 352 UNI GSN Professional RK DK de Originalbetriebsanleitung en Original instructions fr Notice originale es Manual original pt Manual original it Istruzioni originali nl Oorspronkelijke gebruiksaanwijzing da Original brugsanvisning sv Bruksanvisning i original no Original driftsinstruks fi Alkuperäiset ohjeet el Πρωτότυπο οδηγιών χρήσης tr Orijinal işletme talimat pl Instrukcja oryginalna cs Původní návod k používání sk Pôvodný návod na použitie hu Eredeti használati utasítás ru Оригинальное руководство по эксплуатации uk Оригінальна інструкція з експлуатації ro Instrucţiuni originale bg Оригинална инструкция sr Originalno uputstvo za rad sl Izvirna navodila hr Originalne upute za rad et Algupärane kasutusjuhend lv Instrukcijas oriģinālvalodā lt Originali instrukcija ar fa


2 OBJ_BUCH book Page 3 Tuesday, December 8, :03 PM A GSN RK Professional Bosch Power Tools U15 ( )


3 OBJ_BUCH book Page 4 Tuesday, December 8, :03 PM 4 B B2 7 C U15 ( ) 9 Bosch Power Tools


4 OBJ_BUCH book Page 5 Tuesday, December 8, :03 PM 5 D 10 9 E 3 3 F1 F Bosch Power Tools U15 ( )


5 OBJ_BUCH book Page 6 Tuesday, December 8, :03 PM 6 F3 G H 18 I J U15 ( ) Bosch Power Tools
6 OBJ_BUCH book Page 20 Tuesday, December 8, :03 PM 20 English en Safety Notes General Safety Rules for Pneumatic Tools WARNUNG Read and observe all safety warnings and instructions. Failure to follow the following safety warnings and instructions may result in electric shock, fire and/or serious injury. Save all warnings and instructions for future reference. 1) Work area safety a)keep work area clean and well lit. Cluttered or dark areas invite accidents. b)do not operate the pneumatic tool in explosive atmospheres, such as in the presence of flammable liquids, gases or dusts. While working the workpiece, sparks can be created which may ignite the dust or fumes. c) Keep children and bystanders away from your workplace while operating the pneumatic tool. Distractions from other persons can cause you to lose control over the pneumatic tool. 2) Pneumatic tool safety a)use compressed air of Quality Class 5 in accordance with DIN ISO and a separate maintenance unit close to the pneumatic tool. The compressed air supplied should be free of foreign material and moisture to protect the pneumatic tool from damage, contamination, and the formation of rust. b)check the connections and the air supply lines. All maintenance units, couplers, and hoses should conform to the product specifications in terms of pressure and air volume. Too low pressure impairs the function of the pneumatic tool; too high pressure can result in material damage and personal injury. c) Protect the hoses from kinks, restrictions, solvents, and sharp edges. Keep the hoses away from heat, oil, and rotating parts. Immediately replace a damaged hose. A defective air supply line may result in a wild compressed-air hose and can cause personal injury. Raised dust or chips may cause serious eye injury. d)make sure that hose clamps are always tightened firmly. Loose or damaged hose clamps may result in uncontrolled air escape. 3) Personal safety a)stay alert, watch what you are doing, and use common sense when operating a pneumatic tool. Do not use a pneumatic tool while tired or under the influence of drugs, alcohol, or medication. A moment of inattention while operating a pneumatic tool may result in personal injury. b)use personal protective equipment. Always wear eye protection. Protective equipment such as dust mask, non-skid safety shoes, hard hat, or hearing protection used for appropriate conditions will reduce personal injuries. c) Prevent unintentional starting. Make sure that the pneumatic tool is switched off before connecting it to the air supply, picking it up or carrying it. When your finger is on the On/Off switch while carrying the pneumatic tool or when connecting the pneumatic tool to the air supply while it is switched on, accidents can occur. d)remove any adjustment tools before switching on the pneumatic tool. A wrench or key left attached to a rotating part of a pneumatic tool may result in personal injury. e)do not overreach. Keep proper footing and balance at all times. This enables better control of the pneumatic tool in unexpected situations. f) Dress properly. Do not wear loose clothing or jewellery. Keep your hair, clothing and gloves away from moving parts. Loose clothes, jewellery or long hair can be caught in moving parts. g)if devices are provided for the connection of dust extraction and collection facilities, ensure these are connected and properly used. Use of dust collection can reduce dust-related hazards. h)do not directly inhale the exhaust air. Avoid exposing the eyes to exhaust air. The pneumatic tool's exhaust air can contain water, oil, metal particles and debris from the compressor. This can cause damage to one's health. 4) Pneumatic tool use and care a)use the clamping devices or a vice to secure and support the workpiece. Holding the workpiece by hand or against your body will not allow for safe operation of the pneumatic tool. b)do not overload the pneumatic tool. Use the pneumatic tool intended for your work. The correct pneumatic tool will do the job better and safer at the rate for which it is designed U15 ( ) Bosch Power Tools
7 OBJ_BUCH book Page 21 Tuesday, December 8, :03 PM English 21 c) Do not use a pneumatic tool that has a defective On/Off switch. A pneumatic tool that cannot be controlled with the switch is dangerous and must be repaired. d)disconnect the air supply before making any adjustments, changing accessories, or placing the pneumatic tool aside. This safety measure prevents accidental starting of the pneumatic tool. e)store idle pneumatic tools out of the reach of children. Do not allow persons unfamiliar with the pneumatic tool or these instructions to operate the device. Pneumatic tools are dangerous in the hands of untrained users. f) Maintain the pneumatic tool with care. Check for misalignment or binding of moving parts, breakage of parts and any other condition that may affect the pneumatic tool's operation. Have damaged parts repaired before using the pneumatic tool. Many accidents are caused by poorly maintained pneumatic tools. g)use the pneumatic tool, accessories, application tools, etc. according to these instructions. Take into consideration the working conditions and the activities to be carried out. Use of the pneumatic tool for operations different from those intended could result in hazardous situations. 5) Service a)have your pneumatic tool repaired only through a qualified repair person and only using original replacement parts. This will ensure that the safety of the pneumatic tool is maintained. Safety Warnings for Compressed-air Nailers/Staplers Wear safety goggles. Always assume that the pneumatic tool is loaded with fasteners. Careless handling of the pneumatic tool can lead to unexpected shot actuation of fasteners and cause injury. When working, hold the pneumatic tool in such a manner that your head and body cannot be injured in case of sudden kickback due to a malfunction of the energy supply or from hard objects/locations in the workpiece. Never point the pneumatic tool at yourself or at persons close by. Unexpected actuation will expel a fastener, which can lead to injury. Do not actuate the pneumatic tool until firmly placed against the workpiece. When the pneumatic tool is not in contact with the workpiece, the fastener can bounce away from the fastening point and overload the pneumatic tool. Do not work on ladders or scaffolds when the actuation system Contact actuation is set. In particular, do not move from one fastening location to another, close boxes or enclosures, or fasten transport-securing fixtures on e.g., vehicles and waggons, via scaffolds, stairs, ladders or ladder-like constructions, such as roof battens. With this actuation system, a fastener will be discharged each time when accidentally applying the pneumatic tool while the discharge lock-off is pressed in. This can lead to injury. Observe the conditions of the job site. It is possible that fasteners can burst through thin workpieces or be deflected when working in corners or against edges, and harm persons. Disconnect the air supply, when the fastener is jammed in the pneumatic tool. When the pneumatic tool is still connected to the power supply, it can accidentally be actuated when removing a jammed fastener. Use caution when removing a jammed or stuck fastener. The system can be under tension and cause the fastener to be shot or thrust out, while attempting to clear the jam. Bosch Power Tools U15 ( )
8 OBJ_BUCH book Page 22 Tuesday, December 8, :03 PM 22 English Do not use this to pneumatic tool to fasten electrical wiring. It is not suitable for fastening electrical wiring, can damage the insulation of electric cables and thus lead to electric shock and danger of fire. Never use oxygen or flammable gases as the energy source for the pneumatic tool. Flammable gases are dangerous and can cause the pneumatic tool to explode. Use appropriate detectors to determine if utility lines are hidden in the work area or call the local utility company for assistance. Contact with electric lines can lead to fire and electric shock. Damaging a gas line can lead to explosion. Penetrating a water line causes property damage or may cause an electric shock. The pneumatic tool may only be connected to lines, for which the maximal permissible pressure of the pneumatic tool cannot be exceeded by more than 10 %; for higher pressures, a pressure control valve (pressure reducer) with preceding pressure-limitation valve in the compressed-air line must be installed. Excessive pressure leads to abnormal operation or breakage of the pneumatic tool, which can lead to injury. Functional Description Read all safety warnings and all instructions. Failure to follow the warnings and instructions may result in electric shock, fire and/or serious injury. Intended Use The pneumatic tool is intended for connecting work in roofing, encasing, battening, manufacturing wall and ceiling elements, wood facades, pallets, wood fences, noisereduction walls and boxes. Only the fasteners (nails, staples, etc.) specified in table Technical Data may be used. Product Features The numbering of the product features refers to the illustration of the pneumatic tool on the graphics page. 1 Workpiece protector 2 Discharge lock-off 3 Depth stop 4 Air outlet 5 Handle 6 Air connector 7 Magazine slider 8 Magazine 9 Selector switch for actuation system 10 Trigger 11 Outlet 12 Air-connection coupling 13 Supply-air hose 14 Nail strip* 15 Magazine lock 16 Lock pin 17 Driver blade 18 Magazine holder 19 Magazine retainer at shot duct 20 Magazine rail 21 Locking screw 22 Cover lid 23 Spring clip 24 Screwable eyelet for pneumatic tool suspension *Accessories shown or described are not part of the standard delivery scope of the product. A complete overview of accessories can be found in our accessories program U15 ( ) Bosch Power Tools
9 OBJ_BUCH book Page 23 Tuesday, December 8, :03 PM English 23 Technical Data Compressed-air nailer GSN RK Professional GSN DK Professional Article number 3601D D913.. Driving force at 6.3 bar (91 psi) Nm Actuation systems Single actuation with safety run Contact actuation Fastener Type Length Diameter mm mm Nail strip Plastic-bonded Round head Nail strip Paper-bonded D-head Magazine angle Magazine capacity, max Engine oil SAE10, SAE20 ml Internal volume ml Rated pressure bar Connecting thread " 3/8 3/8 Supply-air hose Max. operating pressure at 20 C Inner diameter of hose Max. hose length bar " m 10 3/ /8 30 Air consumption per driving procedure at 6.8 bar (100 psi) l Dimensions Height Width Length mm mm mm Weight according to EPTA-Procedure 01/2003 kg Noise/Vibration Information Measured noise values determined according to EN Typically the A-weighted noise levels of the pneumatic tool are: Sound pressure level 110 db(a); sound power level 123 db(a). Uncertainty K=2 db. Wear hearing protection! Overall vibrational values (vector sum of three directions) determined according to EN and EN ISO Vibrational emission value a h <2.5 m/s 2. Uncertainty K= 1.5m/s 2. Bosch Power Tools U15 ( )
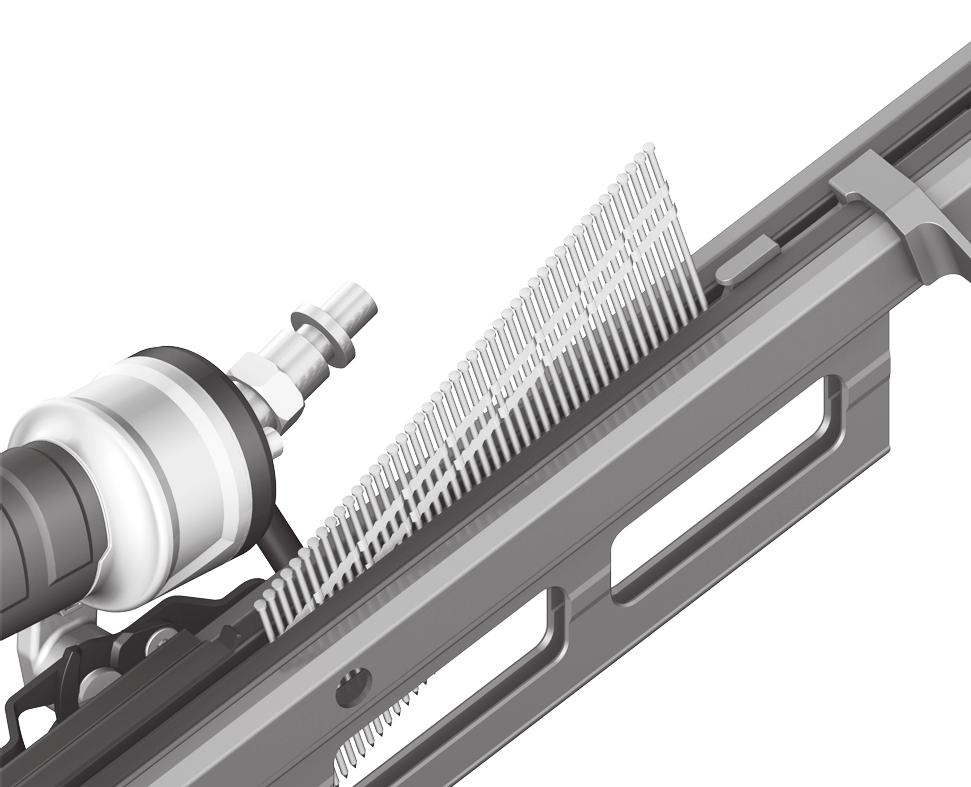
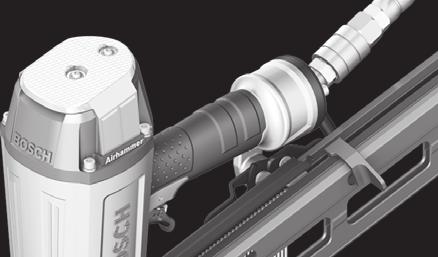
10 OBJ_BUCH book Page 24 Tuesday, December 8, :03 PM 24 English Declaration of Conformity We declare under our sole responsibility that the product described under Technical data is in conformity with the following standards or standardization documents: EN 792 according to the provisions of the directives 98/37/EC (until 28 Dec 2009), 2006/42/EC (from 29 Dec 2009). Technical file at: Robert Bosch GmbH, PT/ESC, D Leinfelden-Echterdingen Dr. Egbert Schneider Senior Vice President Engineering Robert Bosch GmbH, Power Tools Division D Leinfelden-Echterdingen Leinfelden, Assembly Dr. Eckerhard Strötgen Head of Product Certification Connecting the Air Supply (see figure A) Make sure that the pressure of the compressed-air system is below the maximum permitted rated pressure of the pneumatic tool. Firstly, set the air pressure to the lower value of the recommended rated pressure (see Technical Data ). When in doubt, check the pressure at the air inlet with a pressure gauge with the pneumatic tool switched on. For maximum performance, the values for the supply-air hose 13 (connection thread, maximum operating pressure, inner hose diameter, maximum hose length; see Technical Data ) must be observed. The compressed air supplied should be free of foreign material and moisture to protect the tool from damage, contamination, and the formation of rust. All fittings, connecting lines and hoses must be dimensioned for the pressure and the required air volume. Avoid restrictions in the air supply, e.g., from pinching, kinking, or stretching! Connecting the Air Supply to the Pneumatic Tool Empty the magazine 8. (See Emptying the Magazine, page 26) For the following worksteps, a fastener can be discharged when interior parts of the pneumatic tool are not in the starting position due to repairs, maintenance or transport. Connect the air connector 6 with a supply-air hose 13 equipped with an air-connection coupling 12. Check the proper function by placing the outlet 11 or the rubber workpiece protector 1 of the pneumatic tool onto a piece of scrap wood or wood material, and discharging once or twice. Loading the Magazine (see figures B1 B2) Disconnect the air supply before making any adjustments, changing accessories, or placing the pneumatic tool aside. This safety measure prevents accidental starting of the pneumatic tool. Use only original Bosch accessories (see Technical Data ). The precision parts of the pneumatic tool such as the magazine, the outlet and the shot duct are matched to Bosch staples, nails and brads. Other manufacturers use other steel qualities and sizes. Using fasteners not permitted, can damage the pneumatic tool and cause injuries. While loading the magazine, hold the pneumatic tool in such a manner that the outlet 11 is not pointed at your own body or at other persons. Pull back the magazine slider 7 until it engages at the rear. Note: The magazine slider must slide back with only low force (finger-pressure). A tight-running magazine slider causes the nails to be driven in at an incorrect angle. Clean and lubricate the magazine slider 7 as required and make sure that the magazine 8 is not dirty/soiled. Insert a fitting nail strip 14. Do not use nail strips with less than 5 nails. Do not insert more than 2 nail strips. Make sure that the heads of the nails do not overlap. GSN DK: With this pneumatic tool, a lock function of the magazine slider prevents the last nails from being discharged. Approx. 7 nails remain in the magazine. Completely pull back the magazine slider 7 once more to free the lock. Carefully guide the magazine slider to the front until it touches the nail strip. Make sure that the magazine slider is slid beyond the head of the last nail. Note: Do not let the magazine slider snap back without guiding it. Otherwise, the magazine slider could become damaged, and there is danger of your fingers being caught or pinched U15 ( ) Bosch Power Tools
11 OBJ_BUCH book Page 25 Tuesday, December 8, :03 PM English 25 Operation Actuation systems The pneumatic tool can be operated with two different actuations systems: Single actuation with safety run With this actuation system, the discharge lock-off 2 must first be firmly pressed against the workpiece. A fastener is not discharged until the trigger 10 is pulled. Afterwards, further discharging procedures can only be actuated, when the trigger and the discharge lockoff have first been set back to the starting position. Contact actuation With this actuation system, the trigger 10 must be pulled first. A fastener is always discharged when the discharge lock-off 2 is firmly pressed against the workpiece while the trigger is pressed. This enables a higher working speed to be achieved. The actuation system is set via the selector switch 9. Starting Operation Disconnect the air supply before making any adjustments, changing accessories, or placing the pneumatic tool aside. This safety measure prevents accidental starting of the pneumatic tool. Working with Single Actuation (see figure C) Press selector switch 9 inward and at the same time pivot it to the bottom position until it engages. The actuation system single actuation is set. Release the selector switch 9 again. Firmly position the outlet 11 or the rubber workpiece protector 1 on the workpiece until discharge lock-off 2 is pressed in completely. Afterwards, briefly press trigger 10 and release again. A nail is discharged. Allow the pneumatic tool to bounce back from the workpiece. For another driving procedure, completely lift the pneumatic tool from the workpiece and position it firmly at the next desired location. Working with Contact Actuation (see figure D) Press selector switch 9 inward and at the same time pivot it to the upper position until it engages. The actuation system contact actuation is set. Release the selector switch 9 again. Press and hold the trigger 10. Firmly position the outlet 11 or the rubber workpiece protector 1 on the workpiece until discharge lock-off 2 is pressed in completely. A nail is discharged. Allow the pneumatic tool to bounce back from the workpiece. For another driving procedure, completely lift the pneumatic tool from the workpiece and position it firmly at the next desired location. Move the pneumatic tool uniformly over the workpiece by lifting it off and applying it again. Each time when applying the pneumatic tool while the discharge lock-off is pressed in, a nail will be discharged. As soon as the desired amount of nails have been driven in, release trigger 10 again. Working Advice Disconnect the air supply before making any adjustments, changing accessories, or placing the pneumatic tool aside. This safety measure prevents accidental starting of the pneumatic tool. Check the proper function of the safety and actuation devices, and the tight seating of all screws and nuts each time before using. Disconnect a defective or not properly operating pneumatic tool immediately from of the air supply and contact an authorised service agent for Bosch power tools. Do not perform any incorrect manipulations on the pneumatic tool. Do not disassemble or block any components of the pneumatic tool, such as the discharge lock-off. Do not carry out emergency repairs with unsuitable means. The pneumatic tool is to be maintained regularly and properly (see Maintenance and Cleaning, page 27). Bosch Power Tools U15 ( )
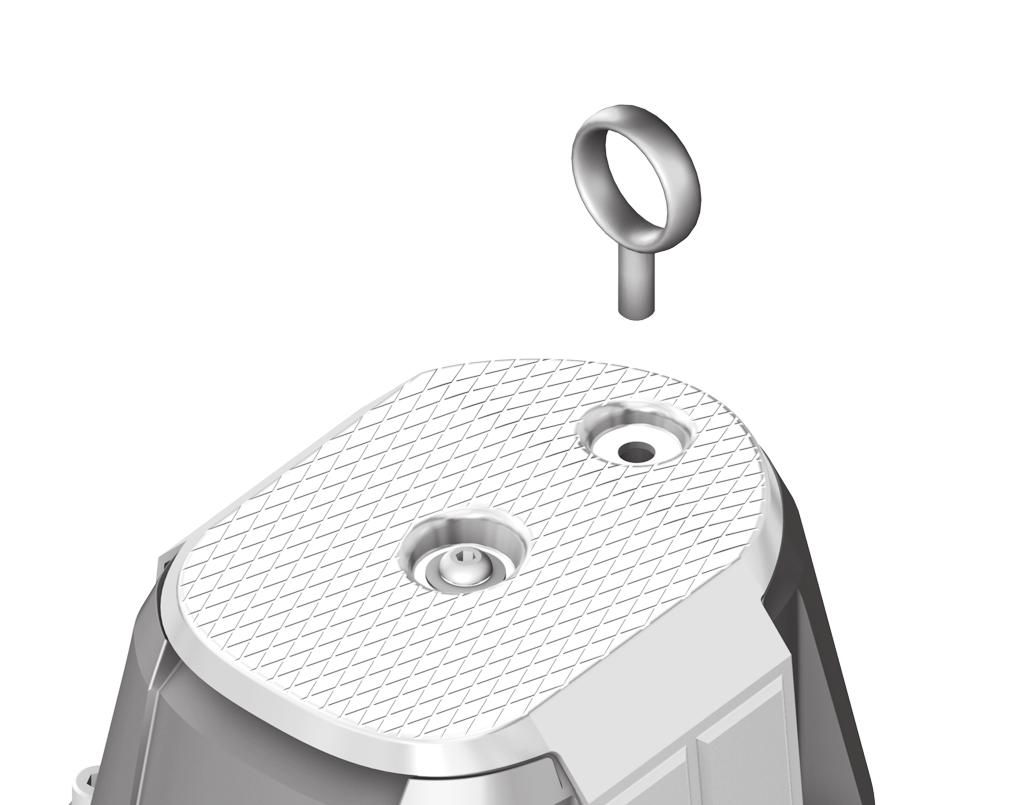
12 OBJ_BUCH book Page 26 Tuesday, December 8, :03 PM 26 English Avoid any weakening and damage whatsoever of the pneumatic tool, e.g., through: Imprinting or engraving, Retrofitting measures not approved by the manufacturer, Guiding along templates manufactured of hard material, e.g. steel, Dropping on or sliding over the floor, Using as a hammer, Applying any kind of force. Make sure to check whatever is below or behind your workpiece. Do not shoot nails into walls, ceilings or floors, when persons are behind them. The nails can burst through the workpiece and injure someone. Do not shoot a nail onto an already driven-in one. This could cause the nail to deform, the nails could become jammed or the pneumatic tool could move uncontrolled. When the pneumatic tool is used under cold ambient conditions, the first nails will be driven in slower than usual. Once the pneumatic tool has warmed up during working, normal operating speed will be regained. Avoid blank shots in order to reduce the wear of the impact striker. For longer work breaks or after finishing work, disconnect the pneumatic tool from the air supply and empty the magazine. Emptying the Magazine Pull back the magazine slider 7 until it engages at the rear. Remove the nail strips 14. Discard nail strips with less than 5 nails. Completely pull back the magazine slider 7 once more to free the lock. Carefully guide the magazine slider to the front until it touches the beginning of the magazine. Note: Do not let the magazine slider snap back without guiding it. Otherwise, the magazine slider could become damaged, and there is danger of your fingers being caught or pinched. Adjusting the Depth Stop (see figure E) The driving depth of the nails can be set with depth stop 3. Empty the magazine 8. (See Emptying the Magazine, page 26) To reduce the driving depth, turn the depth stop clockwise. or To increase the driving depth, turn the depth stop anticlockwise. Refill the magazine. (See Loading the Magazine, page 24) Test the new driving depth on a test workpiece. Repeat the worksteps as required. Clearing Jams (see figures F1 F3) Single nails can become jammed in the shot duct. If this should occur frequently, please contact an authorised service agent for Bosch power tools. Empty the magazine 8. (See Emptying the Magazine, page 26) Open the magazine lock 15. Pull the magazine 8 away from the housing until it slips off of lock pin 16. This makes the jammed nail in the shot duct accessible. Remove the jammed nail. For this, us a pair of pliers, if required. When driver blade 17 is extended, push it back into the piston using a lubricated screwdriver or other suitable lubricated object. Lubricate the shot duct with 2 3 drops of engine oil (SAE 10 or SAE 20). Reinsert the magazine 8 again: Open the magazine lock 15, if required. Guide lock pin 16 into the opening of magazine holder 18. Align the magazine to magazine retainers 19 and push the magazine completely to the front. Lock the magazine by completely folding magazine lock 15 up. Refill the magazine. (See Loading the Magazine, page 24) Changing a Magazine Rail (see figure G) The magazine rails 20 can wear after prolonged use of the pneumatic tool. Replace defective magazine rails. Empty the magazine 8. (See Emptying the Magazine, page 26) Loosen locking screw 21 (3 mm) with the supplied Allen key. Pull cover lid 22 out of the magazine 8. Allow the defective magazine rails 20 to slide out of the magazine. Insert new magazine rails into the magazine. Insert cover lid 22 back into the magazine and tighten locking screw U15 ( ) Bosch Power Tools
13 OBJ_BUCH book Page 27 Tuesday, December 8, :03 PM English 27 Changing the Workpiece Protector (see figure H) The workpiece protector 1 at the end of the discharge lock-off 2 protects the workpiece until the pneumatic tool is correctly placed for the driving procedure. The workpiece protector can be removed and replaced. Remove spring clip 23 and pull the workpiece protector from the discharge lock-off 2. Push the new workpiece protector over the discharge lock-off and mount the spring clip again. Stationary Use of the Pneumatic Tool (see figure I) For stationary use, the pneumatic tool can be fastened to a balancer. The screwable eyelet 24 is required for this. Remove the rear screw of the exhaust cap with the supplied Allen key. Screw the eyelet 24 firmly into the exhaust cap. Hook the eyelet to the balancer hook. Transport and Storage For transport, disconnect the pneumatic tool from the air supply; especially when using ladders or moving in an unusual stance or posture. At the workplace, carry the pneumatic tool only by the handle 5 and with the trigger 10 released. Always store the pneumatic tool disconnected from the air supply and at a clean and dry location. When not using the pneumatic tool for a longer period of time, cover steel parts with a fine oil coating. This prevents the formation of rust. Maintenance and Service Maintenance and Cleaning Disconnect the air supply before making any adjustments, changing accessories, or placing the pneumatic tool aside. This safety measure prevents accidental starting of the pneumatic tool. If the pneumatic tool should fail despite the care taken in manufacture and testing, repair should be carried out by an authorised customer services agent for Bosch power tools. In all correspondence and spare parts orders, please always include the 10-digit article number given on the type plate of the pneumatic tool. Have maintenance and repair work carried out only through qualified persons. This will ensure that the safety of the pneumatic tool is maintained. An authorized Bosch after-sales service agent will carry out this work quickly and reliably. Lubricating the Pneumatic Tool (see figure J) When the pneumatic tool is not connected to a maintenance unit, it must be lubricated at regular intervals: For light-duty use 1x per day. For heavy-duty use 2x per day. Apply 2 3 drops of lubricant into air connector 6. Do not apply too much lubricant, which could then accumulate in the pneumatic tool and be emitted via air outlet 4. Use only the lubricants recommended by Bosch. SAE 10 mineral engine oil (for use at very cold ambient conditions) SAE 20 mineral engine oil Observe all applicable environmental regulations when disposing of old grease and solvents. Bosch Power Tools U15 ( )
14 OBJ_BUCH book Page 28 Tuesday, December 8, :03 PM 28 English Maintenance Schedule Always keep air outlet 4, discharge lock-off 2 and trigger 10 clean and free of foreign material (dust, chips, sand, etc). Clean the magazine 8. Remove any plastic or wood chips that may accumulate in the magazine during operation. Clean the pneumatic tool in regular intervals using compressed air. Measure Explanation Action Draining the exhaust filter daily. Prevents the accumulation of dirt/ Open the drain valve. debris and moisture in the pneumatic tool. Keeping the lubricator filled at all times. Ensures the lubrication of the pneumatic tool. Fill lubricator with the recommended lubricants. (See Lubricating the Pneumatic Tool, page 27) Cleaning the magazine 8 and magazine slider 7. Prevents the jamming of nails. Blow out the mechanism of the magazine/magazine slider daily with compressed air. Ensuring that the discharge lock-off 2 functions properly. Promotes your work safety and efficient usage of the pneumatic tool. Blow out the mechanism of the discharge lock-off daily with compressed air. Lubricating the pneumatic tool. Reduces the wear of the pneumatic tool. Apply 2 3 drops of lubricant into air connector 6. (See Lubricating the Pneumatic Tool, page 27) Draining the compressor. Prevents the accumulation of dirt/ debris and moisture in the pneumatic tool. Open the drain valve of the compressor tank U15 ( ) Bosch Power Tools
15 OBJ_BUCH book Page 29 Tuesday, December 8, :03 PM English 29 Correction of Malfunctions Problem Cause Corrective Measure The pneumatic tool is ready for operation but no nails are discharged. The nails are discharged very slowly and with too little pressure. A nail is jammed in the shot duct. The magazine slider is 7 defective. The spring of the magazine slider is too week or defective. The fasteners being used are not permitted. The magazine 8 is empty. The rated pressure of the compressedair supply is too low. The driver blade is damaged. The sealing ring of the piston is worn or damaged. The buffer is worn. The length and diameter of supply-air hose 13 do not correspond with the data of this pneumatic tool. The supply-air hose 13 is bent/creased. Clear the jam. (See Clearing Jams, page 26) Clean and lubricate the magazine slider 7 as required and make sure that the magazine 8 is not dirty/soiled. Contact an authorised service agent for Bosch power tools. Have the component replaced there. Use only original accessories. Only the fasteners (nails, staples, etc.) specified in table Technical Data may be used. Refill the magazine. (See Loading the Magazine, page 24) Increase the compressed-air supply. 8 bar may not be exceeded. Use only the lubricants recommended by Bosch. (See Lubricating the Pneumatic Tool, page 27) Contact an authorised service agent for Bosch power tools. Have the component replaced there. Contact an authorised service agent for Bosch power tools. Have the component replaced there. Use a supply-air hose with the correct dimensions. (See Technical Data, page 23) Correct the bend/crease in the supplyair hose. The nails are driven in too deep. The rated pressure of the compressedair supply is too high. The depth stop is set too deep. The buffer is worn. Reduce the compressed-air supply. 4 bar may not be fallen below. Adjust the depth stop to the desired depth. (See Adjusting the Depth Stop, page 26) Contact an authorised service agent for Bosch power tools. Have the component replaced there. Bosch Power Tools U15 ( )
16 OBJ_BUCH book Page 30 Tuesday, December 8, :03 PM 30 English Problem Cause Corrective Measure The nails are not driven in deep enough. The pneumatic tool skips nails or has a too large cycle feed. Frequent jamming of nails in the shot duct. The rated pressure of the compressedair supply is too low. The depth stop is set too high. The length and diameter of supply-air hose 13 do not correspond with the data of this pneumatic tool. The supply-air hose 13 is bent/creased. The fasteners being used are not permitted. The magazine 8 is not operating correctly. The spring of the magazine slider is too week or defective. The sealing ring of the piston is worn or damaged. The fasteners being used are not permitted. Increase the compressed-air supply. 8 bar may not be exceeded. Adjust the depth stop to the desired depth. (See Adjusting the Depth Stop, page 26) Use a supply-air hose with the correct dimensions. (See Technical Data, page 23) Correct the bend/crease in the supplyair hose. Use only original accessories. Only the fasteners (nails, staples, etc.) specified in table Technical Data may be used. Clean and lubricate the magazine slider 7 as required and make sure that the magazine 8 is not dirty/soiled. Contact an authorised service agent for Bosch power tools. Have the component replaced there. Contact an authorised service agent for Bosch power tools. Have the component replaced there. Use only original accessories. Only the fasteners (nails, staples, etc.) specified in table Technical Data may be used. Contact an authorised service agent for Bosch power tools. The driven nails are bent. The driver blade is damaged. Contact an authorised service agent for Bosch power tools. Have the component replaced there. Contrary to working with normal operating speed, the nails are not driven in deep enough at higher operating speed. The interior diameter of the supply-air hose is too low. The compressor is not suitable for fast operating speeds. Use a supply-air hose with the correct dimensions. (See Technical Data, page 23) Use a compressor that is sufficiently dimensioned for the number of connected pneumatic tools and the operating speed U15 ( ) Bosch Power Tools
17 OBJ_BUCH book Page 31 Tuesday, December 8, :03 PM English 31 Accessories For more information on the complete quality accessories program, please refer to the Internet under or contact your specialist shop. After-sales Service and Customer Assistance Our after-sales service responds to your questions concerning maintenance and repair of your product as well as spare parts. Exploded views and information on spare parts can also be found under: Our customer service representatives can answer your questions concerning possible applications and adjustment of products and accessories. Great Britain Robert Bosch Ltd. (B.S.C.) P.O. Box 98 Broadwater Park North Orbital Road Denham Uxbridge UB 9 5HJ Tel. Service: +44 (0844) Fax: +44 (0844) boschservicecentre@bosch.com Ireland Origo Ltd. Unit 23 Magna Drive Magna Business Park City West Dublin 24 Tel. Service: +353 (01) Fax: +353 (01) Australia, New Zealand and Pacific Islands Robert Bosch Australia Pty. Ltd. Power Tools Locked Bag 66 Clayton South VIC 3169 Customer Contact Center Inside Australia: Phone: +61 (01300) Fax: +61 (01300) Inside New Zealand: Phone: +64 (0800) Fax: +64 (0800) Outside AU and NZ: Phone: +61 (03) Republic of South Africa Customer service Hotline: +27 (011) Gauteng BSC Service Centre 35 Roper Street, New Centre Johannesburg Tel.: +27 (011) Fax: +27 (011) bsctools@icon.co.za KZN BSC Service Centre Unit E, Almar Centre 143 Crompton Street Pinetown Tel.: +27 (031) Fax: +27 (031) bsc.dur@za.bosch.com Western Cape BSC Service Centre Democracy Way, Prosperity Park Milnerton Tel.: +27 (021) Fax: +27 (021) bsc@zsd.co.za Bosch Headquarters Midrand, Gauteng Tel.: +27 (011) Fax: +27 (011) rbsa-hq.pts@za.bosch.com Disposal The pneumatic tool, accessories and packaging should be sorted for environmental-friendly recycling. When your unit is no longer suitable for use, please return it to a specialist store or send it directly (sufficiently postpaid please) to: Recyclingzentrum Elektrowerkzeuge Osteroder Landstr Kalefeld The units will be disassembled. Plastics, e.g., the housing which are primarily made of polyamide, are identified (Bosch detection code for plastics since 1992) and recycled. Iron, steel, aluminium and cast parts are melted in a high-temperature furnace and recycled. Copper scrap is shredded (without heat) and returned to the copper industry as copper granulate. Subject to change without notice. Bosch Power Tools U15 ( )
 OBJ_BUCH-1199-001.book Page 1 Thursday, April 8, 2010 1:35 PM Robert Bosch GmbH Power Tools Division 70745 Leinfelden-Echterdingen Germany www.bosch-pt.com 1 609 929 U17 (2010.04) PS / 172 UNI GTA 3800
GSB 1600 RE Professional
 OBJ_DOKU-1706-003.fm Page 1 Thursday, June 9, 2011 8:44 AM WEU WEU Robert Bosch GmbH Power Tools Division 70745 Leinfelden-Echterdingen Germany www.bosch-pt.com GSB 1600 RE Professional 1 609 929 M07 (2011.06)
OBJ_BUCH book Page 3 Monday, August 2, :46 PM 1 2 A B
 TruTool N 160 E de Originalbetriebsanleitung en Original instructions fr Notice originale es Manual original pt Manual original it Istruzioni originali nl Oorspronkelijke gebruiksaanwijzing da Original
ENGLISH (Original instructions) INSTRUCTION MANUAL. Drill DS4012 DOUBLE INSULATION. IMPORTANT: Read Before Using.
 INSTRUCTION MANUAL. Drill DS4012 DOUBLE INSULATION. IMPORTANT: Read Before Using.") ENGLISH (Original instructions) INSTRUCTION MANUAL Drill DS402 05402 DOUBLE INSULATION IMPORTANT: Read Before Using. ENGLISH (Original instructions) SPECIFICATIONS Model DS402 Capacities Steel 3 mm Wood
ENGLISH (Original instructions) INSTRUCTION MANUAL Drill DS402 05402 DOUBLE INSULATION IMPORTANT: Read Before Using. ENGLISH (Original instructions) SPECIFICATIONS Model DS402 Capacities Steel 3 mm Wood
Drill INSTRUCTION MANUAL. WARNING: For your personal safety, READ and UNDERSTAND before using. SAVE THESE INSTRUCTIONS FOR FUTURE 1 REFERENCE.
 ENGLISH (Original instructions) INSTRUCTION MANUAL Drill 6411 6412 6413 007894 DOUBLE INSULATION WARNING: For your personal safety, READ and UNDERSTAND before using. SAVE THESE INSTRUCTIONS FOR FUTURE
Impact Wrench MODEL TW1000. WARNING: For your personal safety, READ and UNDERSTAND before using. SAVE THESE INSTRUCTIONS FOR FUTURE REFERENCE.
 ENGLISH Impact Wrench MODEL TW000 00605 DOUBLE INSULATION I N S T R U C T I O N M A N U A L WARNING: For your personal safety, READ and UNDERSTAND before using. SAVE THESE INSTRUCTIONS FOR FUTURE REFERENCE.
GDA 280 E Professional
 OBJ_DOKU-7140-002.fm Page 1 Wednesday, November 12, 2008 3:20 PM Robert Bosch GmbH Power Tools Division 70745 Leinfelden-Echterdingen Germany www.bosch-pt.com GDA 280 E Professional 1 609 929 N92 (2008.11)
ENGLISH (Original instructions) INSTRUCTION MANUAL. Drill DOUBLE INSULATION. IMPORTANT: Read Before Using.
 INSTRUCTION MANUAL. Drill DOUBLE INSULATION. IMPORTANT: Read Before Using.") ENGLISH (Original instructions) INSTRUCTION MANUAL Drill 64 642 643 007894 DOUBLE INSULATION IMPORTANT: Read Before Using. ENGLISH (Original instructions) SPECIFICATIONS Model 64 642 643 Capacities Steel
ENGLISH (Original instructions) INSTRUCTION MANUAL Drill 64 642 643 007894 DOUBLE INSULATION IMPORTANT: Read Before Using. ENGLISH (Original instructions) SPECIFICATIONS Model 64 642 643 Capacities Steel
18V CORDLESS STAPLER/NAILER
 18V CORDLESS STAPLER/NAILER MODEL NO: CONSN18LIC PART NO: 6487058 OPERATION & MAINTENANCE INSTRUCTIONS ORIGINAL INSTRUCTIONS LS0717 ISS2 2 INTRODUCTION Thank you for purchasing this CLARKE product. Before
GBM Professional 10-2 RE RE. Robert Bosch GmbH Power Tools Division Leinfelden-Echterdingen Germany.
 OBJ_DOKU-5383-002.fm Page 1 Tuesday, November 17, 2009 8:48 AM Robert Bosch GmbH Power Tools Division 70745 Leinfelden-Echterdingen Germany www.bosch-pt.com 1 609 929 V00 (2009.11) O / 113 WEU GBM Professional
ENGLISH (Original instructions) INSTRUCTION MANUAL. Drill MT600 MT601 DOUBLE INSULATION. IMPORTANT: Read Before Using.
 INSTRUCTION MANUAL. Drill MT600 MT601 DOUBLE INSULATION. IMPORTANT: Read Before Using.") ENGLISH (Original instructions) INSTRUCTION MANUAL Drill MT600 MT60 003635 DOUBLE INSULATION IMPORTANT: Read Before Using. ENGLISH (Original instructions) SPECIFICATIONS Model MT600 MT60 Capacities Steel
ENGLISH (Original instructions) INSTRUCTION MANUAL Drill MT600 MT60 003635 DOUBLE INSULATION IMPORTANT: Read Before Using. ENGLISH (Original instructions) SPECIFICATIONS Model MT600 MT60 Capacities Steel
Impact Wrench MODEL 6905B MODEL 6906
 ENGLISH Impact Wrench MODEL 6905B MODEL 6906 005305 DOUBLE INSULATION I N S T R U C T I O N M A N U A L WARNING: For your personal safety, READ and UNDERSTAND before using. SAVE THESE INSTRUCTIONS FOR
KR703-XE KR704-XE KR705-XE KR753-XE KR754-XE KR755-XE Australia New Zealand
 6 5 4 www.blackanddecker.com.au 3 7 2 1 8 KR703-XE KR704-XE KR705-XE KR753-XE KR754-XE KR755-XE Australia New Zealand 7 8 A 12 13 10 9 10 B C 11 7 8 D E 2 Intended use Your Black & Decker hammer drill
Impact Wrench. 19 mm (3/4 ) MODEL 6906
 MODEL 6906") Impact Wrench 9 mm (3/4 ) MODEL 6906 002290 DOUBLE INSULATION I N S T R U C T I O N M A N U A L WARNING: For your personal safety, READ and UNDERSTAND before using. SAVE THESE INSTRUCTIONS FOR FUTURE REFERENCE.
Impact Wrench 9 mm (3/4 ) MODEL 6906 002290 DOUBLE INSULATION I N S T R U C T I O N M A N U A L WARNING: For your personal safety, READ and UNDERSTAND before using. SAVE THESE INSTRUCTIONS FOR FUTURE REFERENCE.
ROTARY HAMMER OWNER'S MANUAL
 ROTARY HAMMER OWNER'S MANUAL WARNING: Read carefully and understand all INSTRUCTIONS before operating. Failure to follow the safety rules and other basic safety precautions may result in serious personal
ENGLISH (Original instructions) INSTRUCTION MANUAL. Shear Wrench 6922NB DOUBLE INSULATION. IMPORTANT: Read Before Using.
 INSTRUCTION MANUAL. Shear Wrench 6922NB DOUBLE INSULATION. IMPORTANT: Read Before Using.") ENGLISH (Original instructions) INSTRUCTION MANUAL Shear Wrench 69NB 00498 DOUBLE INSULATION IMPORTANT: Read Before Using. ENGLISH (Original instructions) SPECIFICATIONS Model 69NB Bolt size M6, M0, M
ENGLISH (Original instructions) INSTRUCTION MANUAL Shear Wrench 69NB 00498 DOUBLE INSULATION IMPORTANT: Read Before Using. ENGLISH (Original instructions) SPECIFICATIONS Model 69NB Bolt size M6, M0, M
2-Speed Hammer Drill HP2000 HP2020
 2-Speed Hammer Drill HP2000 HP2020 SPECIFICATIONS Model HP2000 HP2020 Speed High Low High Low Capacities Concrete 20 mm 20 mm Steel 6.5 mm 13 mm 6.5 mm 13 mm No load speed (min 1 ) 0 2,300 0 900 2,300
Nibbler MODEL JN1601. WARNING: For your personal safety, READ and UNDERSTAND before using. SAVE THESE INSTRUCTIONS FOR FUTURE REFERENCE.
 ENGLISH Nibbler MODEL JN60 00477 DOUBLE INSULATION I N S T R U C T I O N M A N U A L WARNING: For your personal safety, READ and UNDERSTAND before using. SAVE THESE INSTRUCTIONS FOR FUTURE REFERENCE. SPECIFICATIONS
ATBG280/6 Bench Grinder Bench Grinder ATBG280/6 230V-50Hz 280 Watt 150mm x 25mm Wheel size
 Bench Grinder ATBG280/6 230V-50Hz 280 Watt 150mm x 25mm Wheel size SPECIFICATIONS Model Number : ATBG280/6 Nominal Voltage Power Consumption No load speed Wheel size Weight 230Volt 50Hz 280 Watts 2880
SAFETY AND OPERATING MANUAL. Hedge Trimmer WG205E WG206E WG207E WG208E
 SAFETY AND OPERATING MANUAL 2 PRODUCT SAFETY GENERAL Power Tool Safety Warnings WARNING: Read all instructions. Failure to follow all instructions listed below may result in electric shock, fire and/or
SAFETY AND OPERATING MANUAL
 SAFETY AND OPERATING MANUAL 2 General Power Tool Safety Warnings WARNING: Read all safety warnings and all instructions. Failure to follow the warnings and instructions may result in electric shock, fire
High Speed Drill MODEL WARNING: For your personal safety, READ and UNDERSTAND before using. SAVE THESE INSTRUCTIONS FOR FUTURE REFERENCE.
 ENGLISH High Speed Drill MODEL 6501 003002 DOUBLE INSULATION I N S T R U C T I O N M A N U A L WARNING: For your personal safety, READ and UNDERSTAND before using. SAVE THESE INSTRUCTIONS FOR FUTURE REFERENCE.
GBH Professional 3-28 DRE 3-28 DFR. Robert Bosch GmbH Power Tools Division Leinfelden-Echterdingen Germany.
 OBJ_BUCH-770-007.book Page 1 Monday, October 7, 2013 10:40 AM Robert Bosch GmbH Power Tools Division 70745 Leinfelden-Echterdingen Germany www.bosch-pt.com 1 619 92A 06A (2013.10) PS / 226 EURO GBH Professional
MINI RECIPROCATING SAW MODEL NO: CRS350M
 CRS350M - Mini Reciprocating saw.fm Page 1 Thursday, November 22, 2012 9:41 AM MINI RECIPROCATING SAW MODEL NO: CRS350M PART NO: 6462550 OPERATION & MAINTENANCE INSTRUCTIONS LS1112 CRS350M - Mini Reciprocating
SAFETY AND OPERATING MANUAL
 SAFETY AND OPERATING MANUAL Impact drill WX317 WX318 1 3 2 8 7 6 5 4 A1 A2 B C1 2 1 3 3 1 D C2 5 4 E F 2 E F 1 G 4 2 H 1. Keyless Chuck 2. Depth gauge 3. Drill/hammer drill function selector 4. Switch
Operating Manual 6 Industrial Bench Grinder ATBG280/
 Operating Manual 6 Industrial Bench Grinder ATBG280/6 804531 40 Year Australian Heritage The reputable name in bench grinders for 40 years Protect yourself and others by observing all safety information,
ENGLISH (Original instructions) INSTRUCTION MANUAL. Straight Shear JS1660 JS1670 DOUBLE INSULATION. IMPORTANT: Read Before Using.
 INSTRUCTION MANUAL. Straight Shear JS1660 JS1670 DOUBLE INSULATION. IMPORTANT: Read Before Using.") ENGLISH (Original instructions) INSTRUCTION MANUAL Straight Shear JS660 JS670 004666 DOUBLE INSULATION IMPORTANT: Read Before Using. ENGLISH (Original instructions) SPECIFICATIONS Model JS660 JS670 Steel
ENGLISH (Original instructions) INSTRUCTION MANUAL Straight Shear JS660 JS670 004666 DOUBLE INSULATION IMPORTANT: Read Before Using. ENGLISH (Original instructions) SPECIFICATIONS Model JS660 JS670 Steel
ENGLISH (Original instructions) INSTRUCTION MANUAL. Curved Planer 1002BA DOUBLE INSULATION. IMPORTANT: Read Before Using.
 INSTRUCTION MANUAL. Curved Planer 1002BA DOUBLE INSULATION. IMPORTANT: Read Before Using.") ENGLISH (Original instructions) INSTRUCTION MANUAL Curved Planer 00BA 0059 DOUBLE INSULATION IMPORTANT: Read Before Using. ENGLISH (Original instructions) SPECIFICATIONS Model 00BA Planing width 0 mm Planing
ENGLISH (Original instructions) INSTRUCTION MANUAL Curved Planer 00BA 0059 DOUBLE INSULATION IMPORTANT: Read Before Using. ENGLISH (Original instructions) SPECIFICATIONS Model 00BA Planing width 0 mm Planing
Auto Feed Screwdriver
 ENGLISH Auto Feed Screwdriver MODEL 6833 MODEL 6834 MODEL 6836 002607 DOUBLE INSULATION I N S T R U C T I O N M A N U A L WARNING: For your personal safety, READ and UNDERSTAND before using. SAVE THESE
Drill MODEL 6013B MODEL 6013BR. WARNING: For your personal safety, READ and UNDERSTAND before using. SAVE THESE INSTRUCTIONS FOR FUTURE REFERENCE.
 ENGLISH Drill MODEL 6013B MODEL 6013BR 004618 DOUBLE INSULATION I N S T R U C T I O N M A N U A L WARNING: For your personal safety, READ and UNDERSTAND before using. SAVE THESE INSTRUCTIONS FOR FUTURE
Klinch-Pak Carton Closer Stapler
 Klinch-Pak Carton Closer Stapler (KP-561M, KP-561PM, KP-560M, KP-560PM, KP-560PN22, KP-RCRR1, KP-RC555) Operation and Maintenance Manual IMPORTANT IMPROPER AND UNSAFE USE OF THIS NAILER WILL RESULT IN
8 TONNE LOG SPLITTER
 8 TONNE LOG SPLITTER MODEL NO: LOGBUSTER 9 PART NO: 3402043 OPERATION & MAINTENANCE INSTRUCTIONS LS03/16 INTRODUCTION Thank you for purchasing this CLARKE 8 Tonne Log Splitter. Before attempting to use
GPO 14 CE Professional
 OBJ_DOKU-22830-001.fm Page 1 Tuesday, June 29, 2010 4:27 PM Robert Bosch GmbH Power Tools Division 70745 Leinfelden-Echterdingen Germany www.bosch-pt.com GPO 14 CE Professional 1 619 P09 071 (2010.06)
ENGLISH (Original instructions) INSTRUCTION MANUAL. Hammer Drill MHP161 DOUBLE INSULATION. IMPORTANT: Read Before Using.
 INSTRUCTION MANUAL. Hammer Drill MHP161 DOUBLE INSULATION. IMPORTANT: Read Before Using.") ENGLISH (Original instructions) INSTRUCTION MANUAL Hammer Drill MHP6 0088 DOUBLE INSULATION IMPORTANT: Read Before Using. ENGLISH (Original instructions) SPECIFICATIONS Model MHP6 Concrete 6 mm Capacities
ENGLISH (Original instructions) INSTRUCTION MANUAL Hammer Drill MHP6 0088 DOUBLE INSULATION IMPORTANT: Read Before Using. ENGLISH (Original instructions) SPECIFICATIONS Model MHP6 Concrete 6 mm Capacities
Circular Saw MODEL MT581. WARNING: For your personal safety, READ and UNDERSTAND before using. SAVE THESE INSTRUCTIONS FOR FUTURE REFERENCE.
 ENGLISH Circular Saw MODEL MT58 005337 DOUBLE INSULATION I N S T R U C T I O N M A N U A L WARNING: For your personal safety, READ and UNDERSTAND before using. SAVE THESE INSTRUCTIONS FOR FUTURE REFERENCE.
Angle Drill MODEL DA3000R MODEL DA3000V
 ENGLISH Angle Drill MODEL DA3000R MODEL DA3000V 003004 DOUBLE INSULATION I N S T R U C T I O N M A N U A L WARNING: For your personal safety, READ and UNDERSTAND before using. SAVE THESE INSTRUCTIONS FOR
PEX 220 A. Robert Bosch GmbH Power Tools Division Leinfelden-Echterdingen M15 ( ) T / 106
 T / 106") OBJ_BUCH-500-001.book Page 1 Monday, November 5, 2007 9:05 AM Robert Bosch GmbH Power Tools Division 70745 Leinfelden-Echterdingen www.bosch-pt.com PEX 220 A 1 609 929 M15 (2007.11) T / 106 de Originalbetriebsanleitung
OBJ_BUCH-500-001.book Page 1 Monday, November 5, 2007 9:05 AM Robert Bosch GmbH Power Tools Division 70745 Leinfelden-Echterdingen www.bosch-pt.com PEX 220 A 1 609 929 M15 (2007.11) T / 106 de Originalbetriebsanleitung
4.0MM METAL CUTTING NIBBLER
 596702 4.0MM METAL CUTTING NIBBLER Read through carefully and understand these instructions before use N3570 SAFETY INSTRUCTIONS PLEASE READ & UNDERSTAND THESE INSTRUCTIONS! STORE THESE INSTRUCTIONS IN
ENGLISH (Original instructions) INSTRUCTION MANUAL. Drill MDP303 MDP304 DOUBLE INSULATION. IMPORTANT: Read Before Using.
 INSTRUCTION MANUAL. Drill MDP303 MDP304 DOUBLE INSULATION. IMPORTANT: Read Before Using.") ENGLISH (Original instructions) INSTRUCTION MANUAL Drill MDP303 MDP304 0876 DOUBLE INSULATION IMPORTANT: Read Before Using. ENGLISH (Original instructions) SPECIFICATIONS Model MDP303 MDP304 Capacities
ENGLISH (Original instructions) INSTRUCTION MANUAL Drill MDP303 MDP304 0876 DOUBLE INSULATION IMPORTANT: Read Before Using. ENGLISH (Original instructions) SPECIFICATIONS Model MDP303 MDP304 Capacities
ENGLISH (Original instructions) INSTRUCTION MANUAL. Impact Wrench 6904VH 6905H DOUBLE INSULATION. IMPORTANT: Read Before Using.
 INSTRUCTION MANUAL. Impact Wrench 6904VH 6905H DOUBLE INSULATION. IMPORTANT: Read Before Using.") ENGLISH (Original instructions) INSTRUCTION MANUAL Impact Wrench 6904VH 6905H 005299 DOUBLE INSULATION IMPORTANT: Read Before Using. 1 ENGLISH (Original instructions) SPECIFICATIONS Model 6904VH 6905H
ENGLISH (Original instructions) INSTRUCTION MANUAL Impact Wrench 6904VH 6905H 005299 DOUBLE INSULATION IMPORTANT: Read Before Using. 1 ENGLISH (Original instructions) SPECIFICATIONS Model 6904VH 6905H
Auto Feed Screwdriver
 ENGLISH (Original instructions) INSTRUCTION MANUAL Auto Feed Screwdriver 684 6843 6844 6846 0080 DOUBLE INSULATION IMPORTANT: Read Before Using. ENGLISH (Original instructions) SPECIFICATIONS Model 684
ENGLISH (Original instructions) INSTRUCTION MANUAL. Recipro Saw JR3050T DOUBLE INSULATION. IMPORTANT: Read Before Using.
 INSTRUCTION MANUAL. Recipro Saw JR3050T DOUBLE INSULATION. IMPORTANT: Read Before Using.") ENGLISH (Original instructions) INSTRUCTION MANUAL Recipro Saw JR3050T 005783 DOUBLE INSULATION IMPORTANT: Read Before Using. ENGLISH (Original instructions) SPECIFICATIONS Model JR3050T Length of stroke
ENGLISH (Original instructions) INSTRUCTION MANUAL Recipro Saw JR3050T 005783 DOUBLE INSULATION IMPORTANT: Read Before Using. ENGLISH (Original instructions) SPECIFICATIONS Model JR3050T Length of stroke
Recipro Saw MODEL JR3000V. WARNING: For your personal safety, READ and UNDERSTAND before using. SAVE THESE INSTRUCTIONS FOR FUTURE REFERENCE.
 ENGLISH Recipro Saw MODEL JR3000V 00477 DOUBLE INSULATION I N S T R U C T I O N M A N U A L WARNING: For your personal safety, READ and UNDERSTAND before using. SAVE THESE INSTRUCTIONS FOR FUTURE REFERENCE.
GSS Professional A A A Multi. Robert Bosch GmbH Power Tools Division Leinfelden-Echterdingen GERMANY.
 OBJ_DOKU-41186-001.fm Page 1 Wednesday, July 22, 2015 3:00 PM Robert Bosch GmbH Power Tools Division 70764 Leinfelden-Echterdingen GERMANY www.bosch-pt.com 1 609 92A 0VX (2015.07) O / 166 EURO GSS Professional
Handling instructions
 Hand Shear Model CE 16SA Handling instructions Note: Before using this Electric Power Tool, carefully read through these HANDLING INSTRUCTIONS to ensure efficient, safe operation. It is recommended that
ENGLISH (Original instructions) INSTRUCTION MANUAL. Hammer Drill HP1630 HP1631 DOUBLE INSULATION. IMPORTANT: Read Before Using.
 INSTRUCTION MANUAL. Hammer Drill HP1630 HP1631 DOUBLE INSULATION. IMPORTANT: Read Before Using.") ENGLISH (Original instructions) INSTRUCTION MANUAL Hammer Drill HP630 HP63 008892 DOUBLE INSULATION IMPORTANT: Read Before Using. ENGLISH (Original instructions) SPECIFICATIONS Model HP630 HP63 Concrete
ENGLISH (Original instructions) INSTRUCTION MANUAL Hammer Drill HP630 HP63 008892 DOUBLE INSULATION IMPORTANT: Read Before Using. ENGLISH (Original instructions) SPECIFICATIONS Model HP630 HP63 Concrete
Impact Wrench 6904VH 6905H INSTRUCTION MANUAL
 ENGLISH (Original instructions) INSTRUCTION MANUAL Impact Wrench 6904VH 6905H 005299 DOUBLE INSULATION WARNING: For your personal safety, READ and UNDERSTAND before using. SAVE THESE INSTRUCTIONS FOR FUTURE
GKF 600 Professional. Izvirna navodila Originalne upute za rad Algupärane kasutusjuhend Instrukcijām ori inālvalodā Originali instrukcija
 609 40 54.book Seite Dienstag,. Januar 008 8:46 08 GKF 600 Professional Originalbetriebsanleitung Original instructions Notice originale Manual original Manual original Istruzioni originali Oorspronkelijke
20V CORDLESS RECIPROCATING SAW MODEL NO: CRS20Li
 20V CORDLESS RECIPROCATING SAW MODEL NO: CRS20Li PART NO: 6487020 OPERATION & MAINTENANCE INSTRUCTIONS LS1013 INTRODUCTION Thank you for purchasing this CLARKE 20V Cordless Reciprocating Saw. Before attempting
GGS Professional 8 CE 28 C 28 CE 28 LC 28 LCE. Robert Bosch GmbH Power Tools Division Leinfelden-Echterdingen Germany.
 OBJ_DOKU-226-003.fm Page 1 Thursday, December 16, 2010 4:03 PM Robert Bosch GmbH Power Tools Division 70745 Leinfelden-Echterdingen Germany www.bosch-pt.com 3 609 929 C06 (2010.12) O / 302 UNI GGS Professional
MULTI-PURPOSE SAW MODEL NO. OZMPS500A OPERATING INSTRUCTIONS
 MULTI-PURPOSE SAW 500watt MODEL NO. OZMPS500A OPERATING INSTRUCTIONS To view our entire range visit www.ozito.com.au SPECIFICATIONS - MODEL NO. OZMPS500A Motor: Input: No load speed: Length of stroke:
ENGLISH (Original instructions) INSTRUCTION MANUAL. Drill 6402 DP4700 DP4700 DOUBLE INSULATION. IMPORTANT: Read Before Using.
 INSTRUCTION MANUAL. Drill 6402 DP4700 DP4700 DOUBLE INSULATION. IMPORTANT: Read Before Using.") ENGLISH (Original instructions) INSTRUCTION MANUAL Drill 6402 DP4700 6402 DP4700 00465 DOUBLE INSULATION IMPORTANT: Read Before Using. ENGLISH (Original instructions) SPECIFICATIONS Model 6402 DP4700 Capacities
ENGLISH (Original instructions) INSTRUCTION MANUAL Drill 6402 DP4700 6402 DP4700 00465 DOUBLE INSULATION IMPORTANT: Read Before Using. ENGLISH (Original instructions) SPECIFICATIONS Model 6402 DP4700 Capacities
GEX Professional A AE. Robert Bosch GmbH Power Tools Division Leinfelden-Echterdingen GERMANY.
 OBJ_DOKU-5259-005.fm Page 1 Thursday, November 27, 2014 9:21 AM Robert Bosch GmbH Power Tools Division 70764 Leinfelden-Echterdingen GERMANY www.bosch-pt.com 1 609 92A 0ZY (2014.11) O / 186 EURO GEX Professional
ENGLISH (Original instructions) INSTRUCTION MANUAL. Nibbler JN1601 DOUBLE INSULATION. IMPORTANT: Read Before Using.
 INSTRUCTION MANUAL. Nibbler JN1601 DOUBLE INSULATION. IMPORTANT: Read Before Using.") ENGLISH (Original instructions) INSTRUCTION MANUAL Nibbler JN60 0077 DOUBLE INSULATION IMPORTANT: Read Before Using. ENGLISH (Original instructions) SPECIFICATIONS Model JN60 Steel up to 00 N/mm.6 mm /
ENGLISH (Original instructions) INSTRUCTION MANUAL Nibbler JN60 0077 DOUBLE INSULATION IMPORTANT: Read Before Using. ENGLISH (Original instructions) SPECIFICATIONS Model JN60 Steel up to 00 N/mm.6 mm /
ROTARY HAMMER 1035 (F )
") ROTARY HAMMER 1035 (F0151035.. ) ORIGINAL INSTRUCTIONS NOTICE ORIGINALE ORIGINALBETRIEBSANLEITUNG ORIGINELE GEBRUIKSAANWIJZING BRUKSANVISNING I ORIGINAL ORIGINAL BRUGSANVISNING ORIGINAL BRUKSANVISNING
ROTARY HAMMER 1035 (F0151035.. ) ORIGINAL INSTRUCTIONS NOTICE ORIGINALE ORIGINALBETRIEBSANLEITUNG ORIGINELE GEBRUIKSAANWIJZING BRUKSANVISNING I ORIGINAL ORIGINAL BRUGSANVISNING ORIGINAL BRUKSANVISNING
Rotary Hammer HR4501C HR4510C HR4511C INSTRUCTION MANUAL
 ENGLISH INSTRUCTION MANUAL Rotary Hammer HR450C HR450C HR45C 00864 DOUBLE INSULATION WARNING: For your personal safety, READ and UNDERSTAND before using. SAVE THESE INSTRUCTIONS FOR FUTURE REFERENCE. ENGLISH
Angle Drill DA4000LR INSTRUCTION MANUAL
 ENGLISH (Original instructions) INSTRUCTION MANUAL Angle Drill DA4000LR 003009 DOUBLE INSULATION WARNING: For your personal safety, READ and UNDERSTAND before using. SAVE THESE INSTRUCTIONS FOR FUTURE
OPERATION & MAINTENANCE
 DOUBLE HEADED METAL NIBBLER MODEL NO: DHC-2 PART NO: 6500233 OPERATION & MAINTENANCE INSTRUCTIONS LS0609 INTRODUCTION Thank you for purchasing this CLARKE Double Headed Metal Nibbler. Before attempting
2-Speed Hammer Drill HP2030 HP2031 INSTRUCTION MANUAL
 ENGLISH (Original instructions) INSTRUCTION MANUAL 2-Speed Hammer Drill HP2030 HP203 002466 DOUBLE INSULATION WARNING: For your personal safety, READ and UNDERSTAND before using. SAVE THESE INSTRUCTIONS
GBH Professional 2-26 E 2-26 RE 2-26 DE 2-26 DRE 2-26 DFR. Robert Bosch GmbH Power Tools Division Leinfelden-Echterdingen Germany
 WEU WEU Robert Bosch GmbH Power Tools Division 70745 Leinfelden-Echterdingen Germany www.bosch-pt.com 1 609 92A 0Z (20.12) PS / 1 WEU GBH Professional 2-26 E 2-26 RE 2-26 DE 2-26 DRE 2-26 DFR de en fr
 GENERAL OPERATIONAL PRECAUTIONS WARNING! When using electric tools, basic safety precautions should always be followed to reduce the risk of fire, electric shock and personal injury, including the following.
SAFETY AND OPERATING MANUAL. 750W/13mm IMPACT DRILL JM750ID
 SAFETY AND OPERATING MANUAL 750W/13mm IMPACT DRILL JM750ID GENERAL POWER TOOL SAFETY WARNINGS WARNING! Read all safety warnings and all instructions. Failure to follow the warnings and instructions may
DC-EX125 Bedienungsanleitung 1 4 Operating instructions 5 8 Mode d emploi 9 12 Istruzioni d uso Gebruiksaanwijzing 17 20
 DC-EX5 *78* 78 D GB F I NL P E DK SF N S GR BG HR PL RUS SK SLO CZ H Bedienungsanleitung Operating instructions 5 8 Mode d emploi 9 Istruzioni d uso 6 Gebruiksaanwijzing 7 Manual de instruções Manual de
Automatic Screwdriver Model W 4YD. Handling instructions
 Automatic Screwdriver Model W 4YD Handling instructions Note: Before using this Electric Power Tool, carefully read through these HANDLING INSTRUCTIONS to ensure efficient, safe operation. It is recommended
OPERATION & MAINTENANCE INSTRUCTIONS
 FOOT OPERATED 1.5 TONNE LOG SPLITTER MODEL NO: LOGBUSTER 10 PART NO: 3402046 OPERATION & MAINTENANCE INSTRUCTIONS LS0815 INTRODUCTION Thank you for purchasing this CLARKE Foot Operated 1.5 Tonne Log Splitter.
Handling instructions
 Nibbler Model CN 16SA Handling instructions Note: Before using this Electric Power Tool, carefully read through these HANDLING INSTRUCTIONS to ensure efficient, safe operation. It is recommended that these
WARNING Failure to follow warning could result in DEATH OR SERIOUS INJURY.
 USERS MANUAL HEAVY DUTY NARROW CROWN STAPLER MODEL: XMT15 Failure to follow warning could result in DEATH OR SERIOUS INJURY. M0723 05/12 V2 CONTENTS: IMPORTANT INFORMATION EXPLANATION OF THE NAILING ACTION
Drill MODEL DP3002/DP3003 MODEL DP4000/DP4001 MODEL DP4002/DP4003
 ENGLISH Drill MODEL DP3002/DP3003 MODEL DP4000/DP400 MODEL DP4002/DP4003 DP3002 DP4000 DP4002 DP3003 DP400 DP4003 003006 DOUBLE INSULATION I N S T R U C T I O N M A N U A L WARNING: For your personal safety,
Handling instructions
 Router Model M 2SC Handling instructions Note: Before using this Electric Power Tool, carefully read through these HANDLING INSTRUCTIONS to ensure efficient, safe operation. It is recommended that these
GST Professional 150 CE 150 BCE. Robert Bosch GmbH Power Tools Division Leinfelden-Echterdingen Germany.
 OBJ_BUCH-107-003.book Page 1 Wednesday, April 16, 014 10:11 AM Robert Bosch GmbH Power Tools Division 70745 Leinfelden-Echterdingen Germany www.bosch-pt.com 609 93 936 (014.04) T / 197 EURO GST Professional
Impact Wrench WR 22SA HANDLING INSTRUCTIONS. Read through carefully and understand these instructions before use.
 Impact Wrench WR 22SA HANDLING INSTRUCTIONS Read through carefully and understand these instructions before use. 1 1 2 2 3 4 5 3 6 7 8 9 5 3 4 kg-m 80 N m 800 M22 70 (F 10T) 0 C 70 700 60 50 600 500 40
PRODUCT MANUAL 5-IN-1 MITER SAW STATION *SAVE THIS MANUAL FOR FUTURE REFERENCE
 PRODUCT MANUAL 5-IN-1 MITER SAW STATION *SAVE THIS MANUAL FOR FUTURE REFERENCE 92778 1 GENERAL SAFETY INFORMATION For your safety, please read these instructions carefully before use and keep them in the
ENGLISH (Original instructions) INSTRUCTION MANUAL. Metal Shear JS1602 DOUBLE INSULATION. IMPORTANT: Read Before Using.
 INSTRUCTION MANUAL. Metal Shear JS1602 DOUBLE INSULATION. IMPORTANT: Read Before Using.") ENGLISH (Original instructions) INSTRUCTION MANUAL Metal Shear JS60 0076 DOUBLE INSULATION IMPORTANT: Read Before Using. ENGLISH (Original instructions) SPECIFICATIONS Model JS60 Steel up to 400 N/mm.6
ENGLISH (Original instructions) INSTRUCTION MANUAL Metal Shear JS60 0076 DOUBLE INSULATION IMPORTANT: Read Before Using. ENGLISH (Original instructions) SPECIFICATIONS Model JS60 Steel up to 400 N/mm.6
GWS Professional. Robert Bosch GmbH Power Tools Division Leinfelden-Echterdingen Germany W53 (2010.
 OBJ_DOKU-5045-003.fm Page 1 Wednesday, March 24, 2010 8:25 AM Robert Bosch GmbH Power Tools Division 70745 Leinfelden-Echterdingen Germany www.bosch-pt.com 1 609 929 W53 (2010.03) O / 398 UNI GWS Professional
PMF 180 E Multi
 OBJ_BUCH-345-006.book Page 1 Wednesday, May 12, 2010 12:46 PM Robert Bosch GmbH Power Tools Division 70745 Leinfelden-Echterdingen Germany PMF 180 E Multi www.bosch-pt.com 2 609 004 835 (2010.05) T / 122
Handling instructions
 Orbital Sander Model SV 12SG Handling instructions Note: Before using this Electric Power Tool, carefully read through these HANDLING INSTRUCTIONS to ensure efficient, safe operation. It is recommended
ELECTRIC STAPLE NAIL GUN
 WHAT S IN THE BOX ELECTRIC STAPLE NAIL GUN 8MM - 14MM INSTRUCTION MANUAL SPECIFICATIONS Input: 230-240V ~ 50Hz Power: 45W Impact Rate: 30/min Staple Size: 8-14mm, Type 50 Nail Size: 15mm, C1 Brad Magazine
10 Ton Pull Back Ram
 10 Ton Pull Back Ram Model 97207 Set up And Operating Instructions Diagrams within this manual may not be drawn proportionally. Due to continuing improvements, actual product may differ slightly from the
PLR 25. Robert Bosch GmbH Power Tools Division Leinfelden-Echterdingen Germany (2011.
 OBJ_DOKU-16620-002.fm Page 1 Thursday, July 14, 2011 10:46 AM WEU WEU IEC 60825-1:07
SAFETY AND OPERATING MANUAL
 SAFETY AND OPERATING MANUAL BladeRunner X2 WX572 9 10 8 11 5 7 12 6 20 1 2 4 3 14 13 15 A2 A1 17 18 B2 B1 1 2 1 2 19 B3 3 4 2 C 1 D1 D1 C 2 1 E1 D2 1 2 E2 1 2 F G1 G1 F OFF ON G2 G3 H1 H2 I1 I2 I1 I2 J
Quick Set Dovetail Jig
 Quick Set Dovetail Jig FOR HELP OR ADVISE ON THIS PRODUCT PLEASE CALL OUR CUSTOMER SERVICE HELP LINE : 01509 500359 THE MANUFACTURER RESERVES THE RIGHT TO ALTER THE DESIGN OR SPECIFICATION TO THIS PRODUCT
Recipro Saw MODEL JR3020. WARNING: For your personal safety, READ and UNDERSTAND before using. SAVE THESE INSTRUCTIONS FOR FUTURE REFERENCE.
 ENGLISH Recipro Saw MODEL JR3020 002479 DOUBLE INSULATION I N S T R U C T I O N M A N U A L WARNING: For your personal safety, READ and UNDERSTAND before using. SAVE THESE INSTRUCTIONS FOR FUTURE REFERENCE.
Finger Jointer. Operating and Safety Instructions FJA300
 Finger Jointer FJA300 Operating and Safety Instructions www.tritontools.com Thank you for purchasing this Triton tool. These instructions contain information necessary for safe and effective operation
Instruction Manual. Manual de instrucciones. Guide d utilisation ET PMET Rev 808
 Instruction Manual Manual de instrucciones Guide d utilisation ET2025 PMET2025-8 Rev 808 www.arrowfastener.com GENERAL SAFETY RULES WARNING! Read all instructions. Failure to follow all instructions listed
Tapping Screw (W/Flange) 46 Cord Armor 47 Tube (D) 48 Cord. 45 Cord Clip. Tapping Screw (W/Flange) 10 Gear Cover Ass'y. 12 Socket (B) Ass'y
 46 Cord Armor 47 Tube (D) 48 Cord. 45 Cord Clip. Tapping Screw (W/Flange) 10 Gear Cover Ass'y. 12 Socket (B) Ass'y") W8VB The exploded assembly drawing should be used only for authoized service center. W8VB Item No. Part time 1 Magnetic Hex. Socket 2 Sub Stopper 3 O-Ring (S-16) 4 Locator (A) 5 Lock Sleeve (A) 6 O-Ring
W8VB The exploded assembly drawing should be used only for authoized service center. W8VB Item No. Part time 1 Magnetic Hex. Socket 2 Sub Stopper 3 O-Ring (S-16) 4 Locator (A) 5 Lock Sleeve (A) 6 O-Ring
ENGLISH (Original instructions) INSTRUCTION MANUAL. Finishing Sander BO4553 BO4561 BO4563 DOUBLE INSULATION. IMPORTANT: Read Before Using.
 INSTRUCTION MANUAL. Finishing Sander BO4553 BO4561 BO4563 DOUBLE INSULATION. IMPORTANT: Read Before Using.") ENGLISH (Original instructions) INSTRUCTION MANUAL Finishing Sander BO4553 BO456 BO4563 00449 DOUBLE INSULATION IMPORTANT: Read Before Using. ENGLISH (Original instructions) SPECIFICATIONS Model BO4553
ENGLISH (Original instructions) INSTRUCTION MANUAL Finishing Sander BO4553 BO456 BO4563 00449 DOUBLE INSULATION IMPORTANT: Read Before Using. ENGLISH (Original instructions) SPECIFICATIONS Model BO4553
SAFETY AND OPERATING MANUAL 135W PALM SANDER JM135PS
 SAFETY AND OPERATING MANUAL 135W PALM SANDER JM135PS GENERAL POWER TOOL SAFETY WARNINGS WARNING! Read all safety warnings and all instructions. Failure to follow the warnings and instructions may result
INSTRUCTION BOOKLET AND WARRANTY INFORMATION 6 BENCH GRINDER
 INSTRUCTION BOOKLET AND WARRANTY INFORMATION 6 BENCH GRINDER Part No.: SW1250 PLEASE READ CARE AND SAFETY INSTRUCTIONS BEFORE USE SPECIFICATIONS Part No.: SW1250 Input Voltage: 240V Frequency: 50Hz Rated
HP2050 HP2050F HP2051 HP2051F
 ENGLISH (Original instructions) INSTRUCTION MANUAL -Speed Hammer Drill HP050 HP050F HP05 HP05F 00989 DOUBLE INSULATION IMPORTANT: Read Before Using. ENGLISH (Original instructions) SPECIFICATIONS Model
GBH 2-23 RE PROFESSIONAL
 OBJ_BUCH-265-001.book Page 1 Wednesday, November 22, 2006 10:58 AM GBH 2-23 RE PROFESSIONAL Bedienungsanleitung Operating instructions Instructions d emploi Instrucciones de servicio Manual de instruções
GENERAL OPERATIONAL PRECAUTIONS PRECAUTIONS ON USING DISC GRINDER
 GENERAL OPERATIONAL PRECAUTIONS WARNING! When using electric tools, basic safety precautions should always be followed to reduce the risk of fire, electric shock and personal injury, including the following.
GCM 8 SJL Professional
 OBJ_BUCH-1736-003.book Page 1 Thursday, August 14, 2014 1:10 PM Robert Bosch GmbH Power Tools Division 70764 Leinfelden-Echterdingen GERMANY www.bosch-pt.com GCM 8 SJL Professional 1 609 92A 0XG (2014.08)
2-Speed Hammer Drill
 ENGLISH 2-Speed Hammer Drill MODEL HP2032 MODEL HP2033 MODEL HP2034 DOUBLE INSULATION 002466 I N S T R U C T I O N M A N U A L WARNING: For your personal safety, READ and UNDERSTAND before using. SAVE
ENGLISH (Original instructions) INSTRUCTION MANUAL. Router 3600H. IMPORTANT: Read Before Using.
 INSTRUCTION MANUAL. Router 3600H. IMPORTANT: Read Before Using.") ENGLISH (Original instructions) INSTRUCTION MANUAL Router 300H 00507 IMPORTANT: Read Before Using. ENGLISH (Original instructions) SPECIFICATIONS Model 300H Collet chuck capacity or /" No load speed (min
ENGLISH (Original instructions) INSTRUCTION MANUAL Router 300H 00507 IMPORTANT: Read Before Using. ENGLISH (Original instructions) SPECIFICATIONS Model 300H Collet chuck capacity or /" No load speed (min
GBH 4-32 DFR Professional
 OBJ_BUCH-337-007.book Page 1 Monday, December 2, 2013 12:58 PM Robert Bosch GmbH Power Tools Division 70745 Leinfelden-Echterdingen Germany www.bosch-pt.com GBH 4-32 DFR Professional 1 619 92A 06G (2013.12)
ENGLISH (Original instructions) INSTRUCTION MANUAL. 2-speed drill DP4010 DP4011 DOUBLE INSULATION. IMPORTANT: Read Before Using.
 INSTRUCTION MANUAL. 2-speed drill DP4010 DP4011 DOUBLE INSULATION. IMPORTANT: Read Before Using.") ENGLISH (Original instructions) INSTRUCTION MANUAL -speed drill DP400 DP40 0083 DOUBLE INSULATION IMPORTANT: Read Before Using. ENGLISH (Original instructions) SPECIFICATIONS Model DP400/DP40 Speed High
ENGLISH (Original instructions) INSTRUCTION MANUAL -speed drill DP400 DP40 0083 DOUBLE INSULATION IMPORTANT: Read Before Using. ENGLISH (Original instructions) SPECIFICATIONS Model DP400/DP40 Speed High
HANDLING INSTRUCTIONS
 Demolition Hammer Model: XP-G55VA HANDLING INSTRUCTIONS Before using this demolition hammer, please carefully read though these HANDLING INSTRUCTIONS. Ensure that you know how the machine works, and how
2-1/2" 16 gauge Straight Finish Nailer Includes: 2 Allen wrenches & pneumatic tool oil
 WARRANTY Model 9755 2-1/2" Finish Nailer If you have any problems with this tool, please call FPC Corporation toll-free at 1-800-860-3838 before returning it to the place of purchase. FPC Corporation warrants
Power Planer 1900B/N1900B/1902
 Power Planer 1900B N1900B 1902 SPECIFICATIONS Model 1900B/N1900B/1902 Planing width... 82 mm Planing depth... 1 mm Shiplapping depth... 9 mm No load speed (min -1 )...16,000 Overall length... 290 mm Net
SDS+ ROTARY HAMMER DRILL
 SDS+ ROTARY HAMMER DRILL MODEL NO: CON400RHD PART NO: 6479510 OPERATION & MAINTENANCE INSTRUCTIONS LS0812 INTRODUCTION Thank you for purchasing this CLARKE SDS+ Rotary Hammer Drill. Before attempting to