Installing the Nantucket (100 Series), Manhattan (200 Series), and Charleston (300 Series) Code-Approved Rail Systems
|
|
|
- Nigel Weaver
- 6 years ago
- Views:
Transcription

1 ENRAIL INSTALL GUIDE Installing the Nantucket (100 Series), Manhattan (200 Series), and Charleston (300 Series) Code-Approved Rail Systems Thank you for choosing Enduris Enrail Code-Approved Railing products. For best results please review the installation instructions to follow. Always check your local building codes before starting a project. Please read assembly instructions completely before beginning construction. Always wear safety goggles. Enduris AC174/AC10 Code approved CCRR-0107 railing systems are guards under the definitions of the 2012 IBC and IRC intended for use on elevated walking areas in buildings and walkways as required by the codes. Enduris 6/22/2016 For the most current version of this installation guide please visit
 Series 6, 8 Stairs 8 only White, Tan & Khaki LAYOUT Enduris Railing System is designed for post sets of either 72, 96, or 120 between posts as shown in Figure #1.")
 rails shorter, the bracket allows the rail to touch the inside to inside of the post.")

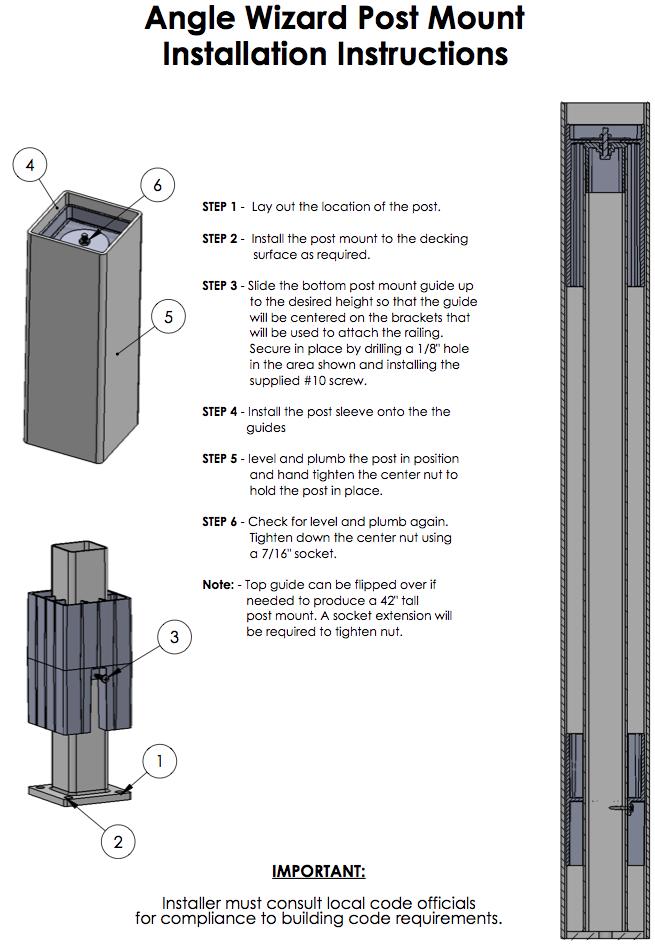
2 ENRAIL INSTALL GUIDE Nantucket (100), Manhattan (200), and Charleston (300) Nantucket (100) Series 6, 8, 10 Stairs 8 only White, Tan & Khaki Manhattan (200) Series 6, 8, 10 Stairs 8 only White, Tan & Khaki Charleston (300) Series 6, 8 Stairs 8 only White, Tan & Khaki LAYOUT Enduris Railing System is designed for post sets of either 72, 96, or 120 between posts as shown in Figure #1. The PVC rail and aluminum insert are cut ¼ shorter making the rail 71 3/4, 95 3/4, and 119 3/4 to allow for the bracket thickness. Do not cut the Charleston (300) rails shorter, the bracket allows the rail to touch the inside to inside of the post. When trimming the rail is necessary, equal amounts should be cut from both ends of the rail in order to maintain equal spacing from the outer picket and the adjacent post. POST MOUNTING Enduris Railing Systems are designed for PVC posts to be sleeved over 4 x 4 pressure treated wood posts or sleeved over a mounting tower such as the Angle Wizard post mount. The Angle Wizard post mount is designed to be mounted to the top of the deck surface with reinforcement in the sub-structure as shown on page #2. Fig. 1 A complete instruction sheet is included in every post mount kit. 1
3 2
4 Once post installation is complete, trim the post sleeve to the proper height and slide over the wood or post mount. Make certain that you maintain an installed vinyl post height as measured from the walking surface to the top of the post that is at least 3 greater than the required rail height. Designed Rail Height Recommended Min. Post Height Residential Commercial HORIZONTAL RAIL INSTALLATION The brackets are designed for easy installation and to provide the required support needed to meet building codes. Prior to completion of these next steps, ensure that you complete the post installations as described above. 1. Cut rails and inserts to length: Measure distance between the inside of the top of the post and subtract ¼ to allow room for brackets. This is the length of the top rail. Measure the distance between the post close to the bottom and subtract ¼ to allow room for the bottom brackets. This is the length of your bottom rail. a. The insert should be the same length as the PVC. Slide rail trim over both ends before installing the rails. Note: The top rail of the Charleston (300) Series will not need to be cut ¼ less. The Charleston (300) Series bracket allows the rail to touch the inside to inside of the post. 2. Drill Drain Holes: Take the bottom rail and drill three ¼ drain holes on the underside of the rail as shown in Figure #2. Fig Install Foot Block Inserts: Center the 7/8" x 1 ½" x 3 ¼" insert block in the center of the bottom rail. Screw the insert block to the bottom rail using #8, 1" self-tapping screws as seen in Figure #2. When utilizing aluminum inserts in both top and bottom rails for residential applications up to 8, the foot blocks are optional. The 10' rail section uses (2) foot blocks per section (spaced 40" from each end). 3
 is inside the rail before placing the brackets over the end of the rail and sliding the rail down between the two posts.")
5 4. Install Bottom Brackets: Slide trim pieces onto the bottom rail facing the finished side towards the center of the rail. Make sure the aluminum insert (if required) is inside the rail before placing the brackets over the end of the rail and sliding the rail down between the two posts. See Figure #4. Fig. 3 Fig. 4 Fig. 4a 4
6 5. Once the rail is level (Figure #4a) at 2 ½ off the walking surface of the deck, attach brackets with provided screws and lock trim into place. Insert three pickets, one in each end and one in the center of the rail. This will help with the placement of the top rail brackets. Fig. 4b a. Slide the top rail down over the (3) pickets. Push the rail to the opposite side and place the bracket on the end of the rail. Then push the rail to the other side allowing you to slide the other bracket on the end of the rail on the opposite end (Figure #4b). b. Make sure the top rail is level and in the center of the post. Check to make sure the rail is the correct height from the surface to the top of the rail for code. c. Attach the bracket to the post with the screws that are provided. d. Remove the rail and add all missing pickets. e. Slide the trim over both ends of the rail and replace the rail back down over all the pickets. f. Check the rail to make sure it is level. g. Screw the #8 self-tapping screws through the bracket, PVC and into the aluminum on both sides. h. Slide trim into the lock position. 5

7 6. Install Post Cap: Glue cap to post as shown in Figure #5. Place a 1 x ¼ wide bead of PVC glue or silicon adhesive on the inside of the cap along the center of all four sides. Slide cap onto the top of the post. The glue will smear as it slides down over the post. Be careful not to drip glue on the outside of the post or cap it may cause a scar to the PVC. Fig. 5 CLEANING PVC RAILING Generally, no cleaning is required under normal circumstances. If cleaning becomes necessary, use mild household cleaner such as Simple Green and #0000 steel wool. It is the responsibility of the railing contractor to meet or exceed all code and safety requirements, and to obtain all required building permits. These instructions are only a guide, and may not address every circumstance. The deck and railing installer should determine and implement appropriate installation techniques for each situation. Enduris shall not be held liable for improper or unsafe installations. 6
The following instructions will guide you through the installation of your new vinyl railing.
 Installation Guide St. James Vinyl T-Rail Tools Required Protective eye glasses 3/8 x 3 Concrete Anchors/Fasteners (for Tape measure concrete installations) Variable speed drill/screwdriver Philips Driver
The following instructions will guide you through the installation of your new vinyl railing stair kit.
 Installation Guide Vinyl Standard Stair Railing Tools Required Protective eye glasses Tape measure Variable speed drill/screwdriver Rotary hammer or hammer drill and masonry percussion bit recommended
DekPro Prestige Aluminum Rail System Level Railing Installation Instructions
 ing Installation Guide Please read all instructions completely before starting any installation of DekPro Prestige Railing Systems. SAFETY: Always be safe and follow all instructions when using power tools
RAILING. Installation Guide
 RAILING Installation Guide THE BEST CHOICE FOR STRONG & DURABLE RAILING SYSTEMS Our exclusive manufacturing process ensures our vinyl railing will provide superior strength plus it is virtually maintenance
2x Bottom Bracket. 1x Rail Support STEP 1 STEP 2
 Level Railing Top Rail Bottom Rail Aluminum Baluster 2x Bottom Bracket 1x Rail Support Kit Includes: 1 - Top Rail (with Baluster Connectors installed) 1 - Bottom Rail (with Baluster Connectors installed)
Ready-To-Assemble VersaRail INSTALLATION INSTRUCTIONS
 FREEDOM-WEB Ready-To-Assemble VersaRail INSTALLATION INSTRUCTIONS Read all instructions prior to installing product. Refer to manufacturers safety instructions when operating any tools. To register your
TREX SELECT RAILING Installation Instructions
 RAILING NOTE : All Trex Select Railing lengths are manufactured at ON CENTER dimensions (spanning from center of each post): 67-5/8" (76.8 cm) for 6' (.83 m) on center, and 9-5/8" (35.3 cm) for 8' (.44
Level Railing. Installation Guide. v2.5 W W W. S O L U T I O N S A L U M I N U M. C O M
 Level Railing Installation Guide Top Rail Bottom Rail Aluminum Baluster 2x Bottom Bracket 1x Rail Support #909915 Kit Includes: 1 - Top Rail (with Baluster Connectors installed) 1 - Bottom Rail (with Baluster
PVC Composite Railing & Stair Kit
 FREEDOM-WEB PVC Composite Railing & Stair Kit INSTALLATION INSTRUCTIONS Read all instructions prior to installing product. Refer to manufacturers safety instructions when operating any tools. To register
INSTALLATION INSTRUCTIONS. Level Rail With Cap: Page 2 Level Rail Without Cap: Page 8 Stair Rail: Page 12
 INSTALLATION INSTRUCTIONS Level Rail With Cap: Page 2 Level Rail Without Cap: Page 8 Stair Rail: Page 12 LEVEL RAIL WITH CAP The testing was performed in accordance with procedures and methods referenced
CXT PRO RAILING INSTALLATION INSTRUCTIONS For Installations Using Aluminum and Glass Balusters Sold Separately
 CXT PRO RAILING INSTALLATION INSTRUCTIONS For Installations Using Aluminum and Glass Balusters Sold Separately CCRR-0171 PFS AA-652 Drill/power screwdriver Assorted drill bits Hammer Miter or circular
TREX SELECT RAILING. Installation Instructions PARTS
 RAILING NOTE : All Trex Select Railing lengths are manufactured at ON CENTER dimensions (spanning from center of each post): 67-5/8" (76.8 cm) for 6' (.83 m) on center, and 9-5/8" (35.3 cm) for 8' (.44
Classic Vinyl Stair Railing. Installation Guide
 Classic Vinyl Stair Railing Installation Guide THE BEST CHOICE FOR STRONG & DURABLE RAILING SYSTEMS Our exclusive manufacturing process ensures our vinyl railing will provide superior strength plus it
TREX ENHANCE RAILING (Also Applies to Trex Select Railing) Installation Instructions
 Installation Instructions") TREX ENHANCE RAILING (Also Applies to Trex Select Railing) NOTE: All Enhance Railing lengths are manufactured at CLEAR SPAN dimensions (spanning between space of posts): 7" for 6' clear span. Note that
TREX ENHANCE RAILING (Also Applies to Trex Select Railing) NOTE: All Enhance Railing lengths are manufactured at CLEAR SPAN dimensions (spanning between space of posts): 7" for 6' clear span. Note that
TREX TRANSCEND RAILING
 RAILING NOTES:» RAILINGS ARE DESIGNED TO BE INSTALLED OVER THE DECKING FRAME OR ON INSIDE OF RIM JOIST. NOTCHING OF PRESSURE-TREATED POSTS OR POSTS INSTALLED ON OUTSIDE OF RIM JOIST IS NOT ALLOWED.» All
TREX REVEAL RAILING Installation Instructions
 TREX REVEAL RAILING NoteS:» Reveal railings are designed to be attached with posts installed at a clear span of 6' (.8 m) or 8' (.44 m).» If installing at exact span lengths of 6' (.8 m) or 8' (.44 m),
AFCO-Rail Post INSTALLATION INSTRUCTIONS AFCO-RAIL POST
 AFCO-Rail Post INSTALLATION INSTRUCTIONS TOOLS REQUIRED: Drill Bits (for the appropriate fastener) Drill (with adjustable clutch, recommended) Level String Line Tape Measure Tools to install fasteners
PORCH COMPANY PVC PANEL AND DECKORATOR RAILING
 PORCH COMPANY PVC PANEL AND DECKORATOR RAILING Installation Instructions +1-615-730-8067 porchstore@porchco.com www.porch-store.com Assumption: Your deck is built, your decking is down and your 4x4 core
Installation Guide. Capped Cellular PVC Fencing. Table of Contents. Storage and Handling Tools Needed Fence Layout and Locating Posts
 Capped Cellular PVC Fencing Installation Guide Table of Contents Storage and Handling Tools Needed Fence Layout and Locating Posts Installation instructions 4 x 4 Over Sleeve Post - 3.5 Rail Privacy Shadowbox
TREX SIGNATURE (Formerly Reveal) PANELS Installation Instructions
 PANELS Installation Instructions") (Formerly Reveal) PANELS NOTES:» SIGNATURE RAILINGS ARE DESIGNED TO BE ATTACHED WITH POSTS INSTALLED AT A CLEAR SPAN OF 6' (.8 M) OR 8' (.44 M).» IF INSTALLING AT EXACT SPAN LENGTHS OF 6' (.8 M) OR 8'
(Formerly Reveal) PANELS NOTES:» SIGNATURE RAILINGS ARE DESIGNED TO BE ATTACHED WITH POSTS INSTALLED AT A CLEAR SPAN OF 6' (.8 M) OR 8' (.44 M).» IF INSTALLING AT EXACT SPAN LENGTHS OF 6' (.8 M) OR 8'
HOW TO INSTALL HORIZONTAL ROD RAILING TREX SIGNATURE STANDARD
 HOW TO INSTALL HORIZONTAL ROD RAILING NOTES:» Adjust drill power to lowest setting that will drive screw. DO NOT OVER TORQUE 6 STAINLESS STEEL STAINLESS FASTENERS.» NEVER use impact tools on 6 Stainless
PORCH RAIL INSTALLATION INSTRUCTIONS. Level Rail... 2 Stair Rail... 8 Care & Maintenance, Finishing... 15
 PORCH RAIL INSTALLATION INSTRUCTIONS Level Rail... 2 Stair Rail... 8 Care & Maintenance, Finishing... 15 COMPONENT LIST LEVEL RAIL KIT Porch Rail was designed to meet the most stringent building codes.
Figure 1. RAILING INSTALLATION The following instructions describe the installation of three types of railing sections: Line, Stair, and Angled
 Veranda Railing System Veranda railing systems are designed to work with a number of different decking materials and surfaces. Before initiating any project, obtain a copy of your local building codes
RadianceRail Installation Guide
 RadianceRail Installation Guide Installing RadianceRail with Glass Infill... 2 Installing RadianceRail Stairs with Glass Infill... 9 Notes... 14 TimberTech Code Listings Once a product is tested by an
Continuous Handrail Kit Installation Instructions
 Continuous Handrail Kit Installation Instructions ALUMINUM RAILING SYSTEM Canadian Version Wall Application (see page 2) Railing Application (see page 7) Wall anchors not provided Hardware included: 1x
WOOD POST FD POST. Installation Guide FD POST MOUNT STAIR / ANGLE RAILING LAG STAIR / ANGLE RAILING STUD CABLE RAILING FITTINGS
 Installation Guide It is the responsibility of the installer to meet or exceed all code and safety requirements, and to obtain all required building permits. These instructions are only a guide and may
TREX SIGNATURE (FORMERLY REVEAL) RAILING Installation Instructions
 RAILING Installation Instructions") TREX SIGNATURE (FORMERLY REVEAL) RAILING Installation Instructions NOTES:» SIGNATURE POSTS CANNOT BE USED WITH SIGNATURE TRADITIONAL OR SIGNATURE COCKTAIL DESIGNS, ONLY PRESSURE TREATED POSTS/ POST SLEEVES
TREX SIGNATURE (FORMERLY REVEAL) RAILING Installation Instructions NOTES:» SIGNATURE POSTS CANNOT BE USED WITH SIGNATURE TRADITIONAL OR SIGNATURE COCKTAIL DESIGNS, ONLY PRESSURE TREATED POSTS/ POST SLEEVES
Installation Instructions for. Before You Begin TOOLS REQUIRED
 Composite Railing System STEP-BY-STEP Installation Instructions for Spectrum Composite Railing Virtually maintenance free 20-year warranty EverNew Spectrum Railing system is designed to work with a number
IMPORTANT: Read all sections before you start
 1 IMPORTANT: Read all sections before you start For the most up to date information please visit our website @ www.newtechwood.com Prior to installing the railing, please consult local zoning laws in regards
Don t spin your wheels by looking at other railing products. Go the distance with Finyl Line!
 Finyl Line is the first and last place you need to go in your search for the perfect railing for your home. Our Finyl Line vinyl railing, with lowmaintenance vinyl and reinforced with strong aluminum,
Evolutions Rail Contemporary Style Installation Guide
 Evolutions Rail Contemporary Style Installation Guide Installing Evolutions Rail Contemporary Style with Glass Infill...2 Installing Evolutions Rail Contemporary Style Stairs with Glass Infill...9 Notes...15
2017 UPDATED INSTALLATION INSTRUCTIONS
 2017 UPDATED INSTALLATION INSTRUCTIONS with square composite or round metal balusters Manufactured by fiberondecking.com 800.573.8841 Horizon Railing 6 ft. and 8 ft. Installation Instructions Required
OPEN PICKET PANEL AND GATE INSTALLATION INSTRUCTIONS
 For All Your Vinyl Fencing Needs OPEN PICKET PANEL AND GATE INSTALLATION INSTRUCTIONS 1 BEFORE YOU START, IT S IMPORTANT TO CHECK: That fence or the fence post footings do not exceed your lot lines of
SEMI-PRIVACY PANEL AND GATE INSTALLATION INSTRUCTIONS
 SEMI-PRIVACY PANEL AND GATE INSTALLATION INSTRUCTIONS 1 BEFORE YOU START, IT S IMPORTANT TO CHECK: That fence or the fence post footings do not exceed your lot lines of your property. If you can locate
TREX REVEAL RAILING Installation Instructions
 TREX REVEAL RAILING BRACKET HARDWARE STAIR APPLICATIONS (INCLUDING STAIR SWIVEL BRACKETS, STAIR CROSSOVER BRACKET, AND COMPOUND SWIVEL BRACKETS) FIXED BRACKET Stair HARDWARE AA. Bottom Stair Bracket and
RAILING R A IL ING 51
 RAILING RAILING 5 TREX TRANSCEND RAILING NOTES:» TREX TRANSCEND RAILINGS ARE DESIGNED TO BE INSTALLED OVER THE DECKING FRAME OR ON INSIDE OF RIM JOIST. NOTCHING OF PRESSURE-TREATED POSTS OR POSTS INSTALLED
Glue the ends onto the rafters following the instructions on the container of glue supplied with the kit.
 29 Glue the ends onto the rafters following the instructions on the container of glue supplied with the kit. 30 Raise and position rafters using a measuring tape to center each rafter on the beams. Secure
Instructional videos are available online at
 Instructional videos are available online at www.intexmillwork.com Please Read Before Getting Started Important Information about the Hampton Rail System The Hampton Rail system utilizes pre-marked dimples
POST INSTALL INSTRUCTIONS
 POST INSTALL INSTRUCTIONS Layout your deck or patio to optimize the railing sections and posts. Use speed square for placement of post. Important to have blocking below decking and fastened to or through
SECTION 19: Endwood Fusion Welded Gate Installation Guide
 SECTION 19: Endwood Fusion Welded Gate Installation Guide ASSEMBLY AND INSTALLATION FOR: Fusion Welded Gates Gate Frame with Full Size Pickets Privacy & Board on Board California & Shadowbox Gate width
Code Compliance Research Report CCRR-0155
 Code Compliance Research Report CCRR-0155 Issue Date: 03-25-2011 Revision Date: 04-18-2018 Renewal Date: 03-26-2019 DIVISION: 06 00 00 WOOD, PLASTICS AND COMPOSITES Section: 06 63 00 Plastic Railings REPORT
PORCH-LOC INSTALLATION INSTRUCTIONS
 PORCH-LOC INSTALLATION INSTRUCTIONS 2017 HB&G Building Products, Inc. Porch-Loc Installation Instructions NOTE: DISCARD THE INSTALLATION INSTRUCTIONS AND HARDWARE THAT CAME IN YOUR PERMAPOST PACKAGING
Vinyl Fence Products. Installation Guidelines. Hyde Park with H-Post Fence
 Vinyl Fence Products Installation Guidelines Hyde Park with H-Post Fence Hyde Park with H-Post Privacy Fence 1. Getting Started Be sure to call underground prior to digging Assemble gates (if necessary)
PRIVACY INSTALLATION FOR: Standard 6 H x 8 W Privacy Fence 4 x 4 Post Sleeve & Brackets Dog Ear or Straight-Edge Pickets 1.75 x 3.
 PRIVACY INSTALLATION FOR: Standard 6 H x 8 W Privacy Fence 4 x 4 Post Sleeve & Brackets Dog Ear or Straight-Edge Pickets 1.75 x 3.5 Rail Storage and Handling Fence Preparation and Layout Locate and Set
Installation Instructions
 File #2013-640A Installation Instructions for DesignRail Aluminum Rail Kits with CableRail Cable Infill - LEVEL RAILING 36-42 high railing for residential applications between wood or non-ferrous metal
PREPARATION & TOOL CHECK LIST
 INSTRUCTION MANUAL RAILING PRODUCTS BEGIN TO AGE AS SOON AS THEY ARE EXPOSED TO NATURE. BUILDINGS EXPERIENCE AGING FACTORS DIFFERENTLY, SO IT IS DIFFICULT TO PREDICT HOW LONG RAILING PRODUCTS WILL LAST.
INSTALLATION INSTRUCTIONS PRAVOL DURA-SHIELD COMPOSITE DECK RAILINGS
 INSTALLATION INSTRUCTIONS PRAVOL DURA-SHIELD COMPOSITE DECK RAILINGS Important: Read all sections before you start Prior to installing railing, please consult local zoning laws in regards to load requirements
SHADOWBOX INSTALLATION FOR: Standard 6 H x 8 W Shadowbox Fence 5 x 5 Routed Posts Dog Ear or Straight-Edge Pickets 1.75 x 3.5 Rail
 SHADOWBOX INSTALLATION FOR: Standard 6 H x 8 W Shadowbox Fence 5 x 5 Routed Posts Dog Ear or Straight-Edge Pickets 1.75 x 3.5 Rail Storage and Handling Fence Preparation and Layout Locate and Set Posts
PREPARATION & TOOL CHECKLIST
 INSTRUCTION MANUAL RAILING PRODUCTS BEGIN TO AGE AS SOON AS THEY ARE EXPOSED TO NATURE. BUILDINGS EXPERIENCE AGING FACTORS DIFFERENTLY, SO IT IS DIFFICULT TO PREDICT HOW LONG RAILING PRODUCTS WILL LAST.
HOW TO INSTALL HORIZONTAL ROD RAILING TREX SIGNATURE STANDARD
 HOW TO INSTALL HORIZONTAL ROD RAILING NOTES:» Adjust drill power to lowest setting that will drive screw. DO NOT OVER TORQUE 36 STAINLESS STEEL STAINLESS FASTENERS.» NEVER use impact tools on 36 Stainless
Ready-To-Assemble VersaRail INSTALLATION INSTRUCTIONS
 Ready-To-Assemble VersaRail INSTALLATION INSTRUCTIONS Read all instructions prior to installing product. Refer to manufacturers safety instructions when operating any tools. To register your product, please
Aluminum Railing Gate Kit
 BOM-34115787 Aluminum Railing Gate Kit INSTALLATION INSTRUCTIONS Read all instructions prior to installing product. Refer to manufacturers safety instructions when operating any tools. To register your
Tools & Materials Needed
 15/16" ALUMINUM RAILING SYSTEM Installation Guide Canadian Version Tools & Materials Needed Hacksaw or metal cutting saw Drill Drill bits: 1/8", 5/32", 3/16", 7/32", 1/4" 3/8" socket or wrench Phillips
TREX POST MOUNT DECKING AND CONCRETE
 TREX POST MOUNT DECKING AND CONCRETE for Pressure-treated Wood Framing LOCATION AND INSTALLATION OF POST MOUNTS IMPORTANT NOTES:» EACH POST MUST BE ATTACHED AS SHOWN TO ENSURE A CODE COMPLIANT AND SAFE
Tools & Materials Needed
 Installation Guide U.S. Version Tools & Materials Needed Hacksaw or metal cutting saw Drill Drill bits: 1/8", 5/32", 3/16", 7/32", 1/4" 3/8" socket or wrench Phillips screwdriver Measuring tape Non-corrosive
Tools & Materials Needed
 Installation Guide Canadian Version Tools & Materials Needed Hacksaw or metal cutting saw Drill Drill bits: 1/8", 5/32", 3/16", 7/32", 1/4" 3/8" socket or wrench Phillips screwdriver Measuring tape Non-corrosive
Installing AZEK Evolutions Rail
 Installing Evolutions Rail TM Contemporary Installing AZEK Evolutions Rail Installing Evolutions Rail Contemporary Style... 2 Installing CableRail by Feeney for Evolutions Rail Contemporary Style... 8
IMPORTANT: CHECK THE INSIDE OF THE LARGER PIECES IN YOUR BOX FOR OTHER MATERIALS PACKED INSIDE.
 ASSEMBLY GUIDE Newport Vinyl Picket Fence with Post and No-Dig Steel Pipe Anchor Kit (6 H x 7 W) 68 / in /6 in 6 in / in 7/8 in 8 / in 6 in in Ground 4 in This fence can easily be trimmed down horizontally
GATE INSTALLATION. Tools & Materials Needed. peakproducts.com. Self-drilling screw. Lag bolt
 GATE INSTALLATION Gate opening (W), must not exceed 46". Remove the latch side of the gate (Fig. 1). Cut the top and bottom gate rails 7 1/2" shorter than the gate opening (Fig. 2). Align the top rail
INSTALLATION INSTRUCTIONS GUIDE
 CERTAINTEED RAILING AND DECKING INSTALLATION INSTRUCTIONS GUIDE Kingston Vinyl Railing and Vinyl Decking CONTENTS Important Information Before You Begin...3 Helpful Hints, Tips, Fire Information and Tools
Country Estate Railing Installation Guide
 Country Estate Railing Installation Guide Country Estate Railings are fabricated with the highest quality Railing products available and will provide you with many years of comfort and security. Please
Dura-Lock Roof System
 DLR-14 Dura-Lock Roof System Assembly and Installation Instructions Read the instructions before starting the job. They explain the steps required to produce a finished product that will meet factory specifications.
General Guidelines:
 ASSEMBLY INSTRUCTIONS Congratulations on your new Patriot Dock purchase. This manual contains instructions to assemble basic dock configurations for use at typical residential shoreline application. Please
PVC Fencing Install Instructions
 PVC Fencing Install Instructions Step 1-Pounding the Galvanized Steel Posts Call your local area utility company to come mark underground lines before any digging or pounding any posts into the ground.
Tools Required. Bench Hardware. Bench Parts. Planter Hardware. Planter Parts. BENCH/PLANTER INSTALLATION GUIDELINES for
 Arbor Collection / Harvest Collection / Terra Collection Page 1 Please read all instructions completely before starting any part of the installation. Each AZEK and Kit comes complete with all hardware,
Tools Needed. 8 per column: stainless steel or hot-dipped galvanized bolts. Mallet
 Structural VINYL PERGOLA SuperiorPlasticProducts.com Tools Needed Drill Safety Glasses 1 Hammer Drill & 1/2" Masonry Bit Tape Measure & Pencil Drill Bits 1/8" 1/4" 5/8" Level 8 per column: Ratchet & Sockets
ATI Evaluation Service A Division of Architectural Testing Certification Services
 ATI Evaluation Service A Division of Architectural Testing Certification Services Subject to Renewal: 11/15/2011 Issued: 11/15/2010 Visit for current status Page 1 of 16 Maine Ornamental LLC 933 U.S. Route
PARTS INCLUDED IN FIXED STAIR CABLE RAIL KIT:
 175 SERIES FIXED STAIR CABLE RAIL - INSTALLATION INSTRUCTIONS PARTS INCLUDED IN FIXED STAIR CABLE RAIL KIT: FIXED STAIR TOP RAIL (1) A FIXED STAIR BOTTOM RAIL (1) B D UPPER SADDLE BRACKET (1) C BRACKET
Installing AZEK Evolutions Rail
 with Glass Infill Installing AZEK Evolutions Rail Installing Evolutions Rail Contemporary Style with Glass Infill... 2 Installing Evolutions Rail Contemporary Style Stairs with Glass Infill... 9 Notes...
UNIT No FRAMELESS PIVOT SHOWER DOOR
 INSTALLATION INSTRUCTIONS UNIT No. 3600 FRAMELESS PIVOT SHOWER DOOR NEED INSTALLATION HELP? Call 1-800-45-BASCO (452-2726) Monday - Friday 8:00 A.M. - 4:30 P.M. Eastern Time QCI0020 Rev. 3 Page 1 of 8
ATI Evaluation Service A Division of Architectural Testing Certification Services Code Compliance Research Report
 ATI Evaluation Service A Division of Architectural Testing Certification Services Subject to Renewal: 04/15/2016 Issued: 06/24/2014 Visit www.ati-es.com for current Revised: 09/24/2014 Page 1 of 21 Maine
UNIVERSAL PANEL AND GATE
 PVC Fencing / Residential Style UNIVERSAL PANEL AND GATE INSTALLATION INSTRUCTIONS Fencing Without Boundaries TM 1 BEFORE YOU START, IT S IMPORTANT TO CHECK......That fence footings do not exceed legally
Double Beam Freestanding Pergola Installation Guide
 Double Beam Freestanding Pergola Installation Guide Patent Pending. Copyright 2011 USAVinyl, LLC - All Rights Reserved The information contained in these instructions are proprietary to USAVinyl, LLC and
Installation Instructions for Fortress Pure View Railing Panels with Universal (UB) Brackets and Iron Posts
 Brackets and Iron Posts") Installation Instructions for Fortress Railing Panels with Universal (U) rackets and Iron Posts It is the responsibility of the installer to meet all code and safety requirements, and to obtain all required
Installation Instructions for Fortress Railing Panels with Universal (U) rackets and Iron Posts It is the responsibility of the installer to meet all code and safety requirements, and to obtain all required
10x10 Trellis Pergola
 0x0 Trellis Pergola ASSEMBLY GUIDE Ver.0-7 Table of Contents PAGE Introduction & Overview...................................................... Pergola Materials Overview..............................................................
10x10 Trellis Pergola
 0x0 Trellis Pergola ASSEMBLY GUIDE Ver.-007 Table of Contents PAGE 0x0 Trellis Pergola Introduction & Overview...................................................... Pergola Materials Overview..............................................................
T r e x Art i s a n Se r i e s Railing
 T r e x Art i s a n Se r i e s Railing I n s t a l l a t i o n In s t ru c t i o n s Trex Railing Components A. Trex Top Rail B. Trex Bottom Rail C. Trex Railing Support Bracket D. TrexExpress Railing
Fortress Al HOME posts must always be secured to the deck framing. Fortress Al HOME posts should never be attached to only the deck boards.
 Installation Instructions for Fortress Al HOME Traditional Adjustable Panels with Simplified and Al HOME Posts It is the responsibility of the installer to meet all code and safety requirements, and to
TRADITIONAL & SCALLOP PICKET INSTALLATION INSTRUCTIONS
 TRADITIONAL & SCALLOP PICKET 1 WHAT YOU LL NEED TO INSTALL POWER AUGER OR POST HOLE DIGGER(CLAMSHELLS) SHOVEL DIGGING BAR (OPTIONAL) BRIGHT COLORED SPRAY PAINT STRING LINE STAKES AND LEVEL CORDLESS OR
2.0. Select Rail & Stair Kit Assembly and Installation Instructions BOM V2 5/13. Owner's Manual. Version
 Select Rail & Stair Kit Assembly and Installation Instructions PLEASE READ OWNER'S MANUAL COMPLETELY BEFORE ASSEMBLING YOUR RAIL OR STAIR KIT. 34106886BOM V2 5/13 Models 73012418 / 73012436 / 73012424
Standard Vinyl Railing with Square Balusters
 Standard Vinyl Railing with Square Balusters KIT INCLUDES: 1-2" x 3-1/2" Vinyl Top Rail 1-2" x 3-1/2" Vinyl Bottom Rail Square Vinyl Balusters- Level - 13 per 6' Kit 18 per 8' Kit 22 per 10' Kit Stair
Vinyl Fence and Railing
 Vinyl Fence and Railing WHY PRO ELITE & PRO GUARD VINYL? Virtually maintenance free Weather resistant Safe, strong, durable, and ideal for all climates No painting, sanding, or maintenance required Easy
Residential & Industrial Fence
 Page Residential & Industrial Fence Assembly Instructions Congratulations on the purchase of your new Fence System. Your fence has been designed to give you years of trouble free service with only minimal
Assembly Instructions 10 X 10 Aluminum Roof Support
 Assembly Instructions 10 X 10 Aluminum Roof Support Aluminum Roof Support Bolt Package 16-5/16 X 2 ¼ SS Bolt 24-5/16 X 1 SS Bolt 40-5/16 SS Nylon Lock Nuts 16-5/16 SS Flat Washers 28-4 ½ Wood Screws 36-1
10 x 10 Arch Top Pergola
 0 x 0 Arch Top Pergola I N S T A L L A T I O N G U I D E O P T I O N A L A C C E S S O R I E S Privacy Fence Panel System ( Panels & Middle Post Included) Bolt Down Bracket Kit (Set of ) Additional Shade
RAILING SYSTEM INSTALLATION INSTRUCTIONS
 RAILING SYSTEM INSTALLATION INSTRUCTIONS Failure to follow these instructions risks voiding the GeoDeck warranty. www.geodeck.com July 2010: V10R.3 Page 1 of 13 www.geodeck.com July 2010: V10R.3 Page 2
The Devonshire Arbor 85 in
 ASSEMBLY INSTRUCTIONS in in in in in Please read through before starting assembly.. in IMPORTANT: CHECK THE INSIDE OF YOUR POSTS FOR ALL MATERIALS. Check Box for These Contents In the event of missing
Regency Railing. Rail Installation Instructions
 Regency Railing Rail Installation Instructions Prior to installing railing: Please consult local zoning laws in regards to load requirements and bottom space requirements for rails. All supporting structures
VersaRail Gate Kit. freedomproduct.com. To register your product, please visit: INSTALLATION INSTRUCTIONS
 VersaRail Gate Kit INSTALLATION INSTRUCTIONS Read all instructions prior to installing product. Refer to manufacturers safety instructions when operating any tools. To register your product, please visit:
INSTALLATION INSTRUCTIONS
 Tools required for the installation. A. Core Drill 87mm Drill bit B. Tape measure C. Spirit Level D. Marking pen E. Caulking gun F. Cutting Pliers G. Cordless Drill and Philips head bit, 5mm Drill bit.
Aluminum Clad Wood Window 1/2 Reinforced Field Mulling and Stacking Supplement
 Aluminum Clad Wood Window 1/2 Reinforced Field Mulling and Stacking Supplement 1 Aluminum Clad Wood Window 1/2 Reinforced Field Mulling and Stacking Supplement The following instructions are a supplement
Post & Rail. Includes: Crossbuck, 2-Rail, 3-Rail and 4-Rail POST SUPPORT OPTIONS
 Post & Rail Includes: Crossbuck, 2-Rail, 3-Rail and 4-Rail STAGGER RAIL ENDS FOR GREATER STRENGTH ALLOW 1-1/2" GAP ON HINGE SIDE OF GATE AND 1-1/4" ON LATCH SIDE OF GATE HARDWARE DIG HOLES 30" MINIMUM
C.R. LAURENCE CO., INC.
 C.R. LAURENCE CO., INC. GRS GLASS RAILING DRY GLAZE TAPER-LOC SYSTEM * *Patent Pending FOR TEMPERED GLASS APPLICATIONS Installation Instructions See the video at crlaurence.com TAPER-LOC Sets consist of
Aluminum Pre-Built Fence For Standard & Heavy-Duty Series
 ALUMFENCEA-BOM Aluminum Pre-Built Fence For Standard & Heavy-Duty Series INSTALLATION INSTRUCTIONS Read all instructions prior to installing product. Refer to manufacturers safety instructions when operating
12 x 12 Flat Top Pergola
 x Flat Top Pergola Model: Regency, Roosevelt A S S E M B L Y G U I D E O P T I O N A L A C C E S S O R Y Bolt Down Bracket Kit ( for Pergola) Ver./MAR 0 Ta b l e o f Co n t e n t s PAGE x Flat Top Pergola
Vinyl Fence Installation Instructions. Privacy Fence Installation Instructions
 Privacy Fence Installation Instructions Tips Before You Start - Read this instruction sheet completely. - During fence assembly, work on a soft, non-abrasive surfaces where possible to avoid - scratching
INSTALLATION MANUAL VERANDA ENCLAVE RAILING. Model # SEC17 EW R15 PRE W/H SEC17 EW R15 KD W/HW SEC17 EWS R13 KD W/H
 Model # SEC17 EW R15 PRE W/H SEC17 EW R15 KD W/HW SEC17 EWS R13 KD W/H INSTALLATION MANUAL VERANDA ENCLAVE RAILING Questions, problems, missing parts? Before returning to the store, call Veranda Customer
INTEX Millwork Solutions SECTION EXTERIOR PVC PERGOLAS (IBC Compliant)
") SECTION 066030 EXTERIOR PVC PERGOLAS (IBC Compliant) PART 1 - GENERAL 1.1 RELATED DOCUMENTS A. Drawings and other Contract Documents, listed in the agreement between the Owner and Contractor, apply to
SECTION 066030 EXTERIOR PVC PERGOLAS (IBC Compliant) PART 1 - GENERAL 1.1 RELATED DOCUMENTS A. Drawings and other Contract Documents, listed in the agreement between the Owner and Contractor, apply to
Residential & Industrial Fence
 Residential & Industrial Fence Assembly Instructions CONTENTS 02: OVERVIEW & CONTENTS 03: PRODUCT SPECIFICATIONS 04: GETTING STARTED 05: WALL ATTACHMENT & LINE POST ASSEMBLY 06: CORNER POST ASSEMBLY 07:
6 1/2 x 6 1/2 Flat Top Pergola
 6 / x 6 / Flat Top Pergola A S S E M B L Y G U I D E Models: Portland, Liberty O P T I O N A L A C C E S S O R Y Bolt Down Bracket Kit V.-0506 Ta b l e o f Co n t e n t s PAGE The Introduction & Overview......................................................