USER S GUIDE. User s Guide Bovie IDS-400
|
|
|
- Barnaby Stevens
- 5 years ago
- Views:
Transcription
1

2 USER S GUIDE User s Guide Bovie IDS-400 i
3 ii Bovie Medical Corporation
4 This manual and the equipment it describes are for use only by qualified medical professionals trained in the particular technique and surgical procedure to be performed. It is intended as a guide for using the Bovie IDS-400 only. Additional technical information is available in the Bovie IDS-400 Service Guide. Equipment Covered in this Manual Bovie IDS-400: Reference No.: IDS-400 For Information Contact Bovie Medical Corporation 5115 Ulmerton Road, Clewarwater, FL USA U.S. Phone Fax International Phone Fax info@boviemed.com 2014 Bovie Medical Corporation. All rights reserved. Contents of this publication may not be reproduced without the written permission of Bovie Medical Corporation. Bovie Part Number MC Rev. 4 CONVENTIONS USED IN THIS GUIDE WARNING: Indicates a potentially hazardous situation which, if not avoided, could result in death or serious injury. CAUTION: Indicates a hazardous situation which, if not avoided, may result in minor or moderate injury. NOTICE: Indicates an operating tip, a maintenance suggestion, or a hazard that may result in product damage. User s Guide Bovie IDS-400 iii
5 TABLE OF CONTENTS Equipment Covered in this Manual...iii For Information Contact...iii Conventions Used in this Guide...iii Introducing the Bovie IDS Indications For Use Safety Contraindications Key Features Components and Accessories Controls, Indicators, and Receptacles Front Panel Symbols on the Front Panel Preset Controls Cut and Blend Controls Coag Controls Bipolar Controls Indicators Power Switch and Receptacles Rear Panel Symbols on the Rear Panel Getting Started Initial Inspection Installation Function Checks Setting Up the Unit Checking the Return Electrode Alarm Confirming Modes Checking Bipolar Mode (with bipolar footswitch) Checking Monopolar Mode (with monopolar footswitch) Checking Monopolar Mode (with handswitch) Performance Checks Using the Bovie IDS Inspecting the Generator and Accessories Setup Safety Setting Up Preparing for Monopolar Surgery Applying the Return Electrode Connecting Accessories Blend Controls Setting and Recalling Memory Presets Memory Memory Function Overview Setting Your Presets Memory Feature (Last Selected Preset) Activating the Unit Activation Safety Maintaining the Bovie IDS Cleaning Periodic Inspection Fuse Replacement iv Bovie Medical Corporation
6 Troubleshooting Repair Policy and Procedures Responsibility of the Manufacturer Returning the Generator for Service Step 1 Obtain a Returned Goods Authorization Number Step 2 Clean the Generator Step 3 Ship the Generator Technical Specifications...A-1 Performance Characteristics...A-2 Input Power...A-2 Duty Cycle...A-2 Dimensions and Weight...A-2 Operating Parameters...A-2 Transport and Storage...A-2 Audio Volume...A-3 Return Electrode Sensing...A-3 Low Frequency (50-60 Hz) Leakage Current...A-3 High Frequency (RF) Leakage Current...A-4 Standards and IEC Classifications...A-4 Class I Equipment (IEC )...A-4 Type CF Equipment (IEC ) / Defibrillator Proof...A-4 Drip Proof (IEC )...A-4 Electromagnetic Interference...A-4 Electromagnetic Compatibility (IEC and IEC )...A-4 Voltage Transients (Emergency Generator Mains Transfer)...A-4 Output Characteristics...A-5 Maximum Output for Monopolar and Bipolar Modes...A-5 EMC Compliance...A-5 Output Power Curves...A-9 Warranty...B-1 User s Guide Bovie IDS-400 v
7 LIST OF FIGURES Figure 2 1 Layout of controls, indicators, and receptacles on the front panel Figure 2 2 Controls for setting and recalling presets Figure 2 3 Controls for the Cut and Blend modes Figure 2 4 Controls for the Coag mode Figure 2 5 Controls for the Bipolar mode Figure 2 6 Indicators for power, return electrodes, and footswitch control Figure 2 7 Location of the unit power switch and front panel receptacles Figure 2 8 Layout of connectors and controls on the rear panel Figure 5 1 Fuse holder Figure A 1 Output power versus voltage for all modes...a-9 Figure A 2 Output power vs impedance for Cut I mode...a-10 Figure A 3 Output power vs impedance for Cut II mode...a-10 Figure A 4 Output power versus impedance for Blend mode...a-11 Figure A 4 Output power versus impedance for Pinpoint mode...a-11 Figure A 6 Output power vs impedance for Spray mode...a-12 Figure A 7 Output power vs impedance for Bipolar mode...a-12 vi Bovie Medical Corporation
8 INTRODUCING THE BOVIE IDS-400 This section includes the following information: Indications For Use Safety Warnings and Cautions Key Features Components and Accessories Additional Accessories CAUTIONS: Read all warnings, cautions, and instructions provided with this generator before using. Read the instructions, warnings, and cautions provided with electrosurgical accessories before using. Specific instructions are not included in this manual. User s Guide Bovie IDS
9 INDICATIONS FOR USE The Bovie IDS-400 Electrosurgical Generator is used to deliver RF energy via an assortment of surgical devices to cut and coagulate different kinds of tissue. SAFETY The safe and effective use of electrosurgery depends to a large degree on factors solely under the control of the operator. There is no substitute for a properly trained and vigilant medical staff. It is important that they read, understand, and follow the operating instructions supplied with this electrosurgical equipment. Physicians have used electrosurgical equipment safely in numerous procedures. Before starting any surgical procedure, the surgeon should be familiar with the medical literature, complications, and hazards of using electrosurgery in that procedure. To promote the safe use of the Bovie IDS-400, this section presents the warnings and cautions that appear throughout this user s guide. It is important that you read, understand, and follow the instructions in these warnings and cautions so that you can operate this equipment with maximum safety. It is also important that you read, understand, and follow the instructions for use in this user s guide. WARNINGS: Hazardous Electrical Output - This equipment is for use only by trained, licensed physicians. Danger: Fire / Explosion Hazard - Do not use the Bovie IDS-400 in the presence of flammable materials. Fire / Explosion Hazard - The following substances will contribute to increased fire and explosion hazards in the operating room: Flammable substances (such as alcohol based skin prepping agents and tinctures) Naturally occurring flammable gases which may accumulate in body cavities such as the bowel Oxygen enriched atmospheres Oxidizing agents (such as nitrous oxide [N 2 0] atmospheres). The sparking and heating associated with electrosurgery can provide an ignition source. Observe fire precautions at all times. When using electrosurgery in the same room with any of these substances or gases, prevent their accumulation or pooling under surgical drapes, or within the area where electrosurgery is performed. Connect the power cord to a properly polarized and grounded power source with the frequency and voltage characteristics that match those listed on the back of the unit. Electric Shock Hazard - Connect the generator power cord to a properly grounded receptacle. Do not use power plug adapters. Electric Shock Hazard - Always turn off and unplug the generator before cleaning. Fire Hazard - Do not use extension cords. Patient Safety - Use the generator only if the self-test has been completed as described. Otherwise, inaccurate power outputs may result. Failure of the high frequency electrosurgical equipment could result in an unintended increase of output power. The instrument receptacles on this generator are designed to accept only one instrument at a time. Do not attempt to connect more than one instrument at a time into a given receptacle. Doing so will cause simultaneous activation of the instruments. Use the lowest output setting necessary to achieve the desired surgical effect. Use the active electrode only for the minimum time necessary in order to lessen the possibility of unintended burn injury. Pediatric applications and/or procedures performed on small anatomic structures may require reduced power settings. The higher the current flow, and the longer the current is applied, the greater the possibility of unintended thermal damage to tissue, especially during use on small structures. 1-2 Bovie Medical Corporation
10 WARNINGS: Use electrosurgery with caution in the presence of internal or external devices such as pacemakers or pulse generators. Interference produced by the use of electrosurgical devices can cause devices such as pacemakers to enter an asynchronous mode or can block the pacemaker effect entirely. Consult the device manufacturer or hospital Cardiology Department for further information when use of electrosurgical appliances is planned for patients with cardiac pacemakers or other implantable devices. If the patient has an Implantable Cardioverter Defibrillator (ICD), contact the ICD manufacturer for instructions before performing an electrosurgical procedure. Electrosurgery may cause multiple activation of ICDs. Do not use electrosurgical equipment unless properly trained to use it in the specific procedure being undertaken. Use by physicians without such training has resulted in serious, unintended patient injury, including bowel perforation and unintended, irreversible tissue necrosis. For surgical procedures where the high frequency current could flow through parts of the body having a relatively small cross-sectional area, the use of bipolar techniques may be desirable to avoid unwanted coagulation. For all Monopolar modes, any associated equipment and active electrodes must be rated to with stand the combination of output voltage, Vpeak and crest factor as stated in the table on page A-5. The generator is equipped with a return electrode sensing and contact quality monitoring system (NEM), which monitors the quality of the patient return electrode connection. When a correctly functioning single plate return electrode is connected to the generator, the NEM verifies the connections between the generator and the single return electrode. It DOES NOT verify that a single return electrode is in contact with the patient. When using a split return electrode, the NEM confirms the total resistance is within the preset safety range. Proper application and visual inspection of the patient return electrode is required for safe operation. In some circumstances, potential exists for alternate site burns at points of skin contact (e.g., between the arm and the side of the body). This occurs when electrosurgical current seeks a path to the return electrode that includes the skin-to-skin contact point. Current passing through small skin-to-skin contact points is concentrated and may cause a burn. This is true for grounded, ground referenced, and isolated output generators. To reduce the potential for alternate site burns, do one or more of the following: Avoid skin-to-skin contact points, such as fingers touching leg, when positioning the patient. Place 5 to 8 cm (2 to 3 in.) of dry gauze between contact points to ensure that contact does not occur. Position the return electrode to provide a direct current route between the surgical site and the return electrode which avoids skin-to-skin contact areas. In addition, place patient return electrodes according to the manufacturer s instructions. Potential for alternate site burns increases if the return electrode is compromised. Bovie recommends the use of split return electrodes and Bovie generators with a contact quality monitoring system. The entire area of the neutral electrode should be reliably attached to the patient s body and as close to the operating field as possible. The cables to surgical electrodes should be positioned in such a way that contact with the patient or other leads is avoided. Temporarily unused active electrodes should be stored so that they are isolated from the patient. Do not wrap the accessory cords or return electrode cords around metal objects. This may induce currents that could lead to shocks, fires, or injury to the patient or surgical team. The use of flammable anesthetics or oxidizing gases such as nitrous oxide (N 2 O) and oxygen should be avoided if a surgical procedure is carried out in the region of the thorax or the head, unless these agents are sucked away. User s Guide Bovie IDS
11 WARNINGS: Non-flammable agents should be used for cleaning and disinfection wherever possible. Flammable agents used for cleaning or disinfecting, or as solvents of adhesives, should be allowed to evaporate before the application if HF surgery. There is a risk of pooling flammable solutions under the patient or in body depressions such as the umbilicus, and in body cavities such as the vagina. Any fluids pooled in these areas should be mopped up before HF surgical equipment is used. Attention should be called to the danger of ignition of endogenous gases. Some materials, for example cotton, wool and gauze, when saturated with oxygen may be ignited by sparks produced in Normal Use of the HF surgical equipment. CAUTIONS: At no time should you touch the active electrode or bipolar forceps. A burn could result. Do not stack equipment on top of the generator or place the generator on top of electrical equipment. These configurations are unstable and/or do not allow adequate cooling. Provide as much distance as possible between the electrosurgical generator and other electronic equipment (such as monitors). An activated electrosurgical generator may cause interference with them. Non-function of the generator may cause interruption of surgery. A backup generator should be available for use. Do not turn the activation tone down to an inaudible level. The activation tone alerts the surgical team when an accessory is active. When using a smoke evacuator in conjunction with the electrosurgical generator, place the smoke evacuator a distance from the generator and set the generator volume control at a level that ensures that the activation tones can be heard. The use of high frequency current can interfere with the function of other electromagnetic equipment. When high frequency surgical equipment and physiological monitoring equipment are used simultaneously on the same patient, place any monitoring electrodes as far as possible from the surgical electrodes. Monitoring systems incorporating high frequency current-limiting devices are recommended. Do not use needles as monitoring electrodes during electrosurgical procedures. Inadvertent electrosurgical burns may result. To avoid the possibility of a burn to the patient, when using a split pad do not activate the unit if the solid pad indicator is illuminated green or the red alarm indicator remains illuminated red. This could indicate improper pad placement or a faulty NEM circuit. To avoid the possibility of an electrosurgical burn to either the patient or the physicians, do not allow the patient to come in contact with a grounded metal object during activation. When activating the unit, do not allow direct skin contact between the patient and the physician. The patient should not come in contact with metal parts which are earthed or which have an appreciable capacitance to earth (for example operating table supports, etc.). The use of antistatic sheeting is recommended for this purpose. Remove any loose fitting jewelry from the patient before activation. Examine all accessories and connections to the electrosurgical generator before use. Ensure that the accessories function as intended. Improper connection may result in arcs, sparks, accessory malfunction, or unintended surgical effects. When not using active accessories, place them in a holster or in a clean, dry, non-conductive, and highly visible area not in contact with the patient. Inadvertent contact with the patient may result in burns. Avoid HF output settings where maximum output voltage may exceed rated accessory voltage. Refer to the accessory s voltage rating. Choose only accessories that will withstand each mode and power setting. 1-4 Bovie Medical Corporation
12 To avoid incompatibility and unsafe operation, use suitable cables, accessories, active and neutral electrodes, including values for the highest allowed H.F. peak voltage. CAUTIONS: Connected accessories need be rated for at least the maximum peak output voltage of the H.F. generator set at the intended output control setting in the intended operating mode. The output power selected should be as low as possible for the intended purpose. Certain devices or accessories may present a safety hazard at low power settings. Apparent low output or failure of the IDS-400 to function correctly at the normal operating settings may indicate faulty application of the neutral electrode or poor contact in its connections. In this case, the application of the neutral electrode and its connections should be checked before selecting a higher output power. When using Cut II mode, associated equipment and active accessories should be selected that have a voltage rating of 650Vpeak or greater. When using Bipolar mode, associated equipment and active accessories should be selected that have a voltage rating of 450Vpeak or greater. When using Spray mode, the active accessory used should have a voltage rating equal to or greater than 4000Vpeak. Studies have shown that smoke generated during electrosurgical procedures can be potentially harmful to patients and the surgical team. These studies recommend adequately ventilating the smoke by using a surgical smoke evacuator or other means U.S. Department of Health and Human Services. National Institute for Occupational Safety and Health (NIOSH). Control of Smoke from Laser / Electric Surgical Procedures. HAZARD CONTROLS, Publication No , September, Contraindications There are no known contraindications. NOTICES: If required by local codes, connect the generator to the hospital equalization connector with an equipotential cable. Do not clean the generator with abrasive cleaning or disinfectant compounds, solvents, or other materials that could scratch the panels or damage the generator. KEY FEATURES The Bovie IDS-400 includes the latest technology. This unit offers unsurpassed performance, flexibility, reliability, and convenience. It includes the following features: Two Cut Modes, Cut I & Cut II Two cut modes give the surgeon flexibility to cut all types of tissue without losing performance. Cut I generates constant output power over a wide range of impedances. Refer to Figure A-1 in the Technical Specifications section of this guide. Cut II is a softer cut that generates constant output power over a small range of impedances. Refer to Figure A-2 in the Technical Specifications section of this guide. Blend with 10 settings The Blend mode is a combination of cutting and hemostasis. The IDS-400 gives the surgeon freedom to adjust the desired level of hemostasis. A setting of 1 is minimal blend with maximum cutting effect. A setting of 10 is maximum hemostasis (blend) with minimal cutting effect. This adjustment is easily achieved by a incremental adjustment. Refer to Section 2, Controls, Indicators, and Receptacles, Cut and Blend Controls. The Blend mode improves the rate of targeted tissue desiccation without increasing the power delivered by the generator. User s Guide Bovie IDS
13 Presets The surgeon can store 10 user-defined presets for easy recall of frequently used settings. Two levels of coagulation: Pinpoint and Spray Pinpoint provides precise control of bleeding in localized areas. Spray provides greater control of bleeding in highly vascular tissue over broad surface areas. Return electrode sensing and contact quality monitoring The IDS-400 incorporates a return electrode contact quality monitoring system (Bovie NEM ). This system detects the type of return electrode: solid or split. The system also continually monitors the contact quality between the patient and the split return electrode. This feature is designed to minimize patient burns at the return electrode site. FDFS TM (Fast Digital Feedback System) The FDFS TM (Fast Digital Feedback System) measures voltage and current at 5,000 times a second and immediately adjusts the power to varying impedance during the electrosurgical procedure. The unit s digital technology senses and responds to changes in tissue and density. Unlike analog, this feature reduces the need to adjust power settings manually. NOTICE: It is recommended that you use a split return electrode while using the Bovie NEM system. To avoid the possibility of a burn to the patient, when using a split pad do not activate the unit if the solid pad indicator is illuminated green or the red alarm indicator remains illuminated red. This could indicate improper pad placement or a faulty NEM circuit. Memory The unit automatically powers up to the last selected preset settings. Isolated RF output This minimizes the potential of alternate site burns. Standard connectors These connectors accept the latest monopolar and bipolar instruments. Refer to Section 2, Controls, Indicators, and Receptacles to learn more. Self diagnostics These diagnostics continually monitor the unit to ensure proper performance. 1-6 Bovie Medical Corporation
14 COMPONENTS AND ACCESSORIES You should receive the following components with your generator: Bovie IDS-400 Hospital-grade power cord (110 VAC and 220 VAC) User s Guide Service Guide Additional Accessories To avoid incompatibility and unsafe operation, we recommend using the following Bovie accessories with the IDS-400: ESREC - split pad with 2.8 M cable ESRE - split pad adult return electrode A1252C - connecting cord for ERREC and ERSRE A1255A - adaptor plug for connecting footswitching pencil A905EL - adaptor for 1/6 electrode into 3/32 collet BV-1253B - footswitch for Monopolar procedures BV-1254B - footswitch for Bipolar and vessel sealing procedures A827 - forceps cord A827V- 2-prong single plug bipolar forceps cord A827 - cord for bipolar forceps ESPR-autoclavable reusable pencil, non-sterile ESPRS-autoclavable reusable pencil, sterile ESP1-disposable pencil, sterile ESP6-disposable rocker switch pencil, sterile ESP7-disposable foot-control pencil, sterile NOTICE: To avoid incompatibility and unsafe operation, we recommend using Bovie Aaron brand accessories with your generator. User s Guide Bovie IDS
15 1-8 Bovie Medical Corporation
16 CONTROLS, INDICATORS, AND RECEPTACLES This section describes: The Front and Rear Panels Controls, Indicators, Receptacles, and Ports User s Guide Bovie IDS
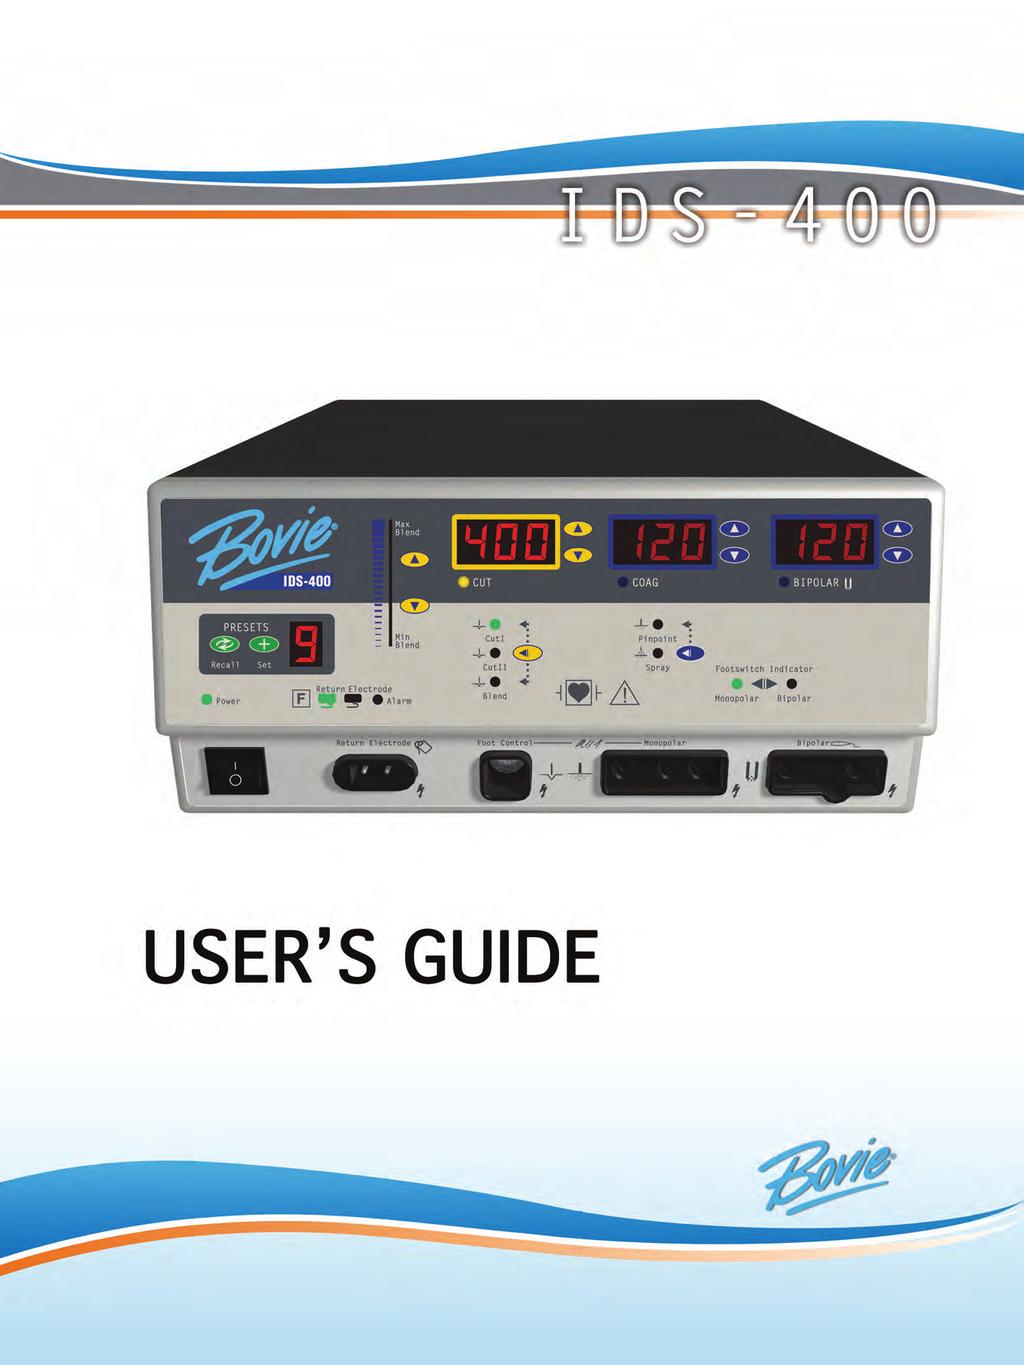
17 FRONT PANEL Figure 2 1 Layout of controls, indicators, and receptacles on the front panel 2-2 Bovie Medical Corporation
18 Symbols on the Front Panel Refer to the following table for descriptions of symbols found on the front panel of the IDS-400. SYMBOLS DESCRIPTION Cut Controls Cut Mode Blend Mode Coag Controls Pinpoint Mode Spray Mode Bipolar Controls Bipolar Mode Indicators Split Return Electrode Solid Return Electrode Regulatory Symbology Read instructions before use. Defibrillator Proof Type CF Equipment RF Isolated patient connections are isolated from earth at high frequency. Power Switch and Handpiece Connectors Return Electrode Receptacle Caution High Voltage Cut Mode Coag Mode Monopolar Handpiece Receptacle Bipolar Mode Bipolar Handpiece Receptacle User s Guide Bovie IDS
19 PRESET CONTROLS Figure 2 2 Controls for setting and recalling presets Preset Number Display Indicates the current selection of one of the 10 presets (0-9). Recall Button Toggles through the 10 presets. Stop at the desired number (0-9) illuminated in the Preset Number Display to recall a Preset. Set Button Sets the desired preset into one of the 10 user-defined presets. Press and hold the Set button for three seconds to save the settings.. Preset Indicator LED Blinks in the lower right corner of the Preset display to indicate that the current setting is not one of the user-defined presets. NOTICES: The IDS-400 incorporates 10 factory-set presets that are all set to zero and can be reset to your preferred settings. Set and Recall are disabled while the unit is activated. 2-4 Bovie Medical Corporation
20 CUT AND BLEND CONTROLS Figure 2 3 Controls for the Cut and Blend modes Blend Amount Control Buttons Increases or decreases the amount of blend (Level 1-10) added in the Blend mode. Cut Power Display (watts) Indicates the power set for the Cut / Blend mode. Cut Power Control Buttons Increases or decreases the Cut or Blend power output in increments of 1 to 10 watts. Cut I Mode Indicator Indicates when the Cut I mode is selected. Cut II Mode Indicator Indicates when the Cut II mode is selected. Blend Amount Indicator Indicates the amount of blend added in the Blend mode. More bars illuminated indicates more blend, divided into 10 steps. Cut Activation Indicator Illuminates when Cut or Blend mode is activated. Cut and Blend Mode Selector Toggles between Cut I, Cut II, and Blend modes. Blend Mode Indicator Indicates when the Blend mode is selected. NOTICE: When selecting the Blend mode, the unit defaults to a setting of minimum blend (only the first bar is illuminated). User s Guide Bovie IDS
21 COAG CONTROLS Figure 2 4 Controls for the Coag mode Coag Power Display (watts) Indicates the power set for the Coag mode. Coag Power Control Buttons Increases or decreases the Pinpoint or Spray Coag power output in increments of 1 to 10 watts. Coag Activation Indicator Illuminates when Coag mode is activated. Pinpoint Mode Indicator Indicates when the Pinpoint mode is selected. Pinpoint and Spray Mode Selector Toggles between Pinpoint mode and Spray mode. Spray Mode Indicator Indicates when the Spray mode is selected. 2-6 Bovie Medical Corporation

22 BIPOLAR CONTROLS Figure 2 5 Controls for the Bipolar mode Bipolar Power Display (watts) Indicates the power set for the Bipolar mode. Displays error code in the event of an error. Bipolar Power Control Buttons Increases or decreases the Bipolar power output in increments of 1 to 5 watts. Bipolar Activation Indicator Illuminates when Bipolar mode is activated. User s Guide Bovie IDS
23 INDICATORS Figure 2 6 Indicators for power, return electrodes, and footswitch control Monopolar Footswitch Indicator Illuminates when monopolar footswitch control is plugged in and available. Bipolar Footswitch Indicator Illuminates when bipolar footswitch control is plugged in and available. Power Indicator Illuminates when the main power is on. Split Return Electrode Indicator Illuminates green when the system detects a split plate is properly placed on the patient. Solid Return Electrode Indicator Illuminates green when the system detects a single plate. Notices: Solid pad indicator only detects that a pad is connected to the unit. The unit does not monitor pad placement on the patient. Alarm Indicator Illuminates when the system detects a return electrode alarm condition. 2-8 Bovie Medical Corporation
24 POWER SWITCH AND RECEPTACLES Figure 2 7 Location of the unit power switch and front panel receptacles Return Electrode Receptacle Accepts a standard return electrode plug. Monopolar Handswitching Receptacle Accepts standard 3-pin handpieces. Connect handswitching accessories. Power On/Off Switch Turns the unit on or off. Monopolar Footswitching Receptacle Accepts cables or adapters equipped with standard active plugs. Connect footswitching accessories. Bipolar Receptacle Accepts standard cables for bipolar handpieces. Connect bipolar accessories. User s Guide Bovie IDS

25 REAR PANEL Figure 2 8 Layout of connectors and controls on the rear panel SYMBOLS DESCRIPTION Equipotential Ground Stud Non-ionizing Radiation Volume Control Danger - Explosion Risk If Used With Flammable Anesthetics. Fuse Enclosed Relay Connector Monopolar Footswitch Input Jack Bipolar Footswitch Input Jack Read Instructions Before Use Do not dispose of this device in the unsorted municipal waste stream. Proper disposal required. Symbols on the Rear Panel Refer to the following table for descriptions of symbols found on the rear panel of the IDS-400. NOTICE: Please note that infected medical devices must be disposed of as medical/biohazard waste and 2-10 Bovie Medical Corporation
26 GETTING STARTED This section includes the following information: Initial Inspection Installation Function Checks Performance Checks User s Guide Bovie IDS
27 INITIAL INSPECTION When you first unpack your Bovie IDS-400, inspect it visually: Look for any signs of damage. Verify that the shipping package contains all items listed on the packing list. If the unit or any accessories are damaged, notify Bovie s Customer Service immediately. Do not use any damaged equipment. INSTALLATION Place the Bovie IDS-400 on any flat surface with a tilt angle not more than 10. The unit relies on natural convection cooling. Do not block its bottom or rear vents. Ensure that air flows freely on all sides of the unit. WARNING: Connect the power cord to a properly polarized and grounded power source with the frequency and voltage characteristics that match those listed on the back of the unit. FUNCTION CHECKS Upon initial installation of the unit, perform the tests listed below. Refer to the figures in the previous chapter for the location of connectors and controls. WARNING: At no time should you touch the active electrode or bipolar forceps. A burn could result. Setting Up the Unit 1. Verify that the Power Switch is in the Off (O) position and that no accessories are connected to the unit. 2. Connect a hospital grade power cable to the AC power cable receptacle on the back of the unit, then to a properly grounded wall outlet. 3. Connect a two-button monopolar pencil to the appropriate receptacle. 4. Do not connect a patient return electrode at this time. 5. Turn the unit on by switching the power switch to the On ( )position. Checking the Return Electrode Alarm 1. Adjust the power settings for each mode (Cut, Coag, Bipolar) to one watt. 2. Press the Coag button of the pencil. Verify that an alarm sounds for three seconds and the patient return electrode sensing alarm indicator light illuminates, indicating that no return electrode is connected to the unit. 3. Verify that adjusting the volume control on the back of the unit while the alarm is sounding does not change the alarm volume. 3-2 Bovie Medical Corporation
28 Confirming Modes Confirm that you can select each mode and adjust the power up and down. Checking Bipolar Mode (with bipolar footswitch) 1. Plug in the Bipolar footswitch. Verify that the Bipolar footswitch indicator illuminates. 2. Press the pedal on the Bipolar footswitch. Verify that the Bipolar mode activation indicator illuminates and that the system generates the Bipolar activation tone. 3. While activating the Bipolar mode, rotate the volume control over the full range to verify that the sound is audible throughout the range. 4. Confirm that releasing the pedal returns the unit to an idle state. Checking Monopolar Mode (with monopolar footswitch) 1. Plug in the Monopolar footswitch. Verify that the monopolar footswitch indicator illuminates. 2. Connect a solid return electrode to the return electrode receptacle. Verify that the green solid return electrode indicator illuminates. 3. Press the Cut pedal (yellow) on the footswitch. Verify that the Cut mode activation indicator illuminates and that the system generates the Cut activation tone. 4. While activating the Cut mode, rotate the volume control over the full range to verify that the sound is audible throughout the range. 5. Press the Coag pedal (blue) on the footswitch. Verify that the Coag mode activation indicator illuminates and that the system generates the Coag activation tone. 6. While activating the Coag mode, rotate the volume control over the full range to verify that the sound is audible throughout the range. Checking Monopolar Mode (with handswitch) 1. Connect a handswitching handpiece to the Monopolar handpiece receptacle. 2. Connect a solid return electrode to the return electrode receptacle. Verify that the green solid return electrode indicator illuminates. 3. Activate, one at a time, the Cut and Coag handswitching controls. Verify that each control causes the correct indicator and tone to sound. PERFORMANCE CHECKS After the unit has passed the preliminary functional test, it is ready for performance testing. A qualified biomedical engineer who is thoroughly familiar with electrosurgical devices should conduct this testing. The testing should include checking all modes of operation for proper function and power output. User s Guide Bovie IDS
29 3-4 Bovie Medical Corporation
30 USING THE BOVIE IDS-400 This section contains the following procedures: Inspecting the Generator and Accessories Setup Safety Setting Up Preparing for Monopolar Surgery Preparing for Bipolar Surgery Setting and Recalling Memory Presets Activating the Unit Activation Safety CAUTIONS: Read all warnings, cautions, and instructions provided with this generator before use. Read the instructions, warnings, and cautions provided with electrosurgical accessories before use. Specific instructions are not included in this manual. User s Guide Bovie IDS
31 INSPECTING THE GENERATOR AND ACCESSORIES Before each use of the Bovie IDS-400, verify that the unit and all accessories are in good working order: Inspect for damage to the Electrosurgical Generator and all its connections. Verify that the appropriate accessories and adapters are present. Inspect all cords and connectors for signs of wear, damage, and abrasion. Verify that no errors occur when you turn on the unit. SETUP SAFETY WARNINGS: Hazardous Electrical Output - This equipment is for use only by trained, licensed physicians. Electric Shock Hazard - Connect the generator power cord to a properly grounded receptacle. Do not use power plug adapters. Connect the power cord to a properly polarized and grounded power source with the frequency and voltage characteristics that match those listed on the back of the unit. Fire Hazard - Do not use extension cords. Patient Safety - Use the generator only if the self-test has been completed as described. Otherwise, inaccurate power outputs may result. The instrument receptacles on this generator are designed to accept only one instrument at a time. Do not attempt to connect more than one instrument at a time into a given receptacle. Doing so will cause simultaneous activation of the instruments. Failure of the high frequency electrosurgical equipment could result in an unintended increase of output power. Do not use electrosurgical equipment unless properly trained to use it in the specific procedure being undertaken. Use by physicians without such training has resulted in serious, unintended patient injury, including bowel perforation and unintended, irreversible tissue necrosis. For surgical procedures where the high frequency current could flow through parts of the body having a relatively small cross-sectional area, the use of bipolar techniques may be desirable to avoid unwanted coagulation. If the patient has an Implantable Cardioverter Defibrillator (ICD), contact the ICD manufacturer for instructions before performing an electrosurgical procedure. Electrosurgery may cause multiple activation of ICDs. In some circumstances, potential exists for alternate site burns at points of skin contact (e.g., between the arm and the side of the body). This occurs when electrosurgical current seeks a path to the patient return electrode that includes the skin-to-skin contact point. Current passing through small skin-to-skin contact points is concentrated and may cause a burn. This is true for grounded, ground referenced, and isolated output generators. To reduce the potential for alternate site burns, do one or more of the following: Avoid skin-to-skin contact points, such as fingers touching leg, when positioning the patient. Place 5 to 8 cm (2 to 3 in.) of dry gauze between contact points to ensure that contact does not occur. Position the return electrode to provide a direct current route between the surgical site and the return electrode which avoids skin-to-skin contact areas. In addition, place return electrodes according to the manufacturer s instructions. Potential for alternate site burns increases if the return electrode is compromised. Bovie recommends the use of split return electrodes and Bovie generators with a contact quality monitoring system. 4-2 Bovie Medical Corporation
32 CAUTIONS: Do not stack equipment on top of the generator or place the generator on top of electrical equipment. These configurations are unstable and/or do not allow adequate cooling. Provide as much distance as possible between the electrosurgical generator and other electronic equipment (such as monitors). An activated electrosurgical generator may cause interference with them. Non-function of the generator may cause interruption of surgery. A backup generator should be available for use. Do not turn the activation tone down to an inaudible level. The activation tone alerts the surgical team when an accessory is active. When using a smoke evacuator in conjunction with the electrosurgical generator, place the smoke evacuator a distance from the generator and set the generator volume control at a level that ensures that the activation tones can be heard. NOTICE: If required by local codes, connect the generator to the hospital equalization connector with an equipotential cable. SETTING UP 1. Verify that the generator is Off by pressing the power switch Off (O). 2. Place the generator on a stable flat surface, such as a table, platform, or medical cart. Carts with conductive wheels are recommended. For details, refer to the procedures for your institution or to local codes. Provide at least 10 to 15 cm (4 to 6 in.) of space from the sides and top of the generator for cooling. Normally, the top, sides, and rear panel are warm when you use the generator continuously for extended periods of time. 3. Plug the generator power cord into the AC Power Cable Receptacle on the rear panel. 4. Plug the generator power cord into a grounded receptacle. 5. Turn on the generator by pressing the power switch On ( ). Verify the following: All visual indicators and displays on the front panel illuminate. Activation tones sound to verify that the speaker is working properly. 6. If the self-test is successful, a tone sounds. Verify the following: A Cut mode is selected; a Coag mode is selected. Each display shows a power setting. The unit automatically powers up to the last selected preset settings. The Patient Return Electrode Alarm Indicator illuminates red. If the self-test is not successful, an alarm tone sounds. An error code will appear in the Bipolar display, in most cases, the generator is disabled. Note the error code and refer to Section 6, Troubleshooting. Once the self-test is successful, connect the accessories and set the generator controls. Refer to Preparing for Monopolar Surgery or Preparing for Bipolar Surgery later in this section. User s Guide Bovie IDS
33 PREPARING FOR MONOPOLAR SURGERY Monopolar surgery requires a return electrode. Applying the Return Electrode To maximize patient safety, Bovie recommends using a split return electrode and a Bovie generator with a contact quality monitoring system (Bovie NEM ). NOTICE: The Bovie NEM system recommends that you use a split return electrode. Before activation, pad placement and visual verification of the split return electrode (split pad) indicator on the front panel is recommended. After connecting the split pad to the generator and placing the split pad securely to the patient, give the unit 5 to 10 seconds to recognize the split pad. The split pad indicator will illuminate green. If the split pad and cord are attached to the generator without secure contact to the patient, the alarm indicator will illuminate red. Refer to the manufacturer s instructions for application site and placement procedures. When using metal plate return electrodes, use a conductive gel specifically designed for electrosurgery. Select a return electrode site with good blood flow. While a properly applied electrode results in minimal tissue heating beneath the electrode, a good blood flow helps carry heat away from the site. 1. Connect the cable to the Return Electrode receptacle on the front of the unit. The unit will automatically sense the presence of a split or solid return electrode and, if a split return electrode is used, will constantly monitor the resistance at the contact between the electrode and the patient. 2. Adjust the Blend setting to the desired amount of hemostasis (Level 1-10). Adjustment is preformed by pressing the up or down buttons next to the Blend setting indicator. Select the desired power settings for Cutting. Adjustment is preformed by pressing the up or down buttons next to the Cut display. Select the mode of operation for Coagulation, either Pinpoint or Spray. Select the desired power setting for Coagulation. Adjustment is preformed by pressing the up or down buttons next to the Coag display. Connecting Accessories 1. Connect a 3-pin monopolar device into the monopolar receptacle on the front of the unit. If footswitching control capabilities are preferred, connect the Bovie monopolar footswitch to the appropriate footswitch connecting socket on the rear of the unit. If you are using Standard 3-pin handswitching pencil Footswitching pencil To activate the Monopolar mode, depress the cut or coag button on the monopolar handpiece or the cut or coag pedal on the monopolar footswitch. Blend Controls Blend settings can be adjusted to a desired amount of hemostasis (Level 1-10). Ascending illuminated bars indicate increased hemostasis. Increase and decrease the amount of blend added to the Blend mode by pressing the Blend amount control arrowed buttons. NOTICE: There are 10 levels of blend available in the Blend Mode. Connect it to Monopolar handswitching receptacle Monopolar footswitching receptacle When selecting the Blend mode, the unit defaults to a setting of minimum blend (only the first bar is illuminated). 4-4 Bovie Medical Corporation
34 PREPARING FOR BIPOLAR SURGERY 1. Connect a Bipolar cable to the Bipolar receptacle on the front of the unit. 2. Connect a forceps instrument to the bipolar cable. 3. Connect the bipolar footswitch to the bipolar footswitch connecting socket located on the rear of the unit. To activate the Bipolar mode, depress the pedal on the bipolar footswitch. SETTING AND RECALLING MEMORY PRESETS The Bovie IDS-400 incorporates 10 user-defined memory preset settings for easy recall of frequently used settings in all three modes. Memory The Memory feature allows the IDS-400 (unit) to display the last selected Preset when the generator is turned on. When activated by the handpiece or footswitch, the unit will operate in that particular mode and power setting. The small red blinking dot in the lower right hand corner of the Preset display lets the user know that the Preset values have been adjusted. All new settings must be saved as a Preset to be available at startup or as a Preset selection (0 through 9) when using the unit. Memory Function Overview The unit powers up with the last selected preset (0-9). Mode (Cut and Coag) membrane switches are disabled during activation. Blend amount control buttons are disabled during activation. Recall and Set membrane switches are disabled during activation. During activation, the activated mode can be adjusted up and or down a maximum of four steps. Refer to the following table for power increments. POWER SETTINGS INCREMENTS FOR INSTANCE Watts 1 Watts The unit is activated using the same preset values as described in Watts 2 Watts Example 1 of this section. While activated, the Cut 1 power output of 30 watts can be Watts 5 Watts adjusted 4 steps down to 26 watts or 4 steps up to 34 watts. The Watts 10 Watts Pinpoint and Bipolar can be adjusted to display a different setting but can not be saved during activation. While operating the unit outside of a user-defined preset (small red dot will be blinking in lower right corner of the Preset display as an indicator), the unit temporarily stores the power setting for the activated mode (Cut, Coag, or Bipolar). This temporary power setting is available until either the unit is reset, a preset is selected, or the power setting for the mode in use is adjusted and the unit is again activated. Presets only store one Cut mode (Cut I or Cut II, or Blend) and power setting, one Blend level (if applicable), one Coag mode (Pinpoint or Spray) and power setting, and Bipolar power setting. When storing, only the information displayed in the display windows will be saved to the unit s memory. User s Guide Bovie IDS
35 Setting Your Presets Select the desired preset (0-9) by pressing the recall button. Select the desired modes to be stored by pressing the mode membrane switches (Cut and Coag). If presetting the Blend mode, select the desired level of hemostasis (Blend Bar 1-10) by pressing the Blend amount control button. Select the desired power (Cut, Coag, and Bipolar) to be stored by using the power output up and down membrane switches. Once all of the settings are selected, depress and hold the Set button for three seconds. To indicate the settings have been stored, the Preset Memory Number (0-9) will blink. To recall a Preset, repeatedly press the Recall button to toggle through all of the presets. NOTICES: The IDS-400 incorporates 10 factory-set presets that are all set to zero and can be reset to your preferred settings. A small red dot blinking in the lower right corner of the Preset indicator display indicates that the unit is not presently set to a user-defined preset. Set and Recall buttons are disabled while the unit is activated. Presets only store one Cut mode (Cut I or Cut II, or Blend) and power setting, one Blend level (if applicable), one Coag mode (Pinpoint or Spray) and power setting, and Bipolar power setting. When storing, only the information displayed in the display windows will be saved to the unit s memory. Memory Feature (Last Selected Preset) The Memory feature allows the unit to display the last selected power preset when the generator is turned on. NOTICE: To have a setting selection available at startup or to be one of the 10 user-defined presets, the adjustment to the mode and/or power settings must be saved by pressing the Set button on the Preset display panel. Examples Examples 1 through 4 explain how the Memory and temporary memory features work and what happens when the power and/or mode is adjusted but not saved as one of the 10 Preset selections. Example 5 explains what happens when the power and/or mode is adjusted and saved as a new Preset setting: #1. The physician performs a surgical procedure using Preset 2. The Preset has been stored with the following mode and power: The mode is set to Cut I The power setting for Cut I is 30 watts The power setting for Pinpoint is 15 watts The power setting for Bipolar is 20 watts. The procedure is completed and the unit is switched off. The next time the unit is switched on, the number 2 Preset will be displayed and available when the unit is activated. The number 2 Preset will be the same as the modes and settings indicated above. #2. The physician performs a surgical procedure using Preset 2 (same as Example #1 Preset values). He adjusts the power settings for each mode but does not store the new settings into the Preset. The next time the unit is switched on, the number 2 Preset will be displayed and available when the unit is activated. The number 2 Preset will be the same as the modes and settings indicated in Example # Bovie Medical Corporation
36 #3. The physician performs a surgical procedure using Preset 2 (same as Example #1 Preset values). He changes the settings by selecting the Cut II mode. The displayed power will remain at 30 watts. The physician then adjusts the power to 100 watts. He resumes the procedure now using Cut II at 100 watts. He then switches the mode back to Cut I. The power output returns to 30 watts as stored in the # 2 Preset. The physician switches again to the Cut II mode and the output power returns to the temporary memory of 100 watts as previously selected. The procedure is completed without saving any modes or power settings. The next time the unit is switched on, the number 2 Preset will be displayed and available when the unit is activated. The number 2 Preset will be the same as the modes and settings indicated in Example #1. #4. The physician performs a surgical procedure using Preset 2 (same as Example #1 Preset values.). As required in the procedure, he selects the Blend mode (the Blend Amount Indicator illuminates to one bar indicating the Blend mode can be increased to the preferred amount of blend). He adjusts the hemostasis level up to a 30% blend but does not store the new settings into the Preset. The next time the unit is switched on, the number 2 Preset will be displayed and available when the unit is activated. The number 2 Preset will be the same as the modes and settings indicated in Example #1. #5. The physician performs a surgical procedure using Preset 2 (same as Example #1 Preset values). He adjusts the power settings for a Cut mode, a Coag mode, and a Bipolar mode and presses the Store button for three seconds to save the new settings as Preset number 2. The next time the unit is switched on, the number 2 Preset will be displayed and available when the unit is activated. The number 2 Preset will now be the last saved Preset settings for Preset 2. ACTIVATING THE UNIT NOTICE: Review Activation Safety on page 6 of this section before activating the unit. When you turn on your unit remember the following feature: The Bovie IDS-400 will power up to the modes and settings displayed when the unit was last activated. For example, if you set Cut I mode at 50 watts and activate the unit, then turn the unit off, it will automatically return to Cut I mode at 50 watts when you turn it on again. Similarly, if you set Pinpoint mode at 40 watts and activate the unit before you turn it off, it will return to Pinpoint mode at 40 watts when you turn it on again. 1. Monopolar Cut - select the mode of operation for Cut: Cut I, Cut II, or Blend then select the desired Cut power settings by pressing the up and down buttons next to the Cut power output display. 2. If using Blend, vary the Blend setting by pressing the up and down buttons next to the blend amount indicator graph. 3. Monopolar Coag - select the mode of operation for coagulation: Pinpoint or Spray, then select the coagulation power settings by pressing the up and down buttons next to the Coag power output display. 4. Bipolar - adjust the Bipolar power settings by pressing the up and down buttons next to the Bipolar power output display. 5. Activate the generator by pressing the appropriate button on the handpiece or pedal on the footswitch. NOTICE: Monopolar and bipolar footswitching operations are controlled by independent foot controls. ACTIVATION SAFETY WARNINGS: Do not wrap the accessory cords or patient return electrode cords around metal objects. This may induce currents that could lead to shocks, fires, or injury to the patient or surgical team. Danger: Fire / Explosion Hazard - Do not use the Bovie IDS-400 in the presence of flammable anesthetics. User s Guide Bovie IDS
37 WARNINGS: Fire / Explosion Hazard - The following substances will contribute to increased fire and explosion hazards in the operating room: Flammable substances (such as alcohol based skin prepping agents and tinctures) Naturally occurring flammable gases that may accumulate in body cavities such as the bowel Oxygen enriched atmospheres Oxidizing agents (such as nitrous oxide [N 2 O] atmospheres). The sparking and heating associated with electrosurgery can provide an ignition source. Observe fire precautions at all times. When using electrosurgery in the same room with any of these substances or gases, prevent their accumulation or pooling under surgical drapes, or within the area where electrosurgery is performed. Use the lowest output setting necessary to achieve the desired surgical effect. Use the active electrode only for the minimum time necessary in order to lessen the possibility of unintended burn injury. Pediatric applications and/or procedures performed on small anatomic structures may require reduced power settings. The higher the current flow, and the longer the current is applied, the greater the possibility of unintended thermal damage to tissue, especially during use on small structures. Use electrosurgery with caution in the presence of internal or external devices such as pacemakers or pulse generators. Interference produced by the use of electrosurgical devices can cause devices such as pacemakers to enter an asynchronous mode or can block the pacemaker effect entirely. Consult the device manufacturer or hospital Cardiology Department for further information when use of electrosurgical appliances is planned for patients with cardiac pacemakers or other implantable devices. CAUTIONS: The use of high frequency current can interfere with the function of other electromagnetic equipment. When high frequency surgical equipment and physiological monitoring equipment are used simultaneously on the same patient, place any monitoring electrodes as far as possible from the surgical electrodes. Do not use needles as monitoring electrodes during electrosurgical procedures. Inadvertent electrosurgical burns may result. To avoid the possibility of an electrosurgical burn to either the patient or the physicians, do not allow the patient to come in contact with a grounded metal object during activation. When activating the unit, do not allow direct skin contact between the patient and the physician. To avoid the possibility of a burn to the patient, when using a split pad do not activate the unit if the solid pad indicator is illuminated green or the red alarm indicator remains illuminated red. This could indicate improper pad placement or a faulty NEM circuit. Remove any jewelry from the patient before activation. Studies have shown that smoke generated during electrosurgical procedures can be potentially harmful to patients and the surgical team. These studies recommend adequately ventilating the smoke by using a surgical smoke evacuator or other means. 1 Examine all accessories and connections to the electrosurgical generator before use. Ensure that the accessories function as intended. Improper connection may result in arcs, sparks, accessory malfunction, or unintended surgical effects. When not using active accessories, place them in a holster or in a clean, dry, non-conductive, and highly visible area not in contact with the patient. Inadvertent contact with the patient may result in burns. 1. U.S. Department of Health and Human Services. National Institute for Occupational Safety and Health (NIOSH). Control of Smoke from Laser / Electric Surgical Procedures. HAZARD CONTROLS, Publication No , September, Bovie Medical Corporation

38 MAINTAINING THE BOVIE IDS-400 This section covers the following topics: Cleaning Periodic Inspection Fuse Replacement User s Guide Bovie IDS
39 Bovie recommends that you complete periodic inspection and performance testing. Perform inspections and performance testing every six months. A qualified biomedical technician should conduct this testing to ensure that the unit is operating effectively and safely. CLEANING After each use, clean the unit. WARNING: Electric Shock Hazard - Always turn off and unplug the generator before cleaning. NOTICE: Do not clean the generator with abrasive cleaning or disinfectant compounds, solvents, or other materials that could scratch the panels or damage the generator. 1. Turn off the generator, and unplug the power cord from the wall outlet. 2. Thoroughly wipe all surfaces of the generator and power cord with a mild cleaning solution or disinfectant and a damp cloth. Follow the procedures approved by your institution or use a validated infection control procedure. Do not allow fluids to enter the chassis. Do not sterilize the generator. PERIODIC INSPECTION Every six months, visually inspect the Bovie IDS-400 for signs of wear or damage. In particular, look for any of the following problems: Damage to the power cord Damage to the power cable receptacle Obvious damage to the unit Damage to any receptacle Accumulation of lint or debris in or around the unit FUSE REPLACEMENT Fuses for the unit reside directly below the Power Cable Receptacle on the rear of the unit. To replace the fuses, follow this procedure: 1. Unplug the power cord from the wall outlet. 2. Remove the power cord from the Power Cable Receptacle on the rear panel. 3. To release the fuse drawer, insert a small flathead screwdriver into the slot on the drawer below the power cord receptacle. Then, slide the drawer out. 4. Remove the two fuses and replace them with new fuses with the same values. 5. Insert the fuse holder into the Power Cable Receptacle. NOTICE: If the unit does not display an error and does not power on, check fuses. Figure 5 1 Fuse holder 5-2 Bovie Medical Corporation
40 TROUBLESHOOTING This section includes Error Code Descriptions and actions to take to resolve them. User s Guide Bovie IDS
41 The Bovie IDS-400 includes automatic self-diagnostics. If the diagnostics detect an error, the system displays an error code, sounds an audible tone, and deactivates the unit output power. Most error codes result from faults in accessories attached to the unit. The following table lists the error codes, describes the errors, and recommends actions to take to resolve the errors. All error codes are displayed in the Bipolar display. If the unit displays any other error code, it requires service. Error Code Description Recommended Action F1 F2 F3 F4 F5 F6 Cut handpiece button may be stuck Coag handpiece button may be stuck Cut footswitch pedal may be stuck Coag footswitch pedal may be stuck Bipolar footswitch pedal may be stuck Simultaneous activation error 1. Turn off, then turn on the generator. Do not press buttons or activate accessory devices during the self-test. 2. If the error code reappears, disconnect all accessories. Turn off, then turn on the generator again. 3. If the problem persists, replace the handpiece or footswitch and repeat the restart. 4. If the error code reappears, record the number and call customer service. The unit does not allow simultaneous activation of the cut and coagulation modes. The activation mode is first come, first serve. This means that whichever mode is selected first will be the function the unit is activated to dispense. An example of this functionality includes, when the handpiece Cut button is pressed, the unit is activated for Cut. If a footswitch is simultaneously pressed for Coag, the unit will continue in the Cut mode as long as the handpiece Cut button is pressed. If the Cut button is released, the unit will sense an error and both functions will be disabled. 1. Release either the cut or coag button on the handpiece, or the cut or coag pedal on the footswitch. 2. If the error code reappears, record the number and contact customer service. E1 E2 E3 E4 E5 E6 E7 E8 Output current out of specification Dosage voltage error Dosage current error DC power error Internal temperature of a section of the unit exceeded the limit. NEM circuit error 1. Turn the unit off. 2. Turn the unit on. 3. If the error code reappears, record the number and contact customer service. 1. Turn the unit off. 2. Allow the unit to cool for 20 minutes. 3. Turn the unit on. 4. If the error code reappears, record the number and contact customer service. 1. Turn the unit off. 2. Turn the unit on. 3. If the error code reappears, record the number and contact customer service. NOTICE: If the unit does not power on to display an error, check fuses as described in Section 5 of this guide. 6-2 Bovie Medical Corporation

42 REPAIR POLICY AND PROCEDURES Refer to this section for information on: Responsibility of the Manufacturer Returning the Generator for Service User s Guide Bovie IDS
43 RESPONSIBILITY OF THE MANUFACTURER Bovie Medical Corporation is responsible for the safety, reliability, and performance of the generator only under the following circumstances: The user has followed the Installation and Setup Procedures in this User s Guide. Persons authorized by Bovie Medical Corporation performed assembly operation, readjustments, modifications, or repairs. The electrical installation of the relevant room complies with local codes and regulatory requirements, such as IEC and BSI. Equipment use is in accordance with the Bovie Medical Corporation instructions for use. Equipment to be diposed/recycled. Please note that infected medical devices must be disposed of as medical/biohazard waste and cannot be included in used electronic equipment disposal/recycling programs. In addition, certain electronic products must be returned directly to Bovie Medical Corporation. Contact your Bovie Medical Corporation representative for return instructions. For warranty information, refer to Appendix B - Warranty. RETURNING THE UNIT FOR SERVICE Before you return the unit, call your Bovie Medical Corporation representative for assistance. If instructed to send the unit to Bovie Medical Corporation, first obtain a Returned Goods Authorization Number. Then, clean the Unit and package securely to ensure proper protection of the unit. So as to aid in the processing of the unit, please be sure to include a reference to the Bovie Return Goods Authorization Number on the outside of the box and ship directly to Bovie Medical Corporation. Step 1 Obtain a Returned Goods Authorization Number Call the Bovie Medical Corporation Customer Service Center (727) to obtain a Returned Goods Authorization Number. Have the following information ready when you call: Hospital / clinic name / customer number Description of the problem Telephone number/fax number Type of repair to be done Department / address, city, state, and zip code P.O. number Model number / Serial number Step 2 Clean the Unit WARNING: Electric Shock Hazard - Always turn off and unplug the unit before cleaning. The use of flammable anesthetics or oxidizing gases such as nitrous oxide (N 2 O) and oxygen should be avoided if a surgical procedure is carried out in the region of the thorax or the head, unless these agents are sucked away. Non-flammable agents should be used for cleaning and disinfection wherever possible. Flammable agents used for cleaning or disinfecting, or as solvents of adhesives, should be allowed to evaporate before the application if HF surgery. There is a risk of pooling flammable solutions under the patient or in body depressions such as the umbilicus, and in body cavities such as the vagina. Any fluids pooled in these areas should be mopped up before HF surgical equipment is used. Attention should be called to the danger of ignition of endogenous gases. Some materials, for example cotton, wool and gauze, when saturated with oxygen may be ignited by sparks produced in Normal Use of the HF surgical equipment. NOTICE: Do not clean the unit with abrasive cleaning or disinfectant compounds, solvents, or other materials that could scratch the panels or damage the unit. 7-2 Bovie Medical Corporation
44 A. Turn off the unit, and unplug the power cord from the wall outlet. B. Thoroughly wipe all surfaces of the unit and power cord with a mild cleaning solution or disinfectant and a damp cloth. Follow the procedures approved by your institution or use a validated infection control procedure. Do not allow fluids to enter the chassis. You cannot sterilize the unit. Step 3 Ship the Unit A. Attach a tag to the unit that includes the Returned Goods Authorization Number and the information (hospital, phone number, etc.) listed in Step 1 Obtain a Returned Goods Authorization Number. B. Be sure the unit is completely dry before you pack it for shipment. Although the preference is to have the unit repackaged using its original packaging, Bovie understands that this may not always be possible. If necessary, contact Customer Service for the proper packaging to ship the unit. Please be sure to include a reference of the Bovie Return Goods Authorization Number on the outside of the box/container. C. Ship the unit, prepaid, to the address given to you by the Bovie Medical Corporation Service Center. User s Guide Bovie IDS
45 7-4 Bovie Medical Corporation
46 TECHNICAL SPECIFICATIONS All specifications are nominal and subject to change without notice. A specification referred to as typical is within ± 20% of a stated value at room temperature (25 C / 77 F) and a nominal input power voltage. User s Guide Bovie IDS-400 A-1
47 PERFORMANCE CHARACTERISTICS Input Power Input Voltage ~ VAC ± 10% Mains line frequency range (nominal): Hz Power consumption: 560 VA Fuses (two): 10 A (fast blow) Duty Cycle Under maximum power settings and rated load conditions (Pure Cut, ohm load), the generator is suitable for activation times of 10 seconds ON followed by 30 seconds OFF for one hour. The internal temperature of the unit is continuously monitored. If the temperature rises above 85 0 C, the alarm will sound and output power will be deactivated. Dimensions and Weight Width 31.1 cm (12.25 in.) Depth 41.3 cm (16.25 in.) Height 15.3 cm (6.00 in.) Weight < 8.75 kg (< 19 lbs) Operating Parameters Ambient temperature range Relative humidity Atmospheric pressure Warm-up time 10 to 40 C 30% to 75%, non-condensing 70kPa to 106kPa If transported or stored at temperatures outside the operating temperature range, allow one hour for the generator to reach room temperature before use. Transport and Storage Generator should fit on all standard Carts for monopolar generators. The device should be stored and used in a room temperature of approximately 77 0 F/25 0 C. Ambient temperature range Relative humidity Atmospheric pressure -40 to +70 C 10% to 100%, including condensation 50kPa to 106kPa A-2 Bovie Medical Corporation
48 Audio Volume The audio levels stated below are for activation tones (cut, coag, and bipolar) and alarm tones (return electrode and system alarms) at a distance of one meter. Alarm tones meet the requirements for IEC Activation Tone Volume (adjustable) Frequency Duration 40 to 65 db Cut I: 610 Hz Cut II: 610 Hz Blend: 610 Hz Pinpoint: 910 Hz Spray: 910 Hz Bipolar: 910 Hz Continuous while the generator is activated Alarm Tone Volume (not adjustable) Frequency Duration 70 db ± 5 db 2 khz 1 2 seconds / 1 khz 1 2 seconds 2 seconds Return Electrode Sensing The system presents audible and visible alarms when it senses no return electrode. Solid Split Trip resistance: 0 Ω to 5 Ω ± 3 Ω Continuous measurement: Once the system establishes the solid return electrode resistance, an increase to 20 Ω ± 5 Ω in resistance will cause an alarm. When the alarm condition exists, the system deactivates output power. Trip resistance: 10 Ω ± 5 Ω to 135 Ω ± 10 Ω Continuous measurement: Once the system establishes the split return electrode resistance, an increase of 40% in resistance will cause an alarm. When the alarm condition exists, the system deactivates output power. Low Frequency (50-60 Hz) Leakage Current Enclosure source current, ground open < 500 µa Source current, patient leads, all outputs Normal polarity, intact ground: < 10 µa Normal polarity, ground open: < 10 µa Reverse polarity, ground open: < 10 µa Sink current at high line, all inputs < 10 µa User s Guide Bovie IDS-400 A-3
49 High Frequency (RF) Leakage Current Bipolar RF leakage current Monopolar RF leakage current (additional tolerance) < 77 ma rms at 120 watts < 150 ma rms STANDARDS AND IEC CLASSIFICATIONS Class I Equipment (IEC ) Accessible conductive parts cannot become live in the event of a basic insulation failure because of the way in which they are connected to the protective earth conductor. Type CF Equipment (IEC ) / Defibrillator Proof The Bovie IDS-400 provides a high degree of protection against electric shock, particularly regarding allowable leakage currents. It is type CF equipment. Patient connections are isolated from earth and resist the effects of defibrillator discharge. Drip Proof (IEC ) The generator enclosure is constructed so that liquid spillage in normal use does not wet electrical insulation or other components which, when wet, are likely to affect adversely the safety of the generator. Electromagnetic Interference When other equipment is placed on or beneath a Bovie IDS-400, the unit can be activated without interference. The generator minimizes electromagnetic interference to video equipment used in the operating room. Electromagnetic Compatibility (IEC and IEC ) The Bovie IDS-400 complies with the appropriate IEC and IEC specifications regarding electromagnetic compatibility. Voltage Transients (Emergency Generator Mains Transfer) The Bovie IDS-400 operates in a safe manner when the transfer is made between line AC and an emergency generator voltage source. A-4 Bovie Medical Corporation
50 OUTPUT CHARACTERISTICS Maximum Output for Monopolar and Bipolar Modes Power readouts agree with actual power into rated load to within 20% or 5 watts, whichever is greater. Mode Output Power Output Frequency Repetition Rate Vpeak max Crest Factor* (Rated Load) Cut I Ω 490 khz ± 4.9 khz N / A 1000V 1.6 ± 20% Cut II Ω 490 khz ± 4.9 khz N / A 625V 1.6 ± 20% Blend (Max) Ω 490 khz ± 4.9 khz 30 khz ± 5 khz 2000V 3.5 ± 20% Pinpoint Ω 490 khz ± 4.9 khz 30 khz ± 5 khz 2400V 4.5 ± 20% Spray Ω 490 khz ± 4.9 khz 30 khz ± 5 khz 4000V 6.5 ± 20% Bipolar Ω 490 khz ± 4.9 khz N/A 450V 1.6 ± 20% EMC COMPLIANCE Special precautions should be taken regarding the IDS-400. Medical Electrical Equipment needs special precautions regarding EMC and needs to be installed and put into service according to the EMC information provided in this manual. Understand that only the Accessories supplied with or ordered from Bovie should be used with your device. The use of accessories, transducers, and cables other than those specified, may result in increased Emissions or decreased Immunity of the IDS-400. The IDS-400 and its accessories are not suitable for interconnection with other equipment. Portable and mobile RF communications equipment can affect Medical Electrical Equipment. The IDS-400 should not be used adjacent to or stacked with other equipment and that if adjacent or stacked use is necessary, the IDS-400 should be observed to verify normal operation in the configuration in which it will be used. User s Guide Bovie IDS-400 A-5
51 Recommended separation distances between portable and mobile RF communications equipment and the IDS-400 The IDS-400 is intended for use in an electromagnetic environment in which radiated RF disturbances are controlled. The customer or the user of the IDS-400 can help prevent electromagnetic interference by maintaining a minimum distance between portable and mobile RF communications equipment (transmitters) and the IDS-400 as recommended below, according to the maximum output power of the communications equipment. Rated maximum output power of transmitter W separation distance according to frequency of transmitter 150 khz to 80 MHz d = [ 3.5 ] P V 1 80 MHz to 800 MHz d = [ 3.5 ] P E MHz to 2.5 GHz d = [ 7 ] P E For transmitters rated at a maximum output power not listed above, the recommended separation distance d in metres (m) can be estimated using the equation applicable to the frequency of the transmitter, where P is the maximum output power rating of the transmitter in watts (W) according to the transmitter manufacturer. NOTE 1 At 80 MHz and 800 MHz, the separation distance for the higher frequency range applies. NOTE 2 These guidelines may not apply in all situations. Electromagnetic propagation is affected by absorption and reflection from structures, objects and people. Guidance and manufacturer s declaration electromagnetic emissions The IDS-400 is intended for use in the electromagnetic environment listed below. The customer or the user of the IDS-400 should assure that is is used in such an environment. Emissions test Compliance Electromagnetic environment - guidance RF Emissions CISPR 11 Group 2 The IDS-400 must emit electromagnetic energy in order to perform its intended function. Nearby electronic equipment may be affected. RF Emissions CISPR 11 Harmonic emissions IEC Voltage fluctuations/flicker emissions IEC Class A Class A Complies The IDS-400 is suitable for use in all establishments other than domestic and those directly connected to the public low-voltage power supply network that supplies buildings used in domestic purposes. A-6 Bovie Medical Corporation
52 Guidance and manufacturer s declaration electromagnetic immunity The IDS-400 is intended for use in the electromagnetic environment listed below. The customer or the user of the IDS-400 should assure that is is used in such an environment. Immunity test IEC test level Compliance level Electromagnetic environment - guidance Electrostatic discharge (ESD) IEC ±6 kv contact ±8 kv air ±6 kv contact ±8 kv air Floors should be wood, concrete or ceramic tile. If floors are covered with synthetic material, the relative humidity should be at least 30%. Electrical fast transient/burst IEC ±2 kv for power supply lines ±1 kv for input/output lines ±2 kv for power supply lines ±1 kv for input/output lines Mains power quality should be that of a typical commercial or hospital environment. Surge IEC ±1 kv differential mode ±2 kv common mode ±1 kv differential mode ±2 kv common Mains power quality should be that of a typical commercial or hospital environment. Voltage dips, short interruptions and voltage variations on power supply input lines IEC Power frequency (50/60 Hz) magnetic field IEC <5 % U t (<95 % dip in U t ) for 0.5 cycle <40 % U t (<60 % dip in U t ) for 5 cycles 70 % U t (<30 % dip in U t ) for 25 cycles <5 % U t (>95 % dip in U t ) for 5 sec 3 A/m 3 A/m <5 % U t (<95 % dip in U t ) for 0.5 cycle <40 % U t (<60 % dip in U t ) for 5 cycles 70 % U t (<30 % dip in U t ) for 25 cycles <5 % U t (>95 % dip in U t ) for 5 sec NOTE U t is the a.c. mains voltage prior to application of the test level. Mains power quality should be that of a typical commercial or hospital environment. If the user of the IDS-400 requires continued operation during power mains interruptions, it is recommended that the IDS-400 be powered from an uninterruptible power supply or a battery. Power frequency magnetic fields should be at levels characteristic of a typical location in a typical commercial or hospital environment. User s Guide Bovie IDS-400 A-7
53 Guidance and manufacturer s declaration electromagnetic immunity continued... Immunity test Conducted RF IEC IEC test level 3 Vrms 150 khz to 80 MHz Compliance level 3 Vrms Electromagnetic environment - guidance Portable and mobile RF communications equipment should be used no closer to any part of the IDS-400, including cables, than the recommended separation distance calculated from the equation applicable to the frequency of the transmitter. Recommended separation distance d = [ 3.5 ] P V 1 d = [ 3.5 ] P E 1 80 MHz to 800 MHz Radiated RF IEC V/m 80 MHz to 2.5 GHz 3 V/m d = [ 7 ] P E MHz to 2.5 GHz where P is the maximum output power rating of the transmitter in watts (W) according to the transmitter manufacturer and d is the recommended separation distance in metres (m) Field strengths from fixed RF transmitters, as determined by an electromagnetic site survey, a should be less than the compliance level in each frequency range. b Interference may occur in the vicinity of equipment marked with the following symbol. NOTE 1 At 80 MHz and 800 MHz, the separation distance for the higher frequency range applies. NOTE 2 These guidelines may not apply in all situations. Electromagnetic propagation is affected by absorption and reflection from structures, objects and people. a Field strengths from fixed transmitters, such as base stations for radio (cellular/cordless) telephones and land mobile radios, amateur radio, AM and FM radio broadcast and TV broadcast cannot be predicated theoretically with accuracy. To assess the electromagnetic environment due to fixed RF transmitters, an electromagnetic site survey should be considered. If the measured field strength in the location which the IDS-400 is used exceeds the applicable RF compliance level above, the IDS-400 should be observed to verify normal operation. If abnormal performance is observed, additional measures may be necessary, such as reorienting or relocating the IDS-400. b Over the frequency range 150 khz to 80 MHz, field strengths should be less than [V 1 ] V/m. A-8 Bovie Medical Corporation
54 OUTPUT POWER CURVES Figure A 1 illutstrates the maximum peak voltage available at a given power setting and output mode. Figures A 2 through A 8 illustrate specific output power delivered to a range of load resistances for each mode. Figures A 9 through A 14 illustrate outpput power curves that depict the changes for each mode at specific power settings. Figure A 1 Output power versus voltage for all modes Figure A 2 Output power versus impedance for Cut I mode User s Guide Bovie IDS-400 A-9
55 Figure A 3 Output power versus impedance for Cut II mode Figure A 4 Output power versus impedance for Blend Min mode A-10 Bovie Medical Corporation
56 Figure A 5 Output power vs impedance for Blend Max mode Figure A 6 Output power vs impedance for Pinpoint mode User s Guide Bovie IDS-400 A-11
57 Figure A 7 Output power vs impedance for Spray mode Figure A 8 Output power vs impedance for Bipolar mode A-12 Bovie Medical Corporation
58 Figure A 9 Power setting versus output power for Cut I mode Figure A 10 Power setting versus output power for Cut II mode User s Guide Bovie IDS-400 A-13
59 Figure A 11 Power setting versus output power for Blend (Min and Max) mode Figure A 12 Power setting versus output power for Pinpoint mode A-14 Bovie Medical Corporation
60 Figure A 13 Power setting versus output power for Spray mode Figure A 14 Power setting versus output power for Bipolar mode User s Guide Bovie IDS-400 A-15
61 A-16 Bovie Medical Corporation
62 WARRANTY Bovie Medical Corporation, warrants each product manufactured by it to be free from defects in material and workmanship under normal use and service for the period(s) set forth below. Bovie s obligation under this warranty is limited to the repair or replacement, at its sole option, of any product, or part thereof, which has been returned to it or its Distributor within the applicable time period shown below after delivery of the product to the original purchaser, and which examination discloses, to Bovie s satisfaction, that the product is indeed, defective. This warranty does not apply to any product, or part thereof, which has been repaired or altered outside Bovie s factory in a way so as, in Bovie s judgment, to affect its stability or reliability, or which has been subjected to misuse, neglect, or accident. The warranty periods for Bovie Aaron products are as follows: Electrosurgical Generators: Two years from date of shipment Mounting Fixtures (all models): Two years from date of shipment Footswitches (all models): Ninety days from date of shipment Patient Return Electrodes: Shelf life only as stated on packaging Sterile Single Use Accessories: Only as stated on packaging This warranty is in lieu of all other warranties, express or implied, including without limitation, the warranties of merchantability and fitness for a particular purpose, and of all other obligations or liabilities on the part of Bovie Medical Corporation. User s Guide Bovie IDS-400 B-1
63 Bovie Medical Corporation neither assumes nor authorizes any other person to assume for it any other liability in connection with the sale or use of any of Bovie s products. Notwithstanding any other provision herein or in any other document or communication, Bovie s liability with respect to this agreement and products sold hereunder shall be limited to the aggregate purchase price for the goods sold by Bovie Medical Corporation to the customer. Bovie Medical Corporation disclaims any liability hereunder or elsewhere in connection with the sale of this product, for indirect or consequential damages. This warranty and the rights and obligations hereunder shall be construed under and governed by the laws of the State of Florida, USA. The sole forum for resolving disputes arising under or relating in any way to this warranty is the District Court of the County of Pinellas, State of Florida, USA. Bovie, its dealers, and representatives reserve the right to make changes in equipment built and/or sold by them at any time without incurring any obligation to make the same or similar changes on equipment previously built and/or sold by them. B-2 Bovie Medical Corporation

64
ELECTROSURGICAL GENERATOR USER S GUIDE
 IDS-300 ELECTROSURGICAL GENERATOR ELECTROSURGICAL GENERATOR USER S GUIDE USER S GUIDE User s Guide Bovie IDS-300 i ii Bovie Medical Corporation This manual and the equipment it describes are for use only
User s Guide Aaron 950
 USER S GUIDE User s Guide Aaron 950 i ii Bovie / Aaron Medical This manual and the equipment it describes are for use only by qualified medical professionals trained in the particular technique and surgical
BOVIE SURGI-CENTER PRO. Electrosurgical Generator. User's Guide
 BOVIE SURGI-CENTER PRO Electrosurgical Generator User's Guide USER S GUIDE User s Guide Bovie Surgi-Center PRO i ii Bovie Medical Corporation This manual and the equipment it describes are for use only
User s Guide Aaron 940
 USER S GUIDE User s Guide Aaron 940 1 TABLE OF CONTENTS Introduction...3 Operating Principle...3 Safety...3 Introduction...3 Warnings and Cautions...3 Contraindications...6 Application Specification...6
DERM 941 DERM 942 High-Frequency Desiccators
 DERM 941 DERM 942 High-Frequency Desiccators User s Guide USER S GUIDE User s Guide DERM 941 / 942 1 TABLE OF CONTENTS Introduction...3 Operating Principle...3 Safety...3 Introduction...3 Warnings and
PULSAR Generator Operator s Manual
 PULSAR Generator Operator s Manual Copyright 2012 Medtronic, Inc. All rights reserved. No part of this publication may be reproduced, transmitted, transcribed, stored in retrieval systems, or translated
Crossfire Footswitch. User Guide
 Crossfire Footswitch 0475000100 User Guide Contents Warnings and Cautions... 3 Symbol Glossary... 4 Product Description and Intended Use... 6 System Overview...6 Indications/Contraindications...8 Package
INSTRUCTIONS ESG-400
 INSTRUCTIONS ELECTROSURGICAL GENERATOR ESG-400 USA: CAUTION: Federal Law restricts this device to use by, or on the order of, a physician. Contents i Contents Labels and Symbols... 4 Important Information
Electrosurgery Units (ESU s) and their variants
 and their variants") Electrosurgery Units (ESU s) and their variants Key Points Electrosurgical Units: - typical output frequency of modern ESU s (450-500 khz, but can be up to 5 MHz) higher frequency makes finer cut with
Electrosurgery Units (ESU s) and their variants Key Points Electrosurgical Units: - typical output frequency of modern ESU s (450-500 khz, but can be up to 5 MHz) higher frequency makes finer cut with
Instruction Manual. (English-English)
") Instruction Manual (English-English) Copyright Information 2014 Cynosure, Inc. Cynosure, Ellman and RadioLase are registered trademarks of Cynosure, Inc. Caution Federal law restricts this device to sale
Instruction Manual (English-English) Copyright Information 2014 Cynosure, Inc. Cynosure, Ellman and RadioLase are registered trademarks of Cynosure, Inc. Caution Federal law restricts this device to sale
RAISING THE LEVEL OF PROTECTION IN YOUR ORS
 Outpatient Supplement to www outpatientsurgery.net Surgery R October 2009 Magazine 2009-10 Manager s Guide to Patient Safety RAISING THE LEVEL OF PROTECTION IN YOUR ORS E L E C T R O S U R G E R Y S A
Aquamantys 3 Pump Generator User Guide. Revision F
 User Guide Aquamantys 3 Pump Generator User Guide Revision F Foreword The Aquamantys 3 Pump Generator is for use only by qualified medical personnel properly trained in the use of electrosurgical equipment,
Electrosurgery Units (ESU s) and their variants. D. J. McMahon rev cewood
 and their variants. D. J. McMahon rev cewood") Electrosurgery Units (ESU s) and their variants D. J. McMahon 150107 rev cewood 2017-12-23 Key Points Electrosurgical Units: - typical output frequency of modern ESU s (450-500 khz, but can be up to 5
Electrosurgery Units (ESU s) and their variants D. J. McMahon 150107 rev cewood 2017-12-23 Key Points Electrosurgical Units: - typical output frequency of modern ESU s (450-500 khz, but can be up to 5
Operator s Manual E L E C T R O S U R G I C A L U N I T
 Operator s Manual TM E L E C T R O S U R G I C A L U N I T LIMITED WARRANTY For a period of two years following the date of delivery, CONMED Corporation warrants the CONMED System 5000 Electrosurgical
J-470 ELECTROSURGE. Radio Frequency Electrosurgery Unit. Operation Instructions
 J-470 ELECTROSURGE Radio Frequency Electrosurgery Unit Operation Instructions Power Foot Switch Electrodes ELECTROSURGE J-470 Waveform Mode Intensity Level RF Light Hand Piece Jack Indifferent Plate Jack
Meg1 (with Ligasmart)
") In the name of God OPERATING INSTRUCTIONS Meg1 (with Ligasmart) Electrosurgical Generator Certifications: Thired Edition Electrosurgical Generator Made in IRAN Printed in IRAN Date of issue: JULY 2013
In the name of God OPERATING INSTRUCTIONS Meg1 (with Ligasmart) Electrosurgical Generator Certifications: Thired Edition Electrosurgical Generator Made in IRAN Printed in IRAN Date of issue: JULY 2013
perioperativecpd.com The basics of diathermy
 perioperativecpd.com continuing professional development The basics of diathermy By the perioperativecpd team Introduction Electrosurgery or diathermy is the passage of a high-frequency alternating current
OPERATING MANUAL ELECTROSURGICAL UNIT
 OPERATING MANUAL ELECTROSURGICAL UNIT 2 Operating Manual ARC 350 900-351_IFU_V2.0.0_20221-S0-20140210-EN Contents Contents 1. Using this operating manual... 7 1.1. Revision index... 7 1.2. Validity...
SAVI SCOUT Surgical Guidance System. Console Operation Manual
 SAVI SCOUT Surgical Guidance System Console Operation Manual 2 Copyrights and Trademarks 2016 Cianna Medical, Inc. All rights reserved. Patents pending. Cianna Medical and SAVI are registered trademarks
OPERATING MANUAL ELECTROSURGICAL UNIT
 OPERATING MANUAL ELECTROSURGICAL UNIT BOWA-IFU-11779-ARC400-V2.1.0-S0-EN Operating Manual ARC 400 3 Contents Contents 1. Using this operating manual... 9 1.1. Revision index... 9 1.2. Validity... 9 1.3.
LEEP System 1000 Table of Contents
 38281 Rev. A 10/14 LEEP System 1000 Table of Contents Section Content Page 1. Professional Use Guide................................................... 1 2. System Features........................................................
Crossfire 2 Integrated Resection and Energy System
 Crossfire 2 Integrated Resection and Energy System 0475-100-000 Table of Contents Warnings and Cautions...3 Product Description/Intended Use...6 Indications...7 Contraindications...7 Package Contents...7
What tests should be done?
 Valleylab Force FX periodic testing Electrosurgery The passage of high frequency electrical current through tissue to create a desired clinical effect. 2/7/2009 1 What tests should be done? 1. Output tests
Andy Falconer. Principles of surgical diathermy
 Andy Falconer Principles of surgical diathermy 1 Andy Falconer Principles of surgical diathermy From an Engineer s perspective 2 Surgical Diathermy Uses RF Current to cut tissue or cause coagulation Modes
BAYLIS MEDICAL COMPANY RADIOFREQUENCY PUNCTURE GENERATOR RFP-100A
 BAYLIS MEDICAL COMPANY RADIOFREQUENCY PUNCTURE GENERATOR RFP-100A ENGLISH User s Manual Carefully read all instructions prior to use. Observe all contraindications, warnings and precautions noted in these
Neo Ultrasound Module Manual
 Neo Ultrasound Module Manual Installation Instructions For complete User Operating Instructions, including Cautions, Warnings, Dangers, Indications, and Contraindications, refer to the User s Manuals.
D C 01/2019 3
 D-0117968-C 01/2019 3 4 D-0117968-C 01/2019 Screw Driver Screw Driver Unplug both the Red & Blue connectors. (see above) Place a small flat head screw driver on the small orange tabs and push down while
ELEKTROTOM 610. Operating Instructions. Valid from version 1130
 ELEKTROTOM 60 Operating Instructions Valid from version 30 Contens Page. Introduction 4 2. Routine checks following delivery 5 3. Initial installation 5 4. First usage 5 5. Important notes for safe usage
EXCELL NHP/T. A new step AheAd to the future ELECTROSURGICAL UNITS FOR MONOPOLAR AND BIPOLAR USE ISO ALSA IT ISO
 EXCELL NHP/T ELECTROSURGICAL UNITS FOR MONOPOLAR AND BIPOLAR USE A new step AheAd to the future ISO 9001 9120.ALSA IT - 1231 ISO 13485 9124.ALS2 0051 The units EXCELL NHP/T series are provided with all
ERBE. ERBOTOM ICC 80 / 50 Instruction manual 08.00
 ERBE ERBOTOM ICC 80 / 50 Instruction manual 08.00 ERBOTOM ICC 80 / 50 V 1.X 10122-103, 10122-101 10122-003, 10122-041 Instruction manual 08.00 ISO 9001 EN 46001 All rights to this instruction manual,
MICROWAVE DIATHERMY AND SURGICAL DIATHERMY DIATHERMICS
 MICROWAVE DIATHERMY AND SURGICAL DIATHERMY 1 Microwave diathermy Microwave diathermy uses microwaves to generate heat in the body. It can be used to evenly warm deep tissues without heating the skin. Microwave
Opus 21 s80 Integrated Amplifier Owner's Manual
 Opus 21 s80 Integrated Amplifier Owner's Manual r e s o l u t i o n From all of us at Resolution Audio, thank you for choosing the Opus 21 s80 amplifier. We went to great lengths to design and produce
MINI RECIPROCATING SAW MODEL NO: CRS350M
 CRS350M - Mini Reciprocating saw.fm Page 1 Thursday, November 22, 2012 9:41 AM MINI RECIPROCATING SAW MODEL NO: CRS350M PART NO: 6462550 OPERATION & MAINTENANCE INSTRUCTIONS LS1112 CRS350M - Mini Reciprocating
WRM-10 TM TRANSFORMER WINDING RESISTANCE METER
 WRM-10 TM TRANSFORMER WINDING RESISTANCE METER USER S MANUAL Vanguard Instruments Company, Inc. 1520 S. Hellman Ave. Ontario, California 91761, USA TEL: (909) 923-9390 FAX: (909) 923-9391 June 2009 Revision
ELECTROSURGICAL UNIT ANALYZER
 ELECTROSURGICAL UNIT ANALYZER ESU-2000A USER MANUAL BC BIOMEDICAL ESU-2000A TABLE OF CONTENTS WARNINGS, CAUTIONS, NOTICES... ii DESCRIPTION... 1 OVERVIEW... 2 OPERATING INSTRUCTIONS... 3 MANUAL REVISIONS...
BM VET 80, 120, 140, 180 W
 Special Medical Technology, Ltd. VETERINARY RADIOFREQUENCY Electrosurgical Units SMT BM VET 80, 120, 140, 180 W 1014 Operating Instructions Special Medical Technology, Ltd. CONTENT: 1. INTRODUCTION...4
R-Series R235LS 2-Channel Power Amplifier with Local Source Switching
 R-Series R235LS 2-Channel Power Amplifier with Local Source Switching User s Manual On Off R235LS POWER A MPLIFIER IMPORTANT SAFEGUARDS WARNING TO REDUCE THE RISK OF FIRE OR ELECTRIC SHOCK, DO NOT EXPOSE
plifier D-501 otion Am Tactile M
 Tactile Motion Amplifier D-501 IMPORTANT SAFETY INSTRUCTIONS WARNING: 1. Read and keep these instructions for future reference. 2. Do not use this apparatus near water. 3. Clean only with a dry cloth.
Crossfire Console REF User Guide
 Crossfire Console REF 0475000000 User Guide Contents Warnings and Cautions...3 Symbol Glossary...7 Product Description and Intended Use...9 Indications/Contraindications...10 Package Contents...10 Available
ERBE ERBOTOM ICC 300. Instruction manual 08.00
 ERBE ERBOTOM ICC 300 Instruction manual 08.00 ERBOTOM ICC 300-H V 4.X 10128-070, 10128-077, 10128-306, 10128-075 ERBOTOM ICC 300-E V 4.X 10128-071, 10128-078, 10128-076, 10128-307, 10128-401 Instruction
ALSATOM SU MPC SU 50 MPC SU 100 MPC SU 140 MPC SU 140/D MPC SU 140/BD MPC
 ALSATOM SU MPC SU 50 MPC SU 100 MPC SU 140 MPC SU 140/D MPC SU 140/BD MPC ELECTROSURGICAL UNITS FOR MONOPOLAR AND BIPOLAR SURGERY CE 0051 The ALSATOM MPC system are a new generation of electrosurgical
Emprint Ablation System with Thermosphere Technology
 Emprint Ablation System with Thermosphere Technology Specification Guide + + + = FIELD CONTROL THERMAL CONTROL WAVELENGTH CONTROL THERMOSPHERE TM TECHNOLOGY Product Information REF / SKU Product Length
White Paper: Technology and Clinical Overview of the Genii TouchSoft Coagulator monopolar probe
 White Paper: Technology and Clinical Overview of the Genii TouchSoft Coagulator monopolar probe Prepared by Genii, Inc. St. Paul, MN, January 2012. (Updated April, 2015) All rights reserved. Introduction
MIC MECHANIC 2. Ultra-Simple Battery-Powered Vocal Effects Stompbox with Echo, Reverb and Pitch Correction. User Manual
 MIC MECHANIC 2 Ultra-Simple Battery-Powered Vocal Effects Stompbox with Echo, Reverb and Pitch Correction User Manual 2 MIC MECHANIC 2 User Manual Important Safety Instructions Terminals marked with this
Electrosurgery. KLS Martin ME 102. The compact Electrosurgical Unit with high Capacity
 Electrosurgery KLS Martin ME 102 The compact Electrosurgical Unit with high Capacity The KLS Martin ME 102 is a 100-W class, universally applicable HF electrosurgical unit with excellent cutting and coagulation
INSTRUCTION MANUAL LKG 601 Electrical Safety Analyzer
 INSTRUCTION MANUAL LKG 601 Electrical Safety Analyzer 110 Toledo Street Farmingdale, NY 11735 USA http://www.netech.org 510-USER-Manual Rev3 10/29/2007 Dear User, We appreciate your purchase of the LKG
MINI PARALLEL REMOVER. Instruction Manual
 MINI PARALLEL REMOVER Instruction Manual Thank you for purchasing the FM-2023 mini parallel remover. Please read this manual before operating the FM-2023. Keep this manual readily accessible for reference.
M30 SPOT WELDER INSTRUCTION MANUAL 230V 1PH.
 M30 SPOT WELDER INSTRUCTION MANUAL 230V 1PH. We have the right to improve and update the machine. The picture and the content are just for your reference. IN20808 2017 Chief Automotive Technologies CO9910.4
Connevans.info. DeafEquipment.co.uk. This product may be purchased from Connevans Limited secure online store at
 Connevans.info Solutions to improve the quality of life Offering you choice Helping you choose This product may be purchased from Connevans Limited secure online store at www.deafequipment.co.uk DeafEquipment.co.uk
ROTARY HAMMER OWNER'S MANUAL
 ROTARY HAMMER OWNER'S MANUAL WARNING: Read carefully and understand all INSTRUCTIONS before operating. Failure to follow the safety rules and other basic safety precautions may result in serious personal
IP Series DUAL POWER AMPLIFIERS
 OPERATING INSTRUCTIONS IP Series DUAL POWER AMPLIFIERS IP-600D IP-450D IP-300D TABLE OF CONTENTS 1. SAFETY PRECAUTIONS... 2 2. GENERAL DESCRIPTION... 4 3. FEATURES... 4 4. HANDLING PRECAUTIONS... 4 5.
OPERATION & SERVICE MANUAL FOR FC 110 AC POWER SOURCE
 OPERATION & SERVICE MANUAL FOR FC 100 SERIES AC POWER SOURCE FC 110 AC POWER SOURCE VERSION 1.3, April 2001. copyright reserved. DWG No. FC00001 TABLE OF CONTENTS CHAPTER 1 INTRODUCTION... 1 1.1 GENERAL...
DRAFT. Crossfire 2 REF
 Crossfire 2 REF 0475100000 Contents Warnings and Cautions...3 Product Description/Intended Use...7 Package Contents...8 Available Accessories...8 The Crossfire 2 Console...9 The Crossfire 2 Interface...11
A WORLD OF LISTENING WARNING: TO PREVENT FIRE OR ELECTRIC SHOCK HAZARD, DO NOT EXPOSE THIS PRODUCT TO RAIN OR MOISTURE.
 DDR-3 FM RDS/DAB digital radio A WORLD OF LISTENING THE LIGHTNING FLASH AND ARROW- HEAD WITHIN THE TRIANGLE IS A WARNING SIGN ALERTING YOU OF DANGEROUS VOLTAGE INSIDE THE RADIO. WARNING: TO PREVENT FIRE
Tube Facing Tool.
 www.swagelok.com Tube Facing Tool This manual contains important information for the safe and effective operation of the Swagelok TF72 series tube facing tool. Users should read and understand its contents
Electrosurgery. KLS Martin ME MB 2 SAFETY BY EASY USE
 Electrosurgery KLS Martin ME MB 2 SAFETY BY EASY USE KLS Martin Electrosurgical Unit ME MB 2 m Simple. Perfect. Display Power adjustment under visual control Endo-mode Time-controlled cutting mode enabling
User and Installation Manual. For Tandem Arm and Slim Line Models. Tandem Arm. Slim Line
 Tandem Arm User and Installation Manual For Tandem Arm and Slim Line Models Tandem Arm Slim Line Table of Contents Warnings... 4 Box Contents... 5 Hardware Kits... 6 Parts... 7 Tandem Arm Installation...
Model 5100F. Advanced Test Equipment Rentals ATEC (2832) OWNER S MANUAL RF POWER AMPLIFIER
 OWNER S MANUAL RF POWER AMPLIFIER") Established 1981 Advanced Test Equipment Rentals www.atecorp.com 800-404-ATEC (2832) OWNER S MANUAL Model 5100F RF POWER AMPLIFIER 0.8 2.5 GHz, 25 Watts Ophir RF 5300 Beethoven Street Los Angeles, CA 90066
Established 1981 Advanced Test Equipment Rentals www.atecorp.com 800-404-ATEC (2832) OWNER S MANUAL Model 5100F RF POWER AMPLIFIER 0.8 2.5 GHz, 25 Watts Ophir RF 5300 Beethoven Street Los Angeles, CA 90066
MODEL 3810/2 Line Impedance Stabilization Network
 EMC TEST SYSTEMS FEBRUARY 1996 REV C PN 399197 MODEL 3810/2 Line Impedance Stabilization Network OPERATION MANUAL USA P.O. Box 80589 Austin, Texas 78708-0589 2205 Kramer Lane, Austin, Texas 78758-4047
GFL-1000 User Manual Ground Fault Locator
 GFL-Series User Manual V1.1 GFL-1000 User Manual Ground Fault Locator Contents Contents... 1 1 Declaration of Conformity... 3 2 Introduction... 3 3 Equipment Information... 3 3.1 Safety Precautions...
EPA152/252/502. User Manual.
 EPA152/252/502 User Manual www.audac.eu ADDITIONAL INFORMATION This manual is put together with much care, and is as complete as could be on the publication date. However, updates on the specifications,
Page 1 T O O L S A N D M AT E R I A L S R E Q U I R E D. 1. Screwdriver 2. Carpenter's level 3. Electrical Tape PA R T S L I S T. A.
 T O O L S A N D M AT E R I A L S R E Q U I R E D 1. Screwdriver 2. Carpenter's level 3. Electrical Tape PA R T S L I S T A. Cabinet B. Wood Screw X4 C. Plastic wire connector x3 Page 1 I M P O R TA N T
GT-1050A 2 GHz to 50 GHz Microwave Power Amplifier
 Established 1981 Advanced Test Equipment Rentals www.atecorp.com 800-404-ATEC (2832) Giga-tronics GT-1050A Microwave Power Amplifier GT-1050A 2 GHz to 50 GHz Microwave Power Amplifier Operation Manual
User s Manual. Miniature Passive Probe. IM EN 3rd Edition
 User s Manual Miniature Passive Probe IM 701946-01EN 3rd Edition Thank you for purchasing the miniature passive probe. This miniature passive probe is designed for user s safety and excellent easyto-use
Atomscope PORTABLE VETERINARY X-RAY EQUIPMENT INSTRUCTION MANUAL. Version 1.0
 Atomscope PORTABLE VETERINARY X-RAY EQUIPMENT INSTRUCTION MANUAL Version 1.0 Thank you for purchasing our HFX90V portable veterinary x-ray unit. We are confident that you will be pleased with the radiographs
INSTRUCTION MANUAL LCS TX
 INSTRUCTION MANUAL LCS TX 4 Channel Transmitter LCS1 Single Channel Transmitter Cardio Theater Inc Service 1-800-776-6695 Sales 1-800-CARDIO-1 1 Introduction CONGRATULATIONS on your choice of this product
léìë=on ëpm=fåíéöê~íéç=^ãéäáñáéê lïåéêdë=j~åì~ä êéëçäìíáçå
 léìë=on ëpm=fåíéöê~íéç=^ãéäáñáéê lïåéêdë=j~åì~ä êéëçäìíáçå From all of us at Resolution AV, thank you for choosing the Opus 21 s30 amplifier. We went to great lengths to design and produce an integrated
Application Notes. Electrosurgical Analyzer Primer
 Electrosurgical Analyzer Primer Purpose Scope Overview The purpose is to outline the characteristics of electrosurgical analyzers, describe the challenges of measuring RF power and review the inspection
Installation & Operation Manual SAGA1-K Series Industrial Radio Remote Control
 Installation & Operation Manual SAGA1-K Series Industrial Radio Remote Control Gain Electronic Co. Ltd. Table Of Contents Safety Considerations ------------------------------------------------------------2
HARMONY SINGER 2. Battery-Powered Vocal Effects Stompbox with Guitar-Controlled Harmony, Reverb and Tone. User Manual
 HARMONY SINGER 2 Battery-Powered Vocal Effects Stompbox with Guitar-Controlled Harmony, Reverb and Tone User Manual 2 Harmony Singer 2 User Manual Important Safety Instructions Terminals marked with this
PA8HF power amplifier Operating guide
 PA8HF power amplifier Operating guide Wilcoxon Sensing Technologies 8435 Progress Drive, Frederick, MD 21701, USA Amphenol (Maryland), Inc d/b/a Wilcoxon Sensing Technologies Tel: +1 (301) 330-8811 Tel:
i3speakers LX503 MK2 User Manual
 i3speakers LX503 MK2 User Manual Index Introduction 5 Precautions 6 Safety requirements 6 Caution servicing 7 EC Declaration of Conformity 7 Waste of Electrical and Electronic Equipment (WEEE) 7 Chapter
Important safety instructions
 MMR-88 Version 1 Important safety instructions 1. 2. 3. 4. 5. 6. 7. 8. 9. Please read these instructions carefully. Please keep these instructions for future reference. Heed all warnings Follow all instructions
GCX. Guitar Audio Switcher OWNER S MANUAL
 GCX Guitar Audio Switcher OWNER S MANUAL Please visit our web site at: www.voodoolab.com Copyright 1998 by Digital Music Corporation. This publication is protected by copyright and all rights are reserved.
On-Line Cardio Theater Wireless Digital Transmitter Installation and Instruction Manual
 On-Line Cardio Theater Wireless Digital Transmitter Installation and Instruction Manual Full installation instructions accompany your Cardio Theater equipment order. This On-Line version of our Installation/Instruction
QA-ES III Electrosurgical Analyzer
 QA-ES III Electrosurgical Analyzer Technical Data The QA-ES III Electrosurgical Analyzer simplifies testing to ensure the performance and safety of electrosurgical units. With generator output current
MIXER POWER AMPLIFIER BG-130
 OPERATING INSTRUCTIONS MIXER POWER AMPLIFIER BG-115 BG-130 TO REDUCE THE RISK OF ELECTRICAL SHOCK, DO NOT REMOVE COVER. NO USER SERVICEABLE PARTS INSIDE. REFER SERVICING TO QUALIFIED SERVICE PERSONNEL
Digital Portable Radio
 II TP620 Digital Portable Radio We are very grateful for your purchasing KIRISUN brand two-way radios produced by Kirisun Communications Co., Ltd. We believe KIRISUN two-way radio, which always incorporates
INSTRUCTION MANUAL LKG
 INSTRUCTION MANUAL LKG 610 Electrical Safety Analyzer With 10 ECG Connectors 110 Toledo Street Farmingdale, NY 11735 USA Homepage: www.netech.org Dear User, We appreciate your purchase of the LKG 610 Electrical
Operation Manual. Congratulations on purchasing your high quality AIMS Power pure sine inverter!
 Operation Manual Congratulations on purchasing your high quality AIMS Power pure sine inverter! It is very important that you read and understand this instruction manual completely prior to use. Contained
Big Bang. B B O w n e r s M a n u a l. Power Amplifiers. SpeakerCraft BB2125 POWER ACTIVE PROTECTION L
 Big Bang Power Amplifiers SpeakerCraft BB2125 ACTIVE POWER PROTECTION L R B B 2 1 2 5 O w n e r s M a n u a l SAFETY INSTRUCTIONS APPLICABLE FOR USA, CANADA OR WHERE APPROVED FOR USAGE CAUTION: To reduce
MS8268 HANDHELD DIGITAL MULTIMETER OPERATOR S INSTRUCTION MANUAL
 MS8268 HANDHELD DIGITAL MULTIMETER OPERATOR S INSTRUCTION MANUAL Table of Contents TITLE PAGE 1. GENERAL INSTRUCTIONS 1 1.1 Precaution safety measures 1 1.1.1 Preliminary 1 1.1.2 During use 2 1.1.3 Symbols
HOLE CUTTER SHARPENER ASSEMBLY & SERVICE MANUAL
 HOLE CUTTER SHARPENER ASSEMBLY & SERVICE MANUAL WARNING You must thoroughly read and understand this manual before operating the equipment, paying particular attention to the Warning & Safety instructions.
EPA104/254. User Manual.
 EPA104/254 User Manual www.audac.eu ADDITIONAL INFORMATION This manual is put together with much care, and is as complete as could be on the publication date. However, updates on the specifications, functionality
Series 7 - Adjustable Height Tables
 Page 1 of 22 Series 7 - Adjustable Height Tables Installation Instructions Tools required: #2 Phillips Bit with Extension #2 Square Drive Bit 4mm Hex Drive Bit Series 7 - Adjustable Height Tables Installation
Wilcoxon Research PA8HF power amplifier Operating guide
 Wilcoxon Research PA8HF power amplifier Operating guide Meggitt Sensing Systems 20511 Seneca Meadows Parkway, Germantown MD 20876, USA Meggitt (Maryland), Inc d/b/a Meggitt Sensing Systems 97012 Rev C.1
Nuclear Associates
 Nuclear Associates 07-424 Digital Densitometer II Operators Manual March 2005 Manual No. 112111 Rev. 4 2003, 2005 Fluke Corporation, All rights reserved. Printed U.S.A. All product names are trademarks
INVERTEC 135S, 150S & 170S
 IM2013 04/2016 REV06 INVERTEC 135S, 150S & 170S OPERATOR S MANUAL ENGLISH Lincoln Electric Bester Sp. z o.o. ul. Jana III Sobieskiego 19A, 58-263 Bielawa, Poland www.lincolnelectric.eu I Declaration of
AV30MX-2 Operation Manual
 AV30MX-2 Operation Manual 1 Important safety instructions 1. Please read carefully prior to product installation or operation. 2. Read these instructions. 3. Keep these instructions. 4. Heed all warnings.
RF leakage current in electrosurgical units: Influence of the layout in taking measurements
 Journal of Physics: Conference Series RF leakage current in electrosurgical units: Influence of the layout in taking measurements To cite this article: L Gentile and P Palacios 2007 J. Phys.: Conf. Ser.
troubleshooting LEVEL 1 training
 troubleshooting LEVEL 1 training EQUIPMENT TROUBLESHOOTING GENERATOR ERRORS AND SOLUTIONS? FOOT PEDAL UNRESPONSIVE - Check foot pedal connection and check line for signs of bends and kinks. - Review temperature
QA-ES III Electrosurgical Analyzer
 QA-ES III Electrosurgical Analyzer Technical Data The QA-ES III Electrosurgical Analyzer simplifies testing to ensure the performance and safety of electrosurgical units. With generator output current
Series 7 AdjusTable Height Tables
 Series 7 AdjusTable Height Tables Tools required: #2 Phillips Bit with Extension #2 Square Drive Bit 4mm Hex Drive Bit #3 Phillips Bit If you have a problem, question, or request, call your local dealer,
See Page 8 for Part Numbers
 Amplifier P/N 10023056 Amplifier Kit P/N 10024074 Amplifier RI P/N 10051289 Amplifier RI Kit P/N 10051290 ClearCommand Communications System OPERATING AND MAINTENANCE INSTRUCTIONS Voice Amplifier/Radio
Series Adjustable Height Tables
 Series 7.2 - Adjustable Height Tables Tools required: Power Drill #2 SQUARE DRIVE BIT If you have a problem, question, or request, call your local dealer, or Steelcase Line 1 at 888.STEELCASE (888.783.3522)
DIGITAL MULTIMETER CONTENTS DIGITAL MULTIMETER CONTENTS
 CONTENTS CONTENTS CONTENTS 1. SAFETY INFORMATION...1 1.1 Preliminary...1 1.2 Dos and don ts...2 1.3 Symbols...3 1.4 Precautions...4 2. DESCRIPTION...5 2.1 Names of parts...6 2.2 Switches, buttons and input
FS-7006PA FS-7012PA YA-7000 POWER AMPLIFIERS. AMPLIFIER AUTO SWITCHING MODULE (Optional) OPERATING INSTRUCTIONS
 OPERATING INSTRUCTIONS") OPERATING INSTRUCTIONS POWER AMPLIFIERS AMPLIFIER AUTO SWITCHING MODULE (Optional) FS-7006PA FS-7012PA YA-7000 Thank you for purchasing TOA's Power Amplifiers. Please carefully follow the instructions
OPERATING INSTRUCTIONS POWER AMPLIFIERS AMPLIFIER AUTO SWITCHING MODULE (Optional) FS-7006PA FS-7012PA YA-7000 Thank you for purchasing TOA's Power Amplifiers. Please carefully follow the instructions
ARC 200 HF SURGICAL GENERATOR SIMPLY SAFE
 BOWA-electronic GmbH & Co. KG Heinrich-Hertz-Strasse 4 10 72810 Gomaringen I Germany Phone +49 (0)7072-6002-0 Fax +49 (0)7072-6002-33 info@bowa-medical.com I bowa-medical.com 10757 4 02/09 Printed in Germany
PROFESSIONAL STEREO AMPLIFIERS USER GUIDE
 PROFESSIONAL STEREO AMPLIFIERS USER GUIDE 967/9673 - September 00 - Version.0 ENGLISH Ti SERIES - Professional stereo amplifiers Page Ti SERIES - Professional stereo amplifiers ENGLISH - Safety information
UR200SI / UR200WE ENGLISH
 ENGLISH Hersteller Wörlein GmbH Tel.: +49 9103/71670 Gewerbestrasse 12 Fax.: +49 9103/716712 D 90556 Cadolzburg Email. info@woerlein.com GERMANY Web: www.woerlein.com UR200SI / UR200WE ENVIRONMENTAL PROTECTION