Feb 11 meet-up. Harford County Photography Group
|
|
|
- Bryce Robinson
- 5 years ago
- Views:
Transcription

1 Feb 11 meet-up Harford County Photography Group


2 Announcements Quote of the Month Masters of Photography Edward Curtis Add CLASS to Your Photography Walt Polley $ Raffle Drawing
3 Future HCPG Meetings March 11 Leo Heppner Exposure & Metering Location: Pizza Hut April 8 Les Picker Travel Photography Location: Pizza Hut May 13 Dave Gigliotti Bird Photography Location: Pizza Hut
4 Upcoming show-and-tell Sessions Havre De Grace Public Library Meeting Battelle 1204 Technology Drive Aberdeen, MD Mon, Feb 23 Image Design and Capturing Light Mon, Mar 23 Add CLASS to Your Photography Mon, Apr 27 Exposure and Metering Mon, May 25 Travel Photography???
5 Upcoming Photo Shoots Exposure and Metering Activity:? Location:? Date and time:? between Mar 12 and Apr 26 Meet-up mentors:? Exposure and Metering Activity: Romancing the Chrome Car Show Location: 3722 Norrisville Rd, Jarrettsville, MD Date and time: Saturday, Apr 11, 10:00 to 4:00 Meet-up mentors:?
6 Upcoming Photo Shoots Travel Photography Activity:? Location:? Date and time:? between Apr 9 and May 24 Meet-up mentors:? Travel Photography Activity:? Location:? Date and time:? between Apr 9 and May 24 Meet-up mentors:?

7 Seminars and Educational Opportunities
8 Horizon Photography Summit February 27, 28 and March 1 University of Delaware, Wilmington, DE 16 Pro Photographers - 30 Different Classes Discounts of 10% for 4+ Registrations
9 Lightroom and Photoshop Seminars Hold these Saturday Dates: February 21 April 18 June 20 August 15 HCPG and Harford Community College are working together to design and implement this exciting educational opportunity. Stay Tuned!!!!
10 Upcoming HCPG Training Sessions Lightroom Session 1 Location: Battelle, 1204 Technology Drive Date and time: Sat, Feb 21, 9:00 to 2:30 Cost: $10 per person Bring your computer with Lightroom installed Lightroom Session 2 Location: Battelle, 1204 Technology Drive Date and time: Sat, Apr 18, 9:00 to 2:30 Cost: $10 per person Bring your computer with Lightroom installed

11 Just a Few More Announcements to Listen to

12 February Special Be Our Valentine Pay In Advance and Save Attend all Regular Wednesday Monthly Meetings in 2015 for $25! Pay Tonight and You ll Save In Addition to Saving A Few $$ - You Don t Have to Worry About Paying Each Visit, and You ll Help the Club With Cash Flow!

13 Quote of the Month I think the emotional content is an image s most important element, regardless of the photographic technique. Anne Geddes
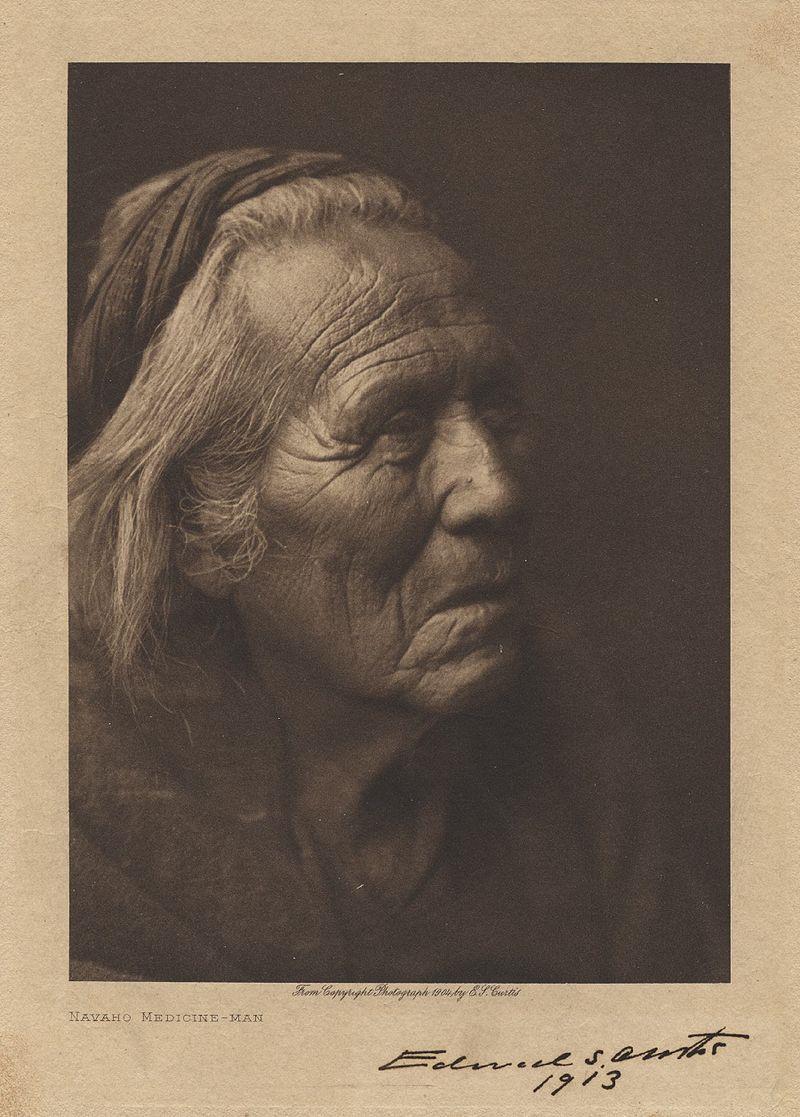
14 Edward Curtis ( ) Masters of Photography

15 Born and raised in the mid-west (Wisconsin and Minnesota) At age 17, Curtis became an apprentice photographer in St. Paul. At age 19 the Curtis family moved to Seattle where Edward purchased a new camera and became a partner in an existing photography studio. He later established his own studio. In 1895, Curtis met and photographed Princess Angeline, the daughter of Chief Sealth of Seattle. This was his first portrait of a Native American. Based in Seattle Curtis became one of the premier portrait photographers in the US.

16 In 1898, three of Curtis images were chosen for an exhibition sponsored by the National Photographic Society.. Also in 1898, while photographing Mt. Ranier, Curtis came upon a small group of scientists, one of whom was an expert on Native Americans. This scientist became interested in Curtis and invited him to join an exhibition to photograph the Blackfeet Indians in Montana in In 1906, J.P. Morgan provided Curtis with $75,000 to produce a series on the North American Indian. The work was to be 20 volumes with 1,500 photographs. Morgan s money was only for fieldwork for the books, not for writing, editing or the production of the volumes. Curtis himself would receive no salary.

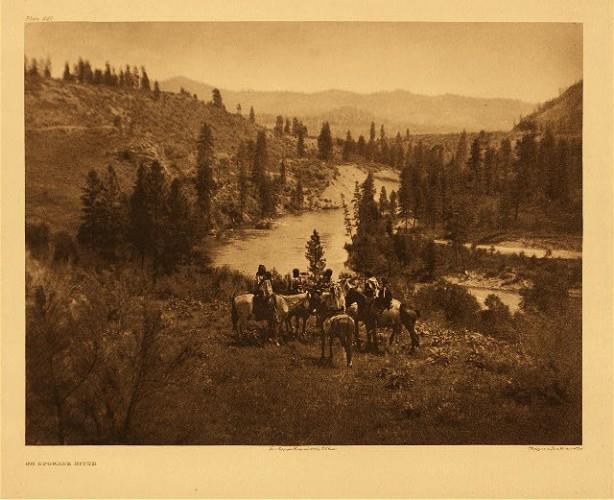
17 This project was to last more than 20 years! 222 complete sets were eventually published. Curtis goal was not just to photograph, but to document, as much American Indian traditional life as possible before that way of life disappeared. He took over 40,000 photographic images from over 80 tribes. Curtis made over 10,000 wax cylinder recordings of Indian language and music.

18 He recorded tribal lore and history, and he described traditional foods, housing, garments, recreation, ceremonies and funeral customs. At the end of 1912 he created a feature film depicting Native American life. Curtis work was a financial failure. He used personal funds and money generated from his studio to fund the project. Around 1922, Curtis moved to Los Angeles and opened a new photo studio. To earn money he worked as an assistant cameraman for Cecil B. DeMille. In 1928, desperate for cash, Curtis sold the rights to the project to J.P. Morgan s son.


19 In 1930 he published the concluding volume of The North American Indian. In total, about 280 sets were sold. In 1935, the Morgan estate sold the rights to Charles E. Lauriat in Boston. Unsold sets were stored in a basement and rediscovered in Curtis died of a heart attack in 1952 in Los Angeles.

20

21

22

23

24

25

26

27
28

29

30
31
 Masters of")
32 Edward Curtis ( ) Masters of Photography
33 Harford County Photography Group February 11, 2015 Add CLASS to Your Photography
34 Add CLASS to Your Photography A catchy way to remember the basics of photography and incorporate these essentials CLASS. Here is what the CLASS catchphrase can remind us of, with each letter as a signifying a key element of photography.
35 Add CLASS to Your Photography C stands for composition. L stands for light. A stands for aperture. S stands for shutter speed. S stands for subject.
36 Add CLASS to Your Photography We will review these five basic elements of photography. Then we will learn four basic steps to analyze your images. Based on this knowledge, we will discuss five steps to quality photographs.
37 C - Stands for composition Composing a picture is something like arranging furniture and decorating a room. When you get everything put in place so that it pleases your eye and is comfortable to you, you know it. When composing a picture, you want to arrange the parts of the picture so that they are pleasing to the eye.
38 C - Stands for composition An old guide for art applies very well to photography: the rule of thirds. It is one of the best ways to improve the overall design and arrangement of picture elements in our photos. What this rule does is divide the picture frame with two horizontal and two vertical lines. The horizontal and vertical lines will intersect in four places.

39 C - Stands for composition The Rule: Place a key point of interest at one of these four intersections. Learning and using it will definitely improve our pictures. There are times when it's ok to ignore the rule. But understanding it will also help us to know when it's ok to ignore it.

40 L - Stands for light Photography is all about the light. There could be no photos without light. Light illuminates the color, contrast, shading and tones, shapes, forms and helps us to give the illusion of depth and distance, adding 3-D effects to a two dimensional image.

41 L - Stands for light We should look for unusual or beautiful light or the great things that light can do to a subject. We can use front lighting, side lighting and back lighting to get different effects.

42 L - Stands for light We should study the light when we look at a scene, indoors or out, and see what the light is doing to it. What is the intensity of the light, its direction, its mood and its color? What can we do to make the light more dramatic or contribute that extra touch to the subject?
43 A - Stands for aperture We control the amount of light coming to the sensor by means of the aperture. One way to have control over the aperture or f/stop is to use Aperture Priority mode. Learning the f/stops will help us to know which of them is appropriate for our purpose. It's like different sizes of garden hoses. If you want more water at once, you need a bigger hose. The size of the hole in the hose determines how much water goes through at one time.
, the smaller the area that will be in focus.")
44 A - Stands for aperture But the aperture does one other thing. It also determines how much of the scene will be in focus. The bigger the aperture (size of the hose), the smaller the area that will be in focus. The smaller the aperture, the more of the subject area will be in focus.
 means more depth of field, so more of the image is in")
45 A - Stands for aperture Here a smaller aperture (like f/11, 16 or 22 for example) means more depth of field, so more of the image is in focus.

46 A - Stands for aperture If you want a narrow DOF to make what's in focus jump out at the viewer against an out of focus background, use the smaller numbers, such as f/2.8, f/4, etc.
47 S - Stands for shutter speed Just as we control the amount of light that comes through the lens with the aperture size, we control how long the flow of the light continues with the shutter speed. The aperture is like the size of the garden hose. The shutter speed is like the length of time you run the water. Shutter speeds are similar to aperture settings in that the higher the shutter speed, the less light flows because the exposure time is less.

48 S - Stands for shutter speed If you want the picture to be tack sharp, you can control that with a fast shutter speed.
49 S - Stands for shutter speed If you want some blur to suggest motion you can get that by control of the shutter speed too, by using a slower speed.
50 S - Stands for subject The subject you choose and how you present it can make or break a photograph. One way to get images that grab the attention of the viewer is to look for what interests you or attracts you. Then analyze why you were drawn to the subject. What was it about it that drew you to it? Was it the way the light hits it? Is it something unique about the object, its shape, colors, or beauty?

51 S - Stands for subject When you have determined the center of interest, what it is that interests or attracts you, then you know what to highlight or emphasize in the picture. Analyze how to photograph the subject in such a way that you convey that interest or appeal to others who view it.

52 S - Stands for subject Creating a photograph often is a process of elimination. You eliminate elements in the picture frame, or other distractions until what is left all contributes to the picture you want. This process of elimination and organization, of changing one's point of view, of emphasizing the key interest and making it stand out from all the rest, can add CLASS to your photographs
 Study the composition Are there pleasing arrangements of picture elements?")
53 Four Basic Steps To Analyze Your Images Check technical execution Did you use the proper camera settings? Is the photo properly exposed? Is it sharply focused? (Unless soft focus is part of the photo's purpose) Study the composition Are there pleasing arrangements of picture elements? Did you use leading lines Were distractions eliminated?

54 Four Basic Steps To Analyze Your Images Review the picture's concept What was your photo idea? Is it unique or is it ordinary? Does it reflect originality? Determine the impact Did it capture attention? Does it show bold visual design?
55 Five Easy Steps To Quality Photographs 1) Determine The Center Of Interest 2) Isolate The Subject 3) Study The Composition 4) Set Up The Shot 5) Create The Picture
56 1) Determine The Center Of Interest Attraction To make quality photographs, you need to respond to what attracts you, what draws you and brings out feelings and emotions. Take time to analyze the subject and find out what interests you about it.
57 1) Determine The Center Of Interest Interest What got your attention? What is the attraction? What is it that interests you about it? Why does it interest you? What is your main focus? Does it demand attention? What is most appealing about it? Does it stir your emotions?
58 1) Determine The Center Of Interest Message When a subject attracts your attention and you become interested, that object has conveyed some message to you. The message is read by your thoughts or emotions, and you respond to it. What is the message with this object? How did it relate to me? Did it cause me to reminisce about the past? Did it stir emotions - such as beauty, sadness, joy, or love? If you cause others to think and feel, you succeeded.
59 1) Determine The Center Of Interest Importance We have all seen photos that really aren't very good, photos that make us wonder why they were made. It may be that the picture reminds the maker of the events associated with it. There is nothing in the picture of value, we just remember when it was taken, an occasion we remember fondly. In this case, the photo likely has little importance to others.
60 1) Determine The Center Of Interest Practical Exercise. Take a walk without your camera. Use a view frame to practice seeing pictures. Take a notebook with you. When something attracts your attention, pause and reflect. Determine what it is that got your attention. What is the attraction? Is it a mood, lighting, beauty, message, or the memories it instills? Write down your thoughts on the following points: Attraction - What is attracting you? Interest - Why does it interest you? Message - Is there a message, what is it? Importance - Would it be important to others? Do this at least five times, stopping to analyze objects that capture your attention. Take good notes. Use these notes later when you go out with your camera. Refer to them and use them to make a photograph of the object of interest.
61 Practical Exercise #1 Attraction What is attracting you? Interest Why does it interest you? Message Is there a message? What is it? Importance Would it be important to others?
62 My Solution PE #1 Attraction - What is attracting you? Jack in the Pulpit Interest - Why does it interest you? Wonderful purple and greens Sometimes hard to find First ones of the year Message - Is there a message; what is it? Beauty and Peace Importance - Would it be important to others? Delicate beauty and restful peace are found in nature
63 2) Isolate The Subject The subject The object of interest is the subject for your photograph. The center of interest drew your attention and held your interest as you analyzed it. It is what you want to draw the viewer's attention to and cause them to respond in the way you did. All of the things that compete for visual attention make it difficult to concentrate on an object that interests us. They cause us to overlook distractions that might affect our picture.
64 2) Isolate The Subject The subject Isolating the subject from all the distractions helps your image communicate its message. It will focus all the attention where you want it to be. The photo needs to isolate the subject and present it clearly. There are three key elements of isolating the subject center of interest, setting it apart, and placement in the picture frame.
65 2) Isolate The Subject Center Of Interest What makes up the center of interest? Having your subject clearly in mind will help you center your attention on the subject and also recognize what should not be there. It will help if you can verbalize it or write it down. If you can explain it, you can present it in a picture.
66 2) Isolate The Subject Setting It Apart How can I best isolate the subject and set it apart from other subjects? There are a variety of ways to isolate the subject you can frame it with foreground objects, you can lead the eye to it with graceful lines use contrast and colors, or other means of separating it from other picture elements. Use other elements to center attention on your subject. Cause the subject to stand out from the rest of the image.
67 2) Isolate The Subject Placement In The Frame Where you place the subject in the picture frame will affect how well it stands out. Consider using the 'Rule of Thirds' for placing the subject in the frame. If you place the center of interest at an intersection of the lines within the frame, it will be more attractive to the viewer. When the subject is on one side or the other and facing inward, the photo with be more dynamic and imply action. You are free to break the rules when it would provide more impact.
68 2) Isolate The Subject Practical Exercise. Open your notebook and review the five subjects you recorded. Take your camera and return to the same location. Walk around each object of interest. Look through your camera's viewfinder and notice how other objects that compete for attention. Move around or forward and back to see changes in your perspective. Record the following information: Center Of Interest - Focus on the subject How To Isolate The Subject - How can I make it stand out? Placement In The Frame - Where should I place the subject? Write an explanation for each of the five subjects in such a way that a novice photographer could understand you and be helped to isolate the subject. The goal of this exercise is to slow down and think about what you would do to make a good picture.
69 Practical Exercise #2 Center Of Interest How can I focus on the subject? Isolate The Subject How can I make it stand out? Placement In The Frame Where should I place the subject?
70 My Solution PE #2 Center Of Interest Focus on the plant Move closer Get on the ground How To Isolate The Subject Control the light Cause shadows in the background Placement In The Frame Right side of frame Full curve of the cap
71 3) Study The Composition Composition A pleasing arrangement of the elements of a picture. Study the object of interest. Consider how you can arrange a photograph that will focus on that subject, with all the elements working together. We all respond to an object of interest. It may be the beauty of lines, shapes and color, or dramatic lighting. We naturally react to what attracts us. We can use this reaction to analyze, isolate and design our photograph. An artist must have a picture in their mind before it can be put on canvas.
72 3) Study The Composition Center Of Interest Every picture must have a center of interest, the object everything else focuses on. The center of interest should dominate the scene. It should convey a simple message. If it is too complicated, it will confuse and, perhaps, put off its viewers. The key word is simplicity, unless your message intends to convey clutter and confusion. Let the message determine design.
73 3) Study The Composition Elements Of Composition All of the elements of the picture should work together, should be harmonious. Anything that is distracting or breaks up the harmony should be eliminated. Take time to study the composition. Look at all parts of the frame. Don't overlook what is at the top or corners of the picture. Sometimes, if we don't look closely, we can overlook what doesn't belong.
74 3) Study The Composition Foreground And Background Objects During your study of the composition, look closely at foreground and background objects. Do they add to the structure? Are you using foreground objects to direct attention to the subject, or to frame it? Does the background contribute or distract? If a distraction, what can you do to eliminate it? Can you throw it out of focus, or change your position?
75 3) Study The Composition Compositional Balance How does the picture fit together? Are all the elements of the composition balanced with each other? Are other elements secondary to the principle center of interest? Balance does not mean placing the subject in the center and other objects surrounding it. Place the subject off center, where it will create visual tension. Break up the composition with lines, shapes and forms.
76 3) Study The Composition Framing The Subject Often, foreground objects can be used to frame the subject and draw attention to it. An overhanging tree, a door frame, a window; anything can be used to frame the center of interest.
77 3) Study The Composition Lead the Eye to the Center Of Interest When viewing a photo, the eye should be led toward the subject. You can use lines to give direction, such as an angled walkway, a curved road or a winding river. Use something that will lead the viewer into the picture.
78 3) Study The Composition Practical Exercise. Revisit the five objects of interest with your framing tool and use it to analyze your subject. Determine the best composition for your photo. Then carefully set your camera for making that very composition. When you see in your viewfinder what you pictured through your framing tool, make the image. Put your finished prints from this exercise and the previous exercise in your notebook and compare them. Do you see a difference? Are these photos better than your previous attempts? If you see improvement, you are making progress. If not, don't be discouraged. The more you put into this process, the more you will get from it. Practice makes perfect. Your photographic skills will improve only by practice. Make pictures as frequently as you can.

79 My Solution PE #3 Determine the best composition for your photo. Then carefully set your camera for making that very composition.
80 4) Set Up The Shot Location, Angle and Framing Where should locate myself for the best viewpoint? What is the best position for the best angle of view? Should I stand, sit, lie down or get in some other position? What kind of framing to use? What would get the right mood, lighting, and composition? What about time of day? What other considerations will affect the quality of the image?
81 4) Set Up The Shot Eliminate Distractions What should be eliminated? What distracts? How can I best eliminate them? Consider changing your position, lens or viewing angle
82 4) Set Up The Shot Study and Control the Lighting What is the direction and intensity of the light? What is the quality of the light? Is it suitable to the subject? Is there too much contrast? How do I control it? How do I create the mood I want? What time of day would work best?
83 4) Set Up The Shot Determine the Exposure Select the aperture for the desired depth of field Choose the shutter speed to control movement Place desired filters on the lens Adjust the ISO as required Steady the camera
84 Practical Exercise #4 Location, Angle and Framing What is the best angle of view? What kind of framing to use? What mood, lighting, and composition? What other considerations? Eliminate Distractions What distracts? How can I best eliminate them? Study and Control the Lighting What is the direction, intensity and quality of the light? How do I control it? How do I create the mood? Determine the Exposure What aperture for the desired depth of field? What shutter speed to control movement? What ISO?


85 My Solution PE #4 Select a wide aperture for shallow depth of field Placed my jacket to shade the background Used a gold reflector to bounce light onto Jack
86 5) Create The Picture The decision to trip the shutter and make the exposure is very important. Re-study your subject, composition, lighting and settings and make sure all contribute to your message. What are you trying to say? Is it a message that this is a thing of beauty? Is it an expression of interest, concern or love?
87 5) Create The Picture Timing is everything. Be ready for the right moment. It might be an expression, an action, quality of light, mood, or other message to present. Remember your audience will others appreciate and enjoy your creation?

88 Most of the work and creativity should be finished before the shutter button is pushed. Post processing is the last step. Post Processing
89 Summary When you see something good you have done, find joy in your success. This will give you confidence that you can do it again. Don't be afraid to shoot often, making a lot of pictures. This will help you to see where you are good and where you can improve. As your creative eye improves, share your work with others. Photography Should Be Fun!
90 Credits I am deeply indebted to Vern Rogers (fotabug) for graciously allowing me to use and arrange his photography workshop for this presentation.
91 Wrap-up Next show-and tell Mon, Feb 23, 6:30 pm Holiday Images (snowed out Jan) Composition and Light Next Meet-up Wed, Mar 11, 6:30 pm Exposure and Metering by Leo Heppner Lightroom and Photoshop training handouts 50/50 raffle
Travel & Landscapes. Introduction
 Introduction Landscape photography captures the natural environment, but can also include man made features within that environment. A striking and breathtaking landscape image will appeal to all our senses
Capturing The Beauty of God s Creation Through The Lens Session 2 Building Your Craft January 14, 2013
 Capturing The Beauty of God s Creation Through The Lens Session 2 Building Your Craft January 14, 2013 Donald Jin donjin@comcast.net Course Overview Jan 6 Setting The Foundation Jan 13 Building Your Craft
SS 0507 PRINCIPLES OF PHOTOGRAPHY
 SUBCOURSE SS 0507 PRINCIPLES OF PHOTOGRAPHY EDITION 6 Lesson 4/Learning Event 1 LESSON 4 APPLY THE BASICS OF COMPOSITION TASK Define and state the theory and application of composing the elements of a
Intro to Digital Compositions: Week One Physical Design
 Instructor: Roger Buchanan Intro to Digital Compositions: Week One Physical Design Your notes are available at: www.thenerdworks.com Please be sure to charge your camera battery, and bring spares if possible.
capture presents, paper, and ribbon
 Capture Your Holidays with Katrina Kennedy LESSON 4 capture presents, paper, and ribbon LESSON #4 OBJECTIVES: At the end of this lesson you will be able to: Create well composed present, paper, and ribbon
Seniors Photography Workshop
 Seniors Photography Workshop Some images stand out from the crowd & make viewers say WOW! Today we will look at how you can give your images that WOW Factor.. So let s think about what makes an
Name Digital Imaging I Chapters 9 12 Review Material
 Name Digital Imaging I Chapters 9 12 Review Material Chapter 9 Filters A filter is a glass or plastic lens attachment that you put on the front of your lens to protect the lens or alter the image as you
Illustrated Lecture Series;
 Presents Illustrated Lecture Series; Understanding Photography Photo Basics: Exposure Modes, DOF and using Shutter Speed Exposure; the basics We have seen that film and digital CCD sensors both react to
Photographer s Handbook. Event Edition
 Photographer s Handbook Event Edition Content 1.0 Events 1.1 Corporate 1.2.0 Birthdays 1.2.1 Kids Party 1.2.2 Adults Party 1.3 Dinner & Dance 1.4 PA and Government 2.0 Terms and Conditions 2.1 For Clients
Tips for Digital Photographers
 Choosing and Introduction to and (f-stop) Two basic controls change how much light hits the sensor in your camera: shutter speed and f-stop. Shutter speed affects how long light is allowed into the camera
PHIL MORGAN PHOTOGRAPHY
 Including: Creative shooting Manual mode Editing PHIL MORGAN PHOTOGRAPHY A free e-book to help you get the most from your camera. Many photographers begin with the naïve idea of instantly making money
Mastering Y our Your Digital Camera
 Mastering Your Digital Camera The Exposure Triangle The ISO setting on your camera defines how sensitive it is to light. Normally ISO 100 is the least sensitive setting on your camera and as the ISO numbers
The Basic SLR
 The Basic SLR ISO Aperture Shutter Speed Aperture The lens lets in light. The aperture is located in the lens and is a set of leaf like piece of metal that can change the size of the hole that lets in
Buxton & District U3A Digital Photography Beginners Group
 U3A Group Lesson 7: Controlling exposure / focal length / perspective / composition for a better picture & Taking Pictures of people 3 December 2013 Programme Buxton & District 19 September Exploring your
An Introduction to. Photographic Exposure: Aperture, ISO and Shutter Speed
 An Introduction to Photographic Exposure: Aperture, ISO and Shutter Speed EXPOSURE Exposure relates to light and how it enters and interacts with the camera. Too much light Too little light EXPOSURE The
A New Perspective: Photography in the Digital Age
 A New Perspective: Photography in the Digital Age Anyone who fails to understand PHOTOGRAPHY. Will be one of the ILLITERATES of the future. László Moholy-Nagy Henri Cartier-Bresson Session Goals 1. Take
mastering manual week one
 THE PURPOSE OF THIS WORKSHOP IS TO PUT THE POWER AND CONTROL OF THE CAMERA INTO YOUR OWN HANDS. When we shoot in automatic, we are at the mercy of the camera s judgment and decisions. Learning the techniques
Film Cameras Digital SLR Cameras Point and Shoot Bridge Compact Mirror less
 Film Cameras Digital SLR Cameras Point and Shoot Bridge Compact Mirror less Portraits Landscapes Macro Sports Wildlife Architecture Fashion Live Music Travel Street Weddings Kids Food CAMERA SENSOR
Digital Photography by Mark Gillan
 Digital Photography by Mark Gillan Leading lines can draw the eye to certain points within an image Lines can add interest Carefully positioned with other lines can take the eye into and around an image
Slide 5 So what do good photos do? They can illustrate the story, showing the viewer who or what the story is about.
 Script: Photojournalism Faculty Member: Mark Hinojosa Slide 2 Photojournalism is the art and practice of telling stories with images. A good photo captures the attention of the viewer and holds it. These
To start there are three key properties that you need to understand: ISO (sensitivity)
") Some Photo Fundamentals Photography is at once relatively simple and technically confusing at the same time. The camera is basically a black box with a hole in its side camera comes from camera obscura,
Some Photo Fundamentals Photography is at once relatively simple and technically confusing at the same time. The camera is basically a black box with a hole in its side camera comes from camera obscura,
Digital Imaging Study Questions Chapter 10 /100 Total Points Homework Grade
 Name: Class: Date: Digital Imaging Study Questions Chapter 10 _/100 Total Points Homework Grade True/False Indicate whether the sentence or statement is true or false. 1. In the early days of photography
Photography 2. how to be a BETTER photographer
 Photography 2 how to be a BETTER photographer Layering In story-telling through Photo-Journalism, secondary elements add to your story-telling power. FOREGROUND ELEMENTS BACKGROUND ELEMENTS Angle Shooting
Take Better Portraits
 SEPTEMBER 4, 2018 BEGINNER Take Better Portraits Learn the elements of a good portrait photograph Featuring GARY SMALL It can't be that difficult, right? Your friend/spouse/child asks you to take his/her
Kent Messamore 3/12/2010
 Photo Composition Kent Messamore 3/12/2010 Composition Choosing a Subject Quality of Light Framing the Image Depth of Field Backgrounds and Foregrounds Viewpoint Leading Lines Contrasts Patterns Negative
Love Your Camera (Introduction to D-SLR)
") Love Your Camera (Introduction to D-SLR) Photography Workshops and Tours in New York City Phone: (646) 736-3231 Email: info@rememberforever.co Web: www.rememberforever.co Copyright 2009-2013 - Remember
Love Your Camera (Introduction to D-SLR) Photography Workshops and Tours in New York City Phone: (646) 736-3231 Email: info@rememberforever.co Web: www.rememberforever.co Copyright 2009-2013 - Remember
As can be seen in the example pictures below showing over exposure (too much light) to under exposure (too little light):
 to under exposure (too little light):") Hopefully after we are done with this you will resist any temptations you may have to use the automatic settings provided by your camera. Once you understand exposure, especially f-stops and shutter speeds,
Hopefully after we are done with this you will resist any temptations you may have to use the automatic settings provided by your camera. Once you understand exposure, especially f-stops and shutter speeds,
01 High-Key SIMPLE SOULFUL SENSATIONAL CHILDRENS PHOTOGRAPHY. Black-and-White Children s Portraiture
 SIMPLE SOULFUL SENSATIONAL CHILDRENS PHOTOGRAPHY SHOOTING BEAUTIFUL IMAGERY WITH NATURAL LIGHT 01 High-Key Black-and-White Children s Portraiture dennisguichardphotography High-impact Architectural Photography
Red. By Jessica Lia BREAKFAST STOCK CLUB PREMIUM CHALLENGE #85
 S E Q U O I A C L U B BREAKFAST STOCK CLUB PREMIUM CHALLENGE #85 Red By Jessica Lia As a stock photographer, it s a ritual for me to shoot something for Christmas and Valentine s Day every year because
Composition: the most important factor in creating a successful photograph and developing a personal style.
 Digital Photography Composition: the most important factor in creating a successful photograph and developing a personal style. What is Composition? Composition is the start of the photographic process
surround us. We are breaking them into the components that create beautiful images.
 Pondering Practice I place my mat. I arrange my water bottle, block, and towel. Today is about this practice. Today is about the series of breaths I will take and poses I will practice. The collection
Moving Beyond Automatic Mode
 Moving Beyond Automatic Mode When most people start digital photography, they almost always leave the camera on Automatic Mode This makes all the decisions for them and they believe this will give the
H Photography Judging Leader s Guide
 2019-2020 4-H Photography Judging Leader s Guide The photography judging contest is an opportunity for 4-H photography project members to demonstrate the skills and knowledge they have learned in the photography
capture outside Capture Your Holidays with Katrina Kennedy It s cold outside! I m sitting At the end of this lesson you will be able to:
 Capture Your Holidays with Katrina Kennedy LESSON 6 capture outside LESSON 6 OBJECTIVES: At the end of this lesson you will be able to: Photograph outdoor light displays. Expose correctly in a snowy scene.
U N I T 3 ~ PA R T 2. Developed by Sonia Coile, Madison County HS ~ Jan 2016
 DIGITAL PHOTOGRAPHY U N I T 3 ~ PA R T 2 WHY DIGITAL PHOTOGRAPHY? Now that you know how to use Photoshop, we need to brush up on your photography skills. At the end of this part of the unit, you will put
* When the subject is horizontal When your subject is wider than it is tall, a horizontal image compliments the subject.
 Digital Photography: Beyond Point & Click March 2011 http://www.photography-basics.com/category/composition/ & http://asp.photo.free.fr/geoff_lawrence.htm In our modern world of automatic cameras, which
Communication Graphics Basic Vocabulary
 Communication Graphics Basic Vocabulary Aperture: The size of the lens opening through which light passes, commonly known as f-stop. The aperture controls the volume of light that is allowed to reach the
How to take photographs
 SCHOOL PROMOTIONS UNIT How to take photographs A quick guide to help you set up and take great photos of the students and activities at your high school Contents Glossary 4-5 Composition 4 Equipment 4
Photography Basics. The Media Co-op. An introduction to taking great photographs - print edition
 Photography Basics An introduction to taking great photographs - print edition For anyone who has little or no photographic experience and wants to take photographs for journalistic, activist or documentary
About Me. Randolph Community College Two year degree in Portrait and Studio Management Portraits, Wedding, Events Landscapes with boats - favorite
 About Me Randolph Community College Two year degree in Portrait and Studio Management Portraits, Wedding, Events Landscapes with boats - favorite Things Forgotten Check camera settings before each session
Reasons To Capture Motion
 3 2 1.ACTION! Reasons To Capture Motion Beginning photographers have likely seen captivating photographs that capture motion which they d like to duplicate. There are several ways to accomplish this and
Photography. Taking better photos
 Photography Taking better photos Composition Composition is the arrangement of the visual elements of the photograph, such as Geometric elements, such as lines, shapes, and curves Contrasts of tone, color,
FOCUS, EXPOSURE (& METERING) BVCC May 2018
 BVCC May 2018") FOCUS, EXPOSURE (& METERING) BVCC May 2018 SUMMARY Metering in digital cameras. Metering modes. Exposure, quick recap. Exposure settings and modes. Focus system(s) and camera controls. Challenges & Experiments.
FOCUS, EXPOSURE (& METERING) BVCC May 2018 SUMMARY Metering in digital cameras. Metering modes. Exposure, quick recap. Exposure settings and modes. Focus system(s) and camera controls. Challenges & Experiments.
PHOTOGRAPHY Mohamed Nuzrath [MBCS]
![PHOTOGRAPHY Mohamed Nuzrath [MBCS]](/thumbs/80/82228500.jpg "PHOTOGRAPHY Mohamed Nuzrath [MBCS]") PHOTOGRAPHY Mohamed Nuzrath [MBCS] Coordinator HND IT / Senior Lecturer IT BCAS Kandy Campus Freelance Photographer Freelance Web/Software Developer PHOTOGRAPHY PHOTO - Light GRAPHY Drawing PHOTOGRAPHY
PHOTOGRAPHY Mohamed Nuzrath [MBCS] Coordinator HND IT / Senior Lecturer IT BCAS Kandy Campus Freelance Photographer Freelance Web/Software Developer PHOTOGRAPHY PHOTO - Light GRAPHY Drawing PHOTOGRAPHY
Intro to Photography. Yearbook Mrs. Townsend
 Intro to Photography Yearbook Mrs. Townsend To begin with Photography is about telling a story. Good photographers use an image to make a point without words. People remember pictures of events long after
capture the tree Capture Your Holidays with Katrina Kennedy
 Capture Your Holidays with Katrina Kennedy LESSON 2 capture the tree LESSON 2 OBJECTIVES: At the end of this lesson you will be able to: Create a photo of your Christmas tree using a slow shutter speed.
THE PHOTOGRAPHER S GUIDE TO DEPTH OF FIELD
 THE PHOTOGRAPHER S GUIDE TO DEPTH OF FIELD A Light Stalking Short Guide Cover Image Credit: Thomas Rey WHAT IS DEPTH OF FIELD? P hotography can be a simple form of art but at the core is a complex set
UNDERSTANDING MACRO PHOTOGRAPHY
 VITAL UNDERSTANDING MACRO PHOTOGRAPHY Beyond the Basics Mahmood Anwar Understanding macro photography There are so many things in our world you want to get close to and photograph. Find out how to set
Photography for the Lighting Designer
 Photography for the Lighting Designer Lighting designers not only have the challenge of creating emotion, space, motion, and a pretty image but we also have the challenge of selling our services to the
PHOTOGRAPHING THE ELEMENTS
 PHOTOGRAPHING THE ELEMENTS PHIL MORGAN FOR SOUTH WEST STORM CHASERS CONTENTS: The basics of exposure: Page 3 ISO: Page 3 Aperture (with examples): Pages 4-7 Shutter speed: Pages 8-9 Exposure overview:
BLACK CAT PHOTOGRAPHIC RULES-OF- THUMB
 Page 1 of 5 BLACK CAT PHOTOGRAPHIC RULES-OF- THUMB These 50+ photo-cyber-tips are meant to be shared and passed along. Rules-of-thumb are a kind of tool. They help identify a problem or situation. They
To do this, the lens itself had to be set to viewing mode so light passed through just as it does when making the
 CHAPTER 4 - EXPOSURE In the last chapter, we mentioned fast shutter speeds and moderate apertures. Shutter speed and aperture are 2 of only 3 settings that are required to make a photographic exposure.
EXPOSURE Light and the Camera
 EXPOSURE Light and the Camera EXPOSURE OVER EXPOSURE = TOO MUCH LIGHT is hitting the sensor UNDER EXPOSURE = NOT ENOUGH LIGHT is hitting the sensor Exposure (the amount of light hitting the sensor)
Abstract & Creative Landscapes Using Intentional Camera Movement. with Stephanie Johnson
 Abstract & Creative Landscapes Using Intentional Camera Movement with Stephanie Johnson Seeing Things Differently Beyond Form Abstract photographic images, created through the applied use of ICM, show
H Photography Judging Leader s Guide
 2017-2018 4-H Photography Judging Leader s Guide The photography judging contest is an opportunity for 4-H photography project members to demonstrate the skills and knowledge they have learned in the photography
COMPOSING YOUR PHOTOGRAPH
 Your photograph should do two things: it must please you and it must communicate your story to the viewer. So how can we do this? Seize the moment. Find a subject that captures your soul, visually explore
capture food & drink Capture Your Holidays with Katrina Kennedy It wouldn t be the holidays without yummy cookies,
 Capture Your Holidays with Katrina Kennedy LESSON 5 capture food & drink All images and lesson content 2014 Katrina Kennedy. All rights reserved. LESSON 5 OBJECTIVES: At the end of this lesson you will
Digital Photography for Rail Fans By David King
 Digital Photography for Rail Fans By David King A Little History The world of digital has affected almost everything thing that we use in today s world and that is very true in photography. Over a hundred
Elements of Exposure
 Elements of Exposure Exposure refers to the amount of light and the duration of time that light is allowed to expose film or a digital-imaging sensor. Exposure is controlled by f-stop, shutter speed, and
Pictures are visual poems, the greatest of which are those that move us the way the photographer was moved when he clicked the shutter.
 VISION IN PHOTOGRAPHY By Deb Evans, 2011 vi sion noun 2. the act or power of anticipating that which will or may come to be Vision is the beginning and end of photography. It is what moves you to pick
Comparison of the diameter of different f/stops.
 LESSON 2 HANDOUT INTRODUCTION TO PHOTOGRAPHY Summer Session 2009 SHUTTER SPEED, ISO, APERTURE What is exposure? Exposure is a combination of 3 factors which determine the amount of light which enters your
Capturing God s Creation Through The Lens. Session 3 From Snap Shots to Great Shots January 20, 2013 Donald Jin
 Capturing God s Creation Through The Lens Session 3 From Snap Shots to Great Shots January 20, 2013 Donald Jin donjin@comcast.net Course Overview Jan 6 Setting The Foundation Jan 13 Building Your Craft
Pinhole Photography. Martin Henson Photography
 Over the last year or so I have been doing more and more pinhole photography than any other type. I have in my collection of cameras 35mm to 4x5 sheet film, the lens are among some of the best, a Zeiss
who are the CREATIVE PEOPLE?
 who are the CREATIVE PEOPLE? Every child is an artist. The problem is how to remain an artist once he grows up. Pablo Picasso We all begin our lives as creatives! Somehow life gets in the way. understanding
Camera controls. Aperture Priority, Shutter Priority & Manual
 Camera controls Aperture Priority, Shutter Priority & Manual Aperture Priority In aperture priority mode, the camera automatically selects the shutter speed while you select the f-stop, f remember the
aperture, shutter speed
 CUDGEGONG C A M E R A C L U B aperture, shutter speed and ISO exposure When you think of the craft or art of photography, you must immediately think of exposure. Exposure is a critical element that determines
Until now, I have discussed the basics of setting
 Chapter 3: Shooting Modes for Still Images Until now, I have discussed the basics of setting up the camera for quick shots, using Intelligent Auto mode to take pictures with settings controlled mostly
Understanding Auto ISO
 FEBRUARY 16, 2018 BEGINNER Understanding Auto ISO Changing ISO on the fly Featuring DIANE BERKENFELD Diane Berkenfeld COOLPIX P510, 1/1000 sec., f/3.1, ISO 100, matrix metering, program. A photographic
TABLETOP WORKSHOP. Janet Steyer
 QUALITIES OF LIGHT There are 6 qualities of light. TABLETOP WORKSHOP Janet Steyer 03-19-05 The first 3 QUALITIES OF LIGHT can be measured. They can also be manipulated after a photograph is taken. You
Educate me! Education Images as Stock. By Andrea Gingerich. As Benjamin Franklin once said, An investment in knowledge pays the best interest.
 Educate me! S E Q U O I A CBREAKFAST L U B STOCK CLUB PREMIUM CHALLENGE #40 By Andrea Gingerich As Benjamin Franklin once said, An investment in knowledge pays the best interest. The same rule applies
Advanced Photography. Topic 3 - Exposure: Flash Photography Tricks
 Topic 3 - Exposure: Flash Photography Tricks Learning Outcomes In this lesson, we will learn about a number of ways (e.g. bouncing the light, the TTL mode, high-speed sync, using gels) in which we can
Quick Tips for Taking Better Portraits
 JANUARY 5, 2019 BEGINNER Quick Tips for Taking Better Portraits Suggested Lens choices, exposure settings and focus modes Featuring GARY SMALL D300, AF-S NIKKOR 24-85mm f/2.8-4d IF lens, 1/30 sec., f/2.8,
Your objective: maximum control, maximum manageability
 Your objective: maximum control, maximum manageability Know how the light works Know how photography works Know the camera you re using Making the most of what you have to work with. ISO This is the first
Table of Contents. 1.Choosing your Camera. 2. Understanding your Camera Which Camera DSLR vs Compact...8
 1.Choosing your Camera 1.3. Which Camera...7 1.4. DSLR vs Compact...8 1.5. Best entry level DSLR's...9 1.6. Best Compact Cameras...10 1.7.Best Hybrid Camera...11 2. Understanding your Camera 2.1 Introducing
Rule of Thirds. Notice how the building and horizon are aligned along rule-of-thirds lines. Image by Trey Ratcliff.
 Rule of Thirds Imagine that your image is divided into 9 equal segments by 2 vertical and 2 horizontal lines. Therule of thirds says that you should position the most important elements in your scene along
Panoramas. Featuring ROD PLANCK. Rod Planck DECEMBER 29, 2017 ADVANCED
 DECEMBER 29, 2017 ADVANCED Panoramas Featuring ROD PLANCK Rod Planck D700, PC-E Micro NIKKOR 85mm f/2.8d, 1/8 second, f/16, ISO 200, manual exposure, Matrix metering. When we asked the noted outdoor and
21 Go-to Shooting Settings
 21 Go-to Shooting Settings JOSHUA DUNLOP Train Your Photography Instinct The purpose of this guide is to hand you the settings you need to start taking the control back from your camera. If you can memorise
#1) Focus and Hold Still
 Focus and Hold Still") Suggestions: This would be an excellent lecture for the first couple of weeks of school. Depending on your class time, you could do the first 5 one day and the last 5 the next day. I like to do it that
Suggestions: This would be an excellent lecture for the first couple of weeks of school. Depending on your class time, you could do the first 5 one day and the last 5 the next day. I like to do it that
TAKING GREAT PICTURES. A Modest Introduction
 TAKING GREAT PICTURES A Modest Introduction HOW TO CHOOSE THE RIGHT CAMERA EQUIPMENT WE ARE NOW LIVING THROUGH THE GOLDEN AGE OF PHOTOGRAPHY Rapid innovation gives us much better cameras and photo software...
Get the Shot! Photography + Instagram Workshop September 21, 2013 BlogPodium. Saturday, 21 September, 13
 Get the Shot! Photography + Instagram Workshop September 21, 2013 BlogPodium Part One: Taking your camera off manual Technical details Common problems and how to fix them Practice Ways to make your photos
A BEGINNER S GUIDE TO PHOTOGRAPHY CHEATSHEET
 A BEGINNER S GUIDE TO PHOTOGRAPHY Cameras are complicated. It took me a ton of trial and error before I started to capture some pretty spectacular images. This cheatsheet is the reference guide I wish
Autumn. Get Ready For Autumn. Technique eguide. Get Ready For
 Get Ready For Autumn Blink and you may have missed it, but our summer is behind us again and we re back into the short days and long nights of autumn. For photography however, the arrival of autumn means
Chapter 2: COMPOSITION
 ******************************* Chapter 2: COMPOSITION A. The Rule of Thirds B. Find Your Best Vantage Point C. Frame Your Picture D. Pay Attention to Detail A. The Rule of Thirds Generally, a photograph
ONE OF THE MOST IMPORTANT SETTINGS ON YOUR CAMERA!
 Chapter 4-Exposure ONE OF THE MOST IMPORTANT SETTINGS ON YOUR CAMERA! Exposure Basics The amount of light reaching the film or digital sensor. Each digital image requires a specific amount of light to
Tips for Digital Photographers
 Introduction to In my Tips for Digital Photographers outlining shutter speed and f-stop settings we discuss how these two settings are a basis for good creative photography. Shutter speed combined with
Introduction To Photography
 Introduction To Photography THETIPS STORYTELLING POWER OF PHOTOGRAPHY FOR TAKING BETTER PHOTOS WITH YOUR PHONE What is photography? Photography is a tool that allow us to share inspiring and important
In Focus. Newsletter of the Morgan Hill Photography Club. RED WHITE & BLUE is the Flickr theme for JULY.
 In Focus Newsletter of the Morgan Hill Photography Club July 2008 Volume 1, Issue 4 RED WHITE & BLUE is the Flickr theme for JULY. Is the Flickr theme for August. See page 5 for ideas. 2 July 2008 Meeting
Photography Composition Basics
 Photography Composition Basics The Rule of Thirds The Rule of Thirds The rule of thirds involves mentally dividing up your image using 2 horizontal lines and 2 vertical lines, as shown below. You then
Zone. ystem. Handbook. Part 2 The Zone System in Practice. by Jeff Curto
 A Zone S ystem Handbook Part 2 The Zone System in Practice by This handout was produced in support of s Camera Position Podcast. Reproduction and redistribution of this document is fine, so long as the
CLAY BLACKMORE S POSING GUIDE
 CLAY BLACKMORE S POSING GUIDE BROUGHT TO YOU BY: Clay Blackmore, a Canon Explorer of Light, is recognized as a leading portrait and event photographer. Many professional photographers follow his tips on
We will look at two different, yet very popular, lighting techniques: high key and low key. High key lighting is just what you would imagine - very
 We will look at two different, yet very popular, lighting techniques: high key and low key. High key lighting is just what you would imagine - very bright, even light, whereas low key emphasizes midtones
Photomanual TGJ-3MI. By: Madi Glew
 Photomanual TGJ-3MI By: Madi Glew i Table of Contents Getting to know Your Camera... 1 Shutter Speed... 3 White Balance... 4 Depth of Field... 5 Aperture Settings... 7 ISO (Film Speed)... 9 3-Point Portrait
Camera Triage. Portrait Mode
 Camera Triage So, you have a fancy new DSLR camera? You re really excited! It probably cost a small fortune. It s gotta be good, right? It better be good, right? Maybe you re having a ton of fun with your
10 Top Photography Composition Rules
 Tips About Contact 10 Top Photography Composition Rules There are no fixed rules in photography, but there are guidelines which can often help you to enhance the impact of your photos. Advertising on YouTube
Aperture, Shutter Speed and ISO
 Aperture, Shutter Speed and ISO Before you start your journey to becoming a Rockstar Concert Photographer, you need to master the basics of photography. In this lecture I ll explain the 3 parameters aperture,
Photographer... and you can too.
 Izzy Learned to be a Photographer... and you can too. A story about photography basics by Bruce Philpott My granddaughter, Izzy, was visiting us when she was eleven years old and she looked at a photo
Improve Your Photography by using Simple Camera Settings and Techniques
 Improve Your Photography by using Simple Camera Settings and Techniques Francis J Pullen 2012 +44 (0)7768 364 567 images@francispullen.co.uk www.francispullen.co.uk Introduction Digital Cameras offer tremendous
Composing Photographs
 JANUARY 18, 2018 BEGINNER Composing Photographs Creatively photographing a salt marsh Featuring DIANE BERKENFELD In addition to zooming in on the details of the salt marsh, remember to take wide shots
Focus Stacking Tutorial (Rev. 1.)
") Focus Stacking Tutorial (Rev. 1.) Written by Gerry Gerling Focus stacking is a method used to dramatically increase the depth of field (DOF) by incrementally changing the focus distance while taking multiple
Focus Stacking Tutorial (Rev. 1.) Written by Gerry Gerling Focus stacking is a method used to dramatically increase the depth of field (DOF) by incrementally changing the focus distance while taking multiple
Capturing God s Creation Through The Lens An Adult Discipleship Course at Grace January 2013
 Capturing God s Creation Through The Lens An Adult Discipleship Course at Grace January 2013 Donald Jin donjin@comcast.net Course Overview Jan 6 Setting The Foundation Introduction and overview Understanding