SensoMaster Bedienungsanleitung Operating instructions Gebruiksaanwijzing Betjeningsvejledning Mode d emploi
|
|
|
- Norah McCarthy
- 5 years ago
- Views:
Transcription


1 DE GB NL DK FR Bedienungsanleitung Operating instructions Gebruiksaanwijzing Betjeningsvejledning Mode d emploi / Rev 0908
2 2
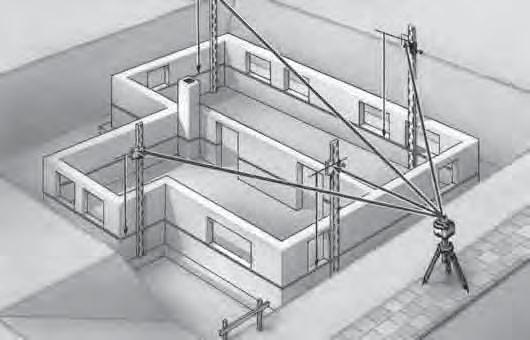
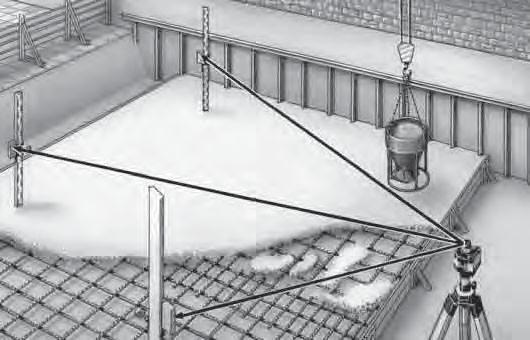
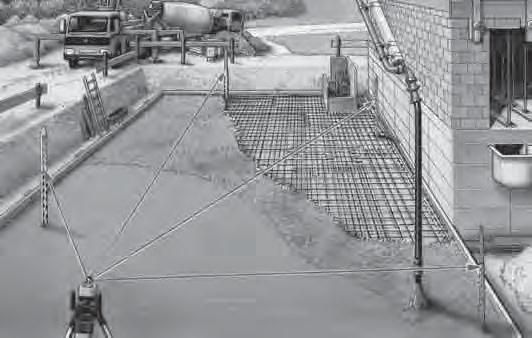
3 General Description The SensoMaster is designed to receive reference elevation information from all rotating laser levels. A large 5.0 inch (127 mm) vertical reception window captures the laser beam using patented SuperCell receiving technology. Elevation information is output via Liquid Crystal Displays (LCD s) on the front and rear and Light Emitting Diodes (LED s) on the front. A beeper also emits an adjustable audible tone. The LCD s indicate elevation information graphically with arrows and bars and numerically. A proportional growing arrow graphic indicates high, low, or on-grade. A numeric elevation display indicates on-grade and how far the laserometer is from on-grade. Accuracy levels, units of measure, sound levels, and various other user options are selectable to meet a variety of job requirements. The unit has been specifically designed for use in harsh construction environments. Strobe rejection technology, over molded housings, recessed windows, waterproof design and durability are incorporated into every detector. Note: A general purpose clamp is included iand designed to mount the detector on various grade rods and staffs. A secondary offset mounting location provides additional versatility is certain applications. A patented reversible wedge on the clamp allows sure grip mounting to round, oval, square, and rectangular rods, as well as various sizes of wooden staffs. Warranty The warranty period is 2 years from the date of purchase. The warranty covers all material or manufacturing defects occurring during this time. The following are excluded from warranty: Damage due to improper use (e.g. operation with wrong type of current/voltage, connection to unsuitable power source, fall onto hard surface, etc.) or improper storage, normal wear and tear, and defects which only insignificantly impair the value or suitability for use. Any tampering by unauthorised persons will render this warranty void. In the event that you need to claim warranty, please take the complete device together with all information and the invoice to one of our dealers or send it in to Umarex-Laserliner. ENGLISH 21

4 Front view Keypad: Power, Accuracy, Units, and Volume switches. 2 LEDs: Easy to see Light Emitting Diodes show position of laserometer relative to the laser beam. Green for on-grade and Red for high or low. 3 Beeper output: Fast audible signal is too High; lower to get to on-grade. Solid signal is On-grade. Slow signal is too Low; raise to get to on-grade. 4 Bubble Vial: aids in keeping laserometer level for accurate readings. 5 Photo-Sensor: Anti-strobe sensor detects strobe lights and rejects their input on laser reception. 6 SuperCell Reception Window: Five (5) inches (127 mm) of reception range. Window must be directed toward laser. 7 LCD (front and rear): Displays elevation information and laserometer settings and status. 8 On-grade Mark: Aligned with laser on-grade reading. 22 ENGLISH
 from marking notch. 11 Captive Screw Thread: Center on-grade clamp position.")
5 Rear View 9 Battery Door & Latch: Waterproof housing holds two AA alkaline batteries Marking Notch: Used to transfer or mark elevation position in handheld applications. Aligns with center on-grade position. Top of detector is 3.15 in (80 mm) from marking notch. 11 Captive Screw Thread: Center on-grade clamp position. Insert accepts rod clamp screw to secure detector to the clamp. 12 Captive Screw Thread: Offset on-grade clamp position. Allows a larger above grade display for certain applications. 13 Clamp Guides (3x): Dimples align rod clamp. 14 Serial Number / ID Label 15 Rear LCD 16 Rubber over mold: Protects the unit from accidental drops. ENGLISH 23
6 Operation of INSTALLING THE BATTERIES 1. Open the battery door using a coin or similar pry device to release the battery door tab. 2. Insert two AA batteries noting the plus (+) and minus (-) diagrams inside the battery housing. 3. Close the battery door. Push down until it clicks into the shut position. Note: i Do not expose batteries to excessive heat such as sunshine, fire, etc. Dry batteries must not be recharged. Used batteries must not be disposed of as household waste. Please take them to a collection point for used batteries or for special waste. Ask your local authority for further details. Batteries with the recycling symbol can also be returned to our dealerships or to our Technical Service. PRIMARY SWITCH FUNCTIONS Power Switch: Press the power switch to turn power ON. All LED s, the LCD, and the beeper will come on momentarily. CAL will be displayed and LED s sequenced as the unit goes through a self-calibrating procedure for approximately 3 seconds. Note: i Do not power up the unit in a laser beam or strobe. If detected, the unit will revert to the previous calibration. Press and hold the Power switch for 2 seconds to turn power OFF. 24 ENGLISH Deutsch 1
7 PRIMARY SWITCH FUNCTIONS 2. Units of Measure Switch: Press once to display the current settings in the numeric display area. Press again while the units are displayed (within one second) to change the current selection. Subsequent presses will scroll through the setting selections of centimeters (cm), millimeters (mm), inches (in), fractional inches (in), and feet (ft). For fractional inches, the fraction bar will be displayed on the LCD. The selected setting will always be displayed on the top of the LCD. 3. Volume Switch: Pressing the switch cycles High, Medium, Low and Off. One beep is emitted at the selected volume when changed. When sound if Off, a single beep will signal that a laser beam has been detected. 4. Accuracy Switch: Press once to numerically display current accuracy settings on the LCD. Press again while the accuracy is displayed (within one second) to change the current selection. Subsequent presses will scroll through five accuracy options (Ultra Fine, Super Fine, Fine, Medium, Coarse). ENGLISH Deutsch 25 1
8 SECONDARY SWITCH FUNCTIONS 5. Brightness of LED display: Pressing the Units and Volume switches together enables the selection of LED s ON Bright, ON Dim, or OFF. Press together to cycle the selection. The LED s will display the current level of brightness selected as the switches are pressed. The LED light bulb symbol on the LCD will also change to display the selected setting Menu: Pressing the Accuracy and Volume switches together enables entry into the Menu functions. - 6a In the Menu mode, the up arrow (Accuracy switch) scrolls the menu up. - 6b In the Menu mode, the down arrow (Volume switch) scrolls the menu down. - 6c In the Menu mode, the enter arrow (Units switch) enters or selects the available options. 7. Capture (HOLD): Allows a reading to be recorded. 7 6c 6a 6 6b Note: i Units, Volume, Accuracy and LED Brightness are stored in memory and will be retained when the unit is turned off or when batteries are replaced. 26 ENGLISH
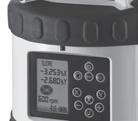
9 LIQUID CRYSTAL DISPLAY (LCD) G F E D C B A H I J K L A Grade indication arrows B Battery status indicator C Laser out-of-level / laser low battery indicator D LED brightness level E Beeper volume level F Auto shut-off timer G Units of measure H Numeric elevation / Menu text display I Numeric elevation for fractional inches / Menu text display J Accuracy (deadband) indicator K Offset on-grade clamp location L Center on-grade clamp location A) GRADE INDICATION ARROWS: 10 individual levels of grade information for above and below grade. Arrow size increases as distance away from on-grade increases. Arrow bars can be selected to represent the selected deadband or can be proportional to the vertical reception range. Horizontal bar indicates on-grade. Lower to on-grade On-grade Out-of Beam display: a sequence of arrows will indicate if the receiver has moved beyond the vertical reception range and will indicate which direction to move to get back to the laser beam. The display can be turned on or off. ENGLISH 27
10 LIQUID CRYSTAL DISPLAY (LCD) B) Batterie Status: indicates 4 levels of battery status. Full Batteries OK Half Initial Warning Outline Approx. 30 Minutes Remaining Flashing Change batteries C) Laser Out-of-Level and Laser Low Battery warning : Certain laser transmitters can signal warnings by changing the rotation speed (RPM) of the laser. When enabled, the transmitter outline is displayed with the appropriate out-of-level or low battery symbol. If a laser out-of-level is detected, the bubble vial symbol will blink. Additionally, the beeper will emit an alternating hi-low tone as a distinct warning, even if the beeper has been turned off. No elevation information will be displayed. If a laser low battery warning is detected, the battery symbol will blink. Elevation information will be displayed normally. Refer to the laser s instructions. D) LED Brightness: indicates if LED s are on Bright, Dim or Off. No display indicates LED s are Off. If no symbol, the LED's are off. LEDs Bright LEDs Dim 28 ENGLISH
11 LIQUID CRYSTAL DISPLAY (LCD) E) Beeper Volume: Indicates if Loud, Medium, Low or Off is selected. Beeper loud Beeper medium Beeper low No symbol represents beeper Off. F) Automatic Shut-Off: clock symbol and number indicate a 30 minute (0.5 hour) or 24 hour shut-off is selected. No symbol indicates automatic shut-off is disabled. 30 minutes selected 24 hours selected G) Units of Measure: Indicates if centimeters (cm), millimeters (mm), inches (in), fractional inches (inch with fraction bar), or feet (ft) is selected. H) Numeric Elevation / Menu Text Display: when in the normal operating mode, the four-character graphic displays numeric elevation. Resolution and the decimal point will be determined by the units of measure and the accuracy selected. Dashed lines across the display indicate the numeric vertical reception range has been exceeded. The numeric display may also be turned off. When in the MENU mode, the menu function text abbreviations will be displayed. ENGLISH 29
12 LIQUID CRYSTAL DISPLAY (LCD) I) Numeric Elevation for Fractional Inches / Menu Text : when in the normal operating mode and fractional inches are selected as the unit of measure, the top number, bottom number, and fraction bar are displayed to form the fraction. When in the MENU mode, the two-character graphic displays the text abbreviation of the current setting and available options when scrolling through the menu. J) Accurancy Indicator: indicates 5 levels of accuracy selections - Ultra Fine, Super Fine, Fine, Medium, and Coarse. Refer to 11, Specifications, for the specific values for each accuracy selected. No center bar is displayed for calibration mode. Ultra Fine Super Fine Fine Medium Coarse Calibration Mode K) Offset on-grade clamp position: Clamp position is sensed automatically and displayed. Offset clamp position moves the on-grade location to allow more grade information to be displayed above grade. This is useful in applications where going below grade is not required, i.e. driving stakes down to grade. L) Center on-grade clamp position: Clamp position is sensed automatically and displayed. Standard center position displays an equal amount of information above and below grade. 30 ENGLISH
13 SPECIAL FUNCTIONS Capture Function (HOLD): The Capture function is used to obtain a single reading and keep it displayed. This may be useful when the unit may not be visible and grade information needs to be obtained. When in the laser beam and power on, momentarily press the Power/Capture switch. The current elevation reading will be saved. A flashing display will confirm the reading has been captured. Press any switch to return to normal operation. When out of the laser beam and power on, momentarily press the Power/Capture switch. A short intermittent beep and WAIT displayed on the LCD confirm the Capture mode. (The beeper will turn on to Low if turned off.) Place the receiver in the beam. The beeper will chirp rapidly after approximately 5 seconds confirming beam capture. A flashing display will also confirm the reading has been captured. Press any switch to return to normal operation. Calibration Mode: Pressing the Power and Accuracy switches together when the unit is off enables entry into a laser calibration accuracy mode. This mode is not marked on the unit. This accuracy is designed to be used when calibrating a laser. It is not recommended for field use. Calibration mode will be confirmed on the LCD by the accuracy indicators without the on-grade bar. Press any key or cycle power to exit the calibration mode and return to the previously stored accuracy setting. ENGLISH 31
14 MENU FUNCTIONS: NOTE: We recommend to change functions only if more power is required or for other special functions. The factory settings are for normal measuring tasks with rotating lasers and receiver fully sufficient! The Menu screen is accessed by pressing the Accuracy and Beeper switches together for approximately two seconds. Menu text will appear in the numeric display area. The first line is the menu function. The second line is the current setting for that function. The remainder of the LCD will be clear. No elevation information will be displayed while in the menu screens. Menu items are selected by scrolling up or down the orange scroll arrows ( ) on the Accuracy and Volume switches. Menu items are entered by pressing the orange enter arrow ( ) on the Units switch. Once entered, the current setting will blink. To change the current setting, use the orange scroll arrows ( ) to scroll through the options for that function. Once selected, press the orange enter arrow ( ) (Units switch) to confirm selection. Use the orange scroll arrows to select additional functions. Once all selections are made, scroll to EXIT, and press the orange enter arrow ( ) to exit the menu. Alternatively, the Power switch can be used to enter a selection, to back up one step or exit the menu. SENS - Sensitivity - HI / MD / LO: Selects reception sensitivity to laser and other light sources. - MD is used for most applications and is default setting. - HI can be used when working with a weak laser beam or if the beam needs to be picked at very long distances. Note: Refer to the laser s specifications for accuracy and distance information. - LO is used if outside sources are disturbing elevation readings. 32 ENGLISH
15 MENU FUNCTIONS: AVG - Numeric & Arrow Averaging - HI / MD / LO : Averages laser beam strikes to improve arrow display performance at long distances. Algorithm factors in laser RPM and accuracy setting. - MD is default setting and used for most applications. - HI can be used in windy conditions, when the laser beam may be unstable, or when working at long distances. Note: Refer to the laser s specifications for accuracy and distance information. - LO uses minimum averaging to display laser strikes. D.R.O. - Digital Read Out - ON / OF: Turns the numeric display On or Off. Default is ON. UNIT - Units of Measure: Select centimeters (cm), millimeters (mm), inches (in), fractional inches (in), or feet (ft). Default is mm. FRC.R - Fractional Reduction - ON / OF: Applied when fractional inches are Units of Measure selected. - ON reduces fractions to the least common denominator. - OFF leaves fraction in reducible form. Default is ON. ENGLISH 33
16 MENU FUNCTIONS: ARRW - Arrow Display - DB / PR: Adjusts how the off-grade arrow and bars are displayed. Default is DB. - DB - Deadband: each bar represents the deadband or accuracy setting. Note: For larger deadbands, all bars may not be displayed. - PR - Proportional: each bar represents the available vertical reception range divided by the number of segments. O.O.B - Out-of-Beam Display - ON / OF: - ON displays a sequence of arrows that indicate when the receiver has moved beyond the vertical laser reception range. The sequence will indicate which direction to move to get back in the laser beam. The display remains on for approximately 25 seconds. - OF turns the display Off. Default is ON. GRD.A. - Grade Alarm - ON / OF: Special application function that when turned ON, disables the audible signal when on-grade. When moved out of the on-grade deadband, the beeper activates as normal. Default is OF. A.S.O. - Automatic Shut Off / OF / 24: Selects automatic shutoff time from last laser strike. Default is 30 minutes minute shutoff. OF - Automatic shutoff turned Off hour shutoff. 34 ENGLISH
17 MENU FUNCTIONS: TX.O.L. - Transmitter Out-of-Level - OF / 6.7 / 5.0 / 3.3 / 2.7 / 2.3: Special Application used with transmitters that communicate to the receiver that the laser is out of level. The lasers change their rotating speed when they are out of level. When enabled, the receiver senses this change and alerts the user. Grade display information is disabled when activated. Default is OF. TX.L.B. - Transmitter Low Battery - OF / 6.7 / 5.0 / 3.3 / 2.7 / 2.3: Special Application used with transmitters that communicate to the receiver that the laser has a low battery. The lasers change their rotating speed. When enabled, the receiver senses this change and alerts the user to a laser low battery condition. Default is OF. INFO - Information - RPS / VER / VEND / MODL / S/N: The (+) symbol indicates an additional level. Press the orange enter arrow. RPS: displays laser Revolutions Per Second for current laser strikes. VER: displays software version VEND: displays serial number prefix information MODL: displays model information S/N: displays serial number Note: i Most menu functions are stored in memory and will be retained when the unit is turned off. Sensitivity, Averaging, Fractional Reduction and Grade Alarm are reset to default settings. ENGLISH 35
18 ROD CLAMP f g a f b e Rectangular Rods Oval / Round Rods d c a. Captive Rod Clamp Screw - attaches to the back of detector. b. Alignment Points (2x) - help secure and align rod clamp. c. Clamping Screw Knob - secures clamp to rods by moving the traveling jaw. Clockwise tightens; Counterclockwise loosens. d. Reference Bar - top of bar is aligned with the detector s on-grade location for both standard center on-grade and offset on-grade clamp locations. e. Traveling Jaw - moving jaw grips tightly to rods. f. Reversible Face - slanted face is used to tightly grip round and oval rods; flat face is used to grip rectangular and square rods. g. Flathead Screw - holds reversible face in place. Remove with flathead screwdriver. Rotate face as shown to change. 36 ENGLISH
19 Technical data* Working radius Laser Detection Height Numeric Readout Height 3 ft ft (1 m m) Laser dependent 5" (127 mm) 4" (102 mm) Accurancy In In (frac) ft mm cm Ultra Fine / Super Fine / Fine / Medium / Coarse / Calibration / Reception Angle Detectable Spectrum Beeper Volumes LED Grade Indicators Power Supply Battery Life Automatic Shut Off + 45 Minimum 610 nm nm (not for green laser) Loud: 110 dba Medium: 95 dba Low: 65 dba Front, Green on-grade, Red Hi/Low 2 x 1,5 V "AA" batteries 60+ hours Selectable: 30 Min., 24 h, OFF Weight without clamp 31.1 oz. (371 g) Dimensions without clamp Operating Temp Storage Temp Transmitter Rotation RPS = RPM * Specifications subject to change without notice 6.6" x 3.0" x 1.4" (168 x 76 x 36 mm) -4 F F (-20 C C) -40 F F (-40 C C) ENGLISH 37
20 MAINTENANCE AND SAFETY CLEANING: Do not wipe dust or dirt off the detector reception window or display windows with a dry cloth or other abrasive material as scratching could occur, reducing visibility through these windows. A soft cloth and mild soap and water are effective. The unit may be submerged under water or sprayed with a low pressure hose if necessary. Do not use any other fluids other than water as they may attack polymer components. TRANSPORT: Use the original carton or a laser instrument case to transport the detector. STORAGE: If the detector will not be used for a month or more, it is recommended to remove the batteries. BATTERIES: It is recommended to use only high quality alkaline or rechargeable batteries. Intended Uses of Detector: The laser detector is designed and suitable for detecting a rotating laser beam. Prohibited Uses: - Operation without instruction. - Operation other than the intended uses. - Opening the detector, except the battery compartment. - Modification or conversion of the detector. PRECAUTIONS: i - The person in charge of the detector must understand the instructions in this manual and ensure other users do also. - Periodically carry out test measurements, particularly after the detector has been subjected to abnormal use and before and after important measurements. 38 ENGLISH

21 93


22 Art.-Nr: A auto auto man Art.-Nr: A auto auto man 94


23 Art.-Nr: max. 260 cm Art.-Nr: Art.-Nr: max. 320 cm min. 140 cm max. 300 cm min. 117 cm max. 255 cm 95

24 IP 67 DE GB NL DK FR Service- und Versand-Anschrift Service- and Shipping Address Service- en verzendadres Service- og Postadresse Livraison et expédition * * SERVICE Umarex GmbH & Co KG Laserliner Möhnestraße 149, Arnsberg, Germany Tel.: , Fax: laserliner@umarex.com Umarex GmbH & Co KG Donnerfeld Arnsberg, Germany Tel.: , Fax:
Operator's Manual STORM Laserometer
 Operator's Manual STORM Laserometer Thank you for purchasing an Apache Technologies, Inc. product. Your laser product is a premium quality tool that has been designed and manufactured to provide years
MetalliFinder Pro DE 02 GB 06 NL 10 DK 14 FR 18 ES 22 IT 26 PL 30 FI 34 Manual_MetalliFinder-Pro_Rev.0909.indd Abs
 DE 02 06 NL 10 DK 14 FR 18 ES 22 IT 26 PL 30 FI 34 a b c d e f 3 2 1 5 4 9 7 8 6 Operating elements a LED Measuring centre b LED Current (AC) found c Set button: Change over material types iron pipes,
ZipLevel A / Rev 0508-GB. Operation manual
 029.020A / Rev 0508-GB GB Operation manual Professional precision altimeter The ZipLevel is a professional altimeter which enables you to scale and level on your own also around corners with accuracy
A510S Operation Manual
 A510S Operation Manual REV 1.1 1 Table of Contents 1 General Information 1-1 Description 1-2 Potential Operational Hazards 1-3 Technical Specifications 1-4 Instrument Overview 1-5 Function Summary 2 How
Laser Distance Finder Extech DT500
 User Guide Laser Distance Finder Extech DT500 Introduction Congratulations on your purchase of the Extech Model DT500 Laser Distance Finder. This meter measures Distance up to 70m (230 ) and calculates
Pipe Laser Model No Instruction Manual
 Pipe Laser Model No. 40-6690 Instruction Manual Congratulations on your choice of this Pipe Laser. We suggest you read this instruction manual thoroughly before using the pipe laser. Save this instruction
USER MANUAL. Laser Distance Meter MODELS DT40M, DT60M, and DT100M
 USER MANUAL Laser Distance Meter MODELS DT40M, DT60M, and DT100M Contents Introduction... 3 Safety Instructions... 3 Descriptions... 4 Measurement Preparation... 6 Programming Menu... 8 Distance Measurements...
Laser Distance Finder Extech DT500
 User Guide Laser Distance Finder Extech DT500 Introduction Congratulations on your purchase of the Extech Model DT500 Laser Distance Finder. This meter measures Distance up to 70m (230 ) and calculates
QUAD 1000 OWNERS MANUAL OPERATION GUIDE
 QUAD 1000 OWNERS MANUAL OPERATION GUIDE www.laserlinemfg.com REV. 4.30.18 COMPONENTS 4001-0000 Quad 1000 5 arc second zenith laser featuring electronic servo self-leveling with variable temperature compensation
UBZ-LJ8 FM TRANSCEIVER INSTRUCTION MANUAL EMETTEUR-RECEPTEUR FM MODE D EMPLOI RICETRASMETTITORE FM MANUALE DI ISTRUZIONI
 UBZ-LJ8 FM TRANSCEIVER INSTRUCTION MANUAL EMETTEUR-RECEPTEUR FM MODE D EMPLOI TRANSCEPTOR DE FM MANUAL DE INSTRUCCIONES RICETRASMETTITORE FM MANUALE DI ISTRUZIONI FM-HANDFUNKSPRECHGERÄT BEDIENUNGSANLEITUNG
UR200SI / UR200WE ENGLISH
 ENGLISH Hersteller Wörlein GmbH Tel.: +49 9103/71670 Gewerbestrasse 12 Fax.: +49 9103/716712 D 90556 Cadolzburg Email. info@woerlein.com GERMANY Web: www.woerlein.com UR200SI / UR200WE ENVIRONMENTAL PROTECTION
Geo EasyTrack Auto Tracking System for Line Lasers
 DE EN FR Geo EasyTrack Auto Tracking System for Line Lasers USER MANUAL I www.geo-fennel.de www.geo-fennel.com www.geo-fennel.fr DE Dear customer, Thank you for your confidence in us having purchased a
Laser LA-4P. Operating instructions
 Laser LA-4P GB Operating instructions A 1 2 3a 5 3c 3b 3a 4 11 11 6 10 7 14a 14b 14c 12 9 8 B C 2. 1. D E F Ø 50mm - 115 mm Ø 2-4,5 G I K s > 6m > 20ft L M N P1 Q O 13 P2 GB Operating instructions The
Instruction Manual. Self-Leveling Cross-Line Laser Level Model No and
 3728H_Manuals 9/2/10 8:02 AM Page 1 Self-Leveling Cross-Line Laser Level Model No. 40-6620 and 40-6625 Instruction Manual Congratulations on your choice of this Self-Leveling Cross-Line Laser Level. We
DE EN FR ECOLINE EL 609 BEDIENUNGSANLEITUNG USER MANUAL MODE D EMPLOI EXACTLY WHAT YOU NEED.
 DE FR ECOLINE EL 609 BEDIUNGSANLEITUNG USER MANUAL MODE D EMPLOI EXACTLY WHAT YOU NEED. 1 FEATURES OPERATIONAL ELEMTS 1 vertical and 1 horizontal laser line form 1 laser cross Laser lines switchable separately
Operating Instructions GEMINI R
 Operating Instructions GEMINI R 060999-104 02.09.2011 General Notes For your safety Documentation Please familiarise yourself with these operating instructions and the safety information it contains before
LASER ENHANCED REVOLVER GRIP OWNER S MANUAL RED LASER GREEN LASER
 LASER ENHANCED RED LASER GREEN LASER REVOLVER GRIP OWNER S MANUAL LASER ENHANCED GRIP Installation Instructions Caution... 3 Safety Labels... 4 Installation...5-7 Programming...8-10 Batteries (Red Laser)...
Multi-Channel In-Out Thermometer with Cable Free Sensor and RF Clock
 Multi-Channel In-Out Thermometer with Cable Free Sensor and RF Clock MAIN FEATURES: MAIN UNIT GB MODEL: RMR182 USER'S MANUAL INTRODUCTION Congratulations on your purchase of the RMR182 Multi- Channel In-Out
PD-I. English Français Español Português
 PD-I English Français Español Português en fr es pt 1 2 3 4 PD-I en English...................................................... 1 fr Français.................................................... 12 es
CONTENTS. User Safety 2 Introduction and CXR880 Accessories 3 CXR880 Diagram 4 CXR880 Keypad and Remote Control 5 Operating Instructions 6
 CONTENTS User Safety 2 Introduction and CXR880 Accessories 3 CXR880 Diagram 4 CXR880 Keypad and Remote Control 5 Operating Instructions 6 Batteries 6 Power and Tilt 7 Rotating Laser 8 Line Lasers 9 Grade
MultiMeter-Pocket CAT III 1000 V
 02 10 18 26 34 42 50 58 66 74 82 DE GB NL DK FR ES IT PL FI PT SE AC DC AC DC CAT III 1000 V 90 98 106 114 122 130 138 146 154 162 170 NO TR RU UA CZ EE LV LT RO BG GR ! Read the operating instructions
WIRELESS Energy Monitor - Smart Meter
 Energy saving made simple MONITOR CONTROL SAVE WIRELESS Energy Monitor - Smart Meter Monitors your electricity use and cost in real time Instruction Manual EW4500 IMPORTANT Please retain your Instruction
CL900. True RMS 1000V 2000A 60MΩ ENGLISH. INSTRUCTION MANUAL 2000A Digital Clamp Meter. Measurement Technology
 ENGLISH INSTRUCTION MANUAL 2000A Digital Clamp Meter True RMS Measurement Technology NON-CONTACT VOLTAGE TESTING INRUSH CURRENT LOW IMPEDANCE DATA HOLD RANGE HOLD AUDIBLE CONTINUITY DIODE TEST CAPACITANCE
RLS2. Owner s Manual. Portable All-Band Radar and Laser Detector with GPS Technology
 RLS2 Owner s Manual Portable All-Band Radar and Laser Detector with GPS Technology K40 Consult Don t like to read manuals? Call our experienced K40 Consultants. We ll explain the whole thing. 800.323.5608
PR-D5 中文 GB. Version 1
 PR-D5 中文 GB Version 1 1. 2. 3. Important safety instructions Read and understand all safety and operating instructions before the radio is operated. Retain instruction: The safety and operating instructions
Cat. No. H8861 Model: RCL-S-STAT
 -AAA Cat. No. H8861 Model: RCL-S-STAT INSTALLATION AND OPERATION INSTRUCTIONS IF YOU CANNOT READ OR UNDERSTAND THESE INSTALLATION INSTRUCTIONS DO NOT ATTEMPT TO INSTALL OR OPERATE INTRODUCTION This remote
Important safety instructions
 RCR-29 GB Version 1 Important safety instructions VERY IMPORTANT PLEASE READ Sangean suggest that you keep your AC Adapter at least 12 inches away from the radio while listening to the AM Band. Your Sangean
Battery Installation Controls and Displays Safety Initial Setup Guidelines Level Setup Slope setup...
 PRO SHOTTMTM Slope Lasers AS2 \ AS2 MAGNUM Operations Guide Introduction Thank you for purchasing a Pro ShotTM AS2 or AS2 MAGNUM laser system. You now have superior laser accuracy and productivity available
GC-1032 Metal Detector OWNER S MANUAL
 GC-1032 Metal Detector OWNER S MANUAL 1 With your GC-1032 metal detector, you can hunt for coins, relics, jewelry, gold, and silver just about anywhere. The detector comes with high sensitivity and strong
CONTENTS Preparation Functions and Indications Operation
 CONTENTS Features 3 Preparation Parts of the detector 4 Assembling the detector 4 Adjusting the search coil 6 Installing the batteries 6 Using the headphones 7 Functions and Indications Parts of the control
+GF+ SIGNET Temperature Transmitter Instructions
 GF SIGNET 80- Temperature Transmitter Instructions ENGLISH -80.090- B-/00 English CAUTION! Remove power to unit before wiring input and output connections. Follow instructions carefully to avoid personal
impact VC-500LR Monolight INSTRUCTIONS
 impact lighting equipment and accessories VC-500LR Monolight INSTRUCTIONS Congratulations on your purchase of the Impact VC-500LR Monolight. We feel that it will contribute much to your photographic skill
TLKR T60 OWNER'S MANUAL EN DE FR IT ES PR NL DA NO TU PL SV RU
 TLKR T60 OWNER'S MANUAL EN DE FR IT ES PR NL DA NO TU PL SV RU SF 1 PRODUCT SAFETY AND RF EXPOSURE FOR PORTABLE TWO-WAY RADIOS! Caution ATTENTION! Before using this product, read the RF energy awareness
K40 Consult. Don t like to read manuals? Call our experienced K40 Consultants. We ll explain the whole thing
 K40 Consult Don t like to read manuals? Call our experienced K40 Consultants. We ll explain the whole thing. 800.323.5608 K40 ELECTRONICS 600 Tollgate Rd., Suite A Elgin, IL 60123 www.k40.com Table of
WEATHER IN MOTION Model: BAR200 / BAR200U / BAR200A USER MANUAL
 WEATHER IN MOTION Model: BAR200 / BAR200U / BAR200A USER MANUAL Eu-declaration Of Conformity... 7 Fcc Statement... 8 Declaration Of Conformity... 8 EN CONTENTS Introdction... 2 Overview... 2 Front View...
Non-contact Forehead IR Thermometer
 User s Manual Non-contact Forehead IR Thermometer Model IR200 Introduction Congratulations on your purchase of the Model IR200 IR Thermometer. This thermometer is intended for scanning groups of individuals
Wireless Pressure Station
 Wireless Pressure Station FORECAST RELATIVE PRESSURE PRESSURE HISTORY inhg -24h -18h -12h -9h- 6h -3h0 h INDOOR For online video support: http://bit.ly/laxtechtalk Model: 308-1417 DC: 111517 Table of Contents
PowerCost Monitor. Installation Guide. Install the Batteries in the Display Unit. Install the Batteries in the Sensor Unit
 PowerCost Monitor Installation Guide Welcome Congratulations on your purchase of the PowerCost Monitor, a new electricity-monitoring device that informs you in real time of the amount of electricity your
BR2 Lap Beacon Manual
 MoTeC BR2 Lap Beacon Manual Contents Introduction... 1 Overview... 3 Operation...3 Orientation...5 Range...5 Alignment...5 Verifying Operation...6 Split Beacon Use...6 Configuration - Quick Start... 7
Nuclear Associates
 Nuclear Associates 07-443 Clamshell Densitometer Users Manual February 2005 Manual No. 166001 Rev. 5 2004, 2005 Fluke Corporation, All rights reserved. Printed in U.S.A. All product names are trademarks
RPS /02 Effective for models with serial numbers beginning with "G".
 Instruction Sheet B2000 Cyclone Bender RPS-0097 0/02 Effective for models with serial numbers beginning with "G". IMPORTANT RECEIVING INSTRUCTIONS Visually inspect all components for shipping damage. If
MACHINE CONTROL: AG. System Five. Operator s Manual
 MACHINE CONTROL: AG AG System Five Operator s Manual AG System Five Operator s Manual For the 9256 Control Box Part Number 7010-0369 Rev. C Copyright Topcon Positioning Systems September, 2003 All contents
USER MANUAL 600A AC Clamp Meter + NCV Model MA610
 USER MANUAL 600A AC Clamp Meter + NCV Model MA610 Additional User Manual Translations available at www.extech.com Introduction Thank you for selecting the Extech MA610 Clamp Meter. This meter measures
FCC ID: SAGA1-L8 IC: 2802A-SAGAL8 CE0470
 FCC ID: SAGA1-L8 IC: 2802A-SAGAL8 CE0470 WARRANTY INMOTION Controls, Inc. guarantees that this product meets its published specification at the time of shipment from the factory. Under proper installation,
Energate Foundation Meter Data Collector Installation Guide
 Energate Foundation Meter Data Collector Installation Guide The Meter Data Collector works with Foundation s built-in Meter Data Receiver. The collector attaches to the meter provided by your electricity
Talkabout T82/ T82 EXTREME OWNER S MANUAL
 Talkabout T82/ T82 EXTREME OWNER S MANUAL B RF ENERGY EXPOSURE AND PRODUCT SAFETY GUIDE FOR PORTABLE TWO-WAY RADIOS ATTENTION! Before using this product, read the RF Energy Exposure and Product Safety
INSTRUCTION MANUAL INF Fax: (503)
") INSTRUCTION MANUAL INF151 1-800-547-5740 Fax: (503) 643-6322 www.ueiautomotive.com email: info@ueitest.com Introduction Congratulations on your purchase of the INF151 infrared thermometer. Like all UEi
INSTRUCTION MANUAL INF151 1-800-547-5740 Fax: (503) 643-6322 www.ueiautomotive.com email: info@ueitest.com Introduction Congratulations on your purchase of the INF151 infrared thermometer. Like all UEi
INSTRUCTION MANUAL VHF FM TRANSCEIVER TK-2206 UHF FM TRANSCEIVER TK-3206 B (M,M3 )
") INSTRUCTION MANUAL VHF FM TRANSCEIVER TK-2206 UHF FM TRANSCEIVER TK-3206 B62-1763-00 (M,M3 ) 09 08 07 06 05 04 03 02 01 00 THANK YOU We are grateful you chose KENWOOD for your land mobile radio applications.
INSTRUCTION MANUAL VHF FM TRANSCEIVER TK-2206 UHF FM TRANSCEIVER TK-3206 B62-1763-00 (M,M3 ) 09 08 07 06 05 04 03 02 01 00 THANK YOU We are grateful you chose KENWOOD for your land mobile radio applications.
Application Brief TROXLER MODEL 3450
 Application Brief TROXLER MODEL 3450 Roadreader Plus Nuclear Moisture Density & Thin Layer Gauge May 2007 Introduction The Troxler Model 3450, Roadreader Plus, nuclear moisture / density gauge offers the
F R F R G
 w w w. e t o n c o r p. c o m F R 2 0 0 F R 2 0 0 G O P E R AT I O N M A N U A L A M / F M / S H O R T W A V E R A D I O TABLE OF CONTENTS DO YOU NEED HELP? Contact Us. Etón Corporation 1015 Corporation
120x165mm. 85x165mm TEMPLATE. ELECTRONIC DEADBOLT model no.: & & Toll-free Number:
 20x65mm 85x65mm ELECTRONIC EABOLT FOR BACSET 2 3/4" ( 70 mm) FOR BACSET 2 3/8" ( 60 mm) Ø 2 /8" ( 54 mm ) Toll-free Number: -800-268-659 IMPORTANT: Please read this manual carefully before installing this
INTRODUCTION CHAPTER 1
 TABLE OF CONTENTS Introduction... 3 Package Contents... 5 Design... 7 Key Functions... 9 Grain Species and Measuring Ranges....11 First Steps...13 Measurement...15 Modification...19 Setup...21 Replacing
PORTROD WALL MOUNTED HEIGHT ROD
 PORTROD WALL MOUNTED HEIGHT ROD USER INSTRUCTIONS P/N UMPORTROD Rev 1-052112 1 PORTROD Thank you for your purchase of this Health o meter Professional product. Please read this manual carefully, and keep
TRMS LEAKAGE CURRENT CLAMP-ON METER 565
 TRMS LEAKAGE CURRENT CLAMP-ON METER 565 E N G L I S H User Manual Statement of Compliance Chauvin Arnoux, Inc. d.b.a. AEMC Instruments certifies that this instrument has been calibrated using standards
ENGLISH PORTUGUÊS NEDERLANDS DAB200
 DEUTSCH ENGLISH FRANÇAIS NEDERLANDS ESPAÑOL PORTUGUÊS NORSK DAB200 Contents Introduction..... 2 What is DAB + Digital Radio?.... 2 Setting up..... 3 Backlit display.... 4 Using headphones...... 4 Your
DT-800 中文 GB. Version 1
 DT-800 中文 GB Version 1 1. 2. 3. 4. 5. 6. 7. 8. 9. Important safety instructions Read and understand all safety and operating instructions before the radio is operated. Retain instructions: The safety and
Earth 2/3 MI 2126 Instruction Manual Version 1.0, Code No
 Earth 2/3 MI 2126 Instruction Manual Version 1.0, Code No. 20 750 190 Distributor: Manufacturer: METREL d.d. Ljubljanska cesta 77 1354 Horjul Slovenia web site: http://www.metrel.si e-mail: metrel@metrel.si
USER GUIDE. White LED Light Meter. Model LT Washington Street Melrose, MA Phone Toll Free
 99 Washington Street Melrose, MA 02176 Phone 781-665-1400 Toll Free 1-800-517-8431 Visit us at www.testequipmentdepot.com White LED Light Meter USER GUIDE Model LT40 Introduction Congratulations on your
Seite 2 Standard-Empfänger. EN Operation Instructions
 sign lux DE Bedienungsanleitung Seite 2 Standard-Empfänger EN Operation Instructions Page 10 Standard receiver FR Mode d emploi Page 18 Récepteur standard NL Gebruiksaanwijzing Pagina 26 Standaard ontvanger
sig pro TM LASER (SPP) Handling & Safety Instructions
 Handling & Safety Instructions") OM-20871-USA v10.28.99 2/2/00 2:35 PM Page 1 SIG Arms AG CH-8212 Neuhausen am Rheinfall Switzerland Phone: (052) 674 65 65 Fax: (052) 674 64 18 SIG Arms Inc. Corporate Park Industrial Drive Exeter, NH
OM-20871-USA v10.28.99 2/2/00 2:35 PM Page 1 SIG Arms AG CH-8212 Neuhausen am Rheinfall Switzerland Phone: (052) 674 65 65 Fax: (052) 674 64 18 SIG Arms Inc. Corporate Park Industrial Drive Exeter, NH
Wireless AC Circuit Identifier
 User's Guide Wireless AC Circuit Identifier Models RT30 and RT30-E 99 Washington Street Melrose, MA 02176 Phone 781-665-1400 Toll Free 1-800-517-8431 Visit us at www.testequipmentdepot.com Back to the
INDEX OPERATING PRINCIPLE... 3 Power Supply... 4 Replacing the Batteries... 4 GENERAL PHOTOMETER OPERATION... 4 Operating Modes... 4 SYSTEM MODE...
 9300 PHOTOMETER The YSI 9300 direct-reading photometer is designed to give long and troublefree operation. To ensure the best results, please read these instructions carefully and follow the procedures
Model: 5301P INSTALLATION AND OPERATION INSTRUCTIONS
 Model: 5301P INSTALLATION AND OPERATION INSTRUCTIONS INTRODUCTION IF YOU CANNOT READ OR UNDERSTAND THESE INSTALLATION INSTRUCTIONS DO NOT ATTEMPT TO INSTALL OR OPERATE This SKYTECH remote control system
1242 Laser Transmitter
 1242 Laser Transmitter User Guide www.trimble.com Introduction Thank you for choosing the 1242 Spectra Precision Laser from the Trimble family of precision lasers. You ve just made a wise investment in
Operator's Manual. 10-in. Digital Multi-function LEVEL with Laser Trac. Model No
 Operator's Manual 10-in. Digital Multi-function LEVEL with Laser Trac Model No. 320.48292! CAUTION Read, understand and follow all Safety Rules and Operating Instructions in this Manual before using this
PIECAL 311 Automated Universal RTD Calibrator Operating Instructions. Product Description. Practical Instrument Electronics
 Product Description Easy to use With the PIECAL 311 you can check & calibrate all your RTD instruments and measure RTD Sensors. Automatic indication of connections on the display for simple hookups. Take
Portable All-Band Radar and Laser Detector RD950. Owner s Manual
 Portable All-Band Radar and Laser Detector RD950 Owner s Manual K40 Consult Don t like to read manuals? Call our experienced K40 Consultants. We ll explain the whole thing. 800.323.5608 K40 ELECTRONICS
TLKR T92 H2O OWNER'S MANUAL. it-it. nl-nl. fi-fi. pt-pt. nb-no tr-tr pl-pl ru-ru uk-ua
 TLKR T92 H2O OWNER'S MANUAL en de-de fr-fr it-it es-es pt-pt nl-nl da-dk sv-se fi-fi nb-no tr-tr pl-pl ru-ru uk-ua RF ENERGY EXPOSURE AND PRODUCT SAFETY GUIDE FOR PORTABLE TWO- WAY RADIOS ATTENTION! Before
IMPORTANT: Read Before Using. Operating/Safety Instructions 8601-RL
 IMPORTANT: Read Before Using Operating/Safety Instructions 8601-RL 3 1 2 7 5 6 8 6 4-2- General Safety Rules! DANGER LASER RADIATION. AVOID DIRECT EYE EXPOSURE. DO NOT stare into the laser light source.
K40 Consult. Don t like to read manuals? Call our experienced K40 Consultants. We ll explain the whole thing
 K40 Consult Don t like to read manuals? Call our experienced K40 Consultants. We ll explain the whole thing. 800.323.5608 K40 ELECTRONICS 600 Tollgate Rd., Suite A Elgin, IL 60123 www.k40.com Table of
Weather Forecast Station with Atomic Time Model: BAR206 / BAR206A
 Weather Forecast Station with Atomic Time Model: BAR206 / BAR206A EN USER MANUAL CONTENTS Overview... 2 Front View... 2 Back View... 2 Remote Sensor... 3 Getting Started... 3 Insert Batteries... 3 Remote
Pair of PMR446 Two-Way Personal Radios Model: TP391
 Pair of PMR446 Two-Way Personal Radios Model: TP391 USER MANUAL MANUALE D USO MANUEL DE L UTILISATEUR BEDIENUNGSANLEITUNG MANUAL DE USUARIO MANUAL DO USUÁRIO HANDLEIDING BRUKSANVISNING P/N:086L004722-016
Wireless Pressure Station with Backlight
 Wireless Pressure Station with Backlight FORECAST RELATIVE PRESSURE PRESSURE HISTORY inhg -24h -18h -12h -9h- 6h -3h0 h INDOOR For online video support: http://bit.ly/laxtechtalk Model: 308-1417BL DC:
Professional UHF Rechargeable Wireless Microphone System POWER ON/OFF BATTERY CHARGE. Green Light (Full) Better Music Builder DOWN VOLUME
 Better Music Builder DOWN VOLUME") Green Light (Full) KARAOKE Professional UHF Rechargeable Wireless Microphone System VM-93C Operating Instructions UHF Frequency 64 Selectable POWER ON/OFF CHARGE Better Music Builder VM-93C CHARGER UHF
Green Light (Full) KARAOKE Professional UHF Rechargeable Wireless Microphone System VM-93C Operating Instructions UHF Frequency 64 Selectable POWER ON/OFF CHARGE Better Music Builder VM-93C CHARGER UHF
netzerotools.com USER GUIDE Extech LT40 LED Light Meter Extech LT45 Color LED Light Meter LED Light Meter Model LT45 netzerotools.
 USER GUIDE Extech LT40 LED Light Meter Extech LT45 Color LED Light Meter LED Light Meter Model LT45 Introduction Congratulations on your purchase of the Extech LT45 LED Light Meter that measures light
INSTRUCTION MANUAL MODE D EMPLOI MANUAL DE INSTRUCCIONES MANUALE DI ISTRUZIONI BEDIENUNGSANLEITUNG GEBRUIKSAANWIJZING
 INSTRUCTION MANUAL MODE D EMPLOI MANUAL DE INSTRUCCIONES MANUALE DI ISTRUZIONI BEDIENUNGSANLEITUNG GEBRUIKSAANWIJZING ProTalk TK-320 UHF FM TRANSCEIVER ÉMETTEUR-RÉCEPTEUR FM UHF TRANSCEPTOR DE FM UHF RICETRASMETTITORE
SlimScan BT Users Manual
 SlimScan BT Users Manual ASP Microcomputers 456 North Road, Ormond, Victoria, 3204 Australia Telephone: (03) 9578-7600 FAX: (03) 9578-7727 email: solutions@asp.com.au World Wide Web: http://www.asp.com.au
QUANTUM Qflash T2 / X2 OPERATING INSTRUCTIONS
 QUANTUM Qflash T2 / X2 OPERATING INSTRUCTIONS 1.0 DESIGNATIONS T2 AND X2 1. Removable Reflector, two positions Normal and Wide angle. 2. Flash-tube 2A. Modeling Lamp (for Model X2 only) 3. Bounce Head,
AT Underground Cable/Pipe Locator System. Users Manual Mode d emploi Bedienungshandbuch Manuale d Uso Manual de uso Användarhandbok
 AT-3500 Underground Cable/Pipe Locator System Users Manual Mode d emploi Bedienungshandbuch Manuale d Uso Manual de uso Användarhandbok For detailed specifications and ordering info go to www.testequipmentdepot.com
Medidores de vibración salida RS232 Datalogger VT-8204 LUTRON manual ingles
 English usermanual VT-8204 Vibration Tachometer Your purchase of this VIBRATION TACHOMETER marks a step forward for you into the field of precision measurement. Although this VIBRATION TACHOMETER is a
Infrared Gun. Perfect For. Easy To Use. Features. Get Professional Results Every Time! Battery Installation. Model: IN1022
 Model: IN1022 Infrared Gun -76 to +1022 F/-60 to +550 C Perfect For Non-contact surface temperatures Easy To Use 1-second response Laser target illumination Backlit Data-hold One-button operation Features
USER MANUAL LASER SIGHT. Triple Duty CRL (Compact Rail Laser) English
 English") USER MANUAL LASER SIGHT Triple Duty CRL (Compact Rail Laser) English ABOUT SIGHTMARK Sightmark offers a wide range of products that include red dot scopes, reflex sights, rangefinders, riflescopes, laser
USER MANUAL LASER SIGHT Triple Duty CRL (Compact Rail Laser) English ABOUT SIGHTMARK Sightmark offers a wide range of products that include red dot scopes, reflex sights, rangefinders, riflescopes, laser
SAFETY INFORMATION IMPORTANT FCC LICENSING INFORMATION
 This device complies with part 15 of the FCC Rules. Operation is subject to the following two conditions: (1) This device does not cause harmful interference, and (2) This device must accept any interference
User manual. paper moisture meter RH5.1 with sword-sensor
 User manual paper moisture meter RH5.1 with sword-sensor version 2.0_en Schaller GmbH 2012 User manual Positioning the instrument Insert the sword-sensor into the stack for only approx. 10 cm, and push
INSTRUCTION MANUAL VHF FM TRANSCEIVER TK-7102H UHF FM TRANSCEIVER TK-8102H KENWOOD CORPORATION B (M)
") INSTRUCTION MANUAL VHF FM TRANSCEIVER TK-7102H UHF FM TRANSCEIVER TK-8102H KENWOOD CORPORATION B62-1596-00 (M) 09 08 07 06 05 04 03 02 01 00 THANK YOU! We are grateful you chose KENWOOD for your personal
INSTRUCTION MANUAL VHF FM TRANSCEIVER TK-7102H UHF FM TRANSCEIVER TK-8102H KENWOOD CORPORATION B62-1596-00 (M) 09 08 07 06 05 04 03 02 01 00 THANK YOU! We are grateful you chose KENWOOD for your personal
1: Introduction : Caution : Tips for Reading this Manual : Preface : System Highlights : Receiver
 1: Introduction....1 1 2: Caution.... 2 2 3: Tips for Reading this Manual....3 3 4: Preface....4 4 5: System Highlights....6 6 6: Receiver..7 7 6.1: Specifications......7 7 6.2: Receiver Operation... 7
User s Manual. Ground Resistance Clamp On Tester MODEL
 User s Manual Ground Resistance Clamp On Tester MODEL 382357 Warranty EXTECH INSTRUMENTS CORPORATION warrants the basic instrument to be free of defects in parts and workmanship for one year from date
Radio BMR100 INSTRUCTION MANUAL. ENGLISH (Original instructions)
") ENGLISH (Original instructions) INSTRUCTION MANUAL Radio BMR00 WARNING: For your personal safety, READ and UNDERSTAND before using. SAVE THESE INSTRUCTIONS FOR FUTURE REFERENCE. Symbols The following show
ENGLISH (Original instructions) INSTRUCTION MANUAL Radio BMR00 WARNING: For your personal safety, READ and UNDERSTAND before using. SAVE THESE INSTRUCTIONS FOR FUTURE REFERENCE. Symbols The following show
32 CHANNEL SELECTABLE CH MHZ DOWN VOLUME
 KARAOKE Professional UHF Wireless Microphone System VM-92U Operating Instructions UHF Frequency 64 Selectable Better Music Builder UHF MIC WIRELESS SYSTEM VM-92U 32 CHANNEL SELECTABLE 248 13.10 CH MHZ
User Manual InfraRed Thermometer With Laser Pointer and High/Low Alarms Model IR270
 User Manual InfraRed Thermometer With Laser Pointer and High/Low Alarms Model IR270 Additional User Manual Translations available at www.extech.com Introduction Thank you for selecting the Extech IR270
Installation And Programming Instructions For Profile Series With RF Technology
 Installation And Programming Instructions For Profile Series With RF Technology A7691A www.sargentlock.com 1 Table of Contents General Description Page 2 3 4 5 6 7 Installation of RF Technology Lock...1
Please read carefuly before using. Aerobic Lateral Trainer ASSEMBLY MANUAL H901
 Please read carefuly before using. Aerobic Lateral Trainer ASSEMBLY MANUAL H901 TABLE OF CONTENTS 1 IMPORTANT SAFETY INFORMATION 2 Important Safety Precautions 2 Weight Limit Capacities 2 Warning 2 2
Leica Rugby 600 Series Your reliable team player on site
 Rugby 600 Series Your reliable team player on site Rugby Simple, fast, tough Select the perfect team player for your site Rugby lasers are the toughest rotating lasers suitable for all construction applications.
Heavy Duty CFM-CMM Thermo-Anemometer With built-in non-contact IR Thermometer and Laser Pointer Model HD300
 User Guide Heavy Duty CFM-CMM Thermo-Anemometer With built-in non-contact IR Thermometer and Laser Pointer Model HD300 Introduction Congratulations on your purchase of the Extech HD300 CFM Thermo-Anemometer.
AH Auto-Darkening Welding Helmet User Manual. Made in China
 AH7-220-0000 Auto-Darkening Welding Helmet User Manual Made in China 2016 TECHNICAL SPECIFICATIONS AH7-220-0000 Auto-Darkening Welding Helmet 2016 WARNING Please read all instructions before using the
Temp / RH / CO 2 Hand-Held Meter
 Temp / RH / CO 2 Hand-Held Meter PRODUCT MANUAL Item # 3440 CONTENTS Specifications 2 Battery 3 LCD Display 3 Keypad 3 Operation 4 Troubleshooting 7 Warranty 8 CE Declaration of Conformity 8 Thank you
GETTING STARTED. Instructions IMPORTANT PS B PS B. Record the serial number from the tag on the door front.
 PS-15-20-B IMPORTANT Instructions Record the serial number from the tag on the door front. Keep keys in a secure place away from children. DO NOT STORE KEYS INSIDE SAFE GETTING STARTED When you first receive
H-ITT ienable (TX3500) manual V1.1
 manual V1.1") H-ITT ienable (TX3500) manual V1.1 The TX3500 is a universal input RF remote transceiver designed for limited access users that may find using typical classroom response reporting devices cumbersome or
H-ITT ienable (TX3500) manual V1.1 The TX3500 is a universal input RF remote transceiver designed for limited access users that may find using typical classroom response reporting devices cumbersome or
3B SCIENTIFIC PHYSICS
 3B SCIENTIFIC PHYSICS Equipment Set for Modulus of Elasticity 1857 Instruction manual 5/16 TL/UD 1. Safety instructions Safe operation of this equipment is assured as long as it is used as stipulated.
User's Guide. Pinless Moisture/Humidity Meter with IR Thermometer + Bluetooth. Model MO297
 User's Guide 99 Washington Street Melrose, MA 02176 Phone 781-665-1400 Toll Free 1-800-517-8431 Visit us at www.testequipmentdepot.com Pinless Moisture/Humidity Meter with IR Thermometer + Bluetooth Model