PD-I. English Français Español Português
|
|
|
- Deborah Goodwin
- 5 years ago
- Views:
Transcription

1 PD-I English Français Español Português en fr es pt
2 1
3 2 3 4
4 PD-I en English fr Français es Español pt Português

5 1 Information about the documentation 1.1 Conventions Warning signs The following warning signs are used: DANGER! Draws attention to imminent danger that will lead to serious personal injury or fatality. WARNING! Draws attention to a potentially dangerous situation that could lead to serious personal injury or fatality. CAUTION! Draws attention to a potentially dangerous situation that could lead to slight personal injury or damage to the equipment or other property Symbols The following symbols are used: Read the operating instructions before use. On/off button Measure button Menu button Delete (clear) button Right arrow button Left arrow button Typographical emphasis The following typographic features are used to emphasize important passages in this technical documentation: 1 These numbers refer to the corresponding illustrations. 1.2 About this documentation It is essential that the operating instructions are read before initial operation. The information provided in the detailed operating instructions installed in the tool as well as the supplements and updates provided at must also be observed. Always keep these operating instructions together with the tool. Ensure that the operating instructions are with the tool when it is given to other persons. 1.3 Product information Hilti products are designed for professional use and may be operated, serviced and maintained only by trained, authorized personnel. This personnel must be informed of any particular hazards that may be encountered. The product and its ancillary equipment may present hazards when used incorrectly by untrained personnel or when used not as directed. The type designation and serial number are printed on the rating plate. Write down the serial number in the table below. You will be required to state the product details when contacting Hilti Service or your local Hilti organization to enquire about the product. Product information page 1 Product information Laser range meter PD-I Generation 01 1
.")


6 Serial no. 1.4 Laser information on the tool Laser information page 2 Laser information Laser Class 2 based on the IEC / EN :2007 standard in compliance with CFR (Laser Notice 50). Laser Class 2: Do not stare into the beam. Do not direct the beam toward other persons or toward areas in which other persons, who are not involved in the work with lasers, may be present. Recycle waste material. 2 Safety 2.1 Safety instructions Basic information concerning safety In addition to the safety rules listed in the individual sections of these operating instructions, the following rules must be strictly observed at all times. The product and its ancillary equipment may present hazards when used incorrectly by untrained personnel or when used not as directed. Keep all safety instructions and information for future reference. Stay alert, watch what you are doing and use common sense when working with the product. Do not use the product while you are tired or under the influence of drugs, alcohol or medication. A moment of inattention while operating the product may result in serious personal injury. Do not render safety devices ineffective and do not remove information and warning notices. If the product is opened improperly, laser radiation in excess of Class 2 may be emitted. Have the product repaired only by Hilti Service. Tampering with or modification of the product is not permitted. Check that the product functions correctly each time before use. Measurements taken through panes of glass or other objects may be inaccurate. The measurement may be incorrect if the conditions under which the measurement is taken change rapidly, e.g. due to people walking through the path of the laser beam. Do not point the product toward the sun or other powerful light sources. Take the influences of the surrounding area into account. Do not use the tool where there is a risk of fire or explosion. Observe the information printed in the operating instructions concerning operation, care and maintenance General safety rules Check the product for damage before use. Have the damage repaired by Hilti Service. Check the accuracy of the product after it has been dropped or subjected to other mechanical stresses. Although the product is designed for the tough conditions of jobsite use, as with other measuring instruments it should be treated with care. Products which are not in use must be stored in a dry, high place or locked away out of reach of children. The product is not intended for use by children. Observe the national health and safety requirements Proper preparation of the working area Avoid unfavorable body positions when working from ladders. Make sure you have a safe stance and that you stay in balance at all times. Secure the site at which you are taking measurements and take care to avoid directing the laser beam toward other persons or toward yourself. 2
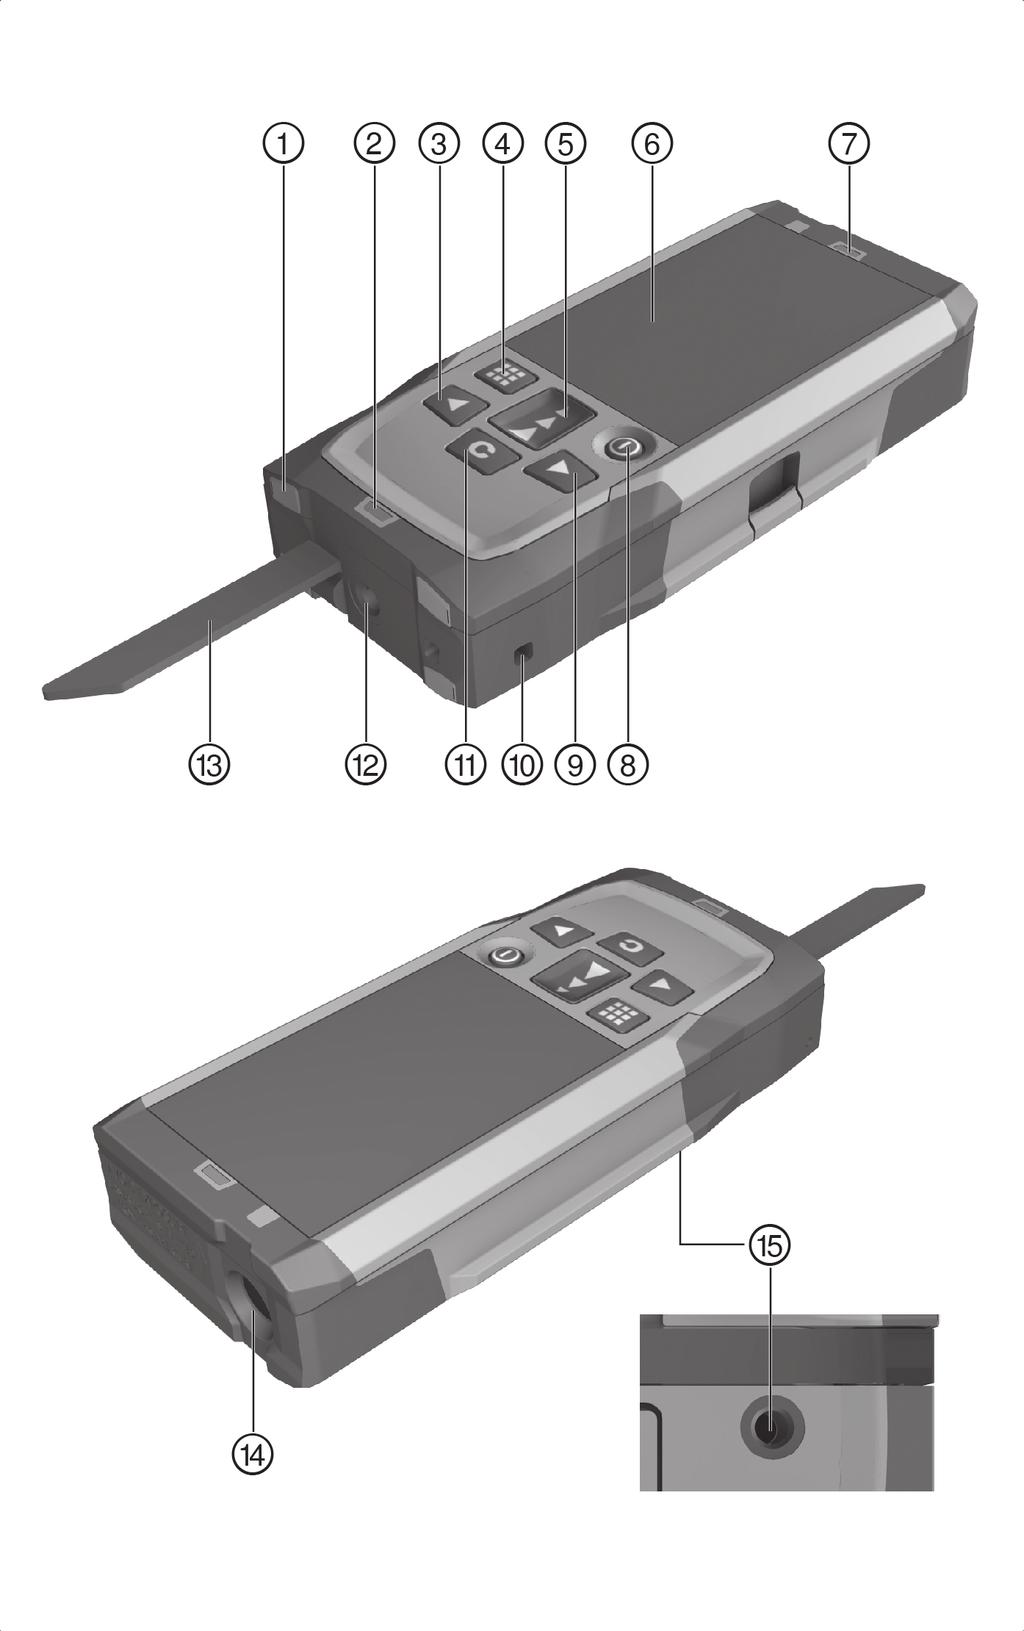
7 When the product is brought into a warm environment from very cold conditions, or vice-versa, allow it to become acclimatized before use. Use the product only within its specified limits. Keep the laser exit window clean in order to avoid measurement errors. Observe the accident prevention regulations applicable in your country Working safely with laser tools Laser Class 2/Class II tools may be operated only by appropriately trained persons. Laser beams should not be projected at eye height. Precautions must be taken to ensure that the laser beam does not unintentionally strike highly reflective surfaces. Precautions must be taken to ensure that persons do not stare directly into the beam. The laser beam must not be allowed to project beyond the controlled area. Switch the laser tool off when it is not in use. Store laser tools, when not in use, in places to which unauthorized persons have no access Electromagnetic compatibility Although the device complies with the strict requirements of the applicable directives, Hilti cannot entirely rule out the possibility of interference to the device caused by powerful electromagnetic radiation, possibly leading to incorrect operation. Check the accuracy of the device by taking measurements by other means when working under such conditions or if you are unsure. Likewise, Hilti cannot rule out the possibility of interference with other devices (e.g. aircraft navigation equipment). The tool complies with the requirements of class A; The possibility of interference occurring in a domestic environment cannot be excluded. Only for Korea: This laser range meter is suitable for commercial and industrial use and for the electromagnetic radiation encountered in this field (Class A). Users must pay attention to this point and make sure that this laser range meter is not used in occupied living areas. 3 Description 3.1 Overview of the product Rear contact surface ; Reference indicator LED for rear contact = Left arrow button % Menu button Measure button & ( Graphic display ) Reference indicator LED for front contact + On/off button Right arrow button / Hand strap attachment point : Delete (clear) button ¹/₄ inch thread $ Folding spike Laser emitting and receiving lens ¹/₄ inch thread 3.2 Intended use The product described is a laser range meter. It is designed for taking individual measurements as well as the continuous measurement of distances. Distances can be measured from all stationary targets without a highly reflective surface, i.e. concrete, stone, wood, plastic, paper, etc. The use of prisms or other highly reflective targets is not permissible and, if attempted, may falsify the results. The product is approved for use with batteries of the type AAA. 3.3 Explanation of the display Main menu Measure volumes Measure rectangular areas Select layout function 3
8 Measure areas and volumes Select special functions Select trapezoid function Select Pythagoras function Select settings At least one right angle is required for horizontal and diagonal distances. Select indirect measuring No specific angle is required for measurements on non-moving objects such as walls. Generally applicable symbols Battery charge state Measuring spike not folded out Measuring spike folded out Measuring Adding distances Subtracting distances Select Do not select Select measuring time Select calculator Area and volume measurement submenu Measuring rectangular areas Measuring triangular areas Measuring volumes Measuring cylinder volume Special functions submenu Select automatic brightness sensor Select min/max delta function Select layout function Determine painter s area Select timer Select offset function 4
9 Select data storage media Trapezoid function submenu Measure 3 distances Measure 2 distances, 1 angle Pythagoras function submenu Single Pythagoras Double Pythagoras Combined Pythagoras Settings submenu Unit of measurement. Select unit of measurement: meter centimeter millimeter Measuring references. Select measuring reference: front edge rear of thread underside of thread Angle unit. Select angle unit: inclination in percent metric units imperial units inclination in angular degrees Select expert mode Edit favorites list Activate scale Switching the signal tone on / off Select laser on constantly Select display inclination Calibrate inclination sensor Display information about the tool Resetting to the default settings Indirect measurement submenu Indirect horizontal distance measurement Indirect vertical distance measurement Measurements on ceilings 3.4 Items supplied Laser range meter, two batteries, operating instructions, manufacturer s certificate. You can find other system products approved for use with your product at your local Hilti Center or online at: 5
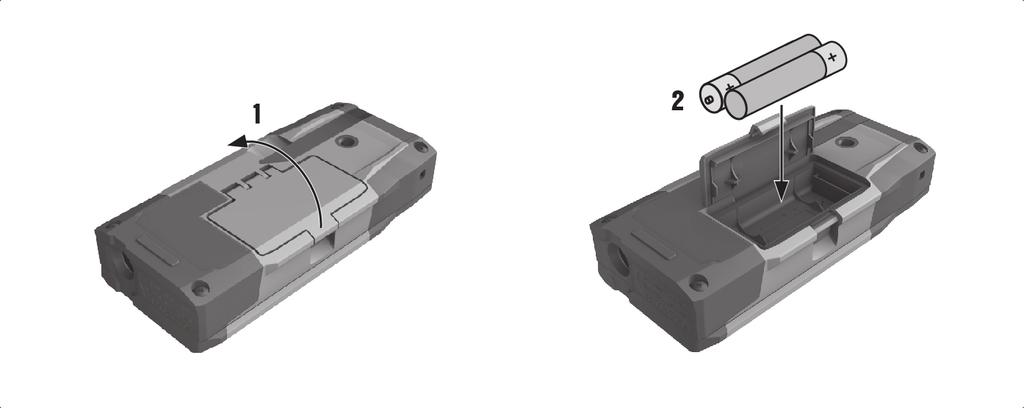
10 4 Technical data Battery life Room temperature: Up to 5000 measurements Operating temperature ( ) Distance measurement accuracy (2σ, standard deviation) ±1.0 mm Inclination measurement accuracy (2σ, standard deviation) ±0.2 Weight (including batteries) 165 g (5.8 oz) Storage temperature ( ) Laser class in accordance with EN :2007 Laser class 2 Protection class in accordance with IEC IP 65 Power source 1.5 V 5 Operation 5.1 Basic functions Navigate to the desired function with the aid of the left or right arrow buttons. Always press the Measure button to select a function. 5.2 Inserting the batteries 2 Take care to ensure correct battery polarity. Change the batteries only in pairs. Do not use damaged batteries. Open the battery compartment and insert the batteries. 5.3 Switching the laser range meter on and off 1. If the tool is switched off, press the on/off button or the Measure button to switch it on. 2. If the tool is switched on, press the on/off button to switch it off. 5.4 Measuring using the spike 3 1. Fold out the spike through 90. The spike can then be used as the contact point. Here, the spike helps to align the device while a stable position is established. This is the case primarily for indirect, trapezoid and Pythagoras measurements since these results are based on estimated values. Use the measuring extension PDA 72 for inaccessible places. The device automatically detects the measuring extension. A confirmation window may appear in the display. 2. Fold out the spike through 180. The measuring reference point is then set automatically. 5.5 Measuring using a target plate 4 1. Use the target plate to measure distance under the following unfavorable conditions: The wall is not sufficiently reflective due to the type of surface. The target point is not on a surface. The distance to be measured is very long. The light conditions are unfavorable (bright sunshine). 2. A distance of 1.2 mm should be added to the measured distance when using a target plate. 6
11 5.6 Single measurements 1. Press the Measure button briefly to activate the laser beam. 2. Keep the laser beam on the target point. 3. Press the Measure button briefly to take the measurement. The measured distance is shown in the lower line of the display. The distance measured in the previous measurement is shown in the upper line of the display. 4. To take another measurement, keep the laser beam on the target point and press the Measure button again. 5.7 Continuous measurement During continuous measurement, 6-10 measurements are taken and displayed every second. The laser range meter can be moved relative to the target until the desired distance is reached. 1. Press the Measure button for 2 seconds. If the signal tone is active, a signal tone will be emitted. 2. Move the laser range meter toward or away from the target until the desired distance is reached. 3. Press the Measure button briefly. The measured distance is shown in the lower line of the display. The distance measured in the previous measurement is shown in the upper line of the display. 5.8 Measuring volumes 1. Aim the tool at the target point and press the Measure button. 2. Aim the tool at the next target point and press the Measure button. 3. Aim the tool at the next target point and press the Measure button. 5.9 Measuring rectangular areas 1. Aim the tool at the target point for the room width and press the Measure button. 2. Aim the tool at the target point for the room length and press the Measure button Layout function 1. Enter the distance manually. Do this by using the left or right arrow buttons to select the keyboard symbol and confirm by pressing the Measure button. 2. Select the applicable numbers and confirm by pressing the Measure button. 3. To confirm the value, select the check mark symbol (tick) at the bottom right corner. 4. Select the flag symbol. The distance you have entered will then be shown between the two flags. 5. Press the Measure button to begin measuring. The arrows on the screen indicate in which direction you must move the tool. When the target distance is reached, black arrows appear above and below the distance shown in the display. 6. To repeat this distance measurement several times, move the tool further. The number of times you have measured out this distance is shown on the right of the screen. 7. Press the Measure button to stop measuring. When the distance to be set out is reached, the currently used measuring reference is shown in the display. As an alternative to entering the distance manually, the distance to be set out may also be measured with the tool. To do this, select the symbol for single measurement and confirm your choice by pressing the Measure button. 7
12 5.11 Special functions Automatic brightness sensor Select the symbol for the automatic brightness sensor from the special functions menu. The automatic brightness sensor automatically dims the lighting on the display in dark surroundings. This saves battery power Min/max delta function 1. Select the symbol for the min/max delta function from the special functions menu. 2. Aim the tool at the target point and press the Measure button. 3. Press the Measure button to stop measuring. The last distances measured are shown in the results line Painter s area 1. Aim the tool at the target point for the first room length and press the Measure button. The result is saved as an intermediate result. 2. Aim the tool at the target for the next room length and press the Measure button to take the measurement. The second result is shown in the intermediate results table. The intermediate result shown in bold is the sum of the measured room lengths. 3. Repeat this procedure until all room lengths have been measured. 4. Press the right arrow button to switch to room height and confirm by pressing the Measure button. 5. Position and aim the tool for room height measurement and then take the measurement. The room height is measured and displayed in the intermediate result line. The painter s area is calculated immediately and shown in the result line Timer 1. Select the timer symbol from the special functions menu. 2. Set the timer to 2, 5 or 10 seconds and confirm by pressing the Measure button. 3. Select the Measure symbol to trigger the delayed measurement Data memory 1. Select the data storage symbol from the special functions menu. The tool can save up to 30 screens, including the graphical symbols. If 30 screens have already been saved, the oldest one will be deleted automatically when a new screen is saved. 2. To delete data storage memory, press and hold the C-button for 2 seconds while the data storage screen is displayed Trapezoid Trapezoid function (3 distances) 1. Select the symbol for the trapezoid function for 3 distances from the trapezoid functions menu. 2. Aim the tool at the target point and press the Measure button. After measuring the first distance, the graphical display automatically prompts you to take the next measurement. 3. Aim the tool at the next target point and press the Measure button. 4. Aim the tool at the third target point and press the Measure button Trapezoid with Inclination (2 distances, 1 angle) 1. Select the symbol for the trapezoid function with inclination from the trapezoid functions menu. 2. Aim the tool at the target point and press the Measure button. 3. Aim the tool at the next target point and press the Measure button. 8
13 5.13 Pythagoras Single Pythagoras 1. Aim the tool at the target point and press the Measure button. 2. Aim the tool at the next target point and press the Measure button. In order to achieve accurate results, the second distance must be measured at right angles to the target distance Double Pythagoras 1. Aim the tool at the target point and press the Measure button. 2. Aim the tool at the next target point and press the Measure button. In order to achieve accurate results, the second distance must be measured at right angles to the target distance. 3. Aim the tool at the third target point and press the Measure button Combined Pythagoras 1. Aim the tool at the target point and press the Measure button. 2. Aim the tool at the next target point and press the Measure button. 3. Aim the tool at the next target point and press the Measure button Settings Editing the favorites list 1. Navigate to the function that you wish to edit and confirm by pressing the Measure button. 2. Navigate to the desired function and confirm by pressing the Measure button Activating the scale 1. Set the applicable number and confirm the value by pressing the Measure button. 2. Select the check mark symbol (tick) to confirm the value Calibrate inclination sensor 1. Place the tool on a horizontal surface and press the Measure button. 2. Rotate the tool through 180 and press the Measure button. The inclination sensor is now calibrated Indirect measurements Indirect horizontal distance measurement Aim the tool at the target point and press the Measure button. The distance and angle of inclination are measured and shown in the intermediate result line. The target distance is calculated immediately and shown in the result line Indirect vertical distance (2 angles, 2 distances) 1. Aim the tool at the target point and press the Measure button. The first distance and angle are measured and shown in the intermediate result line. The graphical display automatically prompts you to measure the second distance. 2. Aim the tool at the next target point and press the Measure button. The target distance is calculated immediately and shown in the result line Measuring on ceilings 1. Aim the tool at the target point and press the Measure button. The first distance and angle are measured and shown in the intermediate result line. The graphical display automatically prompts you to measure the second distance. 9
 1. Aim the tool at the target point and press the Measure button.")

14 2. Aim the tool at the next target point and press the Measure button. The target distance is calculated immediately and shown in the result line Indirect vertical distance II (2 angles, 1 distance) 1. Aim the tool at the target point and press the Measure button. The first distance and angle are measured and shown in the intermediate result line. The graphical display automatically prompts you to measure the second distance. 2. Aim the tool at the next target point and press the Measure button. The target distance is calculated immediately and shown in the result line. 6 Care, transport and storage 6.1 Cleaning Do not touch the lens with the fingers. Clean the lens by blowing the dust off or by wiping with a clean, dry cloth. Do not use liquids other than pure alcohol or water. 6.2 Transport The batteries must be insulated or removed from the product before it is shipped or sent by mail. Use the Hilti packaging or packaging of equivalent quality for transporting or shipping your equipment. 6.3 Storage and drying Do not put the product into storage when wet. Allow it to dry before putting it away. Observe the temperature limits given in the Technical Data section which are applicable to storage or transport of the equipment. Check the accuracy of the equipment before it is used after a long period of storage or transportation. 6.4 Disposal WARNING Risk of injury. Hazards presented by improper disposal. Improper disposal of the equipment may have the following consequences: The burning of plastic components generates toxic fumes which may present a health hazard. Batteries may explode if damaged or exposed to very high temperatures, causing poisoning, burns, acid burns or environmental pollution. Careless disposal may permit unauthorized and improper use of the equipment. This may result in serious personal injury, injury to third parties and pollution of the environment. Most of the materials from which Hilti products are manufactured can be recycled. The materials must be correctly separated before they can be recycled. In many countries, your old tools, machines or appliances can be returned to Hilti for recycling. Ask Hilti Service or your Hilti representative for further information. In accordance with the European Directive on waste electrical and electronic equipment and its implementation in conformance with national law, electric tools or appliances that have reached the end of their life must be collected separately and returned to an environmentally compatible recycling facility. Disposal of electric tools or appliances together with household waste is not permissible. 7 FCC statement / IC statement CAUTION This product has been tested and found to comply with the limits for a class B digital device, pursuant to part 15 of the FCC Rules. These limits are designed to provide reasonable protection against harmful interference in a residential installation. These products generate, use and can radiate radio frequency energy and, if not installed and used in accordance with the instructions, may cause interference to radio communications. 10
15 There is no guarantee that interference will not occur in a particular installation. If this product does cause harmful interference to radio or television reception, which can be determined by turning the product off and on, the user is encouraged to try to correct the interference by taking the following measures: Re-orient or move the receiving antenna. Increase the distance between the product and receiver. Connect the product to a power outlet on a circuit different from that to which the receiver is connected. Consult your dealer or an experienced TV/radio technician for assistance. Changes or modifications not expressly approved by Hilti may restrict the user s right to operate the product. This product complies with the requirements in Paragraph 15 of the FCC Rules and RSS 210 of IC. Operation of the product is subject to the following conditions: This product should cause no harmful interference. This product must accept any interference received, including interference that may cause undesired operation. 8 Manufacturer s warranty Please contact your local Hilti representative if you have questions about the warranty conditions. 11
16 Hilti = registered trademark of Hilti Corp., Schaan Pos * *
PD 5. English Français Español
 PD 5 English Français Español en fr es 1 2 3 4 PD 5 en Original operating instructions.......................... 1 fr Mode d'emploi original............................... 12 es Manual de instrucciones
ON!Track smart tag AI T380. English. Printed: Doc-Nr: PUB / / 000 / 02
 ON!Track smart tag AI T380 English 1 Information about the documentation 1.1 About this documentation Read this documentation before initial operation or use. This is a prerequisite for safe, trouble-free
Table of Contents. Makita LD050P 1
 Table of Contents EN Instrument Set-up - - - - - - - - - - - - - - - - - - - - - - - Introduction- - - - - - - - - - - - - - - - - - - - - - - - - - - - - - - Overview - - - - - - - - - - - - - - - - -
DE EN FR IT ES RU PL DA NL NO SV
 DE FR IT ES RU PL DA NL NO SV Table of Contents Instrument Set-up - - - - - - - - - - - - - - - - - - - - - - - Introduction- - - - - - - - - - - - - - - - - - - - - - - - - - - - - - - Overview - - -
Table of Contents. Stabila LD 320 1
 Table of Contents EN Instrument Set-up - - - - - - - - - - - - - - - - - - - - - - - Introduction- - - - - - - - - - - - - - - - - - - - - - - - - - - - - - - Overview - - - - - - - - - - - - - - - - -
1 Symbols. 4 Foreseeable misuse Do not use the device as a laser pointer. Do not use the device in explosive or aggressive environments.
 A 1 2 B 3 G H 4 C 7 5 6 I J D 8 9 10 11 12 13 12 13 K 14 E F 1 Symbols 1.1 Warning notices The warning notices differ from one another concerning the type of danger through the following signs: Caution
X2 LASER DISTANCE METER. Operating instruction
 X2 LASER DISTANCE METER Operating instruction A B C D E F 1 Symbols 1.1 Warning notices The warning notices differ from one another concerning the type of danger through the following signs: Caution warns
Operating instructions 1 26 Mode d emploi Istruzioni d uso Manual de instruções Manual de instrucciones
 *282401* 282401 PD 30 en fr it pt es Operating instructions 1 26 Mode d emploi 27 52 Istruzioni d uso 53 78 Manual de instruções 79 104 Manual de instrucciones 105 130 5 2 9 10 9 7 10 4 8 6 3 1 PDA 50
INSTRUCTION MANUAL MODEL SAS RS-7 LASER DISTANCE METER
 INSTRUCTION MANUAL MODEL SAS RS-7 LASER DISTANCE METER KEYS, DISPLAYS AND FUNCTIONS GENERAL SAFETY RULES! DANGER! Do not aim light at persons or animals. Do not stare into the laser light source. Laser
Remote Control Outlets Operating Instructions
 Remote Control Outlets Operating Instructions - FOR INDOOR OR OUTDOOR USE - IMPORTANT SAFEGUARDS Signal Word Definitions NOTE: These are general definitions only; all may not pertain to the actual product
SMD 50. Operating instructions Mode d emploi Manual de instrucciones. Printed: Doc-Nr: PUB / / 000 / 00
 SMD 50 Operating instructions Mode d emploi Manual de instrucciones en fr es Printed: 07.07.01 Doc-Nr: PUB / 514545 / 000 / 00 1 1 5 4 5 7 9 8 6 Printed: 07.07.01 Doc-Nr: PUB / 514545 / 000 / 00 1 4 1
P10 LASER DISTANCE MEASURE. IMPORTANT: Read before Using
 IMPORTANT: Read before Using LASER DISTANCE MEASURE P10 www.prexiso-eu.com/penlaser Questions, problems, missing parts? Before returning to your retailer, call our customer service department For English
IMPORTANT: Read Before Using. Operating/Safety Instructions 8601-RL
 IMPORTANT: Read Before Using Operating/Safety Instructions 8601-RL 3 1 2 7 5 6 8 6 4-2- General Safety Rules! DANGER LASER RADIATION. AVOID DIRECT EYE EXPOSURE. DO NOT stare into the laser light source.
Wireless Z-Wave Control ZRP-100US Z-Wave Repeater USER MANUAL. Introduction
 Wireless Z-Wave Control ZRP-100US Z-Wave Repeater USER MANUAL Introduction Thank you for choosing ZRP-100 Z-Wave Repeater product! ZRP-100 is a Z-Wave repeater with best RF performance to repeat Z-Wave
USER MANUAL. Laser Distance Meter MODELS DT40M, DT60M, and DT100M
 USER MANUAL Laser Distance Meter MODELS DT40M, DT60M, and DT100M Contents Introduction... 3 Safety Instructions... 3 Descriptions... 4 Measurement Preparation... 6 Programming Menu... 8 Distance Measurements...
Leica DISTO TM E7100i The original laser distance meter
 Leica DISTO TM E7100i The original laser distance meter Table of Contents Instrument Set-up - - - - - - - - - - - - - - - - - - - - - - - - - - 2 Introduction - - - - - - - - - - - - - - - - - - - - -
Thermo Bluetooth-enabled Thermometer. Model: EMR211 USER MANUAL CONTENTS
 Weather@Home Thermo Bluetooth-enabled Thermometer CONTENTS Model: EMR211 USER MANUAL Introduction... 2 Overview... 2 Front view... 2 Rear view... 2 Remote Sensor (THN132N)... 3 Getting started... 3 Insert
X-Mag. High-Magnification Workstation User s Guide Revision A
 X-Mag High-Magnification Workstation User s Guide www.fsinspection.com 440831-001 Revision A Freedom Scientific, Inc., 11800 31st Court North, St. Petersburg, Florida 33716-1805, USA www.fsinspection.com
TE 7-C. English. Printed: Doc-Nr: PUB / / 000 / 03
 TE 7-C English 1 Information about the documentation 1.1 About this documentation Read this documentation before initial operation or use. This is a prerequisite for safe, trouble-free handling and use
(6) Changing the brightness of the illumination. 16 (7) Additional features Power saving mode Checking the battery status...
 Changing the brightness of the illumination. 16 (7) Additional features Power saving mode Checking the battery status...") Table of Contents 1. What is the SenseView LIGHT?... 4 2. Safety precaution... 5 3. Package... 6 4. Configuration... 7 5. After purchasing... 9 (1) Charging... 9 (2) Remove screen protection film... 9
Table of Contents 1. What is the SenseView LIGHT?... 4 2. Safety precaution... 5 3. Package... 6 4. Configuration... 7 5. After purchasing... 9 (1) Charging... 9 (2) Remove screen protection film... 9
Product Manual. Getting Started with Roadie 2.
 MOL NUMBER RD200 Product Manual Getting Started with Roadie 2. This manual is a quick start guide for Roadie 2. Please read the following instructions and conditions before using Roadie 2. For a more comprehensive
Husqvarna Fleet Services Machine Sensor. Machine Sensor Please read these instructions carefully before using the device. Original instructions
 Husqvarna Fleet Services Machine Sensor Machine Sensor Please read these instructions carefully before using the device. Original instructions Safety and Regulatory Information IMPORTANT: A complete User
DW033 / DW055E User Manual
 DW033 / DW055 User Manual www.dewalt.com Please read these instructions before operating the product S F P PT NL DK S FIN NO PL GR CZ RU HU SK SI BG RO LV LT TR HR Figures B A 1 1 C 3 AAA D 1 1 6.17ft
Leica DISTO TM E7400x The original laser distance meter
 Leica DISTO TM E7400x The original laser distance meter Table of Contents Instrument Set-up - - - - - - - - - - - - - - - - - - - - - - - - - - Introduction - - - - - - - - - - - - - - - - - - - - - -
Connevans.info. DeafEquipment.co.uk. This product may be purchased from Connevans Limited secure online store at
 Connevans.info Solutions to improve the quality of life Offering you choice Helping you choose This product may be purchased from Connevans Limited secure online store at www.deafequipment.co.uk DeafEquipment.co.uk
Manual Laser Range Finder PCE-LDM 44
 PCE Americas Inc. 711 Commerce Way Suite 8 Jupiter FL-33458 USA From Outside US: +1 Tel: (561) 320-9162 Fax: (561) 320-9176 info@pce-americas.com www.pce-instruments.com/us PCE Instruments UK Ltd. Units
Operating Instructions
 3000 Operating Instructions Contents Introduction 1 Operating Instructions 2-4 Demonstrations 5-6 Storing/Handling/Cleaning 7 Safety Precautions 7-8 Specifications 8 FCC Compliance Statement 9-10 Limited
TE 30 TE 30-AVR TE 30-C-AVR
 TE 30 TE 30-AVR TE 30-C-AVR English Français Español Português en fr es pt 1 2 3 4 5 6 7 TE 30 TE 30-AVR TE 30-C-AVR en Original operating instructions....................................... 1 fr Mode
On-Line Cardio Theater Wireless Digital Transmitter Installation and Instruction Manual
 On-Line Cardio Theater Wireless Digital Transmitter Installation and Instruction Manual Full installation instructions accompany your Cardio Theater equipment order. This On-Line version of our Installation/Instruction
Laser Distance Finder Extech DT500
 User Guide Laser Distance Finder Extech DT500 Introduction Congratulations on your purchase of the Extech Model DT500 Laser Distance Finder. This meter measures Distance up to 70m (230 ) and calculates
SAFETY INFORMATION IMPORTANT FCC LICENSING INFORMATION
 This device complies with part 15 of the FCC Rules. Operation is subject to the following two conditions: (1) This device does not cause harmful interference, and (2) This device must accept any interference
Drill INSTRUCTION MANUAL. WARNING: For your personal safety, READ and UNDERSTAND before using. SAVE THESE INSTRUCTIONS FOR FUTURE 1 REFERENCE.
 ENGLISH (Original instructions) INSTRUCTION MANUAL Drill 6411 6412 6413 007894 DOUBLE INSULATION WARNING: For your personal safety, READ and UNDERSTAND before using. SAVE THESE INSTRUCTIONS FOR FUTURE
Always there to help you. Register your product and get support at AJ3400/37. Question? Contact Philips.
 Always there to help you Register your product and get support at www.philips.com/support Question? Contact Philips AJ3400/37 User manual Contents 1 Important 3 Safety 3 2 Your clock radio 4 What's in
Instruction manual ADN-W AM. Antenna Module
 Instruction manual ADN-W AM Antenna Module For your safety www www.sennheiser.com Manual Contents For your safety... 1 The ADN-W AM antenna module... 1 Package contents... 2 Components required for wireless
TV Transmitter. User Guide Master
 TV Transmitter User Guide Master Content Before you start 3 Included in delivery 4 Components 4 Getting started 5 Connecting to power supply 5 Connecting to audio devices 6 Pairing the transmitter 7 Daily
Thermo Plus Bluetooth-enabled Thermo-Hygro Monitor Model: RAR213HG USER MANUAL
 Weather@Home Thermo Plus Bluetooth-enabled Thermo-Hygro Monitor Model: RAR213HG USER MANUAL EN Weather@Home Thermo Plus Bluetooth-enabled Thermo-Hygro Monitor Model: RAR213HG Contents USER MANUAL Introduction-----------------------------------------------------------------3
AUTOMATE Interior Sun Sensor
 AUTOMATE Interior Sun Sensor 433 MHz Internal sun sensor for automatic shade control. FEATURES: 3 Modes of operation: - Close Mode - Open / Close Mode - Shade Detect Mode 4 Light sensitivity levels INSTR.
Weather Forecast Station with Atomic Time Model: BAR206 / BAR206A
 Weather Forecast Station with Atomic Time Model: BAR206 / BAR206A EN USER MANUAL CONTENTS Overview... 2 Front View... 2 Back View... 2 Remote Sensor... 3 Getting Started... 3 Insert Batteries... 3 Remote
Wireless Pressure Station
 Wireless Pressure Station FORECAST RELATIVE PRESSURE PRESSURE HISTORY inhg -24h -18h -12h -9h- 6h -3h0 h INDOOR For online video support: http://bit.ly/laxtechtalk Model: 308-1417 DC: 111517 Table of Contents
ENGLISH (Original instructions) INSTRUCTION MANUAL. Drill DOUBLE INSULATION. IMPORTANT: Read Before Using.
 INSTRUCTION MANUAL. Drill DOUBLE INSULATION. IMPORTANT: Read Before Using.") ENGLISH (Original instructions) INSTRUCTION MANUAL Drill 64 642 643 007894 DOUBLE INSULATION IMPORTANT: Read Before Using. ENGLISH (Original instructions) SPECIFICATIONS Model 64 642 643 Capacities Steel
ENGLISH (Original instructions) INSTRUCTION MANUAL Drill 64 642 643 007894 DOUBLE INSULATION IMPORTANT: Read Before Using. ENGLISH (Original instructions) SPECIFICATIONS Model 64 642 643 Capacities Steel
Clock Radio CR2307 INSTRUCTION MANUAL
 Clock Radio CR2307 INSTRUCTION MANUAL Warnings and Precautions TO PREVENT FIRE OR SHOCK HAZARDS, DO NOT EXPOSE THIS UNIT TO RAIN OR MOISTURE. This symbol, located on back or bottom of the unit, is intended
Model: WS-9066U-IT Instruction Manual DC: Wireless Weather Station with Moon Phase
 Model: WS-9066U-IT Instruction Manual DC: 051716 Wireless Weather Station with Moon Phase Contents Initial Setup... 2 Moon Phase... 2 Buttons... 2 LCD Features... 3 Settings Menu... 3 MIN/MAX Temperature
Contents. Page English 1. French. Spanish. Reset of MIN/MAX records 915 MHz Reception Mounting Care and Maintenance Warranty Information
 Contents Language Page English 1 French Spanish WIRELESS 915 MHz TEMPERATURE STATION Instruction Manual TABLE OF CONTENTS Topic Page Inventory of Contents Features Setting Up Battery Installation Function
ONYX Deskset HD. Portable Video Magnifier User s Guide. Freedom Scientific, Inc Revision A
 ONYX Deskset HD Portable Video Magnifier User s Guide Freedom Scientific, Inc. www.freedomscientific.com 440829-001 Revision A PUBLISHED BY Freedom Scientific 11800 31 st Court North St. Petersburg, Florida
Wireless SingStar Microphone Instruction Manual
 Wireless SingStar Microphone Instruction Manual 2008 Sony Computer Entertainment Europe. SingStar is a trademark or a registered trademark of Sony Computer Entertainment Europe. 2, PLAYSTATION and PlayStation
Laser Distance Finder Extech DT500
 User Guide Laser Distance Finder Extech DT500 Introduction Congratulations on your purchase of the Extech Model DT500 Laser Distance Finder. This meter measures Distance up to 70m (230 ) and calculates
421D. Users Manual. Distance Meter
 421D Distance Meter Users Manual September 2009 2009 Fluke Corporation. All rights reserved. Specifications are subject to change without notice. All product names are trademarks of their respective companies.
Wireless Pressure Station with Backlight
 Wireless Pressure Station with Backlight FORECAST RELATIVE PRESSURE PRESSURE HISTORY inhg -24h -18h -12h -9h- 6h -3h0 h INDOOR For online video support: http://bit.ly/laxtechtalk Model: 308-1417BL DC:
ENGLISH (Original instructions) INSTRUCTION MANUAL. Drill MT600 MT601 DOUBLE INSULATION. IMPORTANT: Read Before Using.
 INSTRUCTION MANUAL. Drill MT600 MT601 DOUBLE INSULATION. IMPORTANT: Read Before Using.") ENGLISH (Original instructions) INSTRUCTION MANUAL Drill MT600 MT60 003635 DOUBLE INSULATION IMPORTANT: Read Before Using. ENGLISH (Original instructions) SPECIFICATIONS Model MT600 MT60 Capacities Steel
ENGLISH (Original instructions) INSTRUCTION MANUAL Drill MT600 MT60 003635 DOUBLE INSULATION IMPORTANT: Read Before Using. ENGLISH (Original instructions) SPECIFICATIONS Model MT600 MT60 Capacities Steel
Wireless Rain Station
 Wireless Rain Station For online video support: http://bit.ly/laxtechtalk Instructional Manual Model: T84237 DC:102017 Table of Contents 1 Button Function Explanation 8 NOW Rainfall Alert (silent) 2 Setup
Model R8001. Instructionn Manual. Laser Distance Meter. reedinstruments. www. com
 Model R8001 Laser Distance Meter Instructionn Manual reedinstruments com Table of Contents Safety... 3 Features... 3 Specifications...3-4 Instrument Description... 5 Operating Instructions...6-10 Measuring
ENGLISH (Original instructions) INSTRUCTION MANUAL. Drill DS4012 DOUBLE INSULATION. IMPORTANT: Read Before Using.
 INSTRUCTION MANUAL. Drill DS4012 DOUBLE INSULATION. IMPORTANT: Read Before Using.") ENGLISH (Original instructions) INSTRUCTION MANUAL Drill DS402 05402 DOUBLE INSULATION IMPORTANT: Read Before Using. ENGLISH (Original instructions) SPECIFICATIONS Model DS402 Capacities Steel 3 mm Wood
ENGLISH (Original instructions) INSTRUCTION MANUAL Drill DS402 05402 DOUBLE INSULATION IMPORTANT: Read Before Using. ENGLISH (Original instructions) SPECIFICATIONS Model DS402 Capacities Steel 3 mm Wood
DC162 Digital Visualizer. User Manual. English - 1
 DC162 Digital Visualizer User Manual English - 1 Chapter 1 Precautions Always follow these safety instructions when setting up and using the Digital Visualizer: 1. Please do not tilt the machine while
WEATHER IN MOTION Model: BAR200 / BAR200U / BAR200A USER MANUAL
 WEATHER IN MOTION Model: BAR200 / BAR200U / BAR200A USER MANUAL Eu-declaration Of Conformity... 7 Fcc Statement... 8 Declaration Of Conformity... 8 EN CONTENTS Introdction... 2 Overview... 2 Front View...
USER'S GUIDE. EcoQuest International 310 T. Elmer Cox Drive Greeneville, TN (423) Setup. Operation. Specifications.
 Setup. Operation. Specifications.") USER'S GUIDE Setup Operation Specifications Warranty (43) 638-746 CAUTION: Read manual carefully for proper procedures and operation. CONTENTS SPECIFICATIONS Specifications...............................................................3
USER'S GUIDE Setup Operation Specifications Warranty (43) 638-746 CAUTION: Read manual carefully for proper procedures and operation. CONTENTS SPECIFICATIONS Specifications...............................................................3
Always there to help you. Register your product and get support at AE2430. User manual
 Always there to help you Register your product and get support at www.philips.com/support AE2430 User manual Contents 1 Important 2 Safety 2 Notice 3 2 Your Portable Radio 5 Introduction 5 What s in the
1. Brief Introduction
 1 3 5 4 6 2 7 8 10 9 11 EN 1. Brief Introduction Laser Site Calculator measures distances up to 60 meters in just one second with 1.5 millimeter accuracy. It s integrated with a worldwide unique feature:
INSTRUCTION MANUAL DW089-XE 3 BEAM LINE LASER
 INSTRUCTION MANUAL DW089-XE 3 BEAM LINE LASER Definitions: Safety Guidelines The definitions below describe the level of severity for each signal word. Please read the manual and pay attention to these
Instruction Manual. Self-Leveling Cross-Line Laser Level Model No and
 3728H_Manuals 9/2/10 8:02 AM Page 1 Self-Leveling Cross-Line Laser Level Model No. 40-6620 and 40-6625 Instruction Manual Congratulations on your choice of this Self-Leveling Cross-Line Laser Level. We
AM/FM Stereo Headset Radio
 User s Guide 12-590 AM/FM Stereo Headset Radio Thank you for purchasing your AM/FM Stereo Headset Radio from RadioShack. Please read this user s guide before installing, setting up, and using your new
LazerTape 160. Lazer Distance Meter TRIPLETT. Instruction Manual. 99 Washington Street Melrose, MA Phone Toll Free
 TRIPLETT - - - -- - - - - -- - - - -- - --- - -- LazerTape 160 Lazer Distance Meter Instruction Manual 99 Washington Street Melrose, MA 02176 Phone 781-665-1400 Toll Free 1-800-517-8431 Visit us at www.testequipmentdepot.com
Ambient Weather WS-0270 Wireless Indoor / Outdoor Thermometer with Indoor Humidity User Manual
 Ambient Weather WS-0270 Wireless Indoor / Outdoor Thermometer with Indoor Humidity User Manual Table of Contents 1 Introduction... 1 2 Getting Started... 1 2.1 Parts List... 2 2.2 Recommend Tools... 2
A510S Operation Manual
 A510S Operation Manual REV 1.1 1 Table of Contents 1 General Information 1-1 Description 1-2 Potential Operational Hazards 1-3 Technical Specifications 1-4 Instrument Overview 1-5 Function Summary 2 How
Camera. Multi Lens Camera A-427-V. Quick Start Guide
 Camera Multi Lens Camera A-427-V Quick Start Guide 0 About this Manual Multi Lens Camera Quick Start Guide This Manual is applicable to A-427-V Network Camera. The Manual includes instructions for using
User s Manual. hand-held laser distance meter
 User s Manual hand-held laser distance meter >1/4 S Safety Regulations Please read the safety regulations and operation guide carefully before operating. Please read all of the operational guide and safety
Active Transmitter Combiner 8:1 AC 3200-II. Instruction manual
 Active Transmitter Combiner 8:1 AC 3200-II Instruction manual Contents Contents Important safety instructions... 2 The AC 3200-II active transmitter combiner 8:1... 4 Delivery includes... 4 Connection
User's Guide. Wireless AC Circuit Identifier. Models RT30 and RT32
 User's Guide Wireless AC Circuit Identifier Models RT30 and RT32 Introduction Congratulations on your purchase of Extech s Model RT30 (914Mhz) or RT32 (869MHz) Wireless AC Circuit Identifier. The detector
THANK YOU! Crush Micro PiX. Thank you for choosing Orange. You are now a member of the Legendary British Guitar Amplifier owners club!
 THANK YOU! Thank you for choosing Orange. You are now a member of the Legendary British Guitar Amplifier owners club! Since 1968 when the company was founded, Orange has been a pioneering force in the
Multi-Channel In-Out Thermometer with Cable Free Sensor and RF Clock
 Multi-Channel In-Out Thermometer with Cable Free Sensor and RF Clock MAIN FEATURES: MAIN UNIT GB MODEL: RMR182 USER'S MANUAL INTRODUCTION Congratulations on your purchase of the RMR182 Multi- Channel In-Out
Panther. Installation instructions. Transmitters PN-TX-MD3M (PN-T13-3) PN-TX-MD4M (PN-T13-4) PN-TX-MD6M (PN-T13-6) PN-TX-MD8M (PN-T13-8) PN-TX-MD10M
 PN-TX-MD4M (PN-T13-4) PN-TX-MD6M (PN-T13-6) PN-TX-MD8M (PN-T13-8) PN-TX-MD10M") Panther Installation instructions Transmitters PN-TX-MD3M (PN-T13-3) PN-TX-MD4M (PN-T13-4) PN-TX-MD6M (PN-T13-6) PN-TX-MD8M (PN-T13-8) PN-TX-MD10M (PN-T13-10) IM-PN-TX104-A03-EN Language: English (original)
Panther Installation instructions Transmitters PN-TX-MD3M (PN-T13-3) PN-TX-MD4M (PN-T13-4) PN-TX-MD6M (PN-T13-6) PN-TX-MD8M (PN-T13-8) PN-TX-MD10M (PN-T13-10) IM-PN-TX104-A03-EN Language: English (original)
Resusci Anne Advanced SkillTrainer
 EN Resusci Anne Advanced SkillTrainer Important Product Information www.laerdal.com Cautions and Warnings A Caution identifies conditions, hazards, or unsafe practices that can result in minor personal
Model: WS-7014CH-IT Instruction Manual DC: WIRELESS FORECAST STATION
 Model: WS-7014CH-IT Instruction Manual DC: 081815 WIRELESS FORECAST STATION Date Time + WWVB Indoor Temperature, Humidity + Comfort Forecast + Tendency Outdoor Temperature ºF/ºC + Channel Indicator Base
Instruction Manual. Model # / / / / BG / BG / BO / BO. Lit # /06-13
 Instruction Manual Model # 360410 / 360411 / 360412 / 360413 / 360401BG / 360411BG / 360400BO / 360401BO Lit # 98-2280/06-13 Control & Display Guide MARK/Backlight Button Direction to Marked Location or
Pocket Weatheradio with Tone and Vibrating Alert
 Pocket Weatheradio with Tone and Vibrating Alert OWNER S MANUAL Please read before using this equipment. Your RadioShack Pocket Weatheradio is designed to receive National Weather Service (NWS) broadcasts,
WS-9006U Wireless Temperature Station
 WS-9006U Wireless Temperature Station Instruction Manual RF reception indicator Outdoor Temperature Indoor Temperature Time Outdoor Temperature Sensor TX43U MIN/MAX/+ Button CF / SET Button FEATURES: Four
ALPHA meter. General. Installation instructions IL S
 Installation instructions IL4-400S General This instructional leaflet contains general installation instructions for the following single phase and polyphase watthour meters: socket-connected meters: S,
Buzz Lightyear Learn & Go
 Buzz Lightyear Learn & Go Disney/Pixar Slinky Dog is a registered trademark of Poof-Slinky, Inc. Poof-Slinky, Inc. Visit the Disney Website at www.disney.com 2010 VTech Printed in China To learn more about
Wireless AC Circuit Identifier
 User's Guide Wireless AC Circuit Identifier Models RT30 and RT30-E 99 Washington Street Melrose, MA 02176 Phone 781-665-1400 Toll Free 1-800-517-8431 Visit us at www.testequipmentdepot.com Back to the
Agilent G1888 Network Headspace Sampler
 Agilent G1888 Network Headspace Sampler Safety and Regulatory Information Agilent Technologies Notices Agilent Technologies, Inc. 2004 No part of this manual may be reproduced in any form or by any means
KANEKA OLED Lighting Module SL (LE-01L, LE-02L, LE-03L, LE-01H, LE-02H, LE-03H) Instruction Manual
 Instruction Manual") KANEKA OLED Lighting Module SL (LE-01L, LE-02L, LE-03L, LE-01H, LE-02H, LE-03H) Instruction Manual Safety Information p. 2 1 Product Overview p. 6 2 Connections and Wiring (when dimming is required) p.
KANEKA OLED Lighting Module SL (LE-01L, LE-02L, LE-03L, LE-01H, LE-02H, LE-03H) Instruction Manual Safety Information p. 2 1 Product Overview p. 6 2 Connections and Wiring (when dimming is required) p.
USER MANUAL 600A AC Clamp Meter + NCV Model MA610
 USER MANUAL 600A AC Clamp Meter + NCV Model MA610 Additional User Manual Translations available at www.extech.com Introduction Thank you for selecting the Extech MA610 Clamp Meter. This meter measures
Always there to help you. Register your product and get support at AJ7045D. Question? Contact Philips.
 Always there to help you Register your product and get support at www.philips.com/welcome Question? Contact Philips AJ7045D User Manual Contents 1 Important 3 Risk of swallowing batteries 3 2 Your clock
Resusci Anne Advanced SkillTrainer
 Resusci Anne Advanced SkillTrainer Important Product Information English www.laerdal.com Cautions and Warnings A Caution identifies conditions, hazards, or unsafe practices that can result in minor personal
P700-WLS ioprox Receiver
 Installation Manual DN1628-1611 Pre-Installation Notes Copyright 2016 Tyco International Ltd. and its Respective Companies. All Rights Reserved. All specifications were current as of publication date and
Bedienungsanleitung Instruction Manual. testo 815 Sound Level Meter
 Bedienungsanleitung Instruction Manual testo 815 Sound Level Meter de en 18 General Information General Information Please read this documentation through carefully and familiarise yourself with the operation
USER MANUAL Digital Wireless Gateway U9120-W4 (P/N: 44002G-01)
") USER MANUAL Digital Wireless Gateway U9120-W4 (P/N: 44002G-01) 19549P-82 (11-16) 2016 DAVID CLARK COMPANY INCORPORATED Cautions and Warnings READ AND SAVE THESE INSTRUCTIONS. Follow the instructions in
USER MANUAL Digital Wireless Gateway U9120-W4 (P/N: 44002G-01) 19549P-82 (11-16) 2016 DAVID CLARK COMPANY INCORPORATED Cautions and Warnings READ AND SAVE THESE INSTRUCTIONS. Follow the instructions in
EF-S17-85mm f/4-5.6 IS USM COPY ENG. Instruction
 EF-S17-85mm f/4-5.6 IS USM ENG Instruction Thank you for purchasing a Canon product. The Canon EF-S17-85mm f/4-5.6 IS USM lens Features is a compact and lightweight standard zoom 1. The Image Stabilizer
Dual Alarm Clock Radio with Digital Tuning NRC-174. Instruction Manual Please read carefully before use and keep for future reference.
 Dual Alarm Clock Radio with Digital Tuning NRC-174 Instruction Manual Please read carefully before use and keep for future reference. Important Safety Information CAUTION RISK OF ELECTRIC SHOCK DO NOT
R PROFLAME Instruction Book Collection
 9.956.028 R00 584 PROFLAME Instruction Book Collection 4-17 18-29 584 PROFLAME System 30-39 Appendix: DIP SWITCH NUMBER (0=ON 1=OFF) 40-41 4-17 Fig. 1 The SIT is a device that allows, in conjunction with
USER MANUAL. Sens it SENS IT 2.4
 USER MANUAL www.sensit.io Sens it SENS IT 2.4 SUMMARY SAFETY INSTRUCTIONS 4 I. CONTENT OF THE PACK 4 II. PRESENTATION 5 III. HOW TO START 8 IV. TECHNICAL SPECIFICATIONS 9 V. WARNING STATEMENTS 10 VI. CREDITS
ed560l Laser Distance Meter User Manual
 ed560l Laser Distance Meter User Manual Laser Distance Meter ennologic ed560l Made in China User Manual Version 1.2. Revised 11/17/2017. 2017 ennologic. All rights reserved. http://ennologic.com Table
DE EN FR ECOLINE EL 609 BEDIENUNGSANLEITUNG USER MANUAL MODE D EMPLOI EXACTLY WHAT YOU NEED.
 DE FR ECOLINE EL 609 BEDIUNGSANLEITUNG USER MANUAL MODE D EMPLOI EXACTLY WHAT YOU NEED. 1 FEATURES OPERATIONAL ELEMTS 1 vertical and 1 horizontal laser line form 1 laser cross Laser lines switchable separately
WEEE/ElektroG. 1. Overview. 2. For your safety! 2.2. General information
 EN DE EN DE We are very pleased that you have decided to purchase this product from Swarovski Optik. If you have any questions, please consult your specialist dealer or contact us directly at www.swarovskioptik.com.
How to install your ecobee Switch+
 How to install your ecobee Switch+ Warning Installing this product involves handling high voltage wiring. Each step of the enclosed instructions must be followed carefully. To avoid fire, personal injury,
WIRELESS 915 MHz TEMPERATURE STATION Instruction Manual
 Contents Language Page English 1 French Spanish TABLE OF CONTENTS WIRELESS 915 MHz TEMPERATURE STATION Instruction Manual Topic Inventory of Contents Features Setting Up Battery Installation Function keys
Geo EasyTrack Auto Tracking System for Line Lasers
 DE EN FR Geo EasyTrack Auto Tracking System for Line Lasers USER MANUAL I www.geo-fennel.de www.geo-fennel.com www.geo-fennel.fr DE Dear customer, Thank you for your confidence in us having purchased a
YDL100SF USER M A N U A L. Smart-Ashley. Smart-Ashley. Y D L S F N a m e and C a u t i o n. A u t u e n t i c a t i o n T y p e
 Smart-Ashley Smart-Ashley YDL100SF USER M A N U A L 1 2 3 4 5 6 Y D L 1 0 0 S F N a m e and C a u t i o n A u t u e n t i c a t i o n T y p e N o t i f i c a t i o n s F a c t o r y R e s e t C a u t i
SwingTracker User Guide. Model: DKST02 User Guide
 SwingTracker User Guide Model: DKST02 User Guide PACKAGE CONTENTS What Comes in the Box USING YOUR SWINGTRACKER SENSOR Attach SwingTracker Sensor to your Bat Turn On your Sensor Pair your Sensor Remove
INSTRUCTION MANUAL. IBRit - rf1 - usb PC - Station for wireless Data transmission. M e s s t e c h n i k. Messtechnik GmbH & Co.
 M e s s t e c h n i k INSTRUCTION MANUAL PC - Station for wireless Data transmission Document No. : D1F604 001 Version : April 2006 Copyright : IBR Messtechnik GmbH & Co. KG Contents 1. Introduction 1.1
INSTRUCTION MANUAL LCS TX
 INSTRUCTION MANUAL LCS TX 4 Channel Transmitter LCS1 Single Channel Transmitter Cardio Theater Inc Service 1-800-776-6695 Sales 1-800-CARDIO-1 1 Introduction CONGRATULATIONS on your choice of this product