SPECIFICATIONS - MODEL NO. MPS-700
|
|
|
- Julianna Bradley
- 5 years ago
- Views:
Transcription
1
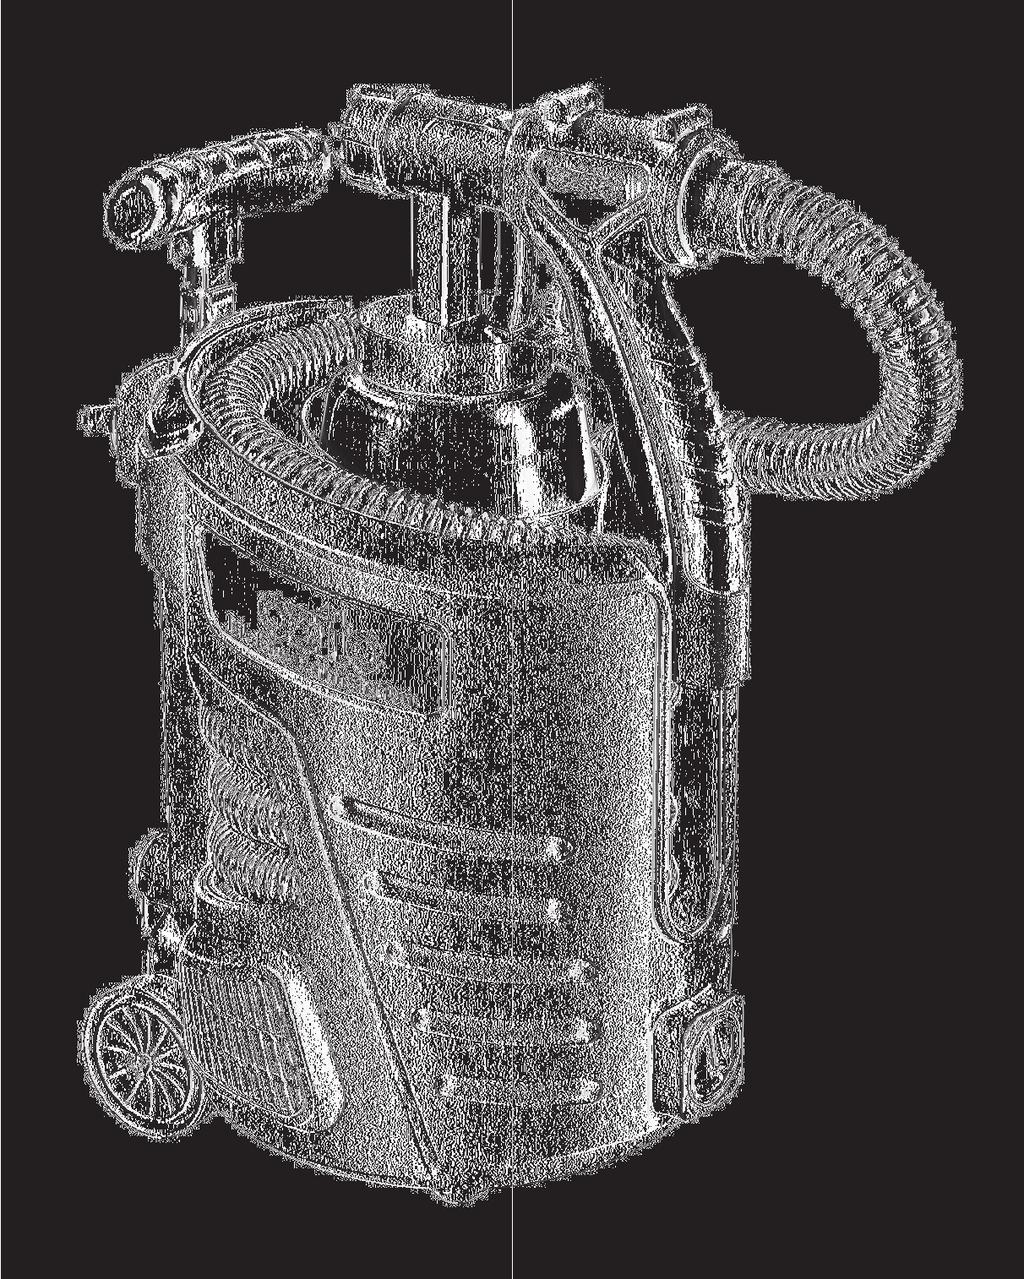
2 SPECIFICATIONS - MODEL NO. MPS-700 Motor: Input: Viscosity: Air Pressure: Max. Air Flow: Max Liquid Flow: Sound Pressure Level: Air Hose Length: Pot Capacity: Nozzle: Weight (tool only): 700W V ~ 50Hz 20 to 80 seconds (DIN-S) bar ( psi) 1200 l/min 640 ml/min 81.3 db (A) k= 3.0 db (A) 3m 800ml ø2.5mm 4.5kgs KNOW YOUR PRODUCT Air Cap 2. Nozzle 3. Spray Gun 4. On/Off Switch 5. Handle Lock 6. Handle 7. Power Cord 8. Knob 9. Wheels 10. Air Hose 11. Paint Pot 12. Trigger 13. Spray regulator dial
3 TABLE OF CONTENTS SPECIFICATIONS.. Page 1 INTRODUCTION Page 3 ELECTRICAL SAFETY. Page 3 GENERAL POWER TOOL SAFETY WARNINGS Page 4 SPRAY GUN SAFETY WARNINGS. Page 6 PREPARATION Page 7 OPERATION Page 9 MAINTENANCE. Page 13 TROUBLE SHOOTING. Page 14 SPARE PARTS.... Page 15 DESCRIPTION OF SYMBOLS. Page 15 PACK CONTENTS Page 16 WARRANTY Page 17 2
4 INTRODUCTION Congratulations on purchasing an Ozito Mobile Paint Station. We aim to provide quality tools at an affordable price. We hope you will enjoy using this tool for many years. Before using, it is most important that you read and follow the instructions in this manual, even if you feel you are quite familiar with this type of product. Your Mobile Paint station MPS-700 has been designed for Spray Painting Surfaces such as fences, boats, radiators, louver doors, sheds, furniture, models etc. and is intended for DIY use only.! ELECTRICAL SAFETY! WARNING! When using mains-powered equipment, basic safety precautions, including the following, should always be followed to reduce risk of fire, electric shock, personal injury and material damage. Read and understand the manual prior to operating this tool. Save these instructions and other documents supplied with this tool for future reference. The electric motor has been designed for 230V and 240V only. Always check that the power supply corresponds to the voltage on the rating plate. Note: The supply of 230V and 240V on Ozito tools are interchangeable for Australia and New Zealand. This tool is double insulated in accordance with AS/NZS ; therefore no earth wire is required. If the supply cord is damaged, it must be replaced by a qualified electrician or a power tool repairer in order to avoid a hazard. If operating a power tool in a damp location is unavoidable use a residual current device (RCD) protected supply Use of an RCD reduces the risk of electric shock. Note: Double insulation does not take the place of normal safety precautions when operating this tool. The insulation system is for added protection against injury resulting from a possible electrical insulation failure within the tool. Using an Extension Lead Always use an approved extension lead suitable for the power input of this tool. Before use, inspect the extension lead for signs of damage, wear and ageing. Replace the extension lead if damaged or defective. When using an extension lead on a reel, always unwind the lead completely. Use of an extension lead not suitable for the power input of the tool or which is damaged or defective may result in a risk of fire and electric shock. 3
5 ! GENERAL POWER TOOL SAFETY WARNINGS WARNING! Read all safety warnings and all instructions. Failure to! follow the warnings and instructions may result in electric shock, fire and/or serious injury. Save all warnings and instructions for future reference. The term power tool" in all of the warnings refers to your mains-operated (corded) power tool or battery-operated (cordless) power tool. 1) Work area safety a) Keep work area clean and well lit. Cluttered or dark areas invite accidents. b) Do not operate power tools in explosive atmospheres, such as in the presence of flammable liquids, gases or dust. Power tools create sparks which may ignite the dust or fumes. c) Keep children and bystanders away while operating a power tool. Distractions can cause you to lose control. 2) Electrical safety a) Power tool plugs must match the outlet. Never modify the plug in any way. Do not use any adapter plugs with earthed (grounded) power tools. Unmodified plugs and matching outlets will reduce risk of electric shock. b) Avoid body contact with earthed or grounded surfaces, such as pipes, radiators, ranges and refrigerators. There is an increased risk of electric shock if your body is earthed or grounded. c) Do not expose power tools to rain or wet conditions. Water entering a power tool will increase the risk of electric shock. d) Do not abuse the cord. Never use the cord for carrying, pulling or unplugging the power tool. Keep cord away from heat, oil, sharp edges or moving parts. Damaged or entangled cords increase the risk of electric shock. e) When operating a power tool outdoors, use an extension cord suitable for outdoor use. Use of a cord suitable for outdoor use reduces the risk of electric shock. f) If operating a power tool in a damp location is unavoidable, use a residual current device (RCD) protected supply. Use of an RCD reduces the risk of electric shock. 3) Personal safety a) Stay alert, watch what you are doing and use common sense when operating a power tool. Do not use a power tool while you are tired or under the influence of drugs, alcohol or medication. A moment of inattention while operating power tools may result in serious personal injury. b) Use personal protective equipment. Always wear eye protection. Protective equipment such as dust mask, non-skid safety shoes, hard hat, or hearing protection used for appropriate conditions will reduce personal injuries. c) Prevent unintentional starting. Ensure the switch is in the off-position before connecting to power source and/or battery pack, picking up or carrying the tool. Carrying power tools with your finger on the switch or energising power tools that have the switch on invites accidents. 4
6 ! GENERAL POWER TOOL SAFETY WARNINGS (cont.) d) Remove any adjusting key or wrench before turning the power tool on. A wrench or a key left attached to a rotating part of the power tool may result in personal injury. e) Do not overreach. Keep proper footing and balance at all times. This enables better control of the power tool in unexpected situations. f) Dress properly. Do not wear loose clothing or jewellery. Keep your hair, clothing and gloves away from moving parts. Loose clothes, jewellery or long hair can be caught in moving parts. g) If devices are provided for the connection of dust extraction and collection facilities, ensure these are connected and properly used. Use of dust collection can reduce dust-related hazards. 4) Power tool use and care a) Do not force the power tool. Use the correct power tool for your application. The correct power tool will do the job better and safer at the rate for which it was designed. b) Do not use the power tool if the switch does not turn it on and off. Any power tool that cannot be controlled with the switch is dangerous and must be repaired. c) Disconnect the plug from the power source and/or the battery pack from the power tool before making any adjustments, changing accessories, or storing power tools. Such preventive safety measures reduce the risk of starting the power tool accidentally. d) Store idle power tools out of the reach of children and do not allow persons unfamiliar with the power tool or these instructions to operate the power tool. Power tools are dangerous in the hands of untrained users. e) Maintain power tools. Check for misalignment or binding of moving parts, breakage of parts and any other condition that may affect the power tool's operation. If damaged, have the power tool repaired before use. Many accidents are caused by poorly maintained power tools. f) Keep cutting tools sharp and clean. Properly maintained cutting tools with sharp cutting edges are less likely to bind and are easier to control. g) Use the power tool, accessories and tool bits etc. in accordance with these instructions, taking into account the working conditions and the work to be performed. Use of the power tool for operations different from those intended could result in a hazardous situation. 5) Service a) Have your power tool serviced by a qualified repair person using only identical replacement parts. This will ensure that the safety of the power tool is maintained. b) If the supply cord is damaged, it must be replaced by the manufacturer, its service agent or similarly qualified persons in order to avoid a hazard. 5
7 ! SPRAY GUN SAFETY WARNINGS Hold power tool by insulated gripping surfaces, when performing an operation where the cutting accessory may contact hidden wiring or its own cord. Cutting accessory contacting a "live" wire may make exposed metal parts of the power tool "live and could give the operator an electric shock. This appliance is not intended for use by persons (including children) with reduced physical, sensory or mental capabilities, or lack of experience and knowledge, unless they have been given supervision or instruction concerning use of the appliance by a person responsible for their safety. Recommendations for the use of a residual current device with a rated residual current of 30mA or less. Using an Extension Lead Always use an approved extension lead suitable for the power input of this tool. Before use, inspect the extension lead for signs of damage, wear and ageing. Replace the extension lead if damaged or defective. When using an extension lead on a reel, always unwind the lead completely. Use of an extension lead not suitable for the power input of the tool or which is damaged or defective may result in a risk of fire and electric shock. It is recommended that the extension lead is a maximum of 25m in length. Do Not use multiple extension leads. NEVER under any circumstances aim the nozzle at another person or animal. In the event of an injury occurring, seek medical advice immediately. The spray gun must not be used for spraying flammable paints and solvents with a flash point of less than 21ºC. Always ensure there is adequate ventilation when spraying. The use of ear protection is recommended. Eye protection is recommended to keep hazardous vapours and liquids out of eyes. Always wear a face mask when spraying. Always read the paint manufacturers thinning instructions before using. Always keep the spray basket nozzle in place during use. Never allow the spray to come in direct contact with the skin. DANGER! Never immerse the spray gun in liquid. This could lead to electric shock, personal injury and material damage. The spray gun must not be cleaned by using flammable liquids with a flash point of less than 21ºC. NEVER spray near a naked flame, including an appliance pilot light. NEVER smoke whilst spraying. NEVER allow children to operate or play with the spray gun. Before cleaning, always disconnect the appliance from the mains supply. Always disconnect from mains supply when refilling the paint pot. After every use ensure you clean your spray gun thoroughly. NEVER use the spray gun outside when it is raining. 6
8 PREPARATION HVLP HIGH VOLUME LOW PRESSURE Traditional spray guns require a compressor to spray with a constant pressure. Normal electric spray guns have an electromagnetic plunger to spray paint; the disadvantage of this is that there is no constant spray. The spray is actually pulsating. The HVLP electric spray gun has a powerful fan rather than a compressor. The fan provides a high volume of air with low pressure, resulting in a constant spray without the assistance of a compressor. Explanation Of The System The device works according to low-pressure spraying technique. A high volume of air surround the spray jet being ejected under low pressure. The air cap provides a very fine atomization with the lowest of spray mist.the coating material is applied to the object quickly and exactly. The air flow shortens the drying time for the coating material this gives perfect spraying result with a saving of coating material and is therefore good for the environment. Function Description The motor blower produces a flow of air which flows through the air hose to the spray gun. The air flow atomizes the coating material at the nozzle and also pressurizes the container. This pressure pushes the coating material up the ascending pipe to the nozzle. The air and pressure setting can be adjusted progressively. Note: For obtaining the best results from your spray gun, surface preparation and paint thinning are the two most important areas with which to be concerned. Ensure all surfaces are free from dust, dirt and grease. Masking is important to ensure you do not spray those areas you wish to remain untouched. Make sure paint is thoroughly mixed. Important Selecting Paint Although a large number of paints and materials can be sprayed, some cannot. Please check manufacturer s recommendation before purchasing paint. If the paint can refers to brush application only it cannot be sprayed. Materials Which Can Be Used Suitable for a range of oil and water based products recommended for spray application, including paint, varnish, stains and wood preservatives. Materials Which Cannot Be Used THE SPRAY GUN CANNOT BE USED FOR PAINTS SUCH AS EXTERIOR TEXTURED WALL PAINTS, MATERIALS CONTAINING ABRASIVE SUBSTANCES, GLAZES, DISPERSION PAINTS, CAUSTIC AND ALKALINE SUBSTANCES OR TEXTURED COATINGS. TO OBTAIN THE BEST RESULTS FROM YOUR SPRAY GUN, PLEASE READ THE INSTRUCTIONS CAREFULLY BEFORE USE. 7
9 PREPARATION (cont.) Thinning Thinning is particularly important when spraying. Most paints are supplied ready for brush application and need to be diluted sufficiently for spraying purposes. Follow the manufacturers guide for thinning in conjunction with a spray gun. If in doubt please consult the manufacturer of the paint. The viscosity cup supplied will help you determine the correct thickness of the paint. As some paints, wood preservatives and other sprayable materials contain particles and have different qualities, please ensure that when filling the paint pot on your spray gun, the paint is filtered through either a funnel with a filter on it, or through nylon tights or stockings. This will ensure no large particles enter the paint pot, therefore preventing blockages and providing you with trouble free spraying. Ensure that a face mask, gloves, goggles and ear protectors are worn at all times when spraying. Floetrol is an acrylic paint conditioner that you can add to the paint pot which is for easy, trouble-free spraying. It helps thin your paint however also reduces wear and replacement cost of parts within the spray gun. It also reduces tip clogging avoiding freeze up in the trigger which gives you a professional finish. Floetrol is available from Bunnings Warehouse. Determining Viscosity Information regarding dilution is normally found on the material tin. Use the viscosity table to determine the thickness of the coating material. First stir the spraying material thoroughly then to determine the viscosity, dip the viscosity cup into the material below the rim level and fill up. Lift the cup out of the tin and start timing as soon as the cup is above the surface. Time how long it takes the viscosity cup to empty (Fig. 1). Use the chart below as a guide to determine if the material requires further thinning and thin accordingly, within the material manufacturers recommendations. This runout time is called DIN seconds (DIN-s). Use this table as a guide only. Material Viscosity Seconds (DIN-s) Oil based paints Primers Clear vanishes Water based paints Oil enamel Oil based primer Oil stain undiluted Clear sealer undiluted Polyurethane undiluted Varnish Wood preservatives undiluted 8
 to the spray gun (3) (Fig. 3). Align the lug with the groove in the spray gun (3). Secure by turning anti-clockwise. Fig. 3 3.")
. 5.")
.")

10 OPERATION 1. Attach air hose (10) to mobile base end (Fig. 2). Align the lug with the groove in the mobile base. Secure by turning anti-clockwise. Fig Attach the other end of the air hose (10) to the spray gun (3) (Fig. 3). Align the lug with the groove in the spray gun (3). Secure by turning anti-clockwise. Fig Unscrew the paint pot (11) from the spray gun. 4. Adjust the suction tube accordingly. It should be possible to spray the contents of the paint pot leaving hardly any paint left in the paint pot (11). 5. Spraying with horizontal objects Turn suction tube forwards as the suction tube should be pointing toward the front of the spray gun (Fig. 4). Fig Spraying overhead objects Turn suction tube to point backwards as the suction tube should be pointing toward the rear of the spray gun (Fig. 5). By pointing the suction tube in the proper direction you will not have to refill the paint pot (11) as often. Fig Filling the paint pot While filling the pot with paint, filter the paint through a piece of nylon stocking or a funnel which incorporates a filter to remove any lumps or particles. DO NOT OVERFILL. Screw the pot into the spray gun ensuring it is secure. 8. Place the spray gun in the mobile base spray gun holder for transporting to the job. 9. Unwind mains cable (7). Insert the plug into mains power socket and switch On. 9
11 OPERATION (cont.) 10. Remove the spray gun from the mobile base spray gun holder and point at a piece of cardboard or newspaper. Turn on using On/Off switch (4) on the mobile base. Note: When the mobile base is switched on the air will flow continually from the air cap (1). 11. Adjusting the Spray Gun 10. Squeeze the trigger (12) while aiming the gun at a piece of cardboard or scrap material and wait the the spray to come out. Turn the spray regulator dial (13) to required position for optimum results (Fig. 6). Fig. 6 Note: The spray regulator dial (13) is a stop that limits distance the trigger can be pressed. Choice of spraying pattern (Fig. 7) A = vertical fan - for horizontal surfaces B = horizontal fan - for vertical surfaces C = round fan - for corners, edges and other hard to access places. Fig. 7 A B C Adjusting the required spray pattern (Fig. 8): With the air cap nut loosened, turn air cap (1) to the required spray pattern. Air cap nut Fig Caution: Never open trigger (12) when making adjustments on the air cap. Spraying Technique The spraying result depends considerably on now smooth and clean the surface is before spraying is begun. For this reason the surface should be carefully prepared and kept free of dust. Surfaces and parts not to be sprayed should be masked by covering with sticky tape and newspaper. It is advisable to carry out a trial spraying onto cardboard or a similar surface to find the most suitable spray gun adjustments. Note: Start spraying outside the surface to be sprayed and avoid stopping in the middle of the surface being sprayed. 10


 and air cap (1) (Fig.11). Remove the air cap nut and air cap (1). Clean both parts and around nozzle (2) with solvent or water using a stiff brush.")
 and remove any paint build up. Be careful not to damage the nozzle (2) as this will affect the spray gun performance. Helpful Hints 1.")
12 OPERATION (cont.) Always hold the spray gun at an even distance from the object to be sprayed. The distance will very with the type of paint being sprayed, 20cm is suggested to start with and adjust if necessary. Move the spray gun evenly across or up and down, depending on the adjusted spraying effect (Fig. 9). The movement of the spray gun should be by the arm rather than the wrist to ensure that the space between the spray gun and surface remains the same throughout the operation. Uneven movement of the spray gun will give a uneven surface quality (Fig.10). A even movement of the spray gun will give a uniform surface quality. Fig. 9 Fig. 10 If coating material builds up on the nozzle (2) and air cap (1) (Fig.11). Remove the air cap nut and air cap (1). Clean both parts and around nozzle (2) with solvent or water using a stiff brush. Air cap nut 1 2 Fig. 11 If the nozzle (2) becomes blocked it can be removed by using a 9mm open ended spanner, carefully unscrew from the paint head. Clean the nozzle (2) and remove any paint build up. Be careful not to damage the nozzle (2) as this will affect the spray gun performance. Helpful Hints 1. Do not spray outdoors on a windy day as the results may be unsatisfactory. 2. Evenly control the speed of movement of the spray gun. A fast speed will give a thin coat and a slow speed will give a heavy coat. 3. Only apply one coat at a time. If a further coat is required follow the paint manufacturers instructions for re-coating and drying times. 4. If spraying small areas or objects keep the output setting low as this will avoid excessive use of paint and will minimise overspray. 5. When spraying large areas or objects, it is best to use a crisscross pattern, either from left to right then up or down or vice-versa. This will ensure maximum coverage (Fig. 12). Fig Avoid stopping and starting when spraying as this can lead to too much or not enough paint on a surface To ensure edges are covered, commence spraying just to the side of an area being sprayed, continue and do not stop until the spray has gone past the opposite edge.


13 CLEANING Clean After Every Use After every use it is essential that you clean the gun thoroughly. This will prevent any blockages occurring and provide reliable performance when you next come to use it. 1. Turn off device. Open trigger so that the coating material in spray gun runs back into the container. 2. Unscrew the container. Return remaining material into the material can. 3. Clean the container. Remove the suction tube by Fig. 13 turning counter-clockwise and pull gently to disassemble from the paint head. Disassemble the suction tube (Fig.13) for further cleaning by turning clockwise then pull to disassemble. Note: Only use solvent with a flash point of over 21 C 4. Take note of the 3 holes on the suction tube, if Fig. 14 blocked clean using the provided cleaning needle (Fig. 14). The 3 holes are used to pressurize the paint pot (11) for the paint pickup. If these holes are partially blocked it will result in uneven and inconsistent spraying. 5. Thoroughly clean the suction tube using clear solvent or water before reassembling. 6. Re-fit suction tube and fill container with solvent or water. 7. Screw container back in place. Turn on device and spray the solvent or water into a container. 8. Repeat the above procedure until clear solvent or water comes out of the nozzle. 9. Turn off device. 10. Then completely empty the container. Always keep the container seal free of coating material and check for damage. 11. If the housing of the gun requires cleaning dip a cloth in the solvent or water, ensuring the cloth is not dripping, wipe the exterior of the spray gun. 12. Unscrew the air cap nut. Remove air cap. Clean the air cap and nozzle with brush and solvent or water. 13. Prior to storing the mobile paint station, ensure it is completely dry. This will minimise residue build-up for the next use. Note: Ozito Industries will not be responsible for any damage or injuries caused by the repair of the tool by an unauthorised person or by mishandling of the tool. 12

14 MAINTENANCE If required the spray gun plunger can be removed and cleaned. This is a maintenance task and should not be required on a frequent basis. If the paint has been allowed to dry in the paint head or the spray gun has had a lot of use then removing and cleaning or replacing the plunger may restore the original spray gun performance. 1. If attached remove the air hose (10) from the spray gun. Using a 8mm socket (not provided) carefully unscrew and remove the spray gun plunger assemble from the rear of the spray gun (Fig. 15). Fig Clean the spray gun plunger assembly and spray gun, remove any paint using clear solvent or water. 3. After cleaning reassemble the plunger assembly in the correct order (Fig. 16) and refit to the rear of the spray gun. Fig. 16 Note: Do not use abrasive material to clean the plunger as this may affect the performance of the spray gun. 13
15 TROUBLE SHOOTING Problem Cause Remedy No coating material is coming out of the nozzle The coating material drips from the nozzle The nozzle is blocked The suction tube is blocked The small hole in the suction tube is blocked Material spray regulator dial turned too far to the (-) The suction tube is loose No pressure is built up in the paint pot The nozzle is loose The nozzle is worn Build up of coating material in the air cap and nozzle Clean Clean Clean Turn to the (+) Tighten pipe Tighten paint pot Tighten Change Clean Spray too coarse Coating material has a too high viscosity Dilute The spray jet pulses Run in the coating material Too much coating material mist (overspray) Too much material, spray regulator dial turned too far to (+) Nozzle dirty Air filter very dirty Not enough pressure built up in paint pot Coating material in paint pot is running out The small hole in the suction tube is blocked Air filter very dirty Too much coating material applied The distance to the object to be sprayed is too large Too much coating material applied Turn spray regulator dial to (-) Clean Change Tighten paint pot Refill Clean Change Turn the material spray regulator dial to the (-) Reduce spraying distance Turn material spray regulator dial to the (-) 14
16 SPARE PARTS Limited spare parts are available subject to availability. Please contact your local Bunnings Special Orders Desk to order the required spare parts. Most common spare parts listed below Spare Part Part No. Air Hose SPMPS Gun Set SPMPS DESCRIPTION OF SYMBOLS V Volts Hz Hertz ~ Alternating current W Watts ºC Degrees Celsius BAR Pressure rating /min Revolutions or reciprocation per minute Regulator compliance mark Do not use in raining Read Instruction manual Double insulated Wear eye, breathing, ear protection Warning 15
17 CARING FOR THE ENVIRONMENT Power tools that are no longer usable should not be disposed of with household waste but in an environmentally friendly way. Please recycle where facilities exist. Check with your local council authority for recycling advice. Recycling packaging reduces the need for landfill and raw materials. Reuse of recycled material decreases pollution in the environment. Please recycle packaging where facilities exist. Check with your local council authority for recycling advice. CONTENTS 1 x Mobile Paint Station MPS x Viscosity cup 1 x Cleaning needle 1 x Instruction manual OZITO INDUSTRIES PTY LTD AUSTRALIA (Head Office) 1-23 Letcon Drive, Bangholme, Victoria, Australia 3175 Telephone: Facsimile: Website: enquiries@ozito.com.au 16
18 WARRANTY THIS WARRANTY FORM AND CONFIRMED BUNNINGS REGISTER RECEIPT SHOULD BE RETAINED BY THE CUSTOMER AT ALL TIMES The warranty is only made available by returning the product to your nearest Bunnings Warehouse with a confirmed Bunnings register receipt. YOUR WARRANTY FORM SHOULD BE RETAINED BY YOU AT ALL TIMES. SHOULD YOU HAVE ANY QUESTIONS PRIOR TO RETURNING YOUR PRODUCT FOR WARRANTY OR REPAIR PLEASE TELEPHONE OUR CUSTOMER SERVICE HELPLINE: Australia New Zealand TO ENSURE A SPEEDY RESPONSE PLEASE HAVE THE MODEL NUMBER AND DATE OF PURCHASE AVAILABLE. AN OZITO CUSTOMER SERVICE REPRESENTATIVE WILL TAKE YOUR CALL AND ANSWER ANY QUESTIONS YOU MAY HAVE RELATING TO THE WARRANTY POLICY OR PROCEDURE. PURCHASED FROM: DATE PURCHASED: 1 YEAR REPLACEMENT WARRANTY Your Ozito tool is guaranteed for a period of 12 months from the original date of purchase and is intended for DIY (Do it yourself) use only. WARNING The following actions will result in the warranty being void. Professional, Industrial or high frequency use. If the tool has been operated on a supply voltage other than that specified on the tool. If the tool shows signs of damage or defects caused by or resulting from abuse, accidents or alterations. If the tool is disassembled or tampered with in any way. Note: Warranty excludes consumable parts such as brushes, atomiser valves, spray nozzles, pistons, discs, drill bits, collets and router bits.
SPECIFICATIONS - MODEL NO. SGP-300
 SPECIFICATIONS - MODEL NO. SGP-300 Motor: Input: Viscosity: Max Liquid Flow: Pot Capacity: Nozzle: Weight (tool only): 300W 220-240V ~ 50Hz 20 to 80 seconds (DIN-S) 450 ml/min 800ml ø2.5mm 1.5kgs KNOW
Spray Gun 300W SGP-300. To view the full range visit: Instruction Manual 1 Year Replacement Warranty
 Spray Gun 300W Instruction Manual 1 Year Replacement Warranty SGP-300! WARNING! Read all safety warnings and all instructions. Failure to follow the warnings and instructions may result in electric shock,
MULTI-PURPOSE SAW MODEL NO. OZMPS500A OPERATING INSTRUCTIONS
 MULTI-PURPOSE SAW 500watt MODEL NO. OZMPS500A OPERATING INSTRUCTIONS To view our entire range visit www.ozito.com.au SPECIFICATIONS - MODEL NO. OZMPS500A Motor: Input: No load speed: Length of stroke:
GRAVITY FEED SPRAY GUN
 WHAT S IN THE BOX GRAVITY FEED SPRAY GUN 100-190 ml/min INSTRUCTION MANUAL SPECIFICATIONS Working Air Pressure: Max Air Pressure: Air Consumption: Nozzle Size: Spray Width: Flow Rate: Feed Type: Paint
SUCTION FEED SPRAY GUN
 WHAT S IN THE BOX SUCTION FEED SPRAY GUN 130-210 ml/min INSTRUCTION MANUAL SPECIFICATIONS Working Air Pressure: Max Air Pressure: Air Consumption: Nozzle Size: Spray Width: Flow Rate: Feed Type: Paint
INSTRUCTION MANUAL PLD5020A. PLD5020A 100W Paint Sprayer
 INSTRUCTION MANUAL PLD5020A PLD5020A 100W Paint Sprayer Specifications Voltage: Rated Power: Reservoir Capacity: Operating Pressure: Flow Rate: Viscosity: Nozzle: Weight: 230-240 Vac 100W 700 ml 140 Bar
WHAT S IN THE BOX DRILL BIT SHARPENER. Drill Bit Sharpener 95W INSTRUCTION MANUAL SPECIFICATIONS. Input Power: (1/8-15/32 ) ozito.com.
 ozito.com.") WHAT S IN THE BOX DRILL BIT SHARPENER 95W INSTRUCTION MANUAL SPECIFICATIONS Voltage: Input Power: No Load Speed: Working Capacity: Weight: ozito.com.au 230-240V ~ 50Hz 95W 1350/min 3mm-12mm (1/8-15/32
WHAT S IN THE BOX DRILL BIT SHARPENER 95W INSTRUCTION MANUAL SPECIFICATIONS Voltage: Input Power: No Load Speed: Working Capacity: Weight: ozito.com.au 230-240V ~ 50Hz 95W 1350/min 3mm-12mm (1/8-15/32
Hammer Drill 1050W OZHD1050WA. To view the entire range visit: Operation Manual 3 Year Replacement Warranty
 Hammer Drill 1050W Operation Manual 3 Year Replacement Warranty OZHD1050WA 0109 To view the entire range visit: www.ozito.com.au SPECIFICATIONS MODEL NO. OZHD1050WA Motor size: Input: Chuck size: No load
Drill INSTRUCTION MANUAL. WARNING: For your personal safety, READ and UNDERSTAND before using. SAVE THESE INSTRUCTIONS FOR FUTURE 1 REFERENCE.
 ENGLISH (Original instructions) INSTRUCTION MANUAL Drill 6411 6412 6413 007894 DOUBLE INSULATION WARNING: For your personal safety, READ and UNDERSTAND before using. SAVE THESE INSTRUCTIONS FOR FUTURE
DELUXE SPRAY GUN ml/min Spray Gun INSTRUCTION MANUAL SPECIFICATIONS ASG-DLX WHAT S IN THE BOX. Paint Pot Size:
 WHAT S IN THE BOX DELUXE SPRAY GUN 160-240 ml/min INSTRUCTION MANUAL SPECIFICATIONS Working Air Pressure: Max Air Pressure: Av. Air Consumption: Nozzle Size: Spray Width: Flow Rate: Feed Type: Paint Pot
GRAVITY FEED SPRAY GUN
 WHAT S IN THE BOX GRAVITY FEED SPRAY GUN 160-240ml/min INSTRUCTION MANUAL SPECIFICATIONS Max Air Pressure: Av. Air Consumption: Nozzle Size: Spray Width: Flow Rate: Feed Type: Paint Pot Size: Air Inlet:
MULTI FUNCTION SHARPENER
 WHAT S IN THE BOX MULTI FUNCTION SHARPENER 65W INSTRUCTION MANUAL SPECIFICATIONS Motor: 65W No Load Speed: 6,700/min Wheel Diameter: 49mm (2 ) Sharpening Capacity Drill bit: 3-10mm Blade: 6-51mm Weight:
DRILL BIT SHARPENER 95W WARRANTY INSTRUCTION MANUAL SPECIFICATIONS. ozito.com.au DBS-095 WHAT S IN THE BOX
 WHAT S IN THE BOX DRILL BIT SHARPENER 95W INSTRUCTION MANUAL SPECIFICATIONS Voltage: Input Power: No Load Speed: Working Capacity: Weight: ozito.com.au 220-240V ~ 50Hz 95W 1,350/min 3mm-12mm (1/8-15/32
Tile Cutting Saw 600W. OZTCS600WA. To view the full range visit: Instruction Manual 3 Year Replacement Warranty
 Tile Cutting Saw 600W Instruction Manual 3 Year Replacement Warranty OZTCS600WA! WARNING! Read all safety warnings and all instructions. Failure to follow the warnings and instructions may result in electric
ENGLISH (Original instructions) INSTRUCTION MANUAL. Drill DS4012 DOUBLE INSULATION. IMPORTANT: Read Before Using.
 INSTRUCTION MANUAL. Drill DS4012 DOUBLE INSULATION. IMPORTANT: Read Before Using.") ENGLISH (Original instructions) INSTRUCTION MANUAL Drill DS402 05402 DOUBLE INSULATION IMPORTANT: Read Before Using. ENGLISH (Original instructions) SPECIFICATIONS Model DS402 Capacities Steel 3 mm Wood
ENGLISH (Original instructions) INSTRUCTION MANUAL Drill DS402 05402 DOUBLE INSULATION IMPORTANT: Read Before Using. ENGLISH (Original instructions) SPECIFICATIONS Model DS402 Capacities Steel 3 mm Wood
TOUCH-UP SPRAY GUN ml/min INSTRUCTION MANUAL SPECIFICATIONS. ozito.com.au WHAT S IN THE BOX ASG-PRO. Spray Gun. Paint Pot.
 WHAT S IN THE BOX TOUCH-UP SPRAY GUN 160-240ml/min INSTRUCTION MANUAL SPECIFICATIONS Max Air Pressure: Av. Air Consumption: Nozzle Size: Spray Width: Flow Rate: Feed Type: Paint Pot Size: Air Inlet: Weight
ATBG280/6 Bench Grinder Bench Grinder ATBG280/6 230V-50Hz 280 Watt 150mm x 25mm Wheel size
 Bench Grinder ATBG280/6 230V-50Hz 280 Watt 150mm x 25mm Wheel size SPECIFICATIONS Model Number : ATBG280/6 Nominal Voltage Power Consumption No load speed Wheel size Weight 230Volt 50Hz 280 Watts 2880
ELECTRIC STAPLE NAIL GUN
 WHAT S IN THE BOX ELECTRIC STAPLE NAIL GUN 8MM - 14MM INSTRUCTION MANUAL SPECIFICATIONS Input: 230-240V ~ 50Hz Power: 45W Impact Rate: 30/min Staple Size: 8-14mm, Type 50 Nail Size: 15mm, C1 Brad Magazine
ENGLISH (Original instructions) INSTRUCTION MANUAL. Drill DOUBLE INSULATION. IMPORTANT: Read Before Using.
 INSTRUCTION MANUAL. Drill DOUBLE INSULATION. IMPORTANT: Read Before Using.") ENGLISH (Original instructions) INSTRUCTION MANUAL Drill 64 642 643 007894 DOUBLE INSULATION IMPORTANT: Read Before Using. ENGLISH (Original instructions) SPECIFICATIONS Model 64 642 643 Capacities Steel
ENGLISH (Original instructions) INSTRUCTION MANUAL Drill 64 642 643 007894 DOUBLE INSULATION IMPORTANT: Read Before Using. ENGLISH (Original instructions) SPECIFICATIONS Model 64 642 643 Capacities Steel
SPRAY PUTTY GUN ml/min INSTRUCTION MANUAL SPECIFICATIONS. ozito.com.au WHAT S IN THE BOX ASG-PGU. Spray Gun. Paint Pot.
 WHAT S IN THE BOX SPRAY PUTTY GUN 160-260ml/min INSTRUCTION MANUAL SPECIFICATIONS Working Pressure: 36psi (2.5Bar) Max Air Pressure: 50psi (3.5Bar) Air Consumption: 57-170l/min (2-6cfm) Nozzle Size: ø1.3mm
Hammer Drill 1050W OZHD1050WA. To view the entire range visit: Operation Manual 3 Year Replacement Warranty
 Hammer Drill 1050W Operation Manual 3 Year Replacement Warranty OZHD1050WA 0112 To view the entire range visit: www.ozito.com.au SPECIFICATIONS MODEL NO. OZHD1050WA Motor size: Input: Chuck size: No load
ENGLISH (Original instructions) INSTRUCTION MANUAL. Drill MT600 MT601 DOUBLE INSULATION. IMPORTANT: Read Before Using.
 INSTRUCTION MANUAL. Drill MT600 MT601 DOUBLE INSULATION. IMPORTANT: Read Before Using.") ENGLISH (Original instructions) INSTRUCTION MANUAL Drill MT600 MT60 003635 DOUBLE INSULATION IMPORTANT: Read Before Using. ENGLISH (Original instructions) SPECIFICATIONS Model MT600 MT60 Capacities Steel
ENGLISH (Original instructions) INSTRUCTION MANUAL Drill MT600 MT60 003635 DOUBLE INSULATION IMPORTANT: Read Before Using. ENGLISH (Original instructions) SPECIFICATIONS Model MT600 MT60 Capacities Steel
PALM PLANER OPERATING INSTRUCTIONS. To view our full range visit MODEL NO. OZPPL280WA
 PALM PLANER 280W MODEL NO. OZPPL280WA OPERATING INSTRUCTIONS To view our full range visit w w w. o z i t o. c o m. a u SPECIFICATIONS MODEL NO. OZPPL280WA Motor size: Input: No load speed: Planing width:
PLANER 750W INSTRUCTION MANUAL SPECIFICATIONS. ozito.com.au PLR-5000 WHAT S IN THE BOX. Planer. Parallel Guide. Rebate Guide.
 WHAT S IN THE BOX PLANER 750W INSTRUCTION MANUAL SPECIFICATIONS Voltage: Input Power: No Load Speed: Planing Width: Blade Type: Planing Depth: Rebate Depth: Weight: ozito.com.au 230-240V ~ 50Hz 750W 14,000/min
SAFETY AND OPERATING MANUAL
 SAFETY AND OPERATING MANUAL Impact drill WX317 WX318 1 3 2 8 7 6 5 4 A1 A2 B C1 2 1 3 3 1 D C2 5 4 E F 2 E F 1 G 4 2 H 1. Keyless Chuck 2. Depth gauge 3. Drill/hammer drill function selector 4. Switch
Impact Wrench MODEL TW1000. WARNING: For your personal safety, READ and UNDERSTAND before using. SAVE THESE INSTRUCTIONS FOR FUTURE REFERENCE.
 ENGLISH Impact Wrench MODEL TW000 00605 DOUBLE INSULATION I N S T R U C T I O N M A N U A L WARNING: For your personal safety, READ and UNDERSTAND before using. SAVE THESE INSTRUCTIONS FOR FUTURE REFERENCE.
MULTI FUNCTION SHARPENER
 WHAT S IN THE BOX MULTI FUNCTION SHARPENER 65W INSTRUCTION MANUAL SPECIFICATIONS Motor: 65W No Load Speed: 6,7/min Wheel Diameter: 49mm (2 ) Sharpening Capacity Drill bit: 3-1mm Blade: 6-51mm Weight: 1.32kg
Handling instructions
 Hand Shear Model CE 16SA Handling instructions Note: Before using this Electric Power Tool, carefully read through these HANDLING INSTRUCTIONS to ensure efficient, safe operation. It is recommended that
SAFETY AND OPERATING MANUAL
 SAFETY AND OPERATING MANUAL 2 General Power Tool Safety Warnings WARNING: Read all safety warnings and all instructions. Failure to follow the warnings and instructions may result in electric shock, fire
SAFETY AND OPERATING MANUAL. Hedge Trimmer WG205E WG206E WG207E WG208E
 SAFETY AND OPERATING MANUAL 2 PRODUCT SAFETY GENERAL Power Tool Safety Warnings WARNING: Read all instructions. Failure to follow all instructions listed below may result in electric shock, fire and/or
SAFETY AND OPERATING MANUAL. 750W/13mm IMPACT DRILL JM750ID
 SAFETY AND OPERATING MANUAL 750W/13mm IMPACT DRILL JM750ID GENERAL POWER TOOL SAFETY WARNINGS WARNING! Read all safety warnings and all instructions. Failure to follow the warnings and instructions may
Operating Manual 6 Industrial Bench Grinder ATBG280/
 Operating Manual 6 Industrial Bench Grinder ATBG280/6 804531 40 Year Australian Heritage The reputable name in bench grinders for 40 years Protect yourself and others by observing all safety information,
STAPLE NAIL GUN. 12V Lithium Ion WARRANTY INSTRUCTION MANUAL SPECIFICATIONS ZLSGS-012 WHAT S IN THE BOX
 WHAT S IN THE BOX STAPLE NAIL GUN 12V Lithium Ion INSTRUCTION MANUAL SPECIFICATIONS Voltage: 12V Impact Rate: 30/min Max. Capacity: 90 x Staples 90 x Nails Staple Size: T50 18 gauge 8-16mm Nail Size: C1
Chainsaw Chain Sharpener
 WHAT S IN THE BOX Chainsaw Chain Sharpener 85W INSTRUCTION MANUAL SPECIFICATIONS Motor: 85W Input: 230V-240V ~ 50Hz No load speed: 4,800/min Table/vice angles: 0 35 left & right Sharpening Wheel: Ø108
HAMMER DRILL 710W WARRANTY INSTRUCTION MANUAL SPECIFICATIONS. ozito.com.au HDR-710 WHAT S IN THE BOX
 WHAT S IN THE BOX HAMMER DRILL 710W INSTRUCTION MANUAL SPECIFICATIONS Motor: Input: Chuck Size: No Load Speed: Impact Rate: Drilling Capacities: Weight: ozito.com.au 710W 230-240V ~ 50Hz 13mm ( 1 / 2 )
KR703-XE KR704-XE KR705-XE KR753-XE KR754-XE KR755-XE Australia New Zealand
 6 5 4 www.blackanddecker.com.au 3 7 2 1 8 KR703-XE KR704-XE KR705-XE KR753-XE KR754-XE KR755-XE Australia New Zealand 7 8 A 12 13 10 9 10 B C 11 7 8 D E 2 Intended use Your Black & Decker hammer drill
ENGLISH (Original instructions) INSTRUCTION MANUAL. Shear Wrench 6922NB DOUBLE INSULATION. IMPORTANT: Read Before Using.
 INSTRUCTION MANUAL. Shear Wrench 6922NB DOUBLE INSULATION. IMPORTANT: Read Before Using.") ENGLISH (Original instructions) INSTRUCTION MANUAL Shear Wrench 69NB 00498 DOUBLE INSULATION IMPORTANT: Read Before Using. ENGLISH (Original instructions) SPECIFICATIONS Model 69NB Bolt size M6, M0, M
ENGLISH (Original instructions) INSTRUCTION MANUAL Shear Wrench 69NB 00498 DOUBLE INSULATION IMPORTANT: Read Before Using. ENGLISH (Original instructions) SPECIFICATIONS Model 69NB Bolt size M6, M0, M
2-Speed Hammer Drill HP2000 HP2020
 2-Speed Hammer Drill HP2000 HP2020 SPECIFICATIONS Model HP2000 HP2020 Speed High Low High Low Capacities Concrete 20 mm 20 mm Steel 6.5 mm 13 mm 6.5 mm 13 mm No load speed (min 1 ) 0 2,300 0 900 2,300
RECIPROCATING SAW. 12V Lithium Ion WARRANTY INSTRUCTION MANUAL SPECIFICATIONS. ozito.com.au ZLRSS-012 WHAT S IN THE BOX
 WHAT S IN THE BOX RECIPROCATING SAW 12V Lithium Ion INSTRUCTION MANUAL SPECIFICATIONS Input Voltage: No Load Speed: Stroke Length: Cutting Capacities: Tool Weight: ozito.com.au 12V 0-2,800spm 13.78mm 50mm
SAVE THIS INSTRUCTION MANUAL FOR FUTURE PEFERENCE.
 N3140 CN EN DE FR IT ES PT RU JP ID 电动喷枪 Electric Spray Gun Elektrische Spritzpistole Pistolet à peinture électrique Pistola a spruzzo elettrica Pistola de pulverización eléctrica Pistola de pulverização
18V CORDLESS STAPLER/NAILER
 18V CORDLESS STAPLER/NAILER MODEL NO: CONSN18LIC PART NO: 6487058 OPERATION & MAINTENANCE INSTRUCTIONS ORIGINAL INSTRUCTIONS LS0717 ISS2 2 INTRODUCTION Thank you for purchasing this CLARKE product. Before
Spade Handlle Drill Watt. OZSHD1050WA. To view the full range visit: Operation Manual 3 Year Replacement Warranty
 Spade Handlle Drill 1050 Watt Operation Manual 3 Year Replacement Warranty OZSHD1050WA 0509 To view the full range visit: www.ozito.com.au SPECIFICATIONS - MODEL NO. OZSHD1050WA Motor: Input: No load speed:
MINI RECIPROCATING SAW MODEL NO: CRS350M
 CRS350M - Mini Reciprocating saw.fm Page 1 Thursday, November 22, 2012 9:41 AM MINI RECIPROCATING SAW MODEL NO: CRS350M PART NO: 6462550 OPERATION & MAINTENANCE INSTRUCTIONS LS1112 CRS350M - Mini Reciprocating
Handling instructions
 Nibbler Model CN 16SA Handling instructions Note: Before using this Electric Power Tool, carefully read through these HANDLING INSTRUCTIONS to ensure efficient, safe operation. It is recommended that these
Planer 82mm Watt
 Planer 82mm - 650 Watt Operation Manual 3 Year Replacement Warranty OZPL650A To view the full range visit: www.ozito.com.au 0209 SPECIFICATIONS MODEL NO. OZPL650A Motor size: Input: No load speed: Planing
RECIPROCATING SAW 920W INSTRUCTION MANUAL SPECIFICATIONS. ozito.com.au RSW-5200 WHAT S IN THE BOX. Reciprocating Saw. Timber Cutting Blades x 2
 WHAT S IN THE BOX RECIPROCATING SAW 920W INSTRUCTION MANUAL SPECIFICATIONS Motor: No Load Speed: Stroke Length: Blade Fitment: Cutting Capacities: Weight: ozito.com.au 920W 800-3000spm 24mm Tool-free Timber
Hedge Trimmer. 450 Watt. HT-501. To view the full range visit: Operation Manual 2 Year Replacement Warranty
 Hedge Trimmer 450 Watt Operation Manual 2 Year Replacement Warranty HT-501 To view the full range visit: www.ozito.com.au 0109 SPECIFICATIONS - MODEL NO. HT-501 Motor size: Input: No load speed: Blade
LAMINATE TRIMMER 350W INSTRUCTION MANUAL SPECIFICATIONS. ozito.com.au LTM-3000 WHAT S IN THE BOX. Laminate Trimmer. Trimming Guide.
 WHAT S IN THE BOX LAMINATE TRIMMER 350W INSTRUCTION MANUAL SPECIFICATIONS Voltage: 230-240V ~ 50Hz Power: 350W No Load Speed: 30,000/min Collet Size: 6.35mm (1/4 ) Weight: 1.7kg ozito.com.au Laminate Trimmer
Impact Wrench MODEL 6905B MODEL 6906
 ENGLISH Impact Wrench MODEL 6905B MODEL 6906 005305 DOUBLE INSULATION I N S T R U C T I O N M A N U A L WARNING: For your personal safety, READ and UNDERSTAND before using. SAVE THESE INSTRUCTIONS FOR
ROTARY HAMMER OWNER'S MANUAL
 ROTARY HAMMER OWNER'S MANUAL WARNING: Read carefully and understand all INSTRUCTIONS before operating. Failure to follow the safety rules and other basic safety precautions may result in serious personal
ENGLISH (Original instructions) INSTRUCTION MANUAL. Curved Planer 1002BA DOUBLE INSULATION. IMPORTANT: Read Before Using.
 INSTRUCTION MANUAL. Curved Planer 1002BA DOUBLE INSULATION. IMPORTANT: Read Before Using.") ENGLISH (Original instructions) INSTRUCTION MANUAL Curved Planer 00BA 0059 DOUBLE INSULATION IMPORTANT: Read Before Using. ENGLISH (Original instructions) SPECIFICATIONS Model 00BA Planing width 0 mm Planing
ENGLISH (Original instructions) INSTRUCTION MANUAL Curved Planer 00BA 0059 DOUBLE INSULATION IMPORTANT: Read Before Using. ENGLISH (Original instructions) SPECIFICATIONS Model 00BA Planing width 0 mm Planing
Spade Handle Drill 1050W. OZSHD1050WA. To view the full range visit: Instruction Manual 3 Year Replacement Warranty
 Spade Handle Drill 1050W Instruction Manual 3 Year Replacement Warranty OZSHD1050WA WARNING Read all safety warnings and all instructions. Failure to follow the warnings and instructions may result in
SAFETY AND OPERATING MANUAL 135W PALM SANDER JM135PS
 SAFETY AND OPERATING MANUAL 135W PALM SANDER JM135PS GENERAL POWER TOOL SAFETY WARNINGS WARNING! Read all safety warnings and all instructions. Failure to follow the warnings and instructions may result
Impact Wrench WR 22SA HANDLING INSTRUCTIONS. Read through carefully and understand these instructions before use.
 Impact Wrench WR 22SA HANDLING INSTRUCTIONS Read through carefully and understand these instructions before use. 1 1 2 2 3 4 5 3 6 7 8 9 5 3 4 kg-m 80 N m 800 M22 70 (F 10T) 0 C 70 700 60 50 600 500 40
ENGLISH (Original instructions) INSTRUCTION MANUAL. Finishing Sander BO4553 BO4561 BO4563 DOUBLE INSULATION. IMPORTANT: Read Before Using.
 INSTRUCTION MANUAL. Finishing Sander BO4553 BO4561 BO4563 DOUBLE INSULATION. IMPORTANT: Read Before Using.") ENGLISH (Original instructions) INSTRUCTION MANUAL Finishing Sander BO4553 BO456 BO4563 00449 DOUBLE INSULATION IMPORTANT: Read Before Using. ENGLISH (Original instructions) SPECIFICATIONS Model BO4553
ENGLISH (Original instructions) INSTRUCTION MANUAL Finishing Sander BO4553 BO456 BO4563 00449 DOUBLE INSULATION IMPORTANT: Read Before Using. ENGLISH (Original instructions) SPECIFICATIONS Model BO4553
ENGLISH (Original instructions) INSTRUCTION MANUAL. Hammer Drill MHP161 DOUBLE INSULATION. IMPORTANT: Read Before Using.
 INSTRUCTION MANUAL. Hammer Drill MHP161 DOUBLE INSULATION. IMPORTANT: Read Before Using.") ENGLISH (Original instructions) INSTRUCTION MANUAL Hammer Drill MHP6 0088 DOUBLE INSULATION IMPORTANT: Read Before Using. ENGLISH (Original instructions) SPECIFICATIONS Model MHP6 Concrete 6 mm Capacities
ENGLISH (Original instructions) INSTRUCTION MANUAL Hammer Drill MHP6 0088 DOUBLE INSULATION IMPORTANT: Read Before Using. ENGLISH (Original instructions) SPECIFICATIONS Model MHP6 Concrete 6 mm Capacities
4.0MM METAL CUTTING NIBBLER
 596702 4.0MM METAL CUTTING NIBBLER Read through carefully and understand these instructions before use N3570 SAFETY INSTRUCTIONS PLEASE READ & UNDERSTAND THESE INSTRUCTIONS! STORE THESE INSTRUCTIONS IN
Nibbler MODEL JN1601. WARNING: For your personal safety, READ and UNDERSTAND before using. SAVE THESE INSTRUCTIONS FOR FUTURE REFERENCE.
 ENGLISH Nibbler MODEL JN60 00477 DOUBLE INSULATION I N S T R U C T I O N M A N U A L WARNING: For your personal safety, READ and UNDERSTAND before using. SAVE THESE INSTRUCTIONS FOR FUTURE REFERENCE. SPECIFICATIONS
High Speed Drill MODEL WARNING: For your personal safety, READ and UNDERSTAND before using. SAVE THESE INSTRUCTIONS FOR FUTURE REFERENCE.
 ENGLISH High Speed Drill MODEL 6501 003002 DOUBLE INSULATION I N S T R U C T I O N M A N U A L WARNING: For your personal safety, READ and UNDERSTAND before using. SAVE THESE INSTRUCTIONS FOR FUTURE REFERENCE.
HVLP SPRAY GUN KIT 700W
 INSTRUCTIONS FOR HVLP SPRAY GUN KIT 700W MODEL NO: HVLP3000 Thank you for purchasing a Sealey product. Manufactured to a high standard, this product will, if used according to these instructions, and properly
ENGLISH (Original instructions) INSTRUCTION MANUAL. Hammer Drill HP1630 HP1631 DOUBLE INSULATION. IMPORTANT: Read Before Using.
 INSTRUCTION MANUAL. Hammer Drill HP1630 HP1631 DOUBLE INSULATION. IMPORTANT: Read Before Using.") ENGLISH (Original instructions) INSTRUCTION MANUAL Hammer Drill HP630 HP63 008892 DOUBLE INSULATION IMPORTANT: Read Before Using. ENGLISH (Original instructions) SPECIFICATIONS Model HP630 HP63 Concrete
ENGLISH (Original instructions) INSTRUCTION MANUAL Hammer Drill HP630 HP63 008892 DOUBLE INSULATION IMPORTANT: Read Before Using. ENGLISH (Original instructions) SPECIFICATIONS Model HP630 HP63 Concrete
TILE CUTTING SAW. 500W 115mm INSTRUCTION MANUAL SPECIFICATIONS. ozito.com.au TCS-115 WHAT S IN THE BOX. Tile Cutting Saw.
 WHAT S IN THE BOX TILE CUTTING SAW 500W 115mm INSTRUCTION MANUAL SPECIFICATIONS Motor: 500W Input: 230 240V~50Hz No Load Speed: 5,200min 1 Blade: Ø115 x Ø22.2mm Max. Depth Of Cut: 24mm Table Size: 330
Angle Grinder 230mm Watt
 AGG-051K manual.qxd 9/24/09 9:48 AM Page 1 Angle Grinder 230mm - 2200 Watt Operation Manual 3 Year Replacement Warranty AGG-051K To view the full range visit: www.ozito.com.au 0909 AGG-051K manual.qxd
ROUTER 850W INSTRUCTION MANUAL SPECIFICATIONS. ozito.com.au ROU-5000 WHAT S IN THE BOX. Router. Guide Fence. Dust Extraction Adaptor.
 WHAT S IN THE BOX ROUTER 850W INSTRUCTION MANUAL SPECIFICATIONS Voltage: 230-240V ~ 50Hz Input: 850W No Load Speed: 11,500-32,000/min Collet Size: 6.35mm (1/4 ) Plunge Depth: 30mm Turret Stops: 3 Weight:
Impact Wrench. 19 mm (3/4 ) MODEL 6906
 MODEL 6906") Impact Wrench 9 mm (3/4 ) MODEL 6906 002290 DOUBLE INSULATION I N S T R U C T I O N M A N U A L WARNING: For your personal safety, READ and UNDERSTAND before using. SAVE THESE INSTRUCTIONS FOR FUTURE REFERENCE.
Impact Wrench 9 mm (3/4 ) MODEL 6906 002290 DOUBLE INSULATION I N S T R U C T I O N M A N U A L WARNING: For your personal safety, READ and UNDERSTAND before using. SAVE THESE INSTRUCTIONS FOR FUTURE REFERENCE.
DETAIL SANDER 180W WARRANTY INSTRUCTION MANUAL SPECIFICATIONS. ozito.com.au DSR-2500 WHAT S IN THE BOX
 WHAT S IN THE BOX DETAIL SANDER 180W INSTRUCTION MANUAL SPECIFICATIONS Motor: No Load Speed: Pad Size: Paper Fitment: Power Cord: Weight: ozito.com.au 180W 15,000/min 140x140x80mm Hook & Loop 2m 1.5kg
2-Speed Hammer Drill HP2030 HP2031 INSTRUCTION MANUAL
 ENGLISH (Original instructions) INSTRUCTION MANUAL 2-Speed Hammer Drill HP2030 HP203 002466 DOUBLE INSULATION WARNING: For your personal safety, READ and UNDERSTAND before using. SAVE THESE INSTRUCTIONS
SPECIFICATIONS - MODEL NO. MFR-250
 MFR-250 manual.qxd 1/12/11 11:24 AM Page 2 SPECIFICATIONS - MODEL NO. MFR-250 Motor size: 250 Watt Input: 230-240V ~ 50Hz No load speed: 15,000-21,000/min Max. stroke length: 3.8mm Orbit angle: 3.2 Sanding
SAFETY AND OPERATING MANUAL
 SAFETY AND OPERATING MANUAL 2 GENERAL POWER TOOL SAFETY WARNINGS WARNING! Read all safety warnings and all instructions. Failure to follow the warnings and instructions may result in electric shock, fire
SPECIFICATIONS MODEL NO. PRR-850
 SPECIFICATIONS MODEL NO. PRR-850 Motor: 850W Input: 230-240V ~ 50Hz No load speed: 11,500-32,000/min -1 Collet Size: 6.35mm (1/4 ) Weight (tool only): 2.93kgs Features: Know Your Product Variable Speed
Angle Drill MODEL DA3000R MODEL DA3000V
 ENGLISH Angle Drill MODEL DA3000R MODEL DA3000V 003004 DOUBLE INSULATION I N S T R U C T I O N M A N U A L WARNING: For your personal safety, READ and UNDERSTAND before using. SAVE THESE INSTRUCTIONS FOR
SPECIFICATIONS MODEL NO. PRR-850 KNOW YOUR PRODUCT V ~ 50Hz. Collet Size: 6.35mm (1/4 ) Weight (tool only): Front. Back
 Weight (tool only): Front. Back") SPECIFICATIONS MODEL NO. PRR-850 Motor: 850W Input: 230-240V ~ 50Hz No load speed: 11,500-32,000 /min Collet Size: 6.35mm (1/4 ) Weight (tool only): 2.93kgs KNOW YOUR PRODUCT Front Back 6 4 5 7 3 2 8 11
SPECIFICATIONS MODEL NO. PRR-850 Motor: 850W Input: 230-240V ~ 50Hz No load speed: 11,500-32,000 /min Collet Size: 6.35mm (1/4 ) Weight (tool only): 2.93kgs KNOW YOUR PRODUCT Front Back 6 4 5 7 3 2 8 11
ENGLISH (Original instructions) INSTRUCTION MANUAL. Drill MDP303 MDP304 DOUBLE INSULATION. IMPORTANT: Read Before Using.
 INSTRUCTION MANUAL. Drill MDP303 MDP304 DOUBLE INSULATION. IMPORTANT: Read Before Using.") ENGLISH (Original instructions) INSTRUCTION MANUAL Drill MDP303 MDP304 0876 DOUBLE INSULATION IMPORTANT: Read Before Using. ENGLISH (Original instructions) SPECIFICATIONS Model MDP303 MDP304 Capacities
ENGLISH (Original instructions) INSTRUCTION MANUAL Drill MDP303 MDP304 0876 DOUBLE INSULATION IMPORTANT: Read Before Using. ENGLISH (Original instructions) SPECIFICATIONS Model MDP303 MDP304 Capacities
Drill MODEL 6013B MODEL 6013BR. WARNING: For your personal safety, READ and UNDERSTAND before using. SAVE THESE INSTRUCTIONS FOR FUTURE REFERENCE.
 ENGLISH Drill MODEL 6013B MODEL 6013BR 004618 DOUBLE INSULATION I N S T R U C T I O N M A N U A L WARNING: For your personal safety, READ and UNDERSTAND before using. SAVE THESE INSTRUCTIONS FOR FUTURE
SPECIFICATIONS - MODEL NO. RHR-850
 SPECIFICATIONS - MODEL NO. RHR-850 Motor: Input: No load speed: Impact rate: Impact energy: Accessory fitment: Drilling capacities: Weight (tool only): 850W 230V ~ 50Hz 800 /min 3,000 bpm 3.8 Joule SDS+
ENGLISH (Original instructions) INSTRUCTION MANUAL. Impact Wrench 6904VH 6905H DOUBLE INSULATION. IMPORTANT: Read Before Using.
 INSTRUCTION MANUAL. Impact Wrench 6904VH 6905H DOUBLE INSULATION. IMPORTANT: Read Before Using.") ENGLISH (Original instructions) INSTRUCTION MANUAL Impact Wrench 6904VH 6905H 005299 DOUBLE INSULATION IMPORTANT: Read Before Using. 1 ENGLISH (Original instructions) SPECIFICATIONS Model 6904VH 6905H
ENGLISH (Original instructions) INSTRUCTION MANUAL Impact Wrench 6904VH 6905H 005299 DOUBLE INSULATION IMPORTANT: Read Before Using. 1 ENGLISH (Original instructions) SPECIFICATIONS Model 6904VH 6905H
Handling instructions
 Orbital Sander Model SV 12SG Handling instructions Note: Before using this Electric Power Tool, carefully read through these HANDLING INSTRUCTIONS to ensure efficient, safe operation. It is recommended
SAFETY AND OPERATING MANUAL 200W 1/3 SHEET SANDER JM200FS
 SAFETY AND OPERATING MANUAL 200W 1/3 SHEET SANDER JM200FS 2 GENERAL POWER TOOL SAFETY WARNINGS WARNING! Read all safety warnings and all instructions. Failure to follow the warnings and instructions may
SPECIFICATIONS - MODEL NO. LTR-301
 SPECIFICATIONS - MODEL NO. LTR-301 Motor: 500W Input: 230-240V ~ 50Hz No load speed: 11,000/min Cutting diameter: 300mm Line diameter: 1.5mm x 4.5m Feed type: Semi-Automatic Weight (tool only): 2.7kg KNOW
Circular Saw MODEL MT581. WARNING: For your personal safety, READ and UNDERSTAND before using. SAVE THESE INSTRUCTIONS FOR FUTURE REFERENCE.
 ENGLISH Circular Saw MODEL MT58 005337 DOUBLE INSULATION I N S T R U C T I O N M A N U A L WARNING: For your personal safety, READ and UNDERSTAND before using. SAVE THESE INSTRUCTIONS FOR FUTURE REFERENCE.
Handling instructions
 Impact Drill Model DV 8V Handling instructions Note: Before using this Electric Power Tool, carefully read through these HANDLING INSTRUCTIONS to ensure efficient, safe operation. It is recommended that
Auto Feed Screwdriver
 ENGLISH Auto Feed Screwdriver MODEL 6833 MODEL 6834 MODEL 6836 002607 DOUBLE INSULATION I N S T R U C T I O N M A N U A L WARNING: For your personal safety, READ and UNDERSTAND before using. SAVE THESE
SDS+ ROTARY HAMMER DRILL
 SDS+ ROTARY HAMMER DRILL MODEL NO: CON400RHD PART NO: 6479510 OPERATION & MAINTENANCE INSTRUCTIONS LS0812 INTRODUCTION Thank you for purchasing this CLARKE SDS+ Rotary Hammer Drill. Before attempting to
Rotary Hammer Drill Kit
 Rotary Hammer Drill Kit 1500W Operation Manual 1 Year Replacement Warranty OZRH1500WAK CAUTION: Read this operation manual before using this tool. To view the full range visit: www.ozito.com.au 0609 SPECIFICATIONS
THIRD SHEET SANDER / 3 SHEET WARRANTY INSTRUCTION MANUAL SPECIFICATIONS. ozito.com.au WHAT S IN THE BOX TSS-3100
 WHAT S IN THE BOX THIRD SHEET SANDER 1 / 3 SHEET INSTRUCTION MANUAL SPECIFICATIONS Motor: No Load Spead: Pad Size: Weight: ozito.com.au 150W 11,000 opm 1 / 3 Sheet (187x90mm) 1.02kg Third Sheet Sander
THIRD SHEET SANDER / 3 SHEET INSTRUCTION MANUAL SPECIFICATIONS. ozito.com.au WHAT S IN THE BOX TSS Third Sheet Sander. Dust Bag.
 WHAT S IN THE BOX THIRD SHEET SANDER 1 / 3 SHEET INSTRUCTION MANUAL SPECIFICATIONS Motor: No Load Spead: Pad Size: Weight: ozito.com.au 150W 11,000 opm 1 / 3 Sheet (187x90mm) 1.02kg Third Sheet Sander
Instruction Manual DETAIL SANDER. Model SROM Our tool range has you covered for DIY. Whatever the job, make light work of it with MAKO tools.
 Instruction Manual DETAIL SANDER Model SROM 1187 Our tool range has you covered for DIY. Whatever the job, make light work of it with MAKO tools. Product Features: 1. On/Off Switch 2. Base Pad 3. Dust
Impact Wrench WR 16SA
 Impact Wrench WR 16SA HANDLING INSTRUCTIONS Read through carefully and understand these instructions before use. 1 1 2 2 3 4 5 6 3 7 8 9 5 3 0 4 (kg-m) 30 20 C 10 M16 55 (F10T) A 0 0 2 4 6 8 10 (s) B 5
ENGLISH (Original instructions) INSTRUCTION MANUAL. Straight Shear JS1660 JS1670 DOUBLE INSULATION. IMPORTANT: Read Before Using.
 INSTRUCTION MANUAL. Straight Shear JS1660 JS1670 DOUBLE INSULATION. IMPORTANT: Read Before Using.") ENGLISH (Original instructions) INSTRUCTION MANUAL Straight Shear JS660 JS670 004666 DOUBLE INSULATION IMPORTANT: Read Before Using. ENGLISH (Original instructions) SPECIFICATIONS Model JS660 JS670 Steel
ENGLISH (Original instructions) INSTRUCTION MANUAL Straight Shear JS660 JS670 004666 DOUBLE INSULATION IMPORTANT: Read Before Using. ENGLISH (Original instructions) SPECIFICATIONS Model JS660 JS670 Steel
20V CORDLESS RECIPROCATING SAW MODEL NO: CRS20Li
 20V CORDLESS RECIPROCATING SAW MODEL NO: CRS20Li PART NO: 6487020 OPERATION & MAINTENANCE INSTRUCTIONS LS1013 INTRODUCTION Thank you for purchasing this CLARKE 20V Cordless Reciprocating Saw. Before attempting
Finger Jointer. Operating and Safety Instructions FJA300
 Finger Jointer FJA300 Operating and Safety Instructions www.tritontools.com Thank you for purchasing this Triton tool. These instructions contain information necessary for safe and effective operation
COLD CUT SAW 1280W INSTRUCTION MANUAL SPECIFICATIONS. ozito.com.au CCS-1200 WHAT S IN THE BOX. Cold Cut Saw. 5mm & 6mm Hex key.
 WHAT S IN THE BOX COLD CUT SAW 1280W INSTRUCTION MANUAL SPECIFICATIONS Rated Voltage: Rated Power: No Load Speed: Supplied Blade: 230 240V ~ 50Hz 1280W 3800rpm Cutting Blade Max.: Ø185mm (7-1/4 ) Cutting
MULTI SANDER 200W WARRANTY INSTRUCTION MANUAL SPECIFICATIONS. ozito.com.au MSK-001 WHAT S IN THE BOX
 WHAT S IN THE BOX MULTI SANDER 200W INSTRUCTION MANUAL SPECIFICATIONS Motor: No Load Speed: Paper Fitment: Paper Size: Weight: ozito.com.au 200W 7,000-12,000/min Hook & Loop 145x100mm (Triangular) 125mm
HP2050 HP2050F HP2051 HP2051F
 ENGLISH (Original instructions) INSTRUCTION MANUAL -Speed Hammer Drill HP050 HP050F HP05 HP05F 00989 DOUBLE INSULATION IMPORTANT: Read Before Using. ENGLISH (Original instructions) SPECIFICATIONS Model
ENGLISH (Original instructions) INSTRUCTION MANUAL. Drill 6402 DP4700 DP4700 DOUBLE INSULATION. IMPORTANT: Read Before Using.
 INSTRUCTION MANUAL. Drill 6402 DP4700 DP4700 DOUBLE INSULATION. IMPORTANT: Read Before Using.") ENGLISH (Original instructions) INSTRUCTION MANUAL Drill 6402 DP4700 6402 DP4700 00465 DOUBLE INSULATION IMPORTANT: Read Before Using. ENGLISH (Original instructions) SPECIFICATIONS Model 6402 DP4700 Capacities
ENGLISH (Original instructions) INSTRUCTION MANUAL Drill 6402 DP4700 6402 DP4700 00465 DOUBLE INSULATION IMPORTANT: Read Before Using. ENGLISH (Original instructions) SPECIFICATIONS Model 6402 DP4700 Capacities
GENERAL OPERATIONAL PRECAUTIONS
 GENERAL OPERATIONAL PRECAUTIONS WARNING! When using electric tools, basic safety precautions should always be followed to reduce the risk of fire, electric shock and personal injury, including the following.
OPERATION & MAINTENANCE
 DOUBLE HEADED METAL NIBBLER MODEL NO: DHC-2 PART NO: 6500233 OPERATION & MAINTENANCE INSTRUCTIONS LS0609 INTRODUCTION Thank you for purchasing this CLARKE Double Headed Metal Nibbler. Before attempting
ROTARY HAMMER DRILL KIT
 KNOW YOUR PRODUCT ROTARY HAMMER DRILL KIT 5 joules 1250w INSTRUCTION MANUAL WARNING: Read all safety warnings and all instructions. Failure to follow the warnings and instructions may result in electric
5 FUNCTION ROTARY HAMMER DRILL
 5 FUNCTION ROTARY HAMMER DRILL MODEL NO: CONRHD720 PART NO: 6480215 OPERATION & MAINTENANCE INSTRUCTIONS LS0712 INTRODUCTION Thank you for purchasing this CLARKE 5 Function Rotary Hammer Drill. Before
TABLE SAW. 200mm 800W WARRANTY INSTRUCTION MANUAL SPECIFICATIONS. ozito.com.au TSB-0808 WHAT S IN THE BOX
 WHAT S IN THE BOX TABLE SAW 200mm 800W INSTRUCTION MANUAL SPECIFICATIONS Motor: 800W (S2 10min) Input: 230-240V ~ 50Hz No Load Speed: 2,950/min Blade: Ø200mm x Ø16 x 2.4mm Blade Teeth 24TCT Depth of Cut: