Hoop Sensor Adjustment. Or How to make your machine recognize your hoop correctly
|
|
|
- Barnard Pierce
- 5 years ago
- Views:
Transcription
1 Hoop Sensor Adjustment Or How to make your machine recognize your hoop correctly
2
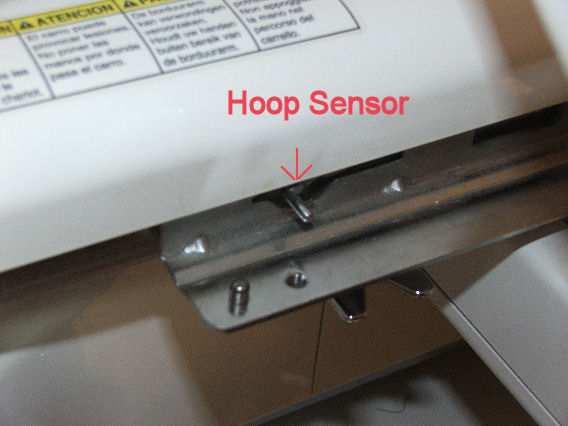
3 Turn off your machine. Hold down all 3 buttons on the LCD screen then turn on the machine. The next screen select Main Board Test Mode, picture 1a. Next screen select A/D Test, picture 1b. The next screen is where all the work is, picture 1c. At the right side you ll see Hoop Type. There will be either LL or S next to it. Below the Hoop Type you ll see two gray buttons with some numbers next to them, LL & S. Install your large hoop, making sure everything is tight as if you were going to embroider. As you install the hoop, watch the numbers change next to the LL gray button. Once the large hoop is in place select the LL button. The numbers now by the Hoop Type & LL should be the same. Repeat above moving the left arm all the way to the right and press the SS button. Now remove the arms and the screen should then say CAP. If you see Cap, then you have done this correctly and all is ready to go.

4 Picture 1a

5 Picture 1b

6 Picture 1c
7 Replacing the Automatic Needle Threader
 and place it in the hole of each plastic cover on the right side of the machine.")
8 Turn off your machine. You will remove five (5) screws on the right side of the machine. Take the needle screw tool (small allen wrench) and place it in the hole of each plastic cover on the right side of the machine. You will need to remove all 5 covers. Then remove the screws and carefully remove the white case.
9 Once the cover is removed, turn the machine back on and select a design. Proceed thru all the screens to the sewing screen. Select needle #1. This will move the needle case to the left and give you room to remove the needle threader. Make sure you have good lighting for the area to be worked on. Look closely at your new threader. You will see a small plastic piece sticking out with a tab at the end of it. Now look at the silver shaft, you will see where this tab fits, into a groove. Use the small screwdriver that came with the machine.
10 Place the screwdriver at the large of the threader and push to the left and slide the threader off of the two shafts, Pic5. You may have to lift the small tab out of the groove while doing this. CAUTION!! There is a small spring the threader is hiding. Do not lose this spring. You ll see it as the threader slides off the shaft. Pic 5
11 Now remove the lower screw on the left side of the machine. This will allow you to slightly move that side of the case to let you wiggle the needle threader out. Take your time, don t try to rush this step.
12 Install 7. Make sure the spring is still there. Slide the needle threader back on both shafts. The longer shaft will move some, don t worry. It can t go anyplace with the case in the way. If you follow the silver long shaft you will see a large end with an allen setscrew in it, Pic4. Pic 4
13 There is a hole in the arm it fits through which is larger than the shaft but not so large that the large end will fall through. The large end will fit right in the hole when you are done. Hold pressure on the large end while you press on the threader. Push the threader on until that little tab falls into the groove of the shaft. It s a snug fit on the shafts. When the threader is in place over both shafts and locked in place the large end of the silver shaft should be in the hole. Replace the case screw and plastic cover. You should double check to make sure the threader is in the correct position.
14 There is a slide on the right side of the machine. Move the slide down and watch the needle threader. Make sure it goes thru the eye of needle number 1. You may want to turn the machine on and check each needle. The needle should be snug against the right side of the threader to be in the correct position. If the threader does not go into the needle correctly, double check the needle position by loosening the needle screw, push the needle up and tighten the screw. If the needle looks bent, replace the needle. If all the needles are in correctly and the threader does not align, then do the following.
15 In the area of the slide there are two philips head screws. Loosen these screws and slightly move the plate and check the needle threader again using the slide. This should only be done if you have replaced all the needles and the threader is still not working correctly. If this still isn t working correctly, then call you nearest authorized Brother dealer and take your machine to them to make the adjustment.
16 Re-Centering your hoops Occasionally your hoops may lose center. If this happens you will need to do the following: Locate your largest hoop and hoops grid. Make sure your hoop arms are on the machine. Press and hold the ON button, trim button and threader button at the same time and turn on the machine. Press MAIN BOARD test mode Press X Y Motor test
17 Put the largest hoop on the machine. Put the grid in the hoop. The center hole in the grid should line up with the needle hole on the machine. Press move origin position. If the holes do not line up, use the up & down and left & right arrows directly under the Move origin button. Move left/right, press SAVE. Move up/down, press SAVE. You must press and let go of the button. It will not move the hoop if you hold the button. It makes tiny moves.
18 Accessories for your PR-600/EMP6

19 There are three (3) after market accessories available for your machines. They are: HoopTech Quick Change or FastFrames window system and the HoopTech clamping system. The Quick Change or FastFrames uses sticky paper. The sticky paper is placed under the window. Put the frame on your machine like you are putting on your regular hoop. You then place the item you want to embroider on the sticky paper. Use your trace button to make sure your design will fit in the area and embroider away.


20 The original bag clamp has 7 windows available. The sizes are: 6 x 5 5 round 4 x 4 2 x 4 3 x 5 2 round 5 x 3

21 The new clamp is larger and has two windows that are larger than the original clamp. The new window sizes are: 8 x 5 11 x 5
22 Each clamp has its own purpose. The smaller clamp is mainly used for purses, back packs, gym bags, etc. where the design is smaller. The larger clamp and windows will now allow you to do longer names, etc. on blankets that are hard to hoop, on the side of the gym bag, diaper bag and on the zipper tab opening on other bags and larger designs.
23 Your machine does not recognize these hoops, so it is important that you use the trace feature of your machine to make sure the design will fit within the window. First move the design to the bottom half of the screen. It is recommended that you do trace before you put the item in the clamp. This way you can see the needle hole on the throat plate to make sure the design will fit. You should also keep in mind that the design should be roughly ½ smaller than the window you are using to allow for the space needed for the embroidery foot. Each product has its uses. For some it will be window size, for others it will be ease of use for a particular project.

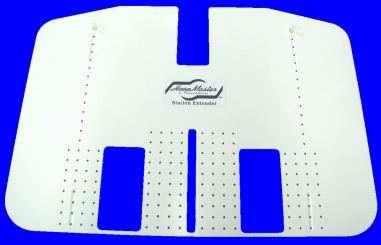
24 HoopMaster Infant Medium Youth Station Extender
25 The HoopMaster is a great accessory to add to your business. This hooping aid allows you to always hoop in the same place for each garment. Hooping will be quicker and more consistent for all your jobs. No more chasing your hoop across the table when hooping your projects. You also get a free-style hooping base so you can hoop hat backs, bags, child shirts, etc.
Hats on the PR-620. The PR620 has two specialized hat frames to allow caps to be embroidered in a natural tubular fashion.
 How to set up the cap frame driver and the mounting jig are covered in these instructions. Learn hat loading, attaching the frame cap to the machine and screen settings for hats. Combine innovative designs
Replacing the Reciprocator on the SWF Compact Series Machine (601C and 1201C)
") Follow the instructions below to replace the reciprocator in the SWF Compact series machines. The tools required can be found in the tool kit that came with the machine. Preparation 1. First, place the
Follow the instructions below to replace the reciprocator in the SWF Compact series machines. The tools required can be found in the tool kit that came with the machine. Preparation 1. First, place the
Basic steps to time the Gammill quilting machine s rotary sewing hook
 Basic steps to time the Gammill quilting machine s rotary sewing hook 1.) Turn the machine off and unplug it. 2.) With the needle bar in the raised position, remove the bobbin and bobbin case. 3.) Remove
STOP! READ THIS FIRST
 STOP! READ THIS FIRST 1 Getting Started With Your Meistergram Embroidery System (the quick guide) Thank you for choosing Pantograms for your embroidery system provider. We encourage you to read the following
Replacing the Reciprocator on an SWF Multi-head.
 Replacing the Reciprocator on an SWF Multi-head. Follow the instructions below to replace the reciprocator in the SWF multi-head machines. The tools required are found in the tool kit that came with the
SERVICE MANUAL PARTS LIST MODEL: NH40
 SERVICE MANUAL & PARTS LIST MODEL: NH40 CONTENTS What to do when... 1-3 SERVICE ACCESS Face Cover... 4 Bed Cover... 5 Free-arm Cover... 6 Front Cover... 7 Rear Cover... 8 MECHANICAL ADJUSTMENT Presser
Using the RhAT II Universal
 Using the RhAT II Universal To use the Original RhAT Tools, the main shaft of the machine had to be rotated to the setting position, either mechanically or electronically, while the needle bar was disengaged
MAIN PARTS
 MAIN PARTS 7 8 9 10 11 12 13 1 2 3 17 4 5 6 01 02 03 04 05 12 23 34 45 56 13 24 35 46 57 14 25 36 47 58 15 16 26 27 37 38 48 49 59 60 06 07 08 09 10 17 18 28 29 39 40 50 51 61 62 19 30 41 52 63 20 21 31
EmagiKit. Privacy Pod Plus. Quiet. Easy. Affordable. INSTRUCTIONS ASSEMBLY
 EmagiKit Privacy Pod Plus Quiet. Easy. Affordable. INSTRUCTIONS ASSEMBLY DIMENSIONS AND COMPONENTS 47 47 Ceiling Unit 2-B 2-L 2-R Glass Door Corner Trim Door Handle 90 Adjustable Height Work Surface 1-B
Code Product Qty 1 Top Vertex 3 2 Hot End Housing 1 3 Bottom Vertex 3 4 Print Platform Lock 3 5 End Stop Holder 3 6 Filament Feeder Motor Bracket 1 7
 List of Parts Code Product Qty 1 680mm Extrusion 3 2 Power Supply 1 3 240mm Extrusion 9 4 42mm Nema 17 Stepper Motor 3 5 Slider-Hotend Connecting Rod 6 6 48mm Nema 17 Stepper Motor 1 7 Linear Rail with
Metroboard Pulley Replacement Procedure
 Metroboard Pulley Replacement Procedure 1) Remove the two transmission cover screws (1/8 allen driver). Then remove the transmission cover. Note there is a split lock washer and flat washer as well, so
STOP! READ THIS FIRST
 STOP! READ THIS FIRST Page 1 of 37 Getting Started With Your Pantograms GS1501 Embroidery Machine (the quick guide) Thank you for choosing Pantograms for your embroidery system provider. We encourage you
Ribcage Installation. Part 2 - Assembly. Back-Bone V1.06
 Ribcage Installation Part 2 - Assembly Back-Bone V1.06 Contents Section 1 Before You Get Started... 2 Included With Your Kit:... 2 Figure: A... 3 CAUTION!... 4 Note:... 4 Tools Required... 5 Section 2:
mila-wall (Series100) General Operating Instructions page 1 of 15
 General Operating Instructions page 1 of 15") mila-wall (Series100) General Operating Instructions page 1 of 15 Step #1: Before setting up walls, lower adjustable leveling feet on each panel approximately 1". This will allow access to the threaded
mila-wall (Series100) General Operating Instructions page 1 of 15 Step #1: Before setting up walls, lower adjustable leveling feet on each panel approximately 1". This will allow access to the threaded
Sew Beautiful. with Kirei NX7 JUKI: SEWING MACHINES WITH HISTORY
 Sew Beautiful with Kirei N7 JUKI: SEWING MACHINES WITH HISTORY Since their introduction in 1947, JUKI s home sewing machines have been a brand loved around the world. JUKI's home sewing machines contain
Assembly Instructions 10 X 10 Aluminum Roof Support
 Assembly Instructions 10 X 10 Aluminum Roof Support Aluminum Roof Support Bolt Package 16-5/16 X 2 ¼ SS Bolt 24-5/16 X 1 SS Bolt 40-5/16 SS Nylon Lock Nuts 16-5/16 SS Flat Washers 28-4 ½ Wood Screws 36-1
TOYOTA TUNDRA CARGO DIVIDER Preparation. Part Number: PT
 Preparation Part Number: PT767-34070 Kit Contents 1 1 Divider Screen 2 1 LH Bracket with Warning Label 3 1 RH Bracket without Warning Label NOTE: Part number of this accessory may not be the same as the
EDGE2 DUAL MONITOR ARM
 EDGE2 DUAL MONITOR ARM EDGE2 Rev A 2/17 Model EDGE2-SLV Model EDGE2-BLK Model EDGE2-WHT ASSEMBLY AND ADJUSTMENT EDGE2 DUAL MONITOR ARM PARTS AND TOOLS PLEASE REVIEW these instructions before beginning
1) Place the reactor stand on a sturdy bench with the bottom plate facing toward the front.
 Place the reactor stand on a sturdy bench with the bottom plate facing toward the front.") Assembly Instructions for ChemRxnHub Reactor Systems 1) Place the reactor stand on a sturdy bench with the bottom plate facing toward the front. Loosen knobs on the right and left using 2 hands of the
Assembly Instructions for ChemRxnHub Reactor Systems 1) Place the reactor stand on a sturdy bench with the bottom plate facing toward the front. Loosen knobs on the right and left using 2 hands of the
Chapter 6 Frame And Lens Repairs
 Chapter 6 Frame And Lens Repairs 6.1 General Information All maintenance on the frame of the EXO Full-Face mask can be accomplished with common hand tools. 6.2 Lens Replacement Tools required: Dow DC-111
-- Gym Glide -- (Recreational Game Standard) Installation Instructions
 Installation Instructions") -- Gym Glide -- (Recreational Game Standard) Installation Instructions Call Jaypro Sports Equipment at 1-800-243-0533 during regular business hours for technical support. www.jaypro.com Rev- Page 1 of
-- Gym Glide -- (Recreational Game Standard) Installation Instructions Call Jaypro Sports Equipment at 1-800-243-0533 during regular business hours for technical support. www.jaypro.com Rev- Page 1 of
Z-Truck Up-and-Down Motion. Y-Truck Side-to-Side Motion. Head. Squaring Plate. Sliding Plate FIGURE 1: THE CARVEWRIGHT MACHINE
 Setup and use of CarveWright CO2 Powered Dragster Jig The CO 2 powered Dragster Jig will arrive from the factory fully assembled, calibrated, and squared. In order to get the best results, your CarveWright
ABM International, Inc.
 ABM International, Inc. Lightning Stitch required 1 1.0: Parts List head and motor assembly (Qty. 1) Reel stand (Qty. 1) Needle bar frame clamp (Qty. 1) Motor drive (Qty. 1) 2 Cable harness with bracket
SERVICE MANUAL AND PARTSLIST
 SERVICE MANUAL AND PARTSLIST Next 20 CONTENTS WHAT TO DO WHEN... 1~3 SERVICE ACCESS FACE COVER... 4 TOP COVER... 4 BASE COVER... 5 REAR COVER... 6 FRONT COVER... 7 MECHANICAL ADJUSTMENT NEEDLE THREAD TENSION...
CAUTION- SAVE THESE INSTRUCTIONS This product is for household use, or equivalent.
 Never operate this sewing machine if it has a damaged cord or plug, if it is not working properly, if it has been dropped or damaged, dropped into water. Return this sewing machine to the nearest authorized
Assembly Instructions. Table of Contents
 HQ Little Foot Assembly Instructions Back of Handi Quilter, Inc. 501 North 400 West North Salt Lake, UT 84054 1-877-697-8458 Front of 2015 Handi Quilter, Inc. www.handiquilter.com Printed in the United
To register your machine warranty and receive Baby Lock product updates and offers, go to If you have questions with
 To register your machine warranty and receive Baby Lock product updates and offers, go to www.babylock.com/profile. If you have questions with registration, visit your Authorized Baby Lock Retailer. CONTENTS
INSTALLATION GUIDE Rear Bumper. Jeep JL Wrangler
 INSTALLATION GUIDE Rear Bumper Jeep JL Wrangler Dual Swing System 1A From the stock bumper you removed from vehicle, you ll need to take the parking sensor wiring from it and feed it into the new bumper.
FBX1104P FBX1104 FBX1106P FBX1106
 FBX1104P FBX1104 FBX1106P FBX1106 Second edition : September 2004 No. 040037 INTRODUCTION Thank you for your purchasing Kansai Special's FBX Series. Read and study this instruction manual carefully before
Assembly Instructions: AM-10 Hand & Foot Cycle Early Intervention Part #: 50-HFC-0105
 Assembly Instructions: AM-10 Hand & Foot Cycle Early Intervention Part #: 50-HFC-0105 Refer to the following instructions on how to assemble your tryke. Study the instructions carefully before beginning
Cover Stitch Wide. Cover Stitch Looper Thread. Cover Stitch Wide page 1
 Cover Stitch Wide Cover Stitch Wide This professional Cover Hem stitch is a necessary requirement for today s sewing. The stitch is often seen in ready-to-wear garments. Two needles create parallel rows
Installation Instructions for FC2 & FC15 Forward Controls for the Super Magna
 Installation Instructions for FC2 & FC15 Forward Controls for the Super Magna It is highly recommended that you use a thread lock compound such as Loctite brand on all threads to keep them from vibrating
Martin Yale 7000E Guillotine Cutter
 Martin Yale 7000E Guillotine Cutter Blade Leveling Guide Provided By http://www.mybinding.com http://www.mybindingblog.com Blade Removal, Installation and Leveling for the 7000E Disclaimer The following
Patton Robotics ESRA II Expressive System for Robotic Animation
 Patton Robotics ESRA II Expressive System for Robotic Animation Assembly and Operation Instructions Version 1.0 Patton Robotics, LLC. 61 Hagan Drive New Hope, PA 18938 Copyright 2015 Patton Robotics, LLC.
SERVICING MANUAL 419S/423S
 SERVICING MANUAL 415 419S/423S TROUBLESHOOTING PROBLEM CAUSE REMEDY REFERENCE 1. SKIPPING 1. NEEDLE IS NOT INSERTED INSERT THE NEEDLE PROPERLY. STITCHES PROPERLY. 2. NEEDLE IS BENT OR WORN. CHANGE THE
Strata. urniture. Adriana Instructions. Parts in the Arm Box: Parts in the Body Box: Watch our assembly videos at
 1A Watch our assembly videos at www.strataf.com/videos Parts in the Arm Box: Arm - Outside View Arm - Inside View 1B Parts in the Body Box: Back Deck x 1 Seat Deck x 1 with the Feet attached Back Panel
Projector Ceiling Mount
 INSTALLATION MANUAL Projector Ceiling Mount PID:3010 PID:5466 20kg (44lbs) RATED CAUTION: DO NOT EXCEED RATED LISTED WEIGHT. SERIOUS INJURY OR PROPERTY DAMAGE MAY OCCUR! ISSUED: FEB. 2013 NOTE: Read the
SAM. Model: STV-C65 LCD Mobile Visualized Stand Instruction Manual. Weight Capacity: 1251bs / 56.7kg Suits LCD Flat Panel Display: 42"-55" Page 20
 SAM Model: STV-C65 LCD Mobile Visualized Stand Instruction Manual Weight Capacity: 1251bs / 56.7kg Suits LCD Flat Panel Display: 42"-55" 20 Step 6 LCD Mobile Lift Stand Model: STV-C65 Cable management
Four-Thread Safety Stitch
 Four-Thread Safety Stitch Four-Thread Safety Stitch This stitch is an alternative to the Five-Thread Safety Stitch. It offers the same type of Two-Thread Chainstitch. However the Three-Thread Overlock
SERVICE MANUAL & PARTS LIST MODEL: MC400E
 First Edition: February SERVICE MANUAL & PARTS LIST MODEL: MC00E PARTS LIST MODEL: MC00E 0 0 MODEL: MC00E KEY PARTS NO. NO. DESCRIPTION 0 0 0B0 000 0A0 0A0 000 000 0 000 0 0000 0000 000 00 0 0 00 A0 0B0
JUST EMBROIDER IT! ALL YOU NEED TO KNOW ABOUT HOOP 'N' BUDDYZ
 BERNINA ebook Series JUST EMBROIDER IT! ALL YOU NEED TO KNOW ABOUT HOOP 'N' BUDDYZ Written by: Judy Hahner BERNINA Educator, Professional & Home Embroidery Specialist Hoop 'N' Buddyz Embroidery Hoop and
SEQUIN DEVICE INSTALLATION MANUAL HCR
 SEQUIN DEVICE INSTALLATION MANUAL For qualified personal only HCR Happy Industrial Co. Ver. 1.1 Contents 1. List of required parts 2. Machine program version 3. Machine setting 4. Installation 3-1.Machine
OPERATOR'S MANUAL RULES FOR SAFE OPERATION
 OPERATOR'S MANUAL #4950300 ROUTER AND JIG SAW MOUNTING KIT (FOR USE WITH THE BT3000 TABLE SAW) CONGRATULATIONS AND THANK YOU FOR BUYING THIS RYOBI ROUTER AND JIG SAW MOUNTING KIT. Your new #4950300 Router
======================================================================================== ( DR / DR) JK WRANGLER MOD RACK
 JK WRANGLER MOD RACK") (10984 4DR / 10982 2DR) JK WRANGLER MOD RACK INSTALLATION SHEET Important Notes: Some brands of windshield light brackets and snorkels may not be compatible with the 10984 MOD Rack System. Body lifts are
(10984 4DR / 10982 2DR) JK WRANGLER MOD RACK INSTALLATION SHEET Important Notes: Some brands of windshield light brackets and snorkels may not be compatible with the 10984 MOD Rack System. Body lifts are
Depending on the size you ordered you will have either 5 Foot sections which will build the 10 Foot frame or 6 Foot sections which will build the 12
 XL Quilting Frame 1 Depending on the size you ordered you will have either 5 Foot sections which will build the 10 Foot frame or 6 Foot sections which will build the 12 Foot frame Printed 2 June 2014 Updated
A. Preparing the fabric (not shown):
:") INSERTING ZIPPERS - CENTER INSERTION The zipper can be snapped on to the right or to the left side of the needle so that you can sew close to the zipper. When sewing on the right side of the zipper, attach
INSERTING ZIPPERS - CENTER INSERTION The zipper can be snapped on to the right or to the left side of the needle so that you can sew close to the zipper. When sewing on the right side of the zipper, attach
Power Break II Circuit Breakers
 DEH40466 Installation Instructions R05 Power Break II Circuit Breakers Replacement Stop Block Kit Application This kit is provided to replace the stop block assembly in the Power Break II insulated-case
M280D M280D. From the movie
 M280D From the movie M280D Discover the magical world of advanced sewing and embroidery featuring Disney characters 125 built-in embroidery patterns, including 45 designs featuring Disney characters 181
HQ Pole Upgrade Kit for HQ Adjustable Table and HQ QuilTable Assembly Instructions 1
 HQ Pole Upgrade Kit for HQ Adjustable Table and HQ QuilTable Assembly Instructions QF09775 The pole upgrade kit can be used with or without the QF09700 HQ Precison-Glide track upgrade kit. What s Included
Innov-ís 2500D PREMIUM PACKAGE
 Innov-ís 2500D PREMIUM PACKAGE Version 2 Upgrade Kit Operation Manual Before using this upgrade kit, be sure to read this Operation Manual for information on its correct use. CONTENTS Before You Start...
Sewing and Embroidery Machine
 Mid-Level Sewing and Embroidery Machine Discover new paths to creativity with the Baby Lock Aventura II sewing and embroidery machine. Powered by Baby Lock IQ TechnologyTM, the Aventura II makes every
ASSEMBLY AND ADJUSTMENT
 EDGE MONITOR ARM EDGE Rev A 2/17 Model EDGE-SLV Model EDGE-BLK Model EDGE-WHT ASSEMBLY AND ADJUSTMENT EDGE MONITOR ARM PARTS AND TOOLS PLEASE REVIEW these instructions before beginning the assembly and
Removing the Z-Axis lead screw
 Page 1 of 8 TITLE: Sabre Z-Axis Lead Screw Replacement Procedure Gerber FastFact #: 5048 Supplied by: Gerber Hardware Support Last Modified: June 14, 2007 Summary: Tools used: The following procedure explains
Top Innovations, Inc. Innovative Products to Make Your Life Easier. Model SP-402 Owner s Manual
 Top Innovations, Inc. Innovative Products to Make Your Life Easier Model SP-402 Owner s Manual THIS IS NOT A TOY! Adult supervision recommended Item contains sharp functional points and small parts Machine
SEQS Built-In Sewing Stitches. 6 Basic, 17 Decorative, 5 Stretch and 2 Buttonholes. 2 Fully Automatic 1-Step Buttonholes
 30 Built-In Sewing Stitches 6 Basic, 17 Decorative, 5 Stretch and 2 Buttonholes 2 Fully Automatic 1-Step Buttonholes A simple 1-step process that provides reliable, precisely balanced buttonholes every
SERVICE MANUAL FOR HOMELOCK M1034D 2034D 1134DW 1134D
 SERVICE MANUAL FOR HOMELOCK M1034D 2034D 1134DW 1134D 11.2000 2.2012 I HOW TO USE THIS MANUAL... 1 II HOW TO ADJUST... 2 1. Height of needle bar... 2 2. Position of the lowerlooper... 3 3. Timing of the
UPLIFT Height Adjustable Standing Desk 3-Leg (T-Frame) DIRECTIONS FOR ASSEMBLY AND USE
 DIRECTIONS FOR ASSEMBLY AND USE") UPLIFT Height Adjustable Standing Desk 3-Leg (T-Frame) DIRECTIONS FOR ASSEMBLY AND USE CAUTION MAKE SURE NO OBSTACLES ARE IN THE DESK S PATH AND ALL CORDS ARE OF APPROPRIATE LENGTH FOR DESK TRAVEL. FAILURE
UPLIFT Height Adjustable Standing Desk 3-Leg (T-Frame) DIRECTIONS FOR ASSEMBLY AND USE CAUTION MAKE SURE NO OBSTACLES ARE IN THE DESK S PATH AND ALL CORDS ARE OF APPROPRIATE LENGTH FOR DESK TRAVEL. FAILURE
Chapter 4: Troubleshooting and Maintenance
 Training: HAPPY HCD-1501 Operations & Maintenance Chapter 4: Troubleshooting and Maintenance Basic Troubleshooting/ Sewing Interruptions Troubleshooting thread breaks 2 Maintenance and Upkeep Oiling: daily
Brother Industries, Ltd. Nagoya, Japan
 4. 2001. This service manual has been compiled for explaining repair procedures of the MODEL XL-6562, XL6452, XR- 46. This was produced based on up-to-date product specifications at the time of issue,
Union Arch Safety Gate
 33000 Please read the following instructions carefully. Keep this instruction manual for future reference. Tools required: Phillips head screwdriver, drill (for top of stair installation), and pencil (not
Leather & Linen Tattoo Clutch
 Leather & Linen Tattoo Clutch Oversized clutch purses are very popular of late, but if you want one with some nice materials or even a little bit of embellishment, you have to fork over some serious cash.
Congratulations on purchasing the Spirit Rails Magnetic Attach that allows easy wand to pack removal and reattachment by just getting close!
 Introduction Congratulations on purchasing the Spirit Rails Magnetic Attach that allows easy wand to pack removal and reattachment by just getting close! The Spirit Rails Magnetic Attach Kit is designed
Main Street Safety Gate
 27930 Please read the following instructions carefully. Keep this instruction manual for future reference. Tools required: Phillips head screwdriver, drill (for top of stair installation), and pencil (not
General Features. Low Profile. The SMART BOXX stands only 1.5 off of the bed of your truck so cargo space is maximized
 General Features Low Profile. The SMART BOXX stands only 1.5 off of the bed of your truck so cargo space is maximized Two Sizes Short Box :74 L X 47 W X 7 T and Long Box 92 L X 47 W X 7 T All Aluminium
Wellington Wallbed 700 Series Assembly Instructions
 Wellington Wallbed 700 Series Assembly Instructions 1. Read all instructions before proceeding. Not following instructions may result in personal harm or damage to the furniture. 2. 2 people are required
A Dream to Use. V-Series. Dreamweaver V-Series Sewing, Quilting and Embroidery Machines
 V-Series A Dream to Use VQ3000 VM6200D Dreamweaver V-Series Sewing, Quilting and Embroidery Machines The Dreamweaver V-Series has been developed with one goal in mind to create a generation of products
Horizontal Cable Systems
 ALUMINUM RAILING INSTALLATION INSTRUCTIONS v2012 orizontal Cable Systems 1) Check Contents Of Packages: Verify that all parts have arrived and that they match the packing list. 1A) Coastal applications:
Easily save and access designs using your USB flash drive. USB connectivity also makes it easy to update your machine with the latest software.
 Aventura The Baby Lock Aventura sewing and embroidery machine will guide you on your next creative journey. Advanced features and Baby Lock IQ Technology make every step easier. Use the twoway USB connectivity
Installation Instructions Parasol Cellular Shades
 Installation Instructions Parasol Cellular Shades SlideArch CONTENTS Getting Started: Product View...1 Tools and Fasteners Needed...2 Installation: Installation Overview... Mount the Installation s Inside
S-85SCH
 4411-4423-4432-4443-4452 5511-5523-5532-5554 44S-85SCH Service Manual 104 73 14-26 2014-02-24 CONTENTS 1. Names of principal parts...2 2. Removing methods of external parts 2-1 Sewing table...3 2-2 Face
Repacking the Spindle Bearings on a 1990 Enco RF-30 Mill/Drill, Version 1.1
 Repacking the Spindle Bearings on a 1990 Enco RF-30 Mill/Drill, Version 1.1 By R. G. Sparber Protected by Creative Commons. 1 Sorry about the rambling title but it was necessary. I looked at a few videos
Monroe sofa. assembly instructions
 Monroe sofa assembly instructions Smooth & Wrinkle-Free Fabric Covers: In addition to these printed instructions, you may want to watch our beauty tips videos on the customer service page of our website.
INSTALLATION INSTRUCTIONS DODGE RAM 2 & 4WD 1500 PART # P5058
 INSTALLATION INSTRUCTIONS 2009-13 DODGE RAM 2 & 4WD 1500 PART # P5058 PARTS LIST: Qty Description Qty Description 1 Grille Guard 12 12-1.75mm Hex Nuts 2 Upper Frame Mounting s (for trucks without tow hooks
Monroe loveseat. assembly instructions
 Monroe loveseat assembly instructions Smooth & Wrinkle-Free Fabric Covers: In addition to these printed instructions, you may want to watch our beauty tips videos on the customer service page of our website.
MADE TO FOLLOW YOUR INSPIRATION! STRONG, CLEVER, IMPROVABLE.
 expressive 900 MADE TO FOLLOW YOUR INSPIRATION! STRONG, CLEVER, IMPROVABLE. According to your choices, the expressive 900 will adapt itself to your favorite settings and little by little become the best
Odyssey Elementary Stem Installation
 Tools Needed Grease Allen Wrenches Open/Closed end wrench Adjustable wrench Note: Tools needed will vary depending on the style of headset compression cap and bolt being used. Removing the Handlebars Loosen
EasyStitch. Instruction and guarantee manual 1 YEAR GUARANTEE
 EasyStitch Instruction and guarantee manual 1 YEAR GUARANTEE CONTENTS: 1. Machine Parts 2. Accessories 3. Safety Instructions 4. Battery Installation 5. Threading 6. Fitting fabric and sewing 7. Adjusting
American Morse Equipment
 American Morse Equipment Thank you for purchasing an American Morse Porta Paddle-II Kit. We redesigned the original Porta Paddle for ease of assembly & provide all parts finished and ready for assembly,
Features and Benefits
 Features and Benefits Designer Topaz 30 and 20 Features and Benefits Generous Capability LARGE EXTENDED SEWING SURFACE Sew large quilts, home dec projects, and garments easily New Swedish design provides
Features and Benefits
 Features and Benefits DESIGNER TOPAZ 30 AND 20 FEATURES AND BENEFITS GENEROUS CAPABILITY LARGE EXTENDED SEWING SURFACE Sew large quilts, home dec projects, and garments easily New Swedish design provides
Make a lasting impression.
 Make a lasting impression. F-Series Optional accessories Wide Table (sewing machines) For easier handling of fabrics when quilting or sewing large projects. Free Motion Guide Grip Keep fabric taut with
Assembly Instructions
 Assembly Instructions 10 CONTRACTOR TABLE SAW Model No. 351.218330 Sears Brands Management Corporation, Hoffman Estates, IL 60179 U.S.A. www.sears.com/craftsman 31624.00 Draft (10/08/09) UNPACKING The
Operation Manual for the EP 1 embroidery peripheral
 Operation Manual for the EP 1 embroidery peripheral Single head, single needle Easy to operate Low power consumption High quality results Part Number 110264-01, Revision A A Saurer Group Company 1575 West
INVENT3D Printer Kit Disassembly Instructions
 INVENT3D Printer Kit Disassembly Instructions Version 6 AST2 10/26/16 1 I. General Disassembly Instructions Use the case layer drawings to ensure that components are stored in the appropriate location
LCD MONITOR/TV WALL MOUNT
 INSTALLATION INSTRUCTIONS LCD MONITOR/TV WALL MOUNT DUAL DESK CLAMP (RFCD-110) S CAUTION CAUTION A alerts you to the possibility of serious injury or death if you do not follow the instructions. A CAUTION
Lawson SSR Registration System Instructions
 Lawson SSR Registration System Instructions Quick on-press registration -- because the SSR System mimics your press. Overview p.2 Instructions p.2 Pin Bar System p.7 314-382-9300 FAX 314382-3012 revised
the needle, the user must take sufficient care to avoid injury and observe the sewing area continuously while sewing.
 / - nstruct0fl maflua 7 the needle, the user must take the light bulb is 15 watts. agent. by anyone but an authorized Pfaff D) The drive belt must never be adjusted B) When leaving the machine, chan C)
For additional assistance call
 The following pages will help guide you through the process of assembling your new 48 custom prize wheel. Choose an assembly area with plenty of room to lay your pieces on the floor and also a bench or
PRS Retro Z-Axis Installation
 PRS Retro Z-Axis Installation Page -1- PRS Retro Z-Axis Installation This document is a guide to installing the PRS Retro Z-axis on early ShopBot models. It describes installation for PR models with PK299
SEW WHERE YOU HAVE NEVER SEWN BEFORE
 The Original INC. SEW WHERE YOU HAVE NEVER SEWN BEFORE 7 IN 1 X-CHANGE Don t Settle for anything less than the Original Fast Frame 2011 WEB CATALOG INC. The American FastFrames has developed a patented,
INSTRUCTIONS FOR USING THE GREIST ZIGZAG / AUTOMATIC BUTTONHOLE ATTACHMENT Model #;s 6, 7, 8, 9 &10
 INSTRUCTIONS FOR USING THE GREIST ZIGZAG / AUTOMATIC BUTTONHOLE ATTACHMENT Model #;s 6, 7, 8, 9 &10 The possession of a Buttonhole Attachment is one luxury which is also an economy and sewing becomes a
INSTALLATION INSTRUCTIONS
 INSTALLATION INSTRUCTIONS PARTS REQUIRED Single QuickStand Lite Parts A (1) Lower Arm A B C D B (1) Upper Arm C (1) Base D (1) Base Plate E (1) M8 Dynamic Arm Long F (1) Clamp Bracket G H (1) VESA Plate
Your new. Rose. spinning wheel. majacraft. all you need to spin your dreams... majacraft
 Your new Rose spinning wheel all you need to spin your dreams... 1 Welcome to the Majacraft family Congratulations on purchasing a new Majacraft Rose. We are very proud of this wheel and hope that it allows
Q-Zone Hoop-Frame. Assembly Instructions. Copyright July 11, 2018 Grace Company (Reproduction Prohibited) Version 1.8
 Version 1.8") Q-Zone Hoop-Frame Assembly Instructions Copyright July 11, 2018 Grace Company (Reproduction Prohibited) Version 1.8 Table of Contents Table of Contents... i Warranty... ii Parts List Box 1...iii Box 2...
Q-Zone Hoop-Frame Assembly Instructions Copyright July 11, 2018 Grace Company (Reproduction Prohibited) Version 1.8 Table of Contents Table of Contents... i Warranty... ii Parts List Box 1...iii Box 2...
JVice Care and Maintenance Thanks for purchasing a Jvice. If properly looked after your Jvice will give a lifetime of tying pleasure.
 JVice Care and Maintenance Thanks for purchasing a Jvice. If properly looked after your Jvice will give a lifetime of tying pleasure. Although it is manufactured from highest quality materials any metal
Symbols used. Move the part in the direction of the arrow. Set the clearance as indicated. Move the part to its highest or lowest position.
 4.1999. This service manual was compiled for use when repairing the XL5300, 5200, 5100, 5030, 5020, 5010,PX300,200,100 Zigzag Stitch Sewing Machines. Use this manual, together with the Parts Catalog, when
Thanks for shopping with Improvements! Essex Hall Tree Item #583143
 Thanks for shopping with Improvements! Essex Hall Tree Item #583143 Note: Read these instructions carefully before assembling. Tools required: Philips screwdriver (not included). Find a clean, smooth area
Adjusting the Rotary Hook Timing using the RhAT
 Adjusting the Rotary Hook Timing using the RhAT To use the RhAT, the main shaft of the machine must to able to be rotated to the setting position, either mechanically or electronically, while the needle
INSTALLATION INSTRUCTIONS
 TEL:1-866-XANATOS INSTALLATION INSTRUCTIONS FOR 07-13 CHEVY SILVERADO 1500 PART#RU-CHSI07-B PARTS LIST: 1 Main Body 28 12mm x 37mm OD x 3mm Large Flat Washers 1 Driver/Left Brush Guard 8 12-1.75mm x 40mm
Replacing the build plate clamps
 Repair manual Replacing the build plate clamps Instructions The build plate clamps hold the glass plate in place on the heated bed. There are two fixed in place at the back of the heated bed and two at