SERVICING RAMCO MIRRORS
|
|
|
- Gwendolyn Owens
- 6 years ago
- Views:
Transcription
1 SERVICING RAMCO MIRRORS Few Items on our coaches have generated the number of complaints or have been the source of as many problems as the mirrors. It would be assumed on a very expensive coach that the last item to have problems with would be the mirrors, but that assumption would be wrong. The complaints involve the chrome plating. The reason is simple. The mirror plating appears sub standard and replating using the full chrome plating process including a base plating of copper appears to solve the problem. But even on mirrors with perfect plating owners are finding immediately that the glass in the main mirror housing shakes and vibrates, something that is just not acceptable. The parts of the mirrors can be replated using good industry techniques and the issue of failing chrome goes away. Typically the problem shows up as what would be considered thin plating on the mirror arm, or bubbles in the chrome on the mirror head usually as a result of the plating having a microscopic opening which allows the introduction of moisture, leading to corrosion of the aluminum beneath the outer chrome surface. The chrome plating on the arm however just begins to show as a slightly milky appearance which appears to look like the chrome plating is wearing off or is too thin. Both the mirror vibration and the poor quality of the plating have been brought to the attention of Prevost and the mirror manufacturer and the result of those conversations has been unsatisfying to say the least. So as a result we have undertaken the effort to show how a mirror can be completely disassembled for plating to address that issue first. The start is to remove the mirror(s) from the coach. On older coaches removing four large phillips head screws and then disconnecting the wiring connector does the trick. Once removed and on the bench disassembly of the entire mirror is required so starting with mirror glass removal is a good place to begin. The mirror on the large head is held in place by two Velcro strips running the length of the mirror. Start by separating the Velcro strips. I used a small putty knife between the hook and loops of the Velcro, and once the two halves were separate I slid a piece of paper between the pieces of Velcro to prevent the mirror from re-attaching the glass to the base plate. I bent the paper and taped it to the mirror glass.


2 I started at one end and worked my way down the mirror, and once the two pieces of Velcro were separated I slid a piece of paper between them and taped it to the glass so it would not slip out Not real sophisticated but it worked.

3 Once I got the Velcro separated on each side of the mirror glass the mirror still was secured to the glass base. The reason is at the top and bottom of the mirror there is a dab of some sealant that is squeezed in between the glass and the base plate and once it hardens it holds the glass tightly. I again used a putty knife to slit between the glass and base plate. Anything that will reach the sealant will work as long as it is sharp enough to push through the dab of sealant. In his video Tom used a hacksaw plade. On this particular mirror the dab of sealant was old, hard and difficult to slice through. As can be seen from the photos below I ended up tearing a piece out of the aluminum foil that is bonded to the rear of the mirror and is there to hold the heater coil for the mirror defrosting in place. Review this video t&threadid=4622 to see exactly where and how to separate the glass from the base plate. When Tom made the video he was working with a new mirror assembly so you will see differences between his mirror assembly and the one shown in this article but the underlying principles are the same.

4 Here you can see the two dabs or globs of sealant stuck to the base plate. In separating the mirror from the base plate this particular mirror s heating element is held in place with an aluminum foil sheet and instead of slicing through the hardened sealant the foil tore and separated from the glass. You can see the H configuration of the heater coil. The heater connectors were a little corroded together so a couple of pair of pliers were used to grab onto the terminals and pull them apart. The older the mirror the more likely the sealant which supplements the Velcro strips is going to be hard to cut through. Additionally the corrosion on the terminals is going to make separation of the terminals more difficult so be prepared to struggle a little, but do so carefully. This particular mirror is about 13 or 14 years old and the amount of aging shows in just about everything. In addition to the terminals and the hardened dab of sealant there was excessive lifting of the plating and where the plating had failed there was a large amount of white powdery corrosion from the aluminum material. That shows that the slightest breach of the chrome plating is going to allow aluminum under the chrome surface to rust and if the breach is on a visible part of the mirror the impact on the appearance will be substantial.


5 Pliers were needed to separate the terminals Typical of the corrosion seen on the mirrors.


6 The next step is to remove the base plate and motor. This is an older style motor and removing 4 screws is required. I had to peel a foil cover from the base plate to get at the motor. The four screws on this assembly enable the removal of the motor and base plate.


7 To get the base plate this far out, the wire bundle had to be pulled through the arm. It is painful to have to cut the wires, but it has to be done. Look carefully at the RH end of the orange wire and you will see where it was pinched and the wire is exposed.


8 This pinched wire could have created a problem but it appears to have not. Ouch. That hurts, but do not fear. Prevost has the kit to replace the connector. Just keep the old one so the wires get reinstalled in the right place. Now to work on removing the upper mirror and housing.

9 Here is where this project gets ugly. On this particular mirror assembly it appears the mirror can be removed from the housing like it was on the large mirror. The putty knife was used to cut the glue bond between the mirror housing and the base plate which is a plastic component. The best laid plans of mice and men don t always work out. In the photo below it shows cutting the seal at that location released the mirror, but damaged the heating element on this version of mirror heater. Adding insult to an already injured mirror is removing the mirror did nothing to expose fasteners to unscrew the motor assembly from the housing. As it turns out this particular version of mirror and motor assembly was not meant to be serviced, repaired or disassembled. It can be presumed if there are issues with plating, broken glass, a failed motor this particular version of the upper head assembly has to be bought as a complete assembly unless Ramco will sell individual parts that have to be assembled as they were from the factory. Or maybe the design has changed. The following photos show how what started as a good project is turning into a problem.


10 The outer perimeter seal was cut successfully, but when the inner seal seen as a circle had to be cut this project started going down hill. The mirror base was pried up and in doing it damaged the motor connectors. The seal around the ring on the mirror base should have been cut but you cannot get a


11 tool in there. A small phillips screw driver was used to remove the motor assembly. And then a new problem arises. The screws will not come out and need to be drilled.


12 Dissimilar metals and corrosion kept the screws tightly in place. With the screw heads drilled off the two heads were separated, The screw body needs to be drilled from the small head and the holes in the large head need to be opened a little to allow larger screws and retapped holes.


13 Even with the allen screws loose, corrosion once again presents a challenge in getting the arm and the head separated. Driving a pickling fork between the head and arm separated the two.
14


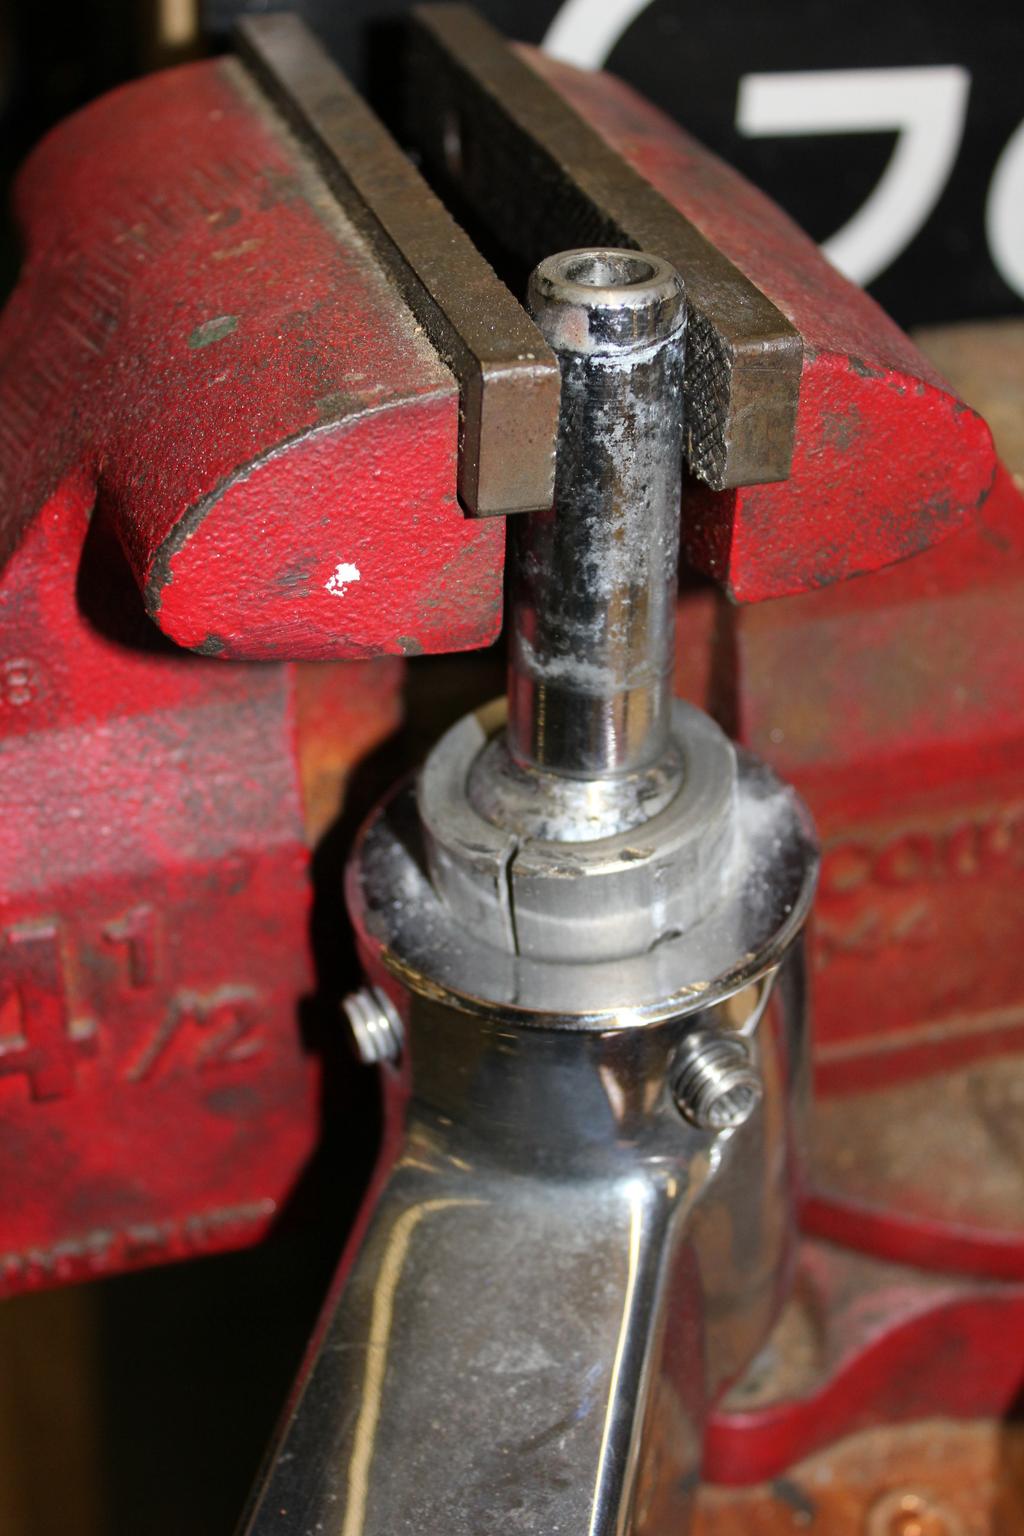
15 Putting the part that slid into the mirror head in a vise and rapping on the arm with a soft faced hammer separated the balance of the parts from the arm. Disassembly required a struggle with corrosion every step of the way. Even getting the lower bolt out was a problem due to corrosion.


16 The four pieces that would be replated. Corrosion was everywhere. Who says aluminum doesn t rust? The bottom line on this project is completely different from the original premise. It
17 began with the intent to show how to disassemble all the mirror components. That has been accomplished by not in a manner that allows this to be a project an owner can do to repair shoddy plating. Since Ramco does such a lousy job of supporting its product, and shows absolutely no desire to cure the plating problem or the mirror shakes, it is foolish to expect their help in supplying replacement parts to replace those that might get damaged during disassembly. I haven t spoken to Ramco about buying a new upper mirror head assembly to replace one not intended to be serviced because if the intent is to fix the plating problem you would be buying a replacement assembly with the same lousy plating. I don t know if they would provide parts for final assembly only and allow you to use properly plated parts you get from a plater. As much as I hate to say this I hope this article helps you to understand how to disassemble a mirror for service or repair, such as glass replacement, but I cannot express confidence doing a project like this to get the parts ready for replating will be viable. I have a lot of tools and patience, but I still have about 6 hours getting everything apart. Re-assembly could take longer because the wires that had to be cut need to be repaired, some damaged components need complete replacement and the end result is it will look nice for a long time, but the mirror will still shake. I cannot envision a good way to stop that shaking and still allow the mirror head to move freely for adjustment. Chalk this project up as a learning process. I hope it helps anyone that does have to do a repair. Jon W. Wehrenberg December 16, 2015 ]
AUDI A8 D3 REPLACING THE OUTSIDE DRIVER DOOR HANDLE
 AUDI A8 D3 REPLACING THE OUTSIDE DRIVER DOOR HANDLE The keyless entry system in the D3 is a great feature. If you have the car key fob in your pocket, putting your hand under the door handle will unlock
TRUE TECHNICAL SERVICE MANUAL - ALL MODELS. DOORS/DRAWERS/LIDS
 DOORS/DRAWERS/LIDS 55 56 NOTES DOORS/DRAWERS/LIDS Swing s 73 74 NOTES INSTALLATION OF A GDM-SWING DOOR Phillips Head Screwdriver (2) - 1/8" Drift Punches (forged) Top Bracket NOTE: It may be necessary
Repairing Microsoft Wedge Touch Mouse Battery Cover Retaining Clip
 Repairing Microsoft Wedge Touch Mouse Battery Cover Retaining Clip Disassembly, repair and reassembly of Wedge Touch mouse when the battery cover will not stay closed. Also is a good guide to repair other
Oasis Recliner Disassembly Instructions
 These instructions may be used to disassemble all versions of our Oasis Recliner seating line and available options. Time Required: 20 minutes. (Internal metal frame) D: Reaching up and inside the back,
PREVOST MINI AIR BAG BELT TENSIONERS
 PREVOST MINI AIR BAG BELT TENSIONERS Over the years on 2 different coaches I have had the miniature air bag belt tensioners to keep the fan and OTR air conditioning belts tight. They do a good job, but
Instructions for Lighting an S Scale Caboose
 Instructions for Lighting an S Scale Caboose The S Scale Caboose lighting kit is adaptable for most caboose models of rolling stock including American Flyer (TM) and contains the same components as found
Serene arm installation instructions for Easyrig 2.5/3 V0.8 Standard arm documentation
 Serene arm installation instructions for Easyrig 2.5/3 V0.8 Standard arm documentation Congratulations you just got your Serene spring arm! Since we are dealing with very strong torque and forces for the
MOTOR & BULK HEAD. A Manual for Repair and Maintenance Technicians
 MOTOR & BULK HEAD A Manual for Repair and Maintenance Technicians CAUTION This manual is designed to help technicians who are already experienced in workshop procedures and know how to handle tools. Only
REPAIR INSTRUCTIONS. Cat. No Cat. No MILWAUKEE ELECTRIC TOOL CORPORATION. SDS Max Demolition Hammer. SDS Max Rotary Hammer
 Cat. No. 9-0 SDS Max Demolition Hammer Cat. No. -0 SDS Max Rotary Hammer MILWAUKEE ELECTRIC TOOL CORPORATION W. LISBON ROAD BROOKFIELD, WISCONSIN 00-0 8-9-0 d 000 8-9-0 d Special Tools Require Forcing
RANGE ROVER TAILGATE
 RANGE ROVER TAILGATE ILLUSTRATED FITTING MANUAL You will need: General workshop tools Torx bits and drill Penetrating oil Impact driver and wire brush 1. Remove the wiper arm, then soak the four tailgate
Signal Mirror Installation Instructions
 Signal Mirror Installation Instructions 2006 2007 Honda Ridgeline THE safety accessory of the 21 st Century. P/N 210 0142 0 Rev. A (9/5/07), BTV 2007 Muth Company, LLC Professional Installation Recommended:
Quantum ProDrive LPS 240MB IDE HDD (Early '90s) Teardown
 Teardown") Quantum ProDrive LPS 240MB IDE HDD (Early '90s) Teardown This is a teardown of a broken Quantum ProDrive LPS 240 megabyte hard drive from the early nineties. Written By: Dylan Treschl ifixit CC BY-NC-SA
Quantum ProDrive LPS 240MB IDE HDD (Early '90s) Teardown This is a teardown of a broken Quantum ProDrive LPS 240 megabyte hard drive from the early nineties. Written By: Dylan Treschl ifixit CC BY-NC-SA
Exterior Door Handle - LH - Unpainted (05-14 All)
") Tools Required: Exterior Door Handle - LH - Unpainted (05-14 All) 1) 10mm and 7mm sockets 2) Socket wrench (small size recommended) 3) T30 Torx bit 4) Plastic pry/molding tool (below, A) 5) Thin plastic
Tools Required: Exterior Door Handle - LH - Unpainted (05-14 All) 1) 10mm and 7mm sockets 2) Socket wrench (small size recommended) 3) T30 Torx bit 4) Plastic pry/molding tool (below, A) 5) Thin plastic
Explorer Wiring Kit (assembled)
") Explorer Wiring Kit (assembled) For Vintage, Firestorm & Standard Series Please Read All Instructions Before Beginning. Tools you will need: Soldering Iron (35 watt preferably) Solder Wet Sponge Wire Clippers
Explorer Wiring Kit (assembled) For Vintage, Firestorm & Standard Series Please Read All Instructions Before Beginning. Tools you will need: Soldering Iron (35 watt preferably) Solder Wet Sponge Wire Clippers
* Drill and 3/32" drill bit: for drilling holes in the factory plastic upper for the screws to secure the brackets (factory upper installation only)
") * Two slider windows (four sliders windows for the 4-door kit) * Four brackets to secure the windows to the upper door frames (8 brackets for the 4-door kit) * Weatherstrip to seal the windows to the half
* Two slider windows (four sliders windows for the 4-door kit) * Four brackets to secure the windows to the upper door frames (8 brackets for the 4-door kit) * Weatherstrip to seal the windows to the half
Under Seat Storage Drawer Installation Instructions
 Under Seat Storage Drawer Installation Instructions Parts List: 1) Drawer Assembly 8) Self Tapping Screws 1) Instructions 1) Template Tools Needed: Drill and/or Bit Driver Tape Measure Jigsaw or metal
Simply lift up on the flexible cover to remove it from the radiator support panel and factory grille, exposing the upper mounting hardware.
 2 Simply lift up on the flexible cover to remove it from the radiator support panel and factory grille, exposing the upper mounting hardware. Apply masking tape to the top of the bumper cover underneath
!! " # $ % & '! ( ) * +, -
 * +, -") !! " # $ % & '! ( ) * +, - North Pegasus This carton contains: (1) Instruction package. Response Curves North Creek Cabinet Handbook North Creek Wiring Guide (2) 6 oz. Rolls of Dacron stuffing. (1) Tube
!! " # $ % & '! ( ) * +, - North Pegasus This carton contains: (1) Instruction package. Response Curves North Creek Cabinet Handbook North Creek Wiring Guide (2) 6 oz. Rolls of Dacron stuffing. (1) Tube
Steel Reinforced Joining Guide (Horizontal / Vertical)
") (Horizontal / Vertical) for Andersen Patio Door and/or Elliptical Top Window Combinations Congratulations! You have just purchased one of the many fine Andersen products. Proper assembly, installation
(Horizontal / Vertical) for Andersen Patio Door and/or Elliptical Top Window Combinations Congratulations! You have just purchased one of the many fine Andersen products. Proper assembly, installation
Lexus ES350 Window Clip Replacement
 Page 1 of 10 1.0 Purpose The following instruction details the tools and supplies required, and the steps for removing and replacing the broken window clip in your 2007-2012 Lexus ES350. 2.0 Tools and
5.Use Spray gasket glue or Silicone Sealant on 1214 Valve Plate. When tacky, place on motor block with 1225 timing plate towards front.
 Assembly 2000 1.Press on 1241S Counterweight Guards onto 1215 Motor Block. The end with the hole goes towards the center. Note slot on top of 1215 Block always goes towards the front. Put 1212S Rings on
Razr Adapter Retrofit Project by Craig Hoy, Edmonton, AB, Canada
 Razr Adapter Retrofit Project by Craig Hoy, Edmonton, AB, Canada The following is a description of the process that I have used to modify the console eject box for e38, e39, e46 and x5 s, part number 84-21-6-933-415.
C70 Window Roller Repair Taken from: Heres the problem:
 C70 Window Roller Repair Taken from: http://www.volvospeed.com/vs_forum/topic/115086-how-to-c70-window-rollers-permanent-fix/ Heres the problem: This happened to two separate window assemblys on my c70
Soundproofing doors and trunk Ford Focus mk1
 Ford-Focus.ST Category: Do It Yourself Tagi: Ford Focus I Soundproofing doors and trunk Mute, dismantling, sound suppress Soundproofing doors and trunk Ford Focus mk1 Muted trunk and door mats special
FACTORY CAT TOMCAT CORPORATION
 FACTORY CAT RPS TOMCAT CORPORATION Artificial Turf and Carpet Sweeping Install Kit #349-641 & #349-642 1. Detach batteries so that there is no power running through the machine before starting. 2. Start
WARNING. Failure to observe these instructions could lead to severe injury or death.
 INSTALLATION INSTRUCTIONS WINCH MOUNTING KIT Part Number: 80156, 80160 Application: 2008 Ford F150 Your safety, and the safety of others, is very important. To help you make informed decisions about safety,
OpenROV. Guide 3 - Electronics. We will now move to the assembly of the electronics that will control the ROV. Written By: OpenROV
 OpenROV Guide 3 - Electronics We will now move to the assembly of the electronics that will control the ROV. Written By: OpenROV 2017 openrov.dozuki.com Page 1 of 33 INTRODUCTION We will introduce soldering
How I fixed my HP Envy 15T-J100 Quad Broken Hinge
 How I fixed my HP Envy 15T-J100 Quad Broken Hinge My daughter sent me the picture below from college (she s in school in AZ, about 1500 miles from home) she lifted the screen on her PC and the base cover
Bi-Color Signal Mirror Installation Instructions
 Bi-Color Signal Mirror Installation Instructions 2005-2009 Toyota Tacoma THE safety accessory of the 21 st Century. P/N 210-0141-0 Rev. A2 (3/30/09), BTV 2007 Muth Mirror Systems, LLC Page 3 of 13PplPage
HDL(M)6 Nut/Screw Assembly
6 Nut/Screw Assembly") HDL(M)6 Nut/Screw Assembly Remove, repair, and reassemble the nut and screw assembly in your HDL series double lock vise. In these instructions when we refer to the front of the vise or nut/screw assembly,
HDL(M)6 Nut/Screw Assembly Remove, repair, and reassemble the nut and screw assembly in your HDL series double lock vise. In these instructions when we refer to the front of the vise or nut/screw assembly,
Dubnium 11 Installation Instructions & Parts List
 Dubnium 11 Installation Instructions & Parts List Illustration Dubnium, H1 Handle Right Hand: Open Out Page 1 of 25 IMPORTANT This shower screen / enclosure must be installed by suitably qualified individuals.
Signal Mirror Installation Instructions Honda Odyssey
 Signal Mirror Installation Instructions 2005-2009 Honda Odyssey THE safety accessory of the 21st Century. P/N 210-0122-0 Rev. A4 (6/9/09), BTV 2006 Muth Company, LLC PROFESSIONAL INSTALLATION RECOMMENDED
Introduction. Rocky Mountain Westy Swing Away Carrier Kit Installation Instructions
 Rocky Mountain Westy Swing Away Carrier Kit Installation Instructions Introduction Thank you for purchasing the Rocky Mountain Westy Swing Away Carrier Kit. We pride ourselves in the products we develop
DIY! How to Make Your Own. Trip Line Detonator for Use With Big Blast Target InflatorÔ
 IMPORTANT To ensure the templates print the correct size make certain that Scale or Scaling in your PDF printing program is set to Off or None. Trip Line Detonator for Use With Big Blast Target InflatorÔ
It s a good idea to identify the Front and Rear cylinder heads. before starting the teardown process.
 It s a good idea to identify the Front and Rear cylinder heads using a paint pen before starting the teardown process. Use a 17/64 drill bit (or 6mm if you have metric drills or round stock) to lock the
Chapter 6 Frame And Lens Repairs
 Chapter 6 Frame And Lens Repairs 6.1 General Information All maintenance on the frame of the EXO Full-Face mask can be accomplished with common hand tools. 6.2 Lens Replacement Tools required: Dow DC-111
JK Front Crusher Flares
 INSTALLATION INSTRUCTIONS INST-17-03-030_A JK Front Crusher Flares IMPORTANT: Thank you for purchasing this Poison Spyder product. Please read through this entire document before proceeding with installation.
Motorola E815 / E816 Disassembly / Assembly Guide. Ver. 1.1 By Chubbs_WA
 Motorola E815 / E816 Disassembly / Assembly Guide Ver. 1.1 By Chubbs_WA April 10, 2007 Table of Contents Disassembly Tools needed 3 Disassembly for dummies 4 Just a note 5 Disassembly of keypad housing
Tools Required For Servicing: Needle Nose Pliers
 Danger Caution Danger of Life Do not attempt to perform service on a hot heat gun. Always allow unit to cool completely and disconnect from power source before performing any service on the heat gun. Fire
Cable Hanging Instruction Manual
 Tri-States Grain Conditioning, Inc. Cable Hanging Instruction Manual There are several types of grain storage tanks and bins. Parts of these instructions may be modified to fit the circumstances. Care
Stream NXT - assembly instructions
 Stream NXT - assembly instructions Recommended settings CG (measured from root leading edge): Speed/launch camber (+down, near the wing root): Cruise camber (+down, near the wing root): Thermal camber
Installation Instructions
 For Medium (15-18.5K) + Heavy duty (22-28.5K) Air Conditioner READ BEFORE INSTALLING UNIT To avoid risk of personal injury, property damage, or product damage due to the weight of this device and sharp
Heavy Duty Ceiling Tilt Mount Installation Manual
 HD-CTM-5580 Heavy Duty Ceiling Tilt Mount Installation Manual *This Installation requires a minimum of two people. For your safety: Read the complete instruction manual before starting an installation
Written By: Brett Hartt
 Replace the battery in your ipad 3 4G. Written By: Brett Hartt ifixit CC BY-NC-SA www.ifixit.com Page 1 of 36 INTRODUCTION When your ipad can't stay awake for longer than a few hours, it is time to replace
Hatchback Wing Riser Kit
 Hatchback Wing Riser Kit 2015-06-11 Thank you for purchasing this PERRIN product for your car! Installation of this product should only be performed by persons experienced with installation of aftermarket
INSTALLATION INSTRUCTIONS WINCH MOUNTING PLATE Part Number: Application: 2007 JEEP JK WRANGLER
 INSTALLATION INSTRUCTIONS WINCH MOUNTING PLATE Part Number: 74247 Application: 2007 JEEP JK WRANGLER Your safety, and the safety of others, is very important. To help you make informed decisions about
Side and rear window, assembly overview
 64-7 Side and rear window, assembly overview 1 - Side/rear window Removing Unbroken Page 64-9 Broken Page 64-11 Installing Page 64-13 Curing time Page 64-21 Re-sealing Page 64-25 2 - PUR adhesive sealant
JK Rear Crusher Flares
 INSTALLATION INSTRUCTIONS INST-17-05-010_A JK Rear Crusher Flares IMPORTANT: Thank you for purchasing this Poison Spyder product. Please read through this entire document before proceeding with installation.
Signal Mirror Installation Instructions Dodge Charger, Dodge Magnum, Chrysler 300
 Signal Mirror Installation Instructions 2006-2009 Dodge Charger, 2005-2008 Dodge Magnum, 2005-2009 Chrysler 300 THE safety accessory of the 21st Century. P/N 210-0123-0 Rev. A4 (10/7/09), BTV 2007 Muth
INSTALLATION INSTRUCTIONS
 INSTALLATION INSTRUCTIONS Trans4mer Grille Guard/Winch Mount Kit 6367 For Chevrolet Silverado 1500, Suburban 1500 and Tahoe As you read these instructions, you will see NOTES, CAUTIONS and WARNINGS. Each
Vulcan MutliFrame SkyHook Series
 Vulcan MutliFrame SkyHook Series Frame V1.05 Thank you for purchasing the Vulcan MultiFrame. The MultiFrame is a very strong, light, durable airframe, and is very straightforward to assemble. Please follow
Splice-In Sequential Tail Lights Installation Guide (96-04)
") Splice-In Sequential Tail Lights Installation Guide (96-04) The below installation instructions work for the following products: Mustang Sequential Taillights Kit - Splice-in (96-04) Please read through
Splice-In Sequential Tail Lights Installation Guide (96-04) The below installation instructions work for the following products: Mustang Sequential Taillights Kit - Splice-in (96-04) Please read through
MODELS 49 RA 49 RAZ 49 RAC
 General Safety and Maintenance Manual MODEL grinder featuring a rear exhaust. Model Number Exhaust Direction REAR Throttle Type (L) Lever or (K) Safety Lever Speed 12000 to 14000 R.P.M (13500rpm is standard)
Hullavator Gas Spring Replacement (simplified)
") Hullavator Gas Spring Replacement (simplified) Some Thule Hullavators came with (original owner) lifetime warranties if you are the original owner of a defective Hullavator and can provide proof of purchase
Hullavator Gas Spring Replacement (simplified) Some Thule Hullavators came with (original owner) lifetime warranties if you are the original owner of a defective Hullavator and can provide proof of purchase
STYLE BAR & TONNEAU COVER INSTALLATION
 STYLE BAR & TONNEAU COVER INSTALLATION INSTALLATION MANUAL: 2005 to '09 Mustang P/N: 10-8002-C12071B Saleen Performance, Inc. 1225 East Maple Rd., MI 48083 800-888-8945 www.saleen.com 1 IF YOU ARE NOT
JK Brawler Rockers. *Includes ONE of the Hardware Kits (not both)
") INSTALLATION INSTRUCTIONS INST-17-08-200_A JK Brawler Rockers IMPORTANT: Thank you for purchasing this Poison Spyder product. Please read through this entire document before proceeding with installation.
INSTALLATION INSTRUCTIONS INST-17-08-200_A JK Brawler Rockers IMPORTANT: Thank you for purchasing this Poison Spyder product. Please read through this entire document before proceeding with installation.
ASSEMBLING YOUR L&L EASY-FIRE KILN
 TABLE OF CONTENTS TOOLS NEED FOR THE JOB............ 1 UNPACKING........................... 2 Inspect for visible damage.......................... 2 Remove Top from Carton........................... 2
Jeep. Flat Style Fender Flares Front Pair Front Part # Rev-9 02/23/2016 For complete fitment info visit :
 STEP 1 PRIOR TO INSTALLATION A) Bushwacker only approves installing the fl ares according to these written instructions with the hardware provided. WARNING: Failure to install according to these instructions
Heavy Wall Applied Stop Tube Frame and Door Installation
 INSTALLATION INSTRUCTIONS Heavy Wall Applied Stop Tube Frame and Door Installation Read all instructions before beginning installation. These instructions are provided to help prevent installation problems
Xenon 05 Installation Instructions & Parts List
 Xenon 05 Installation Instructions & Parts List Illustration Xenon 05, H1 Handle Left Hand: Open Out 26/05/2016 Revision 2.1 Page 1 of 19 IMPORTANT This shower screen / enclosure must be installed by suitably
The GAK using Ziv s GAK in the box
 The GAK using Ziv s GAK in the box By Webslinger The Gonzo Air Kit or GAK has been around for a long time as a "Do-It-Yourself" performance modification. This is probably the least expensive way to increase
Liberty Repair Catalogue
 Liberty Repair Catalogue Manual # Replacement part L 01 L02 L 03 L 04 L 05 L 06 L 07 L 08 L 09 L 10 L 11 L 12 L 13 L 14 Replace arm end fitting Replace arm strop Replace canopy arm Replace canopy strut
WATCH VIDEO INSTALL! HOW-TO INSTALL CV-TL-80S-EB. Page: Instructions for Installation on: Toyota Land Cruiser 80 Series
 Clearview Towing Mirrors (Electric Power Adjustable) CV-TL-80S-EB Instructions for Installation on: Toyota Land Cruiser 80 Series 1990-1997 Page: 1 OF 13 Clearview s premiere line of replacement towing
WPS crew Doors Installation instructions
 WPS-132-133 crew Doors Installation instructions ORDER OF INSTALLATION FOR A COMPLETE ENCLOSURE OF A CREW WPS (Weather Protection System) IS AS FOLLOWS: 1. Heater 2. Rear Thresholds - Right Hand & Left
INSTALLATION INSTRUCTIONS
 INSTALLATION INSTRUCTIONS Trans4mer Grille Guard/Winch Mount For GMC Sierra 2500HD & 3500, + 03 Kit 76248/76249 This WARN Trans4mer system can be customized to give your Chevy Silverado a wide variety
Signal Mirror Installation Instructions
 Signal Mirror Installation Instructions Honda CRV 1997-2003 THE safety accessory of the 21 st Century. P/N 210-0032-0 Rev B2 (6-26-04), GG 2003 Muth Mirror Systems, LLC. Note: Professional Installation
2.007 Design and Manufacturing I
 MIT OpenCourseWare http://ocw.mit.edu 2.007 Design and Manufacturing I Spring 2009 For information about citing these materials or our Terms of Use, visit: http://ocw.mit.edu/terms. Fabrication of a Simple
1956 to 1962 Corvette Windshield Frame Glass Removal and Installation Part 1
 1956 to 1962 Corvette Windshield Frame Glass Removal and Installation Part 1 1956 to 1962 Corvette Windshield Frame Glass Removal and Installation Part 1 - Disassembly This is the procedure that I use
TOOLS REQUIRED FOR INSTALLATION: AIR RACHET, GRINDER AND CUTTER.
 THIS KIT INCLUDES: 16 M8-1.25X30MM BOLTS WITH WASHERS 2 SHOCKS 565 PSI RIGHT AND LEFT HINGE ASSEMBLY 2 SHOULDER BOLTS 2 PINS TOOLS REQUIRED FOR INSTALLATION: AIR RACHET, GRINDER AND CUTTER. 7/23, 10MM,
One Piece Products. Series III El Camino ( ) One Piece Door Glass Conversion Manual.
 One Piece Door Glass Conversion Manual.") One Piece Products Series III El Camino (1964-1967) One Piece Door Glass Conversion Manual *Registered Trademark www.onepieceproducts.com (888)One Products (888)663-7763 1 Installation Instructions_ 1964-1967
One Piece Products Series III El Camino (1964-1967) One Piece Door Glass Conversion Manual *Registered Trademark www.onepieceproducts.com (888)One Products (888)663-7763 1 Installation Instructions_ 1964-1967
Chin Strap, Sealed Pull Pins and Swing Catch for Fiberglass Helmets. Contents
 Chin Strap Chin Strap, Sealed Pull Pins and Swing Catch for Fiberglass Helmets Contents BTM-1 1.1 Chin Strap BTM-4 1.2.3.1 Preparation BTM-1 1.1.1 Chin Strap Removal BTM-4 1.2.3.2 Disassembly BTM-1 BTM-2
How To: Automatic Transmission Indicator Pin Replacement PRNDL. Introduction
 How To: Automatic Transmission Indicator Pin Replacement PRNDL Introduction This How To explains how I would remove the indicator pin from a second gen VCV. Improvements or clarifications to this technique
Written By: Thomas Opsomer
 Power Drill Chuck Replacement This guide will help you to replace the chuck on almost any corded or cordless drill. Written By: Thomas Opsomer ifixit CC BY-NC-SA www.ifixit.com Page 1 of 13 INTRODUCTION
2-Door EXO-Top Roof Rack System
 Page 1/29 Part 13516.01 2-Door EXO-Top Roof Rack System! WARNING The EXO-Top Roof Rack System is rated to a dynamic 300 lb, evenly distributed load. Further loading could result in serious injury or death.
Mac mini Model A1176 SSD Installation
 Mac mini Model A1176 SSD Installation Installing an SSD in the Mac Mini A1176 Written By: Dozuki System 2017 guides.crucial.com Page 1 of 13 INTRODUCTION Upgrade your hard drive for more storage capacity.
Installation Instructions Precision Sport Shifter
 Installation Instructions Precision Sport Shifter 2004 and up Pontiac GTO Part Number 45043 2010, 2005, 2004 by B&M Racing and Performance Products This B&M Precision Sport Shifter has been designed to
WARNING!! DO NOT LIFT DOORS UP WHEN THE HOOD IS OPEN. THE DOORS WILL HIT THE HOOD!
 WARNING!! DO NOT LIFT DOORS UP WHEN THE HOOD IS OPEN. THE DOORS WILL HIT THE HOOD! THIS KIT INCLUDES: 4 M8-1.25X30MM BOLTS WITH WASHERS 12 M8-1.25X40MM BOLTS WITH WASHERS 2 SHOULDER BOLTS WITH RIGHT AND
This is a Disclaimer!!!
 This is a Disclaimer!!! Kevin Hawkins and Terry Baker provide an internet information source that has been created for educational and communication purposes. The procedures for rebuilding a GTS1000 ABS
Signal Mirror Installation Instructions Toyota Tacoma
 Signal Mirror Installation Instructions 2005-2015 Toyota Tacoma THE safety accessory of the 21 st Century. P/N 210-0115-0 Rev. A4 (3/11/15), BTV 2005 Muth Mirror Systems, LLC Page 3 of 12PplPage 3 of 12
OTHER TOOLS MAY BE NEEDED DEPENDING ON YOUR VEHICLE.
 THIS KIT INCLUDES: 16 M8-1.25X40MM BOLTS WITH WASHERS 2 SHOCKS 720 PSI RIGHT AND LEFT HINGE ASSEMBLY 2 SHOULDER BOLTS 2 PINS TOOLS REQUIRED FOR INSTALLATION: AIR RACHET, GRINDER AND CUTTER. 10MM, 11MM,
SAFETY THIS PRODUCT IS FOR OFFROAD USE ONLY. ALL LIABILITY FOR INSTALLATION AND USE RESTS WITH THE OWNER.
 SAFETY Your safety and the safety of others is very important. In order to help you make informed decisions about safety, we have provided installation instructions and other information. These instructions
Never power this piano with anything other than a standard 9V battery!
 Welcome to the exciting world of Digital Electronics! Who is this kit intended for? This kit is intended for anyone from ages 13 and above and assumes no previous knowledge in the field of hobby electronics.
Water Line and Water Line Assembly Gasket
 1 Preparation for Repair 1) Remove tip from scaler 2) Remove scaler from air supply 3) Remove gasket from back end of scaler. Examine gasket for obvious wear or disfigurement. Replace if necessary. 2 Remove
Regardless of how you got here, you have keys that don't match, and you'd like to have a one-key system. Well, today is your lucky day!
 Vollkswagen Cabriiollet DIY Guiide Removiing Door Handlles & Repaiiriing Door Locks This how-to was originally posted on VWvortex.com by scirocco*joe : http://forums.vwvortex.com/zerothread?id=3496179.
MB-105 BENDER INSTRUCTION SET PRO-TOOLS 7616 INDUSTRIAL LANE TAMPA, FLORIDA PHONE FAX
 MB-105 BENDER INSTRUCTION SET PRO-TOOLS 7616 INDUSTRIAL LANE TAMPA, FLORIDA 33637-6715 813-986-9000 PHONE 813-985-6588 FAX ASSEMBLY INSTRUCTIONS IN THE FOLLOWING INSTRUCTIONS WE WILL EXPLAIN THE ASSEMBLY
Portofino Case2 Installation Guide
 Portofino Case2 Installation Guide vjun16 (for 17 or 24 mm Surface Wall Profile) DO NOT ASSEMBLE WITHOUT FULLY READING THESE INSTRUCTIONS Page 2 Thank you for purchasing this Portofino Case 2 shower enclosure.
5/16 Hex Head Bolt, 16 pcs. Plastic Push Retainer, 6 pcs. Alcohol Wipe, 2 pcs. Side Refl ex Reflector, 2 pcs
 STEP 1 PRIOR TO INSTALLATION A) Bushwacker only approves installing the fl ares according to these written instructions with the hardware provided. WARNING: Failure to install according to these instructions
Repairing iphone 4 LCD Backlight Dim spot issue
 Repairing iphone 4 LCD Backlight Dim spot issue found a way to fix a liquid damaged iphone screen back light issue Written By: Pranav Singh ifixit CC BY-NC-SA www.ifixit.com Page 1 of 26 INTRODUCTION found
Installing Your New Creature From The Black Lagoon Tail Light DMD Panel MOD
 Installing Your New Creature From The Black Lagoon Tail Light DMD Panel MOD A few things before we start: The wooden speaker panel provided in this MOD was manufactured using a Precision CNC machine and
EPPA2-KIT DUAL MONITOR ARM CONVERSION
 EPPA2-KIT DUAL MONITOR ARM CONVERSION EPPA2-KIT Rev A 10/17 Model EPPA2-KIT-XXX ASSEMBLY AND ADJUSTMENT EPPA2-KIT PARTS AND TOOLS PLEASE REVIEW these instructions before beginning the assembly and adjustment
MMD Convertible Styling Bar Customer Installation Guide
 MMD Convertible Styling Bar Customer Installation Guide TOOLS REQUIRED/RECOMMENDED: Electric Drill 1 Forstner Bit (Hole Saw) 1 3/8 Hole Saw (manual calls for 1 ¾ ) 1/8, 3/8 & ¾ Drill Bits Rivet Gun Trim
Gallium 03 Installation Instructions & Parts List
 Gallium 03 Installation Instructions & Parts List Illustration Gallium 03, H1 Handle Left Hand: Open Out 04/05/2016 Revision 1.1 Page 1 of 19 IMPORTANT This shower screen / enclosure must be installed
Radon 07 Installation Instructions & Parts List
 Radon 07 Installation Instructions & Parts List Illustration Radon 07, H1 Handle Right Hand: Open Out 14/06/2016 Revision 1.1 Page 1 of 21 IMPORTANT This shower screen / enclosure must be installed by
Pow-R-Feed Systems Service Manual
 Pow-R-Feed Systems Service Manual Important Safety Instructions Please read this manual carefully and follow its instructions. Improper use or failure to follow these instructions could result in serious
INSTALL/REMOVAL INSTRUCTIONS: WINDOW REGULATOR
 REMOVAL/INSTALL OF WINDOW REGULATOR (741-584) Ford Focus 2000-2007 General Tech Tips: Use painter s tape rather than duct tape to secure window. It will not damage paint or leave sticky residue. A plastic
JK FRONT FENDER FLARE INSTALLATION INSTRUCTIONS
 JK FRONT FENDER FLARE INSTALLATION INSTRUCTIONS TOOLS NEEDED 3/16 Allen Wrench 1/2 Socket or wrench 10mm Socket Flat head screwdriver HARDWARE 5/16 x 3/4 button heads (14) 5/16 x 1 button heads (8) 5/16
Technical Documentation Lift Advanced
 Technical Documentation Lift Advanced 1 1 Introduction... 4 2 Basic Information... 5 2.1 Hinge Recommendations... 5 Lift Advanced HF... 5 Lift Advanced HK... 5 2.2 Usage of Aluminium Fronts... 5 19mm Aluminium
1/4 Rubber Spacer, 26 pcs. M5-.8 Machine Screw, 26 pcs 13. Female Wire Connector, 4 pcs
 97-06 Jeep Wrangler TJ Set Part #10920-07 Rev-3 12-15-08 A) B) C) D) E) F) G) STEP 1 - PRIOR TO INSTALLATION Bushwacker only approves installing the fl ares according to these written instructions with
Tapping Screw (W/Flange) 46 Cord Armor 47 Tube (D) 48 Cord. 45 Cord Clip. Tapping Screw (W/Flange) 10 Gear Cover Ass'y. 12 Socket (B) Ass'y
 46 Cord Armor 47 Tube (D) 48 Cord. 45 Cord Clip. Tapping Screw (W/Flange) 10 Gear Cover Ass'y. 12 Socket (B) Ass'y") W8VB The exploded assembly drawing should be used only for authoized service center. W8VB Item No. Part time 1 Magnetic Hex. Socket 2 Sub Stopper 3 O-Ring (S-16) 4 Locator (A) 5 Lock Sleeve (A) 6 O-Ring
W8VB The exploded assembly drawing should be used only for authoized service center. W8VB Item No. Part time 1 Magnetic Hex. Socket 2 Sub Stopper 3 O-Ring (S-16) 4 Locator (A) 5 Lock Sleeve (A) 6 O-Ring
Progeny Integrated Mobile Unit Unpacking/Assembly Guide
 Summary: The following instruction will guide you through the unpacking and installation of the Progeny Mobile Unit. Any question or concerns or suggestions should be directed to Progeny Technical Support