Materials Needed. Tube Size O.D.
|
|
|
- David Wheeler
- 5 years ago
- Views:
Transcription

1
 Water (to cool joint) Needle nose pliers Tape measure Emery paper Hacksaw Pliers Pair of diagonals (or other tool to cut silver wire) Residue-free degreasing agent")
2 Materials Needed Eaton FF9075 silver braze rings or 1/16- inch diameter 45% silver alloy braze wire Water soluble flux Brazing outfit capable of +1200ºF (propane or mapp gas) Small files - rattail and flat Spray paint (quick drying) Water (to cool joint) Needle nose pliers Tape measure Emery paper Hacksaw Pliers Pair of diagonals (or other tool to cut silver wire) Residue-free degreasing agent Wire brush Existing hose socket for reusables Eaton crimp nipple/socket for crimp Tube Size O.D. Part Number (Inches) FF FF FF FF FF FF FF FF EATON Lifesaver Fittings E-SROV-TS008-E1 May 2012


3 Lifesaver Fittings Brazing and assembling Lifesaver reusable fittings is a simple process Eaton Lifesaver hose fittings are designed to simplify the replacement of failed hose lines which have unusual, steel end configurations, compound tubes, or thread styles. Refer to your master catalog for available sizes and hose configurations. The process involves removing the old configuration, silver brazing it to an unused Lifesaver nipple and assembling the fitting onto the hose in the usual manner. A few Lifesaver fittings, some bulk hose, the appropriate hand tools and accessories plus basic silver brazing equipment are all that is necessary to make up hose assemblies anywhere. Be sure to follow all applicable safety procedures when brazing Lifesaver fittings. STEP 2 Cutting Using a hacksaw or tubing cutter, cut the tube at the juncture of the tube and the hose socket. It s important to cut the tube so there is at least 1/4 inch length of straight, un-bent tubing in order for it to properly enter into the counter bore of the Lifesaver nipple. STEP 1 Measuring Measure and record the length of the old assembly. For elbow assemblies, scribe a very light mark 5/16 inch or more from juncture of the tube and the existing hose socket. The distance from the scribe mark to the end of the other fitting should be recorded as the fabrication length. In the case of double elbows, make the scribe marks in line with one another so that you can duplicate the phase angle later. Record the distance between the two scribe marks as the fabrication length. STEP 3 Preparing the tube for brazing Avoid touching the tube, oily or greasy surfaces tend to repel the flux and silver material leaving voids and inclusions. Clean the tube thoroughly using a residuefree degreasing agent, or hot caustic soda. Using a flat file, remove the burrs on the outside of the tube and use a rattail file to remove the burrs on the inside. Polish the tube end on the outside with an emery cloth to remove the plating down to the base metal. It is important to remove oil and grease first because abrasives tend to scrub the oil into the surface and/or impregnate it with a fine abrasive powder, resulting in further contamination. Remem EATON Lifesaver Fittings E-SROV-TS008-E1 May


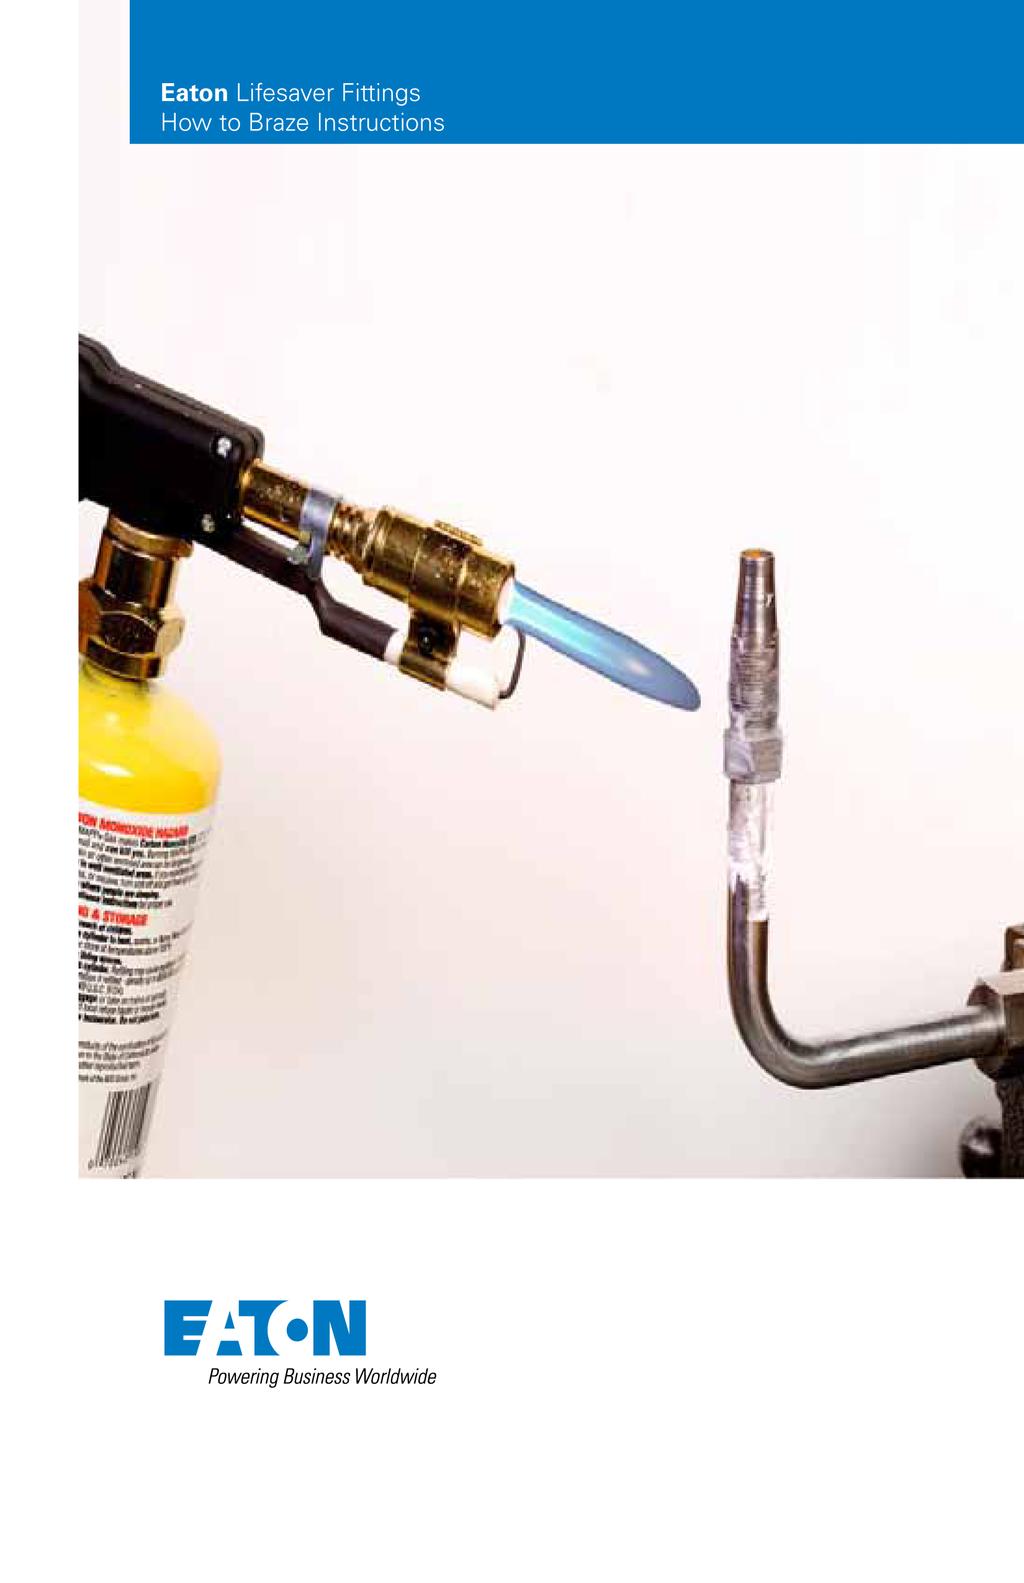
4 Lifesaver Fittings (cont...) ber, attempting to braze contaminated or improperly cleaned surfaces will generally result in an unsatisfactory joint. STEP 5 Fluxing Cover the counterbore, ring, outer hex and threads of the Lifesaver nipple and the outside of the tube with water soluble flux. STEP 4 Preparing the Lifesaver fitting for brazing Clean the nipple and tube end thoroughly. Place the tube into the counterbore (it should fit freely into it). Measure the diameter of the counterbore to determine the braze ring size needed. At this point, you have the option of selecting a readymade Eaton braze ring or making a ring for the application from bulk silver braze wire. To assemble, simply place the appropriate size Eaton FF9075 braze ring into the counterbore of the Lifesaver nipple. To make a braze ring, multiply the diameter of the counterbore by 3 to determine the length of silver wire needed. For example, if the counter-bore diameter measures 3/4 of an inch, a 2¼ inch length of wire would be needed (3/4 X 3 = 9/4 or 2¼ ) Now cut off a piece of sliver wire just short of 2¼ inches, so it is about 2 3 / 16 inches long. Using needle nose pliers, form the wire into a ring and, after wiping it off, place the ring into the counterbore of the Lifesaver nipple. STEP 6 Brazing Place the tube assembly into a vise. Place the nipple with the installed braze ring over the tube. Light the brazing torch and adjust the flame so that the base is blue with orange feather-like-flicks at the end. Try to heat both the nipple and the tube uniformly so they both reach the brazing temperature at the same time. Don t overheat the thin section. As the temperature increases, the flux will undergo several changes: At 212ºF or (100ºC) the water boils off. At 600ºF the flux becomes white puffyand starts to work (snow balling). At 800ºF it lays against the surface and has a milky appearance. At 1100ºF it is completely clear and active and has the appearance of water. At this point, a bright metal surface will appear underneath. The silver wire melts at 1125ºF (600ºC) and flows at 1145ºF (620ºC). 4 EATON Lifesaver Fittings E-SROV-TS008-E1 May 2012

 to the shoulder hex of the Lifesaver")


5 Lifesaver Fittings (cont...) CAUTION! Steam may be directed through the fitting ends. To prevent burns, handle the fitting carefully. Hot water will facilitate flux removal. CAUTION! Never heat the parts to a bright red color. When the silver alloy melts, the flux will draw it throughout the joint and a small fillet of silver alloy will appear around the tube. When this happens the braze is completed. Remove the heat source and allow the fitting to cool for five to ten seconds. Using pliers, place the fitting into water until it completely cools. STEP 8 Hose assembly or Shoulder To determine the required amount of new hose, measure the distance from the scribe mark on the tube (refer to step 1) to the shoulder hex of the Lifesaver nipple. Add this measurement to the Lifesaver D dimension (cut off dimension) found in the Fittings section of the Eaton Master Catalog. For each Lifesaver fitting, subtract this sum from the fabrication length previously recorded. Cut the hose to this length and install the fitting. Align the scribe marks to establish the phase angle. Spray paint brazed joints to prevent rusting. STEP 7 Removing Flux It is necessary to remove residual flux from the area since it is corrosive and presents an unclean appearance and condition. Simply rub the surface using hot water and a wire brush. The water should be at least 120ºF or hotter to be truly effective inside and out. Shop for other automotive tools on our website. EATON Lifesaver Fittings E-SROV-TS008-E1 May
Soldering & De-soldering
 Soldering and De-soldering Digital Electronics 04 Soldering & De-soldering This presentation will Review the tools needed to solder and de-solder electronic components. Demonstrate how to tin a soldering
Case Study On-Site Brazing Audit Improves Client s Joint Quality and Optimizes Brazing Process Overview of Process
 Case Study On-Site Brazing Audit Improves Client s Joint Quality and Optimizes Brazing Process The Lucas-Milhaupt Technical Services Group recently conducted an on-site audit of a client s torch brazing
(a) Work gloves may be cloth, leather palm, or all leather; (b) Welding gloves are gauntlet-type gloves with high
 Work gloves may be cloth, leather palm, or all leather; (b) Welding gloves are gauntlet-type gloves with high") Figure 16-1 cuffs (a) Work gloves may be cloth, leather palm, or all leather; (b) Welding gloves are gauntlet-type gloves with high Figure 16-2 Welding boots should have smooth toes to prevent sparks from
Figure 16-1 cuffs (a) Work gloves may be cloth, leather palm, or all leather; (b) Welding gloves are gauntlet-type gloves with high Figure 16-2 Welding boots should have smooth toes to prevent sparks from
SUPPLIED BY DELTA FLUID PRODUCTS LTD DELTA ROAD ST. HELENS WA9 2ED UK TEL: FAX:
 BRAZOWELD TECHNIICAL LIITERATURE SUPPLIED BY DELTA FLUID PRODUCTS LTD DELTA ROAD ST. HELENS WA9 2ED UK TEL: 01744 611 811 FAX: 01744 453 975 BRAZING COPPER TUBE TO BROWNALL BRAZOWELD FITTINGS 1) Preparation:
Shay Line Shafts & Universal Fabrication
 Shay Line Shafts & Universal Fabrication Nelson Riedel Nelson@NelsonsLocomotive.com Initial: 5/22/03 Last Revised: 06/05/2004 The following describes how I machined some of the parts of the line shaft.
IX. FLARED JOINTS IX. FLARED JOINTS
 IX. FLARED JOINTS IX. FLARED JOINTS While copper tube is usually joined by soldering or brazing, there are times when a mechanical joint may be required or preferred. Flared fittings (Figures 28 and 29)
Make a Safe. Description. Lesson Objectives. Assumptions. Terminology
 Youth Explore Trades Skills Make a Safe Description Welding is a vast area in the metalworking field and a widely used joining process for metal. In this activity plan students will learn how to MIG weld
LocoGear. Technical Bulletin - 02 January 11, by LocoGear LIVE STEAM CASTINGS. Tech Bulletin - 02
 LIVE STEAM CASTINGS Tech Bulletin - 02 LocoGear Technical Bulletin - 02 January 11, 2003 2003 by LocoGear John D.L. Johnson 3879 Woods Walk Blvd. Lake Worth, FL 33467-2359 jjohnson@locogear.com www.locogear.com
INSTALLATION INSTRUCTIONS
 INSTALLATION INSTRUCTIONS Brush Guard Kit Kit no. 67730 (black), 67731 (stainless) for GMC Trucks Your safety, and the safety of others, is very important. To help you make informed decisions about safety,
Field Installed Connectors for TraceTek 7000-HUV Bulk Cable Installation Instructions
 TraceTek TT-7000-HUV-CK-MC-M/F Field Installed Connectors for TraceTek 7000-HUV Bulk Cable Installation Instructions Description These instructions describe field connecting of TT7000-HUV Bulk Sensing
INSTALLATION INSTRUCTIONS
 INSTALLATION INSTRUCTIONS Trans4mer Grille Guard/Winch Mount For GMC Sierra 2500HD & 3500, + 03 Kit 76248/76249 This WARN Trans4mer system can be customized to give your Chevy Silverado a wide variety
Char-Lynn Hydraulic Motor. Repair Information. R Series General Purpose Geroler Motor November, 1996
 Char-Lynn Hydraulic Motor November, 1996 Repair Information General Purpose Geroler Motor 001 002 2 Geroler Motors Parts Drawing Bearing Race Needle Thrust Bearing Key Output Shaft Cap Screw -001 12 pt
INTRODUCTION. Tube and fitting
 Service Application Manual SAM Chapter 630-41A Section 21 SOLDERING & BRAZING COPPER TUBE The Copper Development Association Inc. INTRODUCTION The material that follows is adapted from publications first
Union coupling, copper x female thread. Cone joint
 Union coupling, copper x female thread. Cone joint N69F Union coupling Size Pattern No. Pack 1 Qty Pack 2 Qty Code Barcode Price ( ) ex VAT test 15mm x 1/2" N69F 10 100 84842D 5022050269638 3589.48 22mm
Airflex Product Line PDC Installation, Operation and Maintenance of PDC Assemblies
 Airflex Product Line PDC 16300 Installation, Operation and Maintenance of PDC Assemblies 204268 Table of contents Section Description Page 1.0 Introduction 4-5 1.1 Description 5 1.2 How it works 5 2.0
MINI-LATHE QUICK CHANGE TOOL POST
 MINI-LATHE QUICK CHANGE TOOL POST Cutting and assembly details Machinists should familiarize themselves with the contents of this section before jumping in to the drawings. Many details are described here
WEAR SAFETY GLASSES WHEN INSTALLING THIS KIT.
 INSTALLATION INSTRUCTIONS Trans4mer Mounting Systems Part No. 29753 (black) Part No. 65654 (stainless) for full size GM pickups, and Blazer, Yukon, Suburban, Tahoe As you read these instructions, you will
MODEL T26413, T26414, & T26415 ARBOR PRESS INSTRUCTIONS
 MODEL T26413, T26414, & T26415 ARBOR PRESS INSTRUCTIONS For questions or help with this product contact Tech Support at (570) 546-9663 or techsupport@grizzly.com Introduction This arbor press is designed
Plumbing Part II - Hand Pump
 Plumbing Part II - Hand Pump Nelson Riedel Nelson@NelsonsLocomotive.com Initial: 7/17/03 Last Revised: 06/06/2004 The hand pump located in the tender water tank is a backup pump should the axel pump fail
WARNING. Failure to observe these instructions could lead to severe injury or death.
 INSTALLATION INSTRUCTIONS WINCH MOUNTING KIT Part Number: 80156, 80160 Application: 2008 Ford F150 Your safety, and the safety of others, is very important. To help you make informed decisions about safety,
A Practical Update on Advanced Copper Alloys and On-Site Joining Methods for HVACR Systems. Educate Promote Defend Support Inspire
 A Practical Update on Advanced Copper Alloys and On-Site Joining Methods for HVACR Systems A Practical Update on Advanced Copper Alloys and On-site Joining Methods for HVACR Systems Presented by: John
Heat, Color, Set & Fire
 LARK JEWELRY & BEADING Heat, Color, Set & Fire Surface Effects for Metal Jewelry MARY HETTMANSPERGER Liquid Enamel Necklace Liquid enamel applied over a copper wire coil creates a pendant with great texture.
BRAZING PROCEDURE SPECIFICATION NO
 NATIONAL CERTIFIED PIPE WELDING BUREAU BRAZING PROCEDURE SPECIFICATION NO. 107-1 FOR TORCH BRAZING OF ALLOYS 102, 120, 122, 142, 192 OF TUBE, VALVES, FITTING AND FLANGES USING BcuP-3 THROUGH-7 FILLER METALS
SAVE THIS FOR FUTURE REFERENCE THIS PRODUCT IS FOR PROFESSIONAL LABORATORY USE ONLY USER'S MANUAL
 DENTAL, INC. TECHNICAL BULLETIN Q827-022510 5860 FLYNN CREEK ROAD READ ALL INSTRUCTIONS P.O. BOX 106 BEFORE PROCEEDING COMPTCHE, CALIFORNIA, U.S.A. 95427 SAVE THIS FOR FUTURE REFERENCE www.wellsdental.com
Basic Assembly For Conventional Series 9000 Structural Panels
 Steelcase, Inc. Grand Rapids, MI 49501 U.S.A. 1-888-783-3522 Basic Assembly For Conventional Series 9000 Structural Panels NOTE: Assembly directions for curved panels are the same as standard panels. Tools
No November, Char-Lynn. Hydraulic Motor. Repair Information. R Series General Purpose Geroler Motor
 Char-Lynn Hydraulic Motor No. 7-142 November, 1996 Repair Information General Purpose Geroler Motor 001 002 2 Geroler Motors Parts Drawing Bearing Race Needle Thrust Bearing Key Output Shaft Cap Screw
Installation and Specification Manual December 2012
 Installation and Specification Manual December 2012 APOLLOXPRESS TM fittings are a heat-free method for joining copper tube and provide a clean, easy to use joining method designed to save time and money
BRAZE INSTRUCTION VIDEO
 BRAZE INSTRUCTION VIDEO 1 Purpose: The purpose of this video is to provide instructions, guidelines and examples as to the proper techniques involved in the brazing of diamond cutters into matrix or steel
2.00AJ / 16.00AJ Exploring Sea, Space, & Earth: Fundamentals of Engineering Design Spring 2009
 MIT OpenCourseWare http://ocw.mit.edu 2.00AJ / 16.00AJ Exploring Sea, Space, & Earth: Fundamentals of Engineering Design Spring 2009 For information about citing these materials or our Terms of Use, visit:
Cross Peen Hammer. Introduction. Lesson Objectives. Assumptions
 Introduction In this activity plan students will develop various machining and metalworking skills by building a two-piece steel hammer. This project will introduce basic operations for initial familiarization
Flat Style Fender Flares Rear Pair. Jeep. Included in Hardware Kit:
 Jeep Flat Style Fender Flares Rear Pair STEP 1 PRIOR TO INSTALLATION A) Bushwacker only approves installing the fl ares according to these written instructions with the hardware provided. WARNING: Failure
Introduction to Soldering
 Introduction to Soldering The Soldering Iron American Standard Wire Gage (AWG) Solder The Soldering Process Stripping & Tinning Wire Connecting/Soldering Wire Component Soldering De-Soldering Lab Exercise
1. Turn off or disconnect power to unit (machine). 2. Push IN the release bar on the quick change base plate. Locking latch will pivot downward.
. 2. Push IN the release bar on the quick change base plate. Locking latch will pivot downward.") Figure 1 Miniature Quick Change Applicators, of the end feed type, are designed to crimp end feed strip terminals to prestripped wires. Each applicator is set up to accept the strip form of certain specific
Figure 1 Miniature Quick Change Applicators, of the end feed type, are designed to crimp end feed strip terminals to prestripped wires. Each applicator is set up to accept the strip form of certain specific
Better Soldering (A COOPER Tools Reprint) Overview Solder and Flux Base Material
 Overview Solder and Flux Base Material") Better Soldering (A COOPER Tools Reprint) Purpose We hope this short manual will help explain the basics of Soldering. The emphasis will be on the care and use of equipment. Overview Soldering is accomplished
Better Soldering (A COOPER Tools Reprint) Purpose We hope this short manual will help explain the basics of Soldering. The emphasis will be on the care and use of equipment. Overview Soldering is accomplished
Soldering Basics. Purpose We hope this short manual will help explain the basics of Soldering. The emphasis will be on the care and use of equipment.
 Soldering Basics Purpose We hope this short manual will help explain the basics of Soldering. The emphasis will be on the care and use of equipment. Overview Soldering is accomplished by quickly heating
Heat, Color, Set & Fire
 LARK JEWELRY & BEADING Heat, Color, Set & Fire Surface Effects for Metal Jewelry MARY HETTMANSPERGER 122 Heat, Color, Set & Fire Etched Copper Neckpiece Add a green patina on etched copper to create a
Data Sheet. Number: 003 Issue: BASIC SOLDERING TECHNIQUES.
 BASIC SOLDERING TECHNIQUES. You will need to practice. Nobody would buy a piano and expect to master the fundamentals immediately. So is it with soldering. The concept is simple. 1. Take two pieces of
UNCONTROLLED 3 STANDARD PROCEDURES FOR PREPARING 33KV CABLES
 3 STANDARD PROCEDURES FOR PREPARING 33KV CABLES 3.1 Single-Core Copper Wire Screened Polymeric Cables 3.1.1 Removing the Outer Sheath Clean and abrade the outer sheath with an approved abrasive paper for
unit 3: GENErAL ElectriCAL SySTEM DiAGNOSiS
 Electrical/Electronic Systems unit 3: GENErAL ElectriCAL SySTEM DiAGNOSiS lesson 4: wire and connector repairs I. Connector repairs A. Connector repairs involve fixing damaged wires. Wires are marred due
Meat Hook. Tools: Materials: Directions: Name: 1/4 round cold rolled steel 20 long 1 wooden dowel 5 long Epoxy Wood Stain Sand Paper Emery Cloth
 Meat Hook Name: Description: This project allows students to use hot and cold metal working skills and wood working skills to construct a meat hook. Hot metal working skills are also useful for making
ASSIGNMENT 2. Textbook Assignment: 2-1. Levels are designed for which of the following purposes?
 ASSIGNMENT 2 Textbook Assignment: "Levels," "Plumb Bulbs," "Scribers," "Squares," "Surface, Depth, and Height Gages," "Ring and Snap Gages and Gage Blocks," "Miscellaneous Measuring Gages," "Pliers and
INSTALLATION STANDARD FOR WELDED COPPER AND COPPER ALLOY WATER TUBE IAPMO IS
 INSTALLATION STANDARD FOR WELDED COPPER AND COPPER ALLOY WATER TUBE IAPMO IS 21-2006 1.0 Scope. This standard shall govern the installation of welded copper and copper alloy water tube in potable hot and
METAL FABRICATION MECHANICAL
 METAL FABRICATION MECHANICAL Machine Screws Machine screws have a parallel thread and need a threaded hole to screw into. They come in a wide variety of materials and sizes and are used for semi-permanent
 Building Tip TIP 1: Painting Metal You may want to superdetail your loco before painting. We suggest that you do not paint your loco until it is thoroughly track tested as disassembly and handling generally
Assembly Instructions for the 1.5 Watt Amplifier Kit
 Assembly Instructions for the 1.5 Watt Amplifier Kit 1.) All of the small parts are attached to a sheet of paper indicating both their value and id. 2.) Leave the parts affixed to the paper until you are
Jeep. Flat Style Fender Flares Rear Pair. Included in Hardware Kit:
 Jeep Flat Style Fender Flares Rear Pair STEP 1 PRIOR TO INSTALLATION A) Bushwacker only approves installing the fl ares according to these written instructions with the hardware provided. WARNING: Failure
INSTALLATION INSTRUCTIONS
 INSTALLATION INSTRUCTIONS Trans4mer Mounting System Dodge Ram Kit No. 65220, 73132, 75525, 76253 (black) or 65221, 73133, 75530, 76254 (stainless) As you read these instructions, you will see NOTES, CAUTIONS
INSTALLATION INSTRUCTIONS
 INSTALLATION INSTRUCTIONS Trans4mer Grille Guard/Winch Mount Kit 63470 For Ford 4x4 F150, F250 Light Duty & Expedition As you read these instructions, you will see NOTES, CAUTIONS and WARNINGS. Each message
#85-2-5A: PAINT STRIPPING AND FINISH ANALYSIS AND CORRECTION - (Aug 7, 1985)
") #85-2-5A: PAINT STRIPPING AND FINISH ANALYSIS AND CORRECTION - (Aug 7, 1985) "Please discard previous bulletin 85-2-5 due to this updated information." The corrosion protection provided by the factory
#85-2-5A: PAINT STRIPPING AND FINISH ANALYSIS AND CORRECTION - (Aug 7, 1985) "Please discard previous bulletin 85-2-5 due to this updated information." The corrosion protection provided by the factory
Make a Portable Hibachi
 Metal Work Description The purpose of this activity plan is to introduce students to the metal shop through a practical activity. Students will gain valuable knowledge in using power tools and equipment
Q-Sox Installation Instructions
 Q-Sox Installation Instructions Fabric Duct Systems, Inc. 1127 Riverwood Drive, Burnsville, MN 55337 U.S.A. Phone: 952.278.QSOX (7769) FAX: 952.252.7900 Website: www.qsox.com Installation Sequence For
Additional Information
 NUMBER: 1 34 13 S.M. REF.: Listed in Table ENGINE: EPA04/07 Series 60 DATE: January 2013 SUBJECT: CHECKING CYLINDER LINER PROTRUSION ADDITIONS, REVISIONS, OR UPDATES Publication Number Platform Section
UNPACK & ASSEMBLY. Done! CAUTION! THE MILL WILL BE VERY HEAVY - GET ASSISTANCE Pepe Tools.
 PARTS DIAGRAM T Bar Height adjustment Wooden hand grip Height adjustment gears Frame Height adjustment screws Top roller End Gears cover Handle Brass Bushes (Each side) Bottom roller 4:1 Gearbox Mounting
Woven Leather Chandelier Large Assembly and Installation Instructions
 CAUTION: Woven Leather Chandelier Large Assembly and Installation Instructions BEFORE INSTALLING FIXTURE, MAKE SURE THE POWER TO THE CIRCUIT IS TURNED OFF AT THE MAIN FUSE BOX / CIRCUIT BREAKER UTILITY
Hand Torch or Flame Brazing Principles
 Hand Torch or Flame Brazing Principles Introduction Hand-torch brazing is inexpensive and flexible, making it ideally suited to small production batches or production runs involving differing components.
INSTALLATION OF WELLS SUPER QUICK CHUCK LEFT HAND ON BALDOR LATHE
 DENTAL, INC. TECHNICAL BULLETIN Q832-022510 5860 FLYNN CREEK ROAD READ ALL INSTRUCTIONS P.O. BOX 106 BEFORE PROCEEDING COMPTCHE, CALIFORNIA, U.S.A. 95427 SAVE THIS FOR FUTURE REFERENCE THIS PRODUCT IS
UNPACK & ASSEMBLY. Done! CAUTION! THE MILL WILL BE VERY HEAVY - GET ASSISTANCE Pepe Tools.
 PARTS DIAGRAM T Bar Height adjustment Wooden hand grip Height adjustment gears Frame Height adjustment screws Top roller End Gears cover Handle Brass Bushes (Each side) Bottom roller 4:1 Gearbox Mounting
Installation Instructions:
 NOTE: Carefully read entire instructions thoroughly before attempting to install this part. Parts Included: Qty 93-326EP009 Front Armor: Drvr 1 93-326EP010 Front Fender: Pass 1 90-6774m Hardware Pack:
A Precision 2000 Mixed Media Project
 Día de los Muertos (Day of the Dead) Panel A Precision 2000 Mixed Media Project PROJECT TITLE: Día de los Muertos (Day of the Dead) Panel DESIGNED BY: Andy Spencer SKILL LEVEL: (Adult 1-5: 1 being the
Series Inline Oscillating Saw
 Parts Manual Ersatzteil Liste 45-8185 12-2065 Series Inline Oscillating Saw IMPORTANT: Read and comply with safety and operating instructions contained in this manual. For additional product information
INSTALLATION INSTRUCTIONS
 INSTALLATION INSTRUCTIONS Trans4mer Grille Guard/Winch Mount Kit 6367 For Chevrolet Silverado 1500, Suburban 1500 and Tahoe As you read these instructions, you will see NOTES, CAUTIONS and WARNINGS. Each
EllisSaw.com. EllisSaw.com P.O. Box Verona, WI
 P.O. Box 9019 Verona, WI 9-019 GENERAL OPERATING & SAFETY INSTRUCTIONS * READ INSTRUCTIONS BEFORE USE * CAUTION: Disconnect power supply cord from power source when doing repair work or changing belt.
OPERATING INSTRUCTIONS
 OPERATING INSTRUCTIONS MODEL TSM-6000 FACING/SQUARING MACHINE REV 8/2011 USA Otto Arc Systems, Inc. (Corporate/Sales/Mfg. Division) 3921 Sandstone Drive El Dorado Hills, California 95762 Phone: (916) 939-3400
Catalog October Speedi-Sleeve The quickest and most economical way to repair worn shafts
 Catalog 457027 October 2005 Speedi-Sleeve The quickest and most economical way to repair worn shafts Table of Contents The Speedi-Sleeve concept...3 SPEEDI-SLEEVE, the quickest and most sensible way to
S-Series General Purpose Motors Parts and Repair Manual -012
 S-Series General Purpose Motors Parts and Repair Manual -012 Parts 34 9 8 7 6 5 2 4 19 1 14 17 3 13 14 16 A 15 14 Base Block Mounting Kits B 10-012 Design Code REF. NO. 13 REF. NO. 16 REF. NO. 19 (6 PT.
Tools Required For Servicing: Needle Nose Pliers
 Danger Caution Danger of Life Do not attempt to perform service on a hot heat gun. Always allow unit to cool completely and disconnect from power source before performing any service on the heat gun. Fire
SE5a Instrument Board part 2 - rev 1.1
 SE5a Instrument Board part 2 - rev 1.1 Fuel (Petrol) Valve This valve uses two circular name plates, eight brass screws, one black plastic base, copper wire and two black plastic risers. You can pick any
MODEL T /2-TON ARBOR PRESS INSTRUCTIONS
 MODEL T27033 1/2-TON ARBOR PRESS INSTRUCTIONS For questions or help with this product contact Tech Support at (570) 546-9663 or techsupport@grizzly.com Introduction This arbor press is designed to perform
14401 NE Keil Road, Aurora, Oregon, USA PHONE FAX
 VAN S AIRCRAFT, INC. 14401 NE Keil Road, Aurora, Oregon, USA 97002 PHONE 503-678-6545 FAX 503-678-6560 www.vansaircraft.com info@vansaircraft.com FF-1207 Cooling Shroud Modification 11-19-10 Background:
INSTALLATION INSTRUCTIONS
 INSTALLATION INSTRUCTIONS Trans4mer Gen II Mount System For 2008 Ford Super Duty Kit 80140 (Large Frame Black) and Kit 80150 (Mid Frame Black) and Kit 80155 (Mid Frame Stainless) Your safety, and the safety
INSTALLATION INSTRUCTIONS
 INSTALLATION INSTRUCTIONS Trans4mer Winch Mount For 2007-2010 Chevrolet Silverado HD and GMC Sierra HD Bracket Kit 90140 Your safety, and the safety of others, is very important. To help you make informed
INSTALLATION INSTRUCTIONS
 INSTALLATION INSTRUCTIONS Trans4mer Grille Guard/Winch Mount Kit 7646 & 766 For GMC Sierra 500 As you read these instructions, you will see NOTES, CAUTIONS and WARNINGS. Each message has a specific purpose.
Quick Fit Installation Guide Retractable Screen - Double Door
 Quick Fit Installation Guide Retractable Screen - Double Door 1 REMOVE KIT PARTS FROM SHIPPING TUBE 2 Slide bolts 2 Rail receiver Clips 15 Mounting screws 1 Housing end cap screw 2 Handles 1 Housing end
INSTALLATION INSTRUCTIONS
 INSTALLATION INSTRUCTIONS Trans4mer Grille Guard/Winch Mount Kit 6334 For Chevrolet Silverado 500HD & 3500 This WARN Trans4mer system can be customized to give your Chevy Silverado a wide variety of looks,
Assmann Corporation of America TANK INSTALLATION AND USE GUIDELINES FOR BULK STORAGE TANKS
 Assmann Corporation of America TANK INSTALLATION AND USE GUIDELINES FOR BULK STORAGE TANKS General Information Assmann polyethylene storage tanks are manufactured to give you the toughest, most reliable
5/16 Hex Head Bolt, 16 pcs. Plastic Push Retainer, 6 pcs. Alcohol Wipe, 2 pcs. Side Refl ex Reflector, 2 pcs
 STEP 1 PRIOR TO INSTALLATION A) Bushwacker only approves installing the fl ares according to these written instructions with the hardware provided. WARNING: Failure to install according to these instructions
Jeep. Flat Style Fender Flares Front Pair Front Part # Rev-9 02/23/2016 For complete fitment info visit :
 STEP 1 PRIOR TO INSTALLATION A) Bushwacker only approves installing the fl ares according to these written instructions with the hardware provided. WARNING: Failure to install according to these instructions
SOLDERING & BRAZING SOLDERING & BRAZING
 SOLDERING & BRAZING SOLDERING & BRAZING Soldering Cleaning pads 198 Electric soldering pliers 198 Electric soldering unit 199 Turbo soldering torches 200 Solder wire and solder paste 201 REMS Cu-Vlies
Blackhawk by Proto pliers are manufactured to meet and exceed the demands of the automotive and industrial professionals. Alloy steel construction
 PLIERS DESIGNED TO GET THE JOB DONE Blackhawk by Proto are manufactured to meet and exceed the demands of the automotive and industrial professionals. Alloy steel construction and heat-treated for strength
Building Rudy Kouhoupt s Walking-Beam Engine
 Building Rudy Kouhoupt s Walking-Beam Engine Some time ago I came across a copy of Rudy Kouhoupt s article: "Build this Walking-Beam Engine" (Popular Mechanics August 1969), and decided to try and make
Clarinet/Bass Clarinet Care
 Flute/Piccolo Care When assembling your instrument, be careful that pressure is not applied to the keys or rods. Do not put it together at an angle and then wiggle it together. Make certain each part is
Stained Glass Mission-Style Frame A stained glass project
 Stained Glass Mission-Style Frame A stained glass project Stained Glass Mission-Style Frame A Stained Glass Project PROJECT TITLE: Stained Glass Mission-Style Frame SKILL LEVEL: (Adult 1-5: 1 being the
ELECTRICAL CONNECTIONS
 ELECTRICAL CONNECTIONS Lesson 13 EET 150 Electrical Connections Learning Objectives In this lesson you will: see different methods of making electrical connections. learn a procedure for making soldered
STRENGTH Aligned teeth provide superior gripping power over standard vertical teeth. STRENGTH Diamond serrated jaws provide a firm grip
 STRENGTH Aligned teeth provide superior gripping power over standard vertical teeth STRENGTH Diamond serrated jaws provide a firm grip PLIERS AND SNIPS Locking Pliers Slip Joint Pliers Electrician s Pliers
Before you start Warnings Never use scourers, abrasives or chemical cleaner. IMPORTANT, RETAIN FOR FUTURE REFERENCE READ CAREFULLY See enclosed instru
 Product size: L150*W90*H72 cm The frame of this product is manufactured from mild steel coated with a weather resistant paint. Steel has a natural tendency to rust over time and, whilst we expect you to
INSTALLATION INSTRUCTIONS
 PART NO. 3373MB 3373MC 3373MH PRODUCT DESCRIPTION: 3000 SERIES STEP GUARD BLACK (GRILLE GUARD & BRUSH GUARDS) 3000 SERIES STEP GUARD CHROMED (GRILLE GUARD & BRUSH GUARDS) 3000 SERIES STEP GUARD BLACK/CHROMED
INSTALLATION INSTRUCTIONS
 INSTALLATION INSTRUCTIONS Trans4mer Grille Guard/Winch Mount Kit 76139 & 7643 For Chevrolet Silverado 1500 As you read these instructions, you will see NOTES, CAUTIONS and WARNINGS. Each message has a
Shay Drive Shafts & Universal Fabrication
 Shay Drive Shafts & Universal Fabrication Nelson Riedel Nelson@NelsonsLocomotive.com Initial: 5/22/03 Last Revised: 06/06/2004 The following describes how I machined the universal rings and drive shafts.
7-1
 Tube Cleaning Brushes Fitting Cleaning Brushes available with wire or plastic handle Fitting Cleaning Brushes clean the inside of fittings faster. For plumbing or refrigeration applications. Carbon steel
Heat Exchanger Coil: Build Instructions
 Heat Exchanger Coil: Build Instructions Tank Assemblies Feed Tank (Drawing: WS-101) o Use a jig-saw to cut a large circle into the top of the barrel, 2-3 inches in from the edge o Leave the lip intact.
QUASAR ELECTRONICS KIT No DRILL SPEED CONTROLLER
 QUASAR ELECTRONICS KIT No. 1074 DRILL SPEED CONTROLLER General Description If you work with an electric drill and unless you are lucky enough to own one of the most sophisticated models with speed control,
Fabricate a Coat Hook
 Youth Explore Trades Skills Description Metal fabrication involves the use of a basic set of skills cutting, bending, and assembling processes to create something from raw material. Such a simple project
IMPORTANT SAFETY INSTRUCTIONS:
 PRODUCT NAME: Presley 4 Light Chandelier ITEM NUMBER: LC973 DIMENSIONS OF ITEM ASSEMBLED: 18 H x 18 W x 18 D IMPORTANT SAFETY INSTRUCTIONS: -We strongly recommend that a professional electrician install
AMETAL SHAPER is indispensable for certain METAL SHAPER FOR YOUR SHOP. By S. S. Miner
 METAL SHAPER FOR YOUR SHOP By S. S. Miner AMETAL SHAPER is indispensable for certain machining operations where flat surfaces must be produced within very close limits, such as machining flats on castings,
DODGE Grease Lubricated SPLIT-SPHER Roller Bearings and Pillow Blocks
 Mounting Instructions For DODGE Grease Lubricated SPLIT-SPHER Roller Bearings and Pillow Blocks WARNING: Because of the possible danger to person(s) or property from accidents which may result from the
Making a basic hook tool By Alan Lacer
 Making a basic hook tool By Alan Lacer The hook tool is essentially a right-angle gouge that enables the woodturner doing inside end-grain hollowing to achieve two goals: work with the grain and use a
INSTALLATION INSTRUCTIONS
 INSTALLATION INSTRUCTIONS Trans4mer Gen II Mount System For 2011-2012 Dodge Ram HD 4500/5500 Bracket Kit 90160 Your safety, and the safety of others, is very important. To help you make informed decisions
Make a Pencil Holder. Description. Lesson Objectives. Assumptions. Terminology
 Youth Explore Trades Skills Make a Pencil Holder Description Welders are required to work with many other metalworking trades. To be successful as a welder one must have an understanding of many other
Durapipe ABS Jointing Guide
 Durapipe ABS Jointing Guide Solvent cement welding offers a simple and quick means of constructing high integrity, leak-free joints. The solvent cement operates by chemically softening the joint surfaces.
Custom Pendant- Hardwire Assembly and Installation Instructions
 Custom Pendant- Hardwire Assembly and Installation Instructions CAUTION: BEFORE INSTALLING FIXTURE, MAKE SURE THE POWER TO THE CIRCUIT IS TURNED OFF AT THE MAIN FUSE BOX / CIRCUIT BREAKER UTILITY BOX.