11.6 Victory Conditions...10
|
|
|
- Whitney Ashlie Fitzgerald
- 5 years ago
- Views:
Transcription
1
2 TABLE OF CONTENTS Introduction...4 Glossary...4 Support Components Anatomy of a Combat Unit Organization of Brigades and Regiments Impulse System Activation Roll Actions & Activations Activation Actions Stacking Zones of Control Movement Entry of Reinforcements Exiting the Map Combat Calculating Firepower Determining Defensive Fire Advances After Combat Overruns Determining Superior Arms Recon Units Supporting Assaults Night Recovery Rolls Assets Asset Selection Gunships Scenario 1: Dawn s Early Light NATO Setup Information Pact Setup Information Asset Chits NATO Reinforcements Pact Reinforcements Victory Conditions Breakthrough Line of Communication Scenario 2: The High Road Pact Setup Information NATO Setup Information Asset Chits Pact Reinforcements NATO Reinforcements Victory Conditions Lock n Load Publishing, LLC, DELRH , Rev 10 2
3 12.0 Scenario 3: South Thrust NATO Setup Information Pact Setup Information Asset Chits NATO Reinforcements Pact Reinforcements Victory Conditions Scenario 4: Call the Cavalry Pact Setup Information NATO Setup Information Soviet Reinforcements NATO Reinforcements Asset Chits Surrender Victory Conditions Exiting the Map Scenario 5: Dropping the Guillotine Pact Setup Information NATO Setup Information Asset Chits Pact Reinforcements NATO Reinforcements Victory Conditions Exiting the Map High Noon at Gerzenburg The 11 th Armored Division The 23 rd Guards Tank Division Scenario 6: Three Crossroads Pact Reinforcements NATO Reinforcements Asset Chits Recovery Bonus Victory Line of Communication Scenario 7: Back of the Hand NATO Setup Information Pact Setup Information Asset Chits The Counterattack Gunships Assets Pact Automatic Victory Victory Conditions Gerzenburg Warsaw Pact Botched Orders

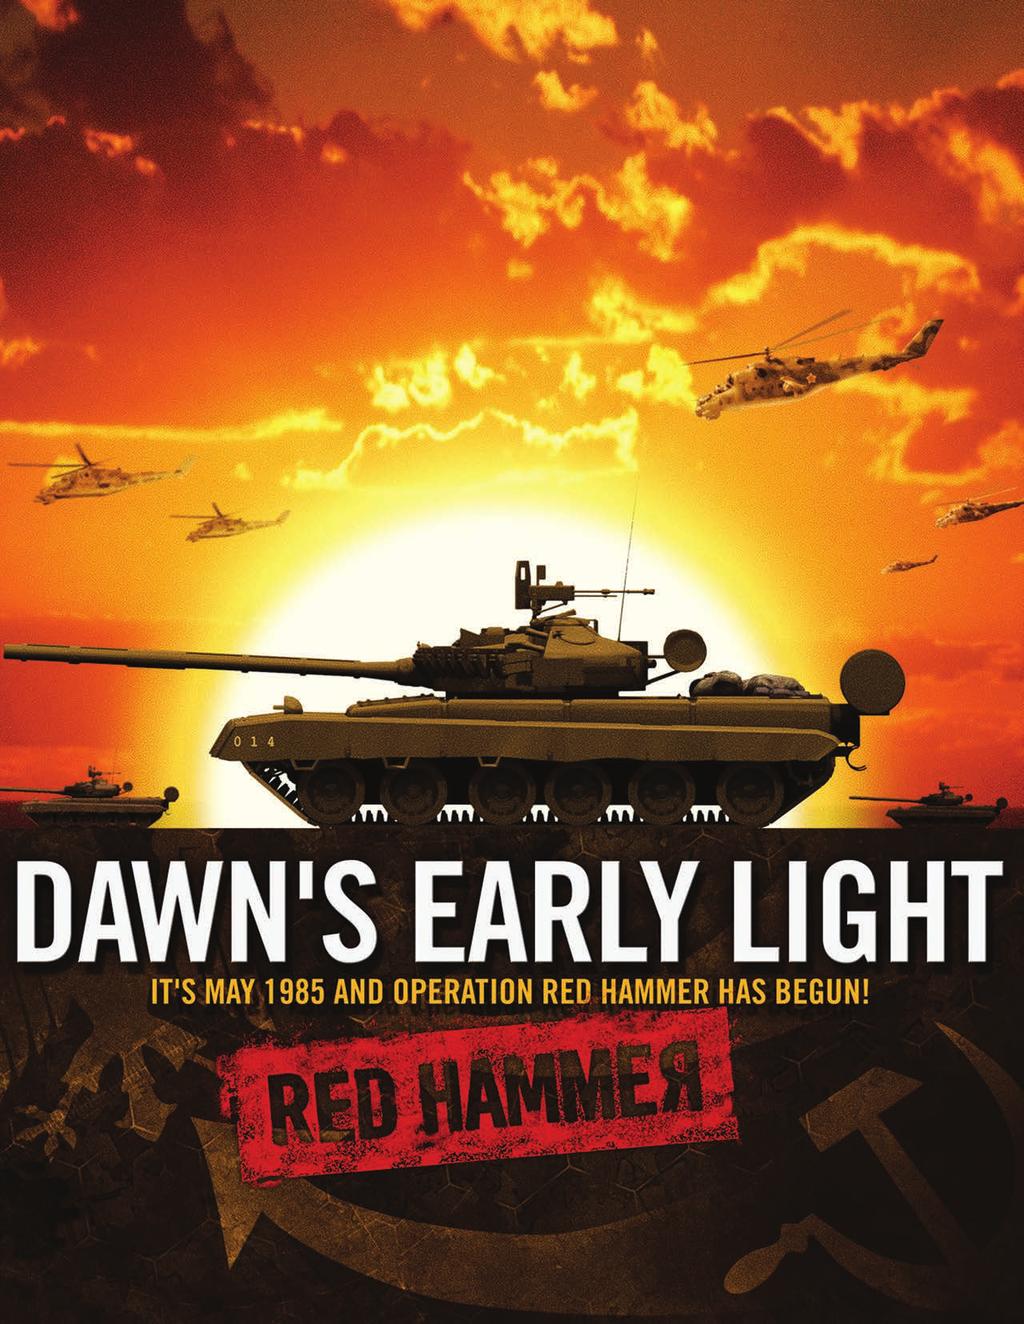
4 INTRODUCTION Dawn s Early Light Red Hammer is a game of the Soviet thrust into Eisenbach Gap in May of 1985, the opening battle of the Third World War. Hexes are approximately 3 miles across and units are airborne, armored, infantry or recon battalions. GLOSSARY h h 1d6: roll one six-sided die 2d6: roll two six-sided dice and sum them ACR: Armored Cavalry Regiment AFB: Air Force Base AN: Activation Number (2.1) Closed terrain: town, rough, forest or rough forest hexes. MP: Movement Point (6.0). NATO: North Atlantic Treaty Organization. Open terrain: clear or airfield hexes. ZOC: Zone of Control (5.0) SUPPORT If you have any game questions or if you just looking for other gamers to chat with you can find quick replies on our Forums at: com. If any parts of this game are damaged, or you have any other support needs, please open a support ticket on our Support Desk at: com. You can also find additional game resources such as scenarios, counters, special rules and other community-design resources in our Resource Section at: COMPONENTS 1.1 ANATOMY OF A COMBAT UNIT All combat units fall into one of five classifications: armored, infantry, reconnaissance, airborne or supply (see the player-aid card). Armored units are better in open terrain, infantry units in closed terrain. Reconnaissance units are terrain-neutral and can support attacks by other units. Supply convoys do little but move, but are worth Victory Points and are still considered combat units. Players should not take the classification as implying units are 100% armor or infantry in composition. At the level below what Dawn s Early Light Red Hammer is looking at, there are numerous cross-attached armor and infantry assets. Even the supply convoys have fighting troops assigned to them. Four nationalities comprise the units in Dawn s Early Light Red Hammer: West Germans, Canadians, Soviets, and Americans. West Germans are blue, Americans green, Canadians are tan, and Soviets are red. The colored band at the top of a unit indicates the parent division as indicated below: Green: American 5 th Armored, 13 th ACR, and 101 st Airborne. Beige: American 11 th Armored. Blue: West German 1 st Panzer. Black: West German Territorials. Gray: West German 27 th Pzg Brigade. Tan: Canadian 4 th Mechanized. Red: Soviet 1 st Guards Tank. Gold: Soviet 47 th Guards Tank. Silver: Soviet 171 st Motor Rifle. Bronze: Soviet 33 rd Motor Rifle. Blue: Soviet 2 nd Guards Airborne. Pink: Soviet 87 th Motor Rifle. Purple: Soviet 232 nd Motor Rifle. Brown: Soviet 23 rd Guards Tank. Units are rated for Strength Points, Protection Factor and Initiative. A unit s Strength Rating reflects its cohesion and firepower. A unit s Protection Factor reflects the difficulty of damaging it. A unit s Initiative reflects both the raw ability of the unit to cover ground and its responsiveness to orders. A unit loses one Strength Point for each hit taken. Flip the counter over to show the first hit and then place a Hit marker underneath the unit for additional hits. When hits reduce a unit s strength to zero, it is destroyed. Some units will lose a point of initiative when flipped over. This is intentional. They do not lose any additional initiative for having a Hit marker placed on them. 4

5 Unless otherwise noted, units will always begin a scenario at full strength. 1.2 ORGANIZATION OF BRIGADES AND REGIMENTS Underneath their parent division, NATO forces are organized into mechanized brigades (consisting of two mechanized-infantry battalions and one armored battalion) and armored brigades (two armored battalions and one mechanized-infantry battalion). The brigade identification is on the divisional color band. Armored Battalion Mechanized Battalion Warsaw Pact forces are organized into tank regiments (three tank battalions and one motor-rifle battalion) and motor-rifle regiments (three motor-rifle battalions and one tank battalion). When the Pact player is given the choice of a regiment, he may select either kind of regiment (provided one is available from the listed formation). The regiment identification is on the divisional color band. 2.1 ACTIVATION ROLL Each time a new couplet is begun, each player should roll 1d6 to generate his Activation Number (AN) and track it with the markers provided for this purpose. The player with the higher AN receives the first impulse of the couplet. On a tie, the NATO player acts first. On an AN of five, a player may secretly decide whether or not to switch his AN to a 2. This decision should be made before his opponent reveals his selected AN (if he was able to choose) or before any botched orders are resolved. On an AN of six, roll 1d6 and consult the Botched Orders table. Rather than roll, a player can select his next AN if his previous AN was a one. He does this secretly before his opponent rolls for an AN and reveals his AN after the AN roll (and any botched-orders effects) are complete. The lower the AN, the more units a player can activate. (3.1) Consequently, there is a trade-off between going first and going with the most. An AN of 1 from the Botched Orders table still qualifies for a choice of activation on the next impulse. 3.0 ACTIONS & ACTIVATIONS When a player receives an impulse, some or all of his units are activated and can perform one action each. Units are always activated individually. Tank Battalion Mechanized Battalion 3.1 ACTIVATION For a unit to activate, it must have an Initiative Rating equal to or greater than the player s AN. Just to be absolutely clear: if your Activation Number exceeds a unit s Initiative Rating, that unit is going to have to pass. No moving or shooting for it! 2.0 IMPULSE SYSTEM Dawn s Early Light Red Hammer does not use a rigid sequence of play. Instead, each turn consists of a number of couplets, during which each player will receive one impulse. An impulse allows each unit of the acting player to take one action. Once four couplets are complete, a night couplet occurs (8.0). Resolve the night couplet and then begin the next turn. If there are no more turns left in the game, check the victory conditions to see who won. 3.2 ACTIONS A unit can move or assault when it is activated; it cannot do both. A unit can choose to pass and do nothing. All units in Dawn s Early Light Red Hammer, except the 2 nd Guards and 101 st Airborne and supply convoys, can make overrun attacks (7.4) when they move. Recon units can support assaults (7.6). Supply convoys cannot assault (or overrun) as indicated by their bracketed Strength Rating. Units that did not activate must pass. 5
.")
 into the six hexes surrounding them.")
6 4.0 STACKING The NATO player can have up to three units in a hex. The Soviet player can stack three units from the same division or two units from different divisions. NATO can stack three units per hex. Stacking is checked at the end of every impulse. If, when checked, a hex exceeds the stacking limit then any excess units are destroyed (owning player s choice). A player can rearrange his stacks at any point in a friendly impulse. The order of stacks is important as combat is fought against the top unit in the stack. In the picture above the American unit would bear the brunt of Soviet attacks. 5.0 ZONES OF CONTROL All combat units project a zone of control (ZOC) into the six hexes surrounding them. This reflects their ability to interdict enemy movement in their vicinity. A unit must stop moving on entering a hex containing an enemy ZOC. Exception: it can spend MPs to make an overrun attack. A unit can move directly from a hex containing an enemy ZOC to an adjacent hex containing an enemy ZOC but must stop and cannot make an overrun attack. Units can otherwise leave ZOCs with no penalty. Terrain has no effect on projecting a ZOC. 6.0 MOVEMENT An activated unit receives Movement Points (MPs) equal to the player s activation number plus one. A unit moves by expending one MP for each hex entered. It can continue to move until its MPs are exhausted. As with every other war game ever made, MPs cannot be saved from one impulse to the next. Forest or rough hexes cost an extra MP to enter if a unit is not moving by road. Rough forest hexes cost two extra MPs. Mountain and lake hexes cannot be entered by any unit. Rivers: a unit cannot cross a river hexside except at a bridge. Bridge hexsides cost an extra MP to cross. Road March: a unit can expend an extra MP if all of its movement occurs along road hexes/hexsides. You can road march through town hexes provided you either (a) start your movement in the hex or (b) move along road hexsides passing through the town hex. Leg Troops: regardless of the number of MPs they have, Pact airborne units can only move one hex (two by a road march). Minimum-Movement Rule: regardless of its MPs, an activated unit can always move one hex. Units can never enter hexes occupied by enemy units or prohibited terrain. The minimum-movement rule does not override this prohibition. 6.1 ENTRY OF REINFORCEMENTS Throughout the game, the players will receive reinforcements. Reinforcements must be activated to enter the map. They pay all normal movement costs to enter their entry hex and then can continue moving if (a) they have MPs remaining and (b) they have not entered an enemy ZOC. If all possible entry hexes (arrows pointing toward map: NATO, green or gray; Soviet, red or yellow) are occupied by enemy units or ZOCs, then reinforcements can enter at the closest hex along the same map edge not occupied by an enemy unit or ZOC. A player can delay entering his reinforcements for as long as he wants. 6.2 EXITING THE MAP The Pact player can exit units from the map. To exit, a unit must move to a Pact exit hex (red arrow pointing off map) and then expend 2 MPs (this can qualify as a road march). Once exited, it cannot return to play. Soviet exit hex 6
7 7.0 COMBAT An activated unit can attack enemy units. There are two types of attacks: assaults, initiated by a nonmoving unit; and overruns, initiated by moving a unit (exception: airborne and supply-convoy units). In an assault, an activated unit must begin its activation adjacent to the defender to attack. In an overrun, a moving unit can move adjacent to an enemy unit and then pay MPs to attack. Note that units can assault hexes they cannot enter, but cannot overrun them. Units always attack individually. A hex can be attacked any number of times in an impulse. 7.1 CALCULATING FIREPOWER In an assault or overrun, an activated unit can fire at the top unit in any adjacent stack of enemy units. For all attacks, generate the firepower for the firing unit. A unit s firepower is normally equal to its current Strength-Point total (its initial Strength Factor reduced by hits (1.1)). A NATO armored unit (M1 or Leopard) adds 1. If the attack possesses superior arms (7.5), add 1. Defender s terrain s combat modifier (if infantry or recon). If the attack crosses a river or bridge hexside, subtract 1. If attacking a recon unit by overrun, subtract 1. If a recon unit is supporting the attack (7.6), add 1. Attacks at night subtract DETERMINING DEFENSIVE FIRE Defenders in Dawn s Early Light Red Hammer receive one or more defensive-fire numbers. If the unmodified attack roll is one of these numbers, then the attacking unit immediately suffers a hit (1.1) and its firepower is recalculated before resolving the attack. NATO units inflict defensive fire on a Pact attack roll of 7. Pact units inflict defensive fire on a NATO attack roll of 4. Infantry units defending in closed terrain also inflict defensive fire on an attack roll of 2-3 or 11. Armored units defending in open terrain also inflict defensive fire on an attack roll of 2-3 or 11. Recon units and supply convoys never inflict extra defensive fire for terrain. EXAMPLE: A NATO infantry unit in town terrain inflicts defensive fire on a Pact attack roll of 2, 3, 7 or RESOLVING FIRE Once the firepower total is generated, the attacker rolls 2d6 and checks for defensive fire. If the die roll triggers defensive fire then he immediately suffers a hit and his firepower is recalculated (1.1). If he survives, or there is no defensive fire, then add his firepower to the die roll. If the final attack roll is equal to or greater than the target s Protection Factor, then the target suffers a hit (1.1). If the final attack roll exceeds the target s Protection Factor by four or more points, the target suffers two hits (1.1). If the attack roll exceeds the target s Protection Factor by eight points, the target suffers three hits (1.1). A unit losing all of its Strength Points to hits is destroyed. If a unit with one Strength Point suffers two hits from fire, the second hit is wasted. It is not applied to other defenders in the hex. 7.3 ADVANCES AFTER COMBAT If an assault or overrun results in all defending units being eliminated, then any unit that attacked or supported an attack on the defending hex this impulse may advance into it. ZOCs do not prevent the advance. Units cannot advance into hexes they could not legally enter in the movement phase. 7.4 OVERRUNS All units (exception: airborne and supply-convoy units) can attack enemy units as part of their movement. To carry out an overrun, the units must move adjacent to the defender s hex and then pay a number of MPs equal to the cost of the defender s hex. Resolve the attack normally. (7.1) Moving units can only attempt to overrun defenders occupying hexes (or across hexsides) the moving units could legally enter. Road-marching units can overrun. Exception: Airborne and supply-convoy units cannot make overrun attacks. If the overrun eliminates all defending units, 7.3 applies. The attacking units cannot move, except to advance after combat, after the combat is over. 7.5 DETERMINING SUPERIOR ARMS The superior-arms bonus is available when the attacking unit is better suited to the terrain in the defending hex than its target. Infantry gains the superior-arms bonus when attacking armor in closed terrain hexes. Armor gains the superior-arms bonus when attacking infantry in open-terrain hexes. 7


8 Recon units neither give nor receive the superiorarms bonus. 7.6 RECON UNITS SUPPORTING ASSAULTS Instead of making an assault, an activated recon unit may choose to support other units assault actions. The recon unit forgoes its own attack for the impulse to add 1 to the firepower of each supported attack. The recon unit must be adjacent to the defending unit under attack. A recon unit can support a number of attacks equal to its strength points. A Soviet recon unit can only support units of its formation. A NATO recon unit can only support units of its nationality. Recon units supporting attacks never suffer losses to defensive fire. 8.0 NIGHT Night is played as a normal couplet with an impulse for each player. All attacks are made at a -1 penalty and all units receive one less Movement Point. Units that pass during a night turn can attempt to recover Strength Points lost to hits. Inactive units are still eligible for recovery. 8.1 RECOVERY ROLLS Any unit that has lost at least one Strength Point to a hit and which passes during a night turn is eligible to make a recovery roll. Immediately roll 1d6 for each hit the unit has taken: NATO and Pact units recover on a die roll of 5-6. Subtract 1 from the die roll if the unit currently occupies an enemy ZOC. A unit recovers one hit for each successful recovery roll. Destroyed units can never be returned to play by recovery. 9.0 ASSETS Both players receive additional assets as the game goes on, representing resources tasked to assist with the fight in the Eisenbach Gap. Details as to the asset chits effects can be found on the player-aid card. Asset Chit 9.1 ASSET SELECTION Before setup, each player should place his asset chits in an opaque container. The scenario will instruct him on which assets to use and how many to draw. He can look at the assets he draws before assigning them. Assets are normally assigned by day; they become available at the beginning of the first couplet of the day. Once available, assets can be played at any time. They are discarded (and removed from the game) after being played. A player is never forced to play an available asset; he can hold onto it for as long as he desires. A player can play as many assets as he would like in an impulse. 9.2 GUNSHIPS Gunships become available via asset chits and are kept off map until called in. They are placed for the duration of the attack and are then removed. Gunships During a player s impulse, he can attempt to call in a gunship counter to attack any enemy unit adjacent to one of his combat units. For the gunships to be successfully called in, he must roll 1d6 and score equal to or less than the gunship s initiative. Subtract 1 from the gunship s initiative if the friendly unit calling in the gunships moved before the die roll. Gunships can be called in before or after any friendly unit activates, but cannot attack in the middle of an activation. Gunships can attack any unit in the target hex using the normal combat procedure (7.2). The only modifier for their attacks is if the target is infantry or recon in closed terrain. Defensive fire has no effect on gunships. 8
9 If a gunship call fails, it is unavailable for the remainder of that impulse. The owning player can attempt to use it again in future impulses. Gunships are not combat units SCENARIO 1: DAWN S EARLY LIGHT On May 14, 1985, two Soviet divisions struck into the Eisenbach Gap. They were charged with breaking through to the west, seizing the vital bridge at Eisenbach and capturing the Stahlhammer Air Force Base. NATO rushed reinforcements forward, but would it be enough? The NATO player deploys first. Game Length: Ends after the night couplet of day four NATO SETUP INFORMATION 5 th Armored Division: Deploy any two brigades and the division cavalry squadron anywhere in hexrows A through I, hexes 5 to st Panzer Division: Deploy any two brigades and the divisional recon battalion anywhere in hexrows M through Q, hexes 6 to PACT SETUP INFORMATION 1 st Guards Tank Division: Before play, enter two regiments and divisional recon battalion via hex P20, expending no more than four MPs per unit (five if using a road march). 47 th Guards Tank Division: Before play, enter two regiments and division recon battalion via hex J20 expending no more than four MPs per unit (five if using a road march) ASSET CHITS Use all available asset chits in the asset pool. At setup, the Pact player draws five asset chits. He assigns two to day one, two to day two and discards the final chit. NATO draws three asset chits. He assigns one to day one, one to day two and discards the final chit. After the night couplet of day two, both players receive fresh assets. The Pact player draws three asset chits. He assigns one to day three and one to day four. The third chit is discarded, as is the final (undrawn) chit from his asset pool. The NATO player draws five asset chits. He assigns two to day three and two to day four. The fifth chit is discarded, as is the final (undrawn) chit from his asset pool. Interdiction: Scenario 1 takes place in an environment where both NATO and the Warsaw Pact are making a massive commitment of air assets to the front. A player deploying an airstrike asset gains both the normal airstrike and interdiction for the day s impulses. Interdiction reduces his opponent s units MP total by one for all day impulses NATO REINFORCEMENTS 5 th Armored Division: Enter remaining brigade on the third couplet of the first day between A4 and E1. 1 st Panzer Division: Enter remaining panzer brigade on the third couplet of the first day between Q3 and Q8. 13 th ACR: Enter anywhere between A4 and E1 when asset chit played. Engineers: Enter when their asset chit is played. Territorial Brigade: Enter anywhere between Q3 and Q8 when asset chit played PACT REINFORCEMENTS 1 st Guards Tank Division: One regiment arrives on the second couplet of day one and the remaining regiment arrives on the fourth couplet of day one. They enter via P th Guards Tank Division: One regiment arrives on the second couplet of day one and the remaining regiment arrives on the fourth couplet of day one. They enter via J rd Motor Rifle Division: Enter one regiment each couplet on day three. The division recon battalion enters on couplet one of day three. They enter via either J20 or P20, but all units in the division must arrive via the same hex. 2 nd Airborne: Enter via air assault when asset chit is played. 87 th Rifle Regiment: Enter via J20 or P20 when asset chit is played VICTORY CONDITIONS The Pact player wins if his net score is at least two Victory Points (VPs) at the end of the game (night couplet of day four). h h +1 VP for controlling the Stahlhammer AFB (O8). 9
10 h h +1 VP for a line of communication to Eisenbach (E11). h h +1 VP for a breakthrough (10.7). A player controls a hex if he either occupies the hex with a combat unit or was the last player to occupy the hex. NATO controls all towns and airfields at the start of play BREAKTHROUGH The Pact player breaks through the Eisenbach Gap if, over the course of the game, he exits (6.2) mechanized infantry, armor and/or reconnaissance units totaling at least nine strength factors (after hits) via the marked exit hexes (A2, C1, L1, or O1). The Airborne infantry CANNOT exit the map. The 2 nd Airborne is on foot and is incapable of exploiting a breakthrough LINE OF COMMUNICATION A chain of communication is a continuous line of road hexes traced from J20 or P20 to Eisenbach (E11). The Warsaw Pact player cannot trace through (a) empty road hexes adjacent to NATO units or (b) hexes containing NATO units. He must control Eisenbach to be able to trace to it SCENARIO 2: THE HIGH ROAD (BY MARK WALKER) A shorter scenario based on the northern Soviet advance against the West Germans. Can the 1 st Guards Tank replicate its brilliant victory of May 1985? It s up to you to find out. The NATO player deploys first, then the Pact player. For this scenario, NATO does not roll on the normal Botched Orders table. Instead, on a roll of 1-4, a randomly determined German brigade (from those with units present on the map), along with the divisional recon battalion, activates with an AN of 1. On a 5-6, the NATO player immediately selects his AN. Game Length: Ends after the night couplet of day two PACT SETUP INFORMATION 1 st Guards Tank Division: Before play, enter two regiments and divisional recon battalion via hex P20, expending no more than four MPs per unit (five if using a road march). 47 th Guards Tank Division: Before play, enter one regiment and divisional recon battalion from hex P20, expending no more than four MPs per unit (five if using a road march) NATO SETUP INFORMATION 1 st Panzer Division: Deploy any two brigades and the divisional recon battalion anywhere in hexrows M through Q, hexes 6 to ASSET CHITS Remove the 13 th ACR, 87 th Rifle, and Engineers asset chits from the mix. At setup, the Pact player draws five asset chits. He assigns two to day one, two to day two and discards the final chit. NATO draws three asset chits. He assigns one to day one, one to day two and discards the final chit. Broken Arrow: At the start of any couplet on day two, NATO can declare Broken Arrow. He draws three asset chits and chooses two to become available immediately, discarding the third. DESIGNER S NOTE: A Broken Arrow is the United States code for calling in all available aircraft or artillery for an airstrike and/or artillery strike very near a friendly position that has been overrun by the foe, and therefore creating a high probability of friendly fire PACT REINFORCEMENTS 1 st Guards Tank Division: One regiment arrives on the second couplet of day one and the remaining regiment arrives on the fourth couplet of day one. They enter via P NATO REINFORCEMENTS Territorial Brigade: Enter via Q5 or Q8 when asset chit is played VICTORY CONDITIONS At the end of the night couplet of day two, the NATO player wins if his net score is at least two Victory Points. h h +1 VP for each of the following hexes controlled: O8, O10, O15, P VP if NATO declares Broken Arrow. A player controls a hex if he either occupies the hex with a combat unit or was the last player to occupy the hex. NATO controls all towns and airfields at the start of play. 10
11 12.0 SCENARIO 3: SOUTH THRUST After punching through the First Panzer, the Soviet Operational Maneuver Groups struck deep into Germany. However, the American forces deployed in the Eisenbach Gap remained a threat to the Army Group s flank. Concerned by this, General Ubirek ordered a new offensive to clear the 5 th Armored Division out of the gap. NATO deploys first, followed by the Pact player. Game Length: Ends after the night couplet of day three NATO SETUP INFORMATION 5 th Armored Division: Three brigades and division recon squadron: hexrows A through I. Each armored brigade sets up with one less armored battalion and the mechanized brigade is short one mechanizedinfantry battalion. 4 th Canadian Mechanized Brigade: Two mechanizedinfantry battalions and an armored battalion set up in hexrows A through I PACT SETUP INFORMATION 1 st Tank Division: Set up in hexrows M through Q. Each tank regiment sets up with one less tank battalion and the motor-rifle regiment is short one motor-rifle battalion. 33 rd Motor Rifle Division: Set up in hexrows M through Q. Each motor-rifle regiment sets up with one less motor-rifle battalion and the tank regiment is short one tank battalion ASSET CHITS Use all asset chits except the 13 th ACR in the asset pool. At setup, the Pact player draws four asset chits. He assigns three to day one and discards the final chit. NATO draws three asset chits and assigns one to day one. He discards the other two. After the night couplet of day one, both players receive fresh assets. The Pact player draws four asset chits. He assigns one to day two and one to day three. The last two chits are discarded, as is the final (undrawn) chit from his asset pool. The NATO player draws five asset chits. He assigns two to day two and two to day three. The last chit is discarded, as is the final (undrawn) chit from his asset pool NATO REINFORCEMENTS 13 th ACR: Enter between A2 and E1 or via A17 at start of day two. Their gunship is available for the daylight couplets of day two. Engineers: Place in any NATO-controlled town hex in hexrows A through I when their asset chit is played. Territorial Brigade: Enter between A2 and E1 or via A17 when asset chit played PACT REINFORCEMENTS 2 nd Guards Airborne: Enter via air assault when asset chit played. 87 th Rifle Regiment: Enter via P20 or between Q3 and Q8 when asset chit played VICTORY CONDITIONS The Pact player wins if his net score is at least two Victory Points at the end of the game (night couplet of day three). h h +1 VP for controlling Eisenbach (E11). h h +1 VP for controlling three of these four town hexes: A7, B12, C9 and F5. h h +1 VP for destroying 7-12 NATO units. h h +2 VP for destroying 13+ NATO units. -1 VP for losing nine or more Pact units from the same division (can lose a maximum of one VP from this condition). -1 VP if any NATO unit enters the Stahlhammer AFB hex (O8) at any point in the scenario. A player controls a hex if he either occupies the hex with a combat unit or was the last player to occupy the hex. At the start of play, the Warsaw Pact controls all towns and airfields in hexrows M through Q, NATO controls all towns and airfields in hex rows A through N. 11
12 13.0 SCENARIO 4: CALL THE CAVALRY The 5 th Armored Division s stand in the Eisenbach Gap left numerous detachments scattered around the countryside. Unwilling to abandon these men to their fate, NATO launched a rescue operation with whatever combat elements were at hand. The Pact player deploys first, then the NATO player. Game Length: Ends after the night couplet of day two. Special Surprise Rule: NATO can choose its Activation Number on the first couplet of day one PACT SETUP INFORMATION Pact units cannot be set up in A7, B12, C9 or F5 (the American infantry set-up hexes). 33 rd Motor Rifle Division: Deploy one regiment adjacent to: A7, B12, C9 and D11. Place the division reconnaissance battalion with any regiment. 87 th Rifle Regiment: Deploy within one hex of F NATO SETUP INFORMATION Survivors 5 th Armored Division: Place one American mechanized-infantry battalion in each of these hexes: A7, B12, C9 and F5 under a Dug In counter. The Dug In counter gives the infantry battalion a Protection Factor of 12 until it moves from the hex or is eliminated. Rescue Force: Canadian 4 th Mechanized brigade, three cavalry squadrons from the 13 th ACR, one panzer battalion from the 1 st Panzer Division and one armor battalion from the 5 th Armored Division. Set up in any/all of these hexes: A1 to A4, B1, C1, D1, E SOVIET REINFORCEMENTS 1 st Guard Tank Division: Enter one tank regiment on couplet one of day one between Q3 and Q NATO REINFORCEMENTS Territorial Brigade: Enter via A1 to A4, B1, C1, D1, or E1 when asset chit played ASSET CHITS The NATO player uses seven asset chits; he leaves out the 13 th ACR and Engineer chits. The Pact player also uses seven asset chits; he leaves out the 2 nd Airborne and 87 th Rifle chits. The NATO player always receives the Signal Interception chit at the start of play. He then mixes the other chits and draws five. He keeps two and discards all the other asset chits. The Warsaw Pact player draws three chits on the second couplet of day one. He keeps one and discards the rest. On the first couplet of day two, he draws three more. He keeps one and discards the all remaining chits SURRENDER At the end of the night couplet of day two, any American infantry battalion that is still on the map might surrender. To avoid surrendering, each battalion must be able to trace a line of communication. A line of communication is a continuous chain of hexes traced from the unit to A1 to A4, B1, C1, D1, or E1. The NATO player cannot trace through (a) empty hexes adjacent to Pact units, (b) hexes containing Pact units, (c) hexrows north of hexrow I or (d) across unbridged river hexsides. Units that surrender are eliminated from play VICTORY CONDITIONS At the end of the night couplet of day two, the NATO player wins if his net score is at least three Victory Points. h h +1 VP if any NATO enters Eisenbach (E11) h h h h during play. +1 VP for each American infantry unit alive at the end of the game (after surrender due to 13.6 is applied)(units that exited the map count for a VP). +1 VP if he destroyed at least nine Pact units from the 33 rd Motor Rifle Division. -1 VP if he lost at least six NATO units EXITING THE MAP NATO units can exit the map (6.2) via any of these hexes: A1 to A4, B1, C1, D1, or E SCENARIO 5: DROPPING THE GUILLOTINE The Pact advances continued to depend on a tenuous supply line stretching through the Eisenbach Gap. Desperate to slow the pace of the enemy vanguard, NATO assembled a scratch force to counterattack into the gap and cut the flow of fuel and ammunition to the frontlines. The Pact player deploys first, then the NATO player. 12
13 Game Length: Ends after the night couplet of day three. Special Surprise Rule: NATO can choose its Activation Number on the first couplet of day one PACT SETUP INFORMATION 33 rd Motor Rifle Division: One motor-rifle regiment (three infantry, one tank) deploys within three hexes of Eisenbach (E11). One motor-rifle regiment deploys within two hexes of Stahlhammer (O8). The recon battalion can deploy with either group. 87 th Rifle Regiment: Deploy within two hexes of P20. Supply Convoys: One supply convoy counter in Eisenbach (E11), one in hex P NATO SET UP INFORMATION 13 th ACR augmented by 5 th Armored Division: Four cavalry squadrons and an armored battalion. 1 st Panzer Division: Recon squadron, two armored battalions, mech-infantry battalion. NATO forces deploy within four MPs of hexes A2 and/or A ASSET CHITS The NATO player uses seven asset chits; he leaves out the 13 th ACR and Engineer chits. The Pact player also uses seven asset chits; he leaves out the 2 nd Airborne and 87 th Rifle chits. On day one, the NATO player draws three asset chits and keeps two, discarding the third. The Pact player draws two asset chits and keeps one, discarding the other. On day two, NATO draws three asset chits and assigns one to day two and one to day three. He discards the final chit (as well as his undrawn asset). The Pact player draws four asset chits and assigns one to day two and one to day three, discarding the others PACT REINFORCEMENTS 1 st Tank Division: At the start of day two, couplet one, two tank regiments (three tank, one motor-rifle battalions) become available. One enters via hex P20, the other between Q2 and Q8. The recon battalion of the 1 st Tank can enter with either of these regiments NATO REINFORCEMENTS Territorials: Enter via A2 or A18 when asset chit played VICTORY CONDITIONS At the end of the night couplet of day three, the NATO player wins if his net score is at least one Victory Point. h h +1 VP if any NATO enters Eisenbach (E11) h h h h h h h h during play. +1 VP if NATO controls Eisenbach (E11) at the end of play. +1 VP if both Soviet supply convoys are still on the map or destroyed at the end of the game. +1 VP if any NATO unit enters the Stahlhammer airfield hex (O8) at any point during the game. +1 VP for destroying 10 or more Pact units from the 1 st Guards, 33 rd Motor Rifle and/or supply convoys. -1 VP for each Soviet supply convoy exited. -1 VP for losing 3-5 NATO units. -2 VPs for losing six or more NATO units. A player controls a hex if he either occupies the hex with a combat unit or was the last player to occupy the hex. The Pact controls all towns and airfields at the start of play. NOTE: NATO can score a total of two VPs from Eisenbach one for entering the city and one for holding it at the end of play. NOTE: NATO will have a very hard time winning this scenario if both supply convoys make it off the map. The Victory Points for entering Eisenbach and Stahlhammer AFB represent NATO forces destroying Pact supply caches EXITING THE MAP NATO units can exit the map (6.2) via hexes A1 to A5 or A16 to A20. Exiting all NATO units does not prevent the Pact player from taking his remaining convoy movements. Warsaw Pact units can exit the map (6.2) from hexes A2, C1, L1, or O HIGH NOON AT GERZENBURG 15.1 THE 11 TH ARMORED DIVISION The 11 th Armored Division is a National Guard formation activated and sent to Europe to bolster NATO s crumbling defenses. When units from this formation suffer a strength-point loss, their Initiative Rating is reduced (see 1.1). The M-60 armored units 13
14 add one (+1) to their firepower when attacking, just as with M1 and Leopard units THE 23 RD GUARDS TANK DIVISION The 23 rd Guards Tank is a first-line Pact formation with two tank regiments equipped with T-80s, one with T-72s and a motor-rifle regiment. T-80- equipped units add one (+1) to their firepower when attacking during day impulses they do not receive any Strength bonus at night SCENARIO 6: THREE CROSSROADS The Pact and NATO both realize the road network in and around Gerzenburg will be vital to keeping NATO s forces to the north fueled. Both sides rush what forces they can scrape together into the area with the aim of seizing the vital crossroads around the town. Map: Use the Gerzenburg map. Game Length: The scenario begins on the third couplet of day one and ends after the night couplet of day three. Starting Forces: There are no units on the map at the start of the game. All units enter the map as reinforcements PACT REINFORCEMENTS 23 rd Guards Tank Division: Enter two regiments on the first couplet of the game; enter two more regiments on the second couplet. The recon battalion can enter with any regiment. All units enter via hex Q3 or Q NATO REINFORCEMENTS All NATO reinforcements enter via hex A3 or A8. 27 th Panzergrenadier Brigade: Enter on the first couplet of the game. 11 th Armored Division: Enter one brigade on the first couplet of the game. Place the other units in a cup and draw one unit to enter at the start of each NATO impulse. Territorials: Enter all three battalions via hex A3 or A8 when (if) this asset chit is played ASSET CHITS The NATO player uses seven asset chits he leaves out the 13 th ACR and the Engineers from his pool. The Pact player also uses seven asset chits he removes the 87 th Rifle and 2 nd Guards Airborne chits. At the start of the night impulse of days one and two, each player draws three asset chits and keeps two. The other chit is discarded, as is the final (undrawn) chit from the pool RECOVERY BONUS The NATO player can discard one (and only one) of his asset chits in each night impulse to give him a +1 bonus on all his recovery rolls that phase VICTORY At the end of day three, the Warsaw Pact wins if they hold three of the five crossroads (hexes C8, D2, F6, H2 and J8) and can trace a line of communication to the east map edge LINE OF COMMUNICATION A line of communication is a continuous line of road hexes traced from a crossroads hex to the east map edge. The Warsaw Pact player cannot trace through (a) empty road hexes adjacent to NATO units or (b) hexes containing NATO units. He must control the crossroads hex to be able to trace to it SCENARIO 7: BACK OF THE HAND Aerial reconnaissance and electronic intercepts indicate the Pact are planning to launch a fresh offensive around Gerzenburg. NATO commanders conceive a desperate plan. They will divert all available reinforcements to a nearby location and order the 11 th Armored to draw the Pact forward, forcing the 23 rd Guards Tank to overextend itself so it can be defeated with a daring counterattack. NATO deploys first. Map: Use the Gerzenburg map. Game Length: The scenario begins on the first couplet of day one and ends after the night couplet of day three NATO SETUP INFORMATION 27 th Panzergrenadier Brigade: Randomly select one unit from the formation and set it to the side it will not be used. Deploy the remaining units in hexrows A to J, inclusive. 11 th Armored Division: Randomly select three units from the formation and set them to the side they 14


 are discarded, including the undrawn chits remaining in the pool. 17.")
15 will not be used. Deploy the remaining units in hex rows A to J, inclusive PACT SETUP INFORMATION 23 rd Guards Tank Division: Randomly select four units from the formation and set them to the side they will not be used. Deploy the remaining units in hexrows N to Q, inclusive. 171 st and 232 nd Motor Rifle Brigades: Deploy all units in hexrows N to Q, inclusive ASSET CHITS Use all asset chits except the 13 th ACR and 2 nd Guards Airborne. The Pact player draws two asset chits on the first impulse of each day, keeping one. The other chit is discarded, as are the undrawn chits remaining in the pool. The NATO player draws three asset chits on the first impulse of days two and three. He keeps two chits on day two and discards the third. On day three, he keeps one if he has launched a counterattack or two if he has not the other chit(s) are discarded, including the undrawn chits remaining in the pool THE COUNTERATTACK At the start of any couplet on day two, before the players make their activation rolls, the NATO player can declare the counterattack. He selects his activation number for that turn as if he had played a signal-interception chit and the counterattack forces immediately become available for entry. To determine the counterattack force, place two 4-Strength-Point Leopards, two 4-Strength-Point Abrams, two 3-Strength-Point cavalry squadrons (American) and two 4-Strength-Point mechanized (Canadian) in a cup. Draw six once the counterattack is launched the other two are set to the side and will not be used. The counterattacking units can always enter via any hex on the western map edge. They can also use one of two available flanking hexes (H1 and H10). Once NATO picks a flanking hex, he is locked in to that choice and cannot use the other one GUNSHIPS ASSETS Both sides committed airborne forces during the fighting around Gerzenburg. Thus, each time a gunship asset is played, a player can place one airborne unit (2 nd Guards or 101 st ) according to the instructions given on the Player-Aid Card for the Guards Airborne asset chit. When placing the 101 st according to this method, invert all NATO references on the Player-Aid Card to read Pact (i.e., it is Pact units that take the free attack against them, not NATO units) PACT AUTOMATIC VICTORY The Pact player wins the game immediately if he, at any time during the game, has exited at least 13 Strength Points via hex A3 or A VICTORY CONDITIONS If NATO did not launch a counterattack (17.4), then victory is evaluated at the end of the game on the strength of the Warsaw Pact player s progress. The Pact player scores one point for each town hex he controls at the end of play. He scores one point if he destroyed six or more NATO units. If the final Pact score is a four or greater, he wins the game. Any other score results in a NATO victory. If NATO launched a counterattack (17.4), then victory is evaluated at the end of the game on the strength of the NATO player s progress. The NATO player scores one point for each town hex he controls at the end of play. He loses one point if the Warsaw Pact destroyed six or more NATO units. If the NATO Pact score is a four or greater, NATO wins the game. Any other score results in a Pact victory GERZENBURG PACT BOTCHED ORDERS When playing the two High Noon at Gerzenburg scenarios, the Warsaw Pact player should use the designated Warsaw Pact Botched Orders table provided on the PAC. The NATO player uses the regular Botched Orders table (also on the PAC). ASSET CHITS SUMMARY 13th ACR: The NATO player receives the three cavalry squadrons of the 13th ACR. He also receives the 13th ACR gunship for the next four day couplets (note: any NATO unit may call in this gunship). 2 nd Airborne: The Soviets commit an air assault regiment. Place the three 2 nd Airborne battalions in up to three town, clear, or rough hexes which are free of NATO units. If they are placed in the ZOC of a NATO unit, each NATO unit gets one free assault attack on EACH 2 nd Airborne unit. The airborne units must pass this impulse, but activate normally for the remainder of the game. 87 th Rifle: the four units of the second-line 87 th Rifle formation are available for entry. Airstrike: play at the start of any day couplet. You may make one airstrike during each of your day impulses for the remainder of the turn. Select any hex and attack each enemy unit in it once. Rolls 2d6 for each attack - a NATO airstrike inflicts a hit on an 8+, a Pact airstrike on a 9+. The only modifier is a -1 if attacking a closed terrain hex. Playing multiple airstrike assets allows you to make a strike for each asset played. Artillery: play at the start of any impulse. For this impulse, all assaults by your units receive +1 firepower. You cannot combine the bonus from multiple artillery assets. ARMOR UNITS INFANTRY UNITS RECON UNITS AIRBORNE UNITS SUPPLY CONVOY TERRAIN KEY Chemical Weapons: play at the start of any Pact impulse. For the remainder of the impulse, all Pact assaults and overruns do not trigger NATO defensive fire. You can combine chemical weapons with an artillery asset. Engineers: the engineering battalion of the 5th Armored Division and assorted rear area troops assemble into an ad hoc combat formation. Place the engineer infantry battalion in any NATO controlled town hex. Gunships: you may add two gunships to your forces for the next four day couplets. Multiple gunship assets merely extend the time these gunships are available. Jamming: NATO must immediately reroll its activation number (even if it allowed to choose). Any attempt by NATO forces to call for gunship support have a -1 penalty to the initiative number. Jamming cannot be played to reroll a NATO AN from a Signal Interception asset. Signal Interception: play after both activation rolls are determined and revealed. You may immediately discard your current AN and select a new one. This can even replace a roll on the Botched Orders table. Territorials: a scratch-built force of three West German territorial battalions reaches the front. TERRAIN MP COST COMBAT DRM DEFENSIVE FIRE BONUS 2-1 (closed) Forest 2 Armor units inflict defensive fire on a 2 - Infantry -0 (open) Rough 3 or 11 units inflict defensive fire on a 2-3 or 11-1 (closed) Infantry units inflict defensive fire on a 2-3 or 11 Town 1-1 (closed) Infantry units inflict defensive fire on a 2-3 or 11 Rough Forest 3-1 (closed) Infantry units inflict defensive fire on a 2-3 or 11 Airfield 1-0 (open) Armor units inflict defensive fire on a 2-3 or 11 Mountain Impassable - - River Impassable -1 Lake Bridge Impassable Road MP for road march (6.0) - Night - -1MP at night COMBAT DRMS h A NATO armored unit (M1 or Leopard) adds 1 h If attacking unit possesses superior arms (7.5) add 1 h Defender s terrain combat modifier h If the attack crosses a river or bridge hexside subtract 1 h If attacking a recon unit by overrun subtract 1 h If a recon unit is supporting the attack add 1 h Attacks at night subtract 1 DEFENSIVE FIRE DRMS h NATO units inflict defensive fire on a Pact attack roll of 7 h Pact units inflict defensive fire on a NATO attack roll of 4 h Infantry units in closed terrain also inflict defensive fire on an attack roll of 2-3 or 11 h Armored units in clear terrain also inflict defensive fire on an attack roll of 2-3 or 11 h Recon units and supply convoys never inflict extra defensive fire for terrrain. RECOVERY ROLLS h NATO and Pact units recover on a die roll of 5-6 h Subtract 1 from the die roll if the unit is currently occupying an enemy ZOC 2015 Lock n Load Publishing, LLC DELRH , Rev 4 PACT BOTCHED ORDERS TABLE st Guards and 33 rd Motor activate. AN st Guards, 47 th Guards and 87 th Rifle activate. AN rd Motor, 47 th Guards and 87 th Rifle activate. AN 1 NATO 1-2 Only American units activate. AN of Only German and Canadian units activate. AN of NATO player immediately selects his AN HIGH NOON AT GERZENBURG WARSAW PACT BROKEN ORDERS TABLE When playing scenarios in the High Noon at Gerzenburg expansion, the Warsaw Pact player should use the following Botched Orders table. The NATO player uses the table provided above. DIE FORMATIONS ACTIVATED ROLL 1 1st & 2nd Regiments, 23rd Guards Tank Division. AN 1 2 1st & 3rd Regiments, 23rd Guards Tank. AN 1 3 1st & 4th Regiments, 23rd Guards Tank. 171st Motor Rifle. AN 1 4 2nd & 3rd Regiments, 23rd Guards Tank. AN 1 5 2nd & 4th Regiments, 23rd Guards Tank. AN 1 6 3rd & 4th Regiments, 23rd Guards Tank. AN 1 15


16 Lock n Load Publishing Team Executive Producer David Heath Associate Producer Blackwell Hird Game Designer Peter Bogdasarian Game Developer Mark Walker Box Design, Map & Counter Artwork Marc von Martial Manual Editing Jeff Lewis Manual Design and Layout Marc von Martial Administration Ava Marie Heath Customer Support Jason Church Shipping Support Darren White Special Thanks & Support Pete Atack, Joyce Bitzer, Michael Bogdasarian, Brant Guillory, Daniel Heath, Yvonne Heath, Nick Katzer, Matthew Kirchenbaum, Phil Lucero, Kindra White Why We Do What We Do We love designing, developing and, most of all, playing games. We thank God for blessing us so we can follow our passions, and our family and friends for their support Lock n Load Publishing, LLC, DELRH , Rev 10
Game Turn 11 Soviet Reinforcements: 235 Rifle Div can enter at 3326 or 3426.
 General Errata Game Turn 11 Soviet Reinforcements: 235 Rifle Div can enter at 3326 or 3426. Game Turn 11 The turn sequence begins with the Axis Movement Phase, and the Axis player elects to be aggressive.
RANDOM MISSION CONTENTS TAKING OBJECTIVES WHICH MISSION? WHEN DO YOU WIN THERE ARE NO DRAWS PICK A MISSION RANDOM MISSIONS
 i The 1 st Brigade would be hard pressed to hold another attack, the S-3 informed Bannon in a workman like manner. Intelligence indicates that the Soviet forces in front of 1 st Brigade had lost heavily
Solitaire Rules Deck construction Setup Terrain Enemy Forces Friendly Troops
 Solitaire Rules Deck construction In the solitaire game, you take on the role of the commander of one side and battle against the enemy s forces. Construct a deck, both for yourself and the opposing side,
A game by Wei Cheng Cheng. - Graphics: Olivier Revenu - Translation: Noël Haubry. Growling Tigers The Battle For
 BATTLES MAGAZINE #7 A game by Wei Cheng Cheng. - Graphics: Olivier Revenu - Translation: Noël Haubry Growling Tigers The Battle For Changde, 1943 is a two player wargame simulating the final stage of the
ARMY COMMANDER - GREAT WAR INDEX
 INDEX Section Introduction and Basic Concepts Page 1 1. The Game Turn 2 1.1 Orders 2 1.2 The Turn Sequence 2 2. Movement 3 2.1 Movement and Terrain Restrictions 3 2.2 Moving M status divisions 3 2.3 Moving
Gazala: The Cauldron Table of Contents
 Gazala: The Cauldron Table of Contents 1.0 Introduction... 1 2.0 Components... 1 2.1 Game Scale... 1 2.2 Playing Pieces... 1 2.2.1 Action Chits (see 4.0)... 1 2.2.2 Tactical Chits (see 4.0)... 1 2.2.3
CEDAR CREEK BY LAURENT MARTIN Translation: Roger Kaplan
 CEDAR CREEK BY LAURENT MARTIN Translation: Roger Kaplan Cedar Creek 1864 simulates the Civil War battle that took place on October 19, 1864 and resulted in a Union victory. It uses many of the rules of
COMPONENT OVERVIEW Your copy of Modern Land Battles contains the following components. COUNTERS (54) ACTED COUNTERS (18) DAMAGE COUNTERS (24)
 ACTED COUNTERS (18) DAMAGE COUNTERS (24)") GAME OVERVIEW Modern Land Battles is a fast-paced card game depicting ground combat. You will command a force on a modern battlefield from the 1970 s to the modern day. The unique combat system ensures
GAME OVERVIEW Modern Land Battles is a fast-paced card game depicting ground combat. You will command a force on a modern battlefield from the 1970 s to the modern day. The unique combat system ensures
DIGITAL. Manual. Copyright 2017 Lock n Load Publishing, LLC. All Rights Reserved
 DIGITAL Manual Copyright 2017 Lock n Load Publishing, LLC. All Rights Reserved Introduction on, Digital edition is a low-complexity, Second World War armored combat game, modeled after the Lock n Load
I-95 GAMERS. Domination Missions
 I-95 GAMERS Domination Missions I-95 GAMERS Domination Missions Design notes Domination special rules Domination Frontline Domination Blind Domination Blitzkrieg Domination Early war Blitzkrieg Domination
Clash of Giants The Campaigns of Tannenberg and The Marne, 1914
 RULEBOOK -UPDATED 12/25/01 Clash of Giants The Campaigns of Tannenberg and The Marne, 1914 Table of Contents 1.0 Introduction............... 2 2.0 Game Components........... 2 3.0 Game Setup...............
Getting Started with Modern Campaigns: Danube Front 85
 Getting Started with Modern Campaigns: Danube Front 85 The Warsaw Pact forces have surged across the West German border. This game, the third in Germany and fifth of the Modern Campaigns series, represents
Montelimar: Anvil of Fate Scenario 1 -Opening Blows - The Feint
 Montelimar: Anvil of Fate Scenario 1 -Opening Blows - The Feint Introduction This is an after action report of a play test game of Monlimar: Anvil of Fate. Please note that the Vassal module and graphics
Command Phase. Setup. Action Phase. Status Phase. Turn Sequence. Winning the Game. 1. Determine Control Over Objectives
 Setup Action Phase Command Phase Status Phase Setup the map boards, map overlay pieces, markers and figures according to the Scenario. Players choose their nations. Green bases are American and grey are
Red Parachutes. Extended Player Aid Sheet by Richard J. Vohlers. Includes advanced rules; optional rules in italics.
 Red Parachutes Extended Player Aid Sheet by Richard J. Vohlers Includes advanced rules; optional rules in italics. S = Soviet; G = German; B = Both; P = Phasing; NP = Non-phasing; OOS = Out of Supply;
Game Journal 53 First fight Smolensk Blitzkrieg. Rules : updated 17/May/2016(see /4.0 /9.2.4 /12.1/14.0/ TERRAIN EFFECT TABLE)
") Game Journal 53 First fight Smolensk Blitzkrieg Rules : updated 17/May/2016(see 2.2.2 /4.0 /9.2.4 /12.1/14.0/ TERRAIN EFFECT TABLE) 1.0 INTRODUCTION This game simulates fighting in Baltic States and Leningrad
Game Journal 53 First fight Smolensk Blitzkrieg Rules : updated 17/May/2016(see 2.2.2 /4.0 /9.2.4 /12.1/14.0/ TERRAIN EFFECT TABLE) 1.0 INTRODUCTION This game simulates fighting in Baltic States and Leningrad
Operation Shingle The Battle for the Beachhead January 22 nd - March 1 st 1944
 Operation Shingle The Battle for the Beachhead January 22 nd - March 1 st 1944 Table of Contents 1.0 Introduction 2.0 Components 3.0 Sequence of Play 4.0 Weather Phase 5.0 Supply Phase 6.0 Reinforcement
Sequence of Play This rulebook is organized according to this Sequence of Play.
 Introduction...1 Sequence of Play...2 Campaign Set-Up...2 Start of Week...10 Pre-Combat...11 Combat...14 Post-Combat...19 End of Week...20 End of Campaign...22 Optional Rules...22 Credits...22 Sample Game...23
Bravery in the Sand. 1. Introduction. 2. Components. Units. Chits. Markers Markers
 1. Introduction Bravery in the Sand 2.1.2 Markers Bravery in the Sand is a two player game that covers the major part of the battle known as Operation Crusader in North Africa during World War Two. Covering
RESERVES RESERVES CONTENTS TAKING OBJECTIVES WHICH MISSION? WHEN DO YOU WIN PICK A MISSION RANDOM MISSION RANDOM MISSIONS
 i The Flames Of War More Missions pack is an optional expansion for tournaments and players looking for quick pick-up games. It contains new versions of the missions from the rulebook that use a different
RULES OF PLAY Living Rules
 Ukraine 43 2nd Edition 2ND EDITION RULES OF PLAY Living Rules 7-4-5 TABLE OF CONTENTS. Introduction... 2 2. Contents... 2 3. Sequence of Play... 3 4. Stacking... 4 5. Movement... 4 6. Zones of Control...
Getting Started with Panzer Campaigns: Budapest 45
 Getting Started with Panzer Campaigns: Budapest 45 Welcome to Panzer Campaigns Budapest 45. In this, the seventeenth title in of the Panzer Campaigns series of operational combat in World War II, we are
RULE BOOK. Table of Contents. Game Design by Ted Raicer
 1 Game Design by Ted Raicer RULE BOOK Table of Contents 1. Introduction... 2 2. Game Components... 2 3. Game Setup... 3 4. How to Win... 3 5. Sequence of Play... 3 6. Stacking... 4 7. Zones of Control...
Fleet Engagement. Mission Objective. Winning. Mission Special Rules. Set Up. Game Length
 Fleet Engagement Mission Objective Your forces have found the enemy and they are yours! Man battle stations, clear for action!!! Mission Special Rules None Set Up velocity up to three times their thrust
2.0 game components support Units. color to make them easier to pick out. Each player has two types of game units: Combat Units Support units
 basic rules Somme 1918 - Bloody Spring is a wargame that simulates the German spring offensive of 1918 that was aimed at separating the British and French armies. Players will find themselves in the role
22.0 Extended Examples of Play
 Last Hundred Yards ~ Playbook 11 22.0 Extended Examples of Play 22.1 Infantry and Mortars Situation: Early dawn, October 1944, southwest of Kohlscheid, Germany. A German outpost, dug-in on Hill 192, has
The counters. BULL RUN VaeVictis 89 The first battle of the Civil War
 BULL RUN 1861 - VaeVictis 89 The first battle of the Civil War A game by Laurent MARTIN Bull Run, 1861 is a simulation of the First Battle of Bull Run (or the First Battle of Manassas for the Confederates),
1.0 INTRODUCTION FORTRESSES COMPONENTS REPLACEMENTS GAME TERMS SEQUENCE OF PLAY VICTORY CONDITIONS
 RULES OF PLAY INDEX 1.0 INTRODUCTION... 2 2.0 COMPONENTS... 2 3.0 GAME TERMS... 3 4.0 SEQUENCE OF PLAY... 4 5.0 SET UP... 5 6.0 REINFORCEMENTS... 5 7.0 LOGISTICS AND INITIATIVE... 5 8.0 COMMAND... 5 9.0
SERIES RULEBOOK. Game Design by Mark S. Miklos. Version: June 2017 TABLE OF CONTENTS. Great Battles of the American Revolution
 1 SERIES RULEOOK Game Design by Mark S. Miklos Version: June 2017 TALE OF CONTENTS 1. Introduction... 2 2. Components... 2 3. Game Scale and Terminology... 2 4. How To Win... 3 5. Sequence of Play Outline...
Napoleon s Triumph. Rules of Play (draft) Table of Contents
 Table of Contents") Rules of Play (draft) Table of Contents 1. Game Equipment... 2 2. Introduction to Play... 2 3. Playing Pieces... 2 4. The Game Board... 2 5. Scenarios... 3 6. Setting up the Game... 3 7. Sequence of Play...
Rules of Play (draft) Table of Contents 1. Game Equipment... 2 2. Introduction to Play... 2 3. Playing Pieces... 2 4. The Game Board... 2 5. Scenarios... 3 6. Setting up the Game... 3 7. Sequence of Play...
Game Journal 47 Fierce Fight! Stalingrad Blitzkrieg
 Game Journal 47 Fierce Fight! Stalingrad Blitzkrieg Different point from MLB is indicated by red. Combat Results Table Ax : number of step attacking lose - : No effect R : All defending units retreat one
Components: Game Map. Unit Chart. Weather Effects. Terrain effects are listed in the rules. Turn Track
 Components: Game Map Unit Chart Weather Effects Terrain effects are listed in the rules. Turn Track Red Hex Line: Units may not move or attack across a red hex line. Fortress/Victory City: A fortified
CONTENTS. A WWII tactical and operational strongpoint defense game. PAGE 1 Introduction. PAGE 2 Setup minutes ages: players
 CONTENTS A WWII tactical and operational strongpoint defense game PAGE 1 Introduction PAGE 2 Setup PAGE 3 Counters and Cards PAGE 4 Playing the Game PAGE 5 Soviet Card Phase PAGE 9 Wehrmacht Card Phase
Nfejfwbm!Cbuumft!!! Mfhobop! 3:ui!Nbz!2287!
 NfejfwbmCbuumft Mfhobop 3:uiNbz2287 2008 1 Battles of the Middle Ages Battle of Legnano 1176 Rulebook version 1.0 1.0 Introduction Battles of the Middle Ages is an easy to learn wargaming system that tries
Maida 1806: Stuart vs. Reynier
 Table of contents. 1.0 Introduction... 2.0 Components... 3.0 Gameplay... 4.0 Leaders... 5.0 Infantry in Column... 6.0 Infantry in Line... 7.0 Square... 8.0 Skirmish order... 9.0 Cavalry... 10.0 Artillery...
World at War. Blood and Bridges, Death of First Panzer, Eisenbach Gap COMBINED SCENARIO: A RACE FOR VICTORY. Robert Holzer, 2010
 World at War Blood and Bridges, Death of First Panzer, Eisenbach Gap Robert Holzer, 2010 COMBINED SCENARIO: A RACE FOR VICTORY In a sudden blitz attack a detachment of the 2 nd Soviet Airborne Division
IWO JIMA RAGE AGAINST THE MARINES 1. INTRODUCTION 2. COMPONENTS 2.1 COUNTERS. Operations Special Issue #1
 1. INTRODUCTION Iwo Jima. The only battle of World War Two that saw the United States Marines suffer more casualties than they inflicted on the enemy. It was a battle that would define a war and would
Henry Bodenstedt s Game of the Franco-Prussian War
 Graveyard St. Privat Henry Bodenstedt s Game of the Franco-Prussian War Introduction and General Comments: The following rules describe Henry Bodenstedt s version of the Battle of Gravelotte-St.Privat
CONTENTS INTRODUCTION Compass Games, LLC. Don t fire unless fired upon, but if they mean to have a war, let it begin here.
 Revised 12-4-2018 Don t fire unless fired upon, but if they mean to have a war, let it begin here. - John Parker - INTRODUCTION By design, Commands & Colors Tricorne - American Revolution is not overly
2.0 The Battlefield. 2.1 Terrain Hexes. 2.2 Terrain Types. 3.0 Command Cards (10 each) 3.1 Order Cards (7 each)
 3.1 Order Cards (7 each)") Advanced Vive l Empereur Introduction Advanced Vive l Empereur is a Histo Command Dice System Game and allows you to simulate on a grand-tactical level the battles of the Napoleonic era. The player is
Advanced Vive l Empereur Introduction Advanced Vive l Empereur is a Histo Command Dice System Game and allows you to simulate on a grand-tactical level the battles of the Napoleonic era. The player is
Moscow WB-95 system. Game and System author: Wojciech Zalewski Cover: Arkadiusz Wróbel Map: Wojciech Zalewski Translation: Roman Mękicki
 Moscow 1941 WB-95 system Game and System author: Wojciech Zalewski Cover: Arkadiusz Wróbel Map: Wojciech Zalewski Translation: Roman Mękicki Playtest: Roman Mękicki, Bartłomiej Batkowski, Szymon Kucharski,
TUTORIAL DOCUMENT. Contents. 2.0 GAME OBJECTIVE The Overall Objective of the game is to:
 TUTORIAL DOCUMENT Contents 1.0 INTRODUCTION 2.0 GAME OBJECTIVE 3.0 UNIT INFORMATION 4.0 CORE TURN BREAKDOWN 5.0 TURN DETAILS 5.1 AMERICAN MOVEMENT 5.2 US COMBAT 5.3 US MOBILE MOVEMENT 5.4 US MOBILE COMBAT
Aperitif Game for Gentlemen, By Pierre Laporte
 Belle Epoque Aperitif Game for Gentlemen, By Pierre Laporte Belle Epoque Aperitif Game for Miniature Battles in the Victorian Era and Early 20 th Century EQUIPEMENT NEEDED Small coloured counters, ordinary
Holland 44 Operation Market-Garden
 Holland 44: Operation Market-Garden Rev. May 2018 Holland 44 Operation Market-Garden 1 RULES OF PLAY Revised May, 2018 TABLE OF CONTENTS 1. Introduction... 2 19. Reinforcements and Entry Areas... 19 2.
GMT Games, LLC P.O. Box 1308, Hanford, CA Game Design: Vance von Borries
 Game Design: Vance von Borries GMT Games, LLC P.O. Box 1308, Hanford, CA 93232-1308 www.gmtgames.com Rules of Play 2 Roads to Moscow ~ Rules of Play T a b l e o f C o n t e n t s 1.0 Introduction 1.1 Historical
ARMOR DIAGRAM ARMOR DIAGRAM. Mech Data. Mech Data BATTLEMECH RECORD SHEET BATTLEMECH RECORD SHEET. Weapons Inventory.
 BATTLEMECH RECORD SHEET Left Torso Head Right Torso ARMOR DIAGRAM Type: HER-2S Hermes II Tonnage: 40 Points: Walking: 6 Running: 9 Weapons Inventory Mech Data Type Location Damage Short Med. Long 1 Autocannon
Fleet Engagement. Mission Objective. Winning. Mission Special Rules. Set Up. Game Length
 Fleet Engagement Mission Objective Your forces have found the enemy and they are yours! Man battle stations, clear for action!!! Mission Special Rules None Set Up velocity up to three times their thrust
HEXBLITZ GENERAL INFORMATION
 GENERAL INFORMATION SCALES: The following time and ground scales are used in battles fought with 20mm or 15mm scale figures and models: Time scale: Each daylight turn represents approximately 2 hours of
001 \ FORTRESS AMERICA
 TM TM 00 \ FORTRESS AMERICA ONE NATION, UNDER SIEGE! IN THE ST CENTURY, THE UNITED STATES OF AMERICA UNVEILED A NEW SYSTEM OF SATELLITES AND POWERFUL LASERS THAT PROVIDED NOT ONLY A FLAWLESS DEFENSE AGAINST
PRELUDE: THE ADVANCE TO THE VOLGA... 2 by Michael A. Rinella. THE BATTLE IN STALINGRAD... 6 by David M. Glantz and Jonathan M.
 PRELUDE: THE ADVANCE TO THE VOLGA..................... 2 by Michael A. Rinella THE BATTLE IN STALINGRAD.................................. 6 by David M. Glantz and Jonathan M. House AFTERMATH:THE DEATH
Barbarossa: The War in the East, Second Edition "The Child's Game of Barbarossa" v 1.0
 Barbarossa: The War in the East, 1941-1945 Second Edition "The Child's Game of Barbarossa" v 1.0 Game Overview Barbarossa is a simple simulation representing the battles on the Eastern Front between the
PROFILE. Jonathan Sherer 9/30/15 1
 Jonathan Sherer 9/30/15 1 PROFILE Each model in the game is represented by a profile. The profile is essentially a breakdown of the model s abilities and defines how the model functions in the game. The
Target: Leningrad Rules v1.0 1
 Target: Leningrad The Attack of Army Group North: June August, 1941 Table of Contents [1.0] INTRODUCTION...1 [2.0] GENERAL COURSE OF PLAY..1 [3.0] GAME EQUIPMENT...1 [4.0] SEQUENCE OF PLAY...2 [5.0] HOW
The Esoteric Order of Gamers
 The Esoteric Order of Gamers www.orderofgamers.com High quality materials for the dedicated devotee of immersive, thematic tabletop games. Game rules summaries, foamcore box plans, articles, interviews,
9.3 Fresh/Spent HQs and Units Cadres AIR POWER Airfields Air Commitment Strategic Missions...
 Summary INTRODUCTION... 3 1.0 GLOSSARY... 3 2.0 GAME COMPONENTS... 5 2.1 Map... 5 2.2 Counters... 5 2.3 Charts and Tables... 9 3.0 SEQUENCE OF PLAY... 9 4.0 MOVEMENT... 10 4.1 General Rules... 10 4.2 Stacking...
Primo Victoria. A fantasy tabletop miniatures game Expanding upon Age of Sigmar Rules Compatible with Azyr Composition Points
 Primo Victoria A fantasy tabletop miniatures game Expanding upon Age of Sigmar Rules Compatible with Azyr Composition Points The Rules Creating Armies The first step that all players involved in the battle
Angola! Rules of Play
 Angola! 1 Rules of Play 2 Angola! Table of Contents Errata 2 1 Introduction 3 1.1 Learning the Game 3 1.2 Definitions 3 1.3 Game Components 3 2 Game Overview 3 2.1 Factions 3 2.2 Playing the Game 3 2.3
command efficiency table
 sequence of play 0. PRE-GAME ORGANIZATION PHASE. 1. POSTURE DETERMINATION PHASE 2D6 + Cohesion. Highest total has initiative in this phase. Mark required stands or groups in movement posture. [6.01.01]
IMPERIAL ASSAULT-CORE GAME RULES REFERENCE GUIDE
 STOP! This Rules Reference Guide does not teach players how to play the game. Players should first read the Learn to Play booklet, then use this Rules Reference Guide as needed when playing the game. INTRODUCTION
GETTING STARTED. For veterans of the Modern Campaigns system, be sure to check out the "What s New in North German Plain 85" section of this manual.
 GETTING STARTED Soviet armor, mechanized infantry and special forces surge across the frontiers of the northern Federal Republic of Germany under the blazing fire of helicopter gunships and the swarming
Game Rules. The Great Battles of the Napoleonic Era. Giovanni Crippa. version October v.1.1. A game by: GIOGAMES
 The Great Battles of the Napoleonic Era Game Rules v.1.1 version 1.2 - October 2013 GIOGAMES A game by: Giovanni Crippa 23900 LECCO (Italy) Introduction Advanced Vive l Empereur is a game system that allows
Frontier/Modern Wargames Rules
 Equipment: Frontier/Modern Wargames Rules For use with a chessboard battlefield By Bob Cordery Based on Joseph Morschauser s original ideas The following equipment is needed to fight battles with these
Portable Wargame. The. Rules. For use with a battlefield marked with a grid of hexes. Late 19 th Century Version. By Bob Cordery
 The Portable Wargame Rules Late 19 th Century Version For use with a battlefield marked with a grid of hexes By Bob Cordery Based on some of Joseph Morschauser s original ideas The Portable Wargame Rules
Rule Book. Table of Contents
 Rule Book Table of Contents 1.0 Introduction... 2 2.0 Components... 2 3.0 Sequence of Play... 3 4.0 Weather and Initiative... 3 5.0 Logistics... 4 6.0 Formations and HQs... 5 7.0 Activation... 6 8.0 Movement...
Air Deck Rules and Use
 Air Deck Rules and Use Note: This is a first draft of the Air Deck rules. Any problems or suggestions can be posted in the forum thread or mailed to PanzerRunes on the Days of Wonder site. Suggestions
1 side. The Play Book provides specifics on map designations and alignments.
 Rules Book Barbarossa Standard Rules Draft: 4-8-18 Game Design by Vance von Borries Copyright 2018, Vance von Borries 1.0 Introduction The Barbarossa portion of GMT s East Front Series is a set of games
GREAT BATTLES OF ALEXANDER 4 th Edition Errata & Clarifications October, 2008
 GREAT BATTLES OF ALEXANDER 4 th Edition Errata & Clarifications October, 2008 GREAT BATTLES OF ALEXANDER Rulebook (2.25) Sample Persian Leader, Line Command Capability: Delete (Optional Rule) (4.21) 1
Recon 1 Air Power Counter Attack Counter Attack Recon 1 Air Power Recon 1 Recon 1 Air Strike Air Power Air Power Air Strike Memoir 44 FAQ
 VIII. COMMAND FAQ Q. If someone can use a Recon 1 card as an Air Power, can the other player Counter Attack the effect or just the card? A. The rule is that a Counter Attack is only allowed to counter
Napoleon s Triumph. Rules of Play (draft) Table of Contents
 Table of Contents") Rules of Play (draft) Table of Contents 1. Parts List... 2 2. Introduction... 2 3. Playing Pieces... 2. The Game Board... 2 5. Scenarios... 3 6. Setting up the Game... 3 7. Order of Play... 3 8. Corps...
Rules of Play (draft) Table of Contents 1. Parts List... 2 2. Introduction... 2 3. Playing Pieces... 2. The Game Board... 2 5. Scenarios... 3 6. Setting up the Game... 3 7. Order of Play... 3 8. Corps...
SCENARIO LIST. (In no particular order) SEIZE GROUND. - As per page #91 of the Warhammer 40,000 Rulebook -
 SEIZE GROUND. - As per page #91 of the Warhammer 40,000 Rulebook -") The following is the complete list of scenarios that may be played at the 2011 Ultimate Warhammer 40K tournament. Four of these will be used by all players in the first four rounds of the tournament (pre-determined
The following is the complete list of scenarios that may be played at the 2011 Ultimate Warhammer 40K tournament. Four of these will be used by all players in the first four rounds of the tournament (pre-determined
The Arduous Beginning
 The Arduous Beginning The Attack of Army Group Center: June August, 191 Table of Contents [1.0] INTRODUCTION...1 [2.0] GENERAL COURSE OF PLAY..1 [3.0] GAME EQUIPMENT...1 [.0] SEQUENCE OF PLAY...2 [5.0]
The Glory that was GREECE. Tanagra 457 BC
 The Glory that was GREECE Tanagra 457 BC TCSM 2009 The Glory that Was Vol. I: Greece Rulebook version 1.0 1.0 Introduction The Glory that was is a series of games depicting several different battles from
R U L E B O O K L E T R U L E B O O K L E T
 R U L E B O O K L E T BARBAROSSA: Crimea R U L E B O O K L E T Game Design by Vance von Borries Table of Contents 1.0 Introduction... 2 2.0 Game Equipment... 2 3.0 Basic Concepts Terminology... 2 4.0 How
Getting Started with Panzer Campaigns: Stalingrad 42
 Getting Started with Panzer Campaigns: Stalingrad 42 Welcome to Panzer Campaigns Stalingrad 42. As winter began to close, the instruction came forward from OKH to von Paulus and the Sixth Army capture
Unit List Hot Spot Fixed
 Getting Started This file contains instructions on how to get started with the Fulda Gap 85 software. If it is not already running, you should run the Main Program by clicking on the Main Program entry
Field of Glory - Napoleonic Quick Start Rules
 Field of Glory - Napoleonic Quick Start Rules Welcome to today s training mission. This exercise is designed to familiarize you with the basics of the Field if Glory Napoleonic rules and to give you experience
Copyright 2013, Compass Games, LLC., All Rights Reserved
 OPERATION SKORPION - ROMMEL S FIRST STRIKE - Copyright 2013, Compass Games, LLC., All Rights Reserved TABLE OF CONTENTS 1.0 INTRODUCTION 2.0 GAME EQUIPMENT 3.0 PREPARE FOR PLAY 4.0 SEQUENCE OF PLAY 5.0
Buck Rogers Battle For The 25 th Century 1. 4 Turn Phases Complete each phase in order Definitions
 Buck Rogers Battle For The 25 th Century 1 OBJECT 1) Control 15 Territorial Zones at the end of any turn 2) Control the last Leader on the board at any time 3) Convince everyone else to surrender 4) Control
J U LY N O V E M B E R,
 J U LY N O V E M B E R, 1 9 4 2 1. Introduction............................. 2 2. Contents................................ 2 3. Sequence of Play Outline................... 4 4. The Initial Phase.........................
ALAMO Thirteen Days of Glory A GAME BY FRANCK YEGHICHEYAN Translation: Roger Kaplan
 ALAMO Thirteen Days of Glory A GAME BY FRANCK YEGHICHEYAN Translation: Roger Kaplan Alamo is a solitaire game depicting the Sunday, March 6, 1836 climax of the thirteenday siege of the Alamo Mission that
The Tide At Sunrise. 1.0 Introduction. 2.0 Components
 Table of Contents The Tide At Sunrise... 2 1.0 Introduction... 2 2.0 Components... 2 2.1 Units... 2 2.2 Markers... 3 2.3 Game Map... 3 2.4 Game Scale... 3 3.0 Sequence of Play... 4 3.1 Detailed Sequence
Location cards. soldier attacks. HostiLe turn. additional information
 introduction Game Overview...2 Victory...2 Component Overview...2 Set-Up...6 BuiLding Your mission and team Mission Card...7 Objective Card...8 Soldiers Player Soldier Cards...9 Non-Player Soldier Cards...10
Range Example. CARDS Most Wanted The special rule for the Most Wanted objective card should read:
 Range Example FAQ Version 1.1.1 / Updated 7.24.2015 This document contains frequently asked questions, rule clarifications, and errata for Star Wars: Armada. All changes and additions made to this document
Introduction. Your Commanders gain Experience with every battle, but they also gain Stress. Each Week, you must decide how hard to push your men.
 Introduction...1 Sequence of Play...2 Campaign Set-Up...2 Start of Week...9 Pre-Combat...10 Combat...12 Post-Combat...16 End of Week...17 End of Campaign...19 Optional ules...19 Credits...19 Sample Game...20
Introduction to Combat and Ranged Attacks. Introduction. Anatomy of a Combat Unit
 Most units have two step strengths, with their CS (especially) and RAS somewhat reduced on their reduced strength side. Reduced infantry units may attempt to recover to full strength by using the Recovery
PROFILE. Jonathan Sherer 9/10/2015 1
 Jonathan Sherer 9/10/2015 1 PROFILE Each model in the game is represented by a profile. The profile is essentially a breakdown of the model s abilities and defines how the model functions in the game.
Down In Flames WWI 9/7/2005
 Down In Flames WWI 9/7/2005 Introduction Down In Flames - WWI depicts the fun and flavor of World War I aerial dogfighting. You get to fly the colorful and agile aircraft of WWI as you make history in
Gettysburg 77 Errata. 1 of 5 RULES CORRECTIONS. Advanced Union Order of Appearance
 RULES CORRECTIONS 1) p.1 Object of Game Culp s hill is U40 not U41. 2) p. 7 Combat Qualifications Rule 3 is (.see 5) not ( see 6) 3) p.8 Retreat rule 2. Change to read: If the retreating unit is adjacent
Operational Combat Series: YUNNAN
 Yunnan Operational Combat Series: YUNNAN 2.0 Japanese Special Rules 3.1a Schedule: The YEF receive the following reinforcements turns: Operational Combat Series Game Number 04-06 supplemental 2.1 Reinforcements
Table of Contents. GMT Games, LLC P.O. Box 1308, Hanford, CA
 RULE BOOK Table of Contents 1.0 Introduction... 2 2.0 Components and Terms... 2 3.0 Sequence of Play... 5 4.0 Movement... 5 5.0 Terrain... 5 6.0 Stacking... 7 7.0 Zone of Control... 7 8.0 Combat... 7 9.0
KAWAGUCHI S GAMBLE: EDSON S RIDGE
 KAWAGUCHI S GAMBLE: EDSON S RIDGE Table Of Contents 1.0 Introduction... 2 2.0 Object... 2 3.0 The Map... 2 3.1 Scale...2 3.2 Areas...2 Map Details...2 3.3 Zones...3 3.4 Turn Record Track...3 3.5 Ammo Track...3
SCENARIO SELECTION. Start Panzer Battles Kursk, if you haven t already and you will be taken to the File Selection Dialog.
 Page 1 Welcome to Panzer Battles: Kursk Southern Flank. On July 4, 1943, Germany launched its summer offensive with an initial aim of destroying the Soviet salient around Kursk. After a week of fighting,
THE LAST CRUSADE 1. Getting Started 2. The Cards 2.1 Terrain cards Supply Cost: Name: Historical information Text: Game effects:
 THE LAST CRUSADE The Last Crusade is a quick, yet realistic game of World War II combat, recreating the Allied campaign from the bocage of Normandy to the crossing of the Rhine and the capture of Germany's
TABLE OF CONTENTS. 1.0 INTRODUCTION 1.1 The Game 1.2 Equipment 1.3 Contacting Compass Games 1.4 Help HQ
 TABLE OF CONTENTS 1.0 INTRODUCTION 1.1 The Game 1.2 Equipment 1.3 Contacting Compass Games 1.4 Help HQ 2.0 GAME COMPONENTS 2.1 Map 2.2 Counters 2.3 Player Aid Cards 2.4 Rules 2.5 Game Scale 3.0 SCENARIOS,
BATTLEFIELD TERRAIN STC RYZA-PATTERN RUINS
 BATTLEFIELD TERRAIN In this section you will find expanded terrain rules for the STC Ryza-pattern Ruins included in Moon Base Klaisus. You do not need to use these rules to enjoy a battle using the models,
Game Components - Sheets
 Game Components...2 Campaign Set-Up...12 Sequence of Play...17 Pre-Flight...18 Target-Bound...20 Over-Target...22 Dogfighting...24 Air to Ground Attacks...28 Home-Bound...31 Debriefing...32 Aces Expansion
Free Shipping for all USA orders!
 Free Shipping for all USA orders! The Game Board The game board shows New York City and surrounding land and water areas. Locations are on land areas. Game units are placed on locations during game play.
Struggle of Empires Game design by Martin Wallace. Artwork by Peter Dennis.
 Struggle of Empires Game design by Martin Wallace. Artwork by Peter Dennis. Overview Struggle of Empires recreates the military, economic, and political rivalries of the major European powers of the eighteenth
Infantry Square Formation for RFF Variants
 Playtest Version 3, 02/16/11 Infantry Square Formation for RFF Variants Infantry can reduce their risk from a cavalry charge by changing formation into a square. During the American Civil War, squares
Stargrunt II Campaign Rules v0.2
 1. Introduction Stargrunt II Campaign Rules v0.2 This document is a set of company level campaign rules for Stargrunt II. The intention is to provide players with the ability to lead their forces throughout