Fabric Replacement Top Without Upper Doors
|
|
|
- Cody Phelps
- 5 years ago
- Views:
Transcription


1 Fabric Replacement Top Without Upper Doors Installation Guidelines For: Jeep Wrangler JK 2-Door & 4-Door!!STOP!! Before proceeding make sure the top is the correct item for the vehicle you are installing it on. DO NOT INSTALL THIS ITEM ON ANY VEHICLE OTHER THAN ONE LISTED ABOVE It is normal for the top to be somewhat wrinkled when you remove it from the box. Additionally the material may have contracted, depending on at what temperature it has been stored. It is highly recommended that you remove the top from the box; lay it out flat at a temperature above 72F and let it relax for at least 24 hours. As well the installation should be done only in an environment where the air temp is above 72F. To avoid improper installation of this item it is imperative that you read and follow these guidelines completely. Failure to install this top correctly may result in a dangerous situation for the vehicle occupants as well as other motorists. SIERRA OFFROAD TAKES NO RESPONSIBILITY FOR THE ACCURACY OR COMPLETENESS OF THESE INSTALLATION GUIDELINES. THEY ARE PROVIDED ONLY FOR INFORMATION PURPOSES. IT IS THE SOLE RESPONSIBILITY OF THE INSTALLER TO ENSURE THAT THE INSTALLTION HAS BEEN PERFORMED CORRECTLY, THERE ARE NO LOOSE OR MISSING PARTS AND THE VEHICLE HAS BEEN ROAD TESTED AFTER INSTALLATION OF THE REPLACEMENT TOP AND DEEMED SAFE TO OPERATE. PARTS LIST Fabric Top Qty 1 Drivers Quarter Window Qty 1 Passenger Quarter Window Qty 1 Rear Window Qty 1 TOOLS REQUIRED Phillips Screwdriver Needle Nose Plier Awl for aligning / piercing THIS REPLACEMENT TOP IS INTENDED TO BE FIT OVER THE FACTORY ORIGINAL HARDWARE AND FRAME. IF THE FRAME IS DAMAGED OR MISSING PARTS DO NOT ATTEMPT THIS INSTALLATION BEFORE REPAIRS ARE MADE TO THE VEHICLE. It is important to read the complete instruction guideline manual BEFORE beginning the installation of your new replacement top. This will familiarize you with all aspects of the installation and help to avoid mistakes. It will be helpful if you keep this guideline manual for future reference. SIERRA OFFROAD FACTORY REPLACEMENT JEEP SOFT TOPS


2 REMOVING EXISTING TOP Unzip and remove left and right rear quarter windows from vehicle. NOTE: As you are removing items, save all screws and hardware to reuse on the new top. 1 Remove existing rear windows Release the two header Top latches to ease pressure from detaching the rear base corder retainers from vehicle. 2 Release header top latches 2 Sierra Offroad


3 Detach the rear base corner retainers from vehicle. Detach the Rear Corner Retainers 3 Completely unzip rear window. Unzip the Rear Window 4 Revision a.1 3


4 Slide out the lower support rail from the rear window to reuse in replacmenet Top. 5 Slide out lower support rail Starting from the rear crossbow, use a Phillips screwdriver to remove four (4) screws from both rear and third crossbows and five screws from second crossbow to release Top from frame. (Showing 4-door model. 2-door model will NOT have a third (3rd) crossbow) 6 Remove screws at rear upper crossbows 4 Sierra Offroad

5 Starting from the rear crossbow, use a Phillips screwdriver to remove four (4) screws from both rear and third crossbows and five screws from second crossbow to release Top from frame. Remove screws at rear upper crossbows 7 Starting from the rear crossbow, use a Phillips screwdriver to remove four (4) screws from both rear and third crossbows and five screws from second crossbow to release Top from frame.v Remove screws at rear upper crossbows 8 Revision a.1 5

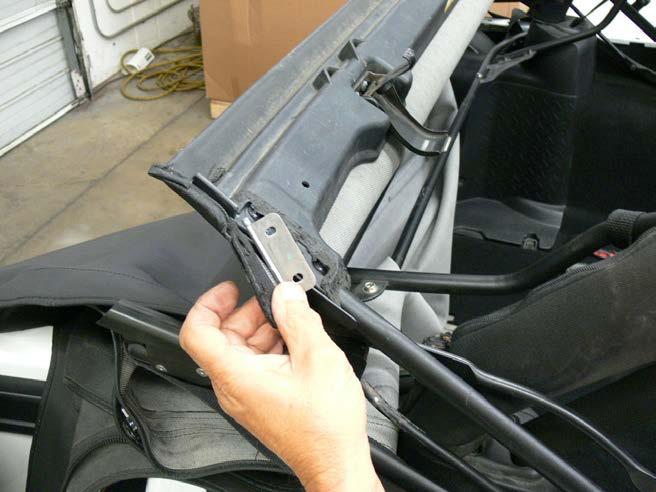
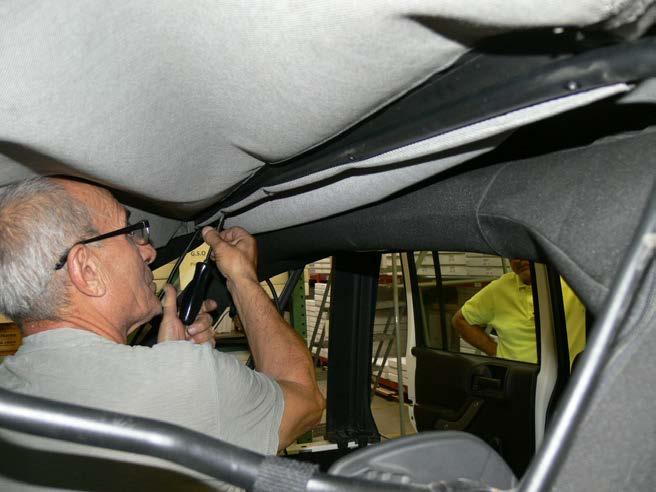
6 Cycle frame to open position and remove the two corner inner header Phiilips screws to release the side support cable brackets from Top frame. 9 Remove corner inner screws Cycle frame to open position and remove the two corner inner header Phiilips screws to release the side support cable brackets from Top frame. 10 Release side support cable brackets 6 Sierra Offroad

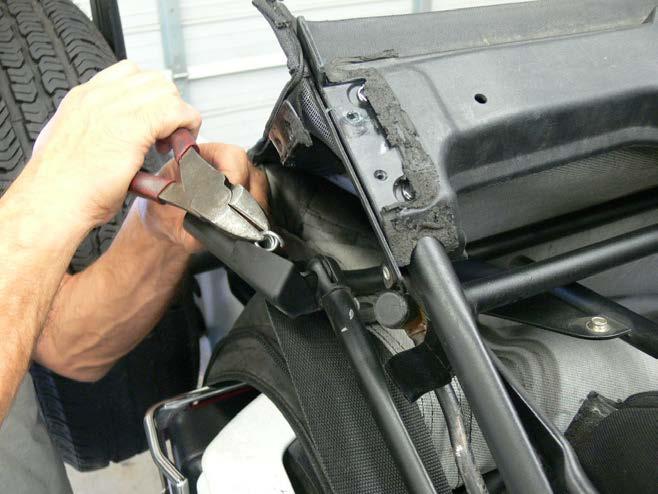
7 Locate the rear side rubber housings where the spring end support cables are protectant in, carefully using a needle nose plier unhook the springs from the Top frame. Locate the rear rubber housings 11 Locate the rear side rubber housings where the spring end support cables are protectant in, carefully using a needle nose plier unhook the springs from the Top frame. Unhook springs from Top frame 12 Revision a.1 7


8 Remove the four (4) inner / outer end header Phillips screws and slide out the header panel and top from frame. 13 Remove four header screws Remove the four (4) inner / outer end header Phillips screws and slide out the header panel and top from frame. 14 Remove four header screws 8 Sierra Offroad

 Phillips screws to separate the two part header panel.")
9 Remove the four (4) inner / outer end header Phillips screws and slide out the header panel and top from frame. Slide out header panel and top from frame 15 On workbench remove the twenty-seven (27) Phillips screws to separate the two part header panel. Revmoe 27 screws to separate header panel 16 Revision a.1 9


10 Carefully remove the five (5) masking tape strips off the Top to release from header panel. 17 Carefully remove masking tape strips Sierra Offroad
11 THIS IS THE END OF THE TOP REMOVAL SECTION THE FOLLOWING PAGES ARE STEPS TO INSTALL YOUR NEW TOP
")
 black masking tape")
12 INSTALLING REPLACEMENT TOP Place the new replacement Top s front leading edge into the header panel and make sure to position the both center marks (Top and header panel) together. 1 Put new Top into header panel Carefully reattached the five (5) black masking tape strips to new replacement top. 2 Reattach black masking tape strips 12 Sierra Offroad
 phillips screws.")

13 Secure the opposite side header panel with the twenty-seven (27) phillips screws. Secure Top to header panel with screws 3 Flip over the header panel and carefully insert the front corners into Top. Insert front corners into Top 4 Revision a.1 13


14 Place the replacement Top upside-down over the retracted fame and carefully one side at a time, slide in the header panel into frame. 5 Slide header panel into frame First use the Awl tool to align the header panel and the frame screw holes together. 6 Use Awl tool to align header panel 14 Sierra Offroad

 Phillips screws.")
15 Use the two (2) Phillip screws to secure header panel to frame. Secure header panel to frame 7 Place the front corner plastic retainer and the side cable brackets onto header, use Awl tool to align and secure with the two (2) Phillips screws. Secure Top to frame 8 Revision a.1 15
 Phillips screws.")

16 Place the front corner plastic retainer and the side cable brackets onto header, use Awl tool to align and secure with the two (2) Phillips screws. 9 Front corner plastic retainer Place the front corner plastic retainer and the side cable brackets onto header, use Awl tool to align and secure with the two (2) Phillips screws. 10 Use Awl tool to align screw holes 16 Sierra Offroad
 Phillips screws.")

17 Place the front corner plastic retainer and the side cable brackets onto header, use Awl tool to align and secure with the two (2) Phillips screws. Secure with two Phillips screws 12 Insert the side support cable end springs into its housing and using a needle nose plier hook the springs into frame. Insert side support cable end springs 13 Revision a.1 17
 crossbow, align frame and Top center marks together, pierce the listing support flap and secure with the five (5)")
 crossbow) 15 Pierce support flap 18 Sierra Offroad")
18 Cycle frame to close position (do not latch header). Starting from the front second (2nd) crossbow, align frame and Top center marks together, pierce the listing support flap and secure with the five (5) Phillips screws. 14 Cycle frame to close position. Do not latch. Cycle frame to close position (do not latch header). Starting from the front second (2nd) crossbow, align frame and Top center marks together, pierce the listing support flap and secure with the five (5) Phillips screws. (Showing 4-door model. 2-door model will NOT have a third (3rd) crossbow) 15 Pierce support flap 18 Sierra Offroad
 crossbow, align frame and Top center marks together, pierce the listing support")
 crossbow, align the center mark on Top between center")
19 Cycle frame to close position (do not latch header). Starting from the front second (2nd) crossbow, align frame and Top center marks together, pierce the listing support flap and secure with the five (5) Phillips screws. Secure with 4 Phillips screws 16 Continuing back to third (3rd) crossbow, align the center mark on Top between center crossbow screw holes, pierce the listing support flap and secure with the four (4) Phillips screws. Align center mark on Top 17 Revision a.1 19
 Phillips screws.")
20 Continuing back to third (3rd) crossbow, align the center mark on Top between center crossbow screw holes, pierce the listing support flap and secure with the four (4) Phillips screws. 18 Pierce the listing support flap Continuing back to third (3rd) crossbow, align the center mark on Top between center crossbow screw holes, pierce the listing support flap and secure with the four (4) Phillips screws. 19 Secure with four Phillips screws 20 Sierra Offroad


21 Secure the two (2) header Top latches first. With additional assistance, force down the rear bow to help tuck-in the Tops both rear lower corner retainers into vehicle. Secure two header Top latches 20 Secure the two (2) header Top latches first. With additional assistance, force down the rear bow to help tuck-in the Tops both rear lower corner retainers into vehicle. Force down rear bow to tuck in reatainers 21 Revision a.1 21


22 Use the Awl tool first to pierce (center) the rear bow support tabs then use four (4) Phillips screws to secure support tabs to rear crossbow. 22 Center the rear bow support tabs Use the Awl tool first to pierce (center) the rear bow support tabs then use four (4) Phillips screws to secure support tabs to rear crossbow. 23 Pierce the tabs and secure with screws 22 Sierra Offroad


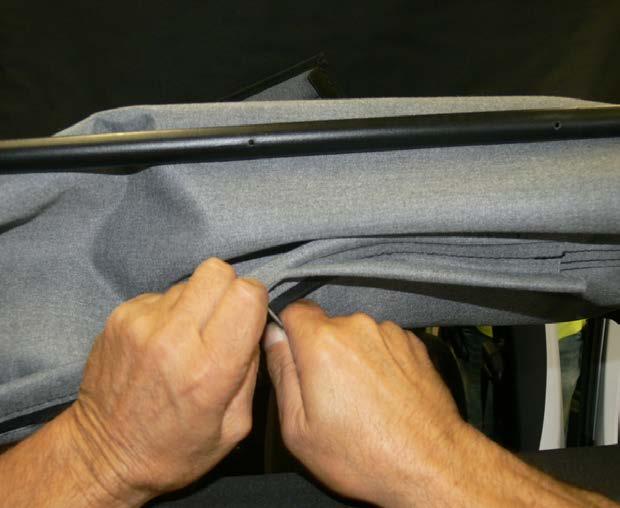
23 Carefully slide-in the rear window section into the base support rail and Start to zip-in the rear window to Top. Slide window section into base support rail 25 Carefully slide-in the rear window section into the base support rail and Start to zip-in the rear window to Top. Zip in the rear window 26 Revision a.1 23

24 Install L/R side windows by tucking-in the retainer attachments to vehicle and zipping the windows to Topv 18 Install the rear side windows CARE AND MAINTENANCE OF YOUR NEW TOP DO: DON T: Wash vinyl fabric using a mild soap and a soft brush. Rinse thoroughly to remove all soap residue Lubricate the zipper slides regularly using a dry graphite powder Wash windows with a soft cloth soaked in lukewarm water. A mild dishwashing soap may be added Use a brush or squeegee to clean the windows Clean snow or frost from the windows using a scraper Roll up the side or rear windows when the temperature is below 60F If a zipper opens behind the slider, the slider jaws may have been spread apart. This problem can usually be repaired by using a pair of pliers to bring the sides of the jaws back into parallel. Return slider to the end of the zipper in the normal Open position. Using pliers gently squeeze the jaws of the slider together until they are parallel. Try closing the zipper. If zipper remains open squeeze more firmly with pliers and try zipper again. 24 Sierra Offroad
Sailcloth Fabric Replacement Top and Doors Installation Instructions
 Sailcloth Fabric Replacement Top and Doors Installation Instructions For: Wrangler/TJ 1997-2002 Part Number: 79121 This product is only designed for the vehicles listed above. DO NOT INSTALL THIS PRODUCT
Sailcloth Fabric Replacement Top and Doors with Tinted Side and Rear Curtains Installation Instructions
 Sailcloth Fabric Replacement Top and Doors with Tinted Side and Rear Curtains Installation Instructions TM For: Wrangler / TJ 2003 - Current Part Number: 79129 Inc. This product is only designed for the
Fabric Replacement Top and Doors
 Fabric Replacement Top and Doors Installation Instructions For: Wrangler/TJ 1997 and Newer Part Number: 51131 WARNING This product is designed to enhance the appearance of the vehicle and to shield the
Replay Top with Tinted Side and Rear Windows Installation Instructions For: Jeep Wrangler (TJ) Part Number: 51141
 Part Number: 51141") Replay Top with Tinted Side and Rear Windows Installation Instructions For: Jeep Wrangler (TJ) 2003 2006 Part Number: 51141 Table of Contents FABRIC REPLACEMENT TOP PARTS LIST... PAGE 2 FABRIC REPLACEMENT
Replay Top with Tinted Side and Rear Windows Installation Instructions For: Jeep Wrangler (TJ) 2003 2006 Part Number: 51141 Table of Contents FABRIC REPLACEMENT TOP PARTS LIST... PAGE 2 FABRIC REPLACEMENT
Installation Instructions Sailcloth Replace-a-top
 Installation Instructions Sailcloth Replace-a-top Upper Door Skins Not Included Vehicle Application Jeep Wrangler TJ 2003-2006 Tinted Glass Windows Part Number: 79141 www.bestop.com - We re here to help!
Half Door Installation Instructions
 Half Door Installation Instructions For: CJ7, CJ8/Scrambler and Wrangler/YJ Part Number: 53028 Note: Wrangler/YJ Use of this product may not allow use of factory side mirrors. Note: Wrangler/YJ Use of
Half Door Installation Instructions
 Half Door Installation Instructions For: CJ5 (1955-1975), CJ6 (All), M38-A1 (1955-1971) Part Number: 53025 WARNING This product is designed primarily to enhance the appearance of the vehicle and to shield
Replay Top w/ Tinted Side and Rear Windows and Upper Door Skins Installation Instructions For: Jeep Wrangler (TJ) Part Number: 51197
 Part Number: 51197") Replay Top w/ Tinted Side and Rear Windows and Upper Door Skins Installation Instructions For: Jeep Wrangler (TJ) 1997 2002 Part Number: 51197 Table of Contents FABRIC REPLACEMENT TOP PARTS LIST... PAGE
Replay Top w/ Tinted Side and Rear Windows and Upper Door Skins Installation Instructions For: Jeep Wrangler (TJ) 1997 2002 Part Number: 51197 Table of Contents FABRIC REPLACEMENT TOP PARTS LIST... PAGE
Installation Instructions Fabric Replacement Top Upper Door Skins Not Included
 Installation Instructions Fabric Replacement Top Upper Door Skins Not Included Vehicle Application Jeep Wrangler TJ 1997 and 2002 Clear Glass Windows Part Number: 51127 Jeep Wrangler TJ 1997 and 2002 Tinted
Installation Instructions Supertop with Tinted Side and Rear Windows
 Installation Instructions Supertop with Tinted Side and Rear Windows Vehicle Application Jeep Wrangler (JK) 2007 Current Part Number: 54716 www.bestop.com - We re here to help! Visit our web site and click
Stop! Read This Important Information.
 Stop! Read This Important Information. Stop, Do Not Proceed, Read This This door replacement kit is designed for the replacement of doors on a Supertop ONLY! This door will not work on any other style
4-Door EXO-Top Roof Rack System
 Page 1/31 4-Door EXO-Top Roof Rack System 13516.02! WARNING The EXO-Top Roof Rack System is rated to a dynamic 300 lb, evenly distributed load. Further loading could result in serious injury or death.
Installation Instructions Trektop NX
 Installation Instructions Trektop NX Vehicle Application: Jeep Wrangler Unlimited TJD 2004 2006 Part Number: 56821 www.bestop.com - We re here to help! Visit our web site and click on Ask a Question. Click
2-Door EXO-Top Roof Rack System
 Page 1/29 Part 13516.01 2-Door EXO-Top Roof Rack System! WARNING The EXO-Top Roof Rack System is rated to a dynamic 300 lb, evenly distributed load. Further loading could result in serious injury or death.
Half Door Installation Instructions
 Half Door Installation Instructions For: CJ5 (1955-1975), CJ6 (All), M38-A1 (1955-1971) Part Number: 53025 Congratulations on your purchasing decision. Bestop designed these Doors to give you years of
Installation Instructions Supertop with Tinted Windows
 Installation Instructions Supertop with Tinted Windows Vehicle Application: Ford Bronco 1966 1977 Part Number: 51533 www.bestop.com - We re here to help! Visit our web site and click on Ask a Question.
Installation Instructions PREMIUM Replacement Top (Part # )
") 0 7-0 9 U n l i m i t e d ( 4 D o o r ) NOTE: Read entire instructions thoroughly before installing this product. It is recommended to install this Top when temperatures are above 70 degrees. The top can
0 7-0 9 U n l i m i t e d ( 4 D o o r ) NOTE: Read entire instructions thoroughly before installing this product. It is recommended to install this Top when temperatures are above 70 degrees. The top can
RAMPAGE P R O D U C T S. INSTALLATION INSTRUCTIONS BRONCO ZIPPER FASTRACK TOP PART #984xx BRONCO TOOLS REQUIRED
 RAMPAGE P R O D U C T S 84 (+/- 1/4 ) INSTALLATION INSTRUCTIONS BRONCO ZIPPER FASTRACK TOP PART #984xx BRONCO 1966-1977 TOOLS REQUIRED 3/8 WRENCH 7/16 WRENCH ½ WRENCH #2 PHILLIPS SCREWDRIVER 1/8 DRILL
Installation Instructions Replacement Top (Part # ) Unlimited (4 Door) Replacement Top (Part # ) JK (2 Door)
 Unlimited (4 Door) Replacement Top (Part # ) JK (2 Door)") NOTE: Read entire instructions thoroughly before installing this product. It is recommended to install this Top when temperatures are above 70 degrees. The top can contract and stretch an inch or more.
NOTE: Read entire instructions thoroughly before installing this product. It is recommended to install this Top when temperatures are above 70 degrees. The top can contract and stretch an inch or more.
Installation Instructions Supertop Kit includes 2-Piece Soft Doors
 Installation Instructions Supertop Kit includes 2-Piece Soft Doors Vehicle Application Jeep CJ5 1955 1975 Part Number: 51595 Jeep M-38A1 1951 1962 Part Number: 51595 www.bestop.com - We re here to help!
Installation Instructions and Owner's Manual. Model: CJ3A, and M38, Part Number 51403
 by Installation Instructions and Owner's Manual Model: CJ3A, 1949-1953 and M38, 1950-1951 Part Number 51403 Congratulations on your purchasing decision. Bestop designed this Convertible Top to give you
Installation Instructions Yamaha Rhino Soft Cab Enclosure
 Installation Instructions Yamaha Rhino Soft Cab Enclosure Vehicle Application Yamaha Rhino 2008 Current Part Number: 20301 www.bestoputv.com - We re here to help! Visit our web site and click on Ask a
Installation Instructions Tigertop
 Installation Instructions Tigertop Vehicle Application Jeep CJ2A 1946 1948 Part Number: 51402 Jeep MB 1941 1945 Part Number: 51402 www.bestop.com - We re here to help! Visit our web site and click on Ask
Installation Instructions Tigertop
 Installation Instructions Tigertop Vehicle Application Jeep CJ5 1976 1983 Part Number: 51407 www.bestop.com - We re here to help! Visit our web site and click on Ask a Question. Click here for more Jeep
INSTALLATION INSTRUCTIONS JEEP SCRAMBLER FAST TRAC TOP PART #108-21X
 INSTALLATION INSTRUCTIONS JEEP SCRAMBLER FAST TRAC TOP PART #108-21X Thank you for purchasing Specialty s Convertible Top for your Jeep vehicle. It has been designed for great fit and long wear. Please
Installation Instructions Factory Style Bow Kit
 INSTALLATION TIME Installation Instructions Factory Style Bow Kit SKILL LEVEL Vehicle Application: Jeep Wrangler JK 2 Door 2007 Current Part Number: 55000 Compatible with original equipment soft tops,
RAMPAGE P R O D U C T S. BRONCO ZIPPER FASTRACK TOP PART #984xx BRONCO TOOLS REQUIRED
 RAMPAGE P R O D U C T S 84 (+/- 1/4 ) BRONCO ZIPPER FASTRACK TOP PART #984xx BRONCO 1966-1977 TOOLS REQUIRED 3/8 WRENCH 7/16 WRENCH ½ WRENCH #2 PHILLIPS SCREWDRIVER 1/8 DRILL BIT 9/64 DRILL BIT 5/32 DRILL
INSTALLATION INSTRUCTIONS
 INSTALLATION INSTRUCTIONS BRONCO FAST TRAC TOP PART #331-210 BRONCO 1966-1977 Thank you for purchasing Specialty s Convertible Top for your Bronco. It has been designed for great fit and long wear. Please
Rugged Ridge Body Armor Guard Kit, 5 Pieces, Black (07-Current JK 4-door)
") Rugged Ridge Body Armor Guard Kit, 5 Pieces, Black (07-Current JK 4-door) Installation Time: 60 Minutes Tools Required: Notes: Phillips head screwdriver 3/8 socket or Flat head screwdriver 1/2 socket 7
Rugged Ridge Body Armor Guard Kit, 5 Pieces, Black (07-Current JK 4-door) Installation Time: 60 Minutes Tools Required: Notes: Phillips head screwdriver 3/8 socket or Flat head screwdriver 1/2 socket 7
Be sure any accessory used will fit with the soft upper doors before installing. Not all accessories will be compatible.
 Company Name: Spike Power Sports Vehicle Name: Polaris General 2P Product Description: Soft Upper Doors Part Number: 58-1600 Revision: R01 09/19/2018 Contents: 655 Elm Ridge Ave, Canal Fulton OH, 44614
SPECIALTY TOP CO. STC
 STC SPECIALTY TOP CO. INSTALLATION INSTRUCTIONS BRONCO 1980-1991 PART #334-31X Thank you for purchasing Specialty's Convertible Top for your Bronco. It has been designed for great fit and long wear. Please
INSTALLATION INSTRUCTIONS CJ-5 M38A PART # With Doors
 INSTALLATION INSTRUCTIONS CJ-5 M38A1 1955-1975 PART #109-011 With Doors Thank you for purchasing Specialty s Convertible Top for your Jeep vehicle. It has been designed for great fit and long wear. Please
BMW Z3/M Roadster
 Convertible Top Installation Guide 1996-2002 BMW Z3/M Roadster What s Included A new convertible top includes sewn-in plastic retainers and tinted plastic window. Also, we enclose new BMW original metal
INSTALLATION INSTRUCTIONS Scout II - Fast Trac PART #
 INSTALLATION INSTRUCTIONS Scout II - Fast Trac PART #442-210 Thank you for purchasing Specialty s Convertible Top for your Scout vehicle. It has been designed for great fit and long wear. Please read and
Trackstar Manual Folding Shade Installation Instructions
 Trackstar Manual Folding Shade Installation Instructions Tracklock or Cord and Pulley Lifting System Thank you for purchasing your new Trackstar folding shade. It has been custom-made from the highest
Before beginning refer to page 4 to assure that all parts are included in your kit. Refer to diagrams for help when installing top and hardware.
 INSTALLATION INSTRUCTIONS BRONCO 1980-1994 PART #98501 RAMPAGE P R O D U C T S Thank you for purchasing Rampage Products Top for your Bronco. Please read and follow, precisely, all installation instructions
INSTALLATION INSTRUCTIONS Super Scout PART #
 INSTALLATION INSTRUCTIONS Super Scout 71-80 PART #443-010 Thank you for purchasing Specialty s Convertible Top for your Scout vehicle. It has been designed for great fit and long wear. Please read and
Bushwacker Jeep Flat Style Fender Flares Rear Pair (JK Wrangler 2dr)
") Bushwacker Jeep Flat Style Fender Flares Rear Pair (JK Wrangler 2dr) Note: These instructions involve cutting parts of your vehicle. Please read all instructions prior to starting. Installation Time: 3-4
Bushwacker Jeep Flat Style Fender Flares Rear Pair (JK Wrangler 2dr) Note: These instructions involve cutting parts of your vehicle. Please read all instructions prior to starting. Installation Time: 3-4
INSTALLATION INSTRUCTIONS
 TEL:1-866-XANATOS INSTALLATION INSTRUCTIONS FOR 07-13 CHEVY SILVERADO 1500 PART#RU-CHSI07-B PARTS LIST: 1 Main Body 28 12mm x 37mm OD x 3mm Large Flat Washers 1 Driver/Left Brush Guard 8 12-1.75mm x 40mm
Fabric Replacement Soft Top
 Fabric Replacement Soft Top Installation Manual for 97-06 Wrangler # 11000.2XXX Loss of vehicle control involves risk of death or serious injury, particularly to parts of your body not restrained within
tile redi redi DOOR Redi Redi Swing Slide g TM TM...Opening Doors to Stunning Showers! TM TM SERIES: CONFIGURATION: MOUNTING PACKAGE:
 redi DOOR INSTALLATION INSTRUCTIONS tile redi Redi Redi Swing Slide g TM TM...Opening Doors to Stunning Showers! TM TM SERIES: CONFIGURATION: MOUNTING PACKAGE: 1100 Door-Door Framed sliding doors RDQCI5023
2015 GMC Yukon. Upper Class Grille Insert
 Upper Class Grille Insert TOOLS REQUIRED: Flat Head Screwdriver Long Flat Head Screwdriver Phillips Screwdriver 7mm Socket 10mm Socket Ratchet & Extensions 3/16 Drill Bit Power Drill Cutting Wheel or Saw
SHOWER ENCLOSURE INSTALLATION
 T F e34 x 46 s a QUATRA LUX 32 x 46 / ele A R r r fo SHOWER ENCLOSURE INSTALLATION I NSTRUCTIONS d e D v o r p IMPORTANT DreamLine reserves the right to alter, modify or redesign products at any time without
JEEP JK ( 5 DOOR ) SLIMLINE II - FULL TRAY EXTREME RACK KIT
 SLIMLINE II - FULL TRAY EXTREME RACK KIT") JEEP JK ( 5 DOOR ) SLIMLINE II - FULL TRAY EXTREME RACK KIT FAJK001 / KRJW014T INSTALL TIME: 2.5 Hours NOTE: Your Jeep JK (5 Door) Extreme Roof Rack Kit consists of four boxes. (1) the Tray, (2) the Roll
JEEP JK ( 5 DOOR ) SLIMLINE II - FULL TRAY EXTREME RACK KIT FAJK001 / KRJW014T INSTALL TIME: 2.5 Hours NOTE: Your Jeep JK (5 Door) Extreme Roof Rack Kit consists of four boxes. (1) the Tray, (2) the Roll
JEEP JK ( 3 DOOR ) SLIMLINE II - FULL TRAY EXTREME RACK KIT
 SLIMLINE II - FULL TRAY EXTREME RACK KIT") JEEP JK ( 3 DOOR ) SLIMLINE II - FULL TRAY EXTREME RACK KIT FAJK004 / KRJW016T INSTALL TIME: 2 Hours NOTE: Your Jeep JK (3 Door) Extreme Roof Rack Kit consists of four boxes. (1) the Tray, (2) the Roll
JEEP JK ( 3 DOOR ) SLIMLINE II - FULL TRAY EXTREME RACK KIT FAJK004 / KRJW016T INSTALL TIME: 2 Hours NOTE: Your Jeep JK (3 Door) Extreme Roof Rack Kit consists of four boxes. (1) the Tray, (2) the Roll
======================================================================================== ( DR / DR) JK WRANGLER MOD RACK
 JK WRANGLER MOD RACK") (10984 4DR / 10982 2DR) JK WRANGLER MOD RACK INSTALLATION SHEET Important Notes: Some brands of windshield light brackets and snorkels may not be compatible with the 10984 MOD Rack System. Body lifts are
(10984 4DR / 10982 2DR) JK WRANGLER MOD RACK INSTALLATION SHEET Important Notes: Some brands of windshield light brackets and snorkels may not be compatible with the 10984 MOD Rack System. Body lifts are
INSTALLATION MANUAL FRONT. See pages 2 and 3 of this manual for configuration options. Level of Difficulty. Product Photo (center section only)
") INSTALLATION MANUAL FRONT Level of Difficulty Moderate Product Photo (center section only) All hardware listed below will be provided with the bumpers center section. Additional hardware will be supplied
INSTALLATION MANUAL FRONT Level of Difficulty Moderate Product Photo (center section only) All hardware listed below will be provided with the bumpers center section. Additional hardware will be supplied
tile redi redi DOOR Redi Redi Swing Slide g TM TM...Opening Doors to Stunning Showers! TM TM SERIES: CONFIGURATION: MOUNTING PACKAGE:
 redi DOOR INSTALLATION INSTRUCTIONS tile redi Redi Redi Swing Slide g TM TM...Opening Doors to Stunning Showers! TM TM SERIES: CONFIGURATION: MOUNTING PACKAGE: 3000 Door-Door Header, sliding doors RDQCI5301
Simply lift up on the flexible cover to remove it from the radiator support panel and factory grille, exposing the upper mounting hardware.
 2 Simply lift up on the flexible cover to remove it from the radiator support panel and factory grille, exposing the upper mounting hardware. Apply masking tape to the top of the bumper cover underneath
Installation Instructions Hard Top Part # ,517701
 Please read instructions entirely before installing this product. This accessory is designed and manufactured primarily to augment the vehicles appearance and to protect the occupants from normal weather
International Scout II
 International Scout II Tools needed: 9/64 drill bit 1/8 drill bit #2 Philips bit for drill Tape measure Pencil Drill #3 Philips Screwdriver #2 Philips Screwdriver Utility knife Contents: 2 bedrails (2
CJ-7 YJ FRONT KITS: Preparation. BEDRUG, INC. n 635 Old Hickory Blvd, Old Hickory, TN n n bedrug.com
 CJ-7 YJ FRONT KITS: BRCYJ76F Jeep Wrangler CJ-7/YJ BedRug Interior Installation Instructions Congratulations on choosing the finest interior flooring kit available for your Jeep. The BedRug material is
Jeep Wrangler JK Door Rear Pair Part # Revision E
 Jeep Wrangler JK 2007 4-Door Rear Pair Part # 10044 Revision E 03-25-09 Step 1: Prior to Installation: A) Bushwacker only approves installing the flares according to these written instructions with the
INSTALLATION INSTRUCTIONS
 INSTALLATION INSTRUCTIONS SNYPER TUBULAR FENDERS APPLICATION: 2007-2017 Jeep Wrangler JK PART NUMBER: 62-1005, 62-1015 ITEM QUANTITY DESCRIPTION TOOLS NEEDED 1,2 2 FRONT FENDERS, DRIVER (1) AND PASSENGER
YJ Bow Assembly. Installation Instructions INSTALLATION TIME SKILL LEVEL TOOLS. Vehicle Application: Jeep Wrangler YJ Part Number: 55004
 Installation Instructions YJ Bow Assembly Vehicle Application: Jeep Wrangler YJ 1988 1995 Part Number: 55004 INSTALLATION TIME SKILL LEVEL 2 Hours 2 - Moderately Easy TOOLS 1/8" Bit 10' #2 #50, #45, #50
SERIES: CONFIGURATION: MOUNTING PACKAGE: 1200 Door-Door Frameless, sliding door
 SERIES: CONFIGURATION: MOUNTING PACKAGE: 1200 Door-Door Frameless, sliding door RDQCI5022 Rev.0 Page 1 Certified 06/01/2016 Tools: To install your New Shower Enclosure, you may need the following: Pencil
Jeep Wrangler JK & 4-Door Front Pair Part # Revision H
 Jeep Wrangler JK 2007 2 & 4-Door Front Pair Part # 10045 Revision H 03-25-09 Step 1: Prior to Installation: A) Bushwacker only approves installing the flares according to these written instructions with
300C6 CONTINUOUS HINGE SEMI-FRAMELESS DOOR KIT
 300C6 CONTINUOUS HINGE SEMI-FRAMELESS DOOR KIT LIMITED WARRANTY AND REMEDY Alumax Bath Enclosures warrants to its dealers, customers, and all subsequent purchasers and users, that the products supplied
738 SERIES PIVOT SHOWER DOOR
 INSTALLATION INSTRUCTIONS 738 SERIES PIVOT SHOWER DOOR Copyright Alumax Bath Enclosures 1997. All rights reserved. Page 1 of 8 LIMITED WARRANTY AND REMEDY Alumax Bath Enclosures warrants to its dealers,
STYLE BAR & TONNEAU COVER INSTALLATION
 STYLE BAR & TONNEAU COVER INSTALLATION INSTALLATION MANUAL: 2005 to '09 Mustang P/N: 10-8002-C12071B Saleen Performance, Inc. 1225 East Maple Rd., MI 48083 800-888-8945 www.saleen.com 1 IF YOU ARE NOT
INSTALLATION INSTRUCTIONS
 SG57f GENUINE PARTS INSTALLATION INSTRUCTIONS. DESCRIPTION: Sunroof Wind Deflector. APPLICATION: Pathfinder; Frontier with no roof rails 3. PART NUMBER: 999D4-XR00 4. KIT CONTENTS: Item No. ) ) 3) 4) 5)
INFINITY-Z SHOWER DOOR / TUB DOOR INSTALLATION INSTRUCTION. MODEL #s 01-Chrome
 INFINITY-Z SHOWER DOOR / TUB DOOR INSTALLATION INSTRUCTION IMPORTANT DreamLine reserves the right to alter, modify or redesign products at any time without prior notice. For the latest up-to-date technical
JEEP JK ( 3 DOOR ) SLIMLINE II - FULL TRAY EXTREME RACK KIT
 SLIMLINE II - FULL TRAY EXTREME RACK KIT") JEEP JK ( 3 DOOR ) SLIMLINE II - FULL TRAY EXTREME RACK KIT FAJK005 / KRJW016T INSTALL TIME: 5 Hours NOTE: Your Jeep JK (3 Door) Extreme Roof Rack Kit consists of four boxes. (1) the Tray, (2) the Roll
JEEP JK ( 3 DOOR ) SLIMLINE II - FULL TRAY EXTREME RACK KIT FAJK005 / KRJW016T INSTALL TIME: 5 Hours NOTE: Your Jeep JK (3 Door) Extreme Roof Rack Kit consists of four boxes. (1) the Tray, (2) the Roll
Bushwacker Jeep Flat Style Fender Flares Front Pair
 Bushwacker Jeep Flat Style Fender Flares Front Pair Note: These instructions involve cutting parts of your vehicle. Please read all instructions prior to starting. Installation Time: 3-4 Hours Tools Required:
Plastic Push. 5/16 Hex Head Bolt, 20 pcs. Retainer, 20 pcs. Female Bullet Connector, 4 pcs. Side Refl ex Refl ector, 2 pcs
 A) B) C) D) E) F) G) STEP 1 - PRIOR TO INSTALLATION Bushwacker only approves installing the fl ares according to these written instructions with the hardware provided. WARNING: Failure to install according
JEEP JK ( 5 DOOR ) SLIMLINE II - FULL TRAY EXTREME RACK KIT
 SLIMLINE II - FULL TRAY EXTREME RACK KIT") JEEP JK ( 5 DOOR ) SLIMLINE II - FULL TRAY EXTREME RACK KIT FAJK002 / KRJW014T INSTALL TIME: 5 Hours NOTE: Your Jeep JK (5 Door) Extreme Roof Rack Kit consists of four boxes. (1) the Tray, (2) the Roll
JEEP JK ( 5 DOOR ) SLIMLINE II - FULL TRAY EXTREME RACK KIT FAJK002 / KRJW014T INSTALL TIME: 5 Hours NOTE: Your Jeep JK (5 Door) Extreme Roof Rack Kit consists of four boxes. (1) the Tray, (2) the Roll
Canterbury 4 DRW CHEST
 Canterbury 4 DRW CHEST Assembly Instructions - Please save for future reference 553/4801 565/2178 572/6080 25 kg 55 lbs 9 kg 20 lbs max. Dimensions Width - 84.3cm Depth - 41.9cm Height - 99.7cm Important
EASY POOL STEP (NE113)
") EASY POOL STEP (NE113) FOR USE WITH: EASY POOL STEP (NE113) (1 CARTON) EASY POOL STEP WITH OUTSIDE LADDER (NE126) EASY POOL STEP ENTRY SYSTEM (NE138) (With Gate) (4 CARTONS) Above are the options available
EASY POOL STEP (NE113) FOR USE WITH: EASY POOL STEP (NE113) (1 CARTON) EASY POOL STEP WITH OUTSIDE LADDER (NE126) EASY POOL STEP ENTRY SYSTEM (NE138) (With Gate) (4 CARTONS) Above are the options available
UPPER DOOR KIT P/N
 UPPER DOOR KIT P/N 2879946 Application RZR XP4 1000 Before you begin, read these instructions twice and check to be sure all parts and tools are accounted for. Please retain these installation instructions
INSTALLATION INSTRUCTIONS
 INSTALLATION INSTRUCTIONS Accessory FABRIC REAR DOORS (5P) P/N 0SR90-HL4-211B (BLACK) P/N 0SR90-HL4-211C (CAMO) Application SXS1000M5P/M5D Honda Dealer: Please give a copy of these instructions to your
C70 Window Roller Repair Taken from: Heres the problem:
 C70 Window Roller Repair Taken from: http://www.volvospeed.com/vs_forum/topic/115086-how-to-c70-window-rollers-permanent-fix/ Heres the problem: This happened to two separate window assemblys on my c70
Flat Style Fender Flares Rear Pair. Jeep. Included in Hardware Kit:
 Jeep Flat Style Fender Flares Rear Pair STEP 1 PRIOR TO INSTALLATION A) Bushwacker only approves installing the fl ares according to these written instructions with the hardware provided. WARNING: Failure
INSTALLATION INSTRUCTIONS 3"/4 BENT END SIDEBARS FORD F-150 SUPERCREW PART # DZ /DZ
 INSTALLATION INSTRUCTIONS 09-12 FORD F-150 SUPERCREW PART # DZ 372697/DZ 372699 PARTS LIST: 1 Driver/Left Sidebar 4 1/2 Lock Washers 1 Sidebar 4 12mm x 32mm OD x 3mm Flat Washers 1 Driver/Left Mounting
5/16 Hex Head Bolt, 16 pcs. Plastic Push Retainer, 6 pcs. Alcohol Wipe, 2 pcs. Side Refl ex Reflector, 2 pcs
 STEP 1 PRIOR TO INSTALLATION A) Bushwacker only approves installing the fl ares according to these written instructions with the hardware provided. WARNING: Failure to install according to these instructions
TRANSIT 148 HIGH ROOF WALL LINERS INSTALLATION INSTRUCTIONS
 TRANSIT 148 HIGH ROOF WALL LINERS INSTALLATION INSTRUCTIONS NOTES: 1. Before commencing, remove all wall liners and D Rings already installed in the vehicle. 2. Consult layout PDF and compare vehicle layout
Assembly Instructions
 Unite Panel System Hinge Door July 2016 #12 x / slotted hex washer head bolt Figure 1 threshold bracket frame Detail F threshold bracket threshold bracket (installed) #12 x / slotted hex washer head bolt
UNIDOOR (STYLE B & C)
") UNIDOOR (STYLE B & C) SHOWER DOOR GLASS PANEL INSTALLATION INSTRUCTIONS IMPORTANT DreamLine TM reserves the right to alter, modify or redesign products at any time without prior notice. For the latest
UNIDOOR (STYLE B & C) SHOWER DOOR GLASS PANEL INSTALLATION INSTRUCTIONS IMPORTANT DreamLine TM reserves the right to alter, modify or redesign products at any time without prior notice. For the latest
INSTALLATION STEPS MAXIMUS-3.COM
 JK WRANGLER MAXIMUS-3 JK ROOF RACK/PLATFORM MAXIMUS-3 RHINO RACK ROOF PLATFORM/RACK IS NOT COMPATIBLE WITH JK 2-DOORS. THIS PRODUCT IS NOT DESIGNED TO WORK WITH JK SOFT TOP ROOF. INSTALLATION GUIDES Please
Convertable Binimi Top Assembly and Instruction Guide
 Convertable Binimi Top Assembly and Instruction Guide Taylor Made Convertible Bimini Top Assembly and Instruction Guide: This Kit contains the following components: If you are missing any of the listed
MODULAR BUMPER INSTALLATION MANUAL
 MODULAR BUMPER INSTALLATION MANUAL Parts List* 1 Center section 1 Side extension, passenger / right 1 Side extension, driver / left 1 Side cap, passenger / right 1 Side cap, driver / left 1 Brush guard,
WARNING: Prior to installation, turn the power off to the vending machine and unplug it from its power source. Also, make sure to level the machine.
 Installation of Gum and Mint Tray for National 147, 157, 167 Important Note: Please read all instructions thoroughly before continuing with installation of kit. If you are having problems installing the
Jeep. Flat Style Fender Flares Rear Pair. Included in Hardware Kit:
 Jeep Flat Style Fender Flares Rear Pair STEP 1 PRIOR TO INSTALLATION A) Bushwacker only approves installing the fl ares according to these written instructions with the hardware provided. WARNING: Failure
Installing A Carver Bimini Top
 Installing A Carver Bimini Top How To Prolong The Life Of Your Bimini Top Carver Bimini Tops are a classy way to protect yourself and your boat from the elements. They also add style and color to your
GENUINE PARTS INSTALLATION INSTRUCTIONS
 GENUINE PARTS INSTALLATION INSTRUCTIONS DESCRIPTION: APPLICATION: PART NUMBER: REAR SPOILER KIT - CARBON FIBER INFINITI Q60 T99J1 5CH0B KIT CONTENTS: Item Qty. Part Description A 1 Spoiler Assembly B 4
Installation Instructions Hard Top Part # , Wrangler 2 & 4 Door
 Please read instructions entirely before installing this product. This accessory is designed and manufactured primarily to augment the vehicles appearance and to protect the occupants from normal weather
INSTALLATION INSTRUCTIONS
 INSTALLATION INSTRUCTIONS Accessory WELL P/N 08P21-STX-200A Application 2011 MDX Publications No. BII 43668 Issue Date AUG 2010 PARTS LIST Left front fender trim Bracket A-L Left front bumper trim Bracket
LEGENDS RETRACTABLE DOOR SCREENS
 LEGENDS RETRACTABLE DOOR SCREENS MAGNETIC LATCHING DESIGN SYSTEM 42 I N S T A L L A T I O N I N S T R U C T I O N S 1 MOUNTING OPTIONS Recess : Mount the Screen Cassette using Recess Mounting Clips Recess
Installation instructions, accessories. Rails. Volvo Car Corporation Gothenburg, Sweden. Instruction No Version Part. No
 Instruction No Version Part. No. 8685942 1.0 Rails J8401014 Page 1 / 9 Equipment A0000162 A0000161 J8401006 Page 2 / 9 INTRODUCTION Read through all of the instructions before starting installation. Notifications
Hardware and Components:
 Hardware and Components: (A) 4X 5/16 x 1 Carriage Bolt (B) 2X 5/16 x 2-1/4 Carriage Bolt (C) 2X 5/16 x 3-1/4 Hex Bolt (D) 2X 5/16 x 3/4 Hex Bolt (E) 2X 5/16 x 1-1/4 Hex Bolt (F) 5/16 x 2-1/4 Hex Bolt (G)
NISSAN NV200 CHEVY CITY EXPRESS WALL LINER KIT INSTALLATION INSTRUCTIONS
 NISSAN NV200 CHEVY CITY EXPRESS WALL LINER KIT INSTALLATION INSTRUCTIONS NOTES: 1. Before commencing, remove all wall liners and D Rings already installed in the vehicle. 2. Consult layout PDF and compare
INSTALLATION INSTRUCTIONS 3000 SERIES STEP GUARD (CENTER GRILLE GUARD & BRUSH GUARDS) CHEVROLET SILVERADO 2500 & /4WD PART # 3168 (MB-MC)
 CHEVROLET SILVERADO 2500 & /4WD PART # 3168 (MB-MC)") INSTALLATION INSTRUCTIONS 3000 SERIES STEP GUARD (CENTER GRILLE GUARD & BRUSH GUARDS) CHEVROLET SILVERADO 2500 & 3500 2/4WD PART # 3168 (MB-MC) PACKING LIST 2 ¼ X ¾ BUTTON HEAD BOLTS 8 5/16 X 3/4 BUTTON
INSTALLATION INSTRUCTIONS 3000 SERIES STEP GUARD (CENTER GRILLE GUARD & BRUSH GUARDS) CHEVROLET SILVERADO 2500 & 3500 2/4WD PART # 3168 (MB-MC) PACKING LIST 2 ¼ X ¾ BUTTON HEAD BOLTS 8 5/16 X 3/4 BUTTON
Contractors Rack Assembly and Installation Instructions
 Part # 18601 & 16601 Contractors Rack Assembly and Installation Instructions 4751 Littlejohn St. Unit A, Baldwin Park, CA 91706 Page 1 of 12 11/13/08 Thank you for purchasing the Paramount Restyling Contractors
BMW X5 OEM RUNNING BOARD PART#SBBW
 INSTALLATION INSTRUCTIONS 2014-2016 BMW X5 OEM RUNNING BOARD PART#SBBW-146-74 QTY HARDWARE 1 Driver Side OEM Running Board 1 Passenger Side OEM Running Board 8 Rivet Pin 1 Page Step 1: Verify all parts
INSTALLATION AND CARE INSTRUCTIONS
 INSTALLATION AND CARE INSTRUCTIONS Skylight Manually Operated Honeycomb Shades 20 C8-10-1806 2/15 1 INTRODUCTION Thank you for purchasing our product. Your new shade has been custom built for you from
WARNING WARNING. CAUTION Indicates a hazard which, if not. NOTICE Indicates an instruc on which, if not
 Prior to installa on, please verify if a revised version of this instruc on sheet is available on Knowledge Center. The following symbols may be used in this document. WARNING Indicates a hazardous situa
INSTALLATION INSTRUCTIONS GRILLE GUARD RAM 1500 PART # 5058/5058-2
 INSTALLATION INSTRUCTIONS GRILLE GUARD PART # 5058/5058-2 PARTS LIST: Qty Description Qty Description 1 Grille Guard 8 12-1.75mm x 35mm Hex Bolts 2 Upper Frame Mounting s (for trucks without tow hooks
Quick Fit Installation Guide Retractable Screen - Double Door
 Quick Fit Installation Guide Retractable Screen - Double Door 1 REMOVE KIT PARTS FROM SHIPPING TUBE 2 Slide bolts 2 Rail receiver Clips 15 Mounting screws 1 Housing end cap screw 2 Handles 1 Housing end
INSTALLATION INSTRUCTIONS
 AUTOMOTIVE PRODUCTS, INSTALLATION INSTRUCTIONS ROCK SLIDERS APPLICATION: 2007-2017 Jeep Wrangler JK 2 Door PART NUMBER: 42-7005 ITEM QUANTITY DESCRIPTION TOOLS NEEDED 1,2 2 ROCK SLIDER ASSEMBLY, DRIVER
IMPORTANT! Recommended Tools. 7/16 Deep socket Phillips screwdriver
 IMPORTANT! Read all instructions carefully before commencing any work. Always wear proper safety equipment. Some installation steps will require two or more installers. Recommended Tools Ratchet 10-mm
WARNING Indicates a hazardous situation which, if not avoided, could result in death or serious injury. WARNING. Ranger XP Door Kit
 REVISION 04 November, 20 2018 Ranger XP Door Kit Prior to installation, please verify if a revised version of this instruction sheet is available on Knowledge Center. The following symbols may be used