LS2 Dry Sleeve Kit Installation Guide
|
|
|
- Rosalind Weaver
- 6 years ago
- Views:
Transcription


1 LS2 Dry Sleeve Kit Installation Guide

2 Thank you for purchasing the Darton state of the art new GM LS-2 Dry Sleeve Kit. The kit makes possible maximum bore sizes, increased cylinder strength and superior wear resistance. Darton wants to provide you with the best technical information we have available to ensure that your sleeved engine will perform to your expectations. Therefore, we have formulated a program of required procedures and components, which we believe will ensure operating success of your sleeved engine in whatever application it will see service in.
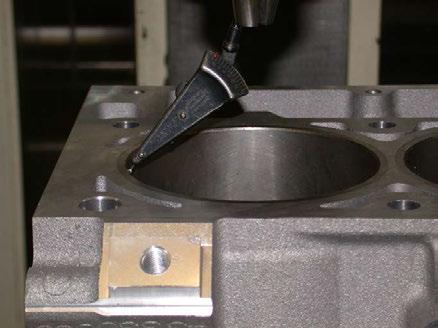
3 INSTALLATION PROCEDURES Revised LS2 Dry Sleeve Kit Installation Read and make sure you understand these instruction before proceeding with block machining. If you have questions concerning machining, assembly, proper tooling, machines, etc. Preparation, Fixturing: 1. The block needs to be fully stripped, cleaned and inspected before machining. Main web cracks, or structural damage will prevent satisfactory sleeve installation. 2. Brand new blocks must be vibratory stress relieved prior to block machining. Failure to do this will result in out of round cylinder bores after the engine is fired up. Setup and Block Machining: 1. With your block mounting fixture securely bolted to the CNC machine table, indicate the centerline of your block mounting bar in the Y axis direction. That will be your Y fixture or part offset depending on terminology used with your machine. You will only have to do this one time since this position will remain the same. The object is to correct for factory machining errors, block warpage. You want the dry liners installed directly over the crankshaft axis and not offset as would probably happen if you merely went off the existing cylinder centerline. Now set the block up on the CNC machine. The preferred method is with precision made mounting rings located in the front and rear main bearing bores and with the bell housing face securely bolted to a fixture plate. Rotate your fixture so the left (driver s side bank) is facing up. Indicate the rear deck surface of the block (by the bell housing) - photo 1. Rotate the block around the crank axis until you get close to zero run out across the deck from side to side. Lock your fixture when you are satisfied the block is true. Zero the degree wheel if so equipped. Note that most blocks will be warped front to back. This is why I recommend dialing in the deck surface at the rear of the block. Now indicate the X centerline of cylinder number one, (left bank first cylinder) - photo 2. The centerline position is your X fixture offset position. Enter the X and Y offsets in your machine s fixture or part offset table. 2. Clean the rust preventative from the sleeves using lacquer thinner. Measure the bottom diameter of each sleeve. Generally the diameters will be very close - within.001 in any one set. Measure the diameters at 90 degrees and average the result - photo 3. The lower sleeve diam-
4 eter specification is The block is bored.0015 to.0017 larger than the sleeve lower diameter. Do not attempt to install the sleeves if you can not hold this tolerance. The upper body diameter has a slight taper. Measure the diameter directly under the flange. This diameter specification is Again, the block will be bored.0015 to.0017 larger than your measured diameter. NOTES: 3. Touch off your tools on the deck surface at the front of the left bank either before you begin machining or as you are about to use them, whichever you prefer - photo 4. Set your tool length offsets into your machine s tool table. Machining depths are from the deck surface down. 4. Note that the bore center to center is 4.400, same as a small block Chevy. You need to keep this centerline dimension to Note that in order to maintain the required tolerances it is highly advisable you use a machine with flood coolant. It will be impossible to hold tolerance otherwise and a poor job will be the result. 5. First operation is to bore the four cylinders on the left bank to diameter to the main bearing webs. Use a double cutter boring head with.030 radius inserts for this operation which will allow sizing in one pass - photos 5 and 6. Depth of cut is from the deck surface. 6. Next operation is boring for the lower body diameter. Bore larger than sleeve as instructed above. Depth of bore should be to clean up the casting at the bottom of the bore. Photos 7 and Next operation is boring for the upper body diameter. Again, bore larger than the measured sleeve diameter as instructed above. Machining depth should be to Photo Next, machine the upper flange diameter to your measured diameter The nominal diameter on the sleeve flange is Your flange bore should be machined to a depth of.202. You can bore or use circular interpolation for this cut dependent on your tooling and expertise. If you use circular interpolation with a carbide end mill, use two passes leaving ~.010 for the finish pass. Photo 10. This will ensure in a better surface finish and rounder hole. 9. Repeat operations (5 through 8) on the opposite bank after indexing the block 90 degrees. Note that the offset for cylinder two (front cylinder on the right bank) is towards the rear of the block from cylinder one on the left bank. Make certain to adjust your new X offset in the machine fixture or part offset table else you will ruin your block. Photo Prior to removing the block from the machine, run a ball hone through all the bores. Remove the block, clean it, and deburr it. Make certain the head threads are clean. A thread forming tool should be run through the head bolt holes on used blocks. Photo 12.
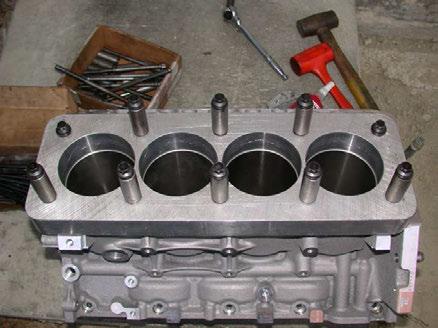
5 Sleeve Installation: 1 It is not necessary but recommended to heat the block to no more than 80º for sleeve installation. Leaving the block sit in the sun for a few minutes is sufficient. If the machining was done properly cooled sleeves will easily install with a shot filled plastic mallet and drive home with an aluminum plate and hammer. 2. Apply a very thin coat of Loctite 515 or 518 flange sealer to the lower bore as shown. And to each upper bore as shown. Photo Chill sleeves in refrigerator or freezer. Drop them into the block two at a time making certain the sleeve flats are aligned. Do not drive the sleeves into place until all four are installed and aligned. The sleeves should go into the bore 3/4 or more of the way with very slight hand pressure. Photo Carefully drive sleeves into place using plastic mallet then aluminum plate with heavier steel or brass hammer. Drive a bit at a time so the flats remain in alignment with one another. Installed sleeves should look like photo Now install deck plates with Fel Pro 1041 or other composition style gasket. Torque ARP bolts to fifty ft./lbs. Let sit for at least 4-24 hours so the Loctite sets up; or you can use Loctite Primer #1649 or acetone for a 30 min to 4 hour set-up. Remove plates, deck flat, then finish bore and hone block. Sleeves are designed for finished bores between to Photo 16. Main cap studs and align honing are highly recommended.
6 BLOCK SPEC LS-2 DRY SLEEVE

7 PHOTO 1 PHOTO 2


8 PHOTO 3 PHOTO 4


9 PHOTO 5 PHOTO 6


10 PHOTO 7 PHOTO 8


11 PHOTO 9 PHOTO 10


12 PHOTO 11 PHOTO 12


13 PHOTO 13 PHOTO 14

14 PHOTO 15 PHOTO 16

15 *Not actual gasket shown. FOR BEST RESULTS: Darton recommends the use of a Cometic M.I.D. MLS head gasket. These head gaskets are specifically made for use with our M.I.D. kits and work with our LS-2 Dry Sleeve Kit. NOTES/CAUTIONS: 1. Make sure that block and head surfaces are machined within proper RMS specification. 2. Depending on the typeof head bolts used, a retorque of head bolts to proper specifications may be required.

16 PRODUCTS Darton recommends the use of Evans coolant! MPG+ for all street applications. MPGR for full race applications.

17 P R E C I S I O N E N G I N E R E B U I L D I N G E Q U I P M E N T Sunnen CV-616 Setup The cost-effective Sunnen CV-616 Automatic Cylinder Hone is one of the mo t versatile machines you can have in your shop. You can count on consistent results as the CV-616 produces the most precise cylinder bores possible, cylinder after cylinder, block after block. Results with Sunnen Honing Stones on Darton Cylinder Sleeve Material EHU 412 EHU-412 C30 PHT Seconds RA μ" RA 15.4 μ" RY μ" RY μ" RZ μ" RZ μ" RPK μ" RPK 10.5 μ" RVK μ" RVK 40.9 μ" RK μ" RK 35.4 μ" MR1 7% MR1 5% MR2 86% MR2 88% EHU 518 EHU 518 C30 PHT Seconds RA 25.1 μ" RA 9.0 μ" RY μ" RY μ" RZ μ" RZ 93.5 μ" RPK 29.9 μ" RPK 7.8 μ" RVK 44.5 μ" RVK 38.4 μ" RK 89.7 μ" RK 23.8 μ" MR1 6% MR1 5% MR2 88% MR2 81%

18 Sunnen CV-616 Set-up JHU 623 JHU 623 C30 PHT Seconds RA 10 μ" RA 6.4 μ" RY 99.6 μ" RY 79.7 μ" RZ 85.5 μ" RZ 62.3 μ" RPK 17.8 μ" RPK 4.8 μ" RVK 18.8 μ" RVK 13.3 μ" RK 34.7 μ" RK 20.9 μ" MR1 10% MR1 4% MR2 89% MR2 89% Results obtained with Sunnen MAN 845 honing oils. Results may vary with other oils.
BHJ Products, Inc. Parts List & Instructions
 Product Name: Lifter-Tru Kit for Ford Windsor & SVO Small Block V8 Page 1 of 5 Kit Contents: 2x End Plates 2x 5/8 Threaded Adjustment Sleeves 1x Front Angle Bracket 2x 5/8 Adjustment Sleeve Spacers * 1x
Fitting & Installation Instructions RB30 WET AND DRY SUMP
 Fitting & Installation Instructions RB30 WET AND DRY SUMP Prior to the installation of your new PREC (Platinum Racing Engine Cradle) the block will need to go to a machine shop so that the standard main
BHJ Products, Inc. Parts List & Instructions
 Product Name: Lifter-Tru Kit for General Motors LS V8 Page 1 of 5 Kit Contents: 2x End Plates 2x Threaded Adjustment Sleeves 1x Front Angle Bracket 2x M10-1.5 x 65 Hex Head Bolts * 2x Angle Adapter Blocks
BHJ Products, Inc. Parts List & Instructions
 Product Name: O-Ring Groove Cutter Page 1 of 6 Kit Contents: 1x Cutter Head Assembly with Handle & Adjustable Tool Block 1x Graduated Adjusting Screw 1x Adjustable Tool Holder 1x Carbide Insert (Size of
INSTRUCTIONS
 IMPORTANT: THIS IS A HIGH PERFORMANCE PART AND IMPROPER INSTALLATION COULD RESULT IN INJURY OR DEATH! NEVER WORK UNDER AN AUTOMOBILE THAT IS NOT PROPERLY SUPPORTED AND BLOCKED FROM ROLLING. NO CREDIT OR
PERFORMANCE RACING AND ENGINE BUILDING MACHINERY AND EQUIPMENT
 PERFORMANCE RACING AND ENGINE BUILDING MACHINERY AND EQUIPMENT F68A Programmable Automatic Machining Center AC Servo Motors and Power Drawbar Hardened Box Way Column Touch Screen Control INDUSTRY EXCLUSIVE
Platinum Racing Products:Tech sheet and Installation instruction ENGINE CRADLE
 Platinum Racing Products:Tech sheet and Installation instruction ENGINE CRADLE This Platinum Racing Engine Cradle (PREC) has been constructed from hi-grade aircraft quality billet aluminum and the product
INSPECTION AND CORRECTION OF BELLHOUSING TO CRANKSHAFT ALIGNMENT
 INSPECTION AND CORRECTION OF BELLHOUSING TO CRANKSHAFT ALIGNMENT BACKGROUND Proper alignment of the transmission input shaft to the crankshaft centerline is required in order to achieve the best results
4/29/2016 Big Block Main Bearing Stud Girdle Kit HUG7380K For B & RB Blocks
 Big Block Main Bearing Stud Girdle Kit HUG7380K For B & RB Blocks Contents of Kit 2-4.40 Main Studs 8-5.187 Main Studs 1- Girdle Plate 18- ½ ARP black flat washers 8- ½-20 Grade 8 plain hex nuts 8- ½-20
Features. Reduced Floor Space Compact, one piece castings and multi layer slideway guards give the most compact surfacing machines available today.
 The S8A is designed to surface large diesel heads, blocks and manifolds. All SA machines use the same tooling and fixturing for quick, rigid setup and versatility. Fine surface finishes are easily obtained
Typical Group D Rear Acoustical Cover Installation
 SERIES 60 SERVICE MANUAL 1. Gear Case Cover 5. Bolt 2. Gear Case 6. Acoustical Cover 3. Acoustical Cover Snap 7. Acoustical Cover 4. Acoustical Cover Clip 8. Nut Figure 1-179 Typical Group D Rear Acoustical
S8M S7M. Soft Touch Buttons with LED Lights Soft Touch Buttons light up a LED once pressed - simplifying operation.
 S8M surfacing machines Soft Touch Buttons with LED Lights Soft Touch Buttons light up a LED once pressed - simplifying operation. S8M with Large Diesel Block Solid Steel Way Guards Heavy duty sliding steel
Torque Specs - Main Caps 1-5 1/2" bolts 100 ft lbs W / CMD# /2" splayed 100 ft lbs Dart s inner head studs 3/8" 7/16" stepped 50 ft lbs
 DART MARK IV Iron Big Block - Technical Notes Deck Height... 9.800" & 10.200" Bore... 4.250", 4.500", 4.560" and 4.600" unfinished Main Bearing Size... Standard BBC Main Caps... All 4 bolt - Steel or Ductile
PERFORMANCE RACING AND ENGINE REBUILDING MACHINERY AND EQUIPMENT
 PERFORMANCE RACING AND ENGINE REBUILDING MACHINERY AND EQUIPMENT SF8M The SF8 is sized to surface diesel heads, blocks and manifolds. All SF machines use the same tooling and fixturing for quick, rigid
Torque Specs - Main Caps 1-5 1/2" bolts 100 ft lbs W / CMD# /2" splayed 100 ft lbs Dart s inner head studs 3/8" 7/16" stepped 50 ft lbs
 DART GEN V Iron Big Block - Technical Notes Deck Height... 9.800" & 10.200" Bore... 4.250" Option (4.500, 4.560 and 4.600) unfinished Main Bearing Size... Standard BBC Main Caps... All 4 bolt - Steel or
INSTRUCTIONS
 ENGINE APPLICATION YEARS/CID: FORD, MERCURY 332, 352, 360, 361, 390, 406, 410, 427, 428 1958-1976 TRANS APPLICATION YEAR/MODEL: GM AUTO PG, TH350, 400, 700R4, CHEVY OR UNI-CASE BOLT PATTERN, IMPORTANT:
Introducing the next generation of E-Z Bore Machines
 Introducing the next generation of E-Z Bore Machines The rise in popularity of OHV motors leaves some flathead E-Z Bore owners thinking their equipment is obsolete. Don't dispose of your old E-Z Bore!
SA SERIES SURFACING MACHINES
 SA SERIES SURFACING MACHINES The S8A is designed to surface large diesel heads, blocks and manifolds. All SA machines use the same tooling and fixturing for quick, rigid setup and versatility. Fine surface
FM2113PC/FM2114PC SBC Top Mount Alt, w/ A/C & Power Steering
 10) At this time assemble the power steering bracket and pump assembly from the instructions provided with the power steering bracket beginning at step 7. Return to step 10 on this sheet when complete.
FM2113PC/FM2114PC SBC Top Mount Alt, w/ A/C & Power Steering
 10) At this time assemble the power steering bracket and pump assembly from the instructions provided with the power steering bracket beginning at step 7. Return to step 10 on this sheet when complete.
DART. ALUMINUM Big Block - Technical Notes
 DART ALUMINUM Big Block - Technical Notes Deck Height... 9.800" & 10.200" Bore... 4.250" or 4.500" unfinished Main Bearing Size... Standard BBC Main Caps... All 4 bolt - Steel or Ductile Iron Weight...
w w w. h d o n l i n e s h o p. d e TIMKEN BEARING CONVERSION TOOL GENERAL INSTALLATION -J04672 REV Kit Number Models
 -J067 REV. 008-07- GENERAL Kit Number 8-08 Models TIMKEN BEARING CONVERSION TOOL For model fitment information, see the P&A Retail Catalog or the Parts and Accessories section of www.harley-davidson.com
The Speed of Live and the Accuracy of Fixed
 The Speed of Live and the Accuracy of Fixed SG10A CYLINDER HEAD SEAT & GUIDE MACHINE Light Weight Work Head The SG10A has a light weight work head for fast and accurate centering for the minimum concentricity.
Motorized M3 AX7200 Rotary-Style Gasket Cutter Operating Instructions
 Motorized M3 AX7200 Rotary-Style Gasket Cutter Operating Instructions INTRODUCTION Congratulations! You are the owner of the finest rotary-style gasket cutter in the world. Originally developed and patented
MODELS 49 RA 49 RAZ 49 RAC
 General Safety and Maintenance Manual MODEL grinder featuring a rear exhaust. Model Number Exhaust Direction REAR Throttle Type (L) Lever or (K) Safety Lever Speed 12000 to 14000 R.P.M (13500rpm is standard)
ASSIGNMENT 4. Textbook Assignment: The point, edge, face, heel, and tang are the five parts of which of the following tools?
 ASSIGNMENT 4 Textbook Assignment: "Files," "Grinders and Sharpening Stones," "Scrapers," "Awls," "Bolt and Cable Cutters," "Glass Cutters," "Knives,' 'Pipe Cutting and Threading Tools," "Tube Cutting and
Bearing Overhaul Instructions for: Tallboy (.1) 2009
 2009") Bearing Overhaul Instructions for: Tallboy (.1) 2009 Tools Needed: 7900 Removal Tool 7902 Removal Tool 7900/7902/6902 Press Tool Grease Gun (included with frame) (2) ll/16" or adjustable wrenches 9/16"
Bearing Overhaul Instructions for: Tallboy (.1) 2009 Tools Needed: 7900 Removal Tool 7902 Removal Tool 7900/7902/6902 Press Tool Grease Gun (included with frame) (2) ll/16" or adjustable wrenches 9/16"
BHJ Products, Inc. Parts List & Instructions
 Product Name: O-Ring Groove Cutter Adjustable Tool Block Upgrade Page 1 of 5 Prototype Kit Contents: 1x Adjustable Tool Block 1x Adjustable Tool Holder 1x Graduated Adjusting Screw 1x 1/8 Registration
S80 SERIES CNC SURFACING MACHINES
 S80 SERIES CNC SURFACING MACHINES Machining Equipment Created for Performance Racing & Engine Remanufacturing. So Advanced, It s Simple. S80 SERIES SURFACING MACHINES The S80 series surfacers are the most
F69A Multi Purpose Machining Center
 F69A Multi Purpose Machining Center The F69A takes us to the highest levels of technology in block machining! Doug Yates Roush Yates Performance Engine Group Machining Equipment Created for Performance
GE-Westinghouse-AO Smith
 New products are developed and released throughout the year. Visit our website regularly pinsetterpartsplus.com GE-Westinghouse-AO Smith Combo Gearbox Conversion Kit Installation Guide New products are
GE-Westinghouse-AO Smith Backend Gearbox Conversion Kit Installation Guide
 New products are developed and released throughout the year. Visit our website regularly pinsetterpartsplus.com GE-Westinghouse-AO Smith Backend Gearbox Conversion Kit Installation Guide New products are
PROSTEER BALL JOINT REBUILD INSTRUCTIONS V1.0
 DYNATRAC PRODUCTS 2003-2010 4X4 DODGE 2500/3500 HEAVY DUTY BALL JOINT PROSTEER BALL JOINT REBUILD INSTRUCTIONS V1.0 WARNING: Improper use or installation of this product can cause major failures that could
LocoGear. Technical Bulletin - 02 January 11, by LocoGear LIVE STEAM CASTINGS. Tech Bulletin - 02
 LIVE STEAM CASTINGS Tech Bulletin - 02 LocoGear Technical Bulletin - 02 January 11, 2003 2003 by LocoGear John D.L. Johnson 3879 Woods Walk Blvd. Lake Worth, FL 33467-2359 jjohnson@locogear.com www.locogear.com
Features. Productivity Up to 75% time savings over traditional machines.
 All F100 machines employ an array of features which help maximize the productivity capabilities of the machines. Quick tooling change-over maximizes the versatility and flexibility of the machine, allowing
Important Note. Tools Required: Welder capable of fully welding 10 GA.135 steel
 INSTALLATION INSTRUCTIONS Frame Reinforcement Kit 11100 (Patent Pending) 1968-72 GM A-Body Coupe/Sedan Read Instructions FULLY before starting Installation Important Note Installation of this kit requires
Technical T-A & GEN2 T-A GEN3SYS APX. Revolution & Core Drill. ASC 320 Solid Carbide. AccuPort 432. Page CONTENTS. Set-up Instructions 256
 Technical ASC 0 Solid Carbide CONTENTS Page Set-up Instructions 6 AccuPort 4 Recommended Speeds & Feeds 60 Guaranteed Application Request Form 99 +44 (0)84 400 900 +44 (0)84 400 0 enquiries@alliedmaxcut.com
Touch Screen CNC Control
 Touch Screen CNC Control FEATURES Nearly four decades ago, Rottler pioneered automation and programming by utilizing electronics and computers. Today, the SAD Surfacing machines incorporate the latest
LS1/LS6 CHEVROLET Installation Manual For Systems without A/C #13405 / #13425
 LS1/LS6 CHEVROLET Installation Manual For Systems without A/C #13405 / #13425 Billet Specialties, Inc. 500 Shawmut Avenue. La Grange, Illinois 60526 Tech Line (708) 588-0505 Fax (708) 588-7181 PLEASE READ
Repair Manual MK40A-MK45A-MK50A MK55A-MK60A-MK65A. Ref Rev.C General Pump is a Member of The Interpump Group
 MK Repair Manual MK40A-MK45A-MK50A MK55A-MK60A-MK65A General Pump is a Member of The Interpump Group 8 INDEX 1. INTRODUCTION..................................................Page 3 2. REPAIR INSTRUCTIONS...........................................Page
QUARTER-SCALE MERLIN PROJECT
 QUARTER-SCALE MERLIN PROJECT Crankcase Group 12/24/02 page 1 This is a draft of instructions for machining the crankcase group. They are offered as a suggested method only, with the realization that experienced
UNIVERSAL RETROFIT KIT
 UNIVERSAL RETROFIT KIT Midwest Office 444 Lake Cook Road, Suite 22 Deerfield, IL 60015 Phone (847) 940-9305 Fax (847) 940-9315 www.flashcutcnc.com 1998-2012 FlashCut CNC, Inc. Table of Contents THANK YOU...
DYNATRAC BALL JOINT REBUILD INSTRUCTIONS V4.0
 DYNATRAC PRODUCTS 2007-2016 4X4 JEEP JK HEAVY DUTY BALL JOINT JP44-2X3050-C DYNATRAC BALL JOINT REBUILD INSTRUCTIONS V4.0 WARNING: Improper use or installation of this product can cause major failures
F69ATC Multi Purpose CNC Maching Center
 F69ATC Multi Purpose CNC Maching Center with Automatic Tool Changer Machining Equipment Created for Performance Racing & Engine Remanufacturing. So Advanced, It s Simple. F69ATC MULTI-PURPOSE CNC MACHING
Cross Peen Hammer. Introduction. Lesson Objectives. Assumptions
 Introduction In this activity plan students will develop various machining and metalworking skills by building a two-piece steel hammer. This project will introduce basic operations for initial familiarization
LS7 CHEVROLET TOP MOUNT Installation Manual For Systems with A/C #13460 / #13490
 LS7 CHEVROLET TOP MOUNT Installation Manual For Systems with /C #13460 / #13490 PLESE RED LL INSTRUCTIONS EFORE INSTLLING NY COMPONENTS OF THE TRU TRC SERPENTINE SYSTEM Important: Thoroughly read the instructions,
Important Note. Tools Required: Welder capable of fully welding 10 GA.135 steel
 INSTALLATION INSTRUCTIONS Frame Reinforcement Kit 11102 (Patent Pending) 1964-67 GM A-Body Coupe/2dr Sedan Read Instructions FULLY before starting Installation Important Note Installation of this kit requires
348/409 CHEVROLET Installation Manual For Systems with A/C #14400 / #14420
 348/409 CHEVROLET Installation Manual For Systems with A/C #14400 / #14420 Billet Specialties, Inc. 500 Shawmut Ave. La Grange, IL 60526 Tech (708) 588-0505 Fax (708) 588-7181 PLEASE READ ALL INSTRUCTIONS
Machine Tool Technology/Machinist CIP Task Grid Secondary Competency Task List
 1 100 ORIENTATION / SAFETY 101 Describe the Occupational Safety and Health Administration (OSHA) and its role in the machining industry. 2 2 2 1 0.5 102 Identify & explain safety equipment and procedures.
Comparative Measuring Instruments
 Comparative Measuring Instruments F-1 TESA YA Internal Measuring Instruments Specially designed for small bores from 0,47 up to 12,20 Determine dimensions as well as form and shape deviations through 2-point
Building Rudy Kouhoupt s Walking-Beam Engine
 Building Rudy Kouhoupt s Walking-Beam Engine Some time ago I came across a copy of Rudy Kouhoupt s article: "Build this Walking-Beam Engine" (Popular Mechanics August 1969), and decided to try and make
SG100XY. Large Capacity Cylinder Head Seat & Guide Machine. With ACTIV Spindle & Guide-to-Guide Automation
 SG100XY Large Capacity Cylinder Head Seat & Guide Machine With ACTIV Spindle & Guide-to-Guide Automation your machining time, productivity and profits! Machining Equipment Created for Performance Racing
FA Series CNC Boring and Sleeving Machines
 FA Series CNC Boring and Sleeving Machines Now with Rottler Windows Touch Screen Control! Machining Equipment Created for Performance Racing & Engine Remanufacturing. So Advanced, It s Simple. ROTTLER
Metal Shapers Forums and Tech Rodding Roundtable Home Forums Events Members Webring Tech Merchandise Contact Chat Services Links Want Ads Advertising
 Metal Shapers Forums and Tech Home Forums Members Webring Tech Contact Chat Services On the following pages your will find detailed instructions on the parts needed and assembly instructions for a 12"
By C.W. Woodson From the pages of Model Craftsman magazine June, 1937
 By C.W. Woodson From the pages of Model Craftsman magazine June, 1937 As shown in Fig. 1, the tool post grinder for which plans are given here can be used to finish up delicate work to more accurate dimensions
Additional Information
 NUMBER: 1 34 13 S.M. REF.: Listed in Table ENGINE: EPA04/07 Series 60 DATE: January 2013 SUBJECT: CHECKING CYLINDER LINER PROTRUSION ADDITIONS, REVISIONS, OR UPDATES Publication Number Platform Section
SMALL BLOCK CHEVROLET
 SMLL LOCK CHEVROLET Installation Manual For Systems with /C #13220 / #13120 illet Specialties, Inc. 500 Shawmut ve. La Grange, IL 60526 Tech (708) 588-0505 Fax (708) 588-7181 PLESE RED LL INSTRUCTIONS
3.1 MUELLER LARGE DRILLING MACHINES
 MUELLER LARGE DRILLING MACHINES 3.1 Shaded area indicates change Rev. 1-09 Large Drilling Machines are used for making 2" to 24" lateral connections on water mains under pressure. These machines are available
3.1 MUELLER LARGE DRILLING MACHINES
 MUELLER LARGE DRILLING MACHINES 3.1 Shaded area indicates change Rev. 1-09 Large Drilling Machines are used for making 2" to 24" lateral connections on water mains under pressure. These machines are available
REPAIR INSTRUCTIONS. Cat. No Cat. No MILWAUKEE ELECTRIC TOOL CORPORATION. SDS Max Demolition Hammer. SDS Max Rotary Hammer
 Cat. No. 9-0 SDS Max Demolition Hammer Cat. No. -0 SDS Max Rotary Hammer MILWAUKEE ELECTRIC TOOL CORPORATION W. LISBON ROAD BROOKFIELD, WISCONSIN 00-0 8-9-0 d 000 8-9-0 d Special Tools Require Forcing
frame bracket Dodge x 2 & 4 x 4 (6-1/2 & 8 Boxes Includes Mega Cab)
") , Rev 4 02/19 frame bracket 8552026 Dodge 3500 4 x 2 & 4 x 4 (6-1/2 & 8 Boxes Includes Mega Cab) 14 5 7 2 4 11 9 10 17 3 6 1 8 13 15 16 18 12 ITEM PART # DESCRIPTION QTY. 1 00085.50 FLAT WASHER 10 2 00248
, Rev 4 02/19 frame bracket 8552026 Dodge 3500 4 x 2 & 4 x 4 (6-1/2 & 8 Boxes Includes Mega Cab) 14 5 7 2 4 11 9 10 17 3 6 1 8 13 15 16 18 12 ITEM PART # DESCRIPTION QTY. 1 00085.50 FLAT WASHER 10 2 00248
DYNATRAC BALL JOINT REBUILD INSTRUCTIONS V5.0
 DYNATRAC PRODUCTS 2007-2018 JEEP JK HEAVY DUTY BALL JOINT JP44-2X3050-C DYNATRAC BALL JOINT REBUILD INSTRUCTIONS V5.0 WARNING: Improper use or installation of this product can cause major failures that
Pickup Box Utility Rack Package Installation (Instruction ID: )
") 017 Chevrolet Colorado Pickup - WD (VIN S) Canyon, Colorado Accessory Installation Manual N America Document ID: 3966961 Pickup Box Utility Rack Package Installation (Instruction ID:3144879) Installation
017 Chevrolet Colorado Pickup - WD (VIN S) Canyon, Colorado Accessory Installation Manual N America Document ID: 3966961 Pickup Box Utility Rack Package Installation (Instruction ID:3144879) Installation
1904, 1904Pg, 1904PgSB, and 1906SB High Capacity Ratchet Knockout Drivers
 INSTRUCTION MANUAL 1904, 1904Pg, 1904PgSB, and 1906SB High Capacity Ratchet Knockout Drivers Read and understand all of the instructions and safety information in this manual before operating or servicing
COFA. Deburring Tool for Elliptical or Contoured Surfaces. increased performance. from stock
 Deburring Tool for Elliptical or Contoured Surfaces increased performance from stock Cat. No. HTC015 Introduction Catalog HTC015No. HTC14 The HEULE COFA deburring tool removes burrs from the front and
- 2 JOINER ALIGNERS - 2 JOINING BRACKETS - 4 HEX BOLTS. Factory pre-installed mud flange TOOLS REQUIRED: Phillips screwdriver, 5/16 nut driver.
 - 2 JOINER ALIGNERS - 2 JOINING BRACKETS - 4 HEX BOLTS TruGroove Drywall A3 MOUNTING Ceiling INSTALLATION System Overview These instructions review how to install drywall trim versions of TruGroove recessed
Clocking a TD-04 Turbo Compressor Housing. Appendix A : AWIC Silicone and Tubing Fitting
 Clocking a TD-04 Turbo Compressor Housing Appendix A : AWIC Silicone and Tubing Fitting Revision A: 7-13-2015 Tools: Metric Sockets (10, 12, 14, 17mm) 5mm Hex Key Large Internal Snap Ring Pliers 3/8 Socket
Installation Instructions
 The IMS ETERNAL FIX PATENT PENDING Installation Instructions EPS recommends professional installation for the Eternal IMS Fix. Please take all precautionary safety measures. We also recommend putting the
Now with DIRECT DRIVE Ball Screws and High Torque Spindle Drive System
 Main Line Boring Waukesha 7042 Now with DIRECT DRIVE Ball Screws and High Torque Spindle Drive System Surfacing CAT C175-V20 Machining Equipment Created for Performance Racing & Engine Remanufacturing.
Master TAPERLOCK GAUGE BLOCK
 Master Taperlock Fastener Gauge Kit Master TAPERLOCK Fastener Gauge Kit UTK-268002-27-4 KIT, Group 1 thru 4 UNITED S Master Taperlock Fastener Gauge Kit contains all of the required gauges and tools to
Astro-Physics Inc. 400QMD Lubrication/Maintenance Guide
 Astro-Physics Inc. 400QMD Lubrication/Maintenance Guide The following guidelines should be followed to lubricate the three main parts of the 400QMD mount. The QMD stands for Quartz Micro-Drive controller.
CONTROLS KIT FOR ALL # & # HARLEY DAVIDSON SPORTSTER MODELS
 INSTALLATION INSTRUCTIONS TC BROS. CHOPPERS PART #0-0075 & #0-0076 (No Pegs) FORWARD CONTROLS KIT FOR ALL 00-0 HARLEY DAVIDSON SPORTSTER MODELS If downloading & printing these instructions online, be sure
Maintenance Information
 16601023 Edition 2 January 2014 Air Impact Wrench 2705P1 Maintenance Information Save These Instructions Product Safety Information WARNING Failure to observe the following warnings, and to avoid these
VSG4720. balancing. block machining. boring. cleaning. crankshaft. cylinder head machining. flywheel grinders. honing. motorcycle small engine
 TM engine rebuilding equipment balancing block boring cleaning crankshaft cylinder head flywheel grinders honing motorcycle small engine surfacing center center versatility New capabilities Tooling adapters
KL50000 Counter Bore OPERATING INSTRUCTIONS. U.S. Patent No CA Patent No
 KL50000 Counter Bore Re-Condtioning Tool Kit OPERATING INSTRUCTIONS U.S. Patent No. 8.308.401 CA Patent No. 2667147 315 Garden Avenue Holland, MI 49424 klineindustries.com 1-800-824-KLINE (5546) cservice@klineind.com
Thread protection accessories are installed at the MODIX production factory and delivered with couplers.
 Installation of MODIX Rebar Coupler Identification of the product The type of MODIX Rebar Coupler can be identified by the marking on the product. Size of the Coupler can be identified also according to
Inventory MODEL T10096 TAPER ATTACHMENT FOR G0509 & G0509G LATHE INSTRUCTIONS. Inventory (Figure 1) Needed Items
 Needed Items") MODEL T10096 TAPER ATTACHMENT FOR G0509 & G0509G LATHE INSTRUCTIONS Inventory The Model T10096 taper attachment was carefully packed when it left our warehouse. If you discover it is damaged after you
MODEL T10096 TAPER ATTACHMENT FOR G0509 & G0509G LATHE INSTRUCTIONS Inventory The Model T10096 taper attachment was carefully packed when it left our warehouse. If you discover it is damaged after you
PEDESTAL OVERHAUL. Some of the tools for a pedestal overhaul. Pedestal work stand
 INTRODUCTION A properly greased labyrinth seal will help prevent dust and water damage to the pedestal bearing oil supply and shaft seal area. Properly greased and oiled pedestals rarely require an overhaul.
Manufacturing Sun Cartridge Cavities
 Manufacturing Sun Cartridge Cavities The following Technical Tip discusses a variety of points that should be considered when manufacturing a Sun cavity. Many of the items discussed could be classified
Student, Department of Mechanical Engineering, Knowledge Institute of Technology, Salem, Tamilnadu (1,3)
") International Journal of Scientific & Engineering Research, Volume 7, Issue 5, May-2016 11 Combined Drilling and Tapping Machine by using Cone Mechanism N.VENKATESH 1, G.THULASIMANI 2, S.NAVEENKUMAR 3,
International Journal of Scientific & Engineering Research, Volume 7, Issue 5, May-2016 11 Combined Drilling and Tapping Machine by using Cone Mechanism N.VENKATESH 1, G.THULASIMANI 2, S.NAVEENKUMAR 3,
Rugged Ridge Engine Transmission Skid Plate JK
 Installation Time: 1-2 Hours Tools Required: Rugged Ridge Engine Transmission Skid Plate 2012-2017 JK Sockets: 16mm, 17mm, 18mm deep well Socket Wrench Wrenches: 16mm, 18mm Torque Wrench Drill ½ Drill
Replacing the Spindle Bearings Detailed Instructions
 Replacing the Spindle Bearings Detailed Instructions These are detailed instructions on how to replace the spindle bearings on a 9x20 lathe sold by many suppliers and made in China. The YAHOO 9x20Lathe
8029 S 200th St. Kent, WA USA Ph: Fax:
 8029 S 200th St. Kent, WA 98032 USA Ph: 253-872-7050 Fax: 253-395-0230 18.09.2018 ORDERING PROCEDURE Contact your regional Rottler sales rep for assistance in ordering optional equipment, replacement
30DC Speed Lathe Manual
 30DC Speed Lathe Manual The Crozier Model 30DC Speed Lathe is our most popular model. It has many standard features not found on any other machine in its class or price range. Standard Features 3/4 HP
AFB (AIR FAN BEARING) INSTALLATION GUIDE
 INSTALLATION GUIDE") 654 AFB (AIR FAN BEARING) INSTALLATION GUIDE AFB PARTS Bearing Housing - Secured together with two 3/8 x 1.25 in. Cap Screws Black Wiper Seals - Secured together with O-ring cord (Subsequently depicted
654 AFB (AIR FAN BEARING) INSTALLATION GUIDE AFB PARTS Bearing Housing - Secured together with two 3/8 x 1.25 in. Cap Screws Black Wiper Seals - Secured together with O-ring cord (Subsequently depicted
Fence Hardware Instructions (Right-Handed Version)
") S I M P L Y C L A S S I C Fence Hardware Instructions (Right-Handed Version) 8 1. 1/4-20 x 1" wing bolt (x2) 2. Bearing washer (x2) 3. Arm lock (x2) 4. Fence (not included) 5. Fence sleeve (x2) 6. Arm
S I M P L Y C L A S S I C Fence Hardware Instructions (Right-Handed Version) 8 1. 1/4-20 x 1" wing bolt (x2) 2. Bearing washer (x2) 3. Arm lock (x2) 4. Fence (not included) 5. Fence sleeve (x2) 6. Arm
Product Guide Specification
 Zurn Industries, LLC November 2014 1801 Pittsburgh Avenue Erie, PA 16502 Toll Free (855) 663-9876 Phone (814) 455-0921 Fax (814) 871-6141 Website www.zurn.com Product Guide Specification Specifier Notes:
Big Block Chevrolet Installation Manual For Systems with A/C #14220 / #14120
 Big Block Chevrolet Installation Manual For Systems with A/C #14220 / #14120 Billet Specialties, Inc. 500 Shawmut Ave. La Grange, IL 60526 Tech Line (708) 588-0505 Fax (708) 588-7181 PLEASE READ ALL INSTRUCTIONS
INSTALLATION MANUAL CHEVROLET BIG BLOCK V4120 / V4220
 INSTALLATION MANUAL CHEVROLET BIG BLOCK V4120 / V4220 Billet Specialties, Inc. 500 Shawmut Avenue La Grange, Illinois 60526 TECH Line 708.588.0505 Fax 708.588.7181 www.billetspecialties.com PLEASE READ
Ford FE Installation Manual For Systems with A/C #14700 / #14720
 Ford FE Installation Manual For Systems with A/C #14700 / #14720 Billet Specialties, Inc. 500 Shawmut Avenue. La Grange, Illinois 60526 Tech Line (708) 588-0505 Fax (708) 588-7181 PLEASE READ ALL INSTRUCTIONS
63824 Ford Combination Vacuum Pump/Alternator Mount
 63824 Ford Combination Vacuum Pump/Alternator Mount This kit is engineered to mount a Moroso enhanced style vacuum pump (22642) and a Nippon Denso 93MM alternator to a Ford small block engine equipped
9-0 CYLINDER/PISTON 9. CYLINDER/PISTON XCITING 500/250
 9 CYLINDER/PISTON SCHEMATIC DRAWING ------------------------------------------------- 9-1 SERVICE INFORMATION------------------------------------------------ 9-2 TROUBLESHOOTING-----------------------------------------------------
Installing CNC Stepper Motor Mounts on a Sherline Mill
 WEAR YOUR SAFETY GLASSES FORESIGHT IS BETTER THAN NO SIGHT READ INSTRUCTIONS BEFORE OPERATING Mill upgrade kit part numbers: P/N 6700/6710 Model 5000/5400 mills P/N 6705/6715 Model 2000 mill P/N 6740/6745
DRIVE COMPONENTS REMOVAL. 9. FXCW/C: see Figure Remove bolt (9), sprocket retainer (8), and thrust washer (7). NOTE PRIMARY DRIVE LOCKING TOOL
, sprocket retainer (8), and thrust washer (7). NOTE PRIMARY DRIVE LOCKING TOOL") DRIVE COMPONENTS REMOVAL PART NUMBER HD-7977 TOOL NAME PRIMARY DRIVE LOCKING TOOL S To remove the primary chain, remove compensating sprocket, clutch assembly and primary chain as an assembly:. Remove
DRIVE COMPONENTS REMOVAL PART NUMBER HD-7977 TOOL NAME PRIMARY DRIVE LOCKING TOOL S To remove the primary chain, remove compensating sprocket, clutch assembly and primary chain as an assembly:. Remove
Installing CNC Stepper Motor Mounts on a Sherline Mill
 WEAR YOUR SAFETY GLASSES FORESIGHT IS BETTER THAN NO SIGHT READ INSTRUCTIONS BEFORE OPERATING Mill upgrade kit part numbers: P/N 6700/6710 Model 5000/5400 mills P/N 6705/6715 Model 2000 mill P/N 6740/6745
Complete O.D. Machining in One Operation
 MFDODM209 Complete O.D. Machining in One Operation Including: Hydra-Drive For Extreme Accuracy CREATING INNOVATIONS IN FACE DRIVING TECHNOLOGY www.facedrivers.com Complete O.D. Machining in one Operation
LU6X-130 Instructions and Parts List (including LU6X Basic) Operating Instructions
 Operating Instructions") LORTONE LU6X-130 Item # 061-092 LU6X Basic Item # 061-090 LU6X-130 Instructions and Parts List (including LU6X Basic) Operating Instructions Introduction The LU6X is one the most versatile pieces of equipment
LORTONE LU6X-130 Item # 061-092 LU6X Basic Item # 061-090 LU6X-130 Instructions and Parts List (including LU6X Basic) Operating Instructions Introduction The LU6X is one the most versatile pieces of equipment
Installation Instructions Standalone or continuous run configurations - 2 JOINER ALIGNERS - 2 JOINING BRACKETS - 4 HEX BOLTS
 - 2 JOINER ALIGNERS - 2 JOINING BRACKETS - 4 HEX BOLTS TruGroove Drywall A3 MOUNTING Ceiling INSTALLATION System Overview These instructions review how to install trimless drywall versions of TruGroove
Zero Point Clamping System. ZERO lock BALL lock
 Zero Point Clamping System ZERO lock BALL lock kap3 kap 263 Technical information regarding ZERO lock Zero Point Clamping System Application The modularly designed, flexible ZERO lock Zero-Point Clamping
Gared Pro-S Portable Backstop
 Models: 9616 & 9618 Installation, Operation and Maintenance Instructions Please read all instructions before attempting installation or operation of these units SAVE THESE INSTRUCTIONS FOR FUTURE USE PUBLICATION