Measuring Guidelines
|
|
|
- Sharleen Peters
- 6 years ago
- Views:
Transcription
1 Measuring Guidelines Table of Contents Page. Panel Anatomy 2. Basic Measuring 2 3. Mounting Options 2 4. General Frame Categories 4 Frame Decision Tree Number of Sides 5. Measuring for 7 Different Frames Direct Mount Standard Deduction Café Shutter Corner Window Bay Window T Post Other Window Situation Disclaimer: Norman International, Co. reserves all rights on updating or modification of any contents within this documentation without prior notification.

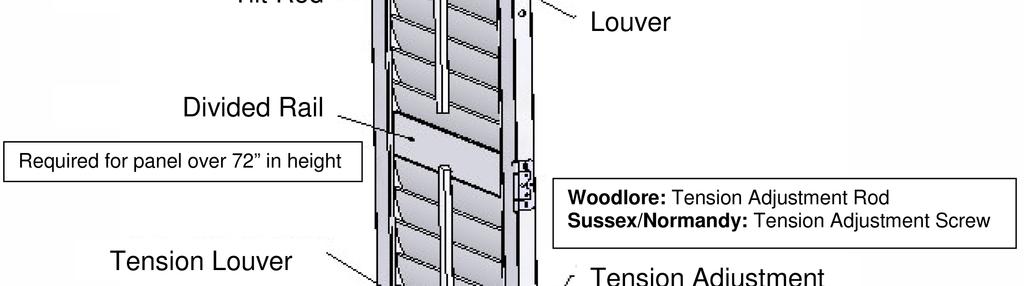

2 Panel Anatomy
3 Basic Measuring To get a precise and accurate measurement is the first step to a perfect shutter. Always use a metal measuring tape. Always measure to the closest / 6. To measure your window Width: Take 3 measurements at the top, middle and bottom of the window opening. Height: Take 3 measurements at the left, center and right of the window opening. Wall Wall Mounting Options Inside Mount (IM) Shutters will fit inside a window opening. There must be enough unobstructed depth on the mounting surface inside the window opening. For IM, please provide the SMALLEST height and width measurement among the three. Outside Mount (OM) Shutters will fit outside a window opening. There must be sufficient flat mounting surface around the window opening. For OM, please provide the LARGEST height and width measurement among the three. Tip: When there is enough flat mounting surface, Outside Mount is generally a preferred method as it is more forgiving and less challenging compare to Inside Mount. 2
4 Basic Measuring Determine Window Squareness Measure diagonally with a metal measuring tape Should the difference between the two diagonal measurements be greater than ¼, OM is highly recommended. Measurement Type (MFF) Finished size of the shutters, measure from the outside edge of the left to right and the top to bottom frame. (WS) Exact size of the window opening WINDOW SIZE Shown in Deco Frame MAX FRAME TO FRAME 3

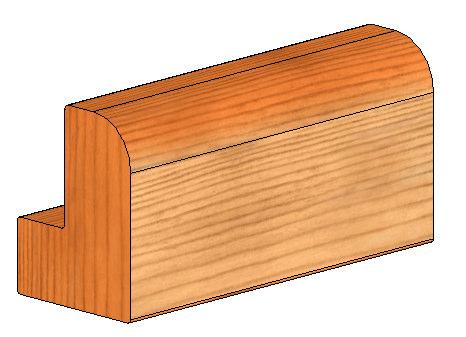
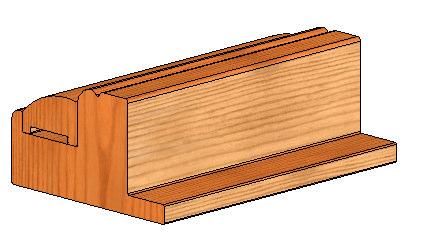
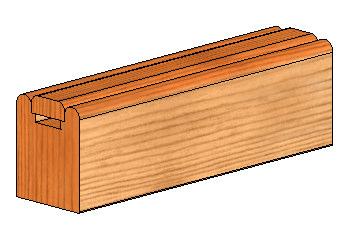


5 General Frame Categories L Frame Deco Frame Z Frame Hang Strip Sill Frame Designer Sill Cap Corner Post T Post 4
6 Frame Decision Tree Drywall Window st Choice IM OM Hang Strip Hang Strip Not Recommended st Choice L Frame Not Recommended Z Frame 2 nd Choice Deco Frame st Choice L Frame 2 nd Choice Casing Window st Choice IM OM Hang Strip st Choice Hang Strip Not Recommended L Frame Not Recommended BullnoseZ/ Beaded Z Frame 2 nd Choice Deco Frame 2 nd Choice L Frame st Choice 5
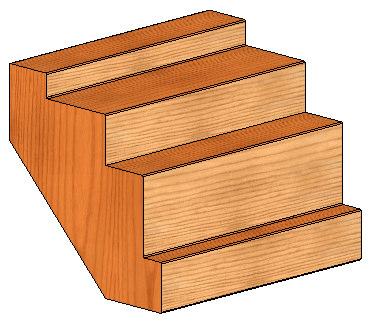
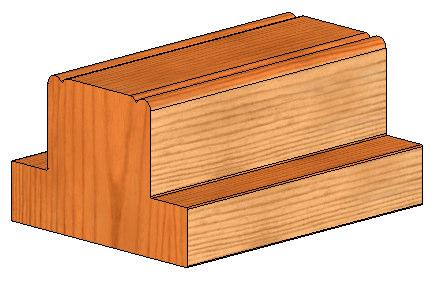
7 Number of Sides 2-sided 3-sided 3-sided 2-sided + Deco Sill Frame/ Designer Sill Cap 3-sided + Deco Sill Frame/ Designer Sill Cap 4-sided 6
8 Measuring For Different Frames L Frame OM or IM OM The edge of L frame usually aligns with the window edge. Under situation where there is moldings around the window, L frame can be mounted on the outside edge of the molding or on top of the molding. Window Opening Size Max Mam Frame to to Frame Frame Size IM measurement is required for L frame inside mount. / 6 is the suggested deduction on each side. Window Opening Size 6 " Spec.Gap 6 " Spec.Gap Max Mam Frame to Frame to Frame Size Note: Feature: L Frame OM leaves more room on the inside of the window opening as it protrudes more into the room compares to other frames. For 2-sided L Frame (IM & OM) other than café shutter, standard deduction for Frame Height = / 6 Panel Height = ¼ unless specify otherwise. 7
9 Measuring For Different Frames Hang Strip OM or IM IM Hang strip is placed behind the panel. Shutters come with two pre-drilled hang strips only. Two light blocks will be provided for the top and bottom of the window opening. Window size measurement Standard deduction for gap between panel and window casing = / 8 for width, / 8 to 3 / 6 for height. window opening size Vintage hang strip Vintage hang strip /8" spec. gap /8" spec. gap measurement width = panel width (not include hinges). height = panel height The total length for hang strip will be / 0 more than panel height. hang strip = Net Max Panel Frame Width to (not Frame include size hinges) = Net Panel Width(No include hinges) HS length = max frame to frame height + 0." hang strip panel max frame to frame height = panel height 8
10 Measuring For Different Frames Hang Strip OM Hang strip is placed on the side of the panel Panel is ½ wider than the window opening on both left and right side window opening size /2" /2" Note: For 2-sided Hang Strip (OM) other than café shutter, standard deduction for Frame Height = / 6 Panel Height = ¼ unless specify otherwise. Hang strip OM; beside the panels (shown in Vintage Hang Strip) Feature: An innovative frame design for easier installation. Hang strip comes with pre-drilled holes and can be installed with screws that will be hidden under the inserts. 9
11 Measuring For Different Frames Deco Frame OM only Must have enough flat surface around the window opening for frame installation. Max. Frame to Frame Note: For 2-sided Deco Frame (OM) other than café shutter, standard deduction for Frame Height = / 6 Panel Height = ¼ unless specify otherwise. Feature: Deco frame can help to hide an imperfect window. The elegant frame profile adds a decorative touch to an ordinary window. An innovative frame design for easier and touch-up free installation. Deco frame comes with pre-drilled holes and can be installed with screws that will be hidden under the inserts. Z Frame IM only Standard deduction = / 6 (all sides for window size) Window Opening Size 6 "Spec.Gap 6 " Spec.Gap Size Note: For 2-sided Z Frame (IM) other than café shutter, standard deduction for Frame Height = / 6 Panel Height = ¼ unless specify otherwise. Feature: Z frame is less protruding into the room. It can help to hide an imperfect window. The elegant frame profile adds a decorative touch to an ordinary window. 0
12 Measuring For Different Frames Deco Sill Frame/Designer Sill Cap Measurement: * If extension is requested behind regular frames, then extension will also be added behind sill frame. Measurement: Measure height from the top of top frame to bottom of Deco Sill or Designer Sill Cap. MFF size To eliminate the gap between the side frame and the bullnose edge of the sill frame (see drawings below), sill frame will be extended ½ " on both sides by default or (optional). Gap
13 Measuring For Different Frames Direct Mount Shutters are directly hinged to window jambs. Hardware, including self mortised hinges and magnets, are mounted onto the panels Comes with 4 light blocks, with magnet catches installed on top/bottom light blocks. For hinge, part goes on the panel is pre-installed while part goes on the window jamb and hinge pin are included in the hardware box. Astragal stile is highly recommended in this mounting option to minimize light gap between panels. For shutters used as a door or without bottom support, please refer to the General Product Specification section for details. measurement Measure both width and height from the inside of window. 0." gap for clearance Hinge gap3/32" Panel Width = Window Opening Width - Hinge Gap 3/32" Hinge gap window opening height panel panel height = window opening height - top & bottom gaps 0." gap for Ramp Cap measurement Equal to panel size. Please note that the width should not include hinge between panel and window jamb. Max frame to frame width = Panel width (not include hinges) panel max frame to frame height = panel height
14 Measuring For Café Shutters Café Shutters The top of the panel requires special finish. Please indicate café shutter when placing orders. Shutter does not come with recessed magnet on top. WS = MFF = Window size measurement Panel Height: From bottom of window to top of panels 2-sided 3-sided 3-side inverted 4-sided Max frame to frame size measurement Panel Height: From bottom of frame to top of panels 2-sided 3-sided 3-side Inverted 4-sided 3
15 Measuring For Corner Window Corner Window Shutter is made as a single unit with corner post to cover both window Standard angle = 90 (For other angles, please refer to Bay Window section) Width will be different at different depths in window. To get an accurate measurement, please decide where frames will be mounted on and then measure width at correct place as shown in the corner window drawings. Suggested deduction is 6 " L Frame Outside Mount (Corner window with a break) L Frame Inside Mount (Continuous Corner Window) 4
16 Measuring For Corner Window Corner Window (con t) Size Size Z Frame Inside Mount ( Continuous Corner Window) Deco Frame Outside Mount (Corner Window with a Break) Size Size 2 " Size 8 " 8 " Size 2 " Hang Strip Inside Mount (Continuous Corner Window) Hang Strip Outside Mount (Corner Window with a Break) 5
17 Measuring For Bay Window Bay Window Shutter is made as a single unit with bay post to cover both window Standard angle = 35 (Custom angle is available) Width will be different at different depths in window. To get an accurate measurement, please decide where frames will be mounted on and then measure width at correct place as shown following diagrams. Glass L Frame Outside Mount L Frame Inside Mount M a x F r a m e t o F r a m e Glass Deco Frame Outside Mount Size Size Size Z Frame Inside Mount 6
18 8 " Measuring For Bay Window Bay Window (con t) Size Size Size 8 " Hang Strip Inside Mount 2 " 2 " Hang Strip Outside Mount 7
19 Measuring For T Post T Post T Post can be used to divides window vertically to match window design with mullion accommodate wider window opening/window with mullion allows shutters to be operated individually for better privacy and light control Custom T Posts are available to accommodate wider mullions and can be used with any frame type. L frame is shown here Measuring T Post location for. T = measure point A to point B 2. T2 = measure point A to point C 3. Measure from point A to point D for the overall window size. Measuring T Post location for. T3 = measure point E to point F 2. T4 = measure point E to point G 3. Measure from point E to point H for overall size. 8
20 Measuring For T Post T Post for Hang Strip OM Window size measurement: T Post is notched in order to fit into the window opening. T Post front face is flushed with hang strip front face. measurement: T Post will not be notched as the distance of the hang strip from the window edge cannot be determined. 3 4 " 2 " 2 " 2 " 2 " 2 " 2 " 2 " 2 " 9
21 Measuring For Other Window Situation Other Window Situation When there is an obstruction: For the example of a side-by-side window, or when there is obstruction such as a cabinet or wall, measurement is preferred. MOVE MOVE cabinet MOVE For windows with protruding cranks: Tilt out Z frame and Notch out L frame can be used for windows with protruding cranks or other obstructions. Tilt out Z frame requires less depth, leaving more room for tilt out windows to operate. All drawings above are shown in Deco Frame 20
22 Measuring For Other Window Situation Other Window Situation When there is a bullnose wall: Place frame on the flat part of the wall (where the curve ends) for both OM and IM width as shown below. Please provide the smallest measurement for IM. *** Please measure from the point where bullnose ends and flat wall begins. For windows with molding, casing or trim: Frame can be placed on the molding or beside the molding (see drawing below). Please provide measurement. Drawings are shown in L frame 2 0
HOW TO MEASURE AN ANGLED OR CURVED BAY WINDOW. A simple measure guide from The Shutter Store. Never be stuck! We re here to help
 HOW TO MEASURE AN ANGLED OR CURVED BAY WINDOW A simple measure guide from The Shutter Store hello@theshutterstore.co.uk 0800 0747 321 www.theshutterstore.co.uk Before you start you will need: A good quality
Features and Benefits
 Table of Contents a. Features & Benefits b. Colors & Louvers c. Stiles d. Panel Configurations e. Frame Styles f. General Product Specifications ions g. Tilt Rods h. Divider Rails i. Hinges j. Track Shutters
Bali DIY Shutters Your Simple Guide to Measuring & Installation
 Bali DIY Shutters Your Simple Guide to Measuring & Installation Free reverso en español Determine Your Wood-wrapped window MOLDING INSIDE MOUNT INSIDE MOUNT A Inside Mount Hang Strips Shutters are mounted
MEASURE INSTRUCTIONS CONTENTS: INSIDE MOUNT PAGE 2-4 OUTSIDE MOUNT PAGE 5-7 CAFE STYLE PAGE 8-14
 MEASURE INSTRUCTIONS CONTENTS: INSIDE MOUNT PAGE 2-4 OUTSIDE MOUNT PAGE 5-7 CAFE STYLE PAGE 8-14 MEASURE INSTRUCTION INSIDE MOUNTED SHUTTERS Measuring for shutters is easy. Just follow these simple steps
Solstice Shutter Reference Guide. August 2014
 Solstice Shutter Reference Guide August 2014 Overview American-Made Because It Matters All shutters are manufactured in Houston Texas in a state-of-the-art 125,000 square foot facility. Made in the USA
Measuring Information
 Measuring Information Measuring Instructions Revised: DEC. 2017 Always take care when measuring plantation shutters and be sure to look for any obstruction that may interfere with the operation of the
Measuring For Shutters
 Measuring For Shutters You will need a steel tape measure, a pencil and paper, you may require steps and another pair of hands to help! Full Height Style Shutters Inside Recess Fitting Before you begin:
HOW TO MEASURE A NON RECESS WINDOW - INSIDE MOUNT FIXING A SIMPLE INSTALLATION GUIDE FROM THERMALITE SHUTTERS 25 YEAR PROUDLY AUSTRALIAN MADE
 HOW TO MEASURE A NON RECESS WINDOW - INSIDE MOUNT FIXING A SIMPLE INSTALLATION GUIDE FROM THERMALITE SHUTTERS WARRANTY PROUDLY AUSTRALIAN MADE 25 YEAR WARRANTY Shutter Basics Plantation shutter panels
Shutter units arrive assembled and ready to install with detailed installation instructions. Traditional Shutter Construction Features
 Horizon Specifications & Measuring Instructions Horizon traditional shutters install to a window using one of three systems. The most basic and popular approach attaches shutters inside of the window opening
Step by Step Installation Instructions. Poly Shutters. Customer Service or visit us online at smithandnoble.com
 Step by Step Installation Instructions Poly Shutters Customer Service 800.248.8888 or visit us online at smithandnoble.com Thank you for purchasing from smith+noble. Your new window treatments have been
2013 Log. Date Topic Page Note 1/1/2013 Hardware Page i Add Panel Lock, Ring Pull, Side Magnet. 1/1/2013 Special Options Page k New PerfectTilt RF
 2013 Log Date Topic Page Note 1/1/2013 Hardware Page i Add Panel Lock, Ring Pull, Side Magnet 1/1/2013 Special Options Page k New PerfectTilt RF Table of Contents Page a. Features & Benefits WL a-1 b.
NORMAN SHUTTERS INSTALLATION INSTRUCTIONS. 4 sided Deco Frame. (Outside Mount - 2 Panel) Getting Started
 Getting Started") NORMAN SHUTTERS INSTALLATION INSTRUCTIONS 4 sided Deco Frame (Outside Mount - 2 Panel) Getting Started Recommended Tools: Nail Gun or Drill, Tape Measure, Torpedo Level, Box Knife, 6 Philips head driver
NORMAN SHUTTERS INSTALLATION INSTRUCTIONS 4 sided Deco Frame (Outside Mount - 2 Panel) Getting Started Recommended Tools: Nail Gun or Drill, Tape Measure, Torpedo Level, Box Knife, 6 Philips head driver
NORMAN SHUTTERS INSTALLATION INSTRUCTIONS. 4 Sided L Frame. (Outside Mount - Single Panel) Getting Started
 Getting Started") NORMAN SHUTTERS INSTALLATION INSTRUCTIONS 4 Sided L Frame (Outside Mount - Single Panel) Getting Started Recommended Tools: Nail Gun or Drill, Tape Measure, Torpedo Level, Box Knife, 6 Philips head driver
NORMAN SHUTTERS INSTALLATION INSTRUCTIONS 4 Sided L Frame (Outside Mount - Single Panel) Getting Started Recommended Tools: Nail Gun or Drill, Tape Measure, Torpedo Level, Box Knife, 6 Philips head driver
Installation Operation Care
 Installation Operation Care Palm Beach Polysatin Shutters CONTENTS Getting Started Installation Overview...1 Unpacking...1 Tools and Materials Needed...1 Fasteners...2 Frame Assembly Assemble the Frame
Shutter units arrive assembled and ready to install with detailed installation instructions. Plantation Shutter Construction Features
 Wood Plantation Shutters Specifications & Measuring Instructions Horizon plantation shutters install to a window using one of three systems. The most basic and popular approach attaches shutters inside
Hardware. Hinges. Direct Mount 3 Hinge. L Hinge
 Hardware Hinges Self-Mortise Hinge Bi-fold Hinge L Hinge Direct Mount 3 Hinge Hinges are available in: Pure White, Silk White, Bisque, Pearl, Bright, Antique, Black, plated, Plated and Stainless Steel
PRODUCT INFORMATION MANUAL SECTION: 2B POLYRESIN SHUTTERS POLYRESIN SHUTTERS
 POLYRESIN SHUTTERS CONTENTS A SELLING The History of Shutters A1 A2-3 Shutter Panel Parts A4 Clearview Mechanism A5 Louvre and Divider Rail Sizes A6 Frame Sizes and Applications A 7-8 Shutter Accessories
INSTALLATION INSTRUCTIONS
 INSTALLATION INSTRUCTIONS TOOLS REQUIRED Rechargeable, variable speed drill 3/8 diameter drill bit 3 Robertson bits #0, #1 and #2 Slot screwdriver Non marring hammer with 1 head Level Caulk or sealant
NORMAN SHUTTERS INSTALLATION INSTRUCTIONS. 4 Sided Z Frame. (Inside Mount - 2 panel) Getting Started
 Getting Started") NORMAN SHUTTERS INSTALLATION INSTRUCTIONS 4 Sided Z Frame (Inside Mount - 2 panel) Getting Started Recommended Tools: Nail Gun or Drill, Tape Measure, Torpedo Level, Box Knife, 6 Philips head driver Make
NORMAN SHUTTERS INSTALLATION INSTRUCTIONS 4 Sided Z Frame (Inside Mount - 2 panel) Getting Started Recommended Tools: Nail Gun or Drill, Tape Measure, Torpedo Level, Box Knife, 6 Philips head driver Make
Table of Contents. Ordering Forms & Warranty Order Reference Chart...61 Polycore Warranty...62 Lexwood Warranty...63 Lexwood Plus Warranty...
 Table of Contents Product Overview and Specifications Features and Benefits...1-2 Shutter Components...3-5 Shutter Terminology...6-8 Overview of Shutter Options...9 Requirements & Limitations...10-11 Shutter
NORMAN SHUTTERS INSTALLATION INSTRUCTIONS. Hang Strip. (Inside Mount 2 Panel) Getting Started
 Getting Started") NORMAN SHUTTERS INSTALLATION INSTRUCTIONS Hang Strip (Inside Mount 2 Panel) Getting Started Recommended Tools: Nail Gun or Drill, Tape Measure, Torpedo Level, Box Knife, 6 Philips head driver Make sure
NORMAN SHUTTERS INSTALLATION INSTRUCTIONS Hang Strip (Inside Mount 2 Panel) Getting Started Recommended Tools: Nail Gun or Drill, Tape Measure, Torpedo Level, Box Knife, 6 Philips head driver Make sure
NewStyle Hybrid Shutters
 NewStyle Hybrid Shutters Marking an evolutionary trend in shutters, NewStyle hybrid shutters combine the great style of wood with the strength, stability and straightness of advanced modern-day materials.
Shutter units arrive fully assembled and ready to install with detailed installation instructions. Poly Plantation Shutter Construction Features
 Poly Plantation Shutter Construction Features Poly Plantation Shutters Measuring Instructions Horizon poly plantation shutters install to a window using one of three systems. The most basic and popular
Installation Operation Care
 Installation Operation Care Palm Beach Polysatin Shutters CONTENTS Getting Started Installation Overview... 1 Unpacking... 1 Tools and Materials Needed... 1 Fasteners... 2 Frame Assembly Assemble the Frame
TIMBER / ALT BLIND MEASURING
 Most timber blind Installations involve fitting a blind within a window recess this is called INSIDE or REVEAL FITTING. Other Installations involve fitting the blind to the wall or onto an architrave.
Versatrim Side-Snap Frame
 Versatrim Side-Snap Frame net door width finished opening width rough opening width (finished opening width plus 1 1/2") Figure 1 Cross section of strike and hinge jambs The rough opening width is equal
French Door W/Cut-Out (Outside Mount L-Frame-Single Panel)
") NORMAN SHUTTERS INSTALLATION INSTRUCTIONS French Door W/Cut-Out (Outside Mount L-Frame-Single Panel) Getting Started Recommended Tools: Nail Gun or Cordless Drill, Tape Measure, Torpedo Level, Box Knife,
NORMAN SHUTTERS INSTALLATION INSTRUCTIONS French Door W/Cut-Out (Outside Mount L-Frame-Single Panel) Getting Started Recommended Tools: Nail Gun or Cordless Drill, Tape Measure, Torpedo Level, Box Knife,
series 9500 top load bi4fold installation instructions
 instructions Head Deflection (+0.12 / -0.00 ) Right Jamb Note: This is a top hung product. Provide adequate structure at head. Continuous threshold support is required. Left Jamb Head 4Lay bed of sealant
Figure #1 - VSNEO Shower Door Assembly
 Figure #1 - VSNEO Shower Door Assembly Figure #2 - VSNEO - Top View Figure #3 - VSNEO - Side View Figure #4 - Foam Curb Plug Figure #5 - Magnet Strip Figure #6 - VSNEO - Drip Deflector Preparation VSNEO
Installation Operation Care
 Installation Operation Care Palm Beach Polysatin Shutters CONTENTS Getting Started Installation Overview... 1 Unpacking... 1 Tools and Fasteners Needed... 1 Additional Materials... 1 Frame Assembly Panel
Bi-Pass And Bi-Fold Sliders
 Bi-Passs and Bi-Fold Sliders Installation Guide Bi-Pass And Bi-Fold Sliders Tools required: Hand Drill Counter Sink Drill BitSet #8 Philips Screw Driver Measuring Tape Level What s Included: Panels with
Sandringham Shutters. Shutters Sep 15. General Shutters information. There are a range of Shutter styles.
 General Shutters information There are a range of Shutter styles. Full height The most popular choice and can be supplied with or without mid/divider rails. The mid rails can be central or offset to match
Installation Manual MODEL ANE-42
 Installation Manual MODEL ANE-42 GET TO KNOW YOUR UNIT 1 2 1. CROSS BRACES 2. SIDE BRACKETS - Stud Finder - 12-14 Level - Tape Measure - Small Flathead Screwdriver Tools Needed: - Electric Drill (with
How To Measure Your Finished Opening
 3000 Series Bifold Doors How To Measure Your Finished Opening MEASURE FROM RIGHT TO LEFT 2 PLACES (WIDTH) MEASURE FROM TOP TO BOTTOM 2 PLACES (HEIGHT) Tools Required for Assembly: Tools Needed: Phillips
4. Partially open the operating panel and tilt the top toward the interior of the door (Figure 4). Lift the panel off the sill and set it aside.
. Lift the panel off the sill and set it aside.") Effective Date: 10/1/2017 Tools Needed Kit Contents Hardware Kit Safety Glasses Cordless drill Phillips screw bit Two-step drill bit (3/8-1/8 ) utility knife Interior Mullion Exterior Mullion Cover clamps
Effective Date: 10/1/2017 Tools Needed Kit Contents Hardware Kit Safety Glasses Cordless drill Phillips screw bit Two-step drill bit (3/8-1/8 ) utility knife Interior Mullion Exterior Mullion Cover clamps
INSTALLING YOUR SHUTTERS OUTSIDE MOUNT FULL HEIGHT SHUTTERS
 Shutters so good, you won t believe you ve done it yourself Installation is simple but a little preparation goes a long way to making it a smooth process. What You ll Have Shutter panels in big boxes Shutter
FIG. #1 - ASD & USD 180/280 Shower Door Assembly
 FIG. #1 - ASD & USD 180/280 Shower Door Assembly USD180 / 280 Euro Stall Header #1020 16 16 1 16 4 ASD180 / 280 Accent Stall Header #1021 5 3 8 6 7 8 Hinge Assembly: 2220, 2201, 2185, 2271, 2213 18 22
Installation Operation Care
 Installation Operation Care NewStyle Hybrid Shutters 9930011143F 4/18 CONTENTS Getting Started Installation Overview... 1 Unpacking... 1 Tools and Materials Needed... 1 Fasteners... 2 Frame Assembly Assemble
INSTALLATION AND CARE INSTRUCTIONS
 INSTALLATION AND CARE INSTRUCTIONS Skylight Manually Operated Honeycomb Shades 20 C8-10-1806 2/15 1 INTRODUCTION Thank you for purchasing our product. Your new shade has been custom built for you from
FIG. #1 - ASD-90 & USD-90 Shower Door Assembly
 Installation Instructions for the Accent/Euro Collection FIG. #1 - ASD-90 & USD-90 Shower Door Assembly #1021 #1021 1 23 25 2 #1020 6 5 12 #1020 9 24 9 8 Hinge Assembly 2109, 2201, 2212, 2213, 2220 7 Please
LEGENDS RETRACTABLE DOOR SCREENS
 LEGENDS RETRACTABLE DOOR SCREENS MAGNETIC LATCHING DESIGN SYSTEM 42 I N S T A L L A T I O N I N S T R U C T I O N S 1 MOUNTING OPTIONS Recess : Mount the Screen Cassette using Recess Mounting Clips Recess
Installation Manual MODEL NE-42
 Installation Manual MODEL NE-42 GET TO KNOW YOUR UNIT 1 1. CROSS BRACES - Stud Finder - 12-14 Level - Tape Measure - Small Flathead Screwdriver Tools Needed: - Electric Drill (with 1/4 & 1/8 drill bit)
C-Series & S-Series Classic Frame with Transom (Single or Pair)
") 1. TOOLS REQUIRED Tape measure 6' magnetic level 3' magnetic level Safety Glasses Screw gun #2 Screwdriver tip #3 Screwdriver tip Philips Head screwdriver (Used to move frame on wall using oval slots on
1. TOOLS REQUIRED Tape measure 6' magnetic level 3' magnetic level Safety Glasses Screw gun #2 Screwdriver tip #3 Screwdriver tip Philips Head screwdriver (Used to move frame on wall using oval slots on
Vinyl Sliding Glass Door Assembly Instructions
 Vinyl Sliding Glass Door Assembly Instructions SERIES SGD 5470/5570 Para instrucciones en español, visite: http://bit.ly/pgtassemblyinstructions Parts List ITEM 4 5 6 7 8 9 0 4 5 6 7 8 SGD 5470/5570 PARTS
Side Light Frame Pack Assembly Instructions
 Please read this complete set of assembly instructions before starting the installation and only when you understand the construction method start to follow the step by step guide. IDENTIFY THE PACK CONTENTS
INSTALLATION INSTRUCTIONS. Deluxe Continuous Hinge Inline Door & Panel Shower Enclosure QCI5230
 INSTALLATION INSTRUCTIONS Deluxe Continuous Hinge Inline Door & Panel Shower Enclosure QCI5230 QCI5230 Rev 0 6 shower new QCI5230 Rev 0 Page 2 Certified 06/20/2016 Parts List A. Curb (w/ weep holes) (1)
How to fit an Internal Door
 How to fit an Internal Door How to fit an Internal Door The following instructions are for installing a internal door only. If you have any queries please contact Cheshire Mouldings technical helpline
Block Frame Inovo Patio Door/Transom/Sidelite Field Mulling Instructions. simonton.com/installation. If mulling sidelites, skip to Step 5.
 Effective Date: 10/1/17 Tools Needed Kit Contents Safety Glasses Cordless Drill Phillips Screw Bit Two-step Drill Bit (3/8-1/8 ) Utility Knife Interior Mullion Exterior Mullion Cover Hardware Kit Clamps
Side Light Frame Pack Assembly Instructions
 Side Light Frame Pack Assembly Instructions Please read this complete set of assembly instructions before starting the installation and only when you understand the construction method start to follow
HOW TO INSTALL YOUR DIY SHUTTERS
 A simple installation guide from California Shutters Page 1 Before you start you will need: Small hammer Phillips Screwdriver (star) Drill Spirit level Appropriate fixings for your window type (rawl plug
Sliding Glass Door Assembly and Installation Guide
 Sliding Glass Door Assembly and Installation Guide Index Door System Components and Hardware The following components are needed to complete the installation of your Sliding Patio Door unit. Check all
Chapter 9. Windows and Exterior Doors
 Chapter 9. Windows and Exterior Doors 9.1 INSTALLING WINDOWS 9.2 INSTALLING EXTERIOR HOUSE DOORS 9.3 INSTALLING SHED DOOR 9.4 INSTALLING EGRESS COMPONENTS Tools needed by volunteers: Hammer Nail apron
western series 9500 f loor load The Volume Program window systems westernwindowsystems.com bi fold installation instructions
 series 9500 f loor load bi fold The Volume Program Note: This is a bottom hung product. Provide adequate structure at threshold. Continuous threshold support is required. Right Jamb Head Deflection (+0.12
NEPAL Installation procedure
 PART DESCRIPTION 1.- Door handle (1pc) 2.- Long tight bar (1pc) 3.- Short tight bar (1pc) 4.- Support block-lower (2pcs) 5.- Wall jamb cap (2pcs) 6.- Tight bar support (2 pcs) 7.- Acrilic base (1pc) 8.-
Fold-A-Way Patio Door ASSEMBLY & INSTALLATION GUIDE
 Fold-A-Way Patio Door ASSEMBLY & INSTALLATION GUIDE This instruction guide provides the minimum recommended procedures to correctly prepare the rough opening, install a fold-a-way patio door unit and apply
METAL BLINDS. Deluxe GETTING STARTED OPTIONAL HARDWARE. A few simple tools are required: STANDARD HARDWARE
 METAL BLINDS Deluxe GETTING STARTED OPTIONAL HARDWARE A few simple tools are required: Steel Tape Measure Pencil Level Hold Down Brackets with Screws Extension Bracket Power Drill and Drill Bits Flathead
Pet Door Panel Installation Manual
 Pet Door Panel Installation Manual 400-558-1 1 4/3/03, 3:26 PM Components: Pet Door Panel Panel Latch Assembly Foam Weather-stripping Glass Sweep (4) Binding Posts (6) #6 x 1/2 Sheet Metal Screws (4) 8-32
Shaker Wall Clock Version 1
 Shaker Wall Clock Version 1 The construction of both the original and this version is as simple as the spare design. I will offer several options -- in construction techniques, dimensional changes and
Step by Step Installation Instructions. Poly Shutters. Customer Service or visit us online at smithandnoble.com
 Step by Step Installation Instructions Poly Shutters Customer Service 800.248.8888 or visit us online at smithandnoble.com THANK YOU for purchasing from smith+noble. Your new window treatments have been
NORMAN SHUTTERS INSTALLATION INSTRUCTIONS. Direct Mount. Getting Started
 NORMAN SHUTTERS INSTALLATION INSTRUCTIONS Direct Mount Getting Started Recommended Tools: Drill (Cordless), Tape Measure, Box knife, #2 Phillips drill tip, #6 Countersink drill bit (for light block) if
Insolroll Clutch Operated Shades Installation Instructions Installation Instructions
 All clutch operated shades are shipped fully assembled and ready for installation. Mounting screws are not provided. Screws for chain guide installation to meet the child safety standards are provided.
INSTALLATION GUIDE. 1. Overview. 2. Measuring. 3. Tools & fixings you will need B C. Opening Width. Opening Height
 INSTALLATION GUIDE Please take a few minutes to read through this guide before getting started. 1. Overview A Typical Sliding Wardrobe Door Layout A Frame - Top Liner (optional) B Top Track C Frame - Strike
Entrance Cabinet Plans
 Entrance Cabinet Plans www.andrewharriswoodwork.com Page 1 of 19 Introduction I have tried to ensure all steps are covered in these plans but if you find any errors in the plans or have a question then
IDP Entry-Fit Steel Door Frames. Installation Instructions K2A and NK2A Series Frames
 IDP Entry-Fit Steel Door Frames Installation Instructions K2A and NK2A Series Frames IDP Inc 21300 W. 8 Mile Rd. Southfield, MI 48075 1-877-645-2770 www.idpframes.com email: info@idpframes.com K2A and
Installation Operation Care
 Installation Operation Care Heritance Hardwood Shutters NewStyle Hybrid Shutters CONTENTS Getting Started Installation Overview... 1 Unpacking... 1 Tools and Materials Needed... 1 Fasteners... 2 Frame
LEGENDS RETRACTABLE DOOR SCREENS
 I N S T A L L A T I O N I N S T R U C T I O N S 1 MOUNTING OPTIONS Recess : Mount the Screen Cassette using Recess Mounting Clips Recess within the door jamb area. Recess installations are the most typically
HOW TO INSTALL YOUR CUSTOM MADE SHUTTERS A SIMPLE INSTALLATION GUIDE FROM THERMALITE SHUTTERS 25 YEAR PROUDLY AUSTRALIAN MADE
 HOW TO INSTALL YOUR CUSTOM MADE SHUTTERS A SIMPLE INSTALLATION GUIDE FROM THERMALITE SHUTTERS WARRANTY PROUDLY AUSTRALIAN MADE 25 YEAR WARRANTY Before you start you will need: Small hammer Phillips Screwdriver
1 PREPARE HEADER AND ROUGH OPENING
 CONTENTS. HEADER & TRACK ASSEMBLY. END BRACKET PLAIN 3. FLOOR PLATE.. 8. 4. SPLIT STUD 6 5. CARRIER (987) 6. QUICK RELEASE PLATE (960) 7. DOOR GUIDE SET (9883) 3. 4. 7. 8. BUMPER KIT (988) 9. #8 X 3/4
Design Considera ons & Installa on Guidance
 Design Considera ons & Installa on Guidance LiteSpace Interior Aluminum Framing provides a slim profile for glass walls and office fronts. It is designed to be cut to length on project sites for finished,
TRADITIONS WOOD SHUTTERS
 Features TRADITIONS WOOD SHUTTERS Table of Contents The Graber Wood Story....2 Wood Characteristics.... Options and Size Considerations Shutter Styles....4-5 Product Illustration, Panel Detail....6 Louver
" " REQUIREMENT: CHECK DEPTH OF WINDOW OPENING TOWARD THE GLASS TO THE FIRST OBSTRUCTION
 Wood-wrapped Window REQUIREMENT: CHECK F SQUARENESS Measure to see if your window is SQUARE. Measure from opposing corners and record your measurements in the spaces below. A B Calculate the DIFFERENCE
Atrium Patio Door Field Service Manual
 Atrium Patio Door Field Service Manual December 2005 Table of contents Service Agreement Pg 2 Release Agreement Pg 5 Inspection form Pg 6 Warranty Pg 8 Replacing swing panel Pg 12 Replacing sliding panel
Folding Sliding door system
 Folding Sliding door system Installation guide V1.1 Nov 2014 p2 This document is offered as guidance for WarmCore folding sliding door installations - for full survey and installation guidelines please
300 CV Series. Semi-Frameless Hinged Door. 202 Anderson Ave., Belvue, KS Phone: Fax:
 202 Anderson Ave., Belvue, KS 66407 Phone: 800-669-9867 Fax: 800-393-6699 www.onyxcollection.com 800-643-1514 www.alumaxshowerdoor.com 300 CV Series Semi-Frameless Hinged Door 300CV-1117 300cv PARTS LIST
Installation Guide. WarmCore. Folding Sliding door system. Glass Packing. Pre-Installation. Removing the Existing Door.
 WarmCore Installation Guide Pre-Installation Glass Packing p5 Removing the Existing Door Glazing Sequence p6 Preparing the Opening Glass Packing Locations for Toe & Heel p6 Door Alignment Sill Options
INOVO 4-LITE SLIDING PATIO DOOR ASSEMBLY AND INSTALLATION INSTRUCTIONS
 INOVO 4-LITE SLIDING PATIO DOOR ASSEMBLY AND INSTALLATION INSTRUCTIONS IMPORTANT: READ THE INSTRUCTIONS AND FAMILIARIZE YOURSELF WITH THE DOOR PARTS AND PIECES BEFORE BEGINNING ASSEMBLY AND INSTALLATION.
XL JOINERY LTD LA PORTE VISTA MODULAR 3 ASSEMBLY INSTRUCTIONS
 XL JOINERY LTD LA PORTE VISTA MODULAR 3 2090mm High x 4687mm Wide ASSEMBLY INSTRUCTIONS READ AND UNDERSTAND THESE INSTRUCTIONS FULLY PRIOR TO STARTING INSTALLATION. IT IS STRONGLY RECOMMENDED THAT A COMPETENT
Model 6100 Illustrated Installation Instructions Contractors Wardrobe
 Model 6100 Illustrated Installation Instructions Contractors Wardrobe DESIGNERS MANUFACTURERS 26121 Avenue Hall Valencia, CA 91355 (661) 257-17 Fax: (661) 257-4907 Toll Free: (800) CW-DOORS (800) 293-6677
Pleated Shades with Corded Top Down / Bottom Up Option
 Pleated Shades with Corded Top Down / Bottom Up Option Installation Instructions Email: customerservice@blindster.com Call us: (888) 256-8672 Mon - Fri 8am - 7pm (CT) Congratulations on purchasing Pleated
IMPORTANT INSTALLATION GUIDE VALENCIA ANGLE CORNER SHOWER READ ALL INSTRUCTIONS CAREFULLY BEFORE STARTING THE INSTALLATION
 INSTALLATION GUIDE VALENCIA ANGLE CORNER SHOWER SEALANT REQUIRED TO COMPLETE THIS INSTALLATION: (Supplied) Sika Sikasil NG (Arctic White) To seal the WHITE shower door and returns to the shower tray. Usage:
Semi-Frameless Hinged Door With Panel And Return
 202 Anderson Ave., Belvue, KS 66407 Phone: 800-669-9867 Fax: 800-393-6699 www.onyxcollection.com 800-643-1514 www.alumaxbath.com Semi-Frameless Hinged Door With Panel And Return Full Showers with Return
Installation Operation Care
 Installation Operation Care Provenance Woven Wood Shades Standard Cordlock CONTENTS Getting Started: Product View... 1 Tools and Fasteners Needed... 2 Installation: Installation Overview... 3 Mount the
2 1 2" Louver Shutter Instructions
 " Shutter Instructions Congratulations on your purchase of the Template Set! These instructions will guide you through the process of building a Plantation Shutter. Familiarity with the instructions will
Perfect Fit blinds. Features. Options. No holes drilled into windows or door. Easy to install and remove: Stylish and contemporary appearance:
 Features Perfect Fit Pleated, Venetian and Roller blinds are designed for most upvc windows, doors and conservatory sides. Features include: No holes drilled into windows or door Easy to install and remove:
1200 SERIES 2 PANEL DOOR rev.1 DETAILED INSTALLATION INTRUCTIONS
 1200 SERIES 2 PANEL DOOR 10.2013 rev.1 DETAILED INSTALLATION INTRUCTIONS GENERAL: Door elevations shown in these instructions are as viewed from the outside. X denotes the active or moving panel(s). O
Chapter 9. Windows and Exterior Doors
 Chapter 9. Windows and Exterior Doors 9.1 INSTALLING WINDOWS 9.2 INSTALLING EXTERIOR HOUSE DOORS 9.3 INSTALLING SHED DOOR 9.4 INSTALLING BASEMENT EGRESS COMPONENTS Tools needed by volunteers: Hammer Nail
3-LITE PATIO DOOR INSTALLATION INSTRUCTIONS
 3-LITE PATIO DOOR INSTALLATION INSTRUCTIONS IMPORTANT: Read the instructions and familiarize yourself with the door parts and pieces before beginning assembly and installation. TOOLS NEEDED: Tape Measure
UNIT No FRAMELESS PIVOT SHOWER DOOR
 INSTALLATION INSTRUCTIONS UNIT No. 3600 FRAMELESS PIVOT SHOWER DOOR NEED INSTALLATION HELP? Call 1-800-45-BASCO (452-2726) Monday - Friday 8:00 A.M. - 4:30 P.M. Eastern Time QCI0020 Rev. 3 Page 1 of 8
Murphy Door DIY Flush-Mount Bookshelf & Hardware Installation Manual
 Murphy Door DIY Flush-Mount Bookshelf & Hardware Installation Manual The Murphy Door Flush-Mount Bookshelf was designed to install in the space normally occupied by a door. It is NOT designed to install
Slider Door Installation Instructions
 Slider Door Installation Instructions IMPORTANT: If installing a Slider Door and Side Panel only; ie. a corner installation, please refer to alternative fixing details on the document reverse. 2 YEAR GUARANTEE
Alessi Installation Guide - vjun16
 - vjun16 1 Thank you for purchasing this Alessi bath screen. Please study these instructions carefully before assembly and installation. Checking of Parts Parts are listed at the beginning of this guide.
LEVOLOR. Sheer Shadings. Persianas traslúcidas Stores diaphanes INSTALLATION OPERATION CARE
 LEVOLOR Sheer Shadings Persianas traslúcidas Stores diaphanes INSTALLATION OPERATION CARE INSTALACIÓN FUNCIONAMIENTO CUIDADO INSTALLATION FONCTIONNEMENT ENTRETIEN Sistema operativo sin cordón Système sans
Versatrac R-System Stock Extrusions, Clips and Accessories
 Versatrac R-System Extrusions are available in 300 series (for 3 3/4" walls) and 400 series (for 4 7/8" walls). Standard finishes are Satin Metallic Bronze, Satin Black, Satin White Baked Enamel, and Clear
2300 BI-FOLD INSTALLATION GUIDE
 2300 BI-FOLD INSTALLATION GUIDE INSTALLATION INSTRUCTIONS OF MAIN FRAME Header #8 x 2½ zinc coated screws 2 1 2 Jamb Jamb 1 1 3 #8 x 2½ zinc coated screws 4 1 4 3 #8 x 2½ zinc coated screws 5 Threshold
INFINITE RANGE - HINGE DOOR
 INFINITE RANGE - HINGE DOOR HINGE DOOR + 1 SIDE RETURN PANEL (CORNER) Please read these instructions before installing, as incorrect fitting will invalidate the guarantee-carry out each stage before moving
Vinyl Privacy & Picket Gates
 FREEDOM-WEB Privacy & Picket s INSTALLATION INSTRUCTIONS Read all instructions prior to installing product. Refer to manufacturers safety instructions when operating any tools. To register your product,
Mod e l A urora P l u s Walk-In Doo r
 Installation Instructions Mod e l A urora P l u s Walk-In Doo r Contractors Wardrobe DESIGNERS MANUFACTURERS TOLL FREE: (800) CW-DOORS (800) 29-66 www.cwdoor.com 26121 Avenue Hall Valencia, CA 9155 (661)
9 X 9 REMOVABLE TYPE ALUMINUM WINDOW BARS INSTALLATION INSTRUCTIONS Import Note : 9 X 9 Spacing Removable Type Installation is covered in this
 Import Note : 9 X 9 Spacing Removable Type Installation is covered in this Instruction. Removable Bars Only Mount in Recess Position ( Between Window Jamb/ Frame ) The spacing between horizontal bars is
Endura All-Aluminum Z-Articulating Cap Sill Retrofit Kit for French Doors
 Endura All-Aluminum Z-Articulating Cap Sill Retrofit Kit for French Doors Installation Instructions Before You Begin: This retrofit kit is designed for the Endura Z-Series All- Aluminum sill. Please ensure
L e g e n d Inline panel shower enclosure installation Instructions (400 Series)
") L e g e n d Inline panel shower enclosure installation Instructions (00 Series) PATENTS PENDING Legend Inline (hinged) 0-3 -0 (A) ALWAYS ON DOOR SIDE EXPLODED VIEW OF MODULAR INLINE PANEL (RIGHT HAND HINGED
L e g e n d Inline panel shower enclosure installation Instructions (00 Series) PATENTS PENDING Legend Inline (hinged) 0-3 -0 (A) ALWAYS ON DOOR SIDE EXPLODED VIEW OF MODULAR INLINE PANEL (RIGHT HAND HINGED