Glue the ends onto the rafters following the instructions on the container of glue supplied with the kit.
|
|
|
- Eleanor Booker
- 5 years ago
- Views:
Transcription


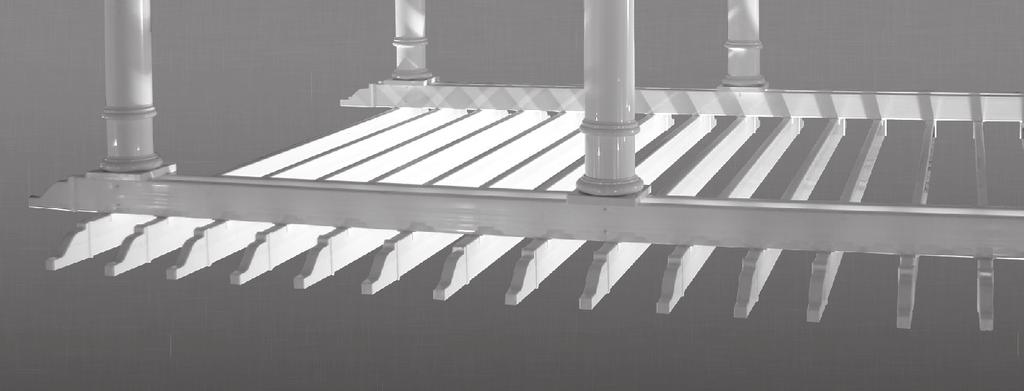
1 29 Glue the ends onto the rafters following the instructions on the container of glue supplied with the kit. 30 Raise and position rafters using a measuring tape to center each rafter on the beams. Secure each rafter by driving #8 x 1" screws through the rafter mounting brackets into the rafters on each side With the bottom trim ring raised out of the way, pre-drill 3 /1/ 16 " holes through the bottom of the post, 11 2" from the bottom on opposite sides, into the post bracket. Secure the post to the bracket using #14 x 4" screws. Lower the bottom post trim into position covering the post bracket. 7


2 Round column assembly completed. 8 Molded column assembly completed.


3 Installation Options Vinyl Lattice Lattice can be installed on the top of the rafters. Allow approximately 4" to overhang the edges of the rafters on the ends with the lattice extending out to where the pergola end caps begin. Channel is installed on each raw edge of the lattice and secured with screws. 11 2" Squares 11 2" squares can be arranged on the top approximately 12" apart with end caps glued onto them. Notice this example has the squares beginning where the pergola caps begin. 9


4 Gingerbread Scroll To install the gingerbread scroll, first cut a section of 5" x 5" vinyl stock to the length between the posts. The 5" x 5" section is screwed between the posts from the inside using 21 2" screws. Follow the instructions with the package that the gingerbread scroll is shipped in. 10


5 Railing For 5" Pergolas 5" Railing is installed following the instructions in the box in which the railing was shipped. If you have chosen to include railing with your installation there are two options for mounting the bottom rail. The option shown here results in there being only two inches from the bottom of the rail to the deck. This may be required for some installations where there is a significant drop to the next level below the deck. Check with the code requirements in your area for specific requirements. The alternative results in there being 4" below the rail and this alternative is installed in the same manner as the T rail mounting bracket. 1 In either case, install the bottom bracket onto the post resting on the trim, as shown. First mark the center of each post trim base. Center the bracket and follow the instructions included with the railing package.?" 2 Measure the span between the two posts and subtract 11 2". Divide the result in half and, from the center of the rail, measure back that distance on the routed side of the rail. Mark that position and measure the total length as determined. Following this procedure should provide a bottom rail that has equally spaced balusters and equally spaced excess on both ends. 3 Using a carbide tip fine-tooth cutting blade, cut at a 22 angle to remove the unwanted material. Remember the cuts start at the top of the rail and travels in on both ends resulting in a keystone shaped piece. 11


6 4 Slide the other bracket onto the end of the rail and fit the rail into the bracket installed in the first step. 5 Position the other side and slide the round column adapter behind the bracket. Slide the bracket against the adapter and secure the sub-assembly to the post. 7 Position the other side and slide the round column adapter behind the bracket. Slide the bracket against the adapter and secure the sub-assembly to the post. 6 Place the balusters into the pockets in the bottom rail. 8 Slide the T rail brackets onto the top rail and, starting at one end, fit each baluster into its appropriate pocket. 9 Position the top rail on the post so that it is plumb with the bottom rail and secure the brackets as in the previous steps. 10 Repeat these steps for each section to be installed. 12
Pergola Installation Instructions
 Pergola Installation Instructions TOOLS REQUIRED HAMMER DRILL 1/2 MASONRY BIT PENCIL DRILL 3/16 DRILL BIT LEVEL SQUARE LADDER WRATCHET & SOCKETS RUBBER MALLET 2 TAPE MEASURE Column/Post Placement Table
CountryAccents Pergola Assembly Instructions
 CountryAccents Pergola Assembly Instructions Options 11 2" Squares Lattice Railing Gingerbread Scroll (For 5" Posts Only) Site Preparation Site preparation for either the round column or the 5" post pergola
10 x 10 Flat Top Pergola
 0 x 0 Flat Top Pergola A S S E M B L Y G U I D E Models: Venetian, Tuscany, Luxor, Acadia O P T I O N A L A C C E S S O R I E S Arch Kit System ( Arches) Privacy Fence Panel System ( Panels & Middle Post)
8 x 8 Flat Top Pergola
 A S S E M B L Y G U I D E O P T I O N A L A C C E S S O R Y Bolt Down Bracket Kit Models: Mirage, Mandalay Ver 6/00 Ta b l e o f Co n t e n t s Introduction & Overview......................................................
8 x 8 Flat Top Pergola
 A S S E M B L Y G U I D E O P T I O N A L A C C E S S O R Y Bolt Down Bracket Kit Models: Mirage, Mandalay Ver 8.0/MAR 0 Ta b l e o f Co n t e n t s PAGE Introduction & Overview......................................................
6 1/2 x 6 1/2 Flat Top Pergola
 6 / x 6 / Flat Top Pergola A S S E M B L Y G U I D E Models: Portland, Liberty O P T I O N A L A C C E S S O R Y Bolt Down Bracket Kit V.-0506 Ta b l e o f Co n t e n t s PAGE The Introduction & Overview......................................................
10 x 10 Flat Top Two Tone Pergola
 0 x 0 Flat Top Two Tone Pergola Models: Bordeaux ASSEMBLY GUIDE OPTIONAL ACCESSORIES Arch Kit System ( Arches) Privacy Fence Panel System ( Panels & Middle Post) Bolt Down Bracket Kit ( for Pergola) Ver.0-00
10 x 10 Arch Top Pergola
 0 x 0 Arch Top Pergola I N S T A L L A T I O N G U I D E O P T I O N A L A C C E S S O R I E S Privacy Fence Panel System ( Panels & Middle Post Included) Bolt Down Bracket Kit (Set of ) Additional Shade
12 x 12 Flat Top Pergola
 x Flat Top Pergola Model: Regency, Roosevelt A S S E M B L Y G U I D E O P T I O N A L A C C E S S O R Y Bolt Down Bracket Kit ( for Pergola) Ver./MAR 0 Ta b l e o f Co n t e n t s PAGE x Flat Top Pergola
12 x 12 Flat Top Pergola
 x Flat Top Pergola Model: Regency, Roosevelt ASSEMBLY GUIDE OPTIONAL ACCESSORIES: Bolt Down Bracket Kit Canvas Weave Shade Kit Privacy Wall Pergola Planter ( for Pergola) (Regency Only) (Regency Only)
6 1/2 x 6 1/2 Wood Grain Flat Top Pergola
 6 / x 6 / Wood Grain Flat Top Pergola A S S E M B LY G U I D E Models: Lakewood OPTIONAL ACCESSORY Bolt Down Bracket Kit Ver /AUG/0 Ta b l e o f Co n t e n t s PAGE The 6.5 x 6.5 Wo o d Grain Flat Top
8 x 8 Flat Top Pergola
 A B C ASSEMBLY GUIDE Models: Mirage OPTIONAL ACCESSORIES A) Bolt Down Bracket Kit ( for Pergola) B) Tall Base Molding C) Short Base Molding Ver 0.-067 Table of Co n t e n t s PAGE Introduction & Overview......................................................
12 x 12 Flat Top Pergola
 x Flat Top Pergola Model: Freemont A S S E M B L Y G U I D E O P T I O N A L A C C E S S O R Y Bolt Down Bracket Kit ( for Pergola) Ver.-057 Ta b l e o f Co n t e n t s PAGE x Flat Top Pergola Introduction
The Mirage Pergola ASSEMBLY GUIDE. OPTIONAL ACCESSORY Bolt Down Bracket Kit. Ver 3/2009
 ASSEMBLY GUIDE OPTIONAL ACCESSORY Bolt Down Bracket Kit Ver /009 Table of Contents PAGE Introduction & Overview...................................................... Mirage Pergola Materials Overview.....................................................
Pergola Kits USA offers two different Premium Vinyl pergola kits
 Pergolas 101 Headers (beams, support rails) - Single or Double support beam, runs the width of the unit. 2 x8 profile lagged or install into post system and receives brackets for rafters. Rafters (joists)
12 x 24 Flat Top Pergola
 A S S E M B LY G U I D E OPTIONAL ACCESSORIES: Bolt Down Bracket Kit Privacy Wall (6 for Pergola) Pergola Planter Ver.-75 Ta b l e o f Co n t e n t s PAGE Introduction & Overview......................................................
6 1/2 x 6 1/2 Wood Grain Flat Top Pergola
 / x / Wood Grain Flat Top Pergola A S S E M B LY G U I D E Models: Lakewood OPTIONAL ACCESSORY Bolt Down Bracket Kit V.- Ta b l e o f Co n t e n t s The PAGE Introduction & Overview.......................................................
VINYL CLASSIC FREESTANDING PERGOLA ASSEMBLY INSTRUCTIONS
 P a g e 1 VINYL CLASSIC FREESTANDING PERGOLA ASSEMBLY INSTRUCTIONS Shown: 8' x 12' Vinyl Classic Pergola with 12" Top and Main Runner Spacing The design of this pergola is based on all posts being installed
The Fairfield Deluxe Arbor
 A S S E M B LY I N S T R U C T I O N S The Fairfield Deluxe Arbor in 9. in in 9. in in Please read through before starting assembly. 0 in 0 in in in IMPORTANT: CHECK THE INSIDE OF YOUR POSTS FOR ALL MATERIALS.
The Devonshire Arbor 85 in
 ASSEMBLY INSTRUCTIONS in in in in in Please read through before starting assembly.. in IMPORTANT: CHECK THE INSIDE OF YOUR POSTS FOR ALL MATERIALS. Check Box for These Contents In the event of missing
12 x 12 Flat Top Pergola
 x Flat Top Pergola A S S E M B LY G U I D E Model: Freemont OPTIONAL ACCESSORY Bolt Down Bracket Kit ( for Pergola) Ver /NOV 00 AI-BP0-0- Ta b l e o f Co n t e n t s PAGE x Flat Top Pergola Introduction
Tools Needed. 8 per column: stainless steel or hot-dipped galvanized bolts. Mallet
 Structural VINYL PERGOLA SuperiorPlasticProducts.com Tools Needed Drill Safety Glasses 1 Hammer Drill & 1/2" Masonry Bit Tape Measure & Pencil Drill Bits 1/8" 1/4" 5/8" Level 8 per column: Ratchet & Sockets
Belham Living Harbor Bay Pergola
 Belham Living Harbor Bay Pergola A S S E M B LY G U I D E OPTIONAL ACCESSORY Bolt Down Bracket Kit Models: Ver.0-08065 Belham Living Harbor Bay Ta b l e o f Co n t e n t s B elham Living Harbor Bay Pergola
6 1/2 x 6 1/2 Wood Grain Flat Top Pergola
 / x / Wood Grain Flat Top Pergola A S S E M B LY G U I D E Models: Lakewood OPTIONAL ACCESSORY Bolt Down Bracket Kit V.-09 Ta b l e o f Co n t e n t s The PAGE Introduction & Overview.......................................................
10x10 Trellis Pergola
 0x0 Trellis Pergola ASSEMBLY GUIDE Ver.-007 Table of Contents PAGE 0x0 Trellis Pergola Introduction & Overview...................................................... Pergola Materials Overview..............................................................
The Nantucket Legacy Arbor
 ASSEMBLY INSTRUCTIONS 0. in 9 in 0. in 68 in 7 in in *Nantucket Legacy with Trim Kit Shown Above. Please read through before starting assembly. in 60 in 0 in 8 in IMPORTANT: CHECK THE INSIDE OF YOUR POSTS
Lenox Slide Lock Pergola
 ASSEMBLY GUIDE Models: Lenox OPTIONAL ACCESSORIES Bolt Down Bracket Kit ( for Pergola) Ver.0-076 Table of Co n t e n t s Introduction & Overview...................................................... Pergola
The Camden Privacy Screen
 ASSEMBLY INSTRUCTIONS The Camden Privacy Screen 0 5/8 in (66 cm) 7 / in (8 cm) 6 / in (6.5 cm) 90 in (9 cm) Post 66 in (68 cm) 78 in (98 cm) Please read through before starting assembly. IMPORTANT: CHECK
INSTALLATION INSTRUCTIONS. Level Rail With Cap: Page 2 Level Rail Without Cap: Page 8 Stair Rail: Page 12
 INSTALLATION INSTRUCTIONS Level Rail With Cap: Page 2 Level Rail Without Cap: Page 8 Stair Rail: Page 12 LEVEL RAIL WITH CAP The testing was performed in accordance with procedures and methods referenced
2017 UPDATED INSTALLATION INSTRUCTIONS
 2017 UPDATED INSTALLATION INSTRUCTIONS with square composite or round metal balusters Manufactured by fiberondecking.com 800.573.8841 Horizon Railing 6 ft. and 8 ft. Installation Instructions Required
VINYL PERGOLA. Structural. Recommended Tools. What's Included. SuperiorPlasticProducts.com. SuperiorPlasticProducts.com
 Structural VINYL PERGOLA Recommended Tools Safety Glasses Tape Measure & Level Power Drill w/ (1/8", 1/4", 5/8") bits Hammer Drill w/ (1/8") bit Circular Saw w/ Fine Tooth Blade Rubber Mallet Ladder What's
10x10 Trellis Pergola
 0x0 Trellis Pergola ASSEMBLY GUIDE Ver.0-7 Table of Contents PAGE Introduction & Overview...................................................... Pergola Materials Overview..............................................................
TREX ENHANCE RAILING (Also Applies to Trex Select Railing) Installation Instructions
 Installation Instructions") TREX ENHANCE RAILING (Also Applies to Trex Select Railing) NOTE: All Enhance Railing lengths are manufactured at CLEAR SPAN dimensions (spanning between space of posts): 7" for 6' clear span. Note that
TREX ENHANCE RAILING (Also Applies to Trex Select Railing) NOTE: All Enhance Railing lengths are manufactured at CLEAR SPAN dimensions (spanning between space of posts): 7" for 6' clear span. Note that
INSTALLATION INSTRUCTIONS PRAVOL DURA-SHIELD COMPOSITE DECK RAILINGS
 INSTALLATION INSTRUCTIONS PRAVOL DURA-SHIELD COMPOSITE DECK RAILINGS Important: Read all sections before you start Prior to installing railing, please consult local zoning laws in regards to load requirements
IMPORTANT: Read all sections before you start
 1 IMPORTANT: Read all sections before you start For the most up to date information please visit our website @ www.newtechwood.com Prior to installing the railing, please consult local zoning laws in regards
WOOD POST FD POST. Installation Guide FD POST MOUNT STAIR / ANGLE RAILING LAG STAIR / ANGLE RAILING STUD CABLE RAILING FITTINGS
 Installation Guide It is the responsibility of the installer to meet or exceed all code and safety requirements, and to obtain all required building permits. These instructions are only a guide and may
PORCH RAIL INSTALLATION INSTRUCTIONS. Level Rail... 2 Stair Rail... 8 Care & Maintenance, Finishing... 15
 PORCH RAIL INSTALLATION INSTRUCTIONS Level Rail... 2 Stair Rail... 8 Care & Maintenance, Finishing... 15 COMPONENT LIST LEVEL RAIL KIT Porch Rail was designed to meet the most stringent building codes.
The Newport Arbor ASSEMBLY INSTRUCTIONS. Material You Will Need (Not Included) 4 in x 4 in x 4 ft Pressure Treated Lumber (4)
 4 in x 4 in x 4 ft Pressure Treated Lumber (4)") ASSEMBLY INSTRUCTIONS in in / in / in 0 in in in in Please read through before starting assembly. IMPORTANT: CHECK THE INSIDE OF YOUR POSTS FOR ALL MATERIALS. Check Box for These Contents In the event
ASSEMBLY INSTRUCTIONS in in / in / in 0 in in in in Please read through before starting assembly. IMPORTANT: CHECK THE INSIDE OF YOUR POSTS FOR ALL MATERIALS. Check Box for These Contents In the event
2x Bottom Bracket. 1x Rail Support STEP 1 STEP 2
 Level Railing Top Rail Bottom Rail Aluminum Baluster 2x Bottom Bracket 1x Rail Support Kit Includes: 1 - Top Rail (with Baluster Connectors installed) 1 - Bottom Rail (with Baluster Connectors installed)
The Festival Assembly Instructions
 The Festival Assembly Instructions Toll Free: 866.768.8465 Hours: 9-5 Monday-Friday EST www.homeplacestructures.com Package ships as shown CONTACT INFORMATION: HomePlace Structures 301 Commerce Drive New
Ready-To-Assemble VersaRail INSTALLATION INSTRUCTIONS
 FREEDOM-WEB Ready-To-Assemble VersaRail INSTALLATION INSTRUCTIONS Read all instructions prior to installing product. Refer to manufacturers safety instructions when operating any tools. To register your
TREX TRANSCEND RAILING
 RAILING NOTES:» RAILINGS ARE DESIGNED TO BE INSTALLED OVER THE DECKING FRAME OR ON INSIDE OF RIM JOIST. NOTCHING OF PRESSURE-TREATED POSTS OR POSTS INSTALLED ON OUTSIDE OF RIM JOIST IS NOT ALLOWED.» All
Installation Instructions
 sentry Railing Installation Instructions Manufactured by www.fiberonhomeselect.com 800.318.7828 FHS-0001-LIT 1/13 Sentry Railing Installation Instructions Required Tools and Supplies: Sentry Top Rail Profile
Double Beam Freestanding Pergola Installation Guide
 Double Beam Freestanding Pergola Installation Guide Patent Pending. Copyright 2011 USAVinyl, LLC - All Rights Reserved The information contained in these instructions are proprietary to USAVinyl, LLC and
FREESTANDING DOUBLE HEADER PERGOLA ASSEMBLY INSTRUCTIONS
 FREESTANDING DOUBLE HEADER PERGOLA ASSEMBLY INSTRUCTIONS Before You Begin: Recommended Tools: Note on Masonry Units: Note on Electric Drills: Note on Cutting and Drilling: 1) Please read all instructions
ATTACHED DOUBLE HEADER PERGOLA ASSEMBLY INSTRUCTIONS
 ATTACHED DOUBLE HEADER PERGOLA ASSEMBLY INSTRUCTIONS Before You Begin: Recommended Tools: Note on Masonry Units: Note on Electric Drills: Note on Cutting and Drilling: 1) Please read all instructions and
ATTACHED SINGLE HEADER PERGOLA ASSEMBLY INSTRUCTIONS
 ATTACHED SINGLE HEADER PERGOLA ASSEMBLY INSTRUCTIONS Before You Begin: Recommended Tools: Note on Masonry Units: Note on Electric Drills: Note on Cutting and Drilling: 1) Please read all instructions and
PVC Composite Railing & Stair Kit
 FREEDOM-WEB PVC Composite Railing & Stair Kit INSTALLATION INSTRUCTIONS Read all instructions prior to installing product. Refer to manufacturers safety instructions when operating any tools. To register
Empire Dresser Plans
 1 Empire Dresser Plans Materials 1 sheet 3/4" plywood (cabinet grade 4' x 8') 1 sheet 5 mm (3/16") underlayment plywood 4'x 8', buy another 1/2 sheet if you want to put a back on the dresser. 1-2" x 4"
Yardistry. External Display YP *Time required for assembly approximately 1.5-2hrs
 Yardistry External Display YP40030 *Time required for assembly approximately 1.5-2hrs Components 4 Packages of Panel Clips (Includes 6 Panel Clips and Hardware) 3 16 1/2 x 16 1/2 Signs (hardware Included)
SHADOWBOX INSTALLATION FOR: Standard 6 H x 8 W Shadowbox Fence 5 x 5 Routed Posts Dog Ear or Straight-Edge Pickets 1.75 x 3.5 Rail
 SHADOWBOX INSTALLATION FOR: Standard 6 H x 8 W Shadowbox Fence 5 x 5 Routed Posts Dog Ear or Straight-Edge Pickets 1.75 x 3.5 Rail Storage and Handling Fence Preparation and Layout Locate and Set Posts
RAILING. Installation Guide
 RAILING Installation Guide THE BEST CHOICE FOR STRONG & DURABLE RAILING SYSTEMS Our exclusive manufacturing process ensures our vinyl railing will provide superior strength plus it is virtually maintenance
ASSEMBLY GUIDE. Barcelona Pergola. 12 X16 (365CMx487CM) VER /01/19
 VER /01/19") ASSEMBLY GUIDE Barcelona Pergola 12 X16 (365CMx487CM) VER 1.9 04/01/19 GETTING STARTED First off, allow us to say thank you for the investment you have made in our fine pergola. This pergola is designed
ASSEMBLY GUIDE Barcelona Pergola 12 X16 (365CMx487CM) VER 1.9 04/01/19 GETTING STARTED First off, allow us to say thank you for the investment you have made in our fine pergola. This pergola is designed
Classic Vinyl Stair Railing. Installation Guide
 Classic Vinyl Stair Railing Installation Guide THE BEST CHOICE FOR STRONG & DURABLE RAILING SYSTEMS Our exclusive manufacturing process ensures our vinyl railing will provide superior strength plus it
Installation Instructions for. Handrail Component System
 Handrail STEP-BY-STEP Installation Instructions for Handrail Component System Rise in Inches Run in Inches 8 8.5 9 9.5 10 10.5 11 11.5 12 12.5 13 13.5 14 14.5 15 8.5 47 45 43 42 40 39 38 36 35 34 33 32
TREX SELECT RAILING Installation Instructions
 RAILING NOTE : All Trex Select Railing lengths are manufactured at ON CENTER dimensions (spanning from center of each post): 67-5/8" (76.8 cm) for 6' (.83 m) on center, and 9-5/8" (35.3 cm) for 8' (.44
Installation Guide. Capped Cellular PVC Fencing. Table of Contents. Storage and Handling Tools Needed Fence Layout and Locating Posts
 Capped Cellular PVC Fencing Installation Guide Table of Contents Storage and Handling Tools Needed Fence Layout and Locating Posts Installation instructions 4 x 4 Over Sleeve Post - 3.5 Rail Privacy Shadowbox
DeckRail A Product of DeckRite LLC 3912 East Progress North Little Rock, AR Phone: (501) Fax: (501)
 Fax: (501)") Deck Rite Welded Picket Railing Installation Guide Disclaimer: This guide is not intended to replace a trained professional installer. The drawings and instructions contained within are for demonstration
Deck Rite Welded Picket Railing Installation Guide Disclaimer: This guide is not intended to replace a trained professional installer. The drawings and instructions contained within are for demonstration
Installing the Nantucket (100 Series), Manhattan (200 Series), and Charleston (300 Series) Code-Approved Rail Systems
, Manhattan (200 Series), and Charleston (300 Series) Code-Approved Rail Systems") ENRAIL INSTALL GUIDE Installing the Nantucket (100 Series), Manhattan (200 Series), and Charleston (300 Series) Code-Approved Rail Systems Thank you for choosing Enduris Enrail Code-Approved Railing products.
ENRAIL INSTALL GUIDE Installing the Nantucket (100 Series), Manhattan (200 Series), and Charleston (300 Series) Code-Approved Rail Systems Thank you for choosing Enduris Enrail Code-Approved Railing products.
Level Railing. Installation Guide. v2.5 W W W. S O L U T I O N S A L U M I N U M. C O M
 Level Railing Installation Guide Top Rail Bottom Rail Aluminum Baluster 2x Bottom Bracket 1x Rail Support #909915 Kit Includes: 1 - Top Rail (with Baluster Connectors installed) 1 - Bottom Rail (with Baluster
CXT PRO RAILING INSTALLATION INSTRUCTIONS For Installations Using Aluminum and Glass Balusters Sold Separately
 CXT PRO RAILING INSTALLATION INSTRUCTIONS For Installations Using Aluminum and Glass Balusters Sold Separately CCRR-0171 PFS AA-652 Drill/power screwdriver Assorted drill bits Hammer Miter or circular
TREX SELECT RAILING. Installation Instructions PARTS
 RAILING NOTE : All Trex Select Railing lengths are manufactured at ON CENTER dimensions (spanning from center of each post): 67-5/8" (76.8 cm) for 6' (.83 m) on center, and 9-5/8" (35.3 cm) for 8' (.44
Oceanside Outdoor Vinyl Shower Kit (3 x 3 Enclosure)
") Oceanside Outdoor Vinyl Shower Kit ( x Enclosure) A B ASSEMBLY GUIDE REQUIRED FOR INSTALLATION (A) Zippity Post Extension for In-Ground Installation (Sold as 4-Packs) (B) Zippity Galvanized Steel Surface
Oceanside Outdoor Vinyl Shower Kit ( x Enclosure) A B ASSEMBLY GUIDE REQUIRED FOR INSTALLATION (A) Zippity Post Extension for In-Ground Installation (Sold as 4-Packs) (B) Zippity Galvanized Steel Surface
INSTALLATION INSTRUCTIONS FOR ULTRA LATTICE AND ALUMAWOOD ARBORS
 INSTALLATION INSTRUCTIONS FOR ULTRA LATTICE AND ALUMAWOOD ARBORS GENERAL INFORMATION: Lattice arbors are designed to be freestanding or attached. They are designed to resist a 10 lb. to 30 lb. per square
Aluminum Railing Gate Kit
 BOM-34115787 Aluminum Railing Gate Kit INSTALLATION INSTRUCTIONS Read all instructions prior to installing product. Refer to manufacturers safety instructions when operating any tools. To register your
Dura-Lock Roof System
 DLR-14 Dura-Lock Roof System Assembly and Installation Instructions Read the instructions before starting the job. They explain the steps required to produce a finished product that will meet factory specifications.
Country Estate Railing Installation Guide
 Country Estate Railing Installation Guide Country Estate Railings are fabricated with the highest quality Railing products available and will provide you with many years of comfort and security. Please
PRIVACY INSTALLATION FOR: Standard 6 H x 8 W Privacy Fence 4 x 4 Post Sleeve & Brackets Dog Ear or Straight-Edge Pickets 1.75 x 3.
 PRIVACY INSTALLATION FOR: Standard 6 H x 8 W Privacy Fence 4 x 4 Post Sleeve & Brackets Dog Ear or Straight-Edge Pickets 1.75 x 3.5 Rail Storage and Handling Fence Preparation and Layout Locate and Set
The Westchester Arbor
 A S S E M B LY I N S T R U C T I O N S 9. in 90 in. in 0 in in 0 in in Please read through before starting assembly. Check Box for These Contents In the event of missing or defective parts please call
Installation Guidelines
 Page 1 Tools You ll Need 4 ft. Carpenter s level Chalk line (to mark U channel locations) Cordless drill/nut driver Caulking gun Chop saw with a metal cutting blade on it (required to make accurate and
MODERN PERGOLA INSTALLATION GUIDE. When only the best will do.
 MODERN PERGOLA INSTALLATION GUIDE When only the best will do. TOOLS LIST Drill(s) 3/8" Magnetic Driver (s) 12" Drill Extension #2 Square Drive bit for Drill or Driver Level Tape Measure Hammer Drill if
Fireball Fab Welded Baluster Insert Panel System Installation Instructions
 Fireball Fab Welded Baluster Insert Panel System Installation Instructions Prior to construction, check with your local regulatory agency for special code requirements in your area. Common railing height
Ready-To-Assemble VersaRail INSTALLATION INSTRUCTIONS
 Ready-To-Assemble VersaRail INSTALLATION INSTRUCTIONS Read all instructions prior to installing product. Refer to manufacturers safety instructions when operating any tools. To register your product, please
The Chrisfield Freestanding Pergolas
 You Can Do-It We Can Help 5/9/2011 The Chrisfield Freestanding Pergolas Pergola Beams: Are two hollow vinyl 2 x 8s which can be sleeved for additional structural support using pressure treated 2x8s NOT
Vinyl Gazebo Instructions
 P a g e 1 Vinyl Gazebo Instructions 10 Vinyl Gazebo Shown Thank you for the purchase of your New Gazebo. Depending on the size of your Gazebo, installation can usually be completed in 1 to 2 days. These
Vinyl Fence Installation Instructions. Privacy Fence Installation Instructions
 Privacy Fence Installation Instructions Tips Before You Start - Read this instruction sheet completely. - During fence assembly, work on a soft, non-abrasive surfaces where possible to avoid - scratching
ATTACHED PERGOLA ARBOR INSTALLATION INSTRUCTIONS
 ATTACHED PERGOLA ARBOR INSTALLATION INSTRUCTIONS Recommended Tools: Before You Begin: Saftey Glasses, Tape Measure, Carpenters Level, Framing Square, Hex Head Nut Drivers, Chalk Line Elec. Drill w/ Bits
Regency Railing. Rail Installation Instructions
 Regency Railing Rail Installation Instructions Prior to installing railing: Please consult local zoning laws in regards to load requirements and bottom space requirements for rails. All supporting structures
Fortress Al Posts must always be secured to the deck framing. Fortress Al Posts should never be attached to only the deck boards.
 Installation Instructions for Fortress Railing Traditional Panels with s and Posts It is the responsibility of the installer to meet all code and safety requirements, and to obtain all required building
Installation Instructions for. Before You Begin TOOLS REQUIRED
 Composite Railing System STEP-BY-STEP Installation Instructions for Spectrum Composite Railing Virtually maintenance free 20-year warranty EverNew Spectrum Railing system is designed to work with a number
AFCO-Rail Post INSTALLATION INSTRUCTIONS AFCO-RAIL POST
 AFCO-Rail Post INSTALLATION INSTRUCTIONS TOOLS REQUIRED: Drill Bits (for the appropriate fastener) Drill (with adjustable clutch, recommended) Level String Line Tape Measure Tools to install fasteners
DeckRail A Product of DeckRite LLC 3912 East Progress North Little Rock, AR Phone: (501) Fax: (501)
 Fax: (501)") Disclaimer: Deck Rail Glass Railing Installation Guide This guide is not intended to replace a trained professional installer. The drawings and instructions contained within are for demonstration purposes
Disclaimer: Deck Rail Glass Railing Installation Guide This guide is not intended to replace a trained professional installer. The drawings and instructions contained within are for demonstration purposes
VersaRail Gate Kit. freedomproduct.com. To register your product, please visit: INSTALLATION INSTRUCTIONS
 VersaRail Gate Kit INSTALLATION INSTRUCTIONS Read all instructions prior to installing product. Refer to manufacturers safety instructions when operating any tools. To register your product, please visit:
REGENCY TIMBER BUILDINGS
 REGENCY TIMBER BUILDINGS TEL 01948 830460 UNIT 22 PENLEY IND EST, PENLEY.WREXHAM. LL13 0LQ 1 Garage fitting instructions Tools needed handsaw, hammer, Stanley knife with hook blade, tape measure, battery
Pergola Installation Guide
 Pergola Installation Guide When only the best will do. 1 Tools Needed Installation Tools for assembly Drill(s) Miter or Circular Saw with carbide blade (cut slowly) ½" Drill Bit 5 /8" Drill Bit 5 /16"
12 x 12 Flat Top Attached Louvered Pergola
 x Flat Top Attached Louvered Pergola Model: Elysium ASSEMBLY GUIDE OPTIONAL ACCESSORIES: Bolt Down Bracket Kit Privacy Wall Pergola Planter ( for Pergola) VR.-0077 Table of Co n t e n t s PAGE x Flat Top
The Nantucket Legacy Arbor
 SSEMLY INSTRUTIONS The Nantucket Legacy rbor Please read through before starting assembly. IMPORTNT: HEK THE INSIDE OF YOUR POSTS FOR LL MTERILS. heck ox for These ontents In. the Keystone event of missing
2.0. Select Rail & Stair Kit Assembly and Installation Instructions BOM V2 5/13. Owner's Manual. Version
 Select Rail & Stair Kit Assembly and Installation Instructions PLEASE READ OWNER'S MANUAL COMPLETELY BEFORE ASSEMBLING YOUR RAIL OR STAIR KIT. 34106886BOM V2 5/13 Models 73012418 / 73012436 / 73012424
Cabinet Mount Lifter Instructions
 PART LIST 2 @ Side Pivot Arms 1 @ Coupler Tube 1 @ Left Hand Bracket 1 @ Right Hand Bracket 2 @ Cover Support Arms w/ Foam Grip 1 set of Cover Saver 4 @ 4 Wood Screw 8 @ 1 Wood Screw 12 @ 1 Black Tek Screw
Octagon Vinyl Gazebo Assembly Instructions
 Octagon Vinyl Gazebo Assembly Instructions For 10 & 12 Models Toll Free: 866.768.8465 Hours: 9-5 Monday-Friday EST www.homeplacestructures.com Package ships as shown revised 04/29/09 Vinyl Gazebo Assembly
Artisan Vinyl Pergola
 Artisan Vinyl Pergola Assembly Manual Thank you for your purchase of this Pergola. Beefy Vinyl Pergola Assembly Manual This manual is designed to simplify the assembly process, however we recommend having
ClearVue Roofing System Technical Manual
 Technical Manual Components CLEARVUE RAFTER BRACKETS CV-02 2 Components CLEARVUE EXTRUSIONS CV-03 3 Components END PLATES - 6mm SHEET CV-04 4 Components END PLATES - 8mm SHEET CV-05 5 Components MECHANICAL
Pergola Installation Guide. When only the best will do.
 Pergola Installation Guide When only the best will do. Tools Needed Installation Tools for assembly Drill(s) Miter or Circular Saw with carbide blade (cut slowly) 5 /8" Drill Bit 5 /16" Magnetic Driver
SYSTEM 42 SCREEN CASSETTE WITH 30mm SIDE RAIL
 LEGENDS VERTICAL WINDOW RETRACTABLE SCREEN SYSTEM 42 SCREEN CASSETTE WITH 30mm SIDE RAIL I N S T A L L A T I O N I N S T R U C T I O N NOTE: Screen components must be installed on a flat surface to ensure
Post & Rail. Includes: Crossbuck, 2-Rail, 3-Rail and 4-Rail POST SUPPORT OPTIONS
 Post & Rail Includes: Crossbuck, 2-Rail, 3-Rail and 4-Rail STAGGER RAIL ENDS FOR GREATER STRENGTH ALLOW 1-1/2" GAP ON HINGE SIDE OF GATE AND 1-1/4" ON LATCH SIDE OF GATE HARDWARE DIG HOLES 30" MINIMUM
T r e x Art i s a n Se r i e s Railing
 T r e x Art i s a n Se r i e s Railing I n s t a l l a t i o n In s t ru c t i o n s Trex Railing Components A. Trex Top Rail B. Trex Bottom Rail C. Trex Railing Support Bracket D. TrexExpress Railing
Need a little help installing your railing?
 Need a little help installing your railing? www.rdirail.com/support/installation-videos.html Post Installation LAG BOLT APPLICATION Determine the desired rail placement and snap a line on to the deck to
Octagon Vinyl Gazebo Assembly Instructions For 10 & 12 Models
 Octagon Vinyl Gazebo Assembly Instructions For 10 & 12 Models Toll Free: 866.768.8465 Hours: 9-5 Monday-Friday EST www.homeplacestructures.com Package ships as shown revised 04/29/09 Vinyl Gazebo Assembly
INSTALLATION INSTRUCTIONS MILLENNIUM DECKING Before Installing Millennium Decking, please read these instructions in their entirety.
 INSTALLATION INSTRUCTIONS MILLENNIUM DECKING Before Installing Millennium Decking, please read these instructions in their entirety. Safety PRE-INSTALLATION Compliance with all applicable local, state
10 x 10 Flat Top Pergola
 0 x 0 Flat Top Pergola B C D SSEMBLY GUIDE Models: Venetian, rcadia, Malibu E OPTIONL CCESSORIES ) Bolt Down Bracket Kit ( for Pergola) B) Pergola Wall C) Pergola Planter - (available for Venetian & Malibu