Create cable assemblies to fit your style
|
|
|
- Mark Butler
- 5 years ago
- Views:
Transcription


1 2015 Feeney (11/15) Quick-Connect Brochure # B Create cable assemblies to fit your style Quick-Connect Solutions Guide
2 The fast and easy way to create your own CableRail assemblies! Our CableRail Standard Assemblies are an easy to use option for most railing installations, but some projects have construction or design needs that require a different solution. We ve taken our patented automatic-locking-jaw technology and applied it to a full range of sleek and swageless cable end fittings that offer you the opportunity to use CableRail stainless steel cable infill to create virtually any assembly you need. Quick-Connect makes it easy Versatile - Use Quick-Connect fittings to attach CableRail to: Post or wall surfaces Angled terminations And more Automatic-Locking-Jaw Technology - Just insert the cable into the fitting, and it locks automatically. No cumbersome crimp tools or difficult to use compression fittings. Easy Cable Tensioning - fittings adjust cable tension with just a spin of the compact turnbuckle body. Fast and Easy Field Assembly - No need to pre-measure cable lengths. Made from high quality 316 marine grade stainless steel for long lasting beauty and easy maintenance. Quick-Connect Fitting Automatic Locking Jaw 1/8-in Cable, 1x19 Construction Protection Seal Stainless Steel Exterior STEP 1 Find Your Solution A. Wood Posts - Outside to Outside Attachment: See CableRail Standard Assemblies brochure B. Wood Posts - Inside to Inside Attachment Level Application 9903w Surface Mount 9910DL Lag 9913w Surface Mount Angled Application 9915DL Pivot 9903w Surface Mount Option DL Lag 9916DL Pivot 9913w Surface Mount Drill lag holes at angles Drill pivot lag Drill surface mounting C. Wood Posts - Outside to Inside Attachment Level Application 9903w Surface Mount Angled Application Beveled Washer & Cap Option DL Pivot 9903w Surface Mount Drill lag holes at angles Drill pivot lag Drill surface mounting D. Wrapped/Sleeved Wood Posts - Inside to Inside Level Application 9910DL Lag Angled Application 9915DL Pivot 9910DL Lag 9916DL Pivot Drill lag holes at angles Drill pivot lag


 180 pivoting allows for angled stair terminations Typically paired with a QC Pivot Turnbuckle Includes 2 Hanger Bolts: One with 2-in of lag thread for")
3 2 STEP Select Your Fittings Fixed Ends are fittings that have no tensioning capabilities. Tension Adjustment Fittings are used to tighten the cable lines. Every cable assembly must be paired with a Tension Adjustment Fitting. For use with 1/8-in diameter CableRail cable only. Fixed Ends (For 1/8-in CableRail) QUICK-CONNECT FIXED LAG Screws into the face of a post or wall using a hanger bolt with 1/4-in lag thread (included) Typically paired with a QC Lag Turnbuckle Includes 2 Hanger Bolts: One with 2-in of lag thread for and one with 2-1/2-in of lag thread for wrapped/ 9905DL-pkg QUICK-CONNECT FIXED SURFACE MOUNT Attaches to the face of a wall or post (wood screws included) 130 pivoting allows for angled stair terminations Typically paired with a QC Surface Mount Turnbuckle 9903w-pkg QUICK-CONNECT PIVOT Screws into the face of a post or wall using a hanger bolt with 1/4-in lag thread (included) 180 pivoting allows for angled stair terminations Typically paired with a QC Pivot Turnbuckle Includes 2 Hanger Bolts: One with 2-in of lag thread for and one with 2-1/2-in of lag thread for wrapped/ 9915DL-pkg Take Up 3/4-in Tension Adjustment Fittings (For 1/8-in CableRail) QUICK-CONNECT LAG SWIVEL TURNBUCKLE Screws into the face of a post or wall using a hanger bolt with 1/4-in lag thread (included) Tension adjusted by spinning the special swiveling body Typically paired with a QC Lag or another QC Lag Turnbuckle Includes 2 Hanger Bolts: One with 2-in of lag thread for wood posts and one with 2-1/2-in of lag thread for wrapped/ Take Up 9910DL-pkg 3/4-in QUICK-CONNECT SURFACE MOUNT SWIVEL TURNBUCKLE Attaches to the face of a wall or post (wood screws included) Tension adjusted by spinning the special swiveling turnbuckle body 130 pivoting allows for angled stair terminations Typically paired with a QC Fixed Surface Mount or another QC Surface Mount Turnbuckle 9913w-pkg Take Up 3/4-in QUICK-CONNECT PIVOT SWIVEL TURNBUCKLE Screws into the face of a post or wall using a hanger bolt with 1/4-in lag thread (included) Tension adjusted by spinning the special swiveling turnbuckle body 180 pivoting allows for angled stair terminations Typically paired with a QC Pivot or another QC Pivot Turnbuckle Includes 2 Hanger Bolts: One with 2-in of lag thread for wood posts and one with 2-1/2-in of lag thread for wrapped/ Take Up 9916DL-pkg 3/4-in QUICK-CONNECT THREADED TERMINAL Inserts through a drill hole in the post and is secured and adjusted with a flat washer and washer-nut (included). Trim excess threads and finish with decorative caps (sold separately, see accesories) Use beveled washers for angled terminations and flat washers for added bearing surface on Take Up 9904-pkg 5-in - or wrapped/ - or wrapped/ - or wrapped/ - or wrapped/ Wood or Metal Wood or Metal Wood or Metal


.")


4 Select Your Cable 3 STEP BULK CABLERAIL CABLE 1/8-in For use with all Quick-Connect fittings Cable Length ft ft ft GENERAL TOOL CHECKLIST Safety Glasses 7/16-in Wrench Work Gloves Electric Grinder & Disk Pencil Hacksaw Measuring Tape Cable Lacing Needle Electric Drill Quick-Connect Release Tool Drill Bits Hanger Bolt Installation Tool Hammer Tension Gauge Cable Cutters or Cut-Off Disk 3/8-in Open End Wrenches Vice-Grip Pliers 4 STEP Select Your Tools CABLE CUTTERS For shearing excess cable Coated handles, hardened jaws 2972-pkg CABLE LACING NEEDLE For quickly lacing cable ends through posts 3221-pkg 5 STEP HANGER BOLT INSTALLATION TOOL For easily installing hanger bolts Used on pivot fittings 3988-pkg QUICK-CONNECT RELEASE TOOL For releasing the cable from the jaws of the QC fitting to remove or adjust the position 3128-pkg Select Your Accessories FEENEY STEELRENEWAL + STEELPROTECT For cleaning and protecting CableRail cable and hardware Description 5064-pkg Stainless steel cleaner + protectant combination pack FEENEY TENSION GAUGE Easy to use tool for checking cable tension 6004-pkg COLORED END CAPS Decorative option for covering and finishing Quick-Connect Threaded fittings Sold 10 per package 7071-pkg 7072-pkg 7073-pkg 7074-pkg 7077-pkg Color Black White Brown Gray Bronze STAINLESS PROTECTOR SLEEVES For protecting corner and stairway transition posts from cable abrasion ( only) Sold 10 per package 3210-pkg (fits 1/4-in diameter holes) Protector Sleeves prevent abrasion at angled transitions on (e.g. stair transition posts or outside faces of double corner posts). DOME CROWN CHAMFER STAINLESS END CAPS Decorative option for covering and finishing Quick-Connect Threaded fittings Sold 4 per package 3372-pkg 3373-pkg 3374-pkg Style Dome Crown Chamfer STAINLESS BEVELED WASHERS For providing a flat bearing surface when attaching fittings at angled stair terminations (for use with Threaded ) Sold 4 per package 3799-pkg FEENEY ALUMINUM INTERMEDIATE PICKETS Non-structural pickets for maintaining cable spacings Pre-drilled for cables Powder coated aluminum, available in Silver, Black and White Includes base plates and screws Description 7648 SLV-pkg Level installations; Silver 7649 SLV-pkg Stair installations; Silver 7648 BLK-pkg Level installations; Black 7649 BLK-pkg Stair installations; Black 7648 WHT-pkg Level installations; White 7649 WHT-pkg Stair installations; White 7648 SLV-pkg Level Use Beveled Washers for stair termination posts with angled holes SLV-pkg Stair


5 Frame Requirements Frames need to support the tension of properly installed cables. They need to be designed and built strong enough for the end and corner posts to support a load of approximately 300-lbs for each cable. Here are some basic guidelines to help you prepare your railing frames for cable infill. Posts End and Corner Posts: The end and corner posts are the cable termination/transition posts and support the full load of the taut cables. They should be sized accordingly. Intermediate Posts: The remaining intermediate posts do not support any tension load since the cables pass straight through, so they can be sized as required for cap rail support or for code. The Basic Frame Design WALL WALL End Posts: Securely bolt or lag to joists or deck surface. MAX. 3-FT Maximum Post Spacing: Space all posts and vertical spacers a maximum of 3-ft apart to minimize any deflection that may occur if the cables are ever forced apart (see below). MAX. 3-FT Intermediate Posts: Size all intermediate posts as required for cap rail support strength or for code. And Some Other Options Top Rail: Always include a strong, rigid cap rail that is securely fastened to all posts. Set railing height per local code. Cable Spacing: Maximum 3-in apart. Wood Blocking (for wood railing) Underneath the cap rail attach minimum 1x 4 wood blocking between posts to provide additional lateral reinforcement to the posts so that they won t pull out of plumb when the cables are tensioned. Double Corner Posts: If possible use double corner posts to allow the cable to run continuously through the corners without terminating (except when using composite /wrapped posts). Securely bolt or lag posts to joists or deck surface. Intermediate Picket: Intermediate pickets may be used instead of the larger intermediate posts to achieve a more open railing design. These are non-structural members and are intended to maintain cable spacing and minimize deflection. Attach them to the cap rail and either the foot rail, deck surface, or joists. Cable Spacing: Maximum 3-in apart. For complete details on railing frame requirements, please visit IMPORTANT NOTES Since building codes vary by state, county, and city, following these guidelines may not ensure code compliance in all areas. Please consult with your local building department before starting your cable project. CableRail cable assemblies and fittings are designed for use on railings, fences, and trellises only. They should never be used for lifting, hanging, or high load applications. Please check with composite material manufacturer and your contractor for recommendations regarding use with CableRail. CONSTRUCTION CHECKLIST Space cables maximum 3-in apart Space posts/verticals maximum 3-ft apart Securely fasten all posts and cap rails Carefully plan all termination and corner posts for proper clearance, positioning, and maximum cable run lengths Straight runs of cable (no turns/dips) should not exceed 50-ft Runs with corner bends (2 corner bends at most) should not exceed 40-ft Use minimum 4x6 size wood for all end and corner posts in wood railings Bottom Rails (OPTIONAL): Recommend spacing no more than 4-in (or as per code) above the deck surface. Single Corner Post (OPTIONAL): Cables must be terminated at the corners if single posts are used. Securely bolt or lag to joists or deck surface. If using QC Threaded s be sure to offset the cable drill holes by at least 1/2-in to allow internal clearance for the cable fittings. Design Ideas! DesignRail Aluminum Rail Kits: These easy-to-use kits come with top and bottom rails, an intermediate picket pre-drilled for CableRail, and the hardware needed to connect the rails to your. Kits are available for both stair and level railings and are made of high quality aluminum for long lasting beauty with low maintenance. Feeney Intermediate Pickets: Pre-drilled and pre-packaged aluminum intermediate pickets are ready to be installed.


6 Quick-Connect Assemblies Are Easy To Install 1 Measure Length Measure Length 2 3 Termination Posts Review your railing frame. Determine which posts or walls will be used for terminating the cable assemblies. Select your cable and fittings. Mark and drill holes in all posts. Hole sizes will vary depending on the size and style of cable fittings used. Lace the cable assemblies through your intermediate posts and attach the fittings to the termination posts Spin Turnbuckle Body Tighten Nut Trim cable to length. Insert cable into fitting with protection seal in place. Jaws lock automatically. CABLE ASSEMBLY CARE & MAINTENANCE The protective chromium oxide film on the surface of stainless steel gives it superior corrosion resistance. Properly maintained stainless steel provides excellent luster, strength, and durability. In most applications stainless steel will not rust or stain even after many years of service, but it is NOT rust or stain proof. When stainless comes in contact with chloride salts, sulfides, or other rusting metals, it can discolor or even rust and corrode. With proper care and maintenance, however, stainless steel can remain beautiful and functional for years to come. Clean stainless with soap and warm water. Never clean with mineral acids or bleaches. Never use coarse abrasives like sandpaper or steel wool on stainless. Use synthetic Scotch pads instead. Never leave stainless in contact with iron, steel, or other metals. This can cause rust spots or corrosion. Always remove stains or rust spots as soon as possible with either soap and water or a brass, silver, stainless, or chrome cleaner. Periodically inspect cable assemblies for proper tension and re-tension as necessary. This is important. Protection Seals are pre-inserted into the nose of each fitting to provide added protection against the entry of dirt and dust into the fitting. Tighten the cables using the Tension Adjustment Fittings. The Feeney Tension Gauge may be used to check cable tension. If using QC Threaded s, trim any excess threads and apply caps to finish the ends. Looking for more information, detailed installation instructions, or technical documentation? Please scan the QR code. AVAILABLE AT: DETERMINING WHAT YOU LL NEED Carefully Review: Read all of the product descriptions, installation instructions, and frame recommendations in this brochure. For additional details, visit Section Frames: Divide your railing frame into sections by determining which walls or posts will be the cable termination points. Remember that straight runs should not exceed 50-ft and runs with bends (2 corner bends at most) should not exceed 40-ft. Calculate Quantities: The number of assemblies depends on your railing design. Please note: each horizontal cable is a separate assembly and cables should not be spaced further than 3-in apart. Calculate the number of fittings, 2 per assembly, including at least 1 tension adjustment fitting, and total cable needed for the project. Check Accessories & Tools: Count up all the end caps, protector sleeves, beveled washers, cutters, lacing needles, drills, saws, and abrasive disks you may need Feeney, Inc. Fill Your Order: Visit your local CableRail dealer and pick up your required items.
Now available at participating Feeney (2/14) AF# A. Stores. 1/8'' Stainless Steel Cable Assemblies to Enhance Any Railing and Any View!
 AF# A. Stores. 1/8'' Stainless Steel Cable Assemblies to Enhance Any Railing and Any View!") 2014 Feeney (2/14) AF# 2009-236A Now available at participating Stores 1/8'' Stainless Steel Cable Assemblies to Enhance Any Railing and Any View! Easy-to-install, prefabricated cable assemblies are an
2014 Feeney (2/14) AF# 2009-236A Now available at participating Stores 1/8'' Stainless Steel Cable Assemblies to Enhance Any Railing and Any View! Easy-to-install, prefabricated cable assemblies are an
1/8 Stainless Steel Cable Assemblies to Enhance Any Railing and Any View!
 2017 Feeney (2/17) Packaged Products Catalog #2011-338G 1/8 Stainless Steel Cable Assemblies to Enhance Any Railing and Any View! Standard Cable Assemblies Easy-to-install, prefabricated cable assemblies
1/8 Stainless Steel Cable Assemblies to Enhance Any Railing and Any View!
 2015 Feeney (3/15) Packaged Products Catalog #2011-338D 1/8 Stainless Steel Cable Assemblies to Enhance Any Railing and Any View! Standard Cable Assemblies Easy-to-install, prefabricated cable assemblies
ATTRACTIVE VERSATILE DURABLE
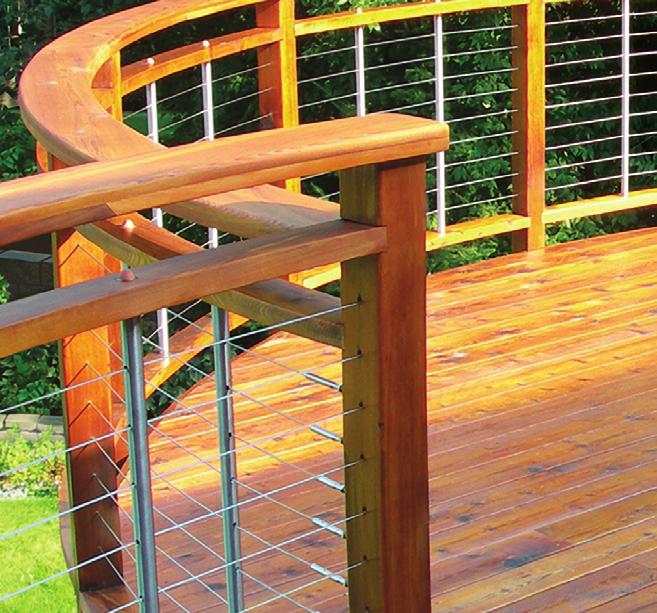
 CABLERAIL 7 CHECK THE CABLERAIL ADVANTAGES Attractive, affordable, and very low-maintenance. Invisible appearance will not impair views. Made from strong and weather-tough type 6 stainless steel cable.
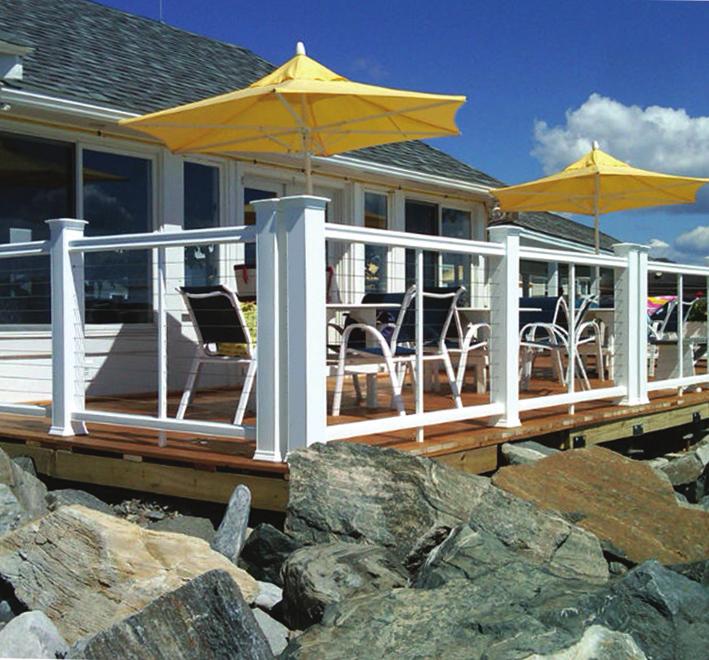
Make your railing view friendly with the original stainless steel cable infill for wood, metal, and composite-sleeved wood railing.
 Make your railing view friendly with the original stainless steel cable infill for wood, metal, and composite-sleeved wood railing. 1 Feeney makes it easy The CableRail cable infill system is slender,
Guide to Cable Railings
 Version 2014 Guide to Cable Railings Prefabricated Kits and Custom Design Options START www.feeneyinc.com Feeney Inc. 2014 Slide 1 of 71 Table of Contents Overview: Cable Railing Assemblies page 3 Frame
DesignRail Kits. Modular Aluminum Railing System
 DesignRail Kits Modular Aluminum Railing System Feeney makes it easy Create beautiful railings inside and out with DesignRail Kits. Installation is fast and easy with our modular kits and CableRail stainless
Horizontal Cable Systems
 ALUMINUM RAILING INSTALLATION INSTRUCTIONS v2012 orizontal Cable Systems 1) Check Contents Of Packages: Verify that all parts have arrived and that they match the packing list. 1A) Coastal applications:
Horizontal Cable Systems
 ALUMINUM RAILING INSTALLATION INSTRUCTIONS Horizontal Cable Systems 1) Check Contents Of Packages: Verify that all parts have arrived and that they match the packing list. 1A) Coastal applications: Confirm
2013 Feeney (2/14) # B. Aluminum Railing Systems
 # B. Aluminum Railing Systems") 2013 Feeney (2/14) #2012-425B Aluminum Railing Systems Aluminum Railing Systems Searching For a Complete Railing System? Look No Further. DesignRail by feeney aluminum railing frame systems combine the
2013 Feeney (2/14) #2012-425B Aluminum Railing Systems Aluminum Railing Systems Searching For a Complete Railing System? Look No Further. DesignRail by feeney aluminum railing frame systems combine the
Installation Instructions
 File #2013-640A Installation Instructions for DesignRail Aluminum Rail Kits with CableRail Cable Infill - LEVEL RAILING 36-42 high railing for residential applications between wood or non-ferrous metal
2015 Feeney (8/15) # D. Aluminum Railing Systems
 # D. Aluminum Railing Systems") 2015 Feeney (8/15) #2012-425D Aluminum Railing Systems Aluminum Railing Systems Searching For a Complete Railing System? Look No Further. DesignRail by feeney aluminum railing frame systems combine the
2015 Feeney (8/15) #2012-425D Aluminum Railing Systems Aluminum Railing Systems Searching For a Complete Railing System? Look No Further. DesignRail by feeney aluminum railing frame systems combine the
Open Up Your View With CABLE SYSTEMS
 Open Up Your View With CABLE SYSTEMS PRESENTED BY CROWN HERITAGE Our Cable Multiple options to accomodate any deck or stair design Marine Grade 316 stainless steel Swaging is the term used for attaching
Clearview Railing System Installation Instructions
 Clearview Railing System Installation Instructions Disclaimer: AGS Stainless, Inc. has its Clearview Railing Systems designed by a professional engineer to meet the requirements of the latest national
Cable Cutter Square. 25 Tape Measure. Chalk Line Level Loctite 242 Blue
 ATLANTIS RAIL Contact Information: Atlantis Rail Systems 70 Armstrong Road 3900 Civic Center Drive Plymouth, MA 02360 North Las Vegas, NV 89030 (800) 541-6829 or (508) 732-9191 (508) 732-9798 www.atlantisrail.com
Hammer. Loctite 242 Blue. April 2018 trademarks of Suncor Stainless, Inc. Loctite is a registered trademark of Henkel Corporation
 ATLANTIS RAIL Contact Information: Atlantis Rail Systems 70 Armstrong Rd. Plymouth, MA 02360 (800) 541-6829 or (508) 732-9191 (508) 732-9798 www.atlantisrail.com HandiSwage Cable Railing Installation Instructions
ATLANTIS RAIL Contact Information
 ATLANTIS RAIL Contact Information Customer Service (800) 541-6829 (508) 732-9191 Spectrum System Installation Instructions Atlantis Rail s Spectrum System is an easy to install, universal cable railing
Cable Railing Kit Application Guide
 Cable Railing Kit Application Guide January 2019 Nationwide Industries 10333 Windhorst Rd. Tampa, FL 33619 813.988.2628 Fax: 813.988.3465 Photo courtesy of FabWorx Framework You Will Need for Cable Railing
Installing AZEK Evolutions Rail
 Installing Evolutions Rail TM Contemporary Installing AZEK Evolutions Rail Installing Evolutions Rail Contemporary Style... 2 Installing CableRail by Feeney for Evolutions Rail Contemporary Style... 8
March 1, Fax:
 March 1, 2017 U.S.A. Manufacturer The Cable Connection 52 Heppner Drive Carson City, Nevada 89706 800.851.2961 775.885.1443 Fax: 775.885.2734 E-mail: info@ultra-tec.com www.ultra-tec.com Framework You
ATLANTIS RAIL HandiSwage Installation Instructions ATLANTIS RAIL Contact Information Atlantis Rail Systems November, 2013
 ATLANTIS RAIL HandiSwage Installation Instructions ATLANTIS RAIL Contact Information Atlantis Rail Systems November, 2013 Atlantis Rail s HandiSwage System is an easy to use cable railing product utilizing
QUICKLOCK ASSEMBLY TYPE #2 INSTRUCTIONS
 Phone: Fax: Email: Website: Address: CUSTOMER SERVICE CONTACT INFO 855-820-8439 (VIEW) 855-820-8439 (VIEW) sales@cablerailingdirect.com www.cablerailingdirect.com 3315 NE 112th Ave #90/91, Vancouver, WA
Tape Measure Carpenter s Square Touch-up Paint Chalk Line. Blue 242. Template
 ATLANTIS RAIL Contact Information: Atlantis Rail Systems 70 Armstrong Rd. Plymouth, MA 02360 (800) 541-6829 or (508) 732-9191 (508) 732-9798 www.atlantisrail.com NOVA System Installation Instructions The
ATLANTIS RAIL Contact Information: Atlantis Rail Systems 70 Armstrong Road 3900 Civic Center Drive Plymouth, MA North Las Vegas, NV 89030
 ATLANTIS RAIL Contact Information: Atlantis Rail Systems 70 Armstrong Road 3900 Civic Center Drive Plymouth, MA 02360 North Las Vegas, NV 89030 (800) 541-6829 or (508) 732-9191 (508) 732-9798 www.atlantisrail.com
Template. Blue 242. May 2018 trademarks of Suncor Stainless, Inc. Loctite is a registered trademark of Henkel Corporation
 ATLANTIS RAIL Contact Information: Atlantis Rail Systems 70 Armstrong Road 3900 Civic Center Drive Plymouth, MA 02360 North Las Vegas, NV 89030 (800) 541-6829 or (508) 732-9191 (508) 732-9798 www.atlantisrail.com
Framework for Cable Railing
 Framework for Cable Railing End Post Construction Since hundreds of pounds of tension are being applied to end posts using cable railing, those posts must be substantial enough to handle that tension.
Architectural Cable Railing Products
 Architectural Cable Railing Products August 1, 2017 ISO Certified U.S.A. Manufacturer www.ultra-tec.com TABLE OF CONTENTS ULTRA-TEC RAILING PRODUCTS Cable Type and Size... 3 Options for How to Receive
MARINE-GRADE 316L STAINLESS STEEL RAILING ARCHITECTURALLY CORRECT POSTS AND HANDRAIL RAILING BUYER S GUIDE VIEWRAILSYSTEMS.COM
 MARINE-GRADE 316L STAINLESS STEEL RAILING ARCHITECTURALLY CORRECT POSTS AND HANDRAIL RAILING BUYER S GUIDE VIEWRAILSYSTEMS.COM Cablerail for Metal Posts 4 This section explains how the Viewrail Kits, components,
CABLE RAILING INSTALLATION GUIDE FOR WOOD POST SYSTEMS
 RAILING INSTALLATION GUIDE FOR WOOD SYSTEMS Welcome to Viewrail! We are excited to help you install your new railing system. We know you will enjoy it for many years to come. Our goal is to bring you top
I n v i s i R a i l. c o m
 InvisiRail.com Get the look you ve always wanted You ve worked hard to create that view. Choose InvisiRail for the best sight lines while providing safety and security for your family. Our 10mm thick safety
ARCHITECTURAL & GARDEN PRODUCTS
 CATAOG 2017 R A A B I E R C C A IAB E R A I ARCHITECTURA & GARDEN PRODUCTS I G H T ISNT EA - O S K T A - T OR KE ITSR E C T O I O NE C T D I OE N ND RE AS I I G N C O I S E C S I G SINCE 1948 Since 1948,
The following instructions will guide you through the installation of your new vinyl railing stair kit.
 Installation Guide Vinyl Standard Stair Railing Tools Required Protective eye glasses Tape measure Variable speed drill/screwdriver Rotary hammer or hammer drill and masonry percussion bit recommended
SERIES 9000 RAILING SYSTEMS INSTALLATION GUIDE
 Your Clear Choice GLASS PICKET CABLE SERIES 9000 RAILING SYSTEMS INSTALLATION GUIDE Table of Contents Table of Contents 1 Introduction 2 Setup 2 Required and Recommended Tools 2 Site Review 2 Parts Manifest
Deck Designer Specification Kit For AZEK. All rights reserved copyright 2015 AZEK Building Products
 Deck Designer Specification Kit For AZEK All rights reserved copyright 2015 AZEK Building Products Deck layout diagram Top view without planks Bottom view with planks Top view with planks Page 2 Permit
Deck Designer Specification Kit For. TimberTech. All rights reserved copyright 2015 AZEK Building Products
 Deck Designer Specification Kit For TimberTech All rights reserved copyright 2015 AZEK Building Products Deck layout diagram Top view without planks Bottom view with planks Top view with planks Page 2
T r e x Art i s a n Se r i e s Railing
 T r e x Art i s a n Se r i e s Railing I n s t a l l a t i o n In s t ru c t i o n s Trex Railing Components A. Trex Top Rail B. Trex Bottom Rail C. Trex Railing Support Bracket D. TrexExpress Railing
Face Mount to Through-the-Post Mount
 Face Mount to Through-the- Mount Cable Runs through Two Corners When going around two corners, it s necessary to tension the cable from both ends as shown in Deck 4. Use the 672 series The tensioning devices
DesignRail. Aluminum Railing System
 DesignRail Aluminum Railing System D Feeney makes it easy Lovely for the long haul esi g nr a il lets you create lasting beauty with high strength 6000-series aluminum extrusions and powder-coated finishes
Deck Designer Specification Kit For. TimberTech. All rights reserved copyright 2015 AZEK Building Products
 Deck Designer Specification Kit For TimberTech All rights reserved copyright 2015 AZEK Building Products Deck layout diagram Top view without planks Bottom view with planks Top view with planks Page 2
YUKON PATIO COVER INSTALLATION INSTRUCTIONS
 YUKON PATIO COVER INSTALLATION INSTRUCTIONS Before You Begin: Consult your local building department for any required permits You may be required to obtain a building permit for this structure. Contact
PARTS INCLUDED IN FIXED STAIR CABLE RAIL KIT:
 175 SERIES FIXED STAIR CABLE RAIL - INSTALLATION INSTRUCTIONS PARTS INCLUDED IN FIXED STAIR CABLE RAIL KIT: FIXED STAIR TOP RAIL (1) A FIXED STAIR BOTTOM RAIL (1) B D UPPER SADDLE BRACKET (1) C BRACKET
Deck Designer Specification Kit For. TimberTech. All rights reserved copyright 2015 AZEK Building Products
 Deck Designer Specification Kit For TimberTech All rights reserved copyright 2015 AZEK Building Products Deck layout diagram Top view without planks Bottom view with planks Top view with planks Page 2
WEAR SAFETY GLASSES WHEN INSTALLING THIS KIT.
 INSTALLATION INSTRUCTIONS Trans4mer Mounting Systems Part No. 29753 (black) Part No. 65654 (stainless) for full size GM pickups, and Blazer, Yukon, Suburban, Tahoe As you read these instructions, you will
RAILING. Installation Guide
 RAILING Installation Guide THE BEST CHOICE FOR STRONG & DURABLE RAILING SYSTEMS Our exclusive manufacturing process ensures our vinyl railing will provide superior strength plus it is virtually maintenance
1. TOOLS + MATERIALS REQUIRED
 R INSTALLATION INSTRUCTIONS PRODUCT: BALDUR + ODEN CONFIGURATION: BI-PARTING DOOR MOUNT: TOP MOUNT Product is covered by U.S. patents. For more information visit www.krownlab.com. TOOLS + MATERIALS REQUIRED
WARNING. Failure to observe these instructions could lead to severe injury or death.
 INSTALLATION INSTRUCTIONS WINCH MOUNTING KIT Part Number: 80156, 80160 Application: 2008 Ford F150 Your safety, and the safety of others, is very important. To help you make informed decisions about safety,
Deck Designer Specification Kit For. TimberTech. All rights reserved copyright 2015 AZEK Building Products
 Deck Designer Specification Kit For TimberTech All rights reserved copyright 2015 AZEK Building Products Deck layout diagram Top view without planks Bottom view with planks Top view with planks Page 2
MIRAGE-X / BELLA. Shower Door Installation Instructions
 MIRAGE-X / BELLA Shower Door Installation Instructions IMPORTANT DreamLine reserves the right to alter, modify or redesign products at any time without prior notice. For the latest up-to-date technical
The Festival Assembly Instructions
 The Festival Assembly Instructions Toll Free: 866.768.8465 Hours: 9-5 Monday-Friday EST www.homeplacestructures.com Package ships as shown CONTACT INFORMATION: HomePlace Structures 301 Commerce Drive New
Deck Designer Specification Kit For. TimberTech. All rights reserved copyright 2015 AZEK Building Products
 Deck Designer Specification Kit For TimberTech All rights reserved copyright 2015 AZEK Building Products Deck layout diagram Top view without planks Bottom view with planks Top view with planks Page 2
Installation Instructions for. Handrail Component System
 Handrail STEP-BY-STEP Installation Instructions for Handrail Component System Rise in Inches Run in Inches 8 8.5 9 9.5 10 10.5 11 11.5 12 12.5 13 13.5 14 14.5 15 8.5 47 45 43 42 40 39 38 36 35 34 33 32
Deck Designer Specification Kit For. TimberTech. All rights reserved copyright 2015 AZEK Building Products
 Deck Designer Specification Kit For TimberTech All rights reserved copyright 2015 AZEK Building Products Deck layout diagram Top view without planks Bottom view with planks Top view with planks Page 2
Installation Manual Flat Track Series
 Manual Flat Track Series Contents Safety...1 Parts...2 Hardware.......................................... 2 Tools Required..................................... 4.............................................
Instruction Manual. The Clear Choice! Aluminum Railing. Stainless Railing. Cable Railing. Trellis Systems. Maintenance Free. 316 Stainless Steel
 Instruction Manual Aluminum Railing Stainless Railing Cable Railing Trellis Systems Maintenance Free 316 Stainless Steel Virtually Invisible Light Strong Durable Custom Colors The Clear Choice! 1 Table
Kit 102 Series Installation Instructions for Wood or Metal Posts on Level Runs
 Kit 102 Series Installation Instructions for Wood or Metal Posts on Level Runs A. Drill Posts Hole size for 1/8" or 3/16" cable installation This kit may also be used for stairs or runs that exit the end
Transform Cable Rail MUST be installed on 4" x 4" wooden posts sleeved with Transform post sleeves to support cable tension!
 CABLE RAIL INSTALLATION INSTRUCTIONS OVERVIEW...2 LEVEL...3 STAIR...13 Transform Cable Rail MUST be installed on 4" x 4" wooden posts sleeved with Transform post sleeves to support cable tension! 1 Need
The following instructions will guide you through the installation of your new vinyl railing.
 Installation Guide St. James Vinyl T-Rail Tools Required Protective eye glasses 3/8 x 3 Concrete Anchors/Fasteners (for Tape measure concrete installations) Variable speed drill/screwdriver Philips Driver
Designing a Wood Railing
 Inside: Construction, location of end posts Configuration of corners Location of intermediate posts Choosing the right cable diameter Spacing of cables Cutting cables in field versus factory-cut Hardware
ADD ELEGANCE WITH RAILING. PREMIER RAILING with Composite Balusters
 ADD ELEGANCE WITH RAILING PREMIER RAILING with Composite Balusters Select Your Rail Style Select the rail style that best complements your home. From the clean lines and striking silhouette of a contemporary
SINCE 1948 ARCHITECTURAL & GARDEN PRODUCTS
 SINCE 1948 ARCHITECTURA & GARDEN PRODUCTS C ATA O G 2 0 1 2 Makes It Easy I IG G H H T T I IN N E E S S T T A - - O K T R E I I S C O E C T I O N D E S I G N R R A A I I C C A A B B E E R R A A I I For
TREX POST MOUNT DECKING AND CONCRETE
 TREX POST MOUNT DECKING AND CONCRETE for Pressure-treated Wood Framing LOCATION AND INSTALLATION OF POST MOUNTS IMPORTANT NOTES:» EACH POST MUST BE ATTACHED AS SHOWN TO ENSURE A CODE COMPLIANT AND SAFE
INSTALLATION INSTRUCTIONS
 INSTALLATION INSTRUCTIONS Trans4mer Winch Mount For 2007-2010 Chevrolet Silverado HD and GMC Sierra HD Bracket Kit 90140 Your safety, and the safety of others, is very important. To help you make informed
INSTALLATION VIDEOS ONLINE
 Railing Installation Guide GLASS PICKET CABLE INSTALLATION VIDEOS ONLINE Videos are broken up into small segments which covers most aspects of glass, picket, and cable railing installations. Cable railing
Installing. Cable Railings. Two specialty tools and a few techniques expand your design options
 Installing Cable Railings Two specialty tools and a few techniques expand your design options 1 Professional Deck Builder March/April 2007 Figure 1. Posts and rails can be a variety of materials. Although
DekPro InvisiCable. Cable Railing for Wood Systems
 DekPro InvisiCable Cable Railing for Wood Systems A simple, affordable cable railing option for the value conscious consumer that wants the look of cable but at a lower cost. Proudly made in the USA of
INSTALLATION INSTRUCTIONS
 INSTALLATION INSTRUCTIONS Trans4mer Mounting System Dodge Ram Kit No. 65220, 73132, 75525, 76253 (black) or 65221, 73133, 75530, 76254 (stainless) As you read these instructions, you will see NOTES, CAUTIONS
Product #: Product #:
 STANLEY FATMAX Push-Lock Groove Joint Pliers Multi-purpose jaws designed to grasp flat and round objects. Push-Lock technology allows for quick and easy adjustment in 17 positions. Induction hardened jaws
Installing Cable Railings
 A simple approach to a great upgrade Figure 1. Cable railings exert considerable tension on the end posts. The solution is to use beefier end posts and fill in between them with sub-rails. by Mark Ellis
INSTALLATION INSTRUCTIONS - CEILING POWER TRAK, HANGER HOOKS AND RACKS I. CONTENTS CEILING POWER TRAK KIT
 INSTALLATION INSTRUCTIONS - CEILING POWER TRAK, HANGER HOOKS AND RACKS I. CONTENTS CEILING POWER TRAK KIT QUANTITY DESCRIPTION 2 POWER TRAK, 5 FT LG 4 END CAPS, YELLOW 10 SCREWS, 1 5/8 LG 10 WASHERS, 5/8
Installation Instructions for. Before You Begin TOOLS REQUIRED
 Composite Railing System STEP-BY-STEP Installation Instructions for Spectrum Composite Railing Virtually maintenance free 20-year warranty EverNew Spectrum Railing system is designed to work with a number
48 in. X 96 in. 500 Pound Capacity Motorized Overhead Storage Unit Option A
 48 in. X 96 in. 500 Pound Capacity Motorized Overhead Storage Unit Option A MODEL # PRM4X8 Patent Pending 1 Table of Contents Table of Contents PAGES Installation Support 3 Safety Information 4-5 Required
Today s Service Station
 F I X IT Today s Service Station The Fixit includes all the tools necessary to perform basic bike repairs and maintenance, from changing a flat to adjusting brakes and derailleurs. The tools and air pump
2x2 Baluster Railings FPO REDWOOD. Naturally beautiful Easy to use Practical and economical Durable and stable Resistant to decay and insects
 B U I L D I T W I T H REDWOOD 2x2 Baluster Railings FPO R E D W O O D Naturally beautiful Easy to use Practical and economical Durable and stable Resistant to decay and insects 2x2 Baluster Railings RAILING
INSTALLATION INSTRUCTIONS
 INSTALLATION INSTRUCTIONS Brush Guard Kit Kit no. 67730 (black), 67731 (stainless) for GMC Trucks Your safety, and the safety of others, is very important. To help you make informed decisions about safety,
PRODUCT: LOKI INSTALLATION INSTRUCTIONS. Product is covered by U.S. patents. For more information visit
 R INSTALLATION INSTRUCTIONS PRODUCT: LOKI CONFIGURATION: SINGLE DOOR MOUNT: GLASS MOUNT Product is covered by U.S. patents. For more information visit www.krownlab.com . TOOLS + MATERIALS REQUIRED TOOLS
Baby Grande or Grande Crank Shade with Cables and Housing Installation Instructions
 Baby Grande or Grande Crank Shade with Cables and Housing Installation Instructions Tools Needed Drill 3/8 Metal Drill Bit Screwdriver (Flat & Phillips) Measuring Tape Pencil 4 Level Plumb Line ¼ Masonry
Installation manual. For setting in concrete/on base plates - Panel height 1830
 1 Aluminium fencing and drive-in gates Installation manual For setting in concrete/on base plates - Panel height 1830 Aluclos system components: U10 Connecting U-bracket 1900 mm CL18/CL18.XL Half-height
Original Gallery System
 GAllery System Art Displays Original Gallery System a Gallery System product Here s everything you need to know to get started with your Gallery System Art Hanging System GS getting started To install
Marketed and Distributed by: Absolute Distribution, Inc. Ph: Fax
 Marketed and Distributed by: Absolute Distribution, Inc. TM Integra Rail Kits 84Composite Rail Kit IntegraTM Connector Options Use the steps below for the following pages to complete your Integra Rail
PREPARATION & TOOL CHECKLIST
 INSTRUCTION MANUAL RAILING PRODUCTS BEGIN TO AGE AS SOON AS THEY ARE EXPOSED TO NATURE. BUILDINGS EXPERIENCE AGING FACTORS DIFFERENTLY, SO IT IS DIFFICULT TO PREDICT HOW LONG RAILING PRODUCTS WILL LAST.
INSTALLATION INSTRUCTIONS
 INSTALLATION INSTRUCTIONS Trans4mer Grille Guard/Winch Mount For GMC Sierra 2500HD & 3500, + 03 Kit 76248/76249 This WARN Trans4mer system can be customized to give your Chevy Silverado a wide variety
Fortress Railing Overview ACTUAL FREIGHT CHARGES APPLY TO ALL FORTRESS RAIL ORDERS
 Fortress Railing Overview 4 3 1 Fe 26 Iron Railing Systems Fortress Use the steps below for the following pages to complete your rail Vertical Cable and Glass Options Available Fortress Iron Railing System
CXT PRO RAILING INSTALLATION INSTRUCTIONS For Installations Using Aluminum and Glass Balusters Sold Separately
 CXT PRO RAILING INSTALLATION INSTRUCTIONS For Installations Using Aluminum and Glass Balusters Sold Separately CCRR-0171 PFS AA-652 Drill/power screwdriver Assorted drill bits Hammer Miter or circular
CertainTeed INSTALLATION GUIDE SIMTEK FENCE PRODUCTS. Fence Installation Guide 3', 4' & 6' High
 CertainTeed INSTALLATION GUIDE SIMTEK FENCE PRODUCTS Fence Installation Guide 3', 4' & 6' High INSTALLATION GUIDE These instructions are designed to assist both professional installers and do-it-yourselfers
Fortress Fe Posts must always be secured to the deck framing. Fortress Fe Posts should never be attached to only the deck boards.
 Installation Instructions for FortressCable V-Series Cable Stair Panel System with UB-05 With ngle dapter and Fe Posts It is the responsibility of the installer to meet all code and safety requirements,
Chalk Line. #4 Phillips Driver Bit. Cable Cutters
 ATLANTIS RAIL Contact Information: Atlantis Rail Systems 70 Armstrong Road 3900 Civic Center Drive Plymouth, MA 02360 North Las Vegas, NV 89030 (800) 541-6829 or (508) 732-9191 (508) 732-9798 www.atlantisrail.com
Barn Door & Hardware Installation Guide
 Barn Door & Hardware Guide INTRODUCTION Thank you for purchasing our hardware. Our barn door and hardware will add a stunning accent to your living environment and maximize its space. This manual covers
ADI CABLE RAILING FOR METAL. AS&D TM Aluminum Railing. Solutions TM Aluminum Railing
 TM ADI CABLE RAILING FOR METAL AS&D TM Aluminum Railing pg 120-131 Solutions TM Aluminum Railing pg 132-133 119 AS&D Railing System Overview For the discriminating homeowner, a contemporary, esthetically
TO O L K IT. Public Bike Repair
 TO O L K IT Public Bike Repair The Dero Tool Kit includes all the necessary tools to perform most routine maintenance and adjustments on most bikes. All the tools are securely fastened with stainless steel
DESIGN. DELIVER. DONE. RAILING + FLOATING STAIRS
 DESIGN. DELIVER. DONE. RAILING + FLOATING STAIRS Modern strength has never been so simple. Floating stairs have always been a fab-on-site nightmare...until now. Viewrail Flight unites rock solid construction
ENDURANCE PRODUCT LINE
 ENDURANCE PRODUCT LINE The Endurance family of maintenance-free building products is our national best seller, thanks to sound engineering that enables easy and safe installations. Our maintenancefree
Installation Instruction
 Tools Needed for Assembly Stud finder (for wood stud wall) Pencil Mark Electric drill Wood Stud Wall Installation Step 1. Locate the Wood Studs Installation Instruction Drill bit (for wood stud wall) Masonry
installation care & maintenance instructions moistureshield.com limited lifetime warranty
 installation care & maintenance instructions 866.729.2378 moistureshield.com limited lifetime warranty It s comforting to know that you re about to build a deck that gives you every possible advantage.
Safety Glasses Work Gloves Chop Saw with Cutting Disk. Half Round File Pencil Marker
 ATLANTIS RAIL Contact Information: Atlantis Rail Systems 70 Armstrong Road 3900 Civic Center Drive Plymouth, MA 02360 North Las Vegas, NV 89030 (800) 541-6829 or (508) 732-9191 (508) 732-9798 www.atlantisrail.com
WOOD POST FD POST. Installation Guide FD POST MOUNT STAIR / ANGLE RAILING LAG STAIR / ANGLE RAILING STUD CABLE RAILING FITTINGS
 Installation Guide It is the responsibility of the installer to meet or exceed all code and safety requirements, and to obtain all required building permits. These instructions are only a guide and may
Baby Grande or Grande Crank Shade with Cables and Housing Installation Instructions
 Baby Grande or Grande Crank Shade with Cables and Housing Installation Instructions Tools Needed Drill 3/8 Metal Drill Bit Screwdriver (Flat & Phillips) Measuring Tape Pencil 4 Level Plumb Line ¼ Masonry
INSTALLATION INSTRUCTIONS
 INSTALLATION INSTRUCTIONS Trans4mer Grille Guard/Winch Mount For 2007 Chevrolet Silverado 1500 and GMC Sierra 1500 Kit 75230 (Black) and 76007 (Stainless) Your safety, and the safety of others, is very
CAVALIER. Shower Door Installation Instructions
 CAVALIER Shower Door Installation Instructions IMPORTANT DreamLine reserves the right to alter, modify or redesign products at any time without prior notice. For the latest up-to-date technical drawings,
Tools & Materials Needed
 Installation Guide Canadian Version Tools & Materials Needed Hacksaw or metal cutting saw Drill Drill bits: 1/8", 5/32", 3/16", 7/32", 1/4" 3/8" socket or wrench Phillips screwdriver Measuring tape Non-corrosive